RİSK NOTIFICATION USER HELP DOKÜMANI
REV NO: <REV_NO>
REV. DATE: <REV_TARIHI>
Module Version: 5.26.1.1.
TABLE OF CONTENTS
5.1. System Infrastructure Definitions/Risk bildirimi 4
5.1.3. Event Distribution Matrix Diagnosis mlama 13
5.1.4. Risk Disclosure Parametreleri 15
: The selected report format is displayed in the list and downloaded. 19
5.1.7. Acknowledgment Flow Diagnosis mlama 20
5.2. GRC Management system/Risk bildirimi 27
5.2.3.1. Distribution of Risks by Region 35
5.2.3.2. Risk Disclosure Listesi 35
5.2.4.2. Event distribution Matrisi 40
5.2.4.3. Risk Comparison Grafiği 41
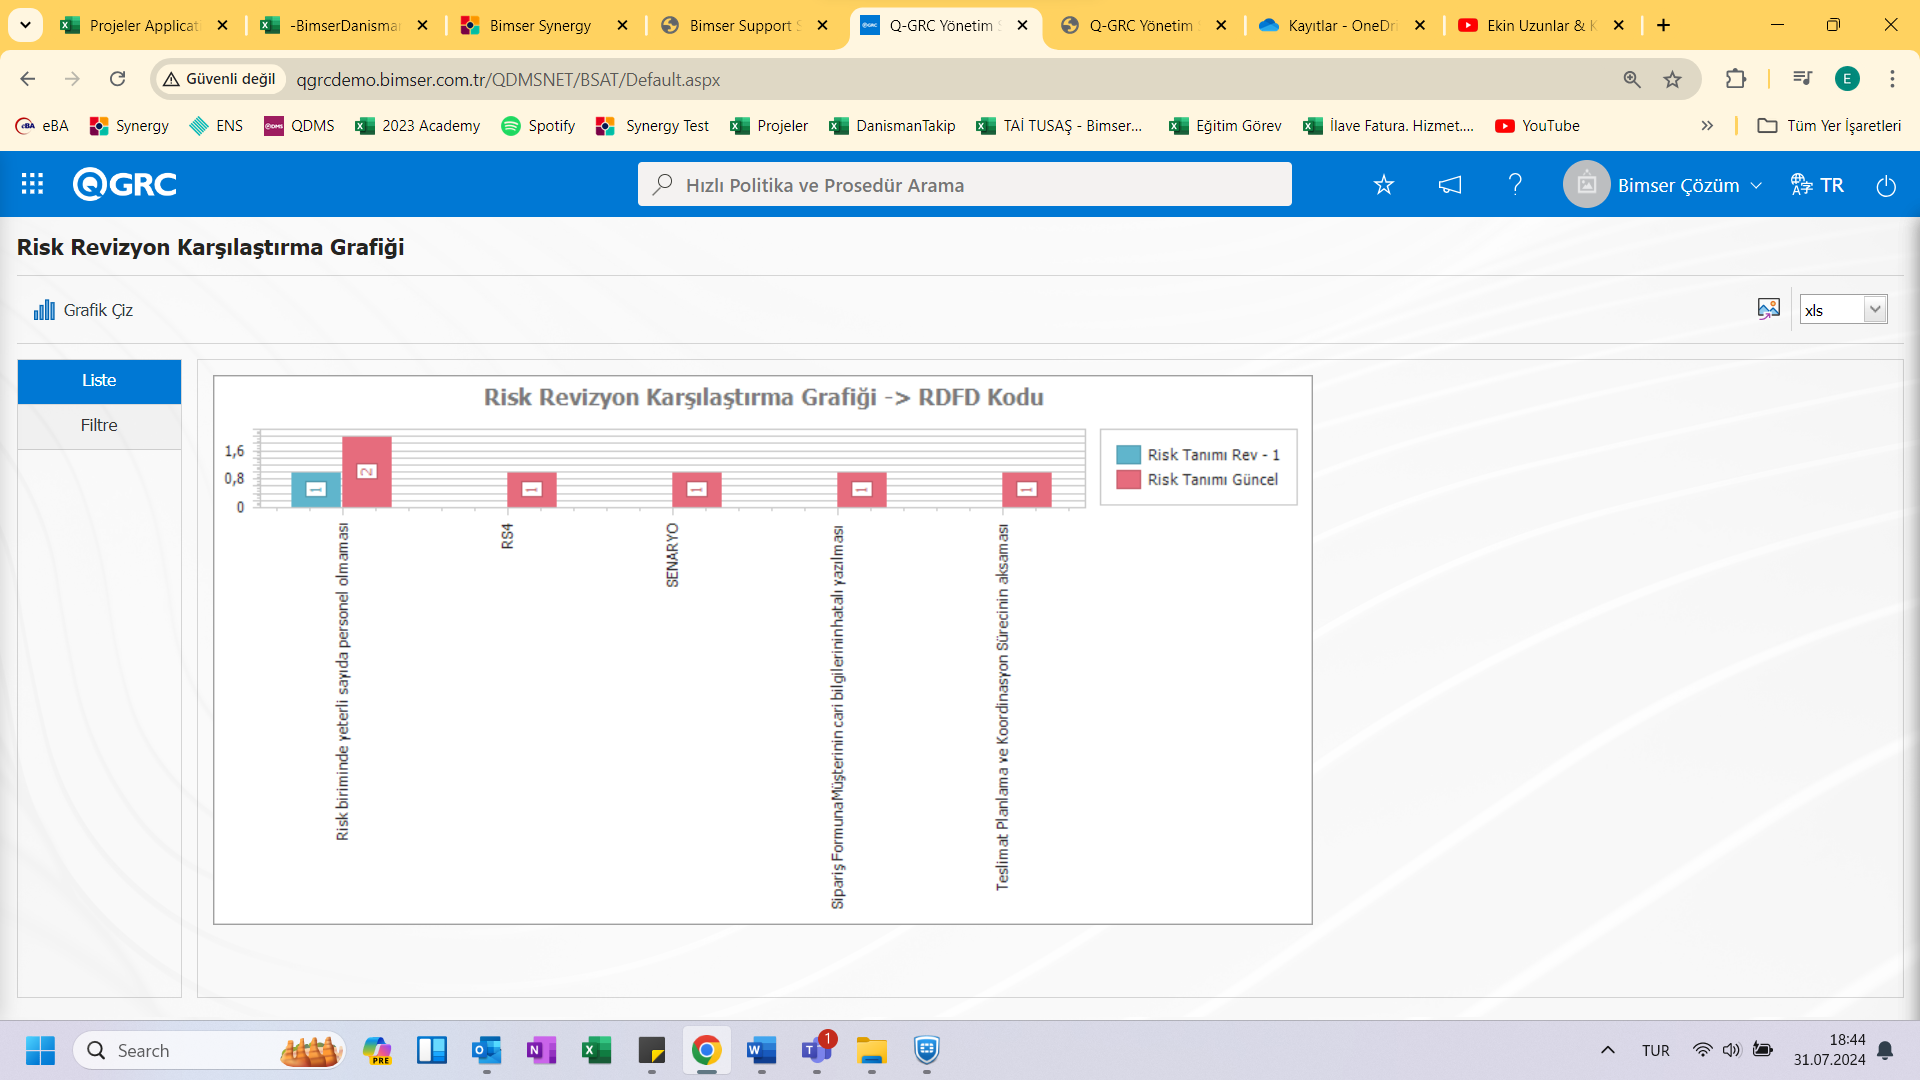
5.2.5.4. Risk Revision Benchmark Grafiği 42
<a id="_Toc173418820">``````</a>1. INTRODUCTION: Risk Notification Module is used to record and track events occurring in companies. It is ensured that the threat elements and missing elements of the events that occur are determined and taken under control and followed up with the relevant actions.
<a id="_Toc173418821">``````</a>2. OBJECTIVE: The purpose of the Bu__ yard im guideline is to determine the path to be followed by the QGRC kullanan__ kuruluşlar during and after the Risk Disclosure modülünün __implementasyonu in the planning of risk notifications and the actions to be taken in relation to these notifications.
<a id="_Toc173418822">``````</a>3. RESPONSIBILITIES : Corporate Risk Manager
<a id="_Toc173418823">``````</a>4. ABBREVIATIONS
GYS: GRC Management System
<a id="_Toc173418824">``````</a>5. RISK DISCLOSURE MODÜLÜ
It is a Risk Notification module that enables the digital follow-up of the Risk Notification methodology in use, creating and monitoring the risk analysis history, determining and tracking the actions as a result of the Risk Notification, transferring the existing risk notification forms to the system, providing authorization control over the risk forms and preventing unauthorized access.
<a id="_Toc173418825">``````</a>5.1. System Infrastructure Definitions/Risk bildirimi
QGRC is the part where the necessary definitions are made in order to create the infrastructure of the risk notification module. <a id="_Hlk35437931">``````</a>According to the definitions, these data are used and seen in the entries from the GRC Management System menu.
<a id="_Toc173418826">``````</a>5.1.1. Area Diagnosis mlama
Menü Name: System Infrastructure Definitions/Risk Statement/Field Definition
It is the menu where the fields to be used in the functions to be associated in the risk notification module (Risk Notification Form Definition, Risk Notification Detail, Activity Group Definition, Activity Definition ) are defined. The fields created here are added to the field pool.

With the help of the buttons located in the Ekrandaki;
: A new field is added.
: Used if changes are to be made to an existing field.
: Used to copy an existing field.
: Used to delete the corresponding field.
: The values of the field are defined.
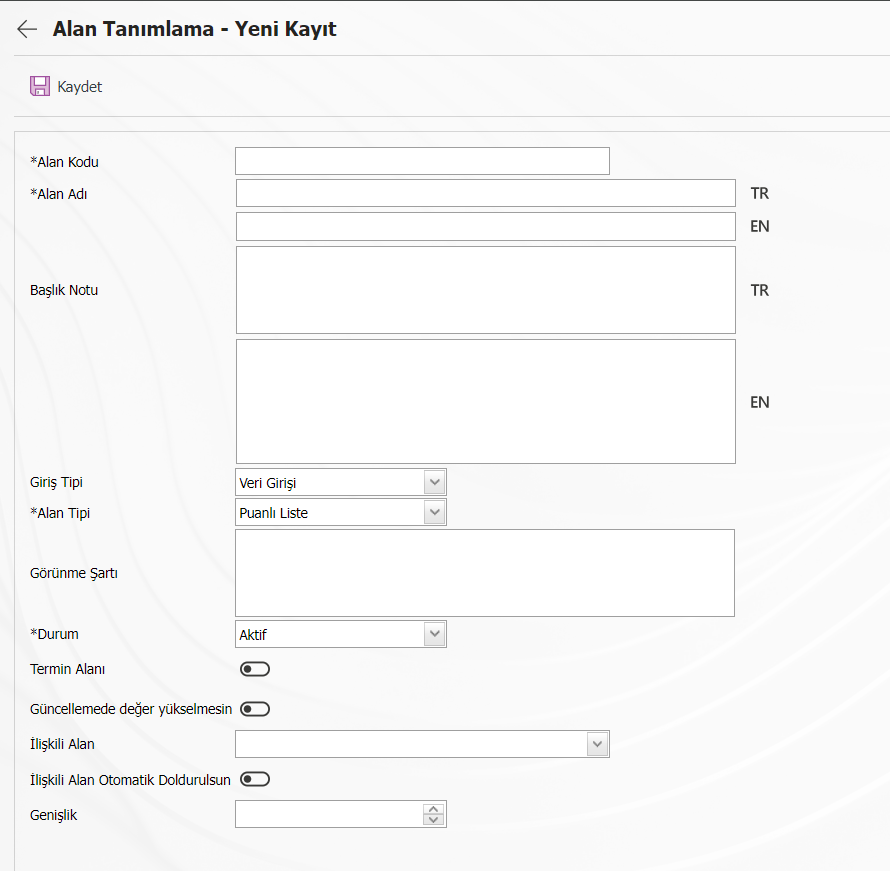
To add a new field to the list, click By clicking the (New) button, the Field Identification\New Record screen is displayed.
<a id="_Hlk35851380">``````</a>
On the Aç screen, the relevant fields are defined:
Alan Code: Area code information is defined. It should be defined without using characters such as spaces, Turkish characters, so that they are not the same as the fields defined before. E.g.. '001' , 'RK'
Alan Name: Domain name information is defined.
Başl Note: The title grade information of the field is defined.
Giriş Type: <a id="_Hlk35868756">``````</a>In the created field, it is determined whether the user will enter / select data or be automatically assigned by the system with the calculation method.
Alan Tipi: Text, numeric, date, list, etc. It is determined which of the field types will be.
Görünme Condition: It is determined whether the field in progress will appear according to the value of another previously defined field. Use [FIELDCODE]=FIELD_DEĞERİ and so on. It is in the form. (For example, Is there a threat? The area code for the field is 01; Let the threat area area code be 02. If the "Threat" Field is located, "Is there a threat?" If the value "Yes" with a value code of 100 is selected from the options in the field, the number 02 should be written in the Condition of the "Threat" field as follows: [01]=100)
Durum: <a id="_Hlk35869654">``````</a>The field state is selected as active or passive.
Termin Field: If the deadline field is to be activated, the relevant box is checked. The deadlines of the action plans are determined by taking into account the time here.
Güncellemeden value does not increase: If the information that the value does not increase without updating is to be activated, the relevant box is checked. In fields where this information is checked, the point value cannot be entered higher than the current value at the time of update.
İlişkili Field: A relationship can be established between two fields with an option type with the associated field property. On the screen where the elements of the reference field are defined, it is possible to select which values are related to the associated field. Thus, when the value of the reference field changes on the form, the related field can be filled automatically selectively or only the associated values can be selected from the selection screen.
İlişkili Autofill Field:If the option to autofill the related field is to be activated, the relevant box is checked. It allows one of the fields to be automatically filled in based on the relationship established between the values of two list-type fields.
Genişlik: The column width information of the field is defined.
After filling in the required fields on the field definition screen, click (Save) button to register.
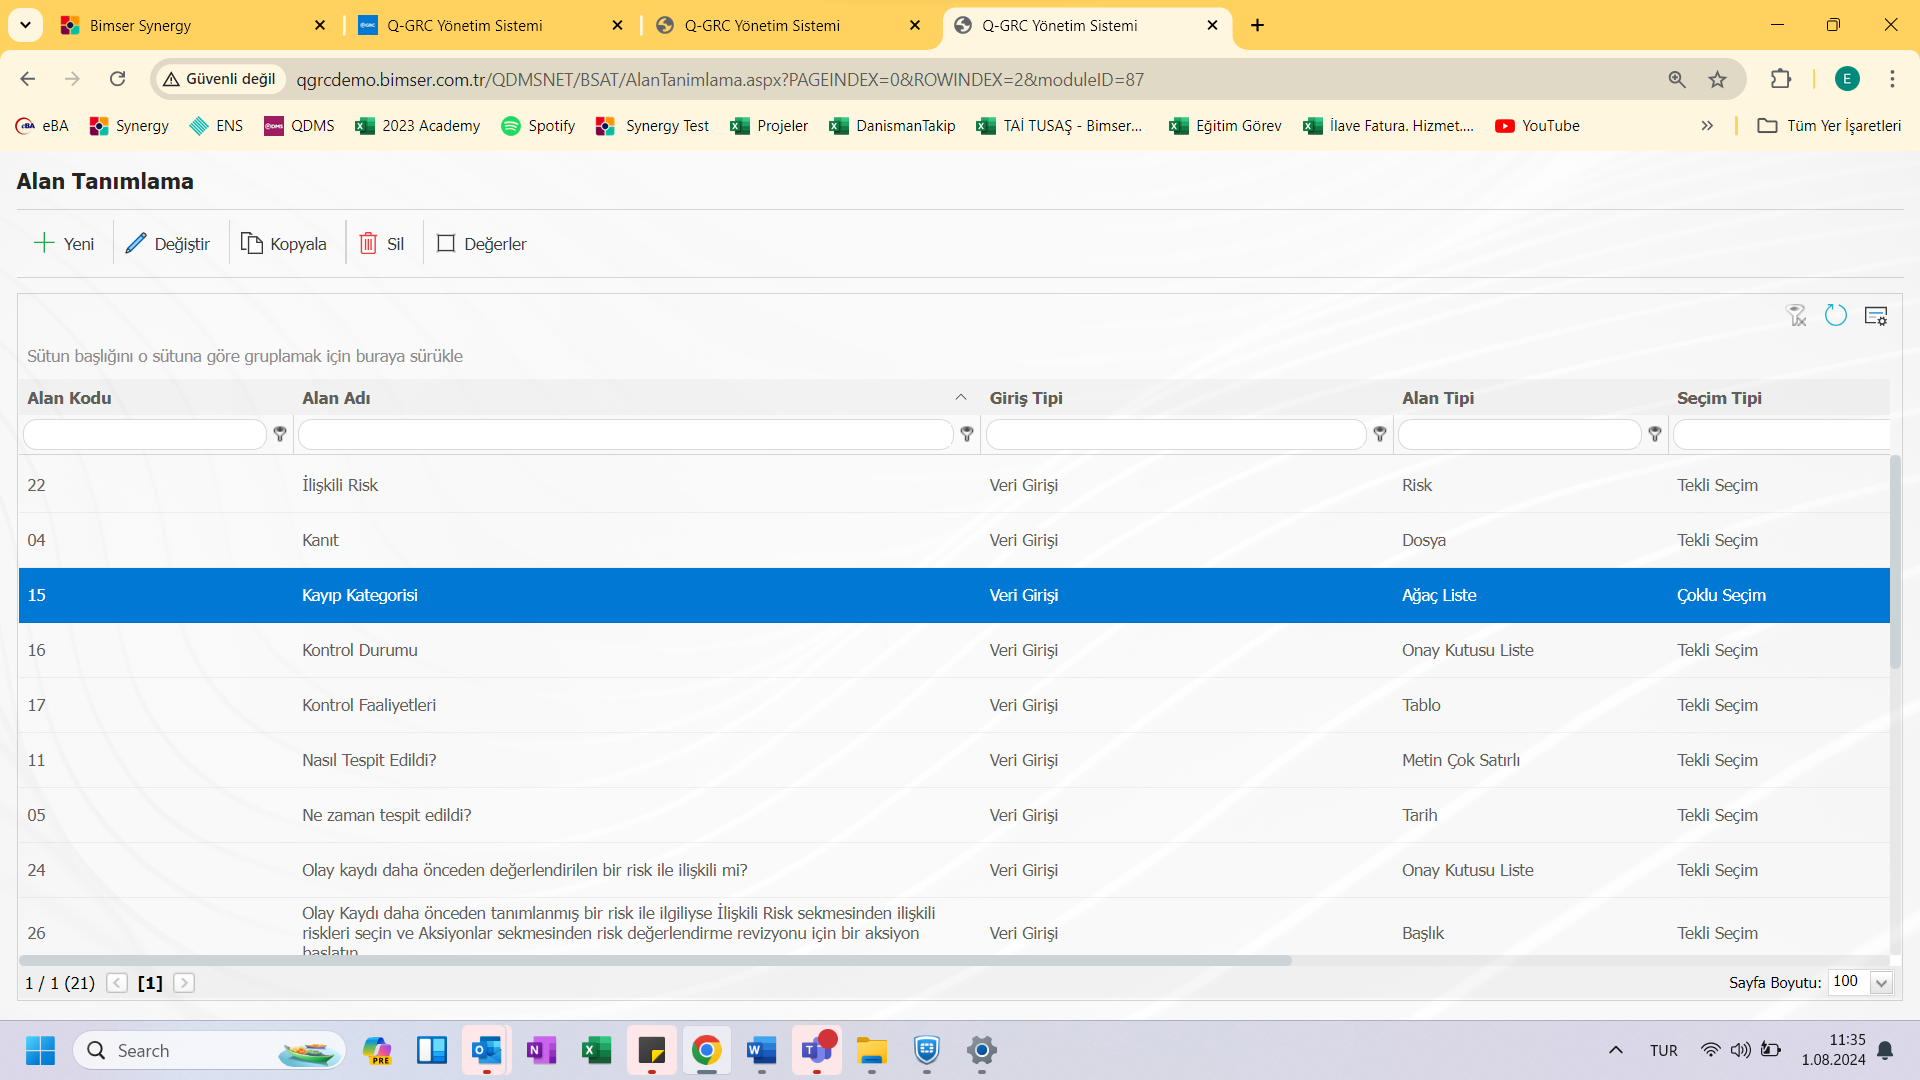
To add a value to the Lost Category field, this field is selected with ! By clicking the (Values) button, the screen where the values of the field will be introduced.
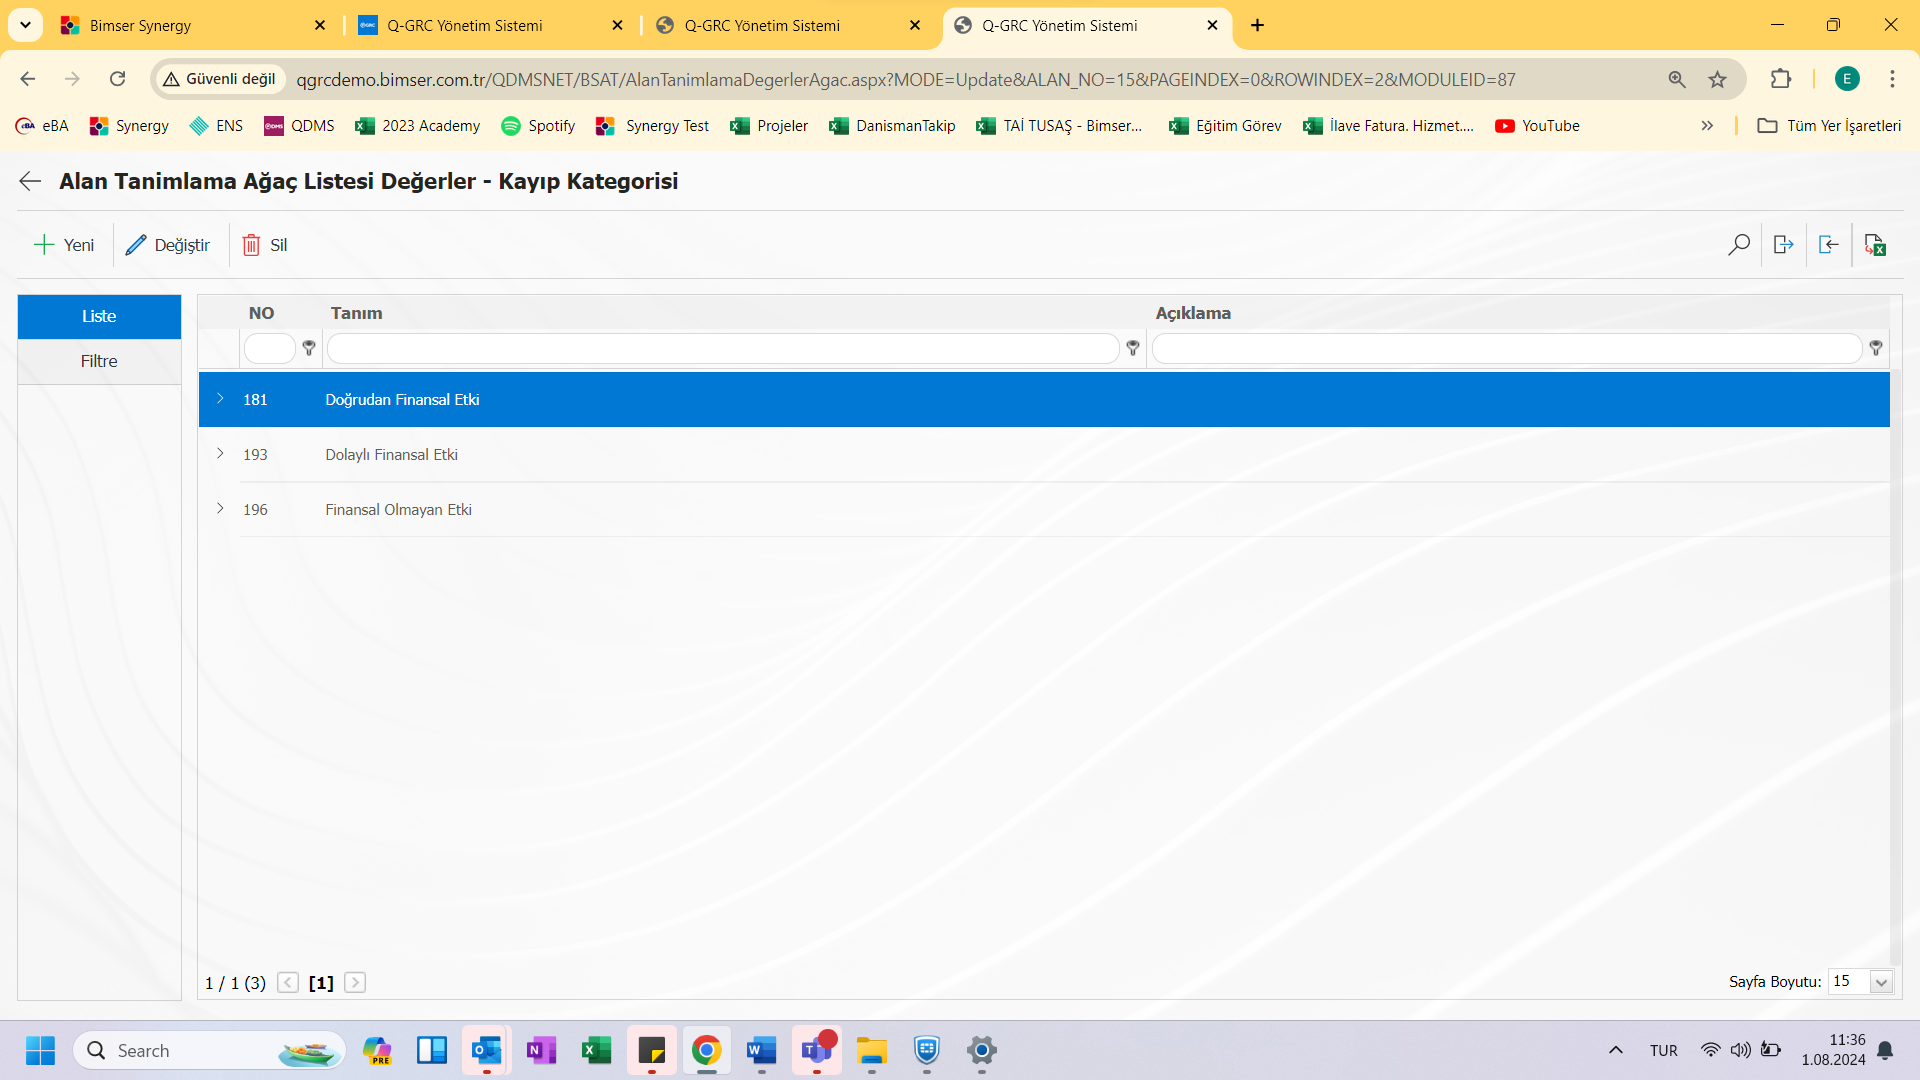
With the help of the buttons located in the Ekrandaki;
: A new value is defined
: Any corrections or updates are made to the value.
: The value can be deleted.
: Records can be searched by filtering.
: Data can be exported to Excel.
: The template is downloaded.
: The template is loaded.
<a id="_Hlk37149557">``````</a>Note: Field values can be transferred to the system in bulk with the Download Template and Upload Template buttons. With the template download button, the system downloads the template to the computer. When the relevant template is filled in by the users and uploaded to the system with the template upload button, all field values in the template will be transferred to the system.
: By clicking the New button, the process of defining a new value is started.
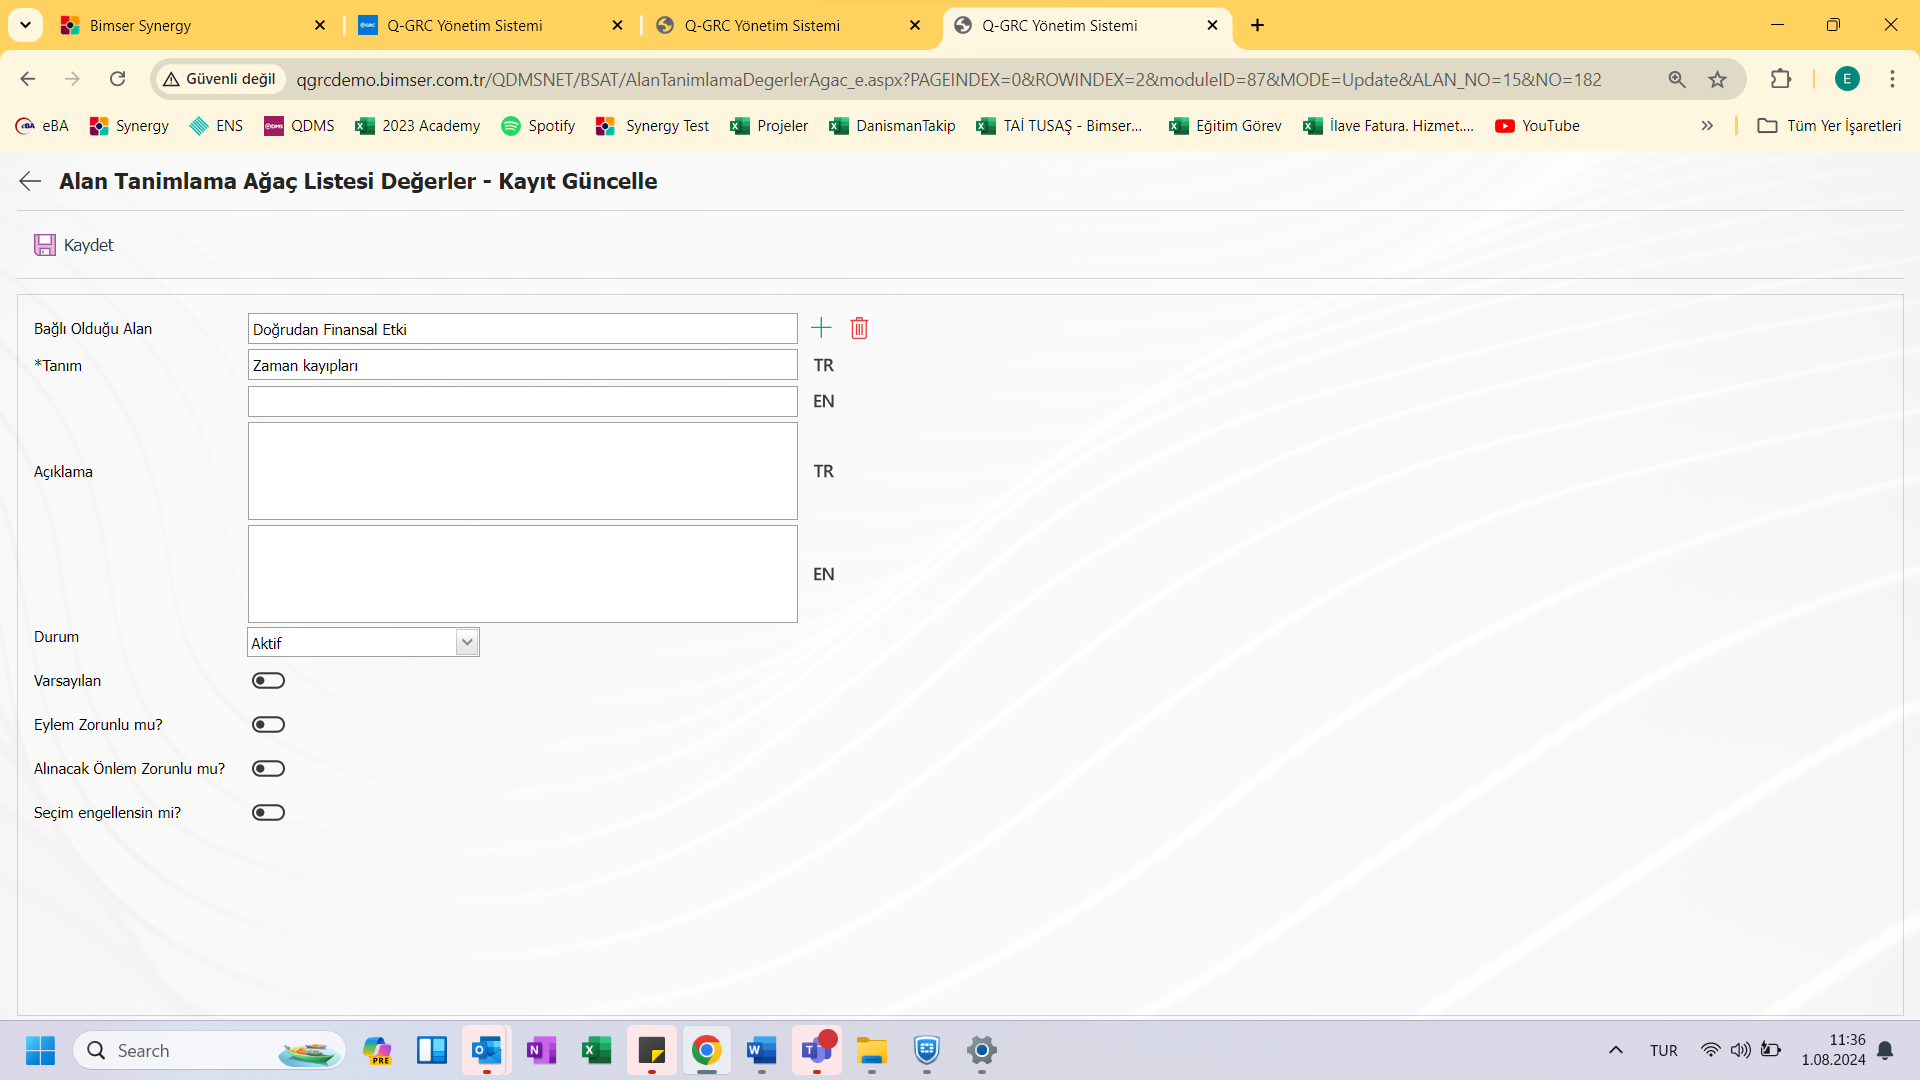
<a id="_Hlk35851503">``````</a>Aç the corresponding fields are defined on the screen:
Bağl Field: Since the type of field added to Değer is a tree list, values can be added by breakdown, an upper value should be selected to be attached to a field that is active in such fields.
Tan My: Cookie is entered.
Aç Description: Description information is written.
Durum: The state of the value is selected as active or passive.
Varsay Advertisement: Makes the corresponding list value appear in the field by default.
Is Eylem mandatory?: When Bu value is selected, it is mandatory to enter at least one Action from the actions tab.
Al Is the precaution mandatory?: When this value is selected, the precaution planning to be taken is mandatory.
Seçim Block?: Tree-type is a field that comes to fields when defining values. The tree should be marked if a value to be added to the list is not desired to be selected on the form entry screen.
Once the required fields are filled, click the Value identification is performed by clicking the (Save) button. This is how the value definition of tree list, scored list, list, lookup list type fields is done. Depending on the field types, there may be changes on this screen.
<a id="_Hlk35851581">``````</a>The full list of field types available in the system is given below;
- Metin: Adds a text box that allows Elle spelling.
- Metin Multiline: Adds a multi-line text box with no character limit that allows Elle spelling.
- Nümerik: Say Makes data entry as a matter of fact.
- Nümerik-Monetary: Parasal numeric input as a value.
- Nümerik-Unit: Birim numerical entries.
- Tarih: Adds Takvim field.
- Liste: Makes a single selection from more than Birden elements.
- Puanl List:
<a id="_Hlk35502489">``````</a>Selects from the drop-down menu, the point values of the list elements are available. - Arama Featured List: Allows single and/or multiple selections to be made from Birden elements, allowing you to search with a wide search function.
- Ağaç List: Allows you to select from multiple elements with Ağaç breakdown so that you can search with the wide search function.
- Personel: QGRC allows people to be selected from the personnel database.
- Departman: Allows QGRC to select department information from the department database.
- Unvan: QGRC allows title information to be selected from the title database.
- Politika and Procedure: QGRC Allows you to select Policy and Procedure from the Policy and Procedure database.
- Süreç: QGRC Allows Process selection from the Process database.
- Yönetim System: QGRC Management System allows you to select management system information from the database.
- Müşteri: QGRC allows customer information to be selected from the customer database.
- Tedarikçi: Allows QGRC supplier information to be selected from the supplier database.
- Başl ik:
<a id="_Hlk35502621">``````</a>Adds a title field to be written in bold letters on forms. - Dosya: Suitable field for Dosya insertion getirecektir__ __
- Resim: Will bring up suitable space for Resim addition
- Resim List: Allows you to choose from a list of Resim.
- Çoklu Image: Allows Çoklu image to be selected.
- Tablo: Allows the creation of Tablo type of field. (After adding such a field, it is necessary to define new fields as field values.)
- Sorgu: It is the type of field that can be defined in order to select from the master data in QGRC/Ensemble databases. (Only to be defined by Bimser Support Team) Single and multiple selections can be made.
- Sorgu Tree: It is the type of field that can be defined in order to be selected from the main data with tree breakdown in QGRC/Ensemble databases. (Only to be defined by Bimser Support Team) Single and multiple selections can be made.
- Sekme: Mevcut Creates a new tab in which the fields can be seen by establishing a relationship other than the tab where the fields are located in the risk notification form.
- Onay Box List:
<a id="_Hlk35502996">``````</a>It is a list-type field that can be selected single or multiple according to demand. - Risk: Allows values to be selected from Risk-based modules. After adding such a field, it is necessary to select which module the values will come from on the field definition screen.
- Aç Modified List: It is the type of field that provides the opportunity to write a description next to the Seçilen list value. When defining field values in the Field Definition menu, it is necessary to select whether the description box will be active for each value. According to the selection made here, when the relevant selection is made in the menu where this field will be seen under the GRC Management System menu, the box is opened for the user to write a description next to the field value.
- Pozisyon: Allows position information to be selected from QGRC position database.
- Saat: Adds clock-type field.
<a id="_Toc173418827">``````</a>5.1.2. Function Dizayner
Menü Name: System Infrastructure Definitions/Risk Disclosure/__ __Fonksiyon Designer
Fields added to the field pool with the Function Designer menu can be associated with the relevant functions of the Risk Notification module. For this, go to the Function Designer menu under the System Infrastructure Definitions / Risk Notification Module. On the screen that opens, the functions of the Risk Notification module that can be added fields will be listed. On this screen, the fields to be used in Resource Group Identification, Resource Identification, Risk Notification Form Definement, Risk Notification Detail, Action Definition and Control Definition functions and their order and hierarchy detail in approval processes are defined.
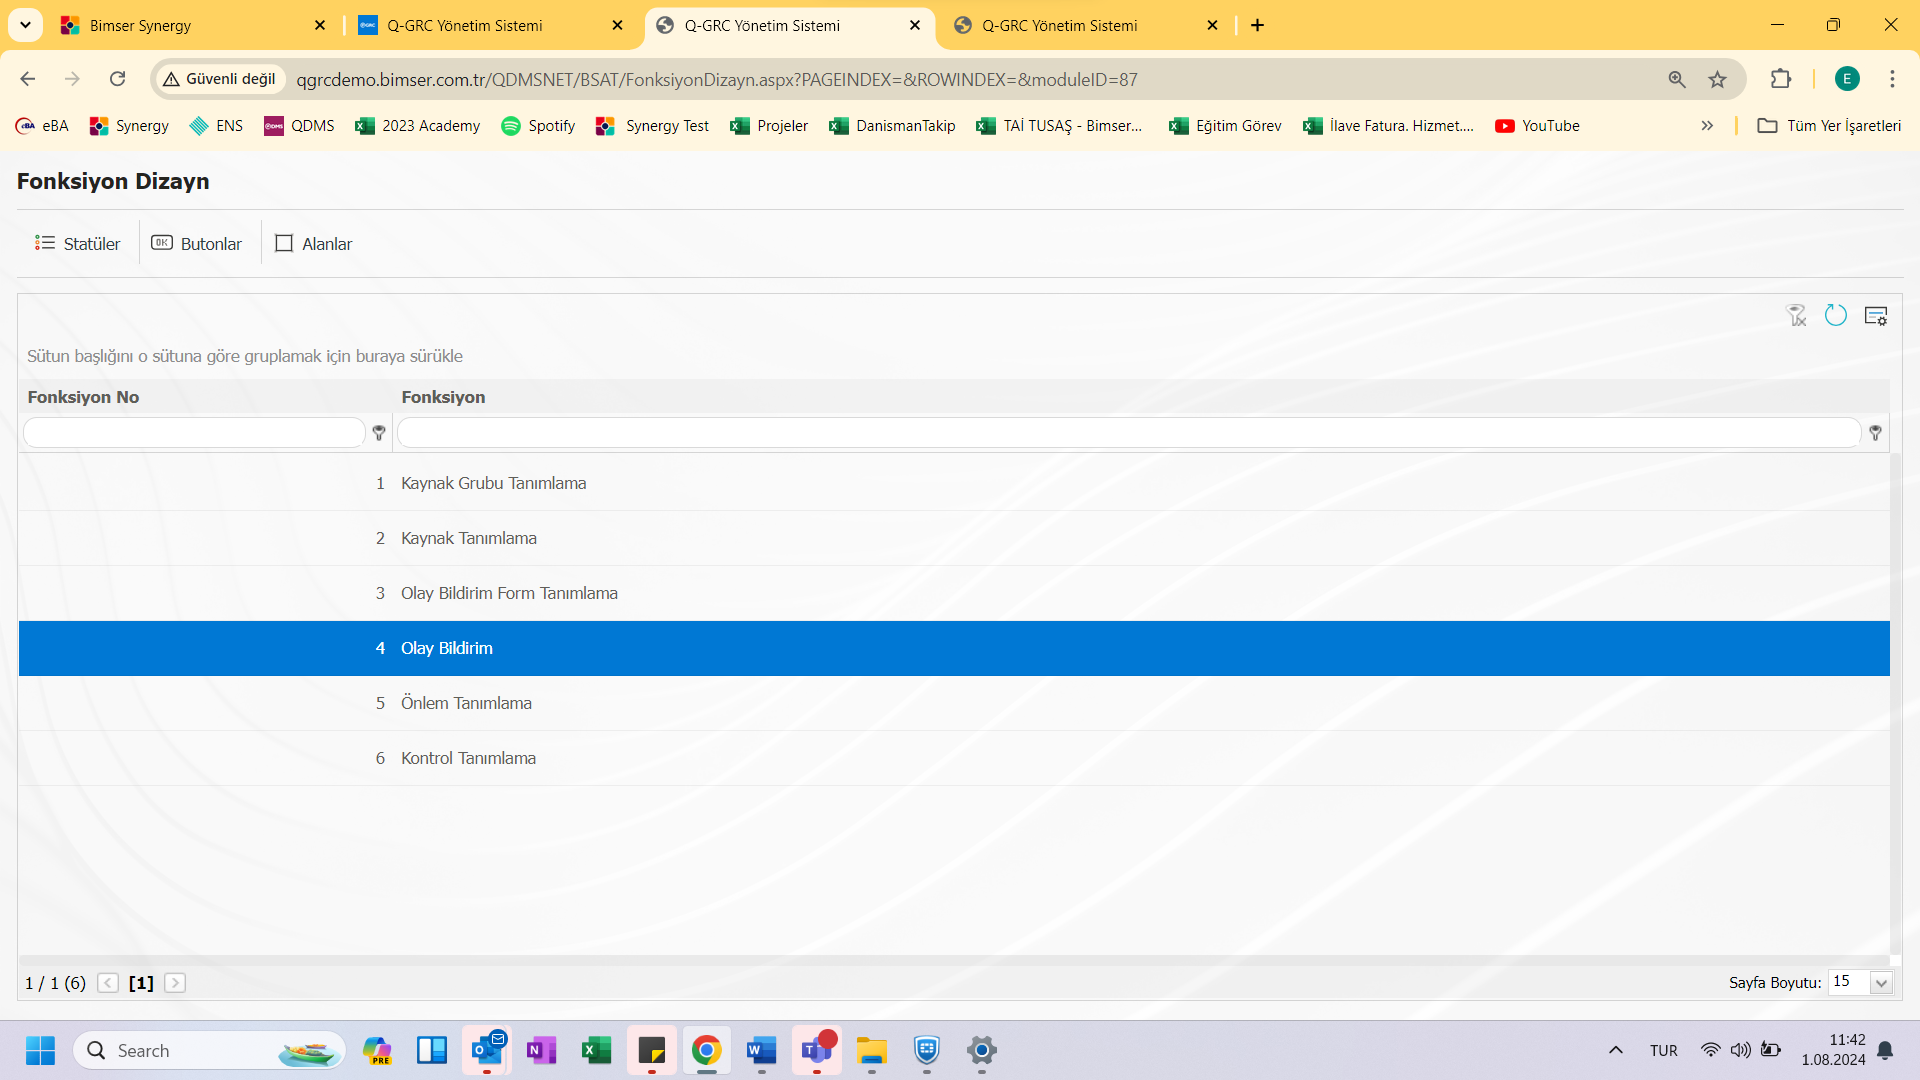
With the help of the buttons located in the Ekranda;
: Status is defined.
: The button is defined.
: Fields are associated with functions.
<a id="_Hlk37018443">``````</a> : By clicking the Fields button, the screen opens where the fields defined in the field definition menu will be associated with the relevant function.
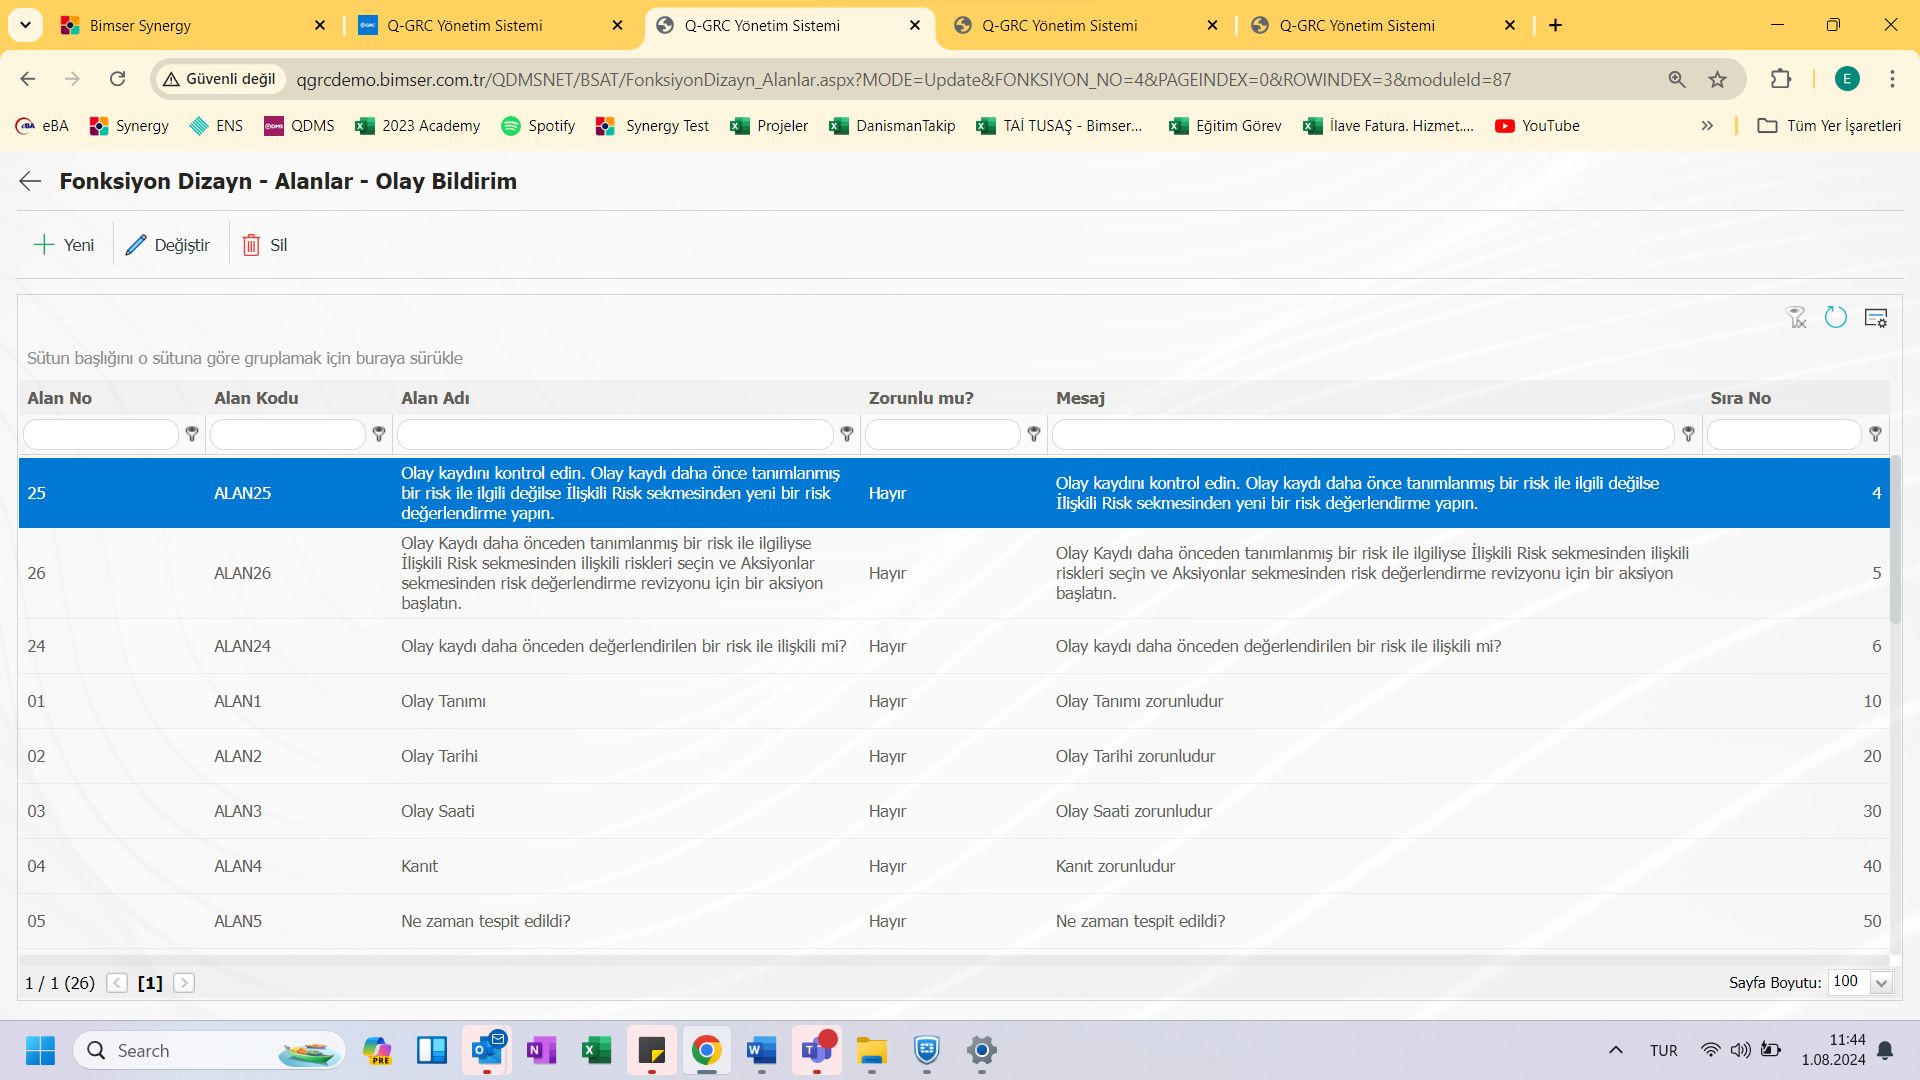
__Ekrandaki function designer with the help of the buttons in the designer;
: A field is added to the new
< id="_Hlk35872424">``````</a>.
: The selected field in the list is replaced.
: The selected field in the list can be deleted.
: Revert to the previous screen.
Fields to be used in the relevant function(New) button.
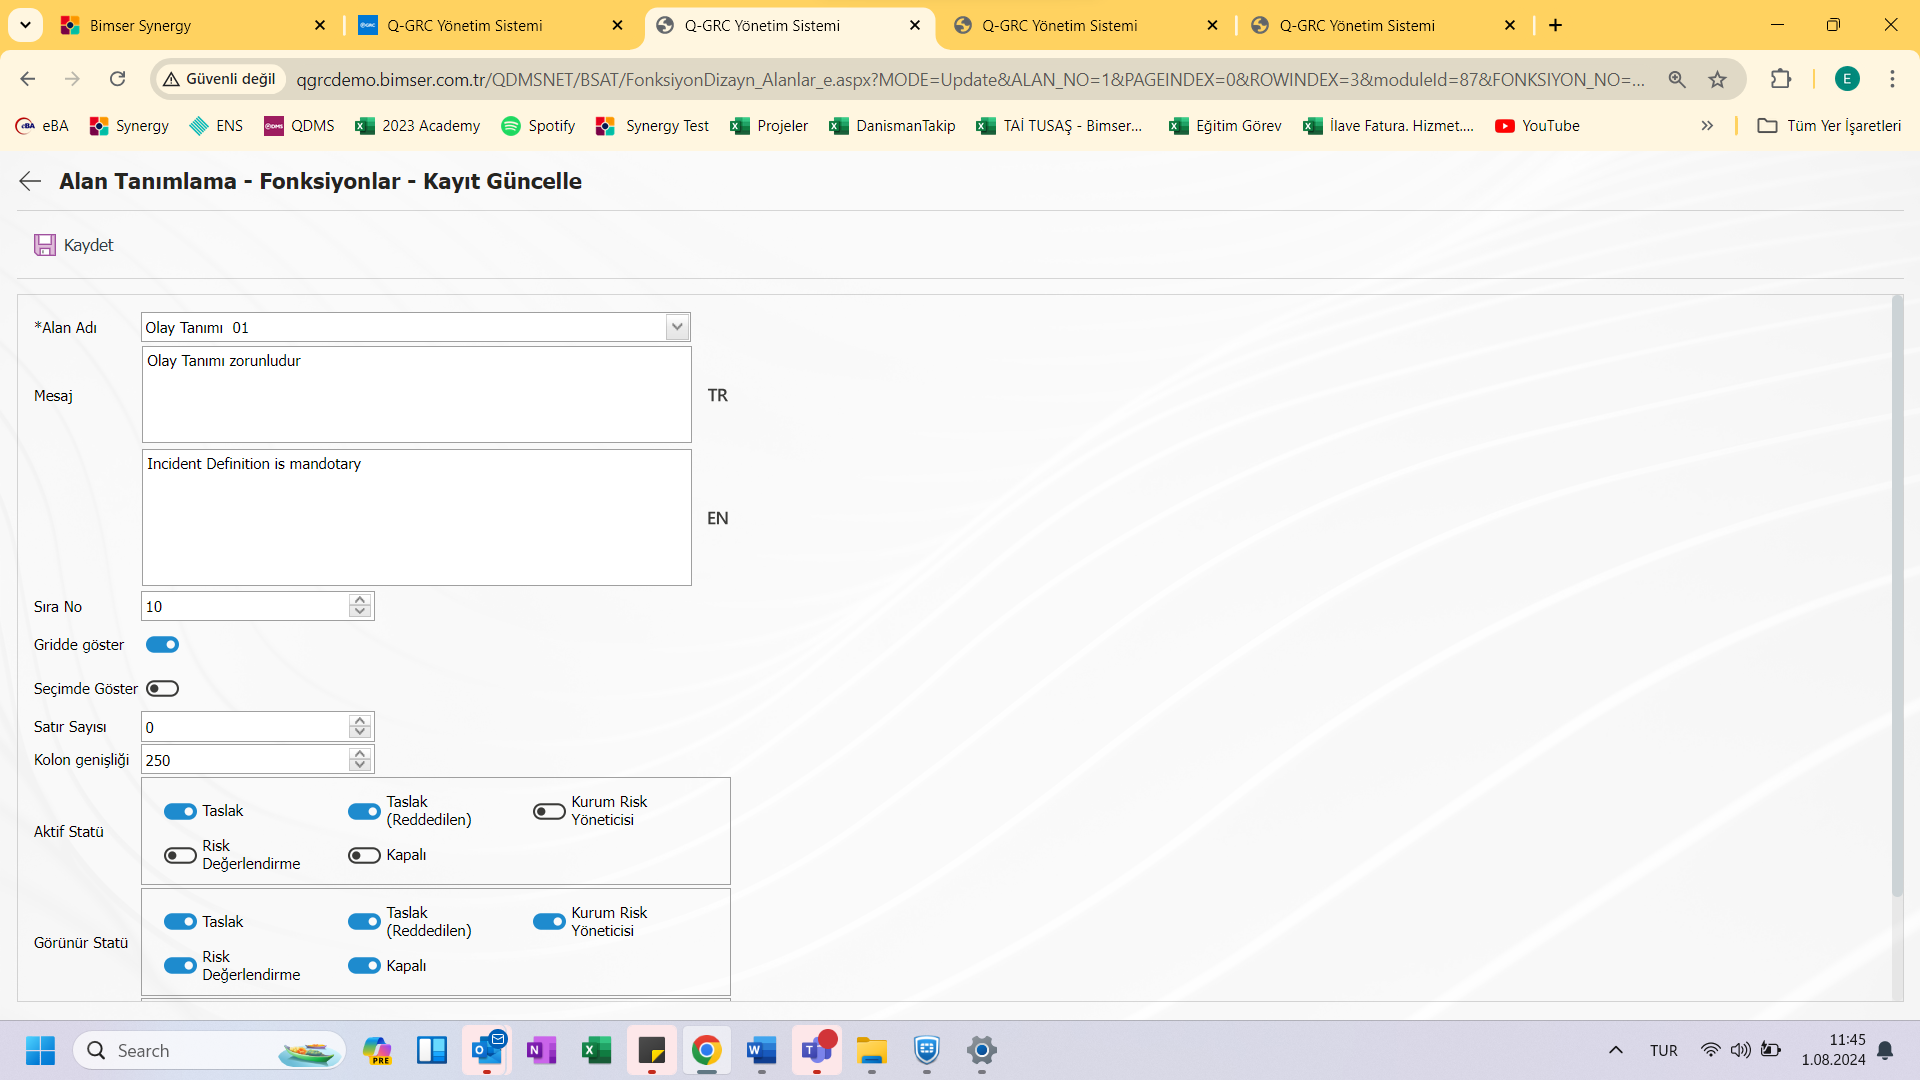
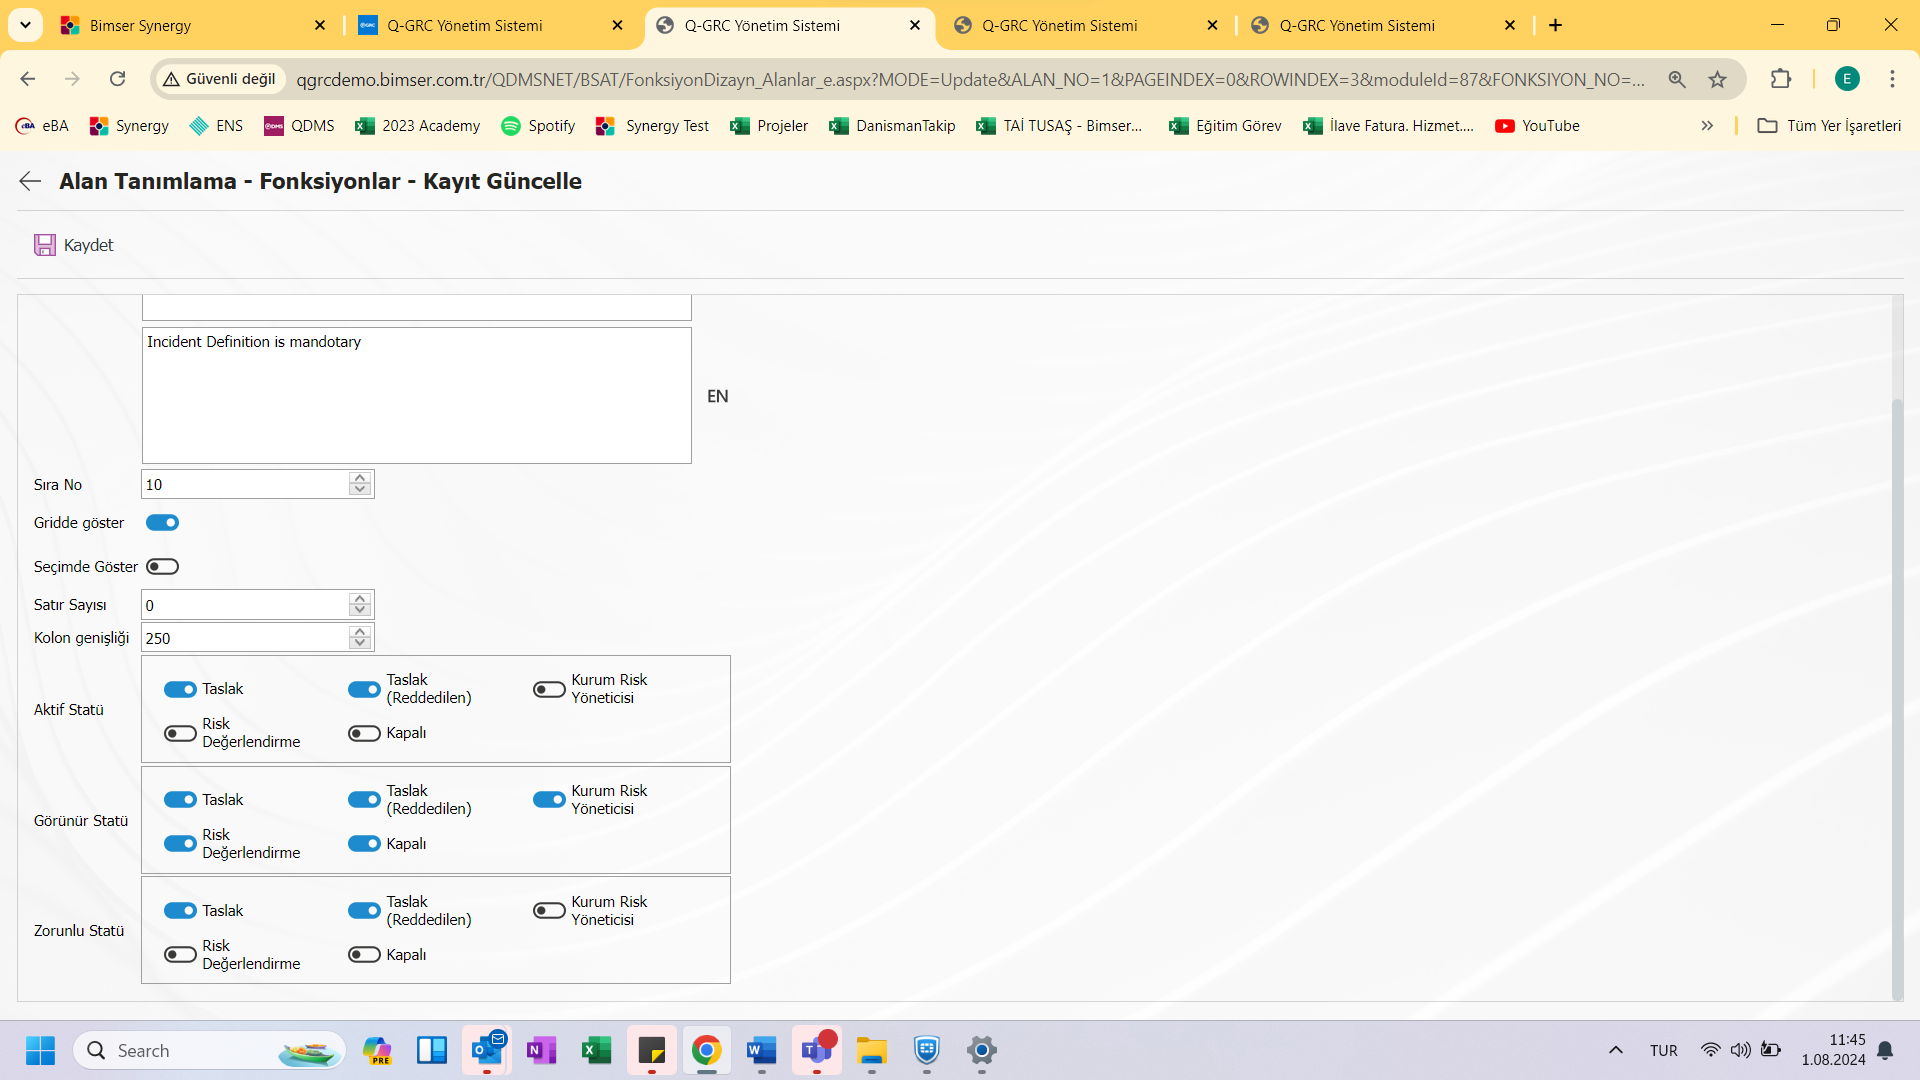
<a id="_Hlk35851712">Aç</a> the corresponding fields are defined on the screen:
Alan Name: Field selection is made from the fields defined on the field definition screen.
Zorunlu? : Select whether the field is mandatory or not. (It will be seen when there is no use of status.)
Zorunluluk Message: When the mandatory field is not filled, the warning message information to be given is written in this field.
S IRA No: The sequence number in which the field will appear on the form screen is determined.
Show Gridde: If the field needs to be shown in the grid, the corresponding box is checked.
<a id="_Hlk36811863">Seçimde</a> show: <a id="_Hlk37019093">``````</a>In cases where it is necessary to establish a relationship from other risk or event modules, a risk-type field can be defined in the field definition menu. As a result, if the relevant form relationship is established, a risk tab will be created. When the add button is pressed in this tab, a list of risks / events in the module that needs to be related will appear. Which fields should appear in the columns of the incoming list, the show in selection box should be checked in the relevant module for those fields. (Fields other than textual expressions such as tables, files, pictures, etc. should not be selected)
Sat Number of Rows: If the relevant field is multi-line, it is determined how many rows should appear on the data entry screen.
Kolon Width: In the list of records entered in the relevant module, the column width information of the field (in the grid) is determined. For areas where the data is long, avg. It is ideal to use 250, and 75 for fields where only numbers are entered. Considering the data to be entered in the field, it would be appropriate to use a value in these ranges.
Aktif Status: Determines which of the statuses defined in the system the field will be active. In the statuses marked in this field, transactions can be performed according to the type of relevant field.
Görünür Status: Determines which of the statuses defined in the system the field will be seen. Active status should be determined for selected areas in such a way that at the same time the visible status is the status marked in the least active status field.
Zorunlu Status: : Determines in which of the statuses defined in the system the field will be mandatory.__ __
İlişkili Tab: It becomes active when the tab-type field is defined in the Alan definition menu and it is selected which tab this field will be associated with.
NOT: Status and Button identification operations 5.1.7. It is described in the Approval Flow Definition clause.
<a id="_Toc173418828">``````</a>5.1.3. Event Distribution Matrix Diagnosis mlama
Menü Name: System Infrastructure Definitions/Risk Disclosure/Event Distribution Matrix Definition
The event distribution matrix is the menu where the definition process takes place. The purpose of defining an event distribution matrix is to determine in which ranges the event distribution is more intense according to the determined parameters.
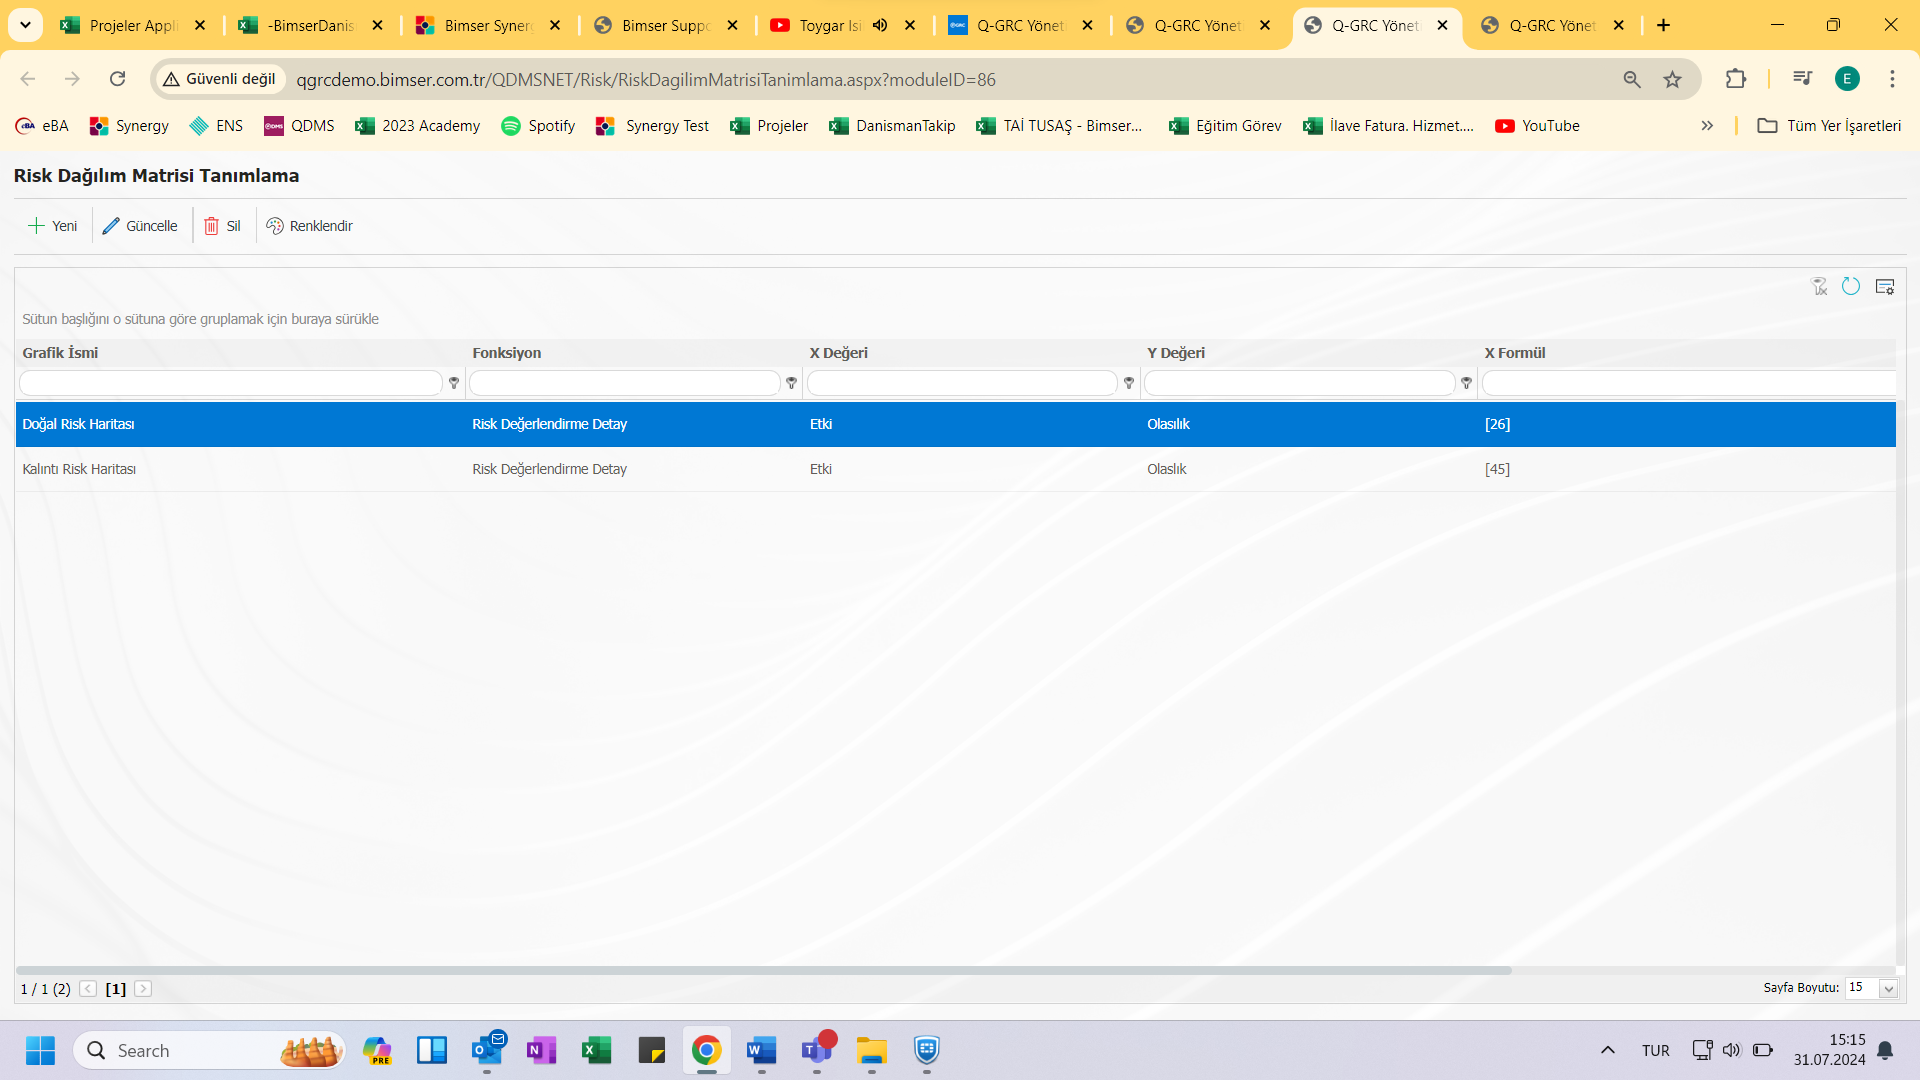
With the help of the buttons on the Ekran;
: A new Event distribution is added.
: The Event distribution information selected in the list is replaced.
: The selected Event distribution in the list can be deleted.
: Colorizes the Event Distribution Matrix.
: Revert to the previous screen.
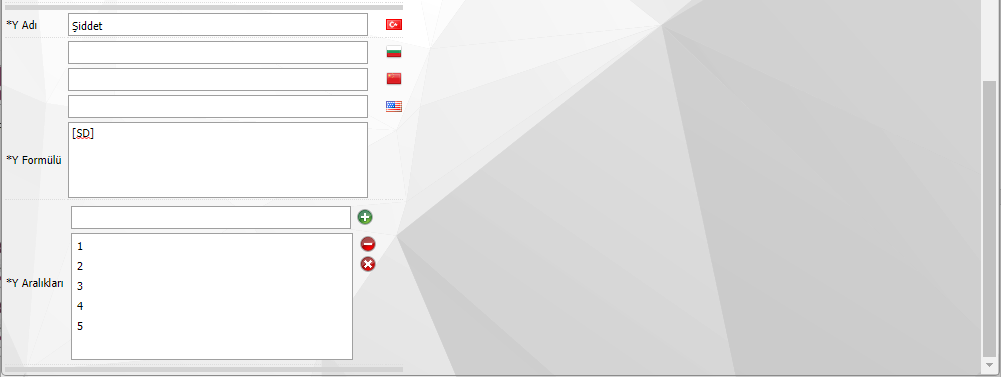 To add a new event distribution matrix to the list, click ! Clicking the new button displays Event Distribution Matrix Identification\New Record t__ __ekran.
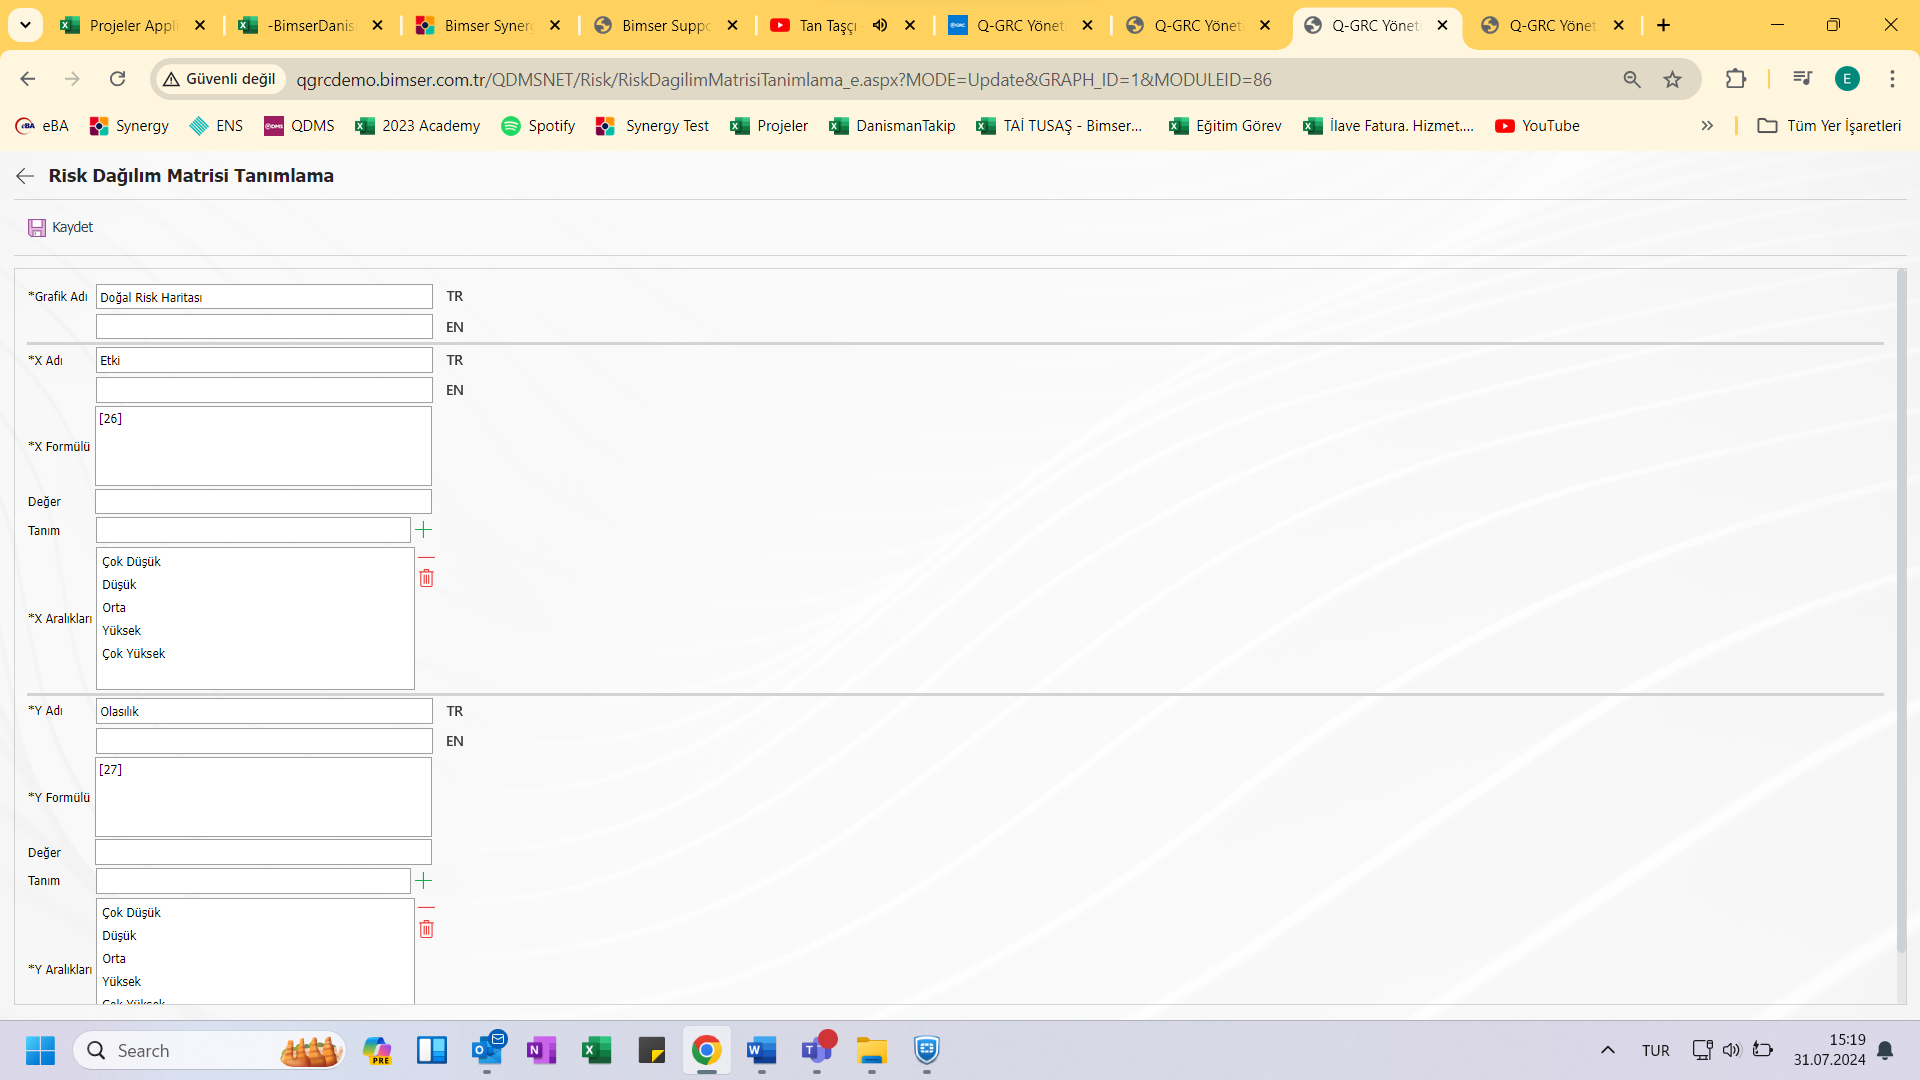
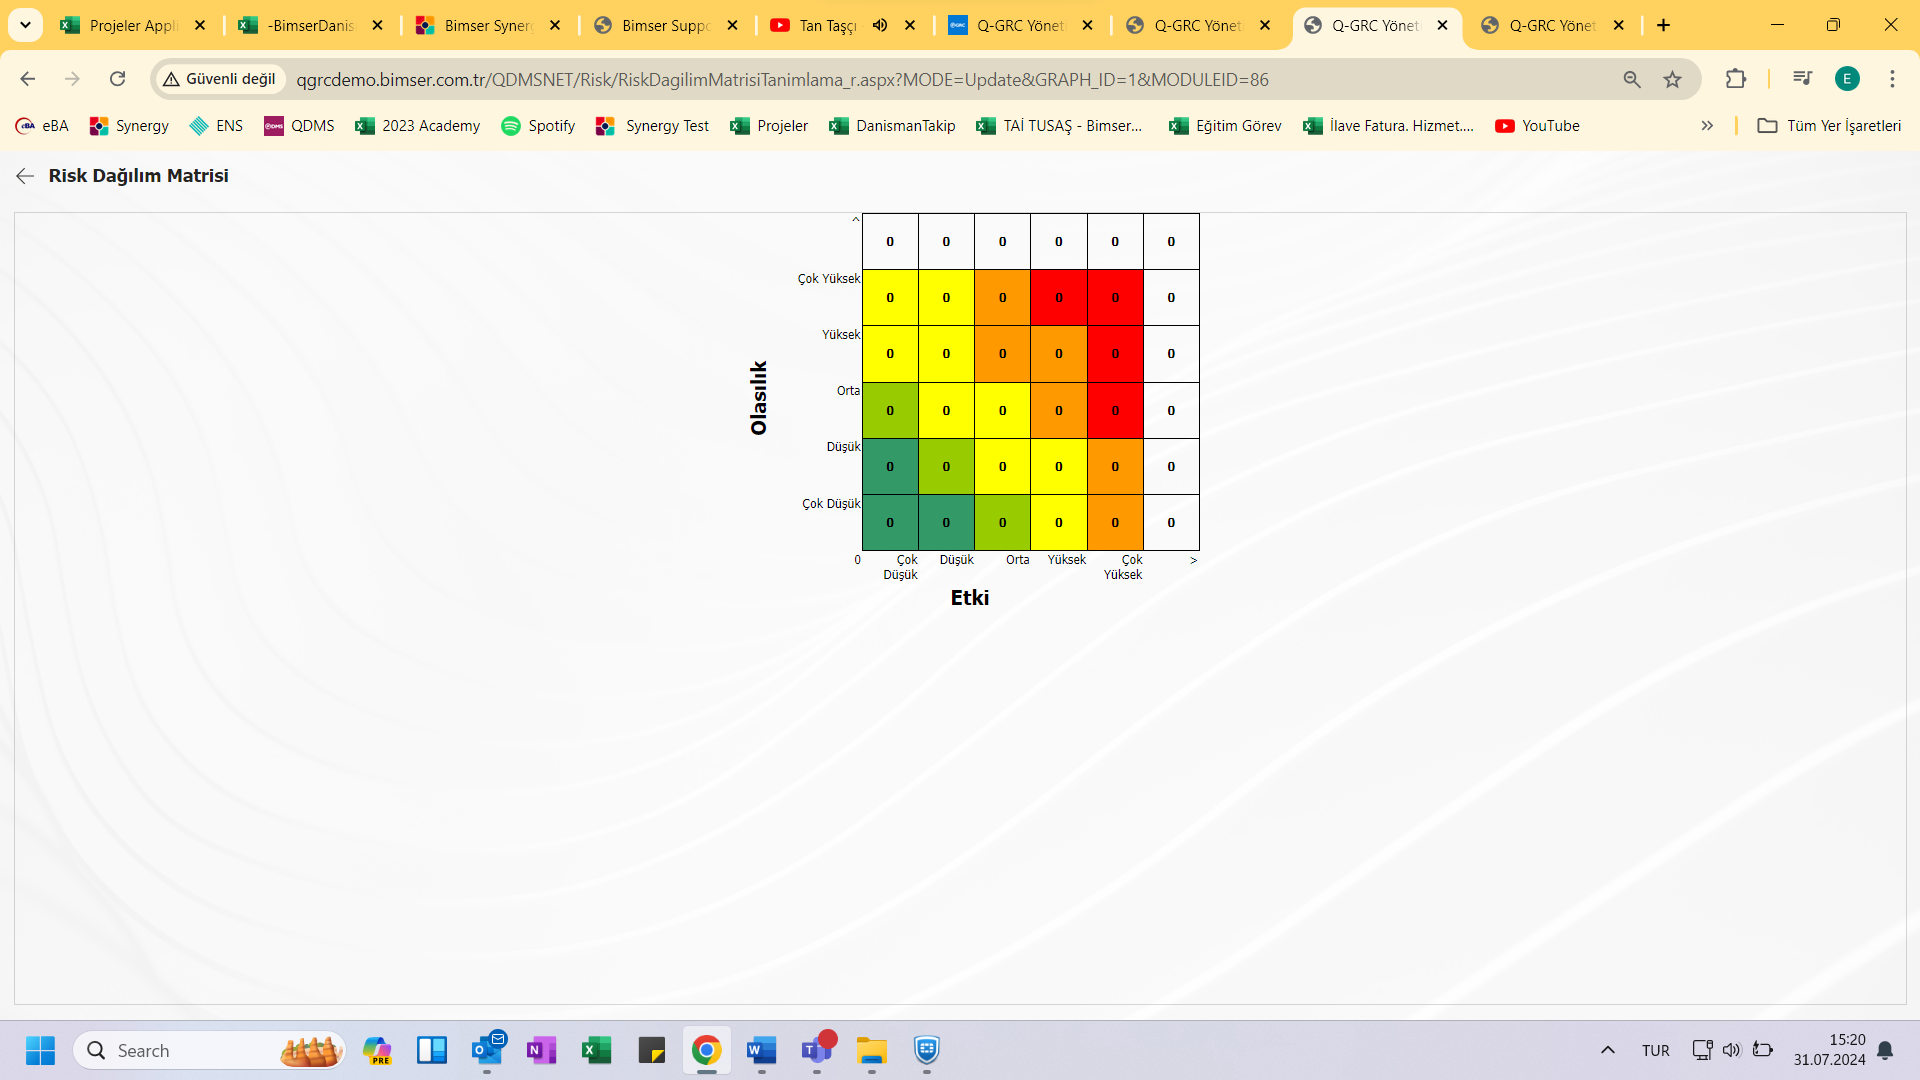
On the screen that opens, "Chart Name" is determined. For the parameters on the X and Y axis, the fields to be used in risk comparison are determined. The formulas for these fields in the field definition menu are written in the "Formula X" and "Formula Y" sections. In the "X Ranges" and "Y Ranges" sections, the values of the fields are entered. Once the processes are completed, the registration process is carried out.

To color the event distribution matrix in accordance with the method used, click "Color" in the upper right corner of the event distribution matrix definition screen. The matrix created by the button opens. By clicking on each tile on the screen, the tiles are colored.
<a id="_Toc173418829">``````</a>5.1.4. Risk Disclosure Parametreleri
Menü Name: System Infrastructure Definitions/Risk Statement/__ __Risk Notification parameters
It is the menu where the system settings of the risk notification module are made according to the wishes and needs of the user and the parameters are determined accordingly.
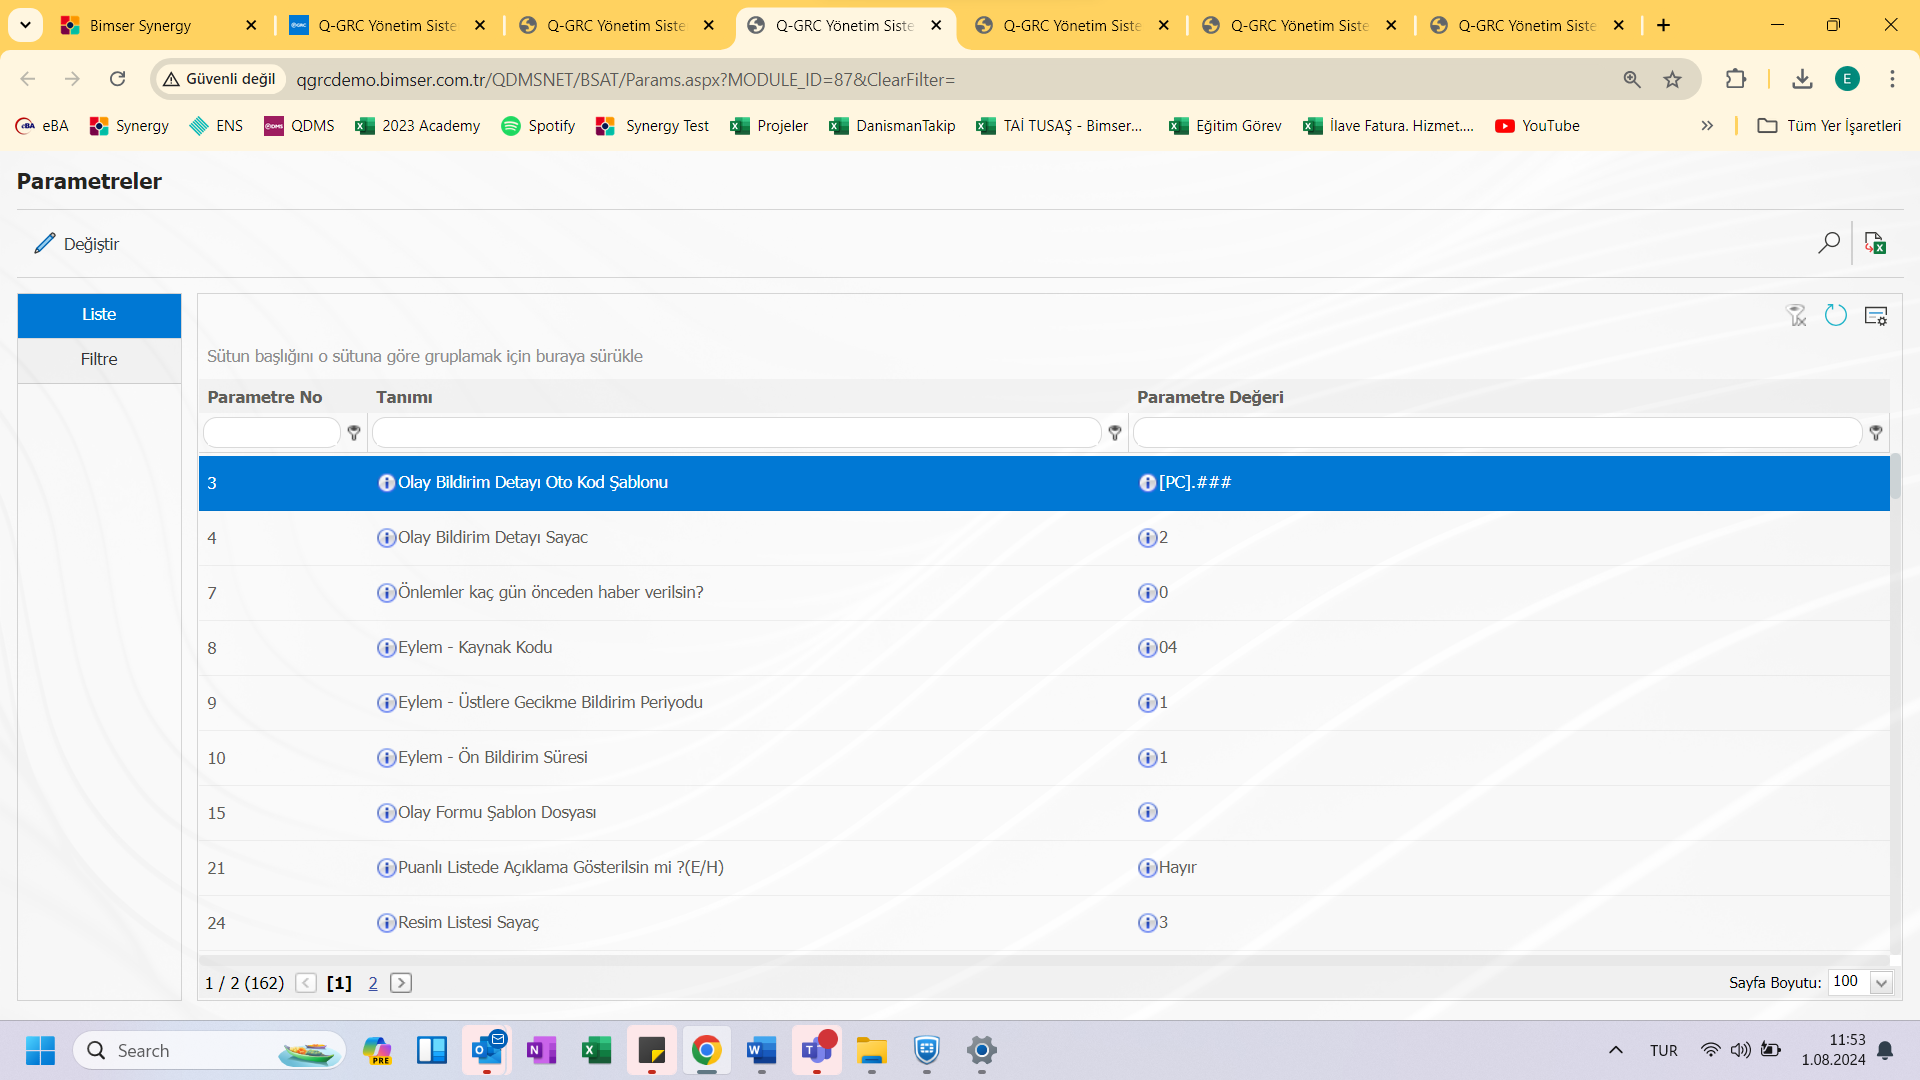
With the help of the buttons located in the Ekrandaki;
: The selected parameter in the list is replaced.
: Records can be searched by filtering.
: Data can be exported to Excel.
<a id="_Toc173418830">``````</a>5.1.5. E-Mail Settings
Menü Name: System Infrastructure Definitions/Risk Statement/ E-mail Settings
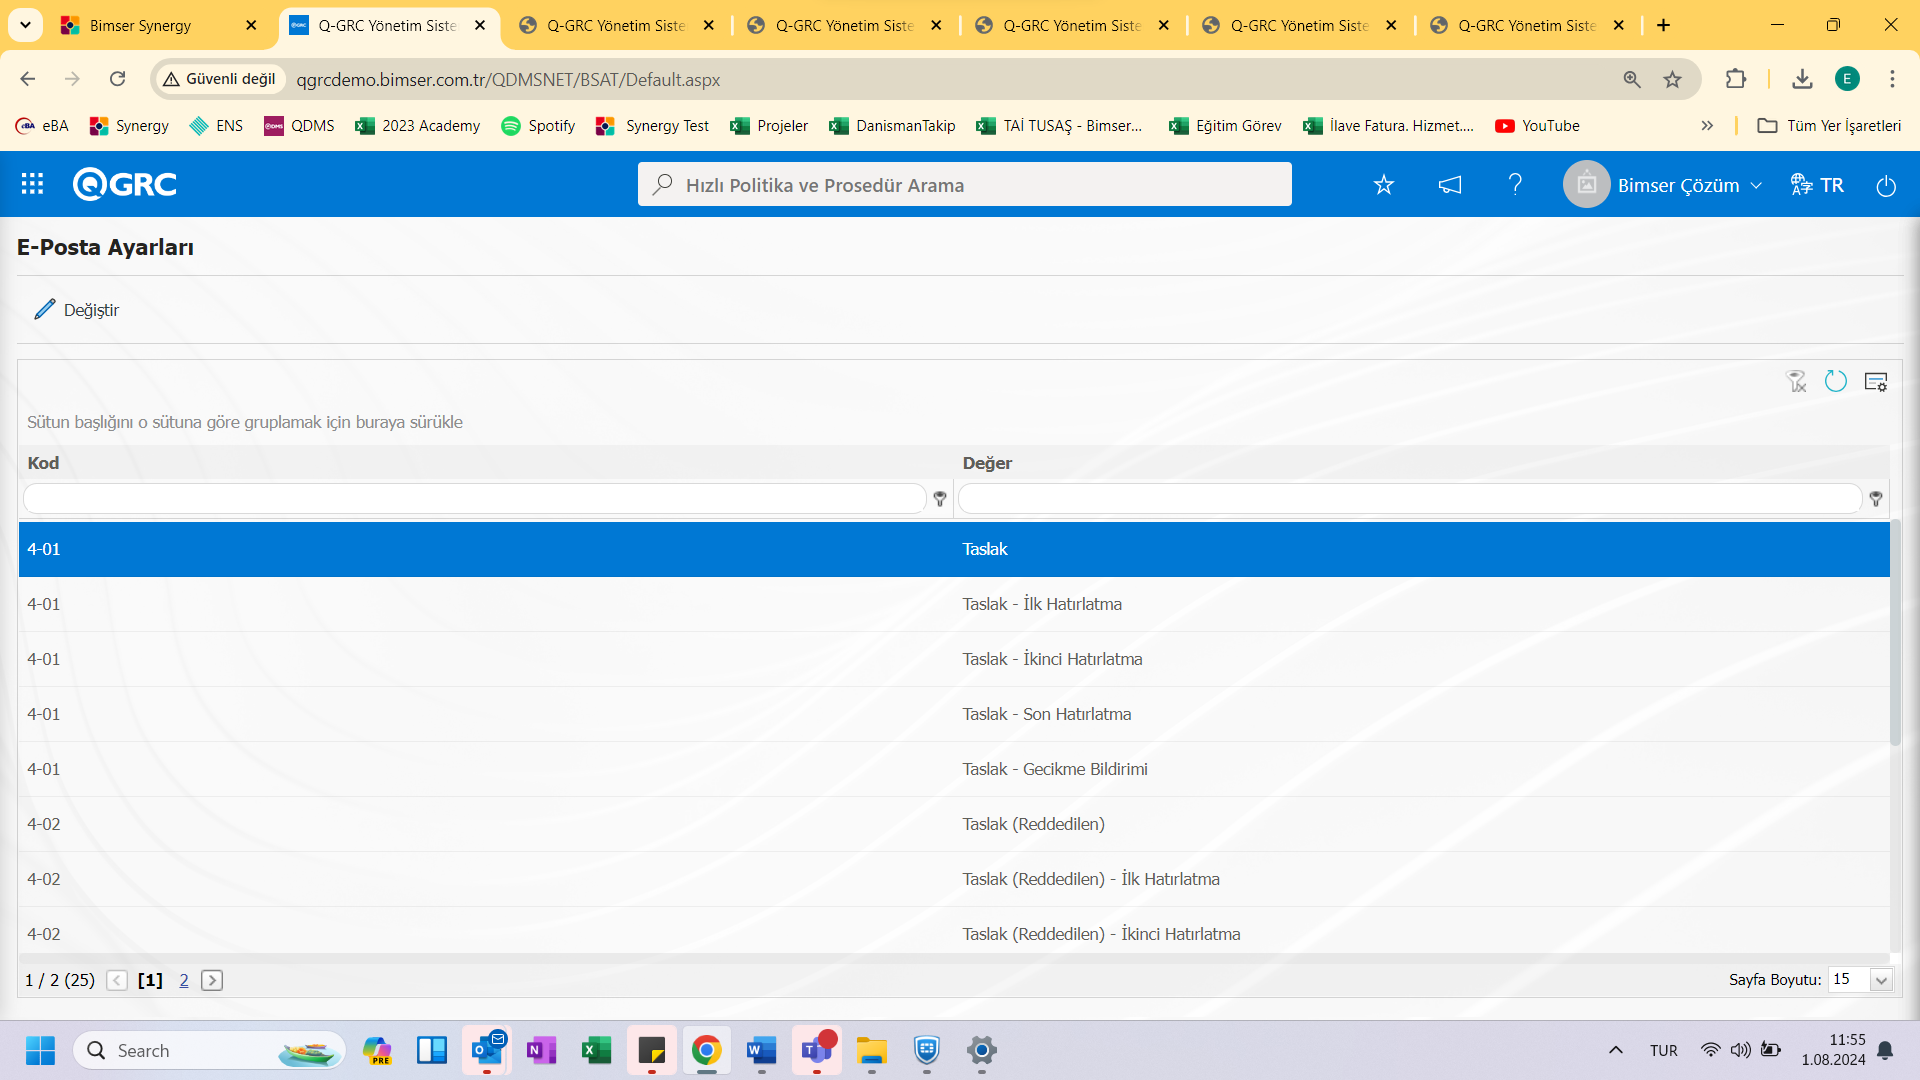
It is the menu where the e-mails to be created from the risk notification module are set to whom and with which message body they will be sent.
Hover over the value to be set to the notification and (change) button is clicked.
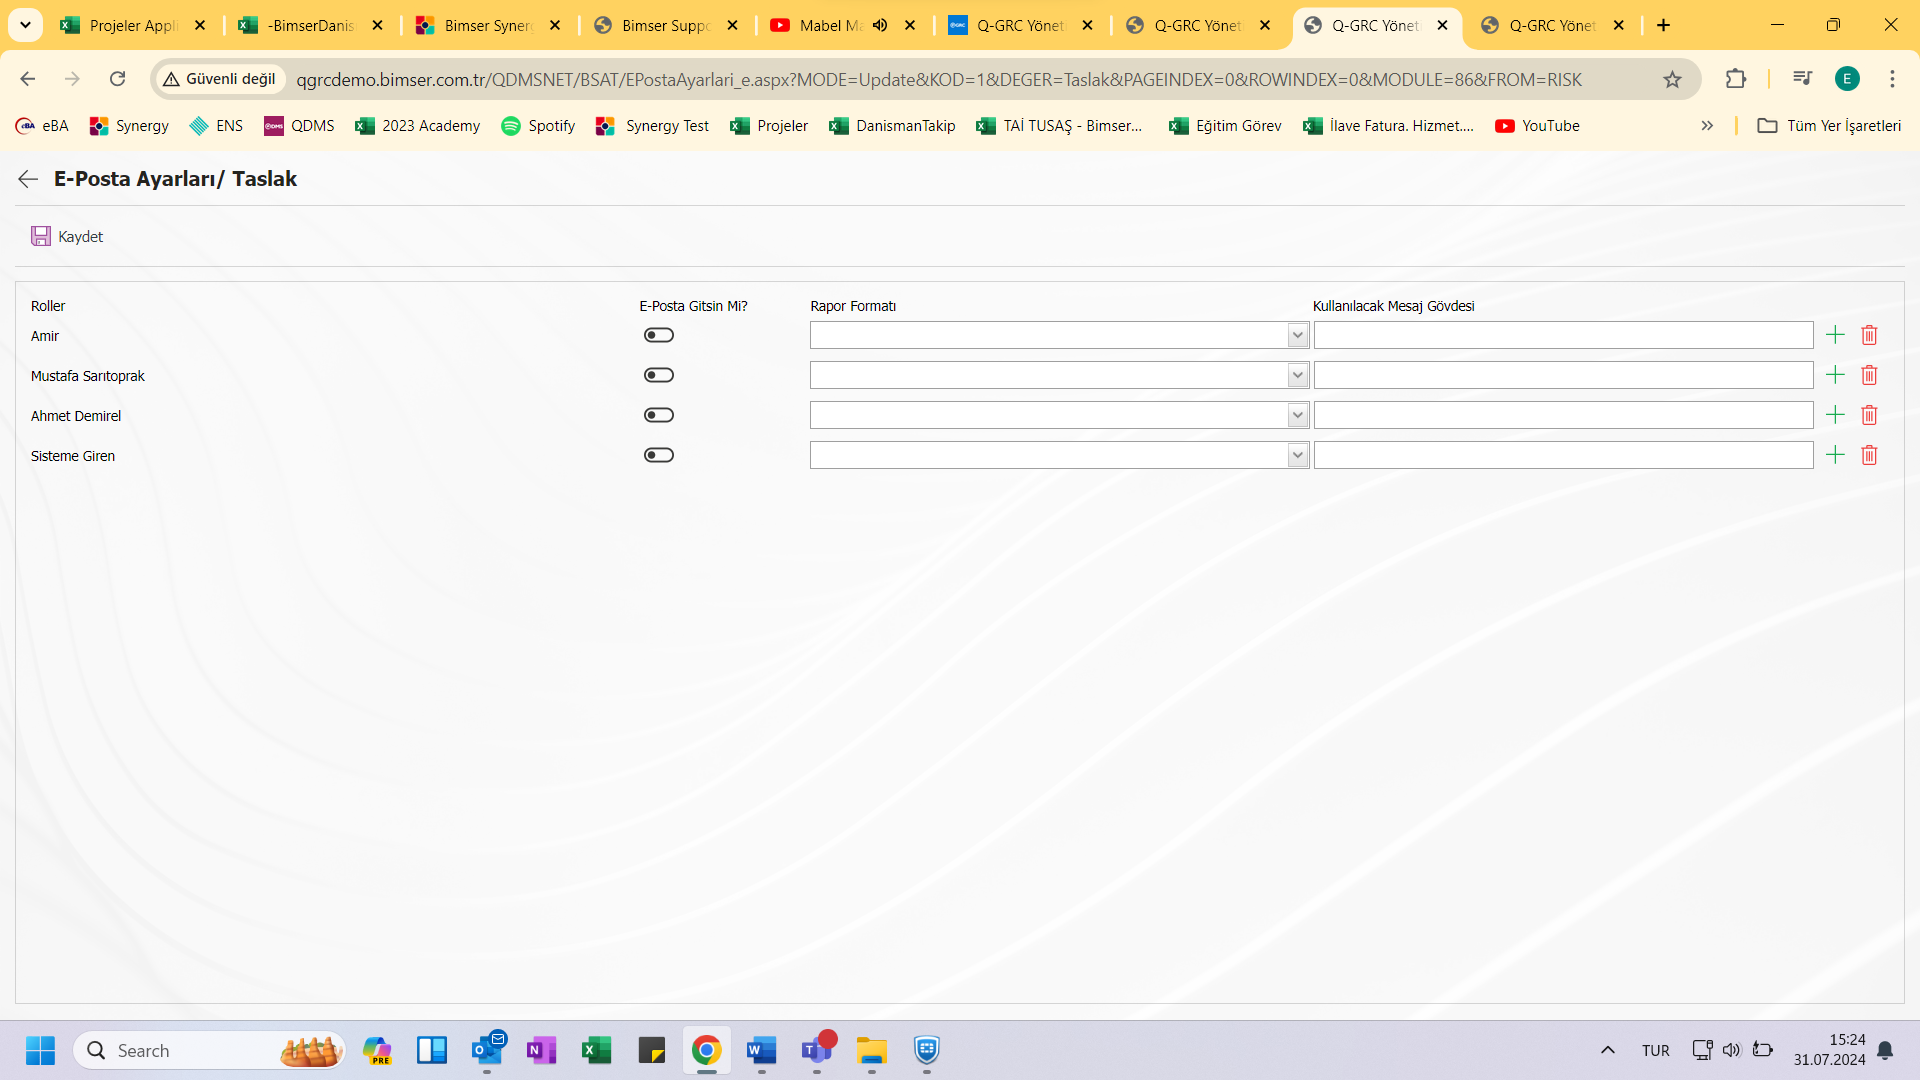
After entering the value with the (Change) button, the appropriate message body is selected according to the roles and the e-mail is saved by checking the box \ Should the e-mail go. If an SMS needs to be sent to the person concerned, the "Should the SMS be sent?" box should also be checked. Bimser Technical Support Team should be contacted for sending SMS.
<a id="_Toc173418831">``````</a>5.1.6. Report Formats
Menü Name: System Infrastructure Definitions/Risk Statement/__ __Rapor Formats
The report formats menu can be used to create different report formats according to the risk reporting methods.
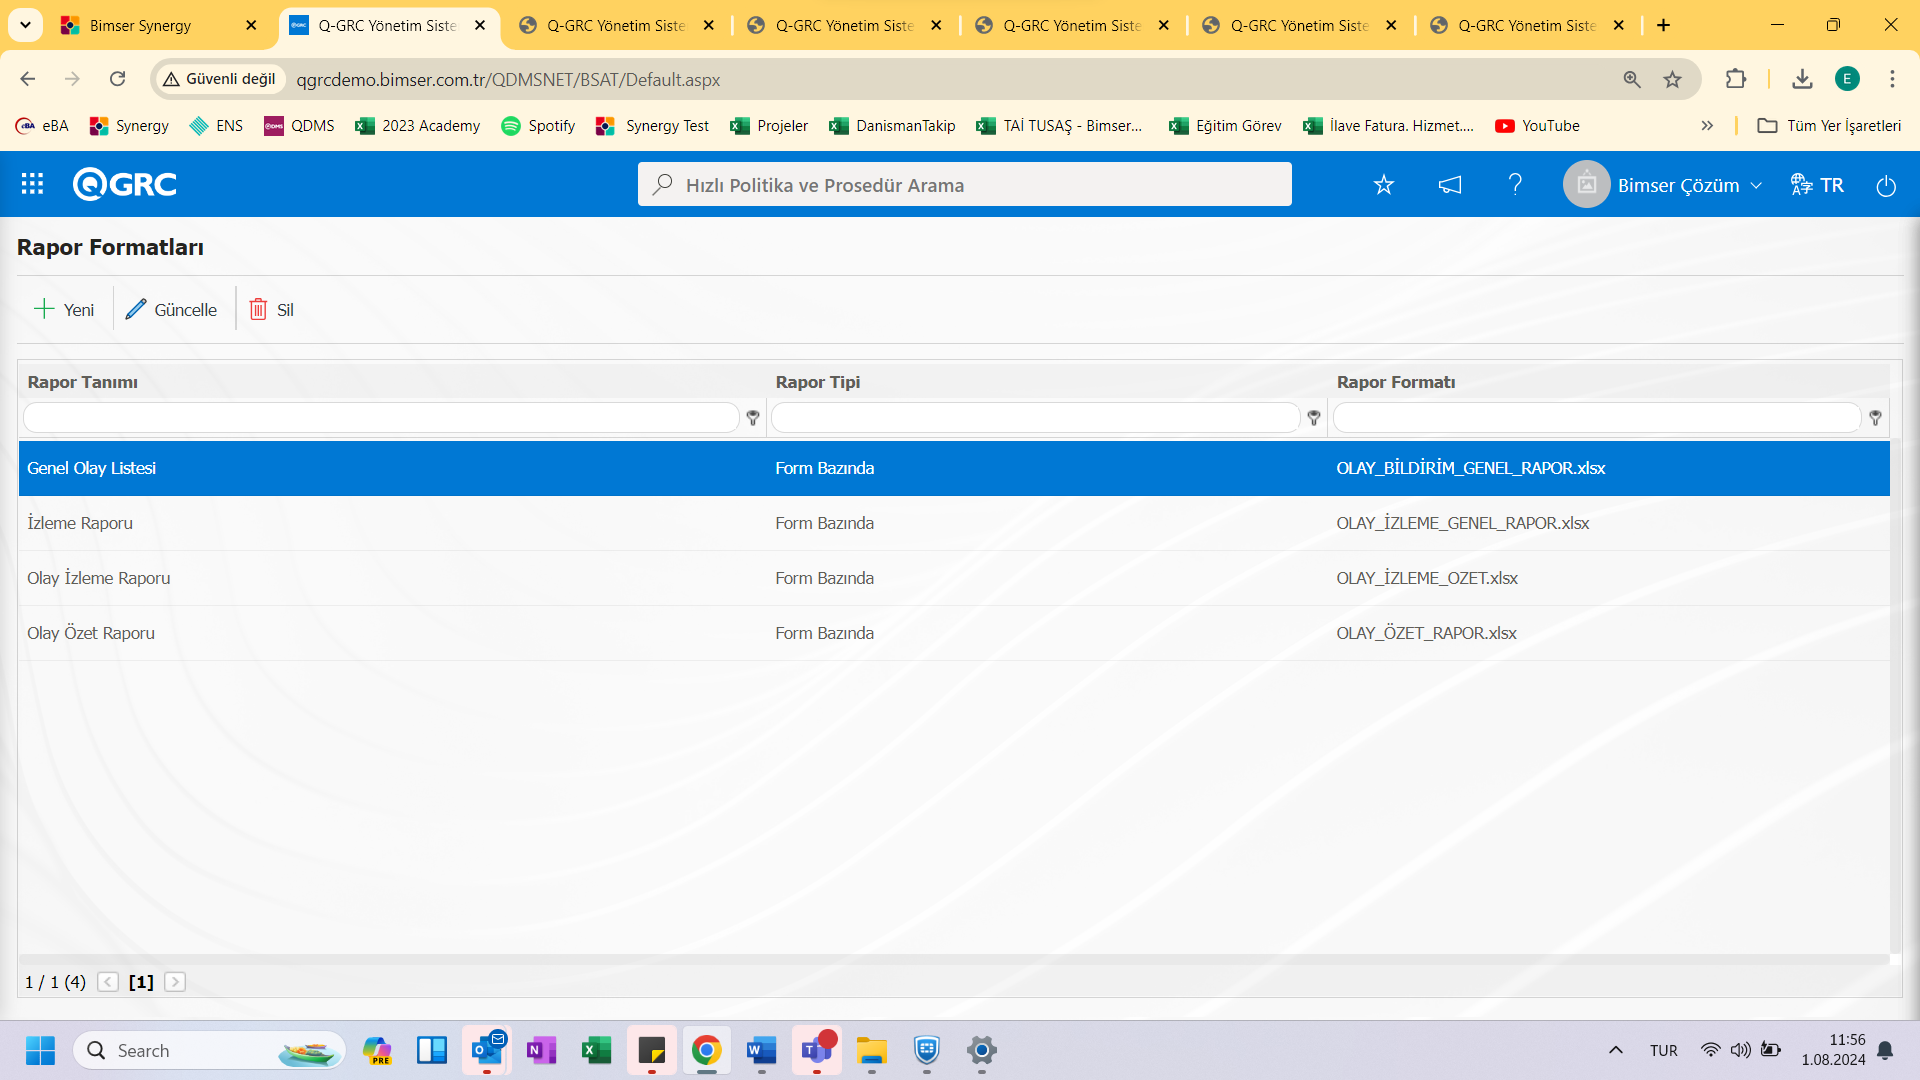
With the help of the buttons located in the Ekrandaki;
: A new report format is added.
: The information for a selected report format in the list is changed.
: The report format selected in the list can be deleted.
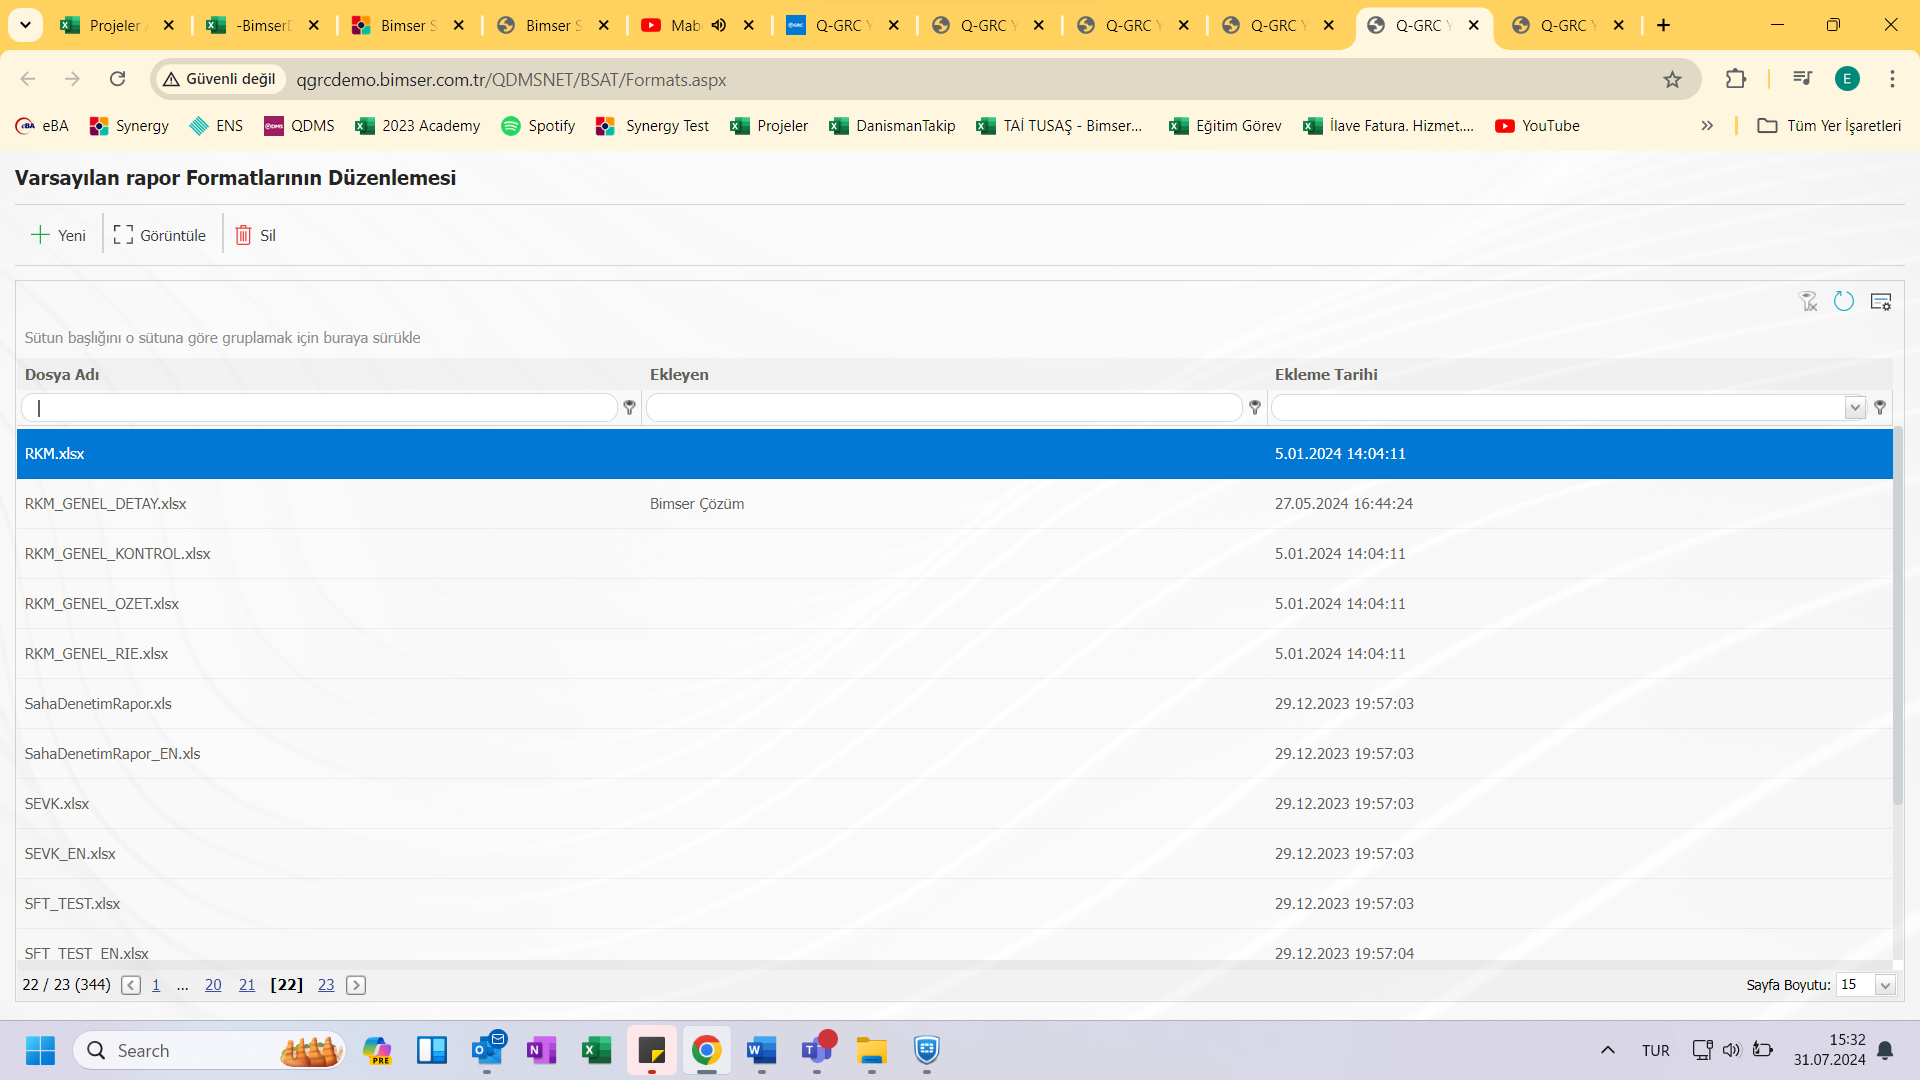
To do this, first of all, all the report formats to be created in the SAT/BSAT/Configuration Settings/Report Formats editing menu must be defined.
<a id="_Toc3446174">``````</a>``````<a id="_Toc3448751">``````</a>``````<a id="_Toc6564800">``````</a>``````<a id="_Toc6565122">``````</a>``````<a id="_Toc7781408">``````</a>``````<a id="_Toc20480317">``````</a>``````<a id="_Toc20481149">``````</a>``````<a id="_Toc20485309">``````</a>``````<a id="_Toc22890929">``````</a>``````<a id="_Toc22895614">``````</a>``````<a id="_Toc22896580">``````</a>``````<a id="_Toc26282406">``````</a>
With the help of Ekrandaki buttons;
: A new report format is uploaded to the system.
<a id="_Toc173418749">``````<``````</a>a id="_Toc173418832">``````</a>: The selected report format is displayed in the list and downloaded.
: The report format selected in the list is deleted.
In the menu that opens! By clicking the (New) button, the report format is added and the name of the report format is copied with its extension.
Then, the System Infrastructure Definitions/Risk Disclosure/Report formats menu opens again.
To add a new report format to the list, click Clicking the (New) button displays the Report Format \New Record t__ __ekran.
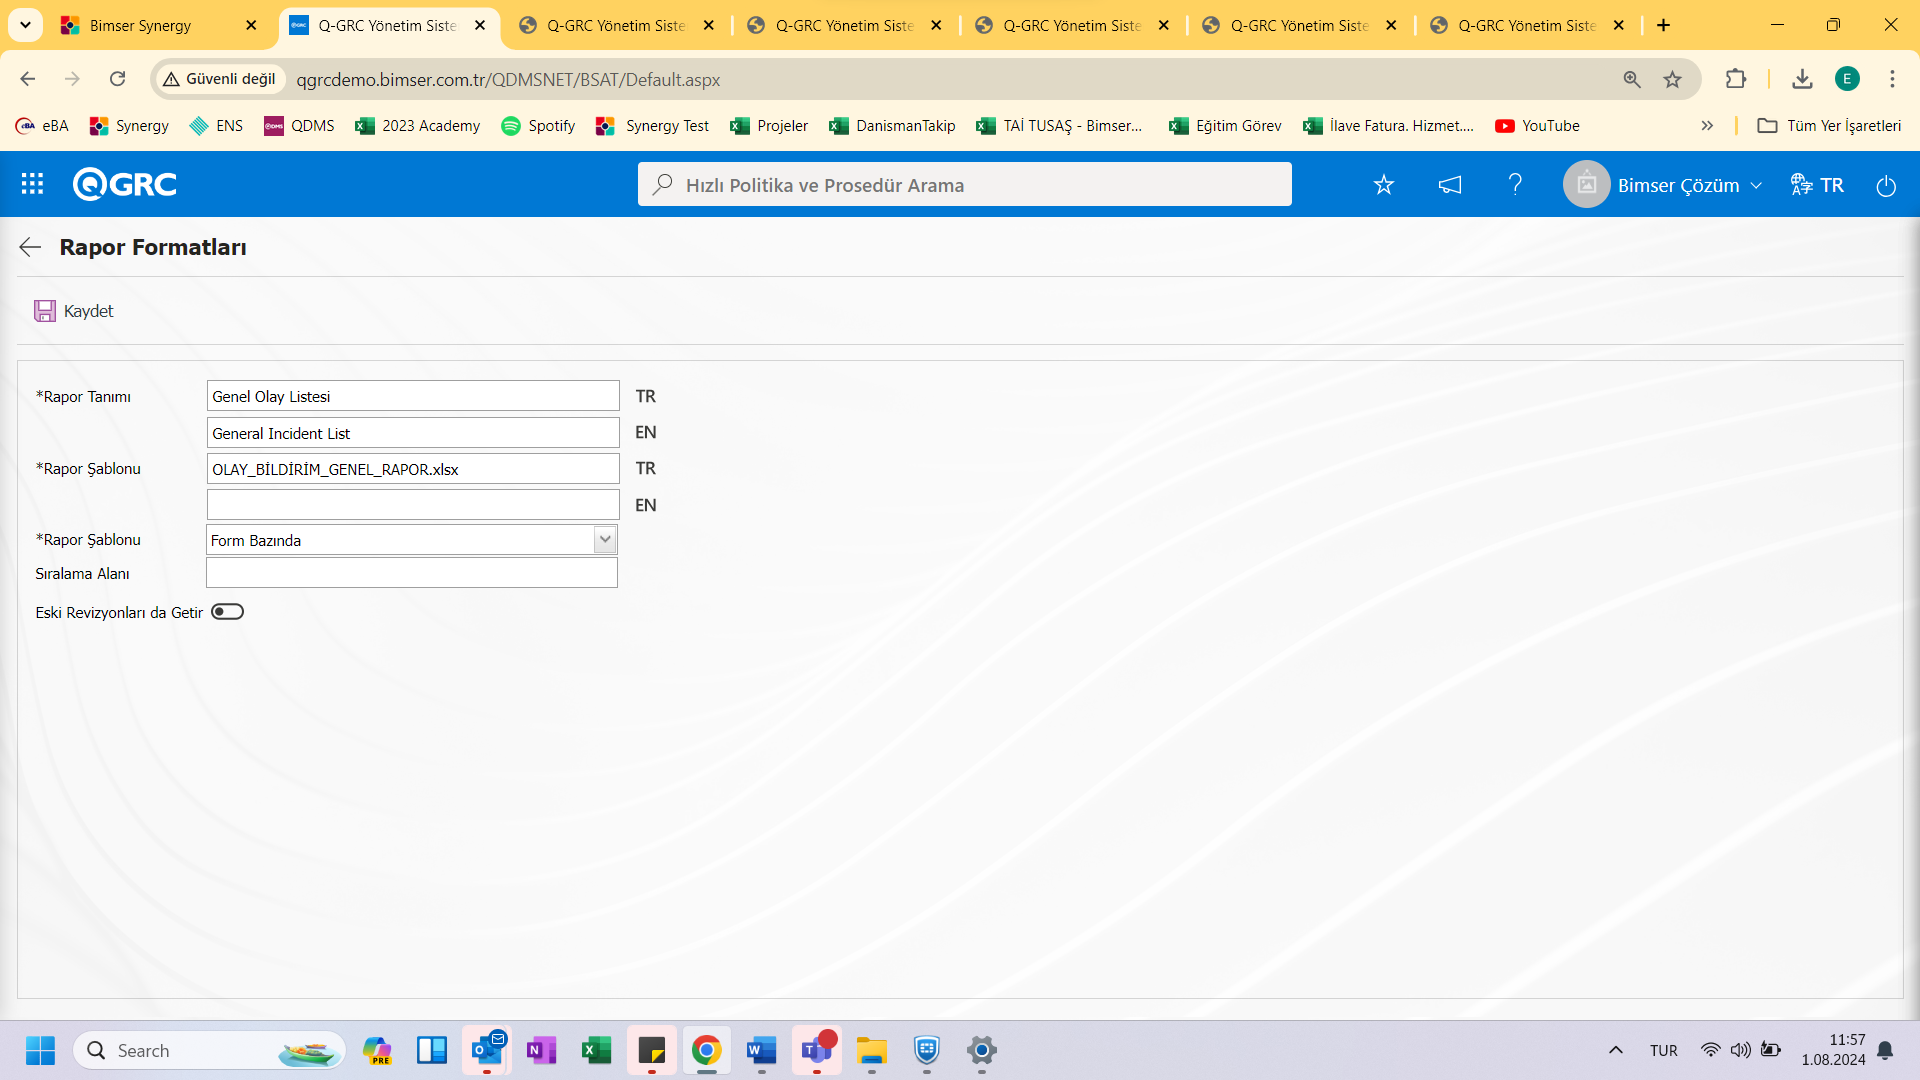
On the Aç screen, the relevant fields are defined:
Rapor Definition: The report definition information is entered.
Rapor Template: Enter the name and extension of the report template.
Rapor Type: Three options of report type information can be selected: on the basis of record, on the basis of form and on the basis of general.
- Kay On the basis of IT: Selected when each risk record is requested to be reported separately. (GYS/Risk notification/Risk notification is taken with the "PDF" button that appears after pressing the Details button in the Form definition menu. The PDF button is not displayed unless there is a record-based identification.)
- On Form Basis: Selected for cases where all risk disclosure records are exported to Excel in a single list.
(GYS/Risk notification/Risk notification Form is taken with the "Excel" button that appears after pressing the Details button in the Definition menu.)
- Genel: Selected when all risk detail records are requested to be seen in a single Excel.
(GYS/Risk notification/Reports/Risk Notification List is taken from the Report screen.)
Create as PDF: This box can be checked so that a notification record selected on the GRC Management system/Risk notification/All notifications screen can be exported as a PDF in the selected report formats on the basis of Rapor type record.
On the screen that opens, the names of the report formats to be introduced are written in the Report Description field. In the Report Template field, the file name copied from the report formats editing menu is pasted birlikte__ __uzant heat.
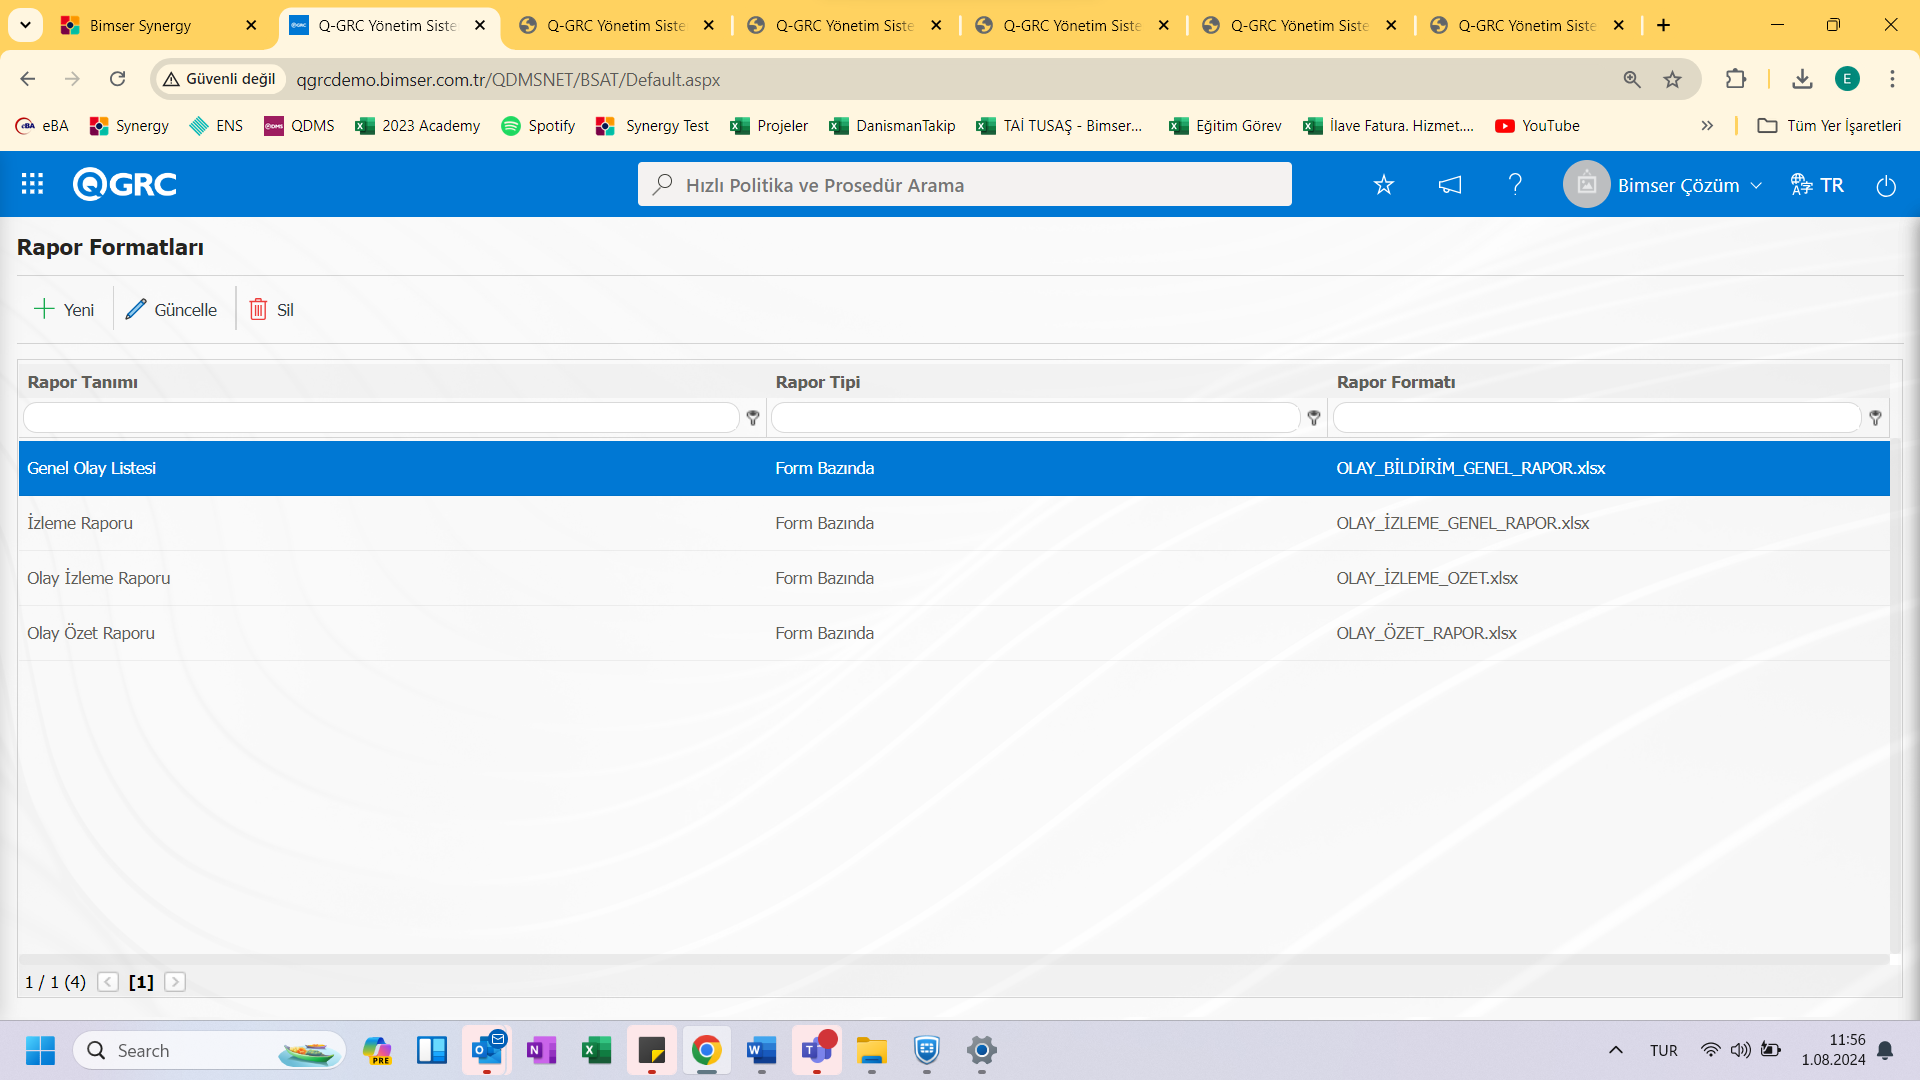
After filling in the required fields on the Report Definition screen, click By clicking the (save) button, the report definition and registration process is performed.
<a id="_Toc173418833">``````</a>5.1.7. Approval Flow Diagnostics mlama
In order for the evaluated risk notifications to be approved by the determined users, it is necessary to set up an approval flow in the system.
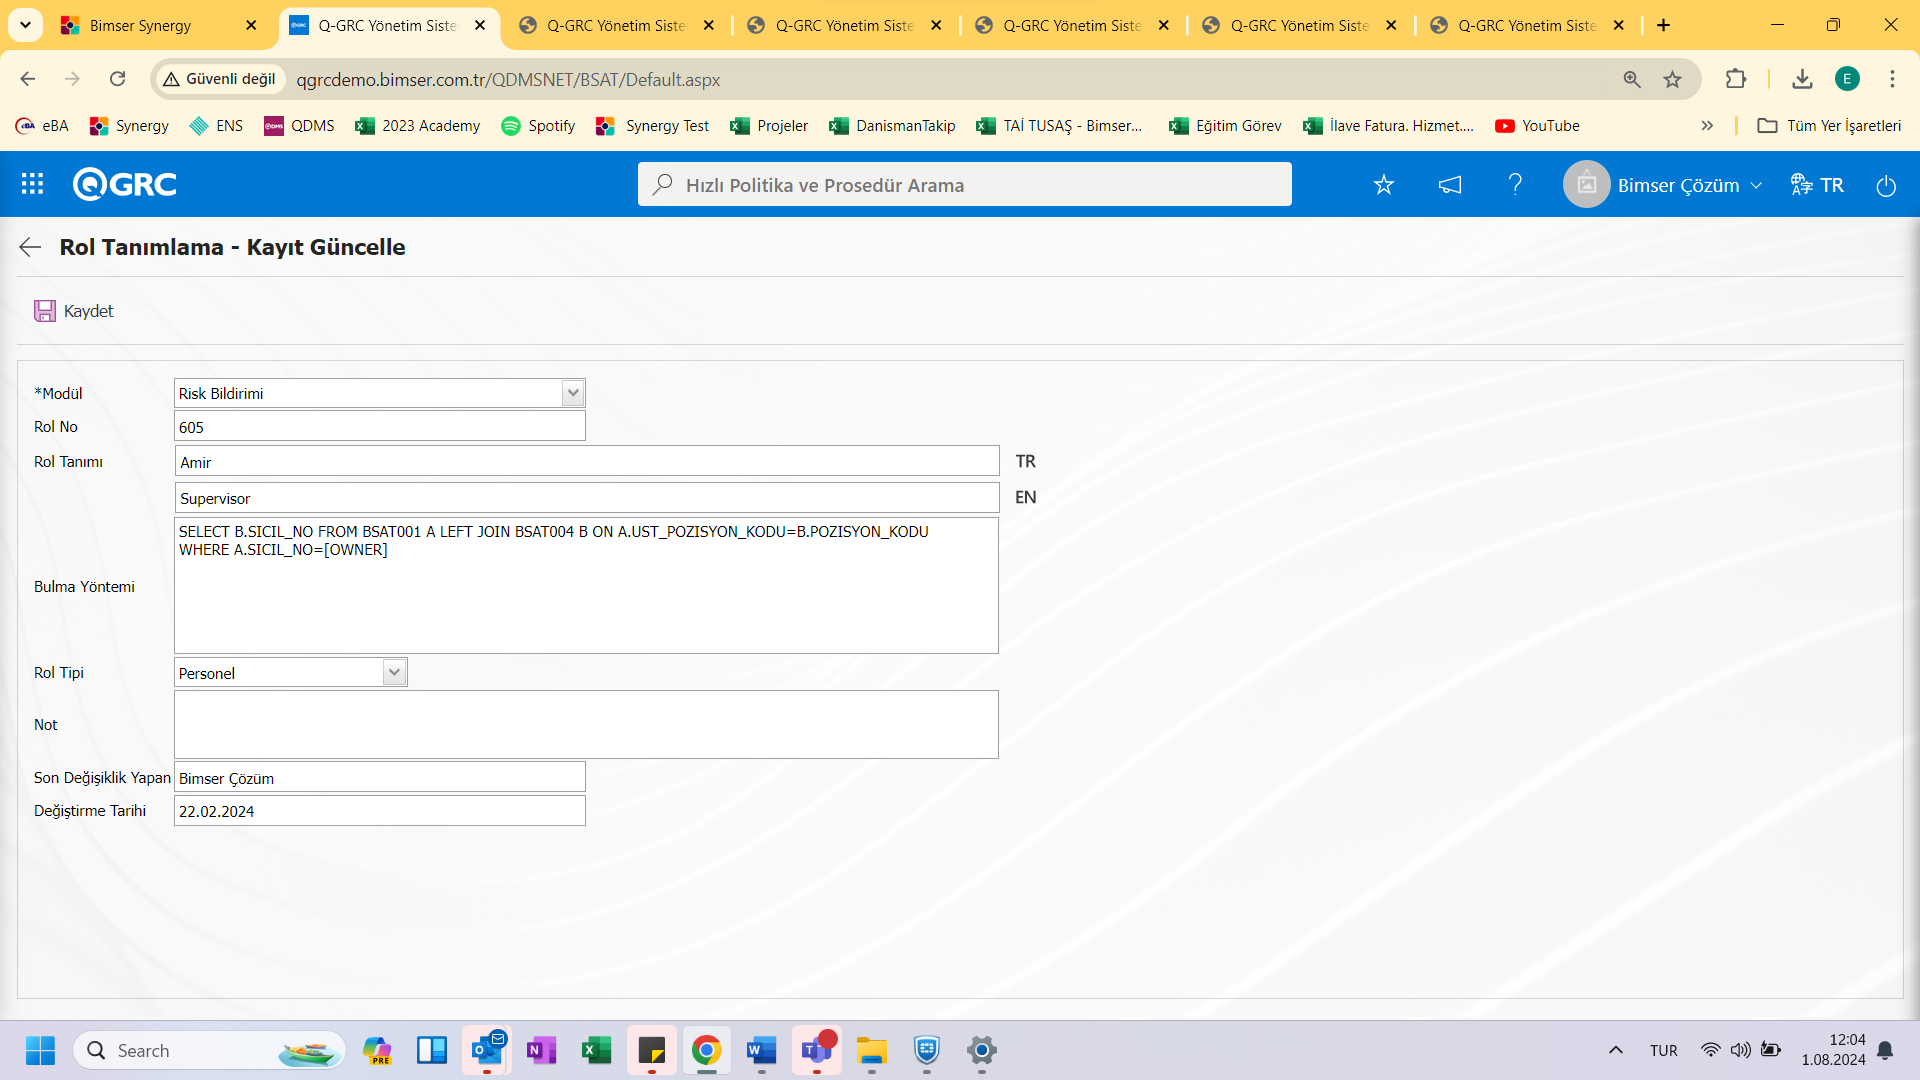
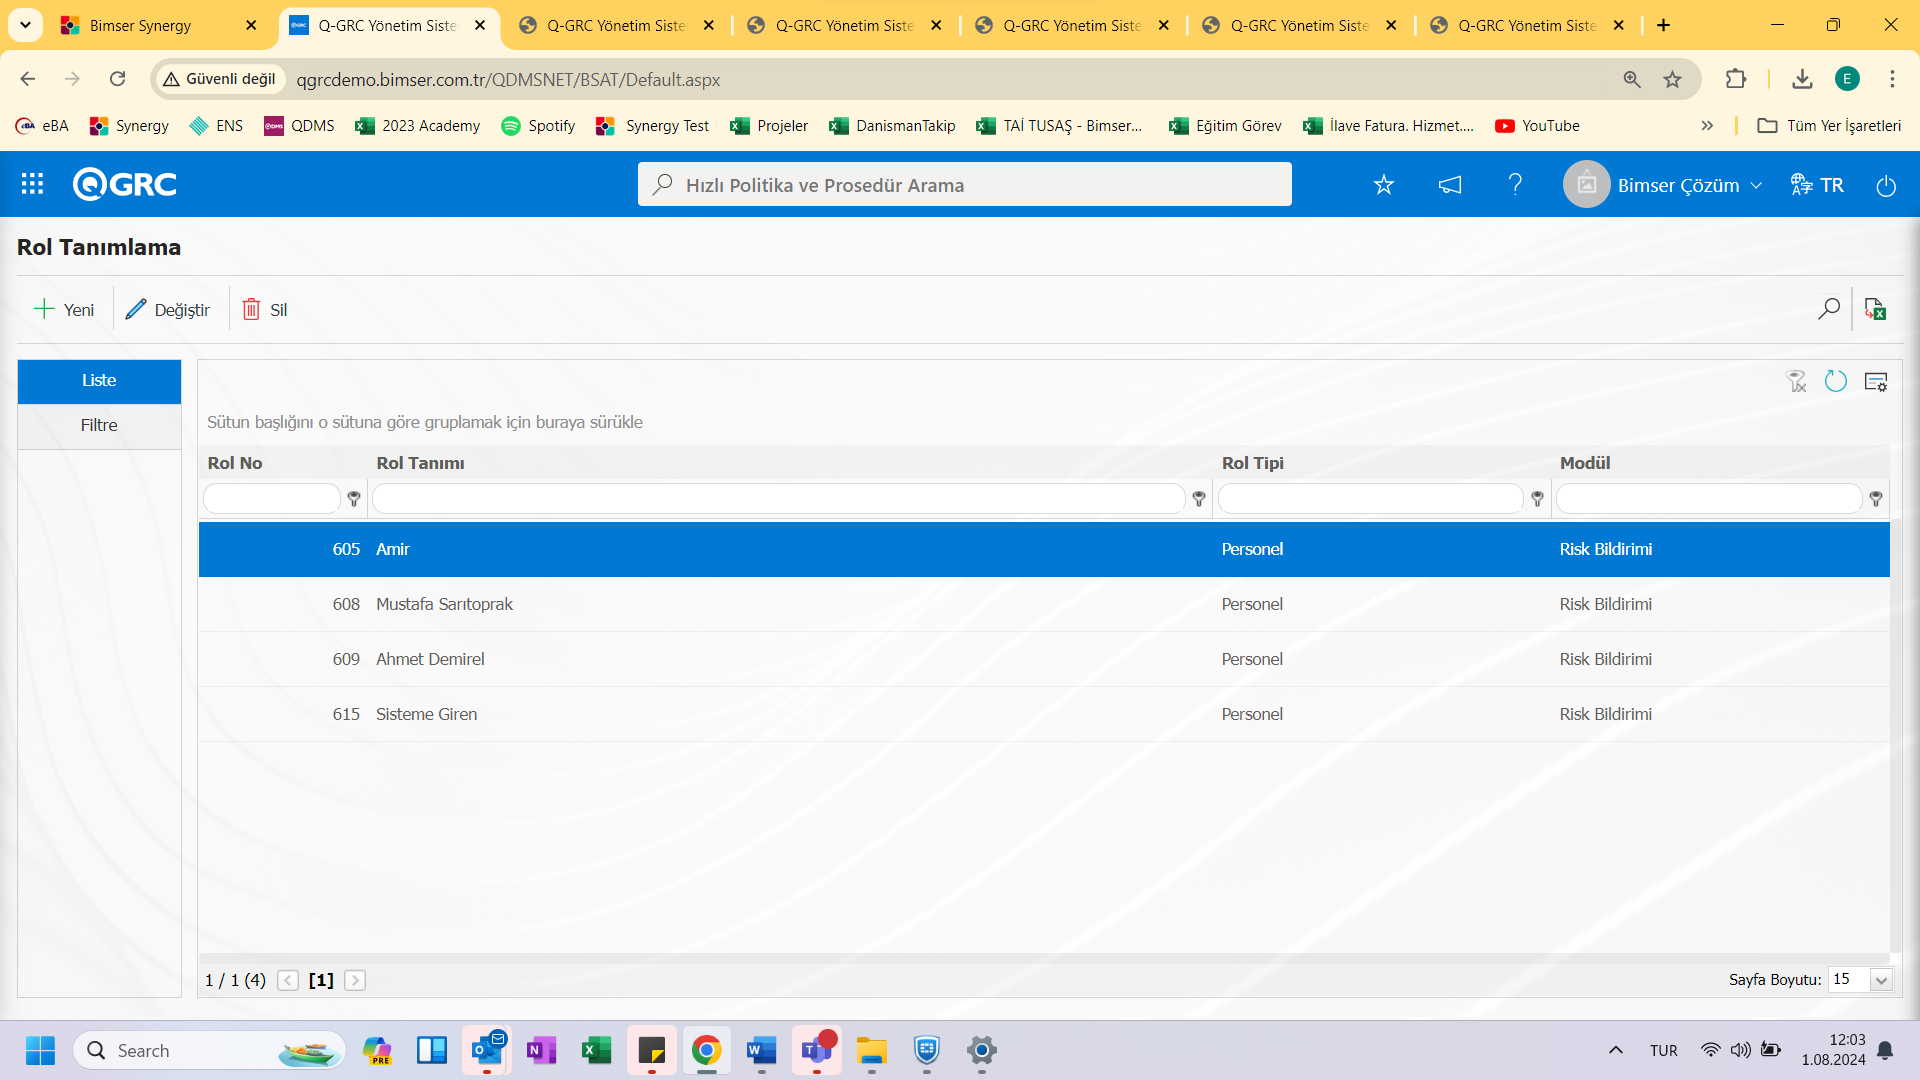
NOT: <a id="_Hlk37022118">``````</a>Flow definitions should be checked from System Infrastructure Definitions/ BSAT/ Configuration Settings/ Flow definition screen, or flows should be defined. In addition, role definitions are made for approval flows from the System Infrastructure Definitions / BSAT / Configuration Settings / Role Definition screen. Since SQL and QGRC database knowledge will be required in role definition processes, the necessary role can be requested by contacting the Bimser Technical Support team.
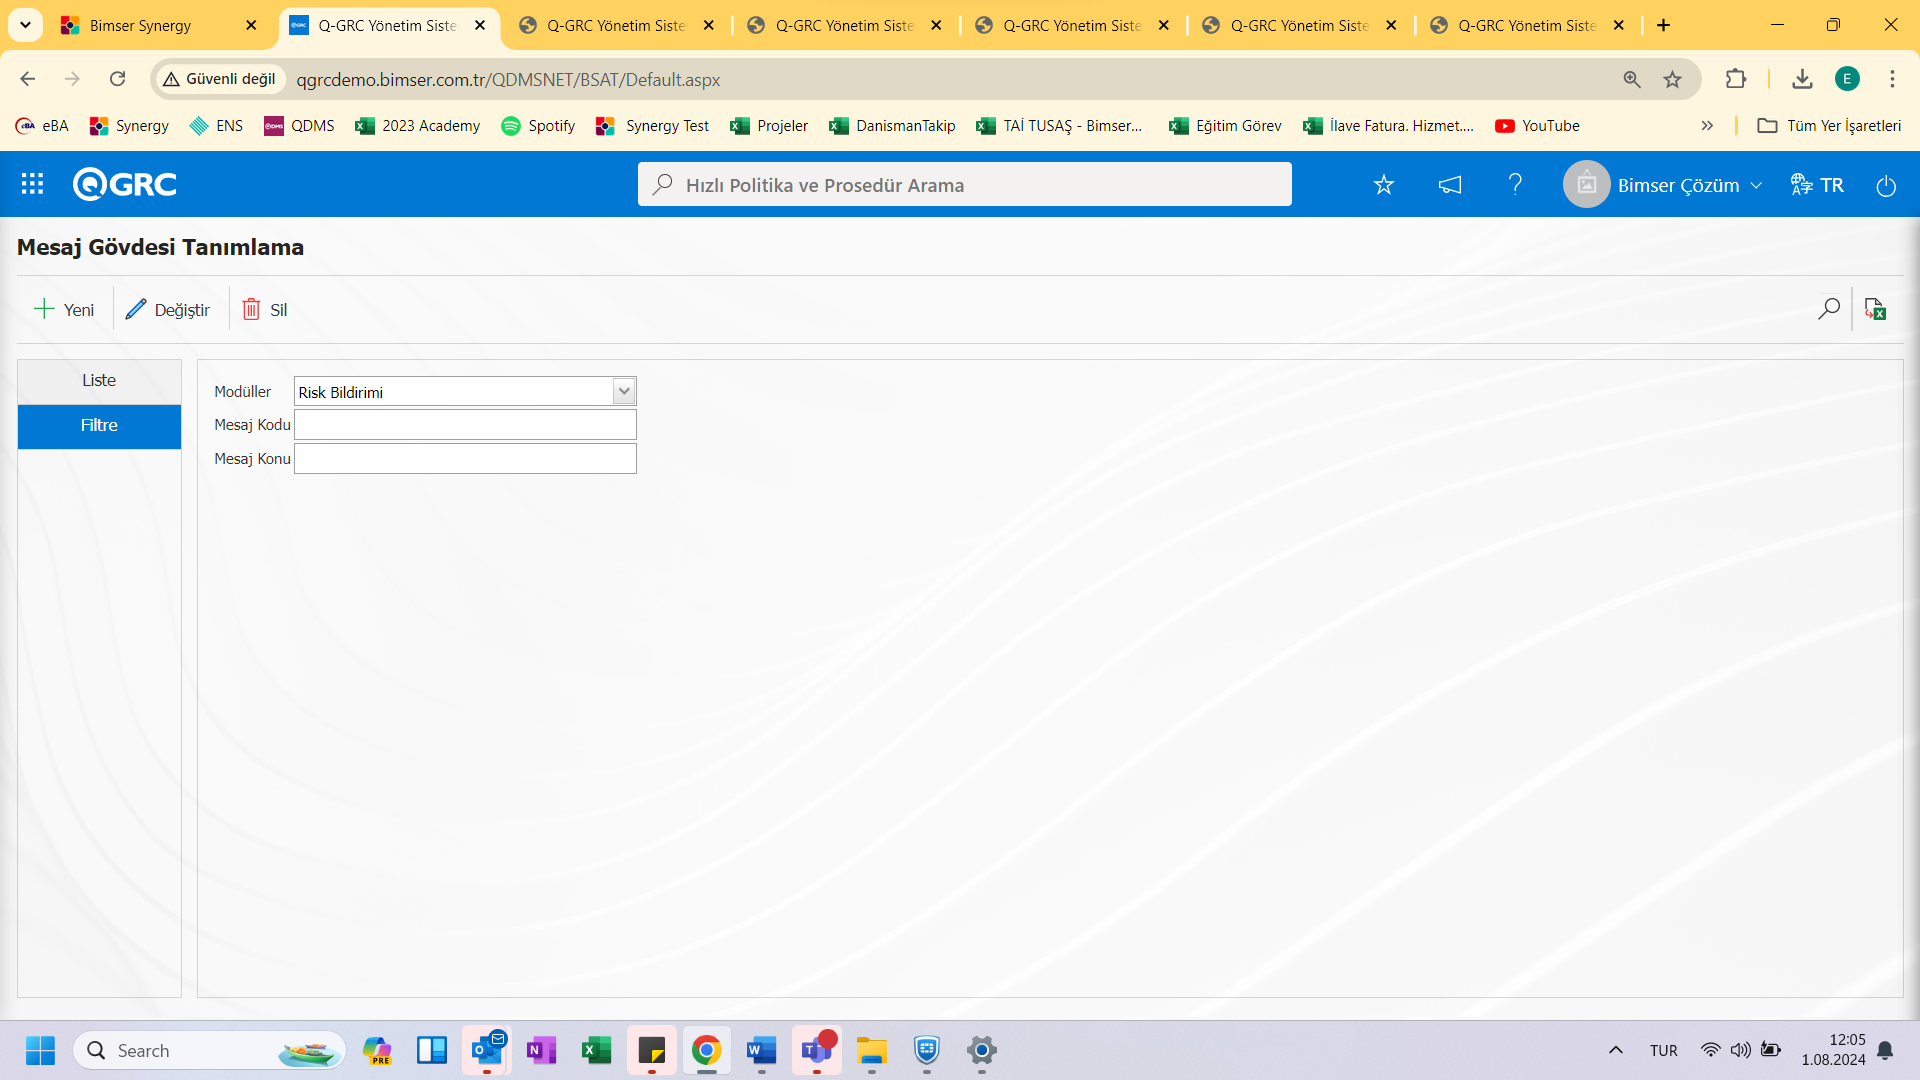
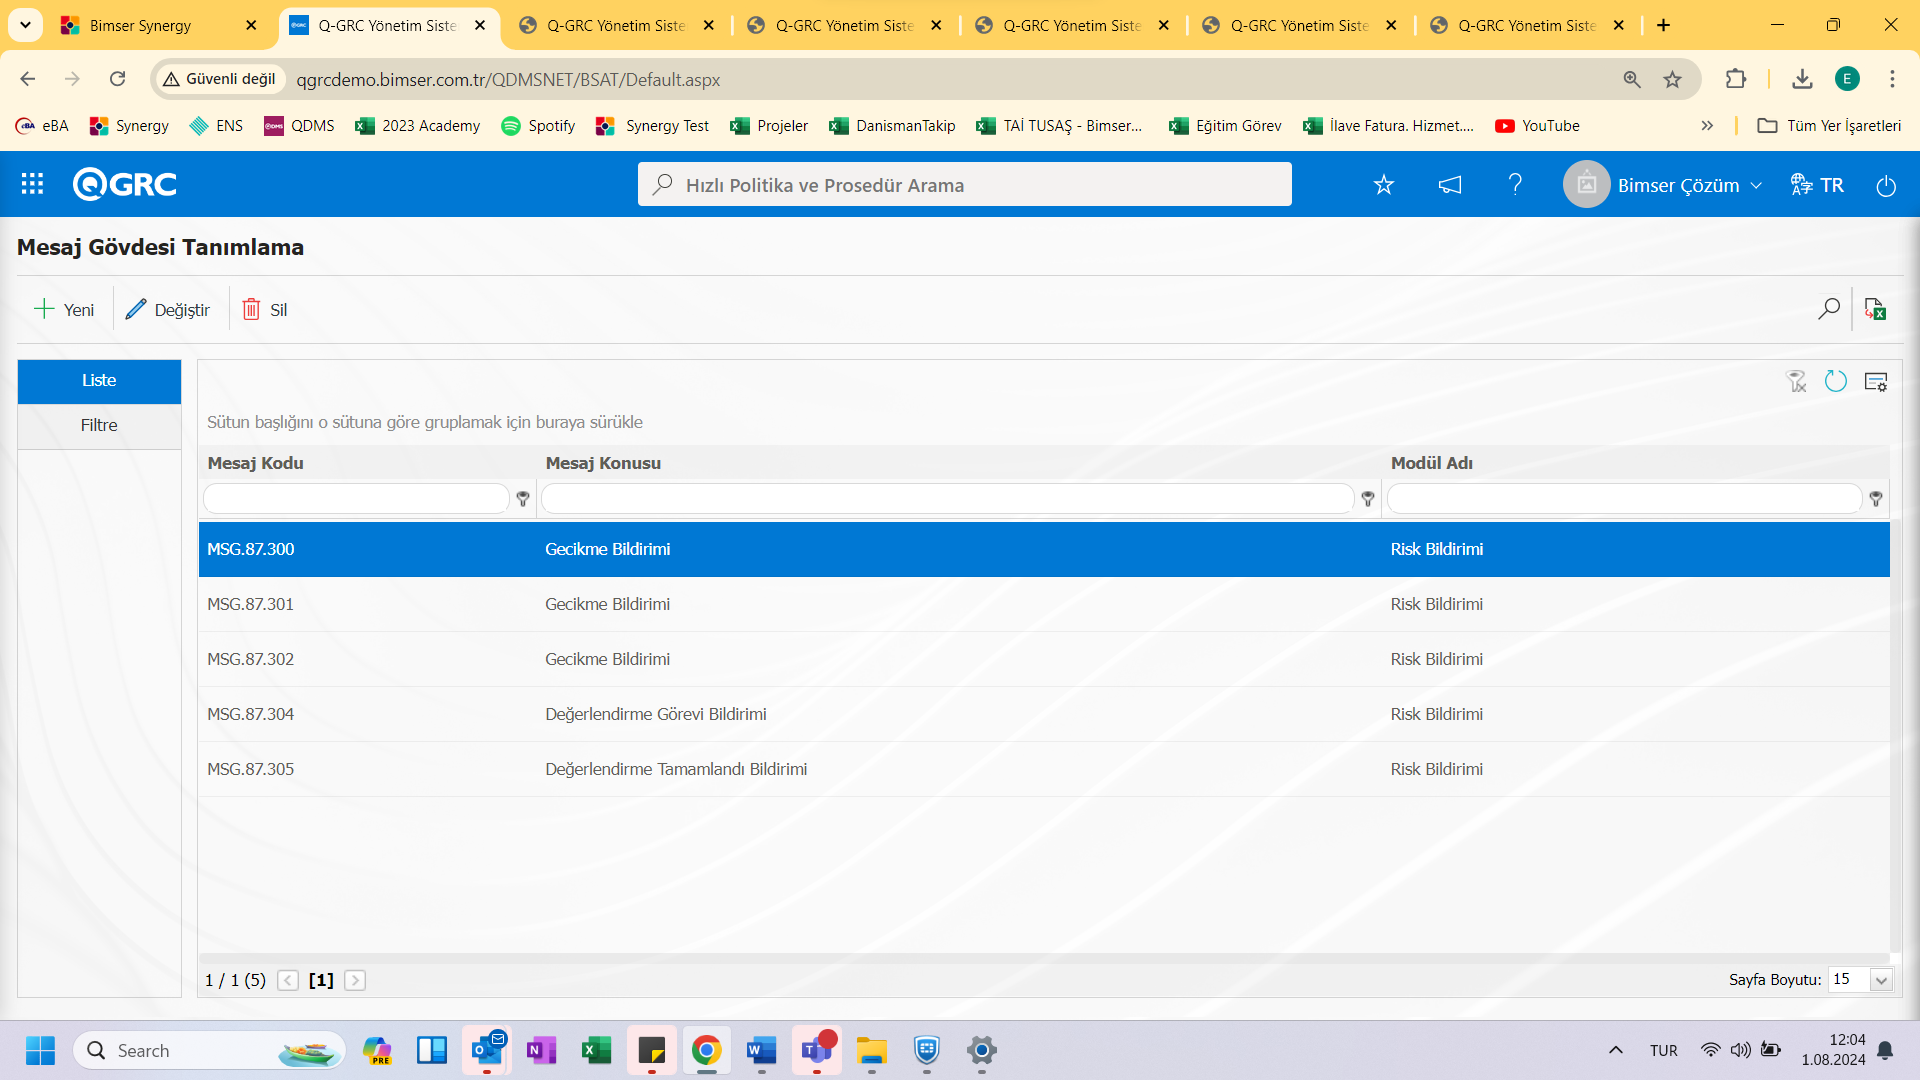
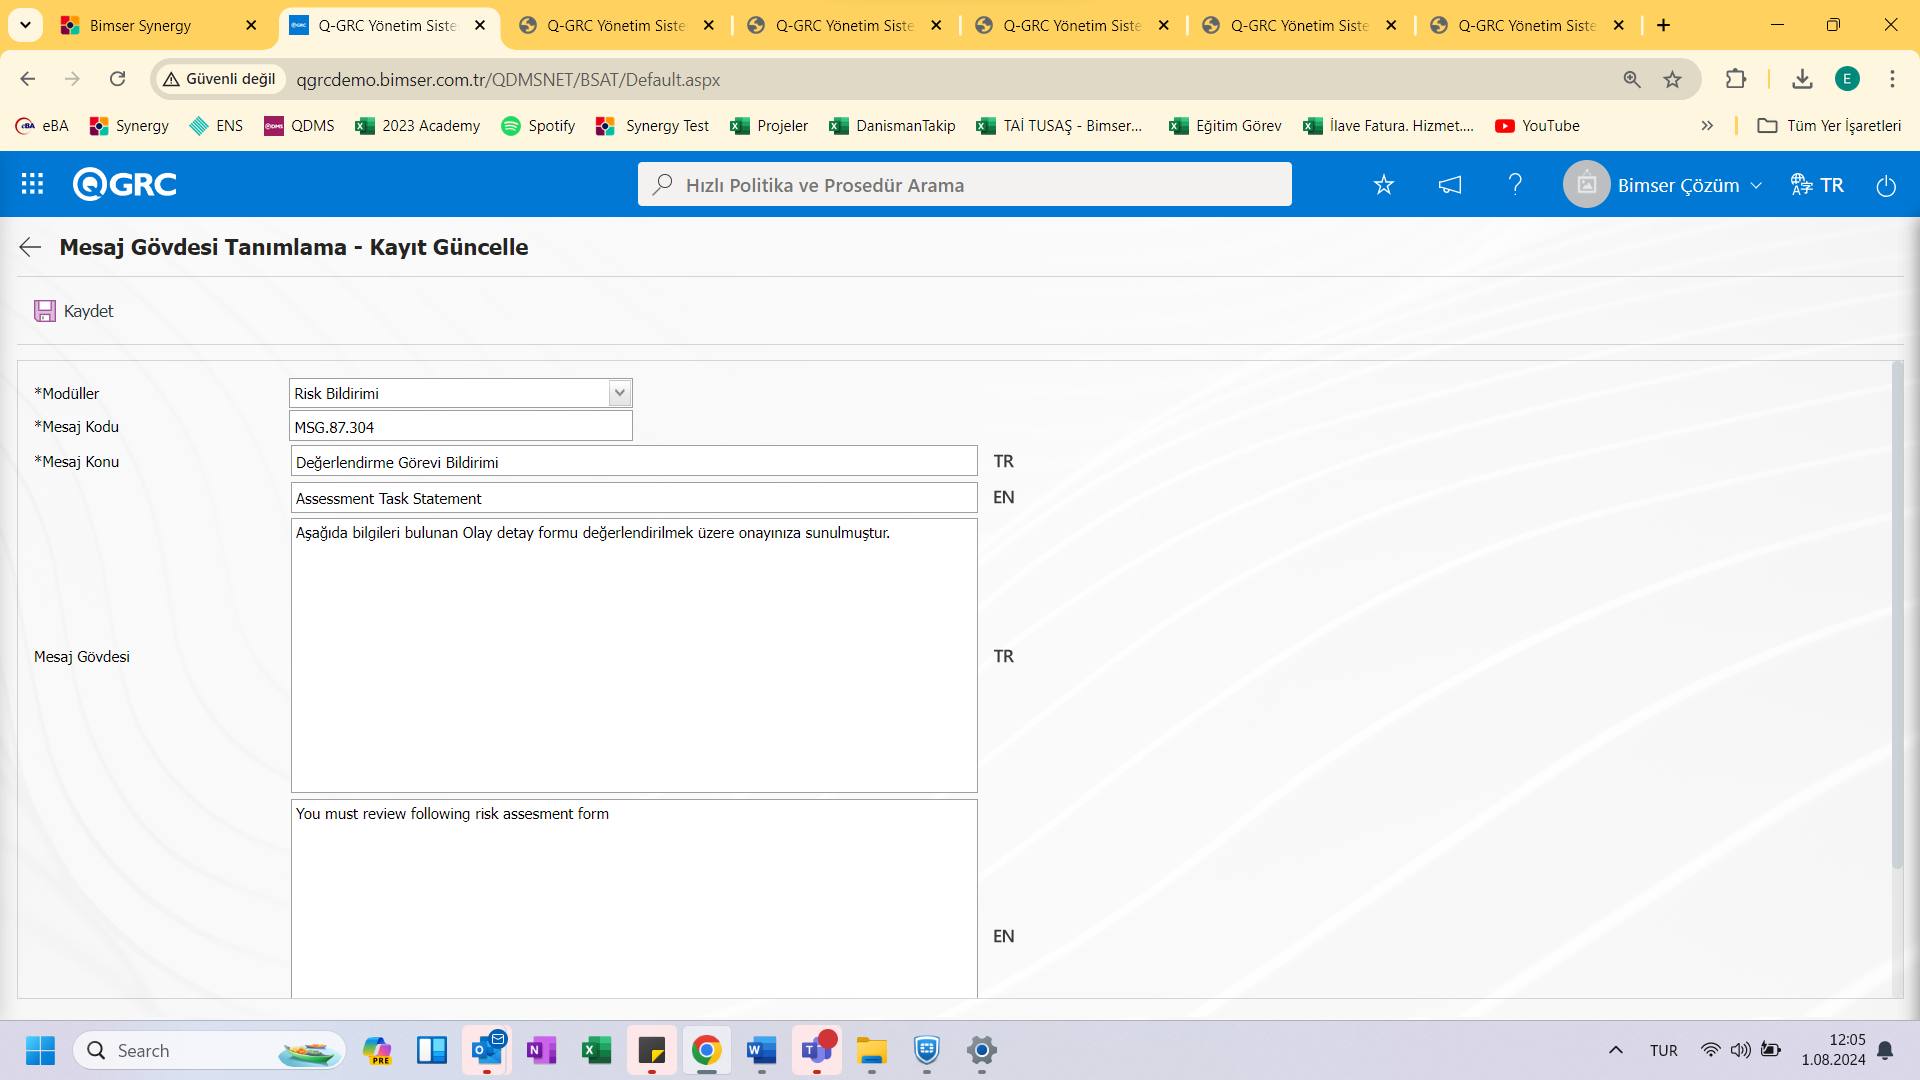
New message body definitions can be made for the module from the System Infrastructure Definitions / BSAT / Definitions / Message Body Definition screen.
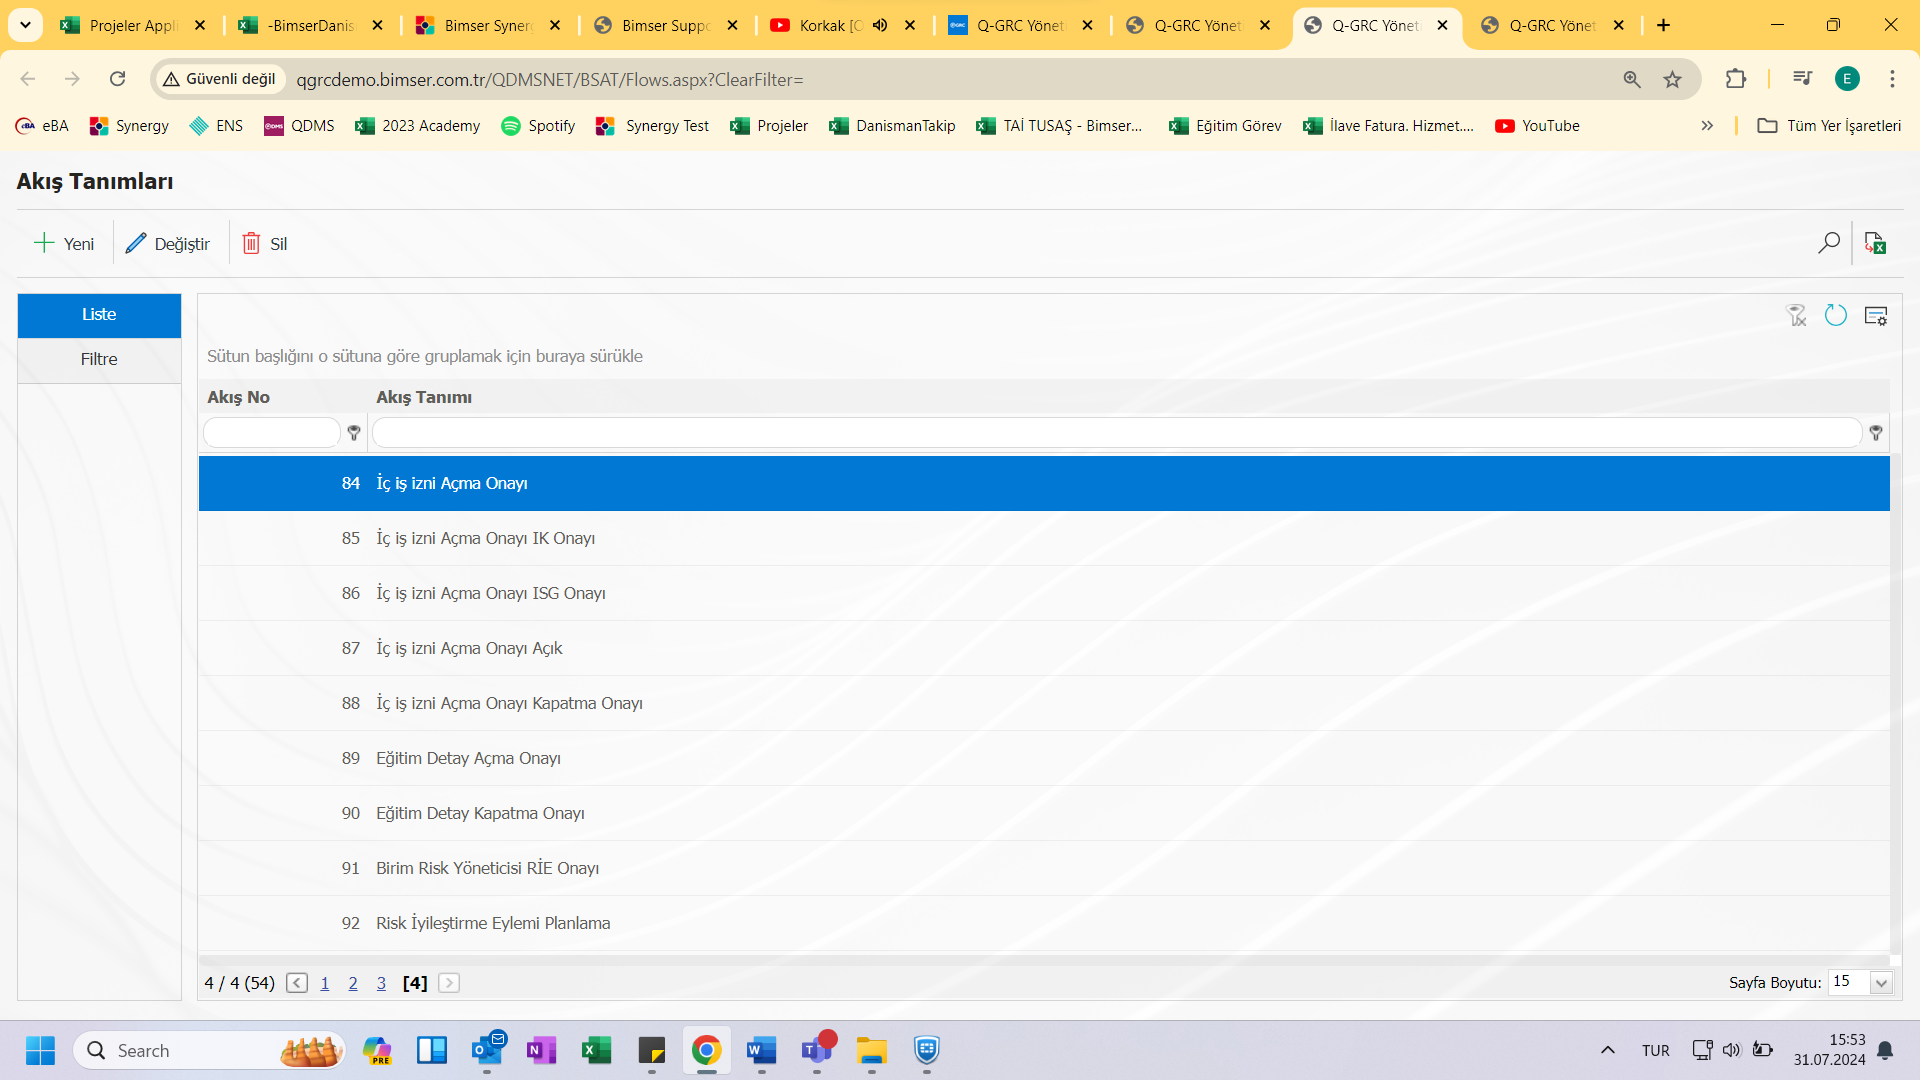
Flow definitions are made from the System Infrastructure Definitions / BSAT / Configuration Settings / Flow Definition screen.
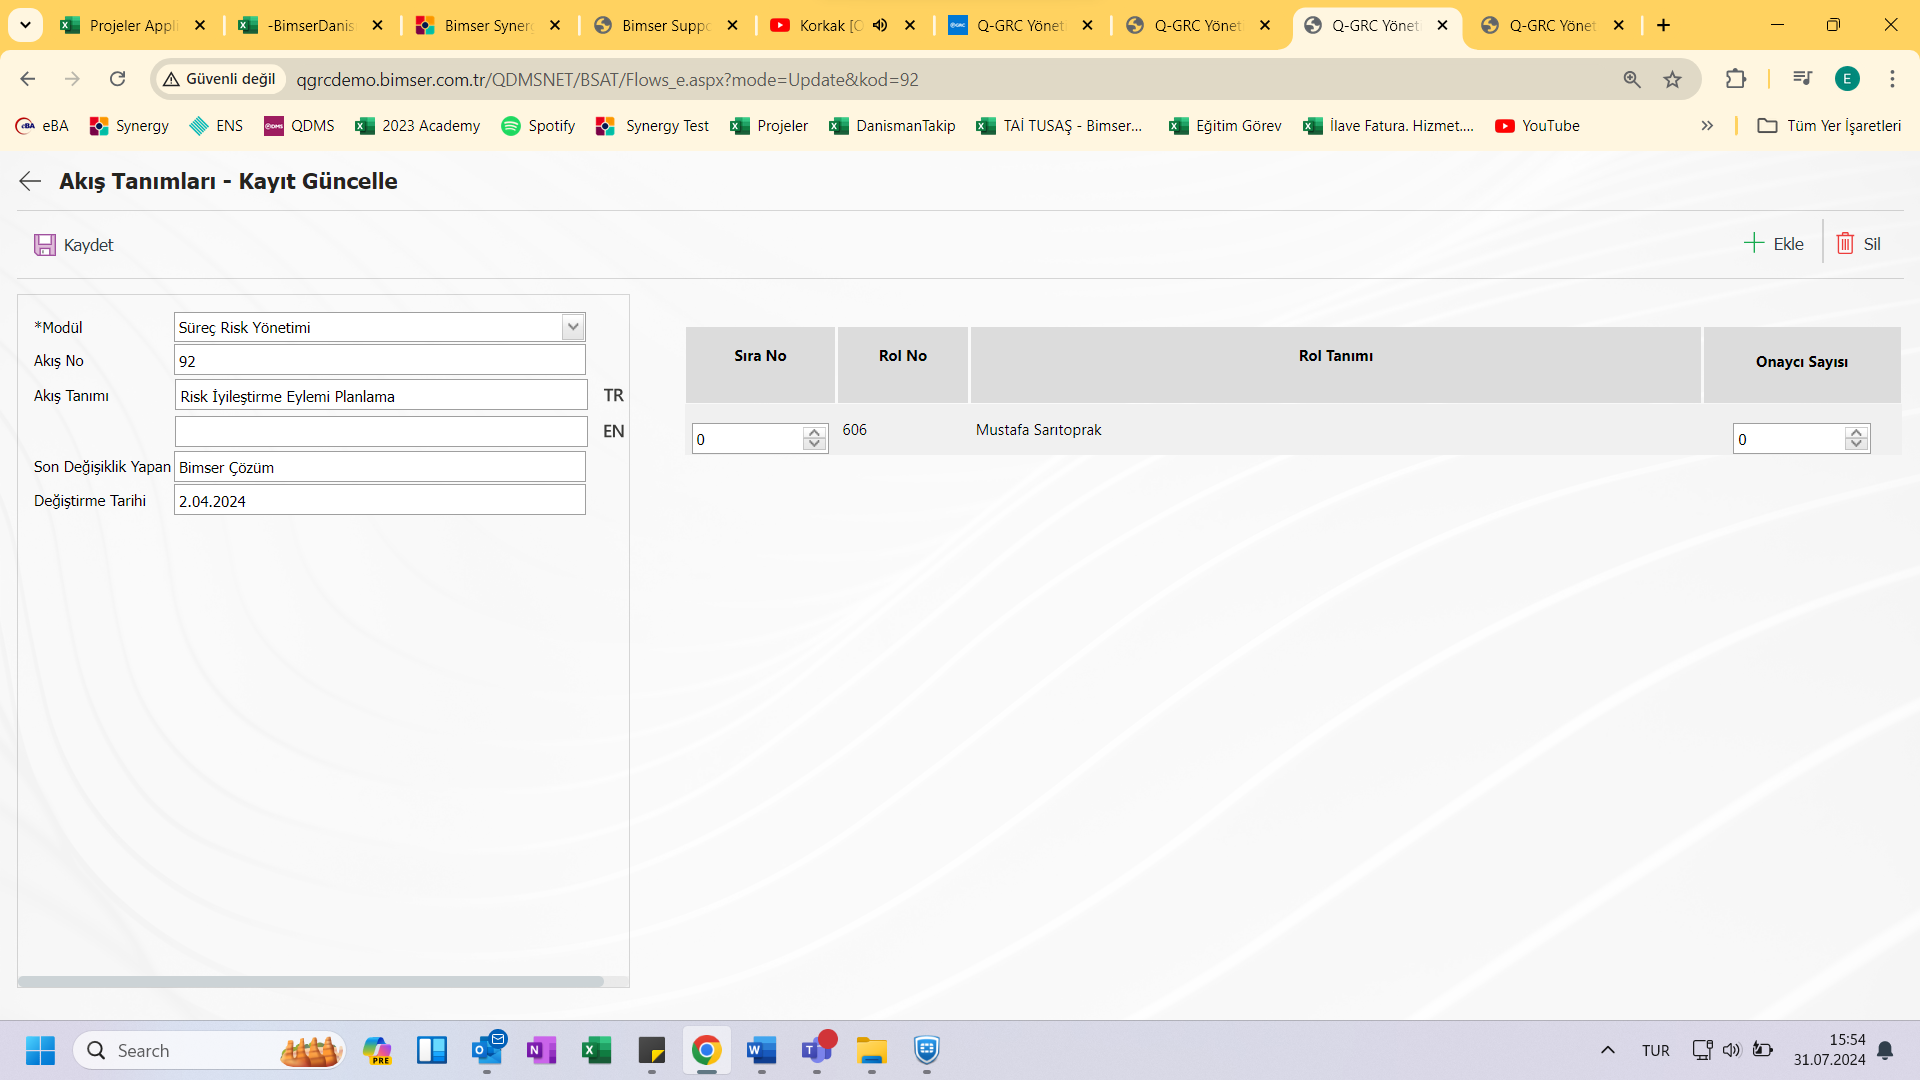
By clicking the New button, the Stream Definition\New Recording screen is displayed. On this screen, the relevant role is selected from the roles previously defined in the system. When saved with the Save button, the stream will be defined in the system. If more detailed information is requested with flow and role definitions, this request can be met with BSAT User Help Documents.
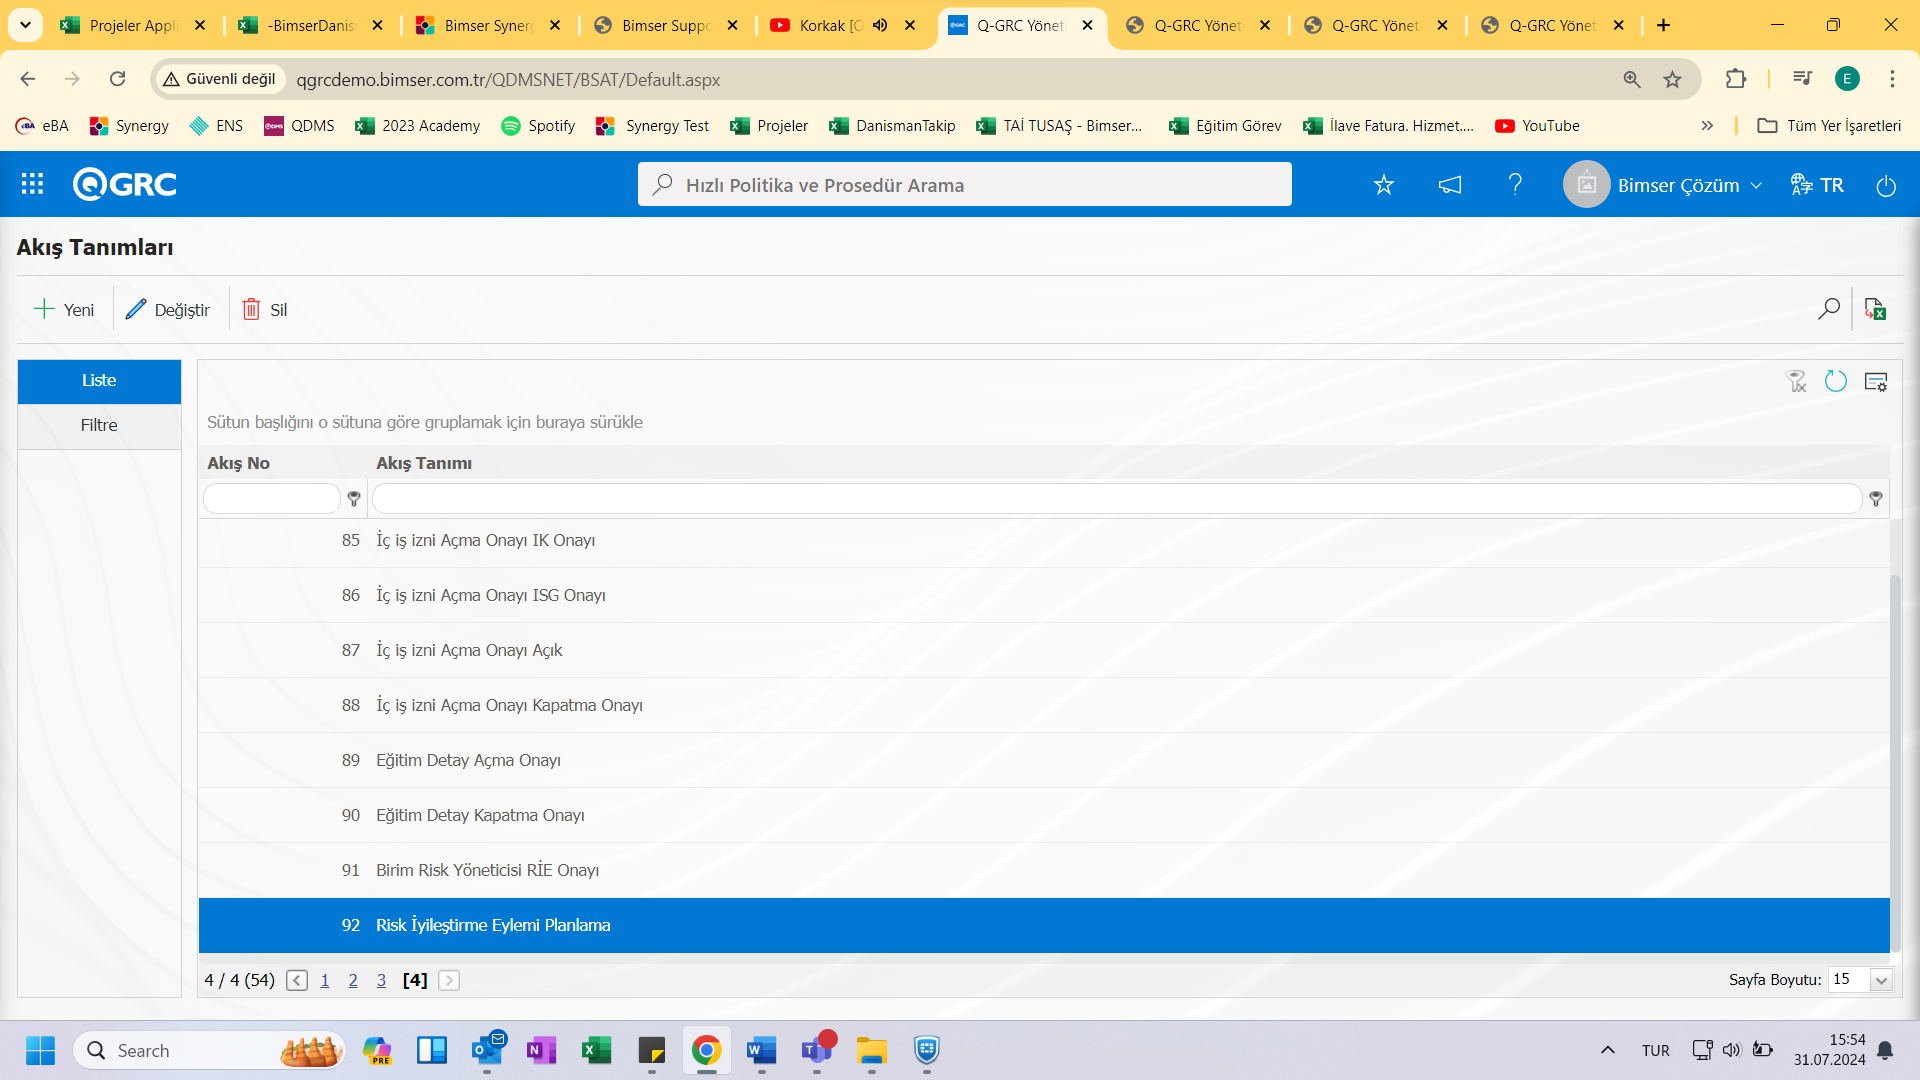
Defined flows are defined in the statuses in the Function Designer menu. When the Function Designer menu is opened, two different action buttons called Status and Buttons will only be active for Risk Assessment Form Definition No. 3 and Risk Assessment Detail Functions No. 4, since the approval flow cannot be determined in other functions.
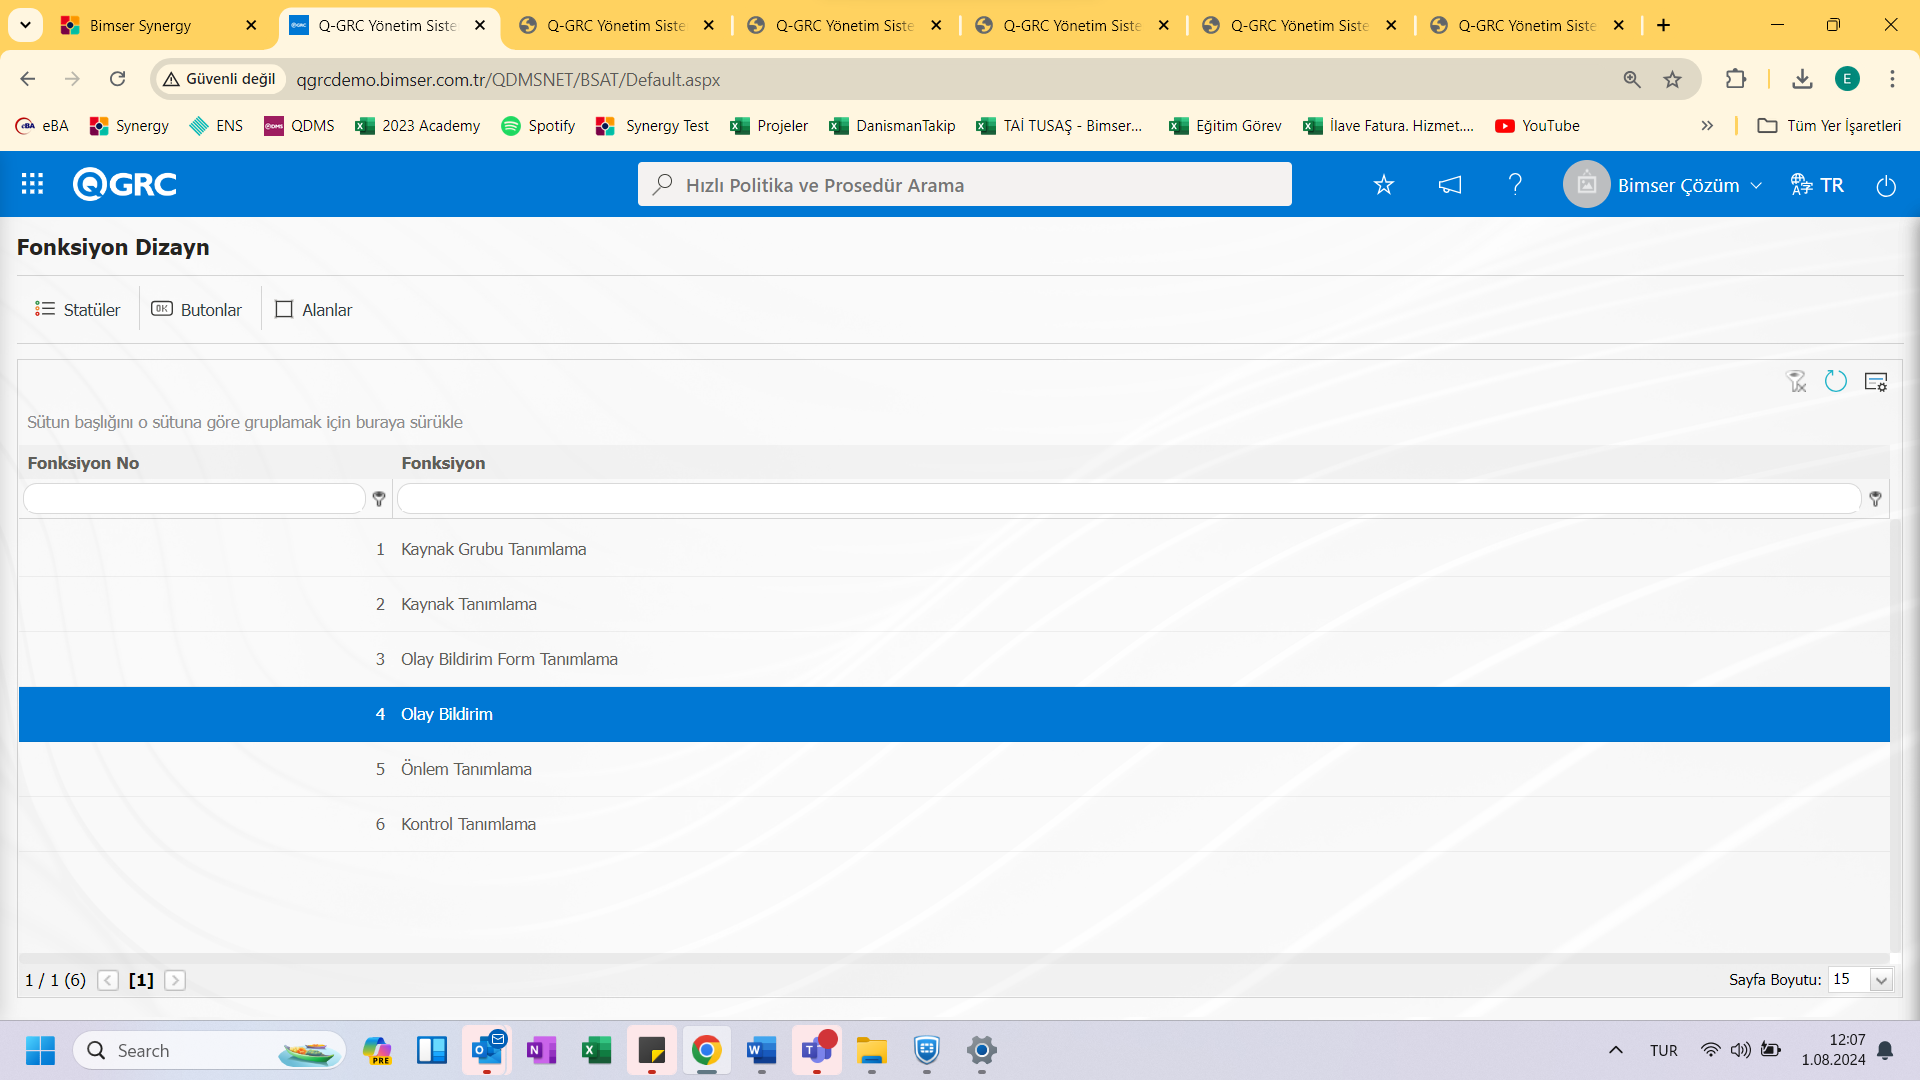
With the help of the buttons located in the Ekrandaki;
: Status is defined.
: The button is defined.
: Fields are associated with functions.
Function from the Designer menu Statuses are defined with the (Statuses) button.
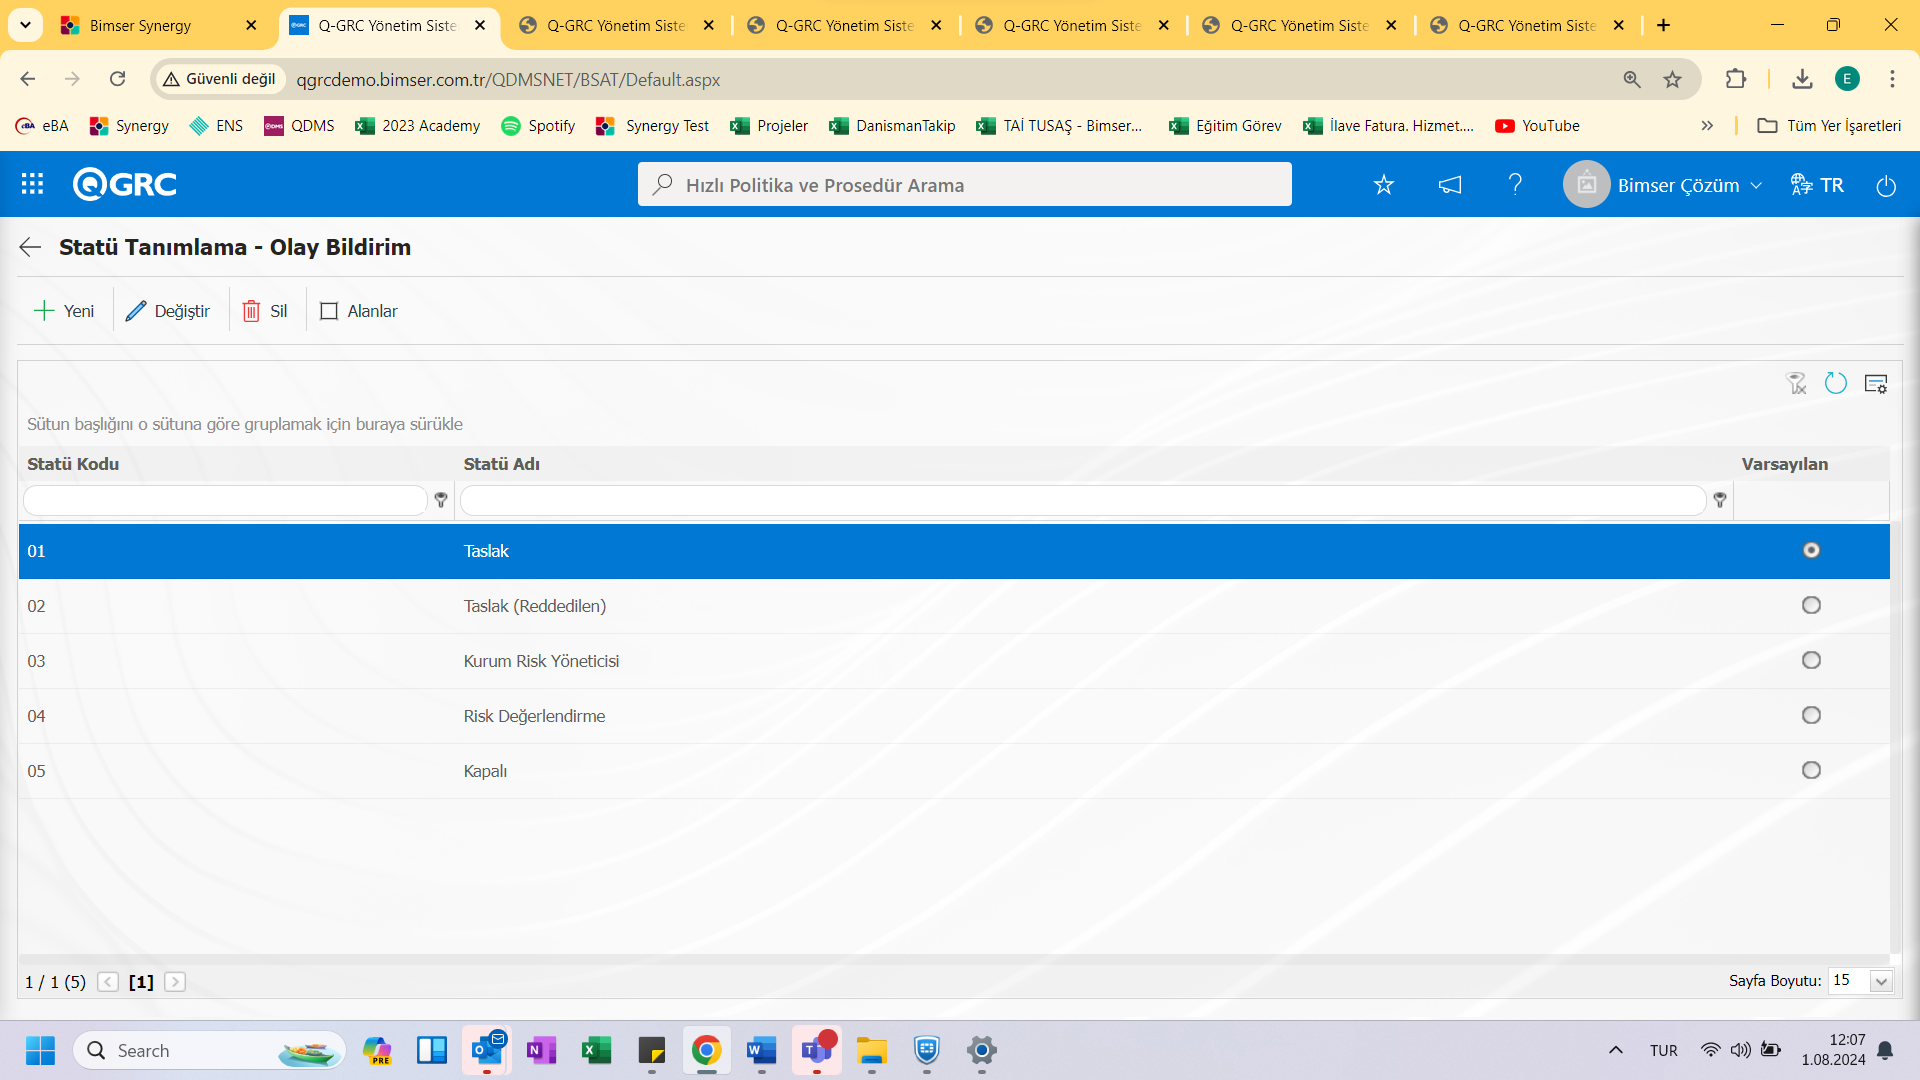
With the help of the buttons on the Ekran;
: A new status is defined.
: The status information selected in the list is updated.
: The status information selected in the list is deleted.
- : Return to the previous screen.
With the new button, you will be taken to the new status definition screen.
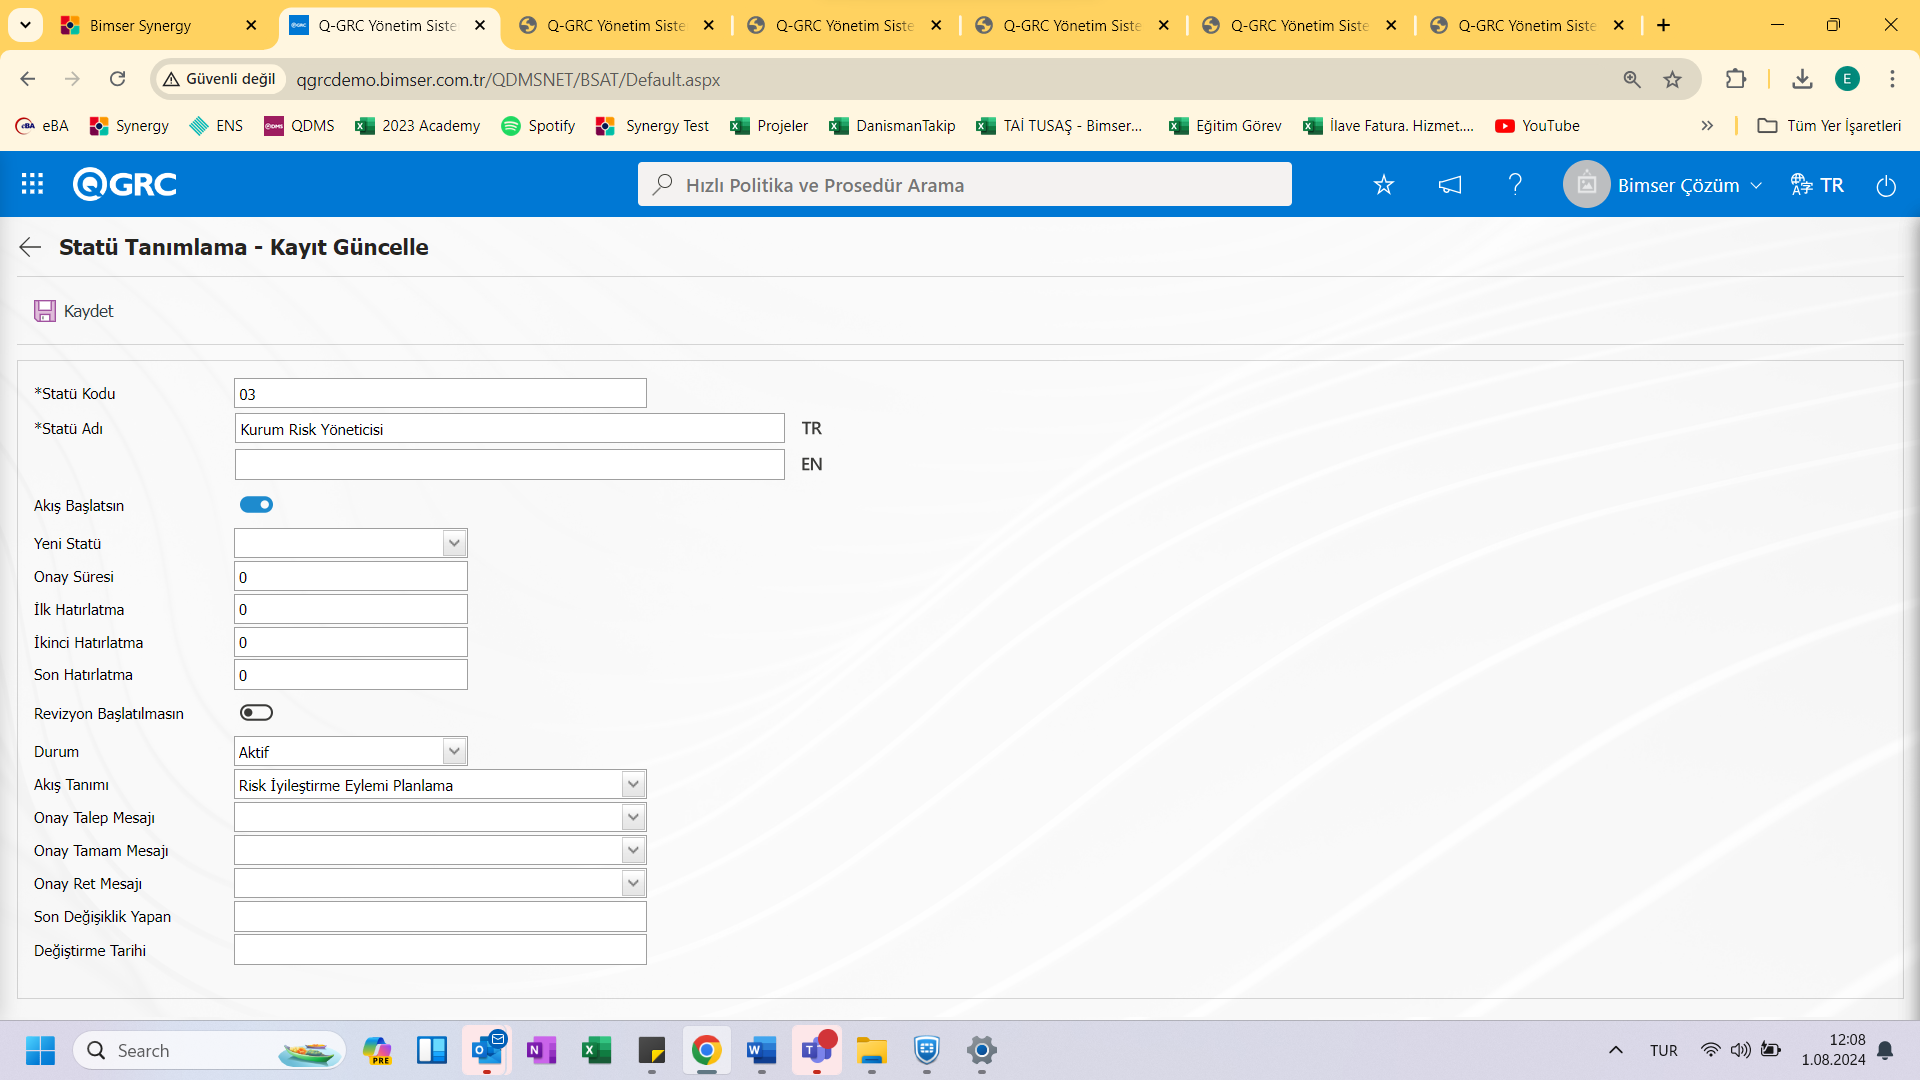
On the screen that opens, the status code, status name, whether the flow will be started or not, new status, status, flow definition, approval request message, approval complete message and approval rejection message are entered and saved.
From Function Designer The (Buttons) button defines the buttons to be used in statuses.
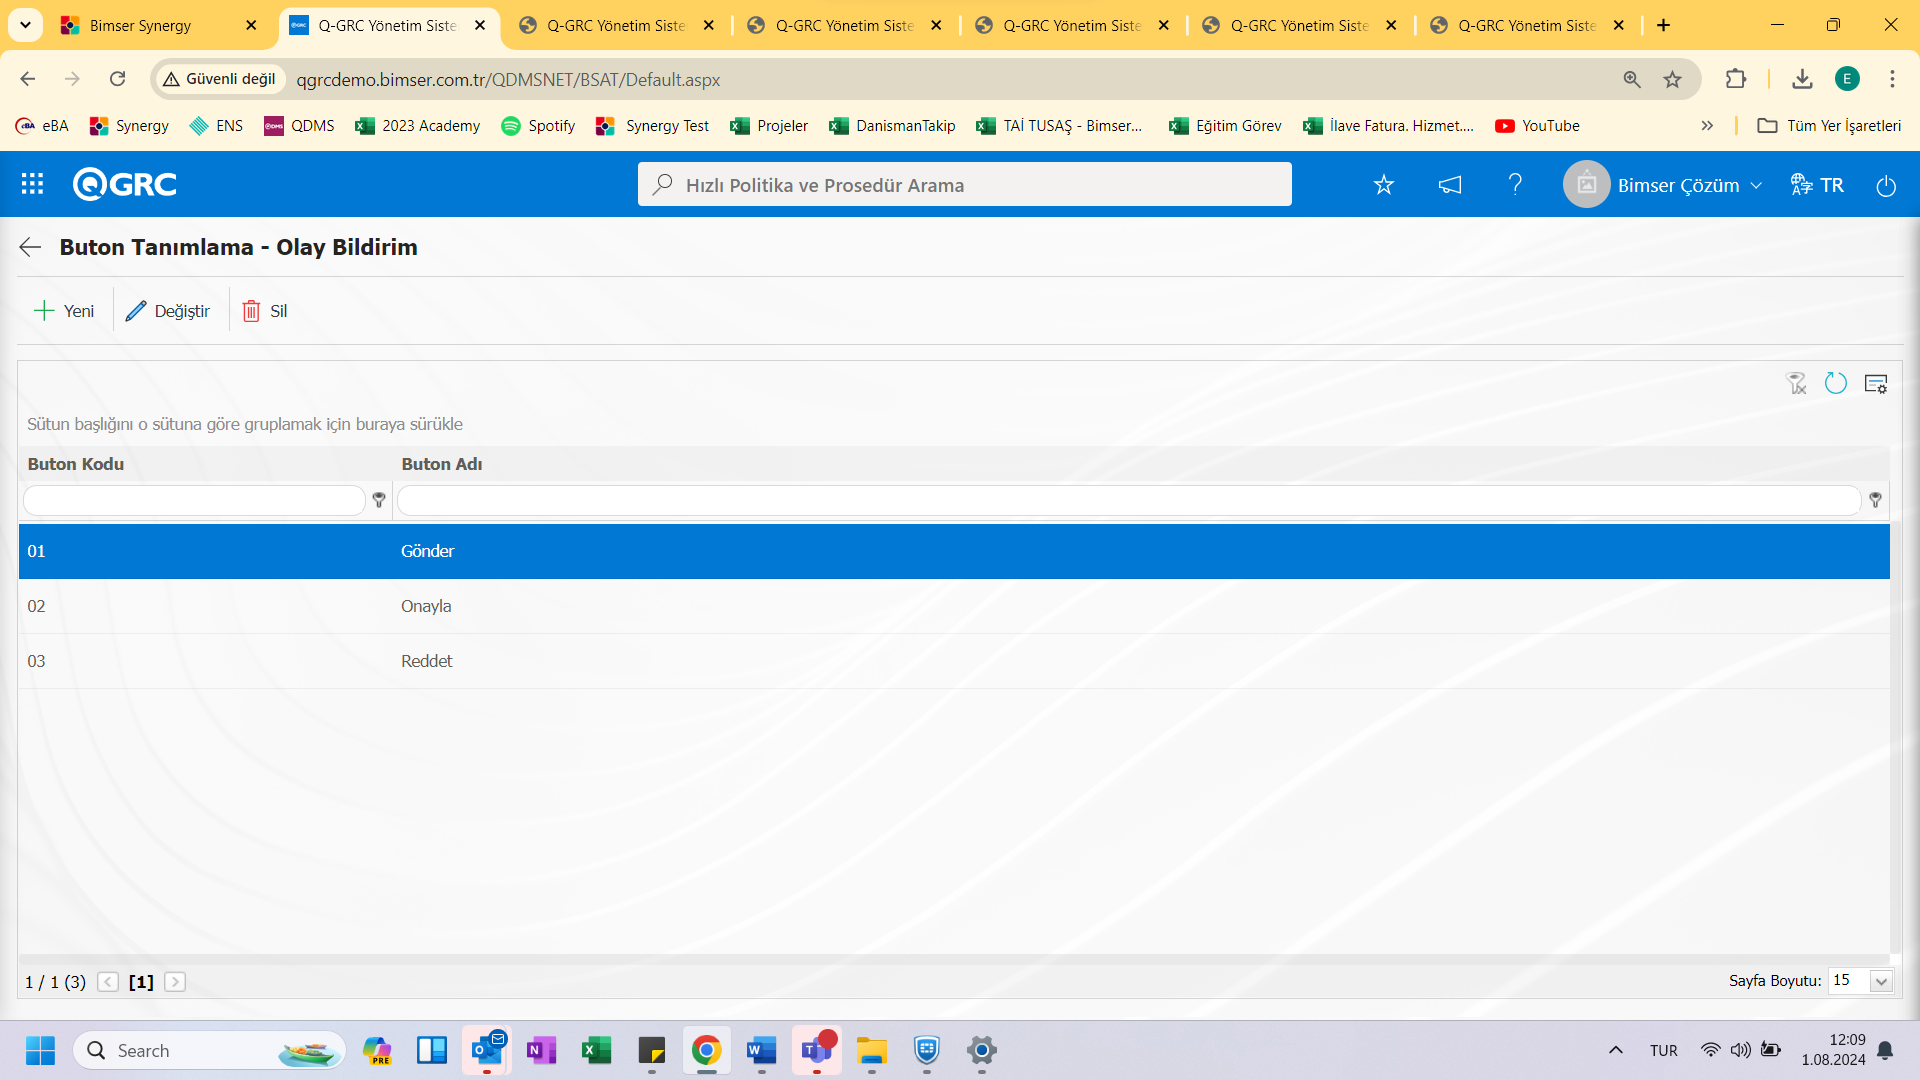
With the help of the buttons on the Ekran;
: A new button is defined.
: The selected button information in the list is updated.
: The selected button in the list is deleted.
- : Return to the previous screen.
With the new button, you will be taken to the new button definition screen.
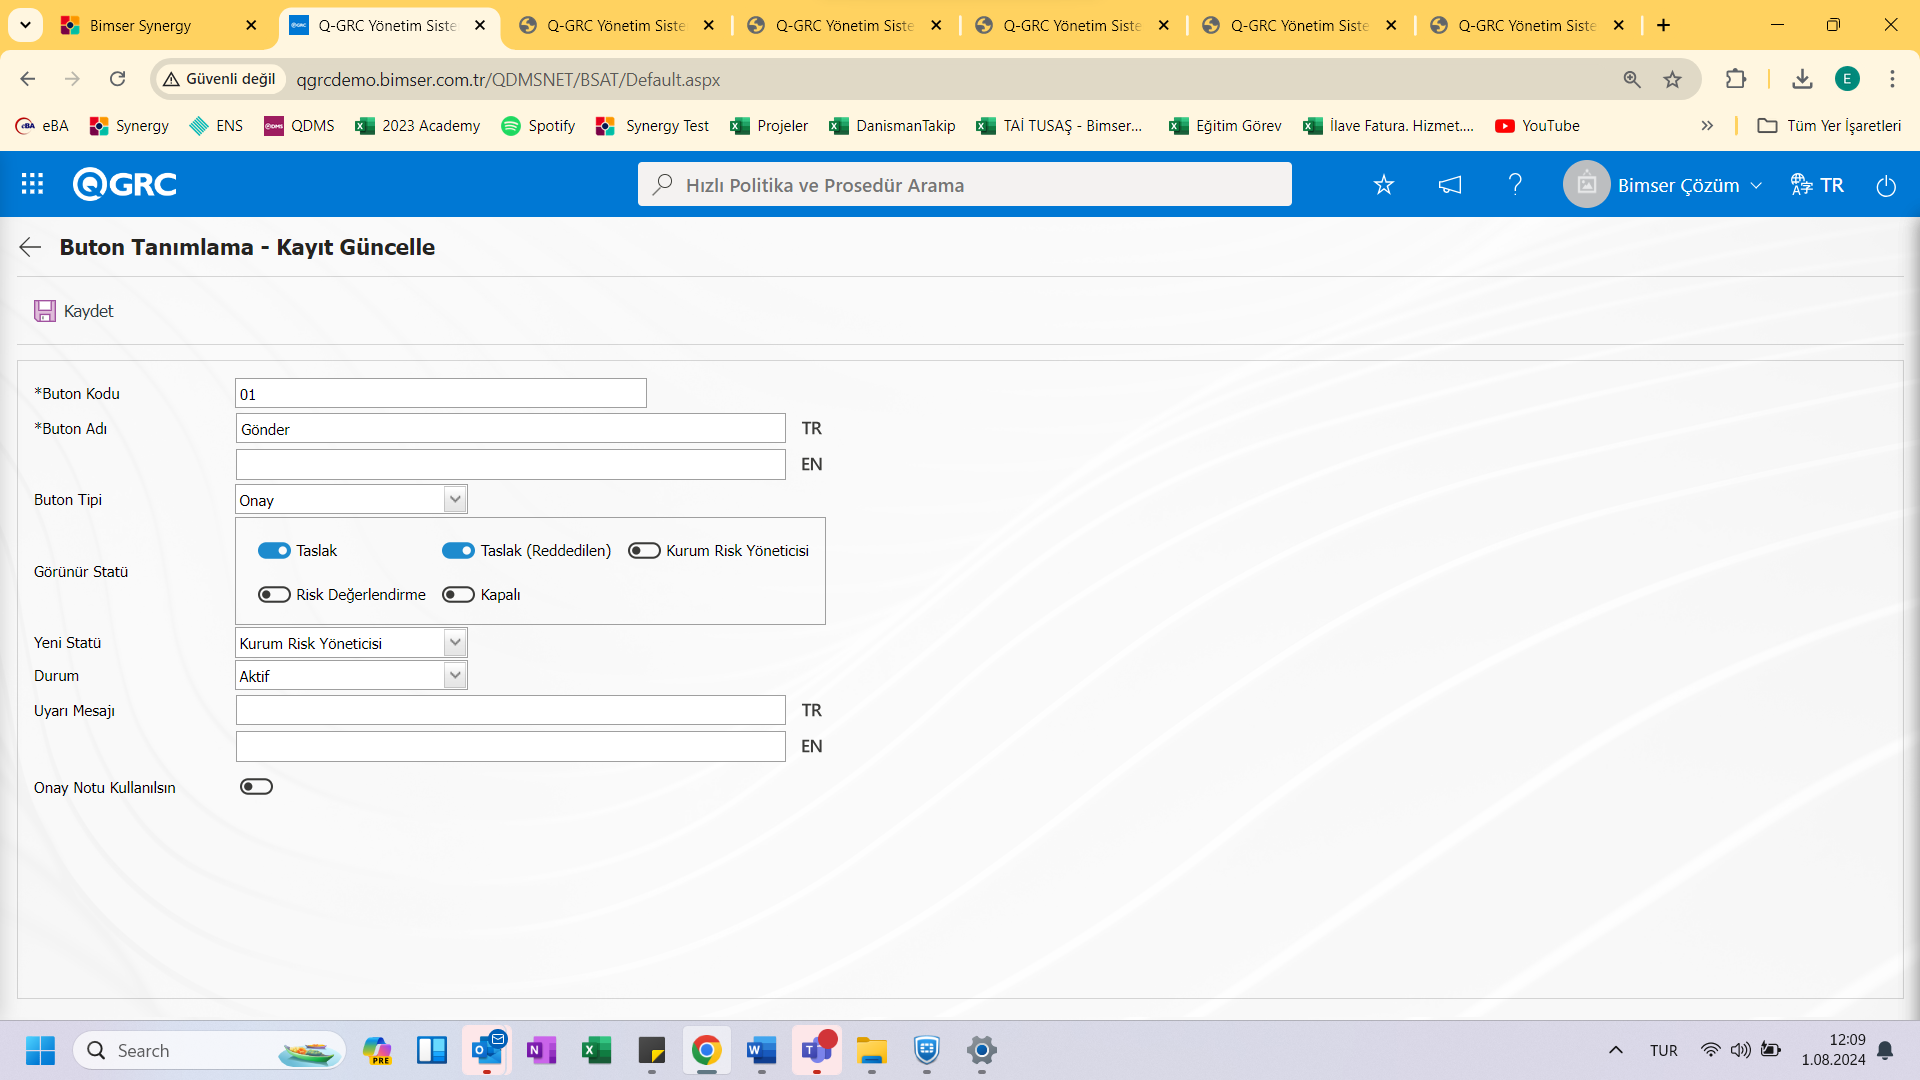
On the screen that opens, the Button Code, Button Name are determined and the button type is selected. Visible Status, New Status and Status are selected. Once the required fields are filled in is saved with the (save) button.
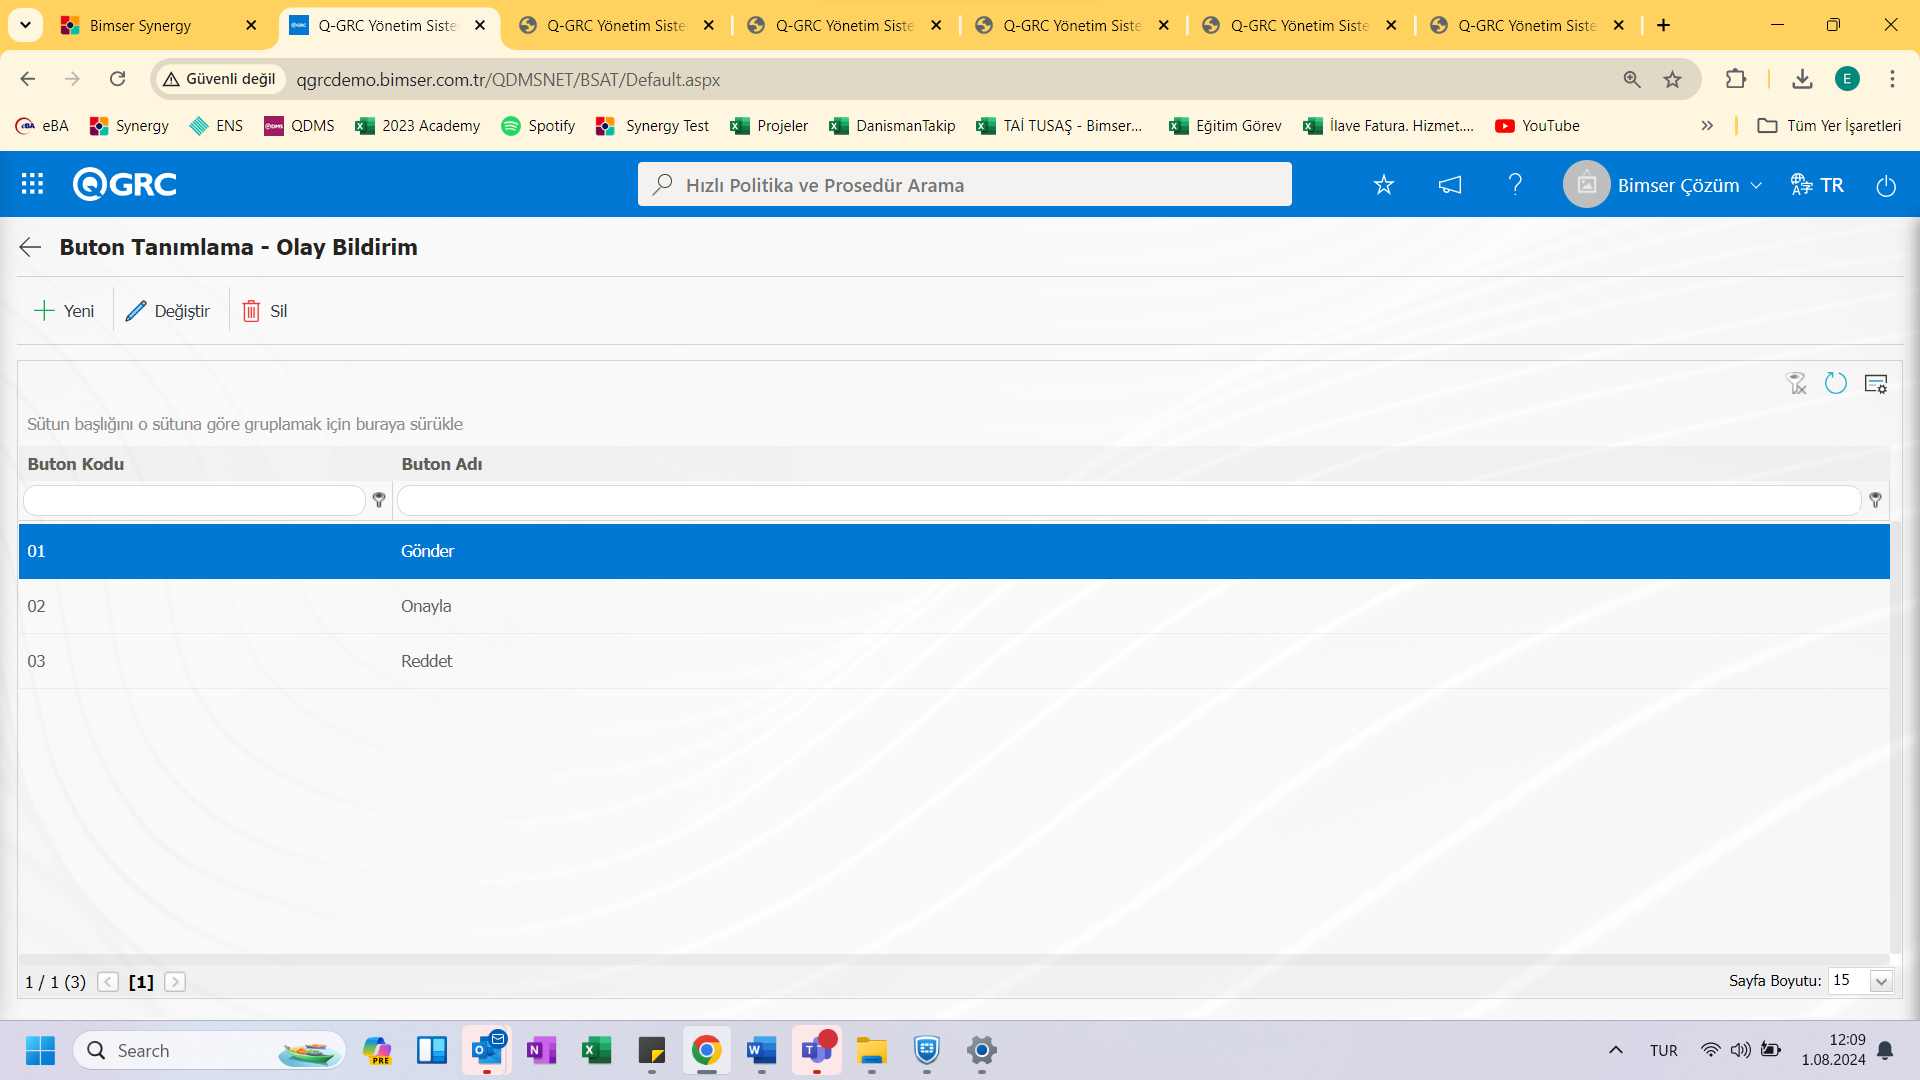
NOT: Since there is no main form structure in the Risk Notification module, there is no need to define status and button for function 3.
<a id="_Toc173418834">``````</a>5.2. GRC Management system/Risk bildirimi
It is the part where Activity Groups, Activity, Risk Form, Risk Form Details are defined, Reports and Graphics are displayed.
<a id="_Toc173418835">``````</a>5.2.1. All Bildirimler
Menü Name: GRC Management system/Risk statement/ All Notices
From the All notifications screen, you can view the existing records opened and start a new record, start a revision, track old revisions, revision changes.
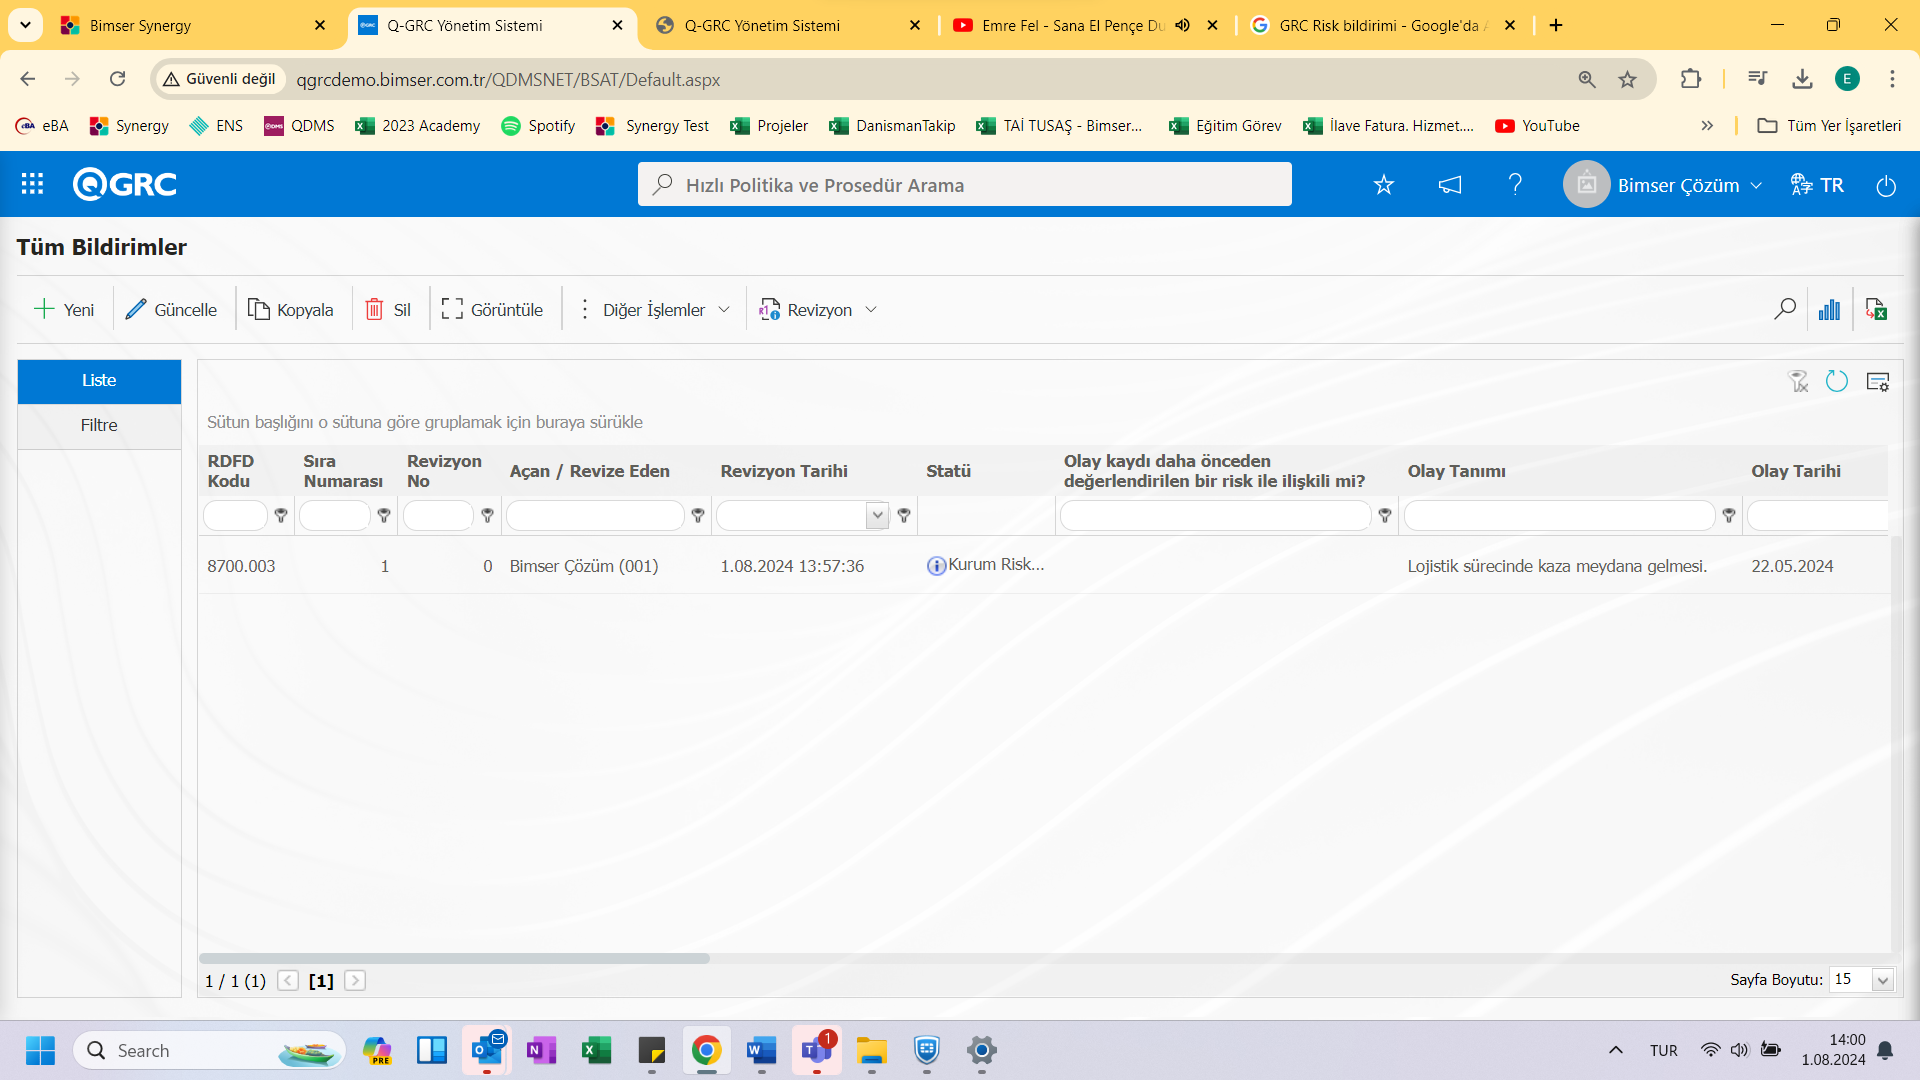
With the help of the buttons located in the Ekrandaki;
: A new risk disclosure form can be defined.
: Used when changes are desired to be made to the existing Risk Notification form.
: Used to delete the selected notification form in the list.
: Used to create a new form by copying the risk disclosure form.
: The selected risk detail form information is displayed.
: Template download and template upload operations are performed by selecting the sub-buttons of this button for changing the sequence number and uploading bulk forms.
: Revising a selected form, viewing its previous revisions, and viewing revision changes are performed from the sub-buttons of this button.
: Used to search with the filter property.
: Used to export risk statement form definitions to Excel.
<a id="_Hlk37149783">``````</a>Note: After the adaptation studies, existing Risk Notification Forms can be transferred to the system in bulk. For this reason, field definition, etc. If it is decided that the system is ready for use after the processes are completed, the download template and upload template button appears under the Other operations button on the Risk notification Form Detail screen of the users determined as administrators in this module in the BSAT>Configuration Settings>Administrator Definition menu. The template is automatically generated based on the fields defined in the system. With the template download button, the system downloads the created template to the computer. When the relevant template is filled in by the users and uploaded to the system with the template upload button, all risks are transferred to the system on a form basis.
The (New) button displays the Risk Disclosure Form entry screen.
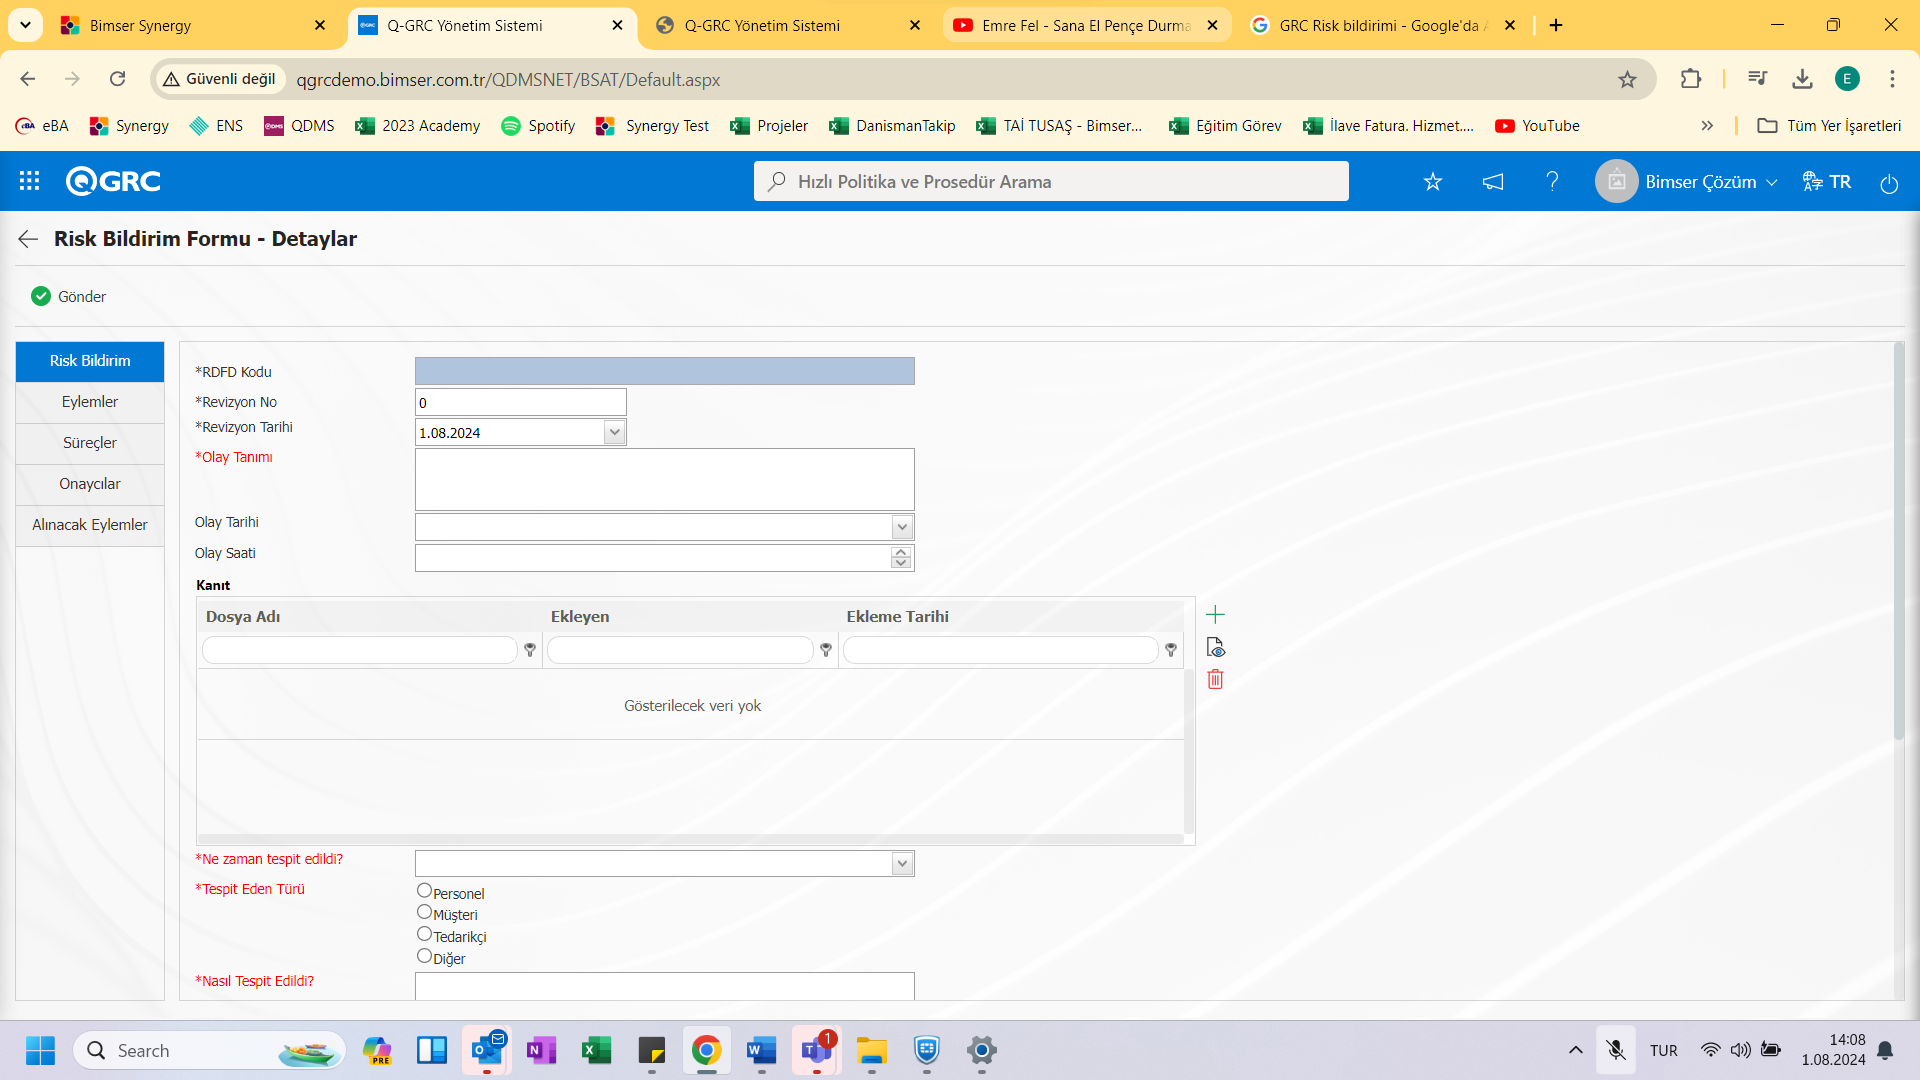
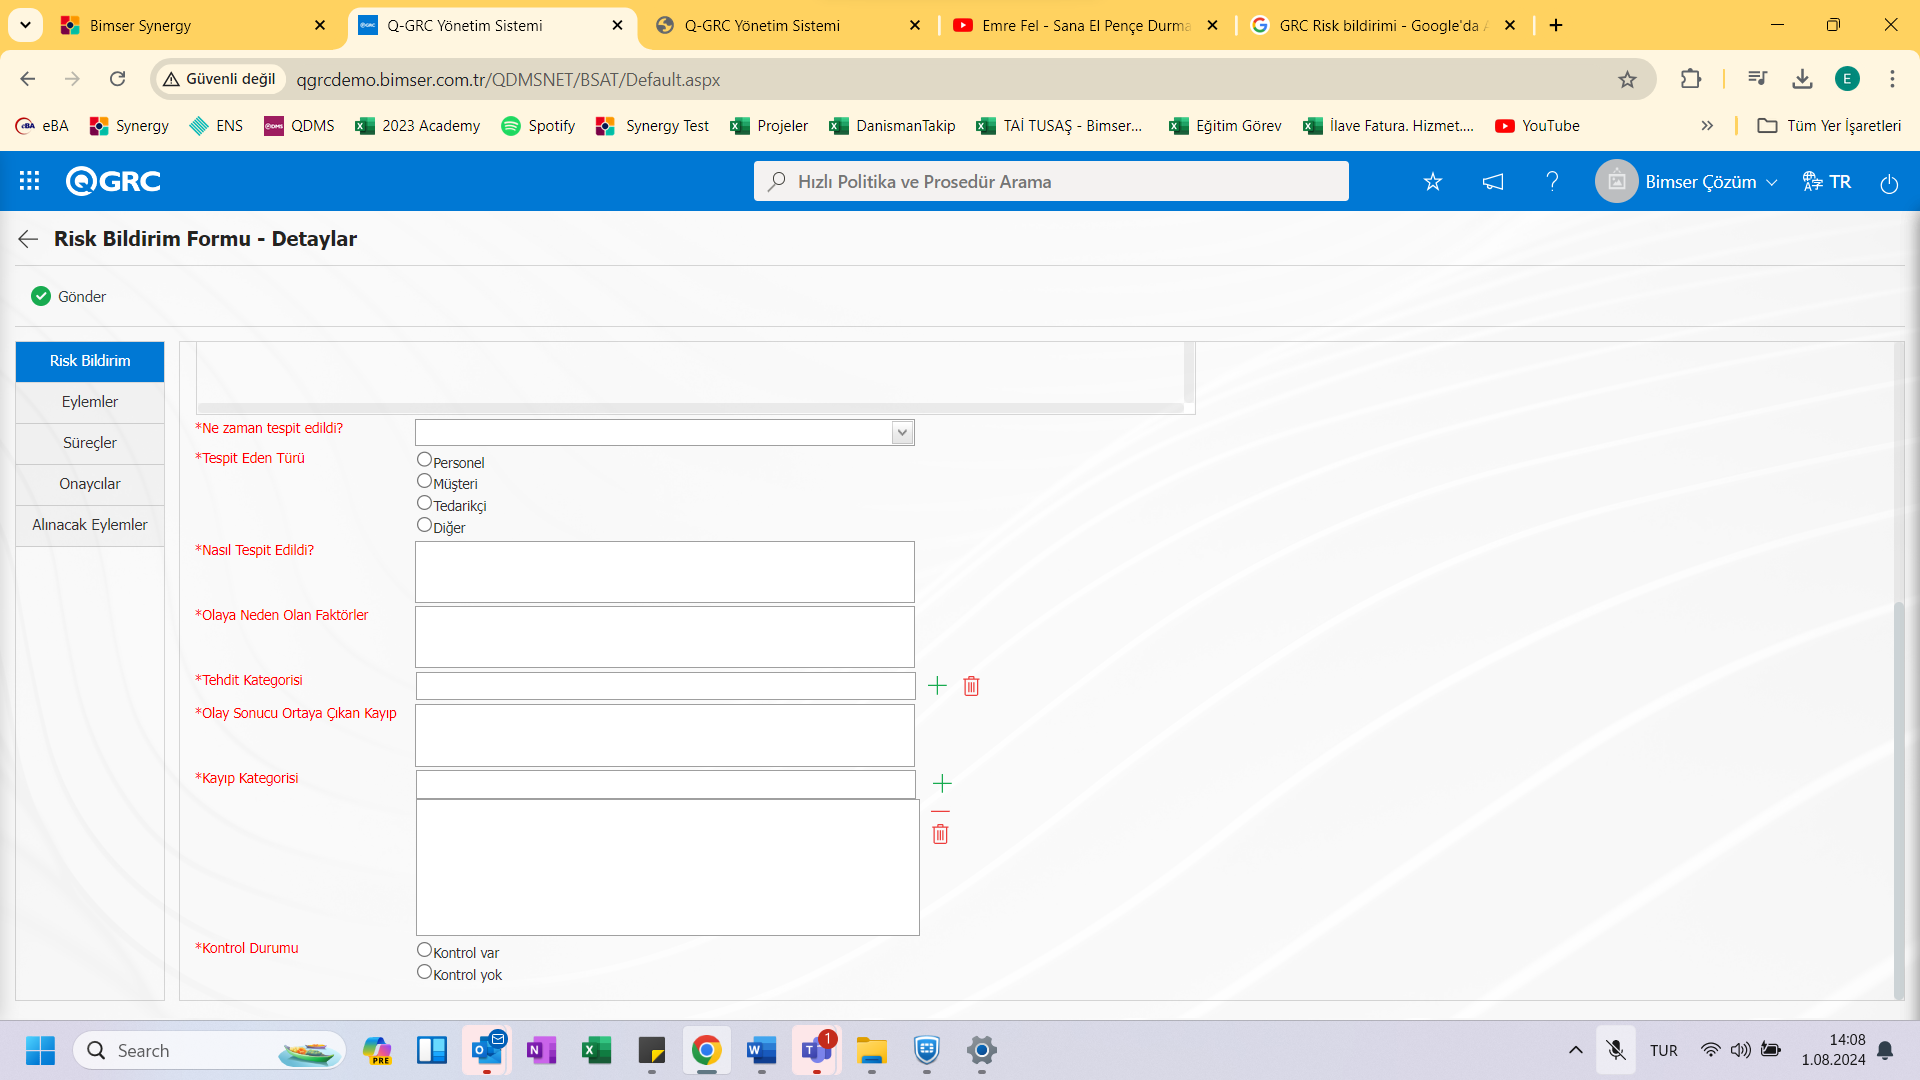
Different tabs can be seen on the Aç screen;
Of these tabs, the Risk Assessment tab is the tab where the fields defined for the Risk notification are seen. On the Actions tab, the actions to be taken for this risk notification record are determined. On the Processes tab, the corresponding process definition is selected. Action plans to be taken are created on the Actions to be taken tab. On the Approvers tab, the status-approver information of the record can be seen in cases where there is a status use. On the Risk Disclosure tab, the relevant fields are defined:
RİSK EVALUATION SEKMESİ
By default, the following fields are coming, these fields can be changed with the field definition/function designer menus.
RDFD Code: RDFD Code information is automatically given by the system.
Revizyon No: Revision No information is given.
Revizyon Date: Revision Date information is given.
Olay s Definition: The definition of the event to be reported is the text-type field where it is manually entered.
Olay Time: This is the time-type field where the time of the occurrence of the event to be notified is selected.
Kan it: The file type field to which the evidence for Olay file can be attached
Ne Time Detected?: It is the date type field where the date Olay was detected was selected.
Tespit Eden Type: Listeden checkbox is the list-type field where the corresponding value is selected.
Nas il Detected: It is the text-type field where it is written how Olay was detected.
Olaya Causative Factors: It is the text-type field where the factors that cause Olay to occur are explained.
Tehdit Category: It is the list-type area where the threat categories that may be created as a result of Olay can be selected.
Olay Loss as a Result of the Incident: It is the text-type field where the losses that occur as a result of the Olay are explained.
Kay ip Category: It is the list-type field where the category of losses incurred as a result of the experience of Olay is selected.
Kontrol Status: The choice of whether there is control or not is made. If the asset value is selected, the control activities area is active.
Kontrol Activities: It is a table-type field containing the fields of Control No., Control Type, Control Definition, Why Control Did Not Work, Description.
<a id="_Hlk37024781">``````</a>On the Risk notification tab, the basic information and user-defined fields required for the notification are filled in.
EYLEMLER SEKMESİ
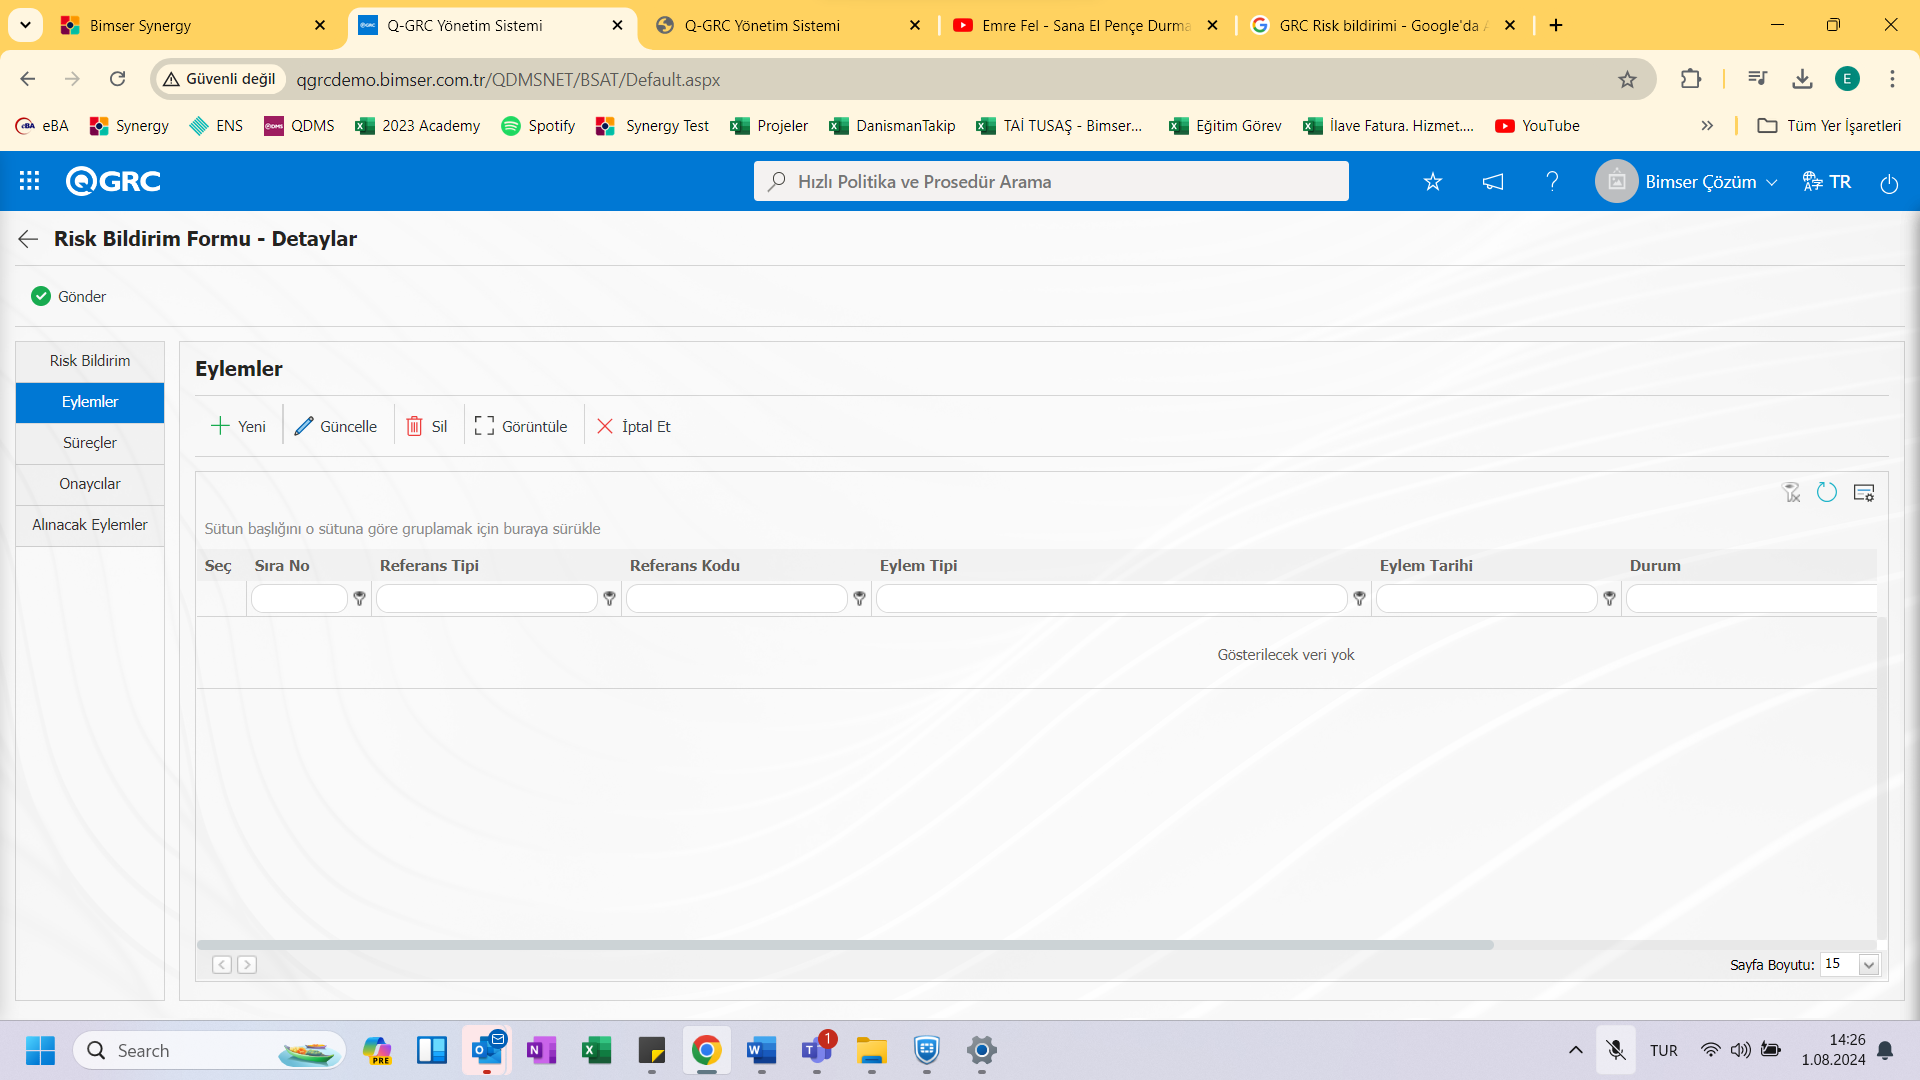
On the Actions tab, the actions that will be planned as a result of the event that occurs are planned.
With the help of the buttons located in the Ekrandaki;
: A Yeni action is defined.
: Existing action information can be edited.
:The selected action is deleted.
:The selected action information is displayed in the list.
: Used to cancel the selected action.
When you get to the Actions tab, you can see A new action is entered with the (New) button.
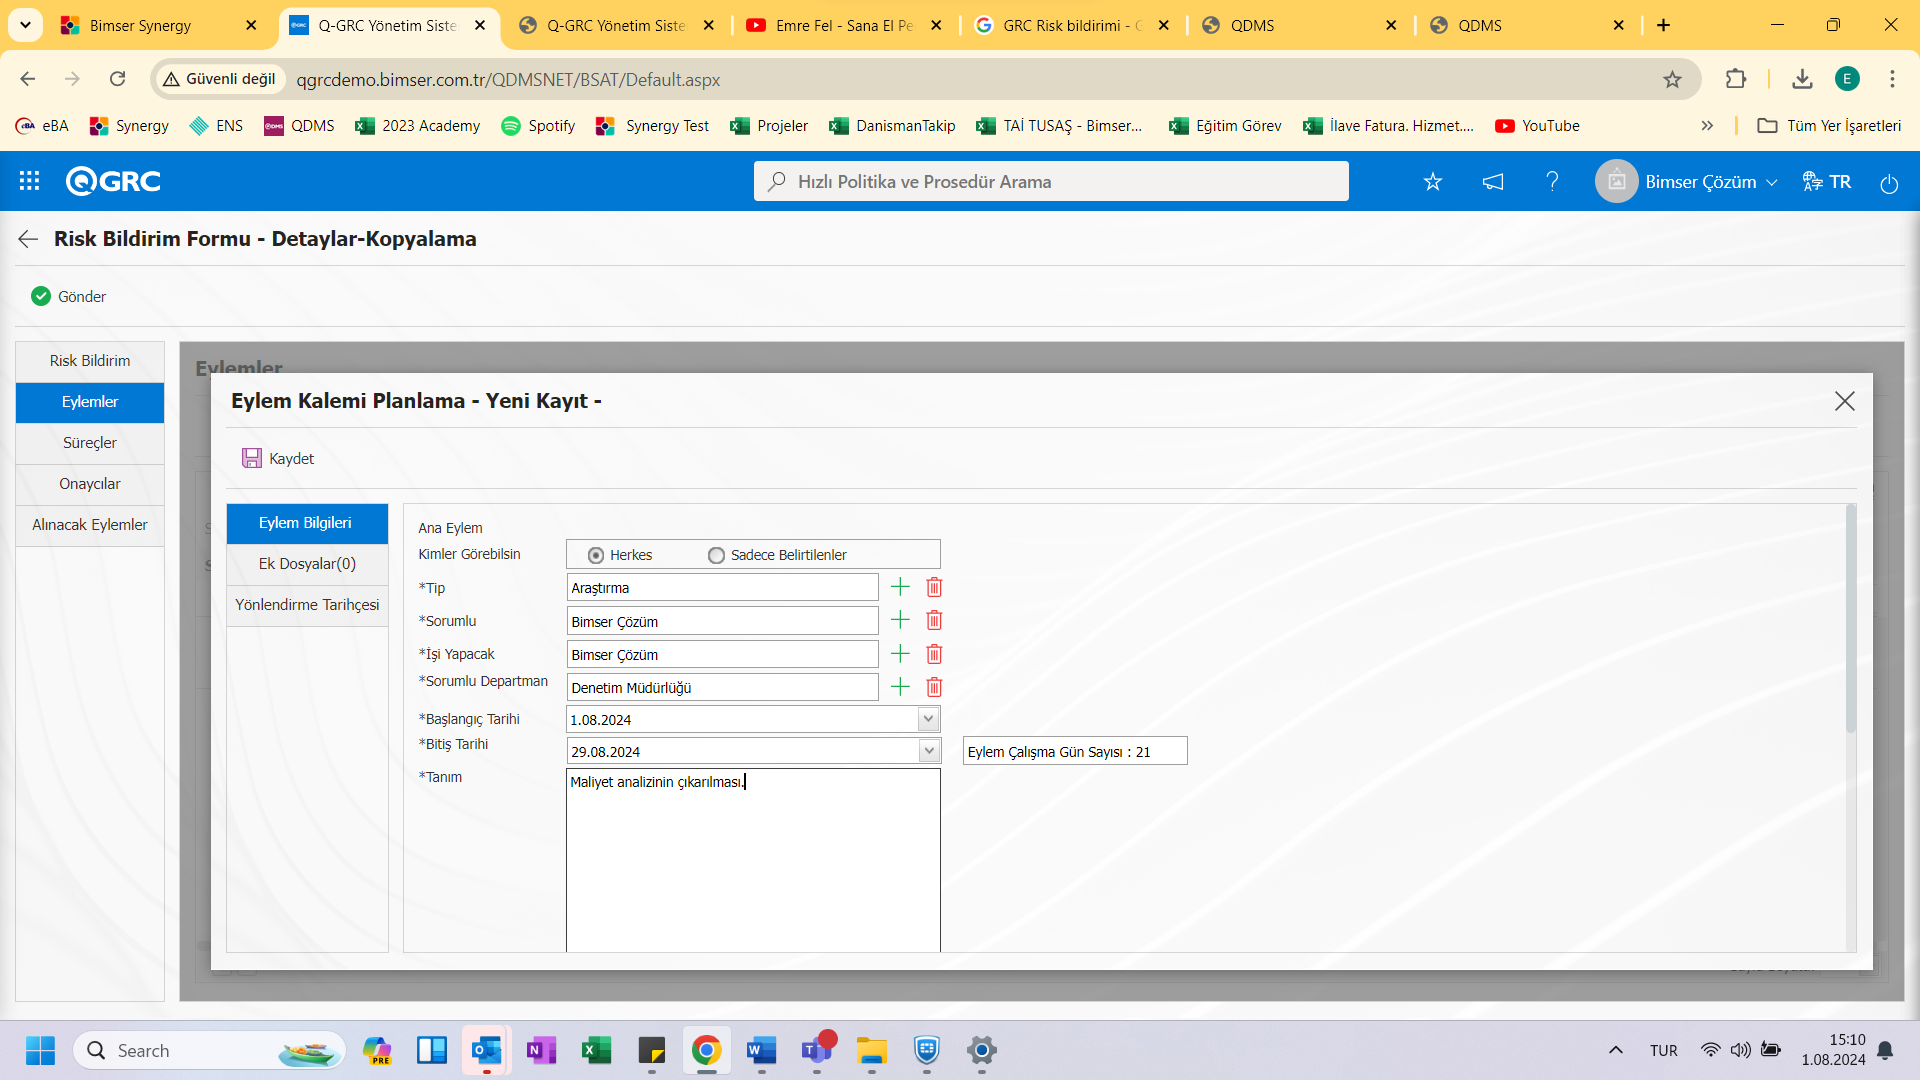
If there is an attachment file related to the action from the Additional files tab, it is added to the system.
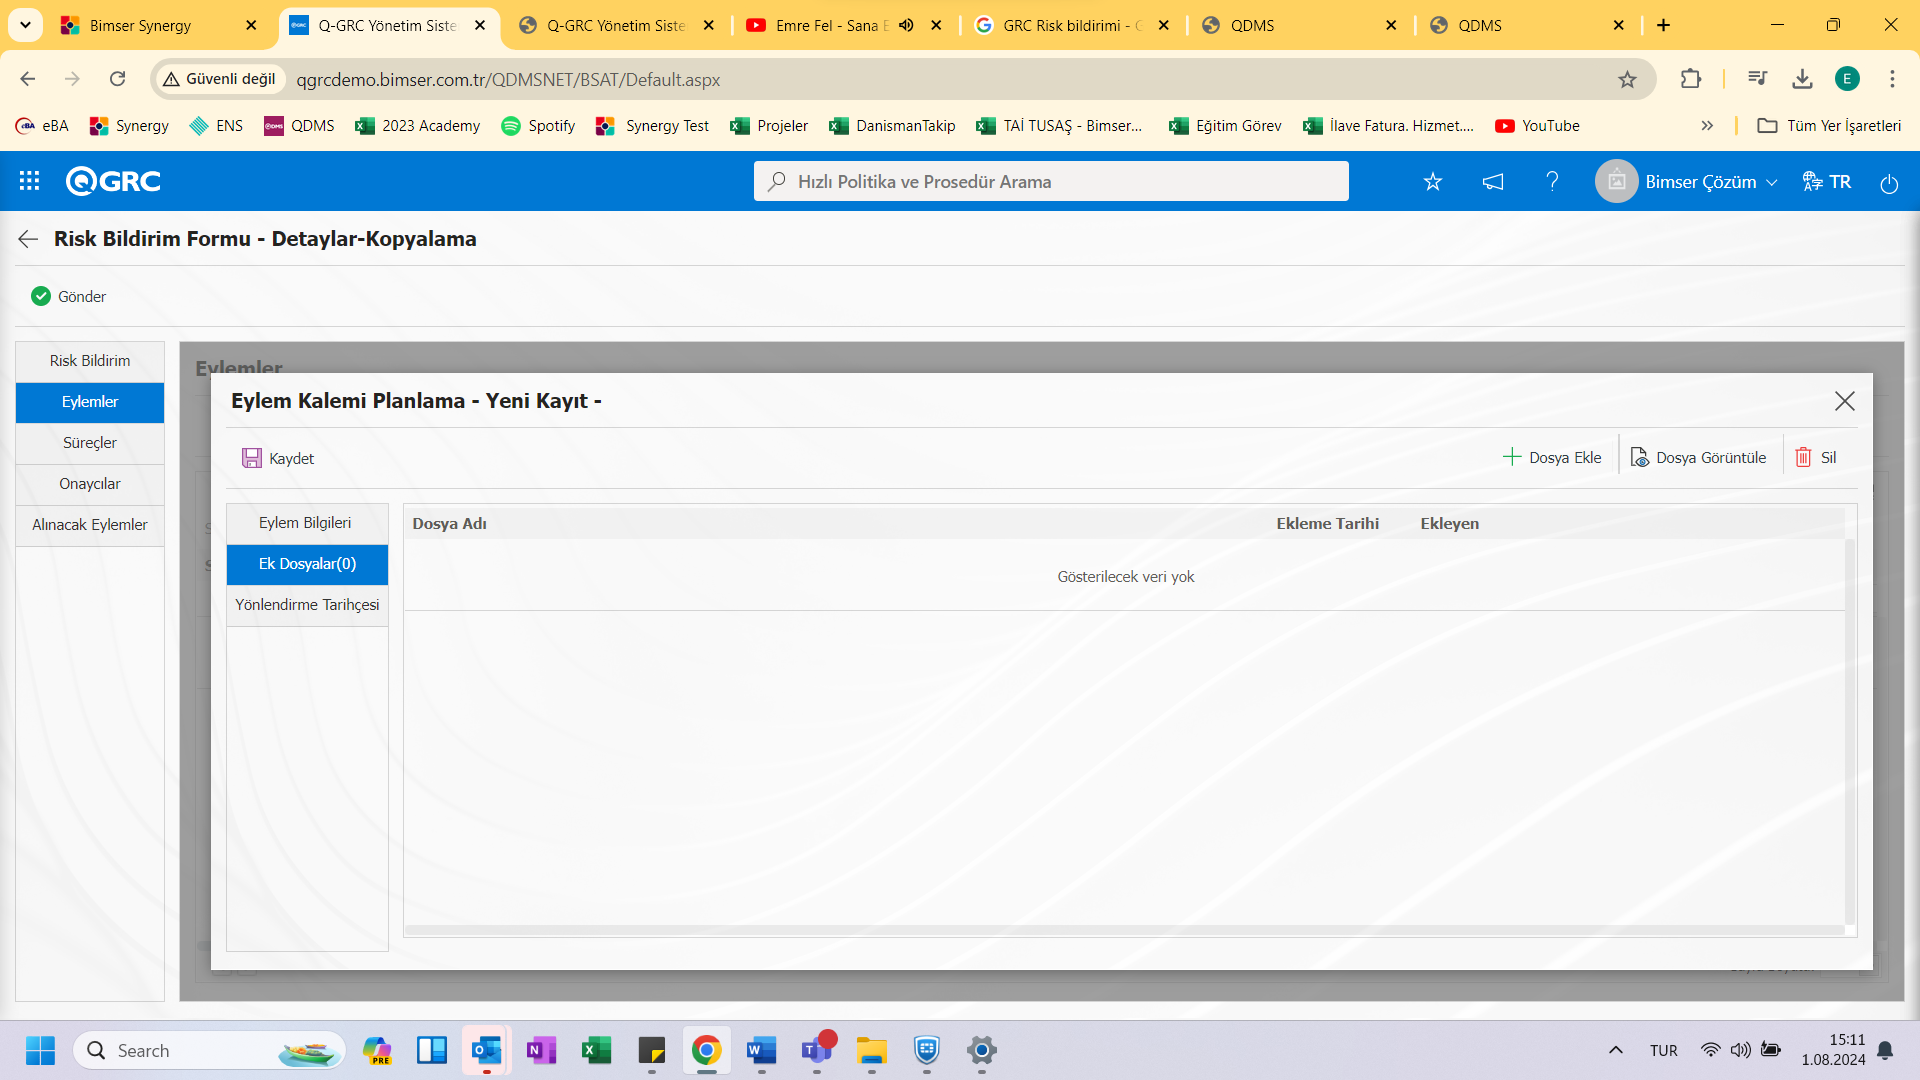
With the help of the buttons located in the Ekrandaki;
: The attachment file is uploaded to the system.
: The uploaded attachment file information is displayed.
: The uploaded attachment file information is deleted.
The Routing history tab displays information about the routing operations that were performed for the action that was dropped.
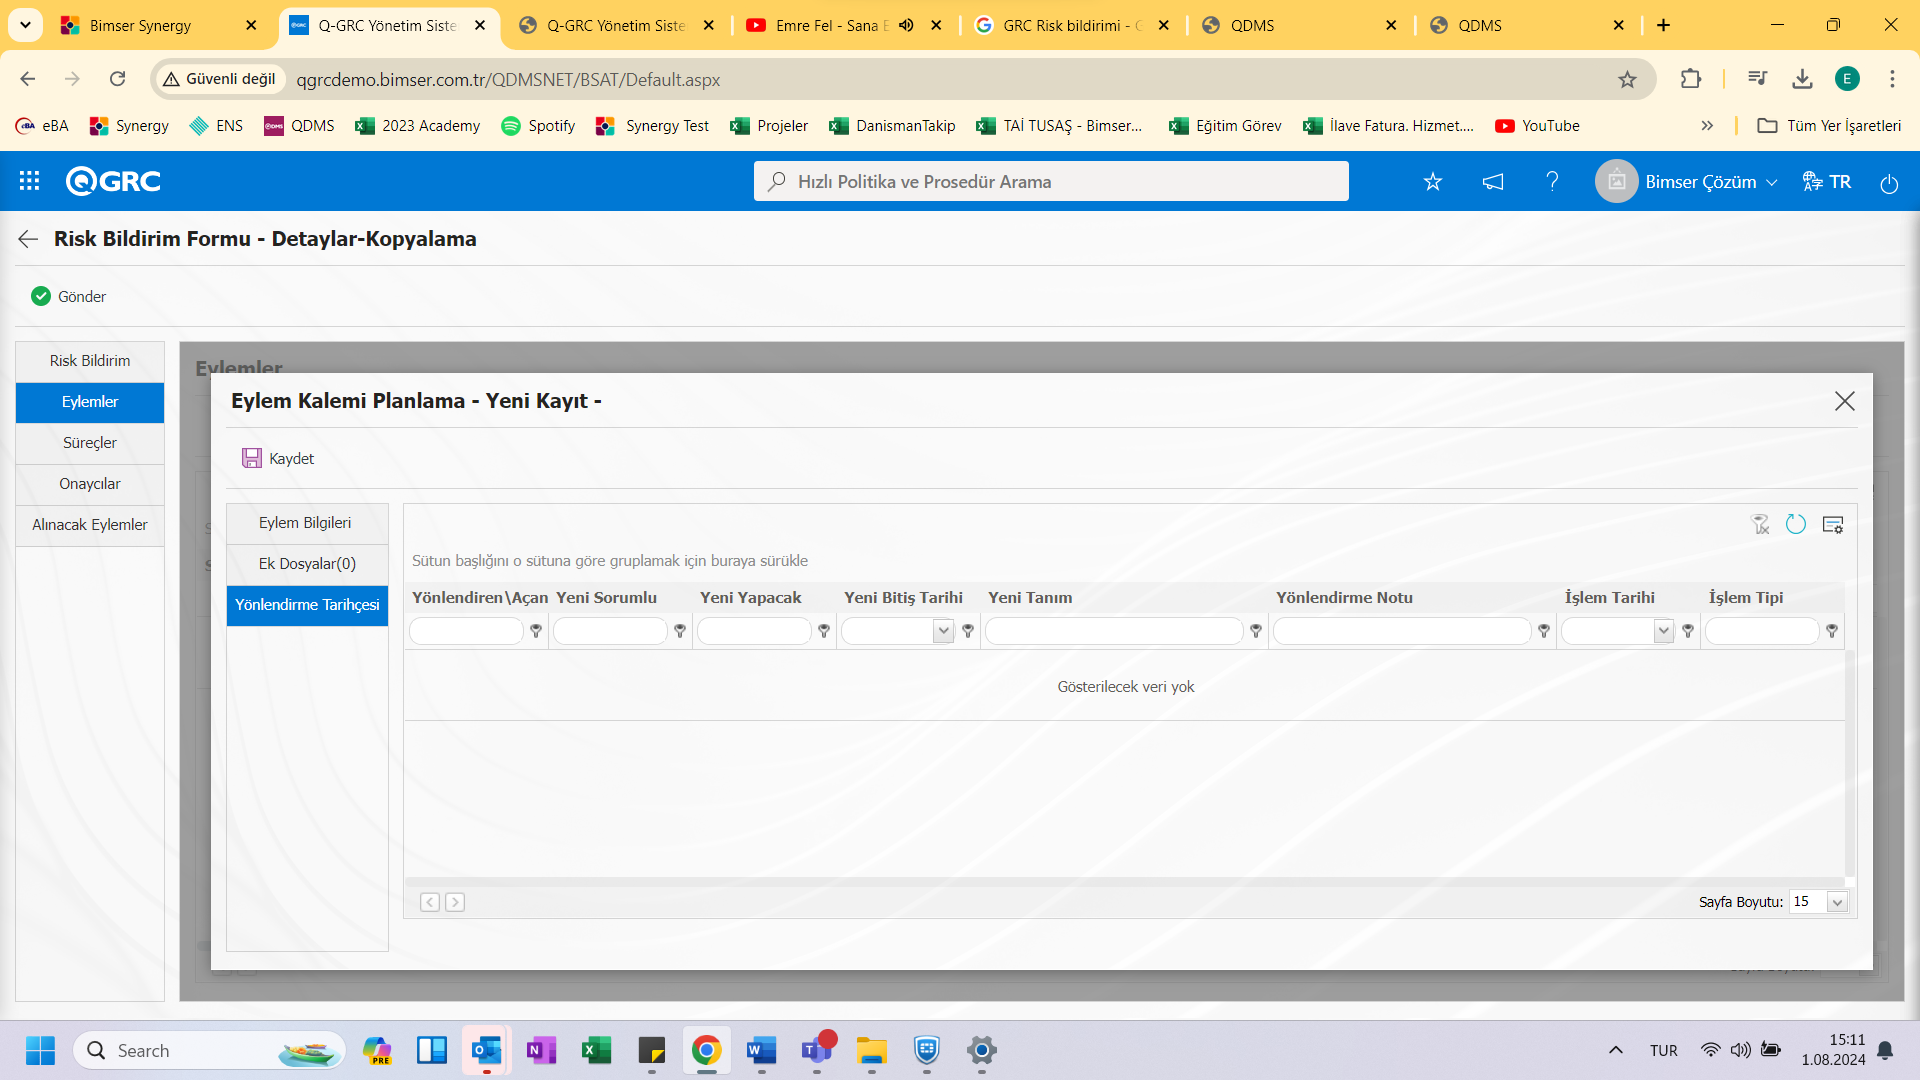
By clicking the Save button, the Action falls into the pending jobs of the relevant user for the approval of opening an Action or the Performing an Action according to the setup in the Action Planning module.
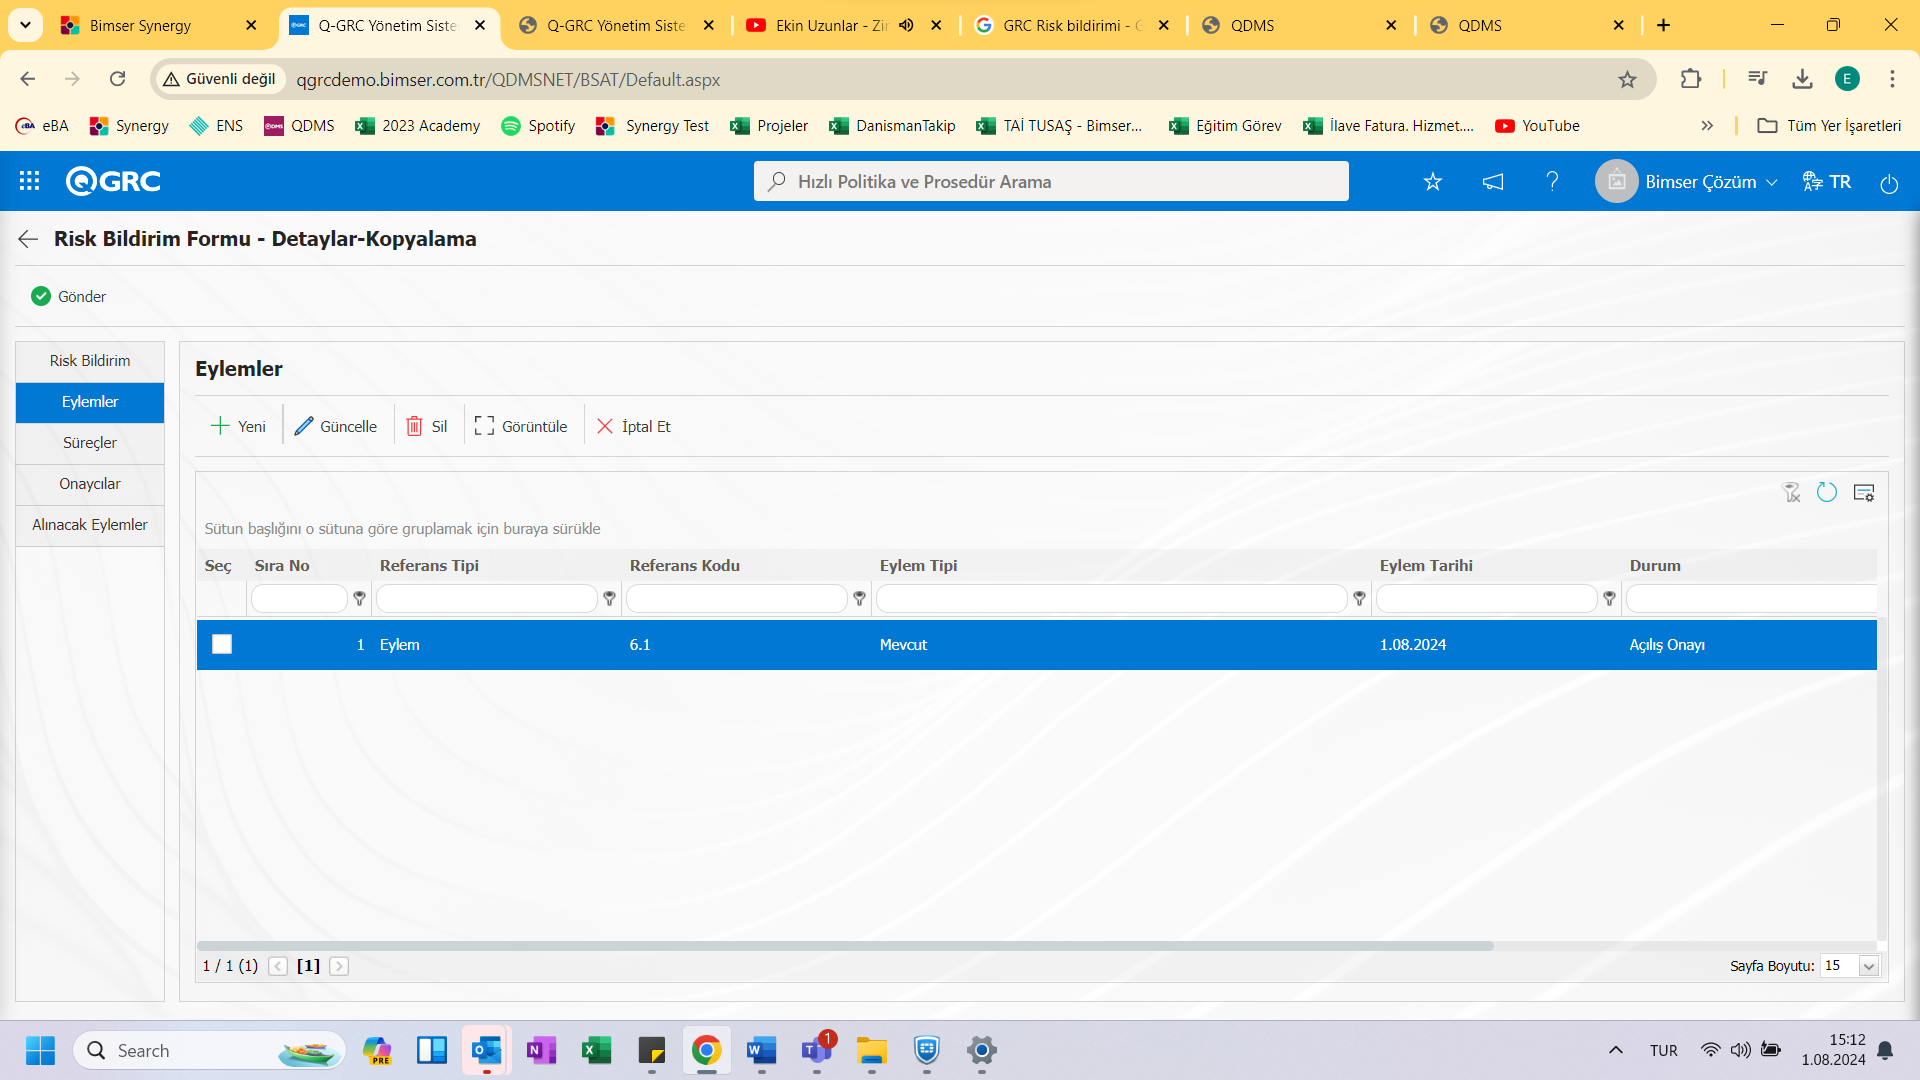
Revizyon Process: RDFDs can be subjected to revision at any time after they have been saved. To do this, while the Event list is open, the relevant record is selected and click the (Revision) button is clicked.
The next step is exactly the same as the steps followed when filling in the risk detail for the first time. The only difference is that when you are on the RDFD screen, the revision number will automatically increment by one.
To view older revisions of the corresponding RDFD, while the ! Press the button and click on Old Revisions from the bottom buttons. On the new screen that opens, the old revisions are listed.
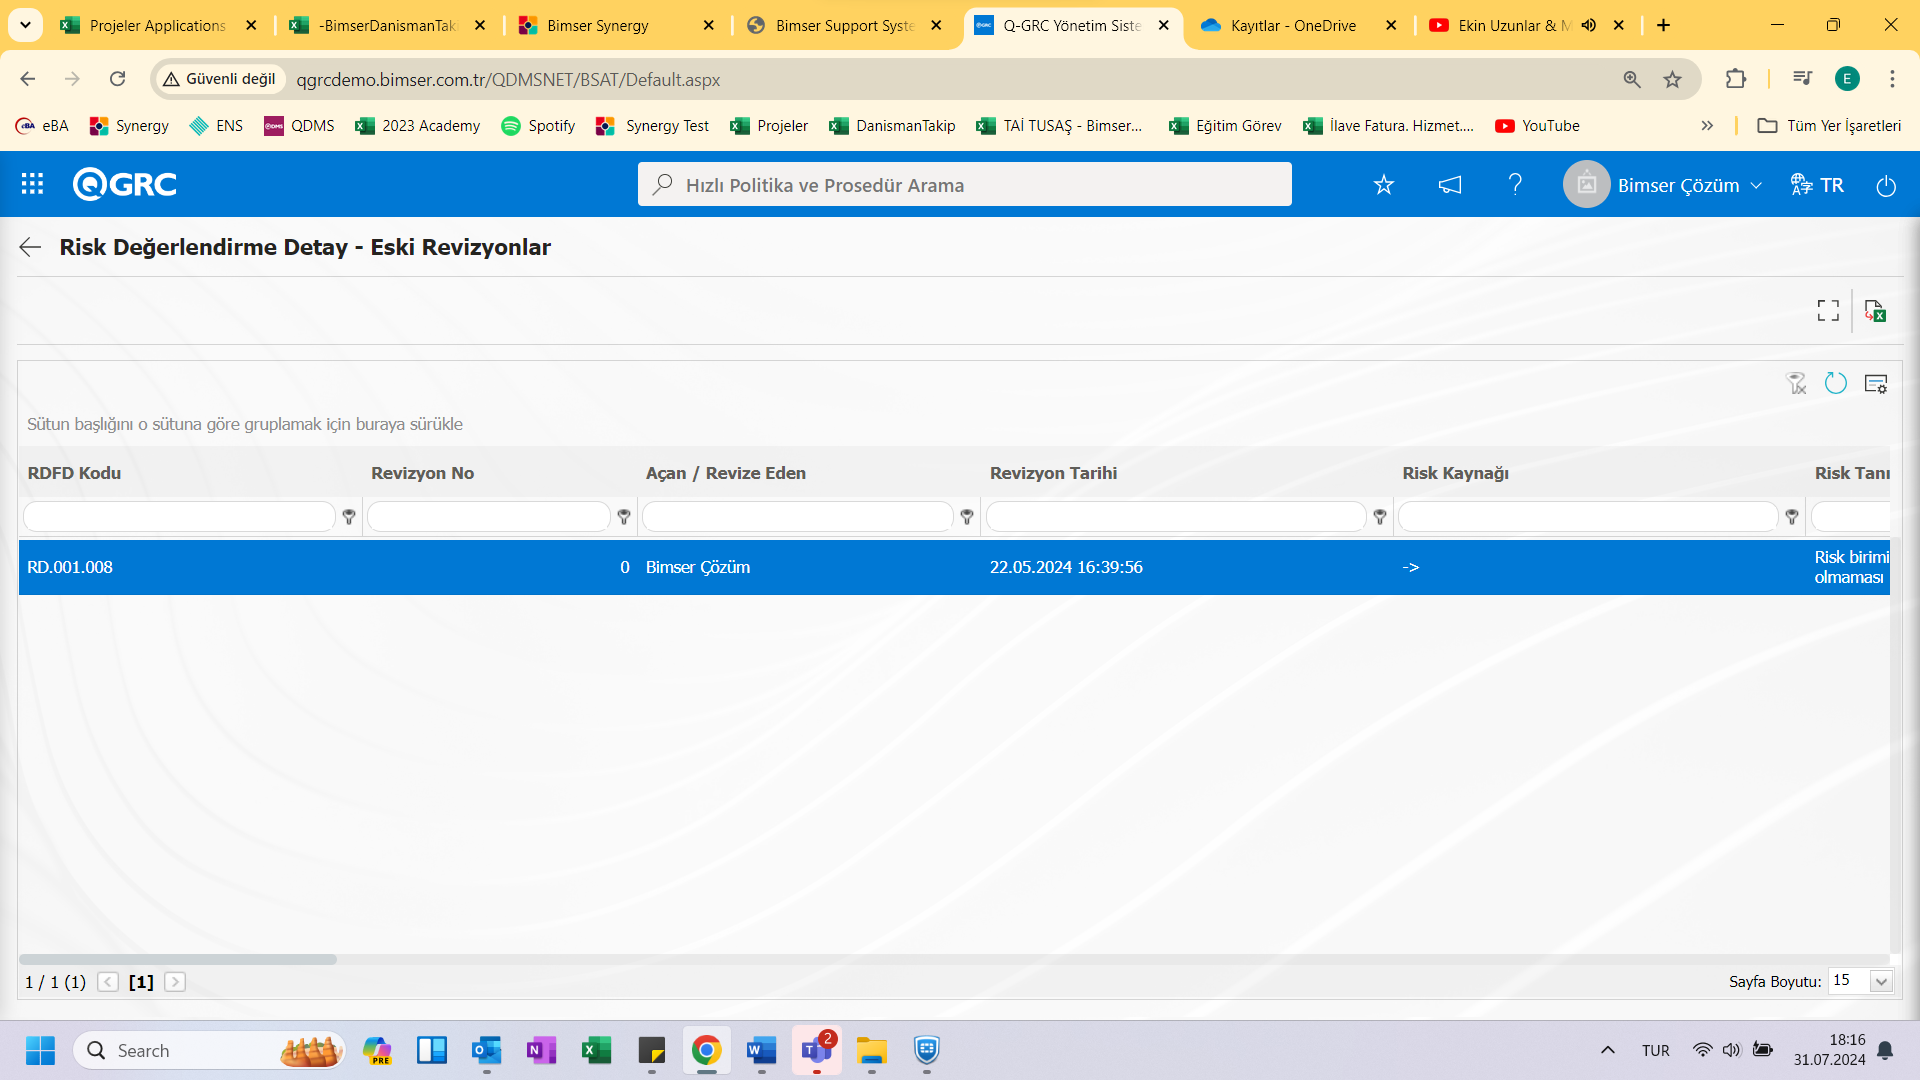
With the help of the buttons located in the Ekrandaki;
:Displays old revisions.
: Data can be exported to Excel.
After selecting the list in view of the old revision information, The (view) button displays the information.
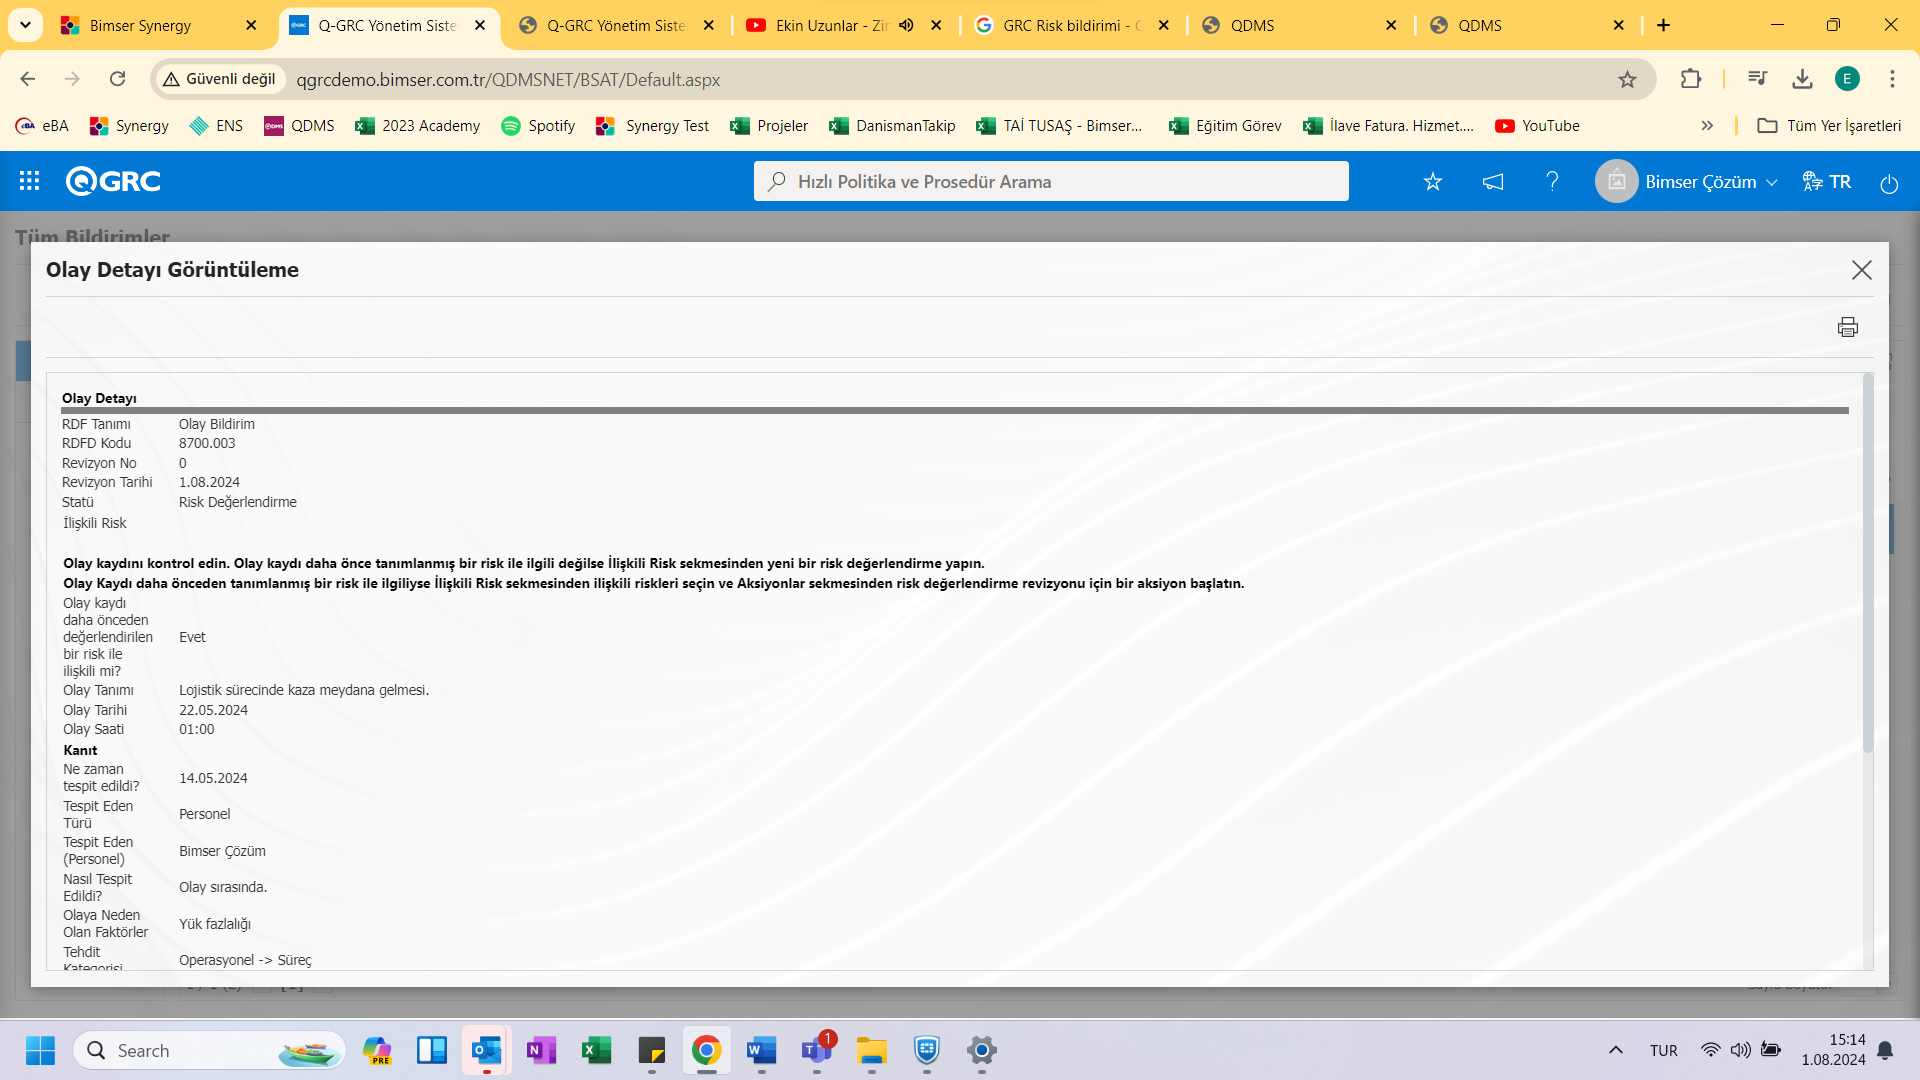
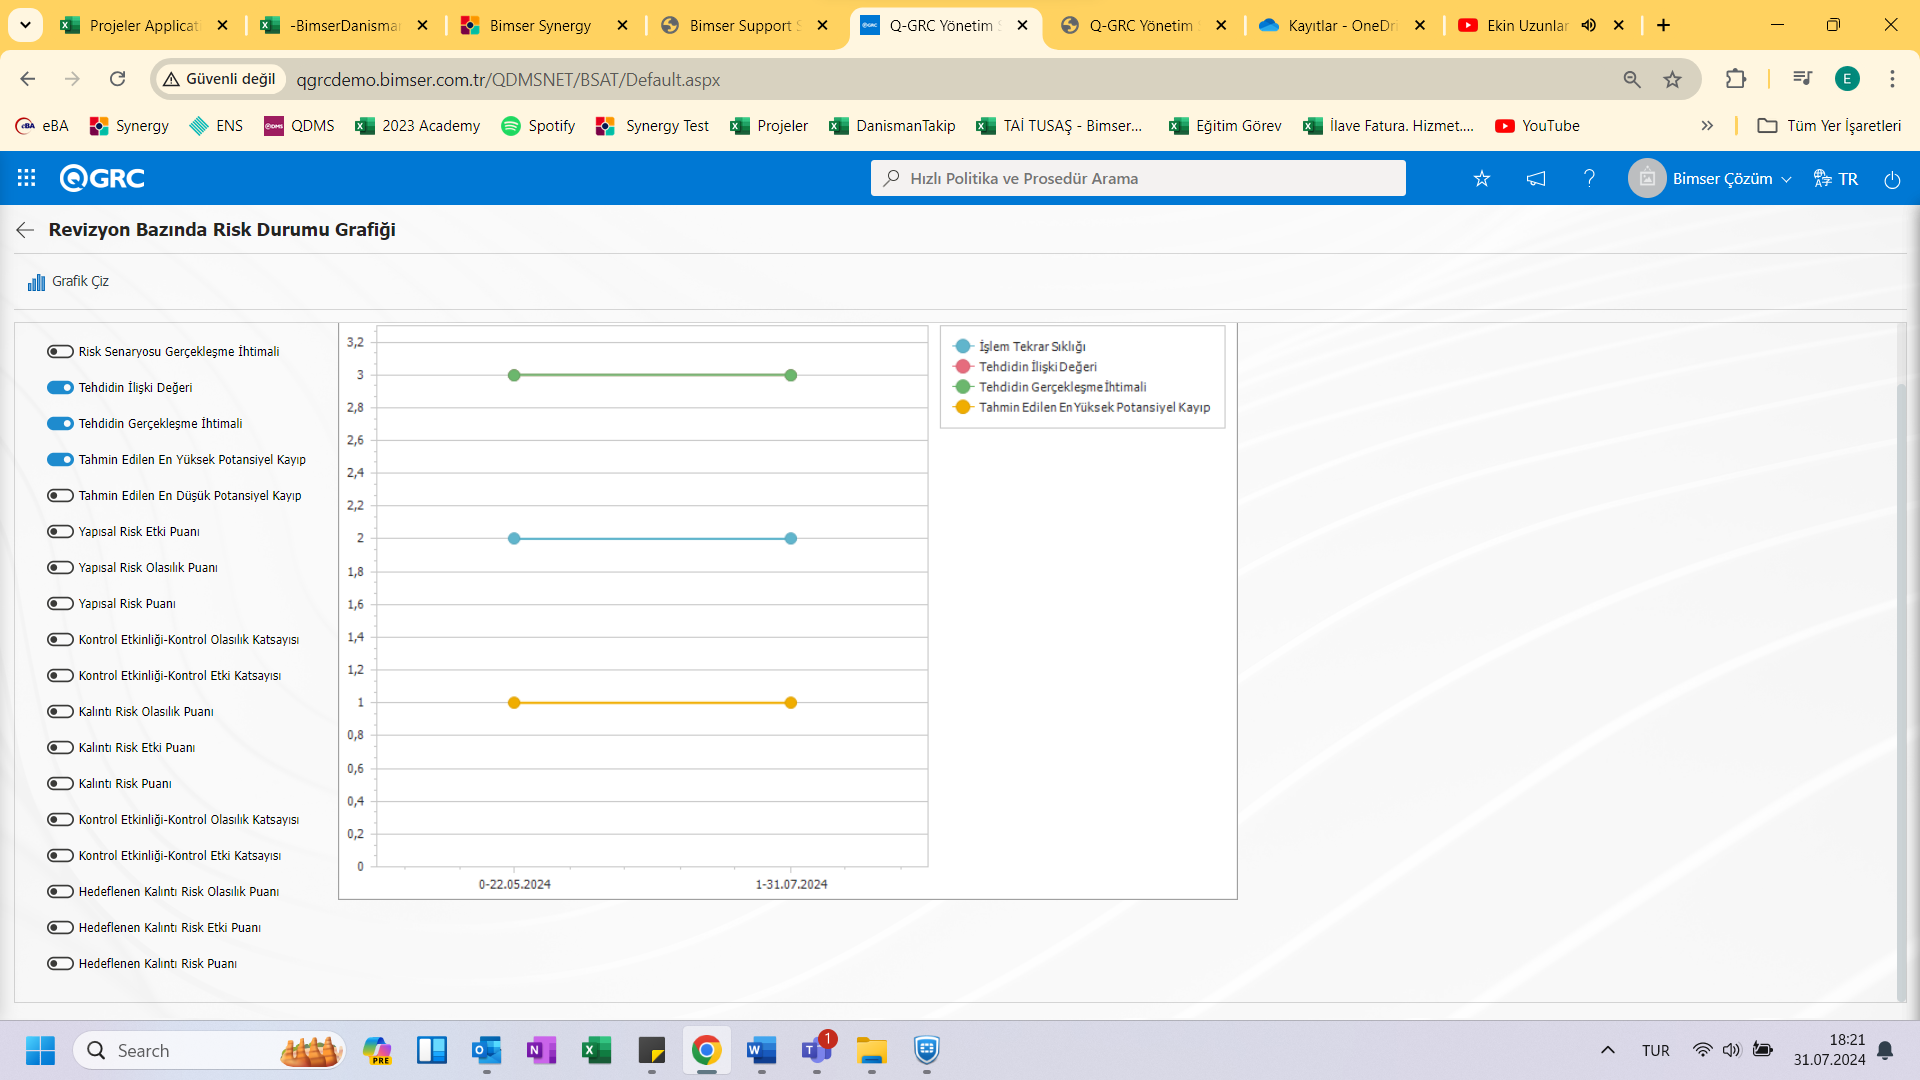
On the RDFD screen ! With the help of the (draw graph) button, a risk status graph can be drawn on the basis of revisions.
On the screen that opens, there are "Fields" to be selected on the left side and shown on the chart. After the relevant selections are made from the Fields section, click the (Draw Graph) button to draw the graph.
<a id="_Toc173418836">``````</a>5.2.2. New Apricot t
Menü: GRC Management System/Risk Disclosure/New Registration.
New event entry is made according to the form fields created from the engine definitions.
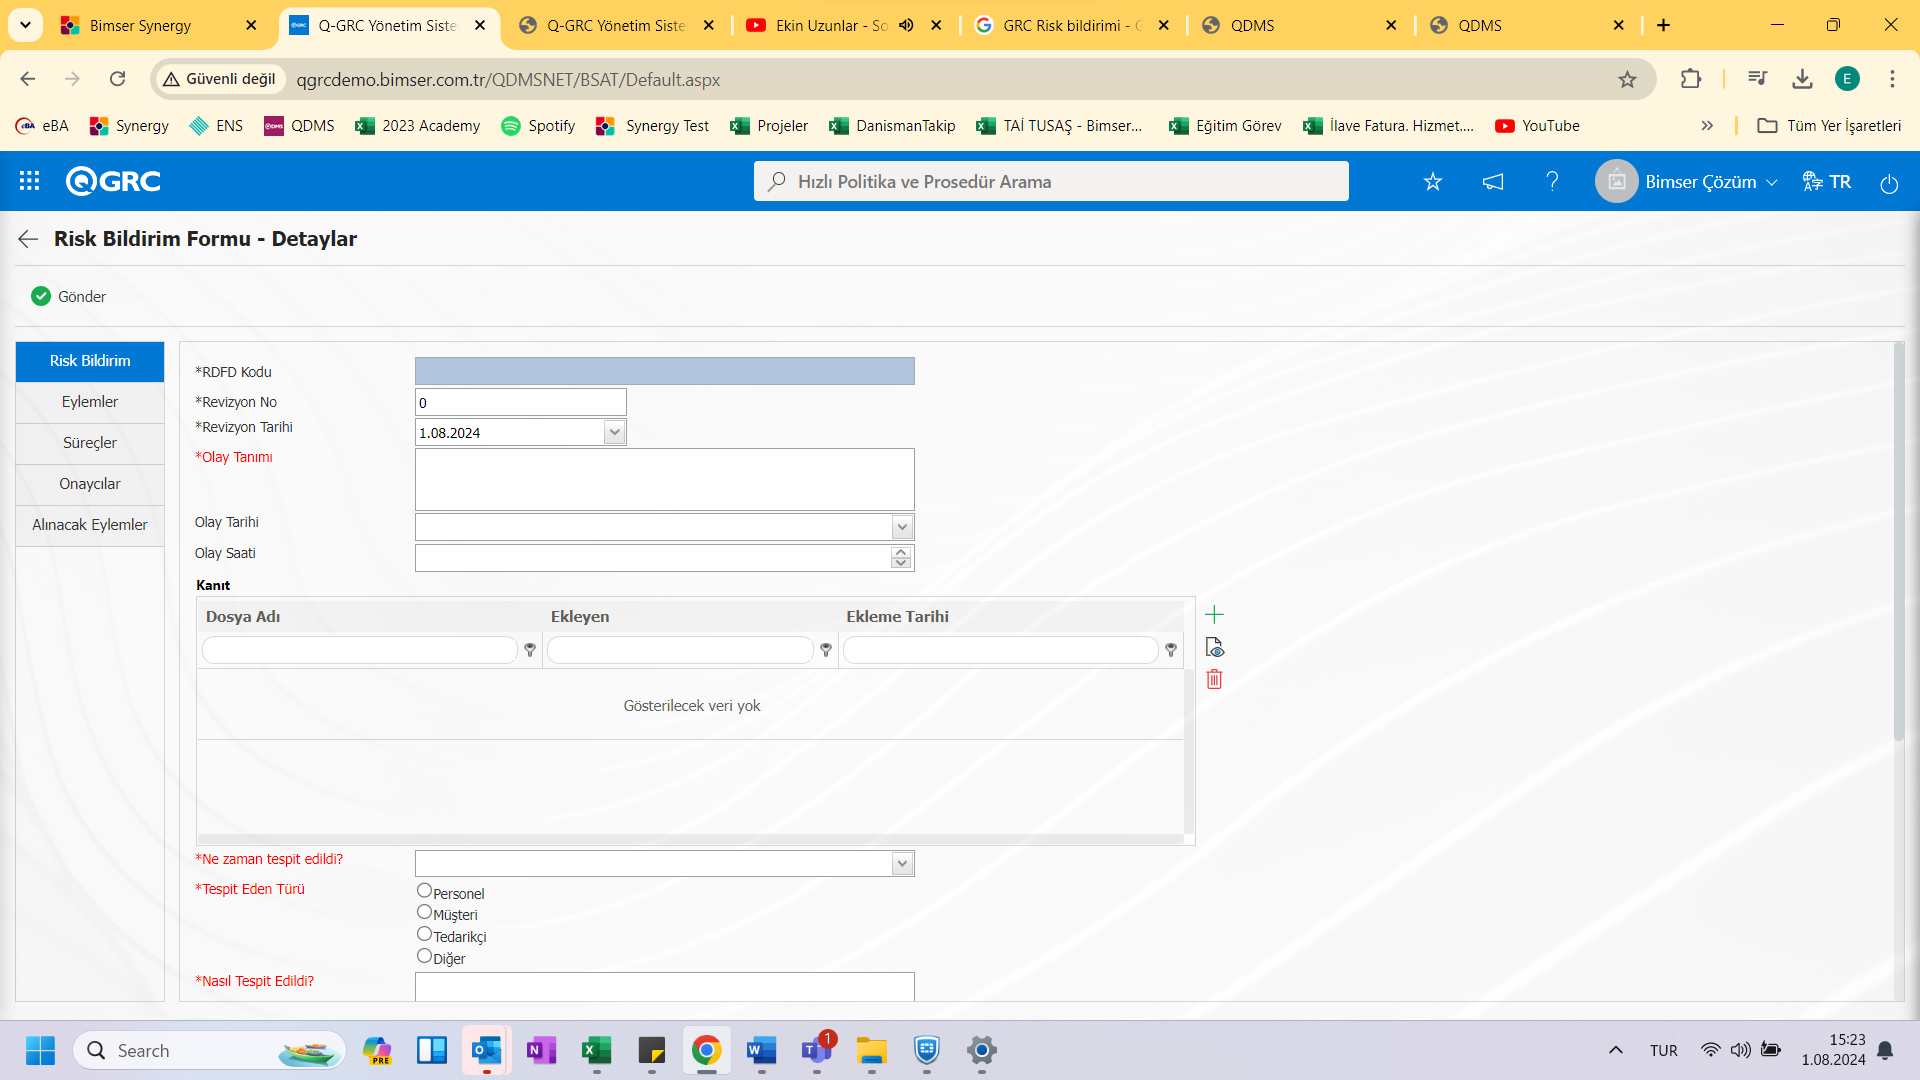
On the screen that opens, the fields that come by default and the fields in the tabs are filled, and event entries are made according to the flow defined in the infrastructures in accordance with the event notification procedures and forms used by the company.
With the help of the buttons located in the Ekrandaki;
: The screen with all the recordings opens
: The form is forwarded to the user in the flow.
<a id="_Toc173418837">``````</a>5.2.3. Reports
Menü Name: GRC Management system /Risk Disclosure/Reports
This is the part where reports related to the risk notification module are displayed.
<a id="_Toc173418838">``````</a>5.2.3.1. Distribution of Risks by Regions
Menü Name: GRC Management system /Risk Statement/Reports/Distribution of Risks to Regions
It is a report that provides workplace-based risks on the map.
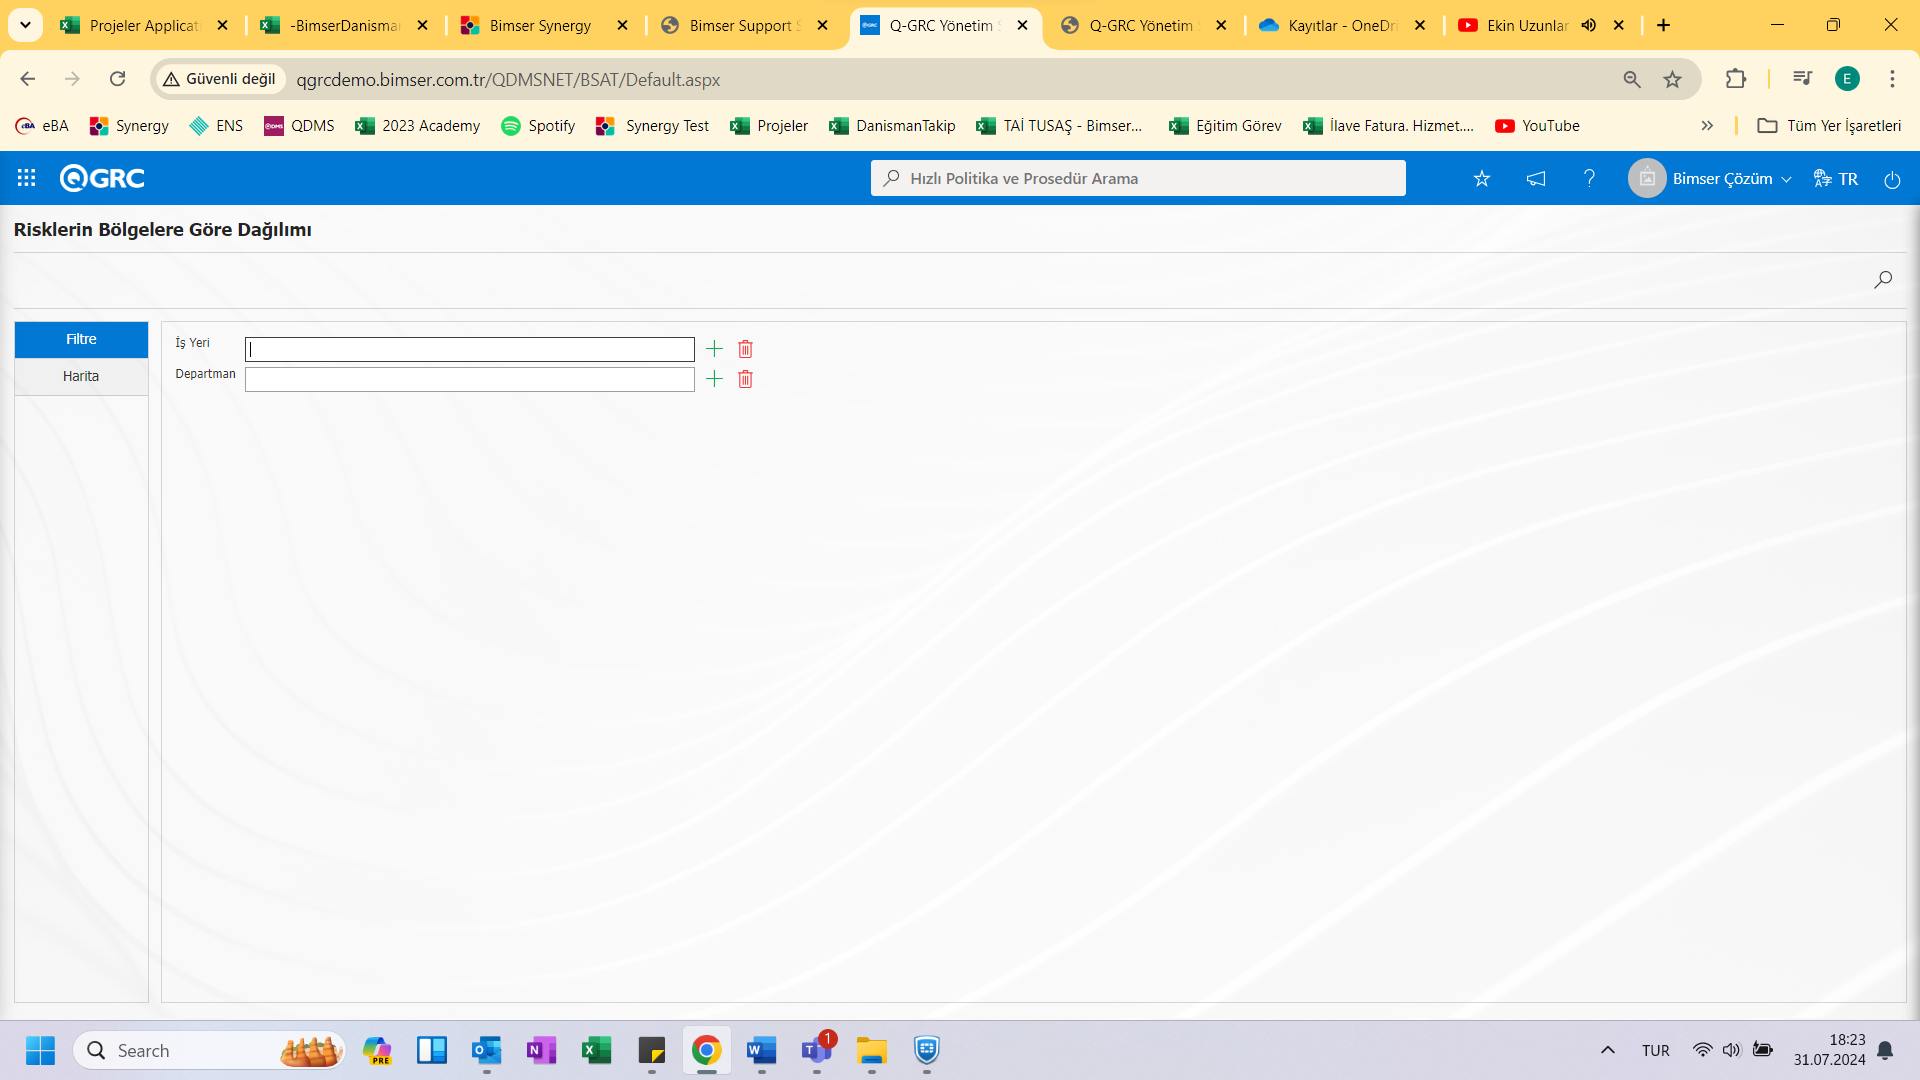
With the help of the buttons located in the Ekrandaki;
: Records can be searched by filtering.
<a id="_Toc173418839">``````</a>5.2.3.2. Risk Disclosure Listesi
Menü Name: GRC Management system /Risk Statement/Reports/ Risk Notification List
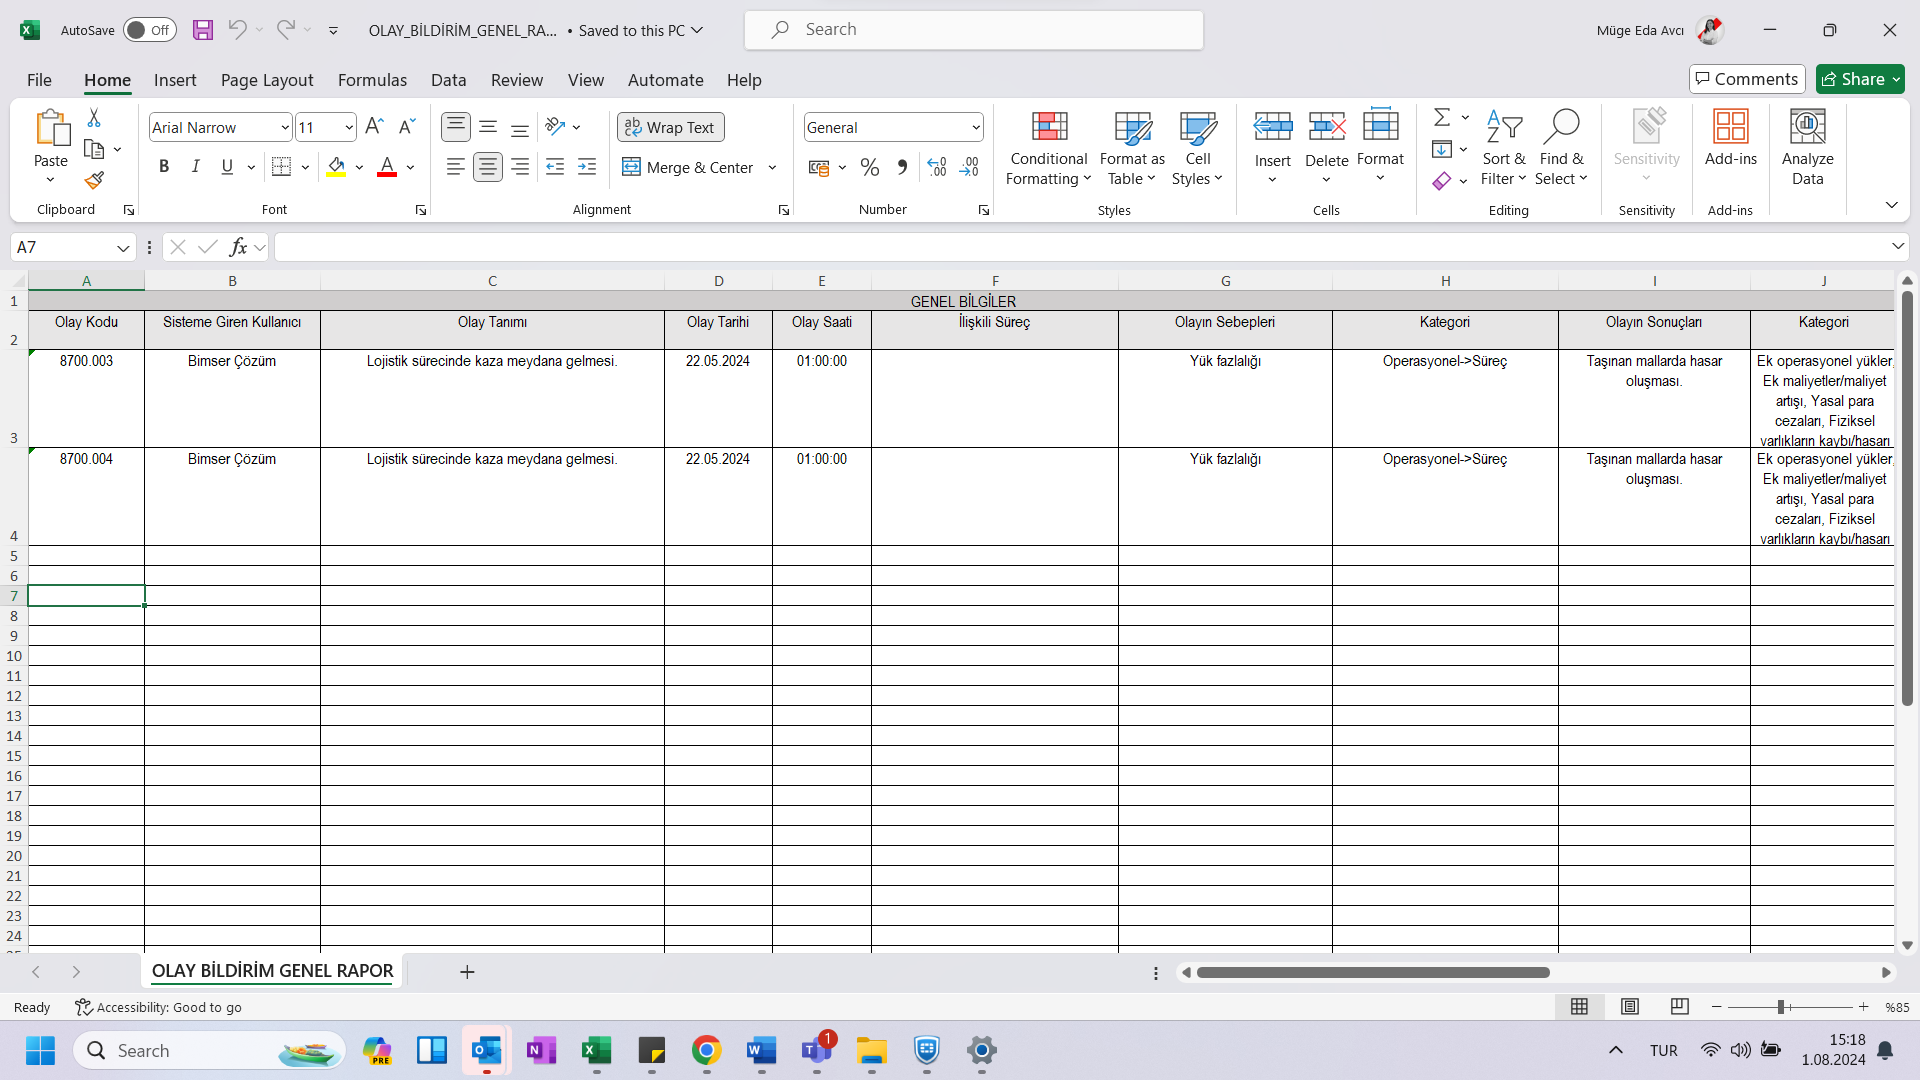
To get the risk notification list report, select Risk listesi__ __aç from the Reports menu. It is the list where all the risk details in the records can be seen. In the window that opens, a list of RDFDs is displayed.
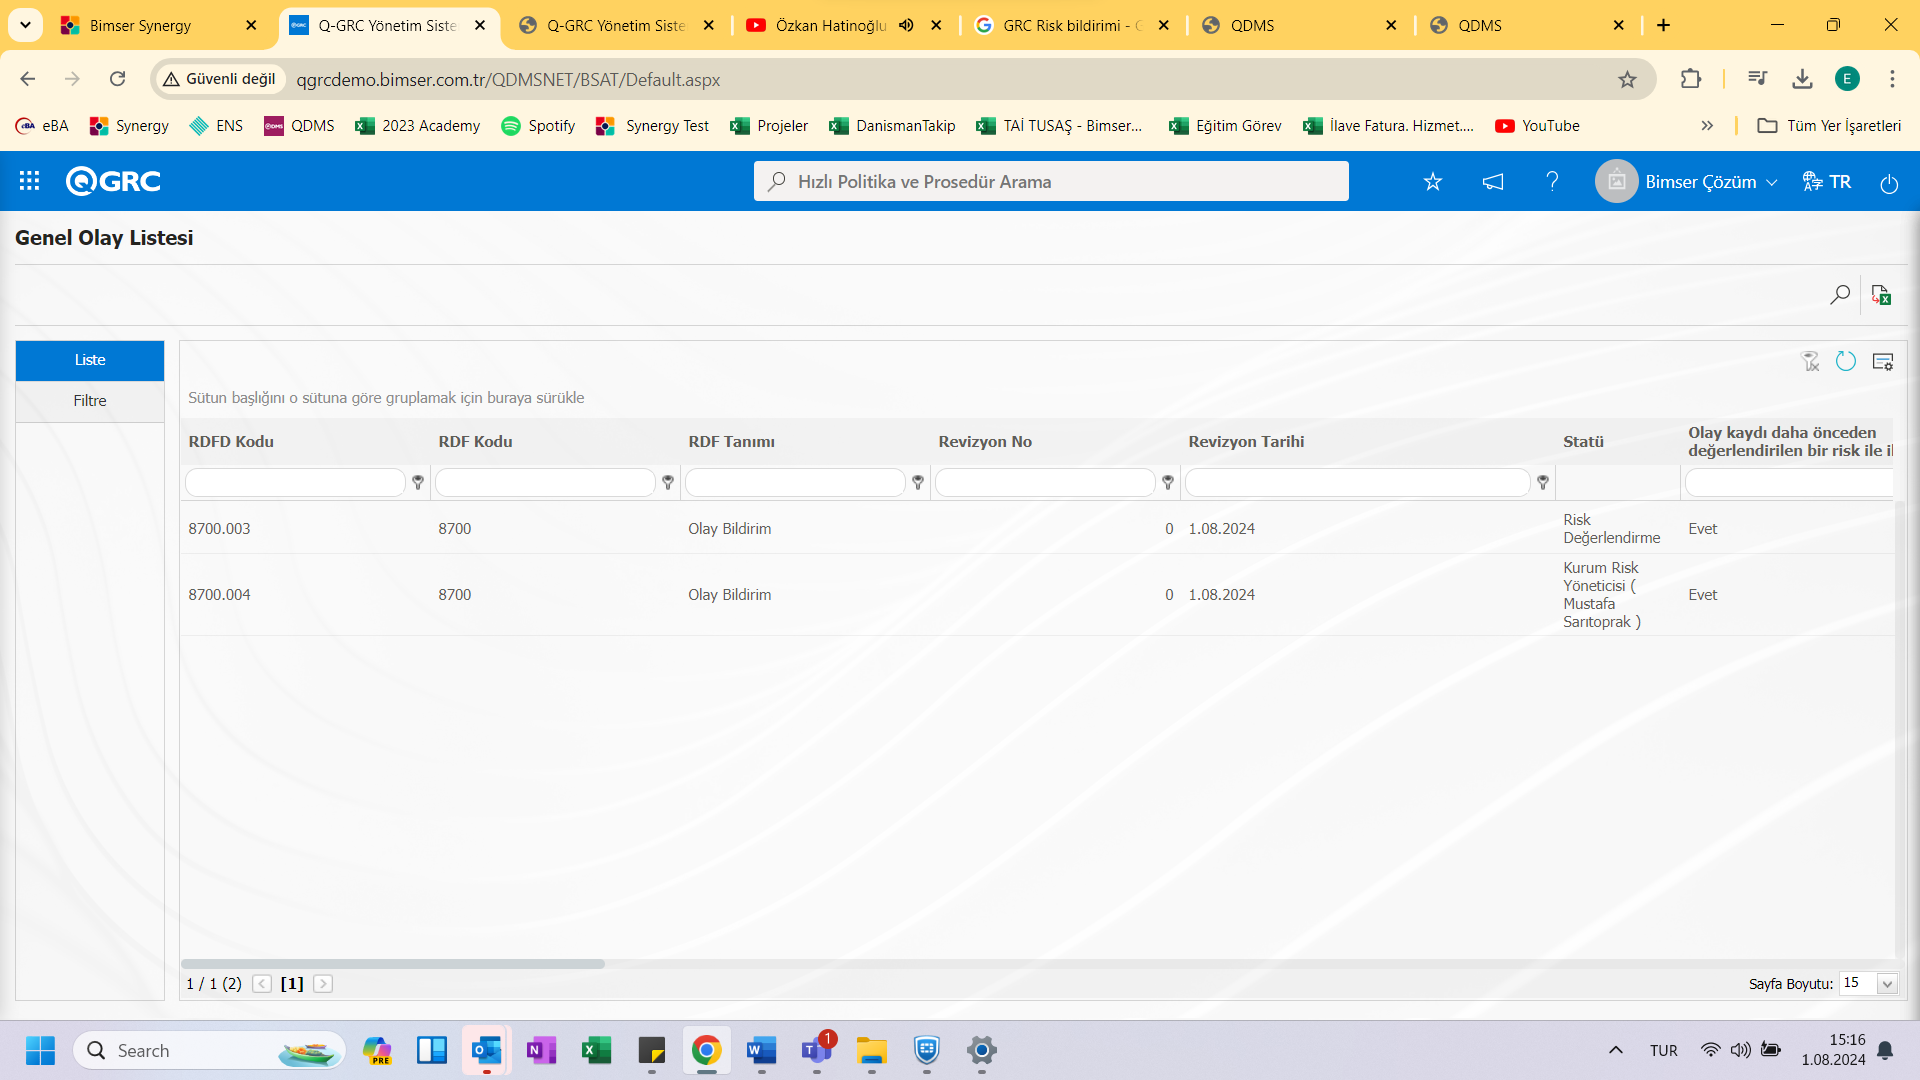
With the help of the buttons located in the Ekrandaki;
: Data can be exported to Excel.
: Records can be searched by filtering.
If the export to Excel button is pressed, the system creates the General Risk List of the RDFDs in the list in Excel format and presents it to the user.

<a id="_Toc173418840">``````</a>5.2.3.3. Action Raporu
Menü Name: GRC Management system /Risk statement/Reports/ Action Report
To get the Action Report, select Action Raporu__ __aç from the Reports menu. Received as a result of the risk notification Action is the report on which the actions are taken. This report can be exported to Excel. Summary report can be obtained. Also time-based Action chart report can be pulled.
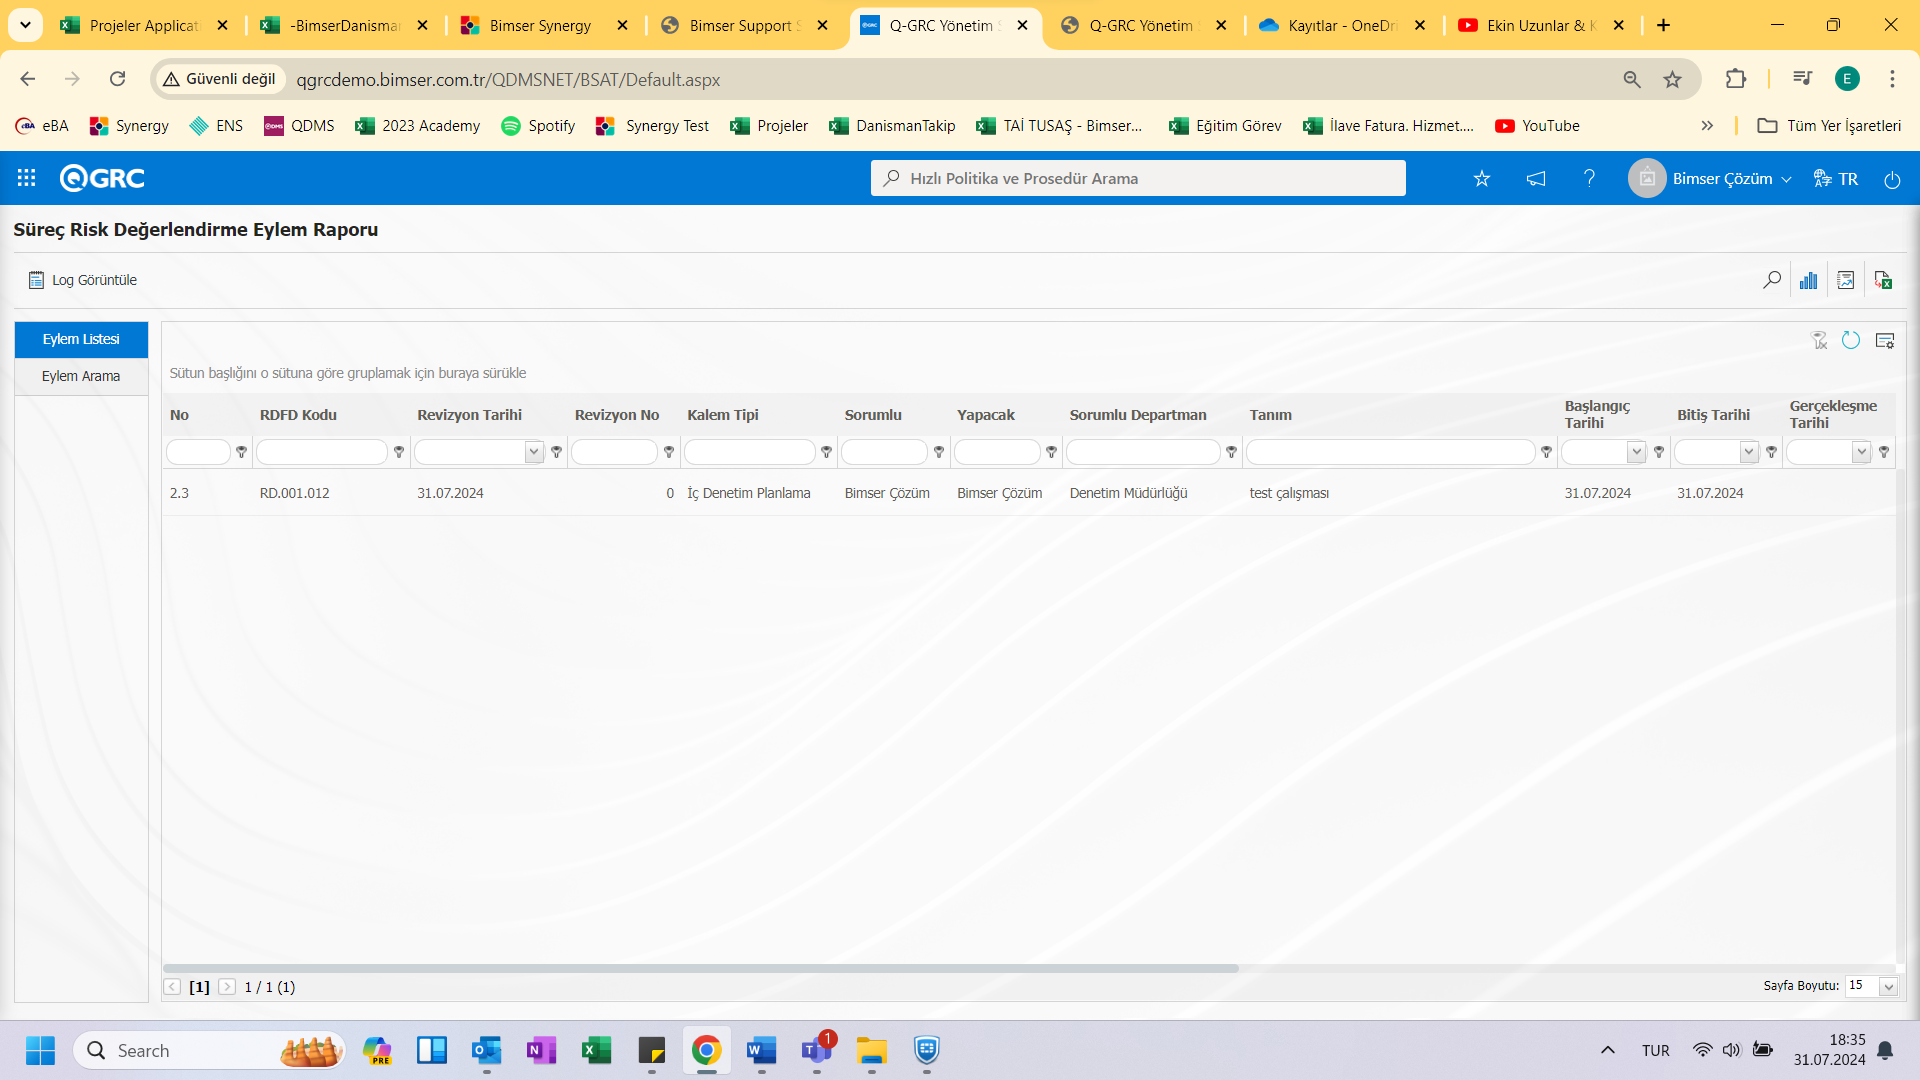
With the help of the buttons located in the Ekrandaki;
: Data can be exported to Excel.
: Records can be searched by filtering.
:Summary report is retrieved.
: Displays the action chart report.
:Log is displayed.
If the export to excel button is pressed, the system creates the Action report in the list in Excel format and presents it to the user.

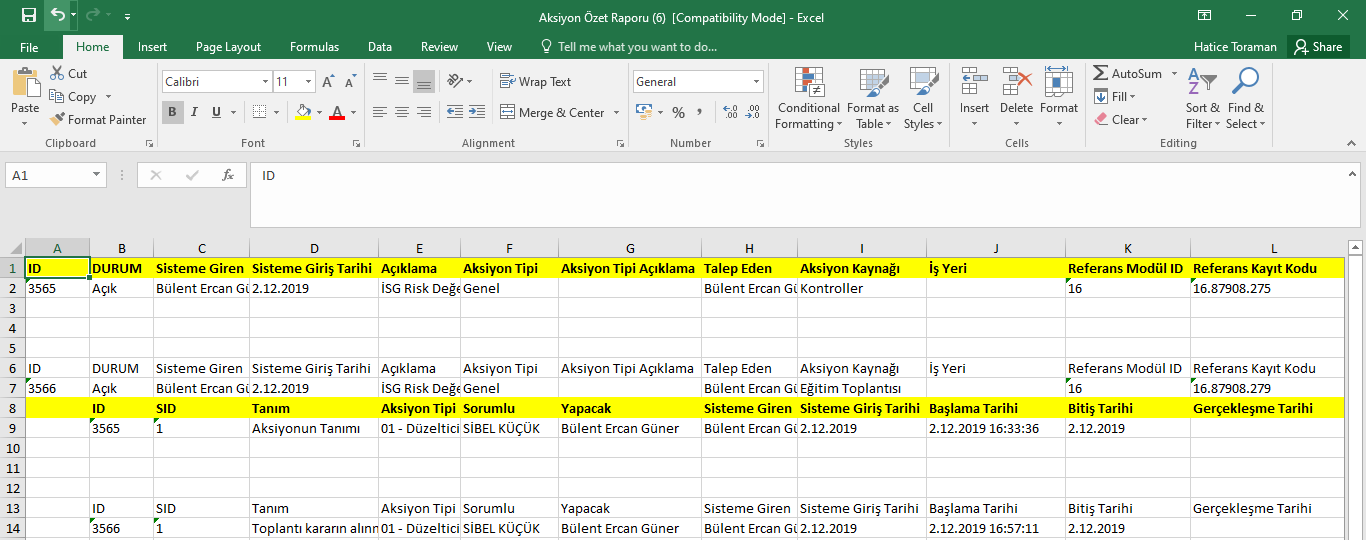
Clicking the Summary Report button displays the Action Summary Report.
<a id="_Toc173418841">``````</a>5.2.4. Graphics
Menü Name: GRC Management System /Risk Disclosure/Charts
This is the part where the graphs related to the risk notification Module are displayed.
<a id="_Toc173418842">``````</a>5.2.4.1. Most Analizi
Menü Name: GRC Management system /Risk Disclosure/Charts/Top Analysis
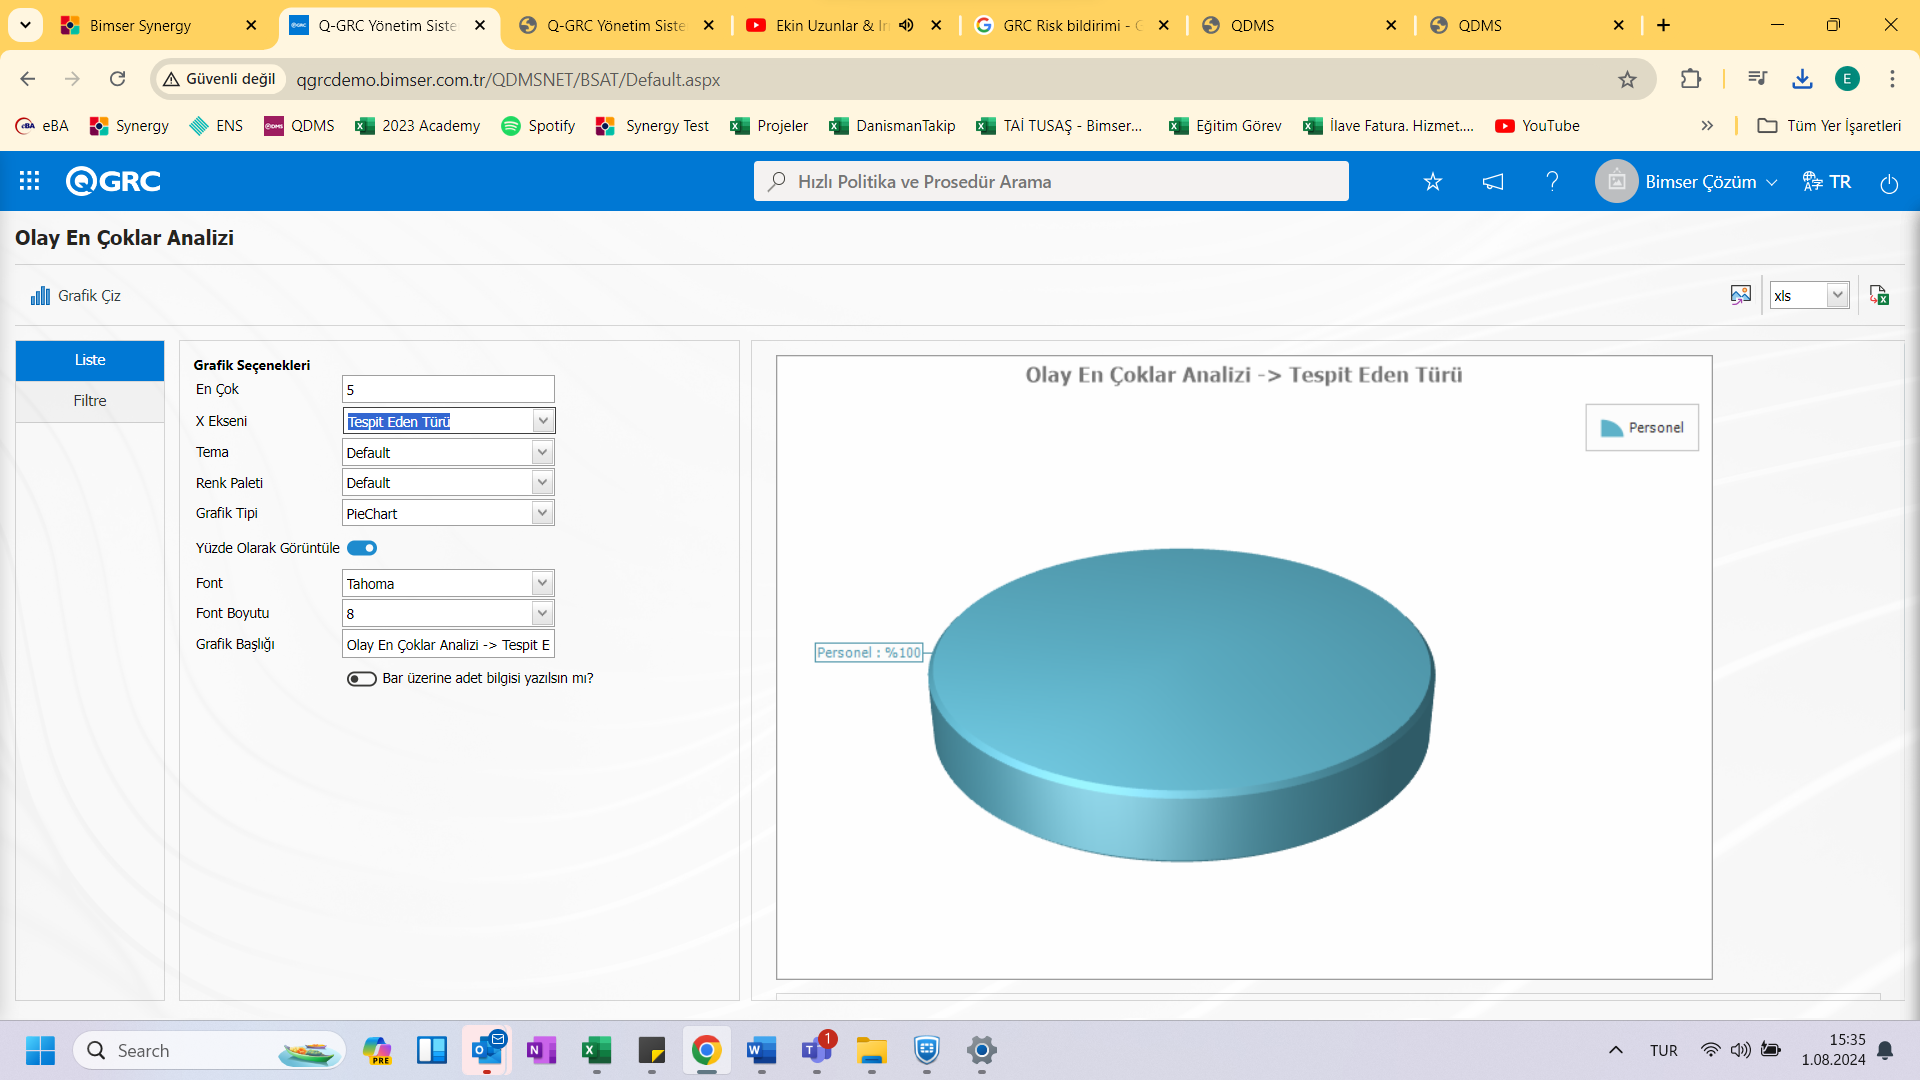
To get the Top Analysis chart, click the Top Analysis menu from the Charts menu.
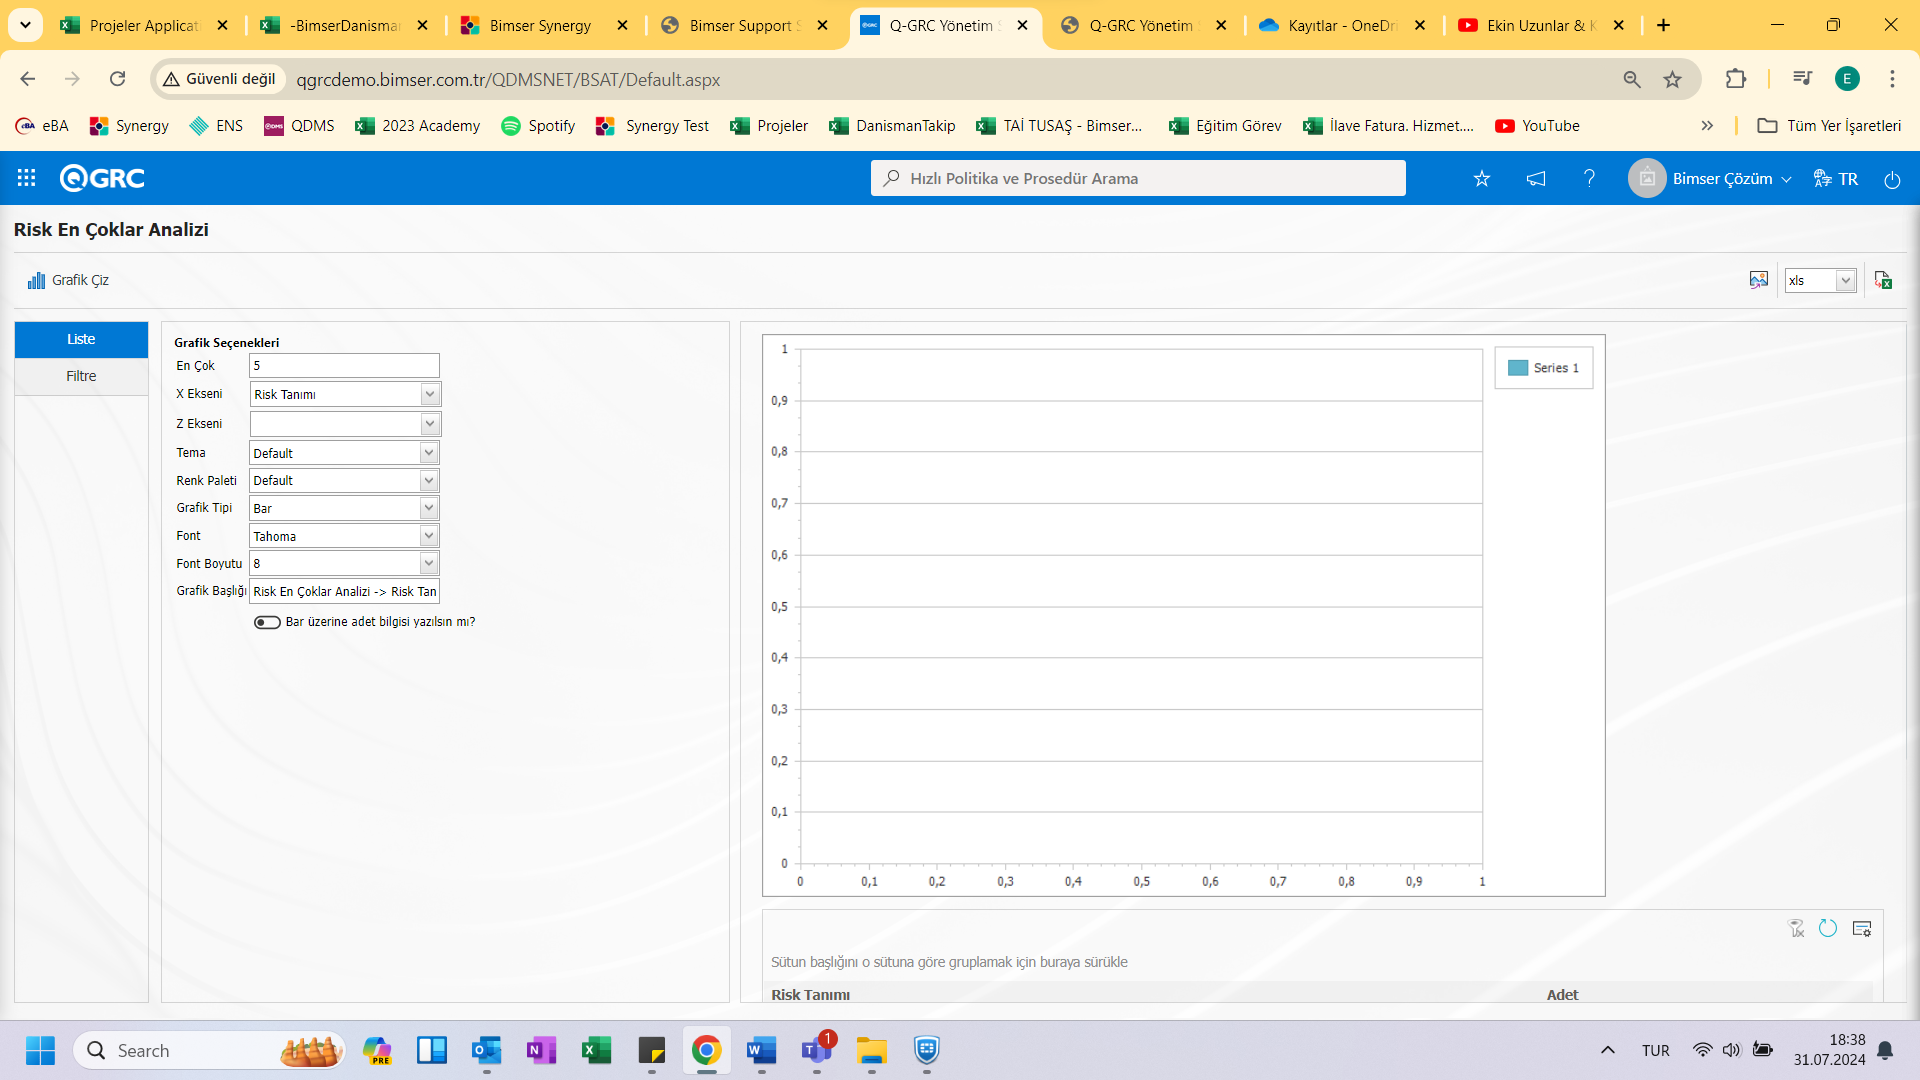
On the Top Analysis screen, the necessary selections are made in the Chart Options section. The maximum range that is desired to be on the chart is determined. From the chart options, the desired attribute to be located on the x-axis is selected. The main theme can be customized from the Color Palette properties. To create a chart by specifying the chart title! Click the (Draw Graph) button.
If requested, filtering can be done according to many criteria and only RDFDs with this feature can be included in the chart.
With the help of the buttons located in the Ekrandaki;
: Plots the graph on the screen according to the specified properties.
: Converts the desired graphic to the format type (Excel, jpg, pdf, etc.) selected from the drop-down menu and exports it to external media.
: Chart data is exported in Excel list format.
<a id="_Toc173418843">``````</a>5.2.4.2. Event distribution Matrisi
Menü Name: GRC Management System /Risk Disclosure/Graphs/Event Distribution Matrix
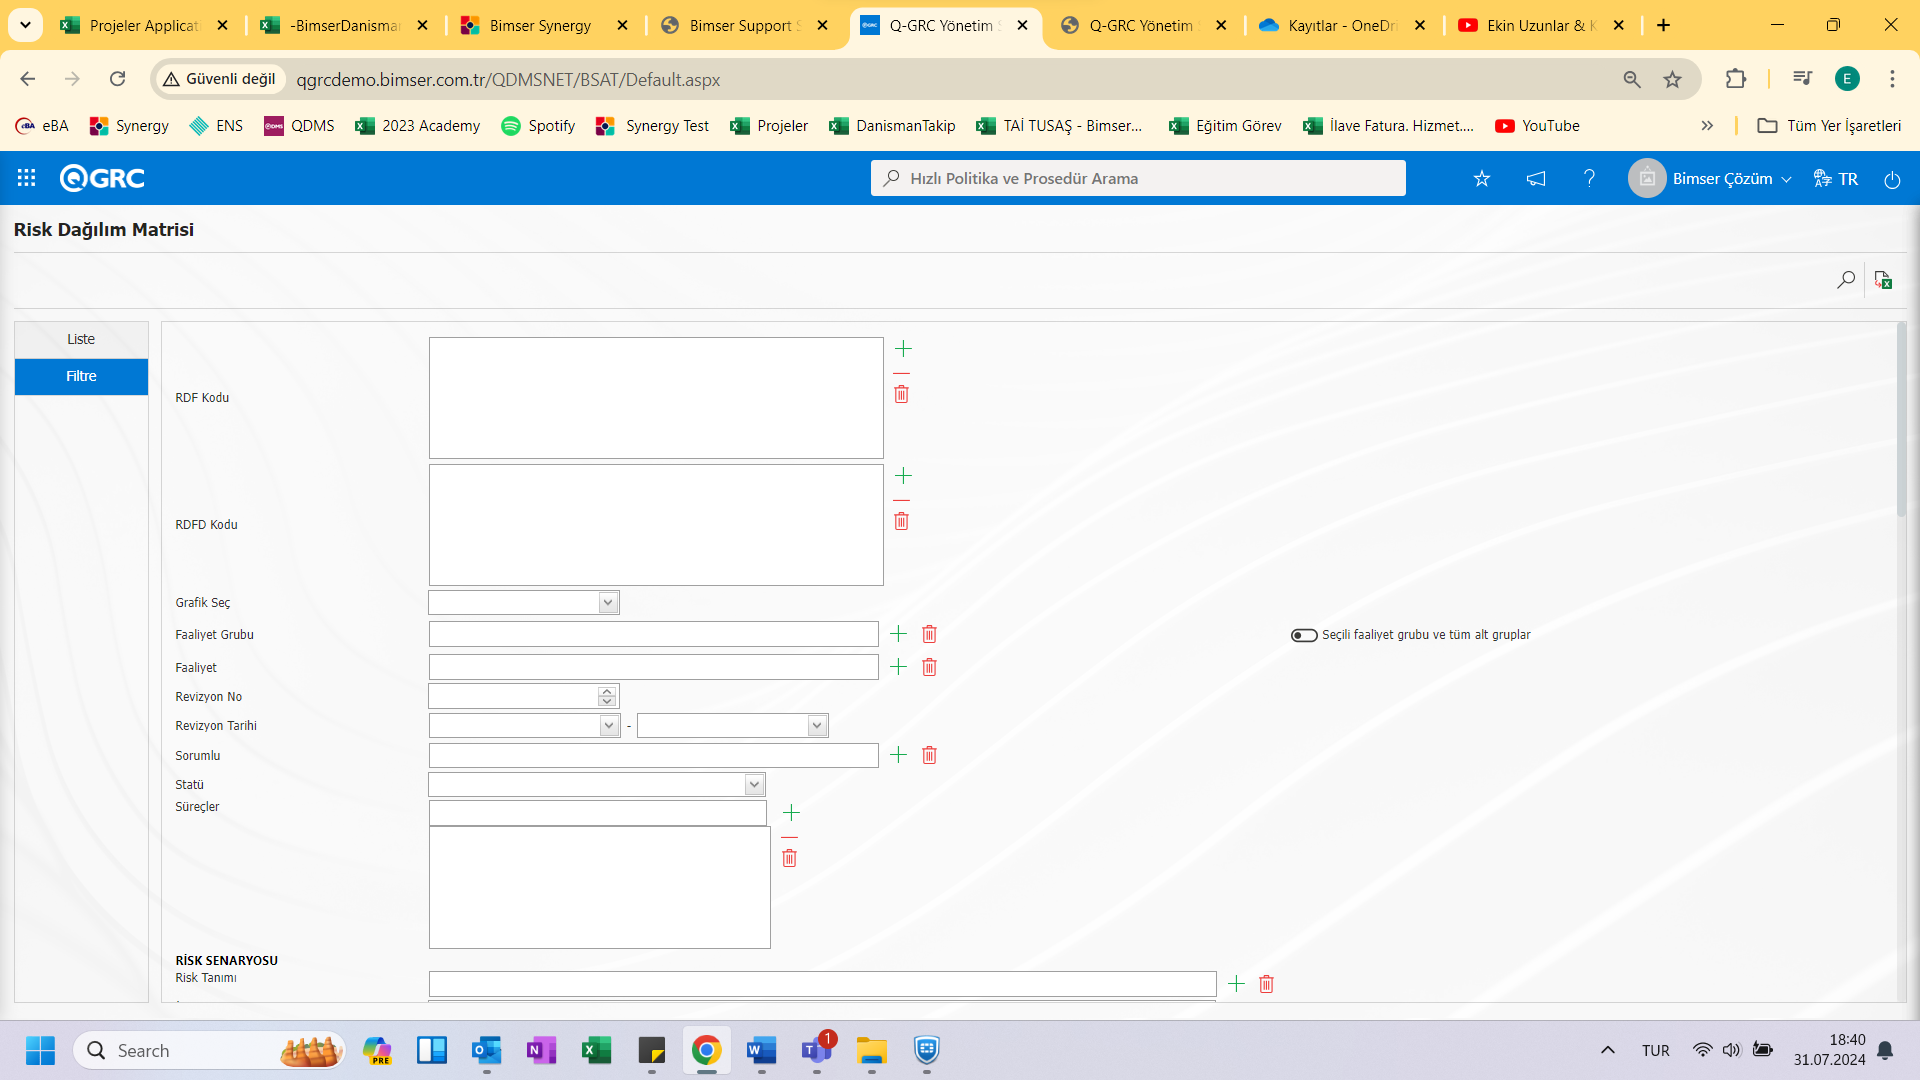
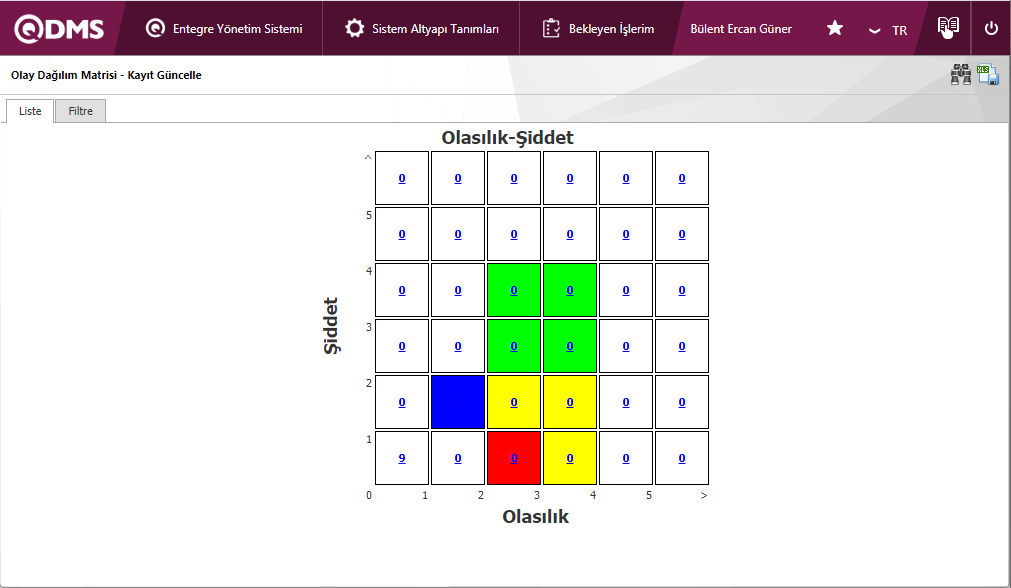
To get the Event Distribution Matrix, click on the Event Distribution Matrix menu from the Charts menu. Creates a two-dimensional graph that shows how many risks are in which range.
With the help of the buttons located in the Ekrandaki;
: Data can be exported to Excel.
: Records can be searched by filtering.
On the screen that opens, select the Chart Type and click the search button.
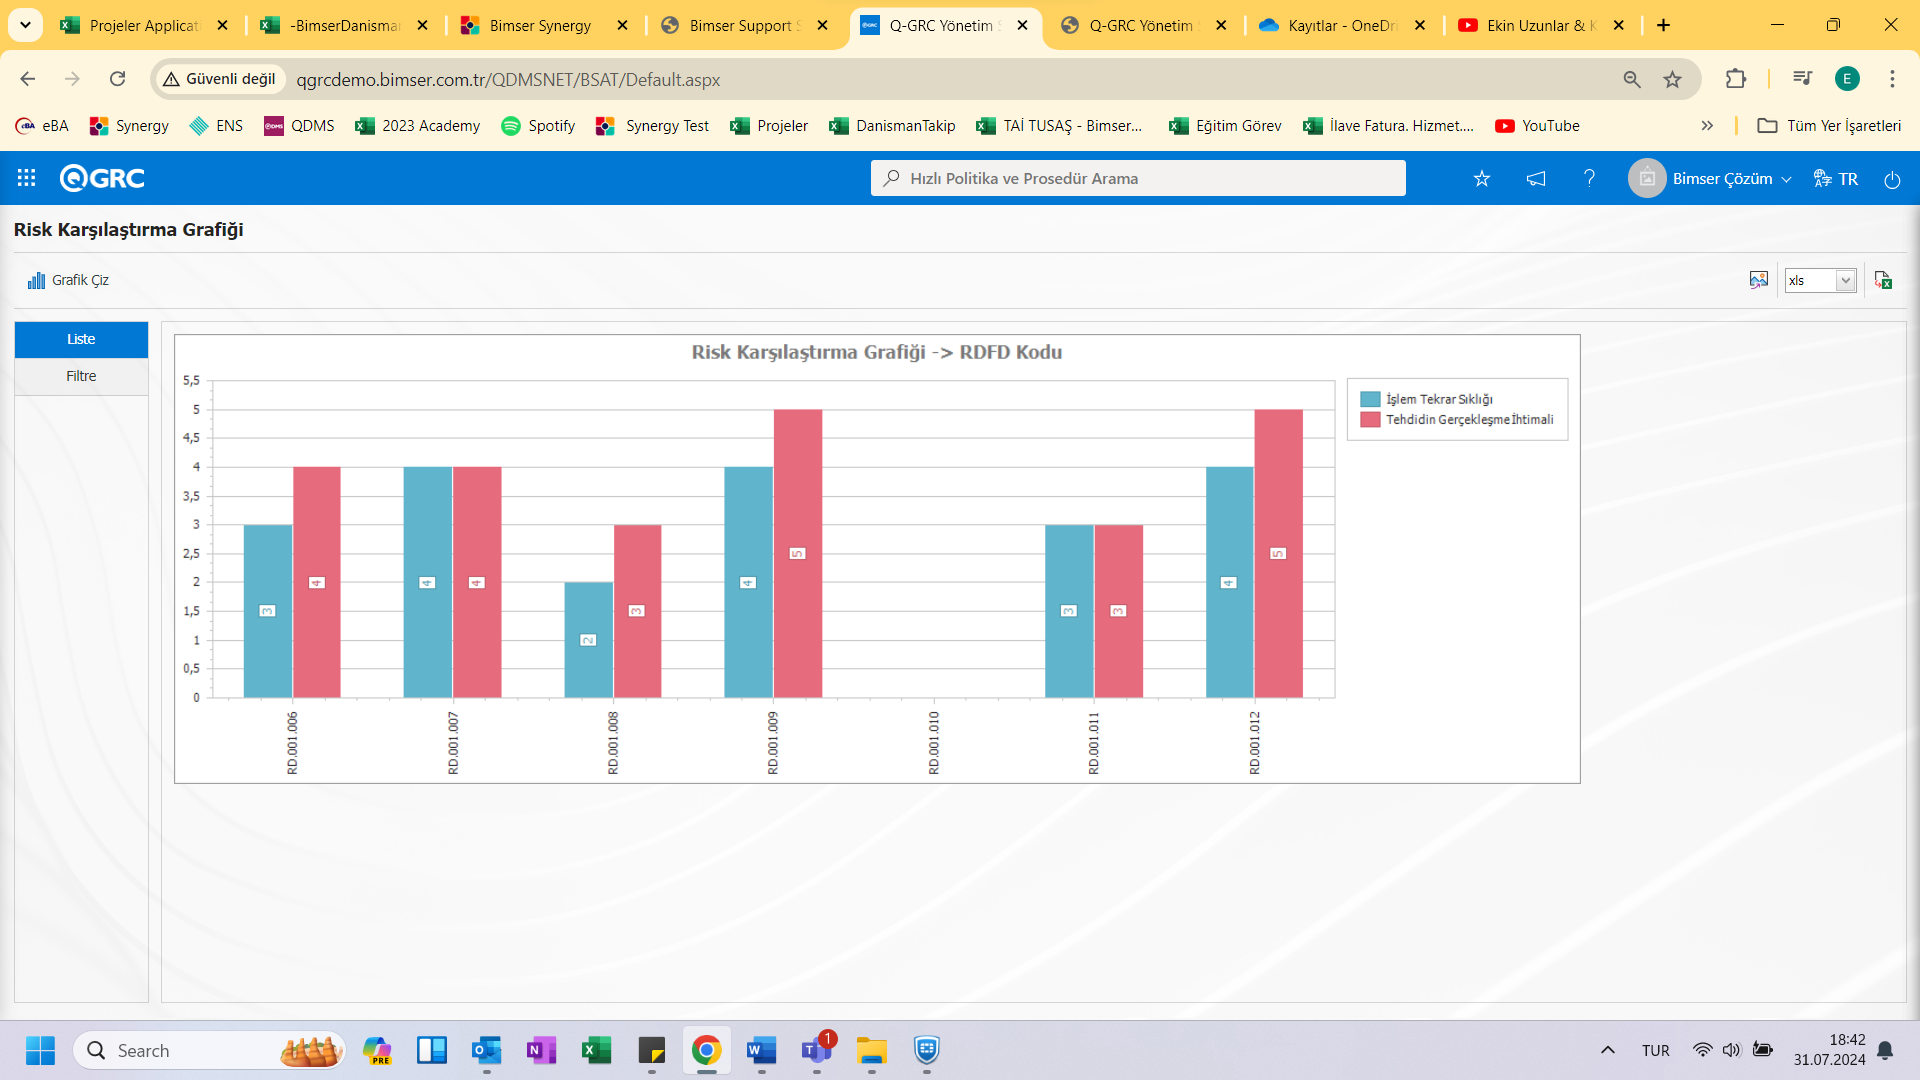
<a id="_Toc173418844">``````</a>5.2.4.3. Event Comparison Grafiği
Menü Name: GRC Management system /Risk Disclosure/Graphs/ Event Comparison Chart
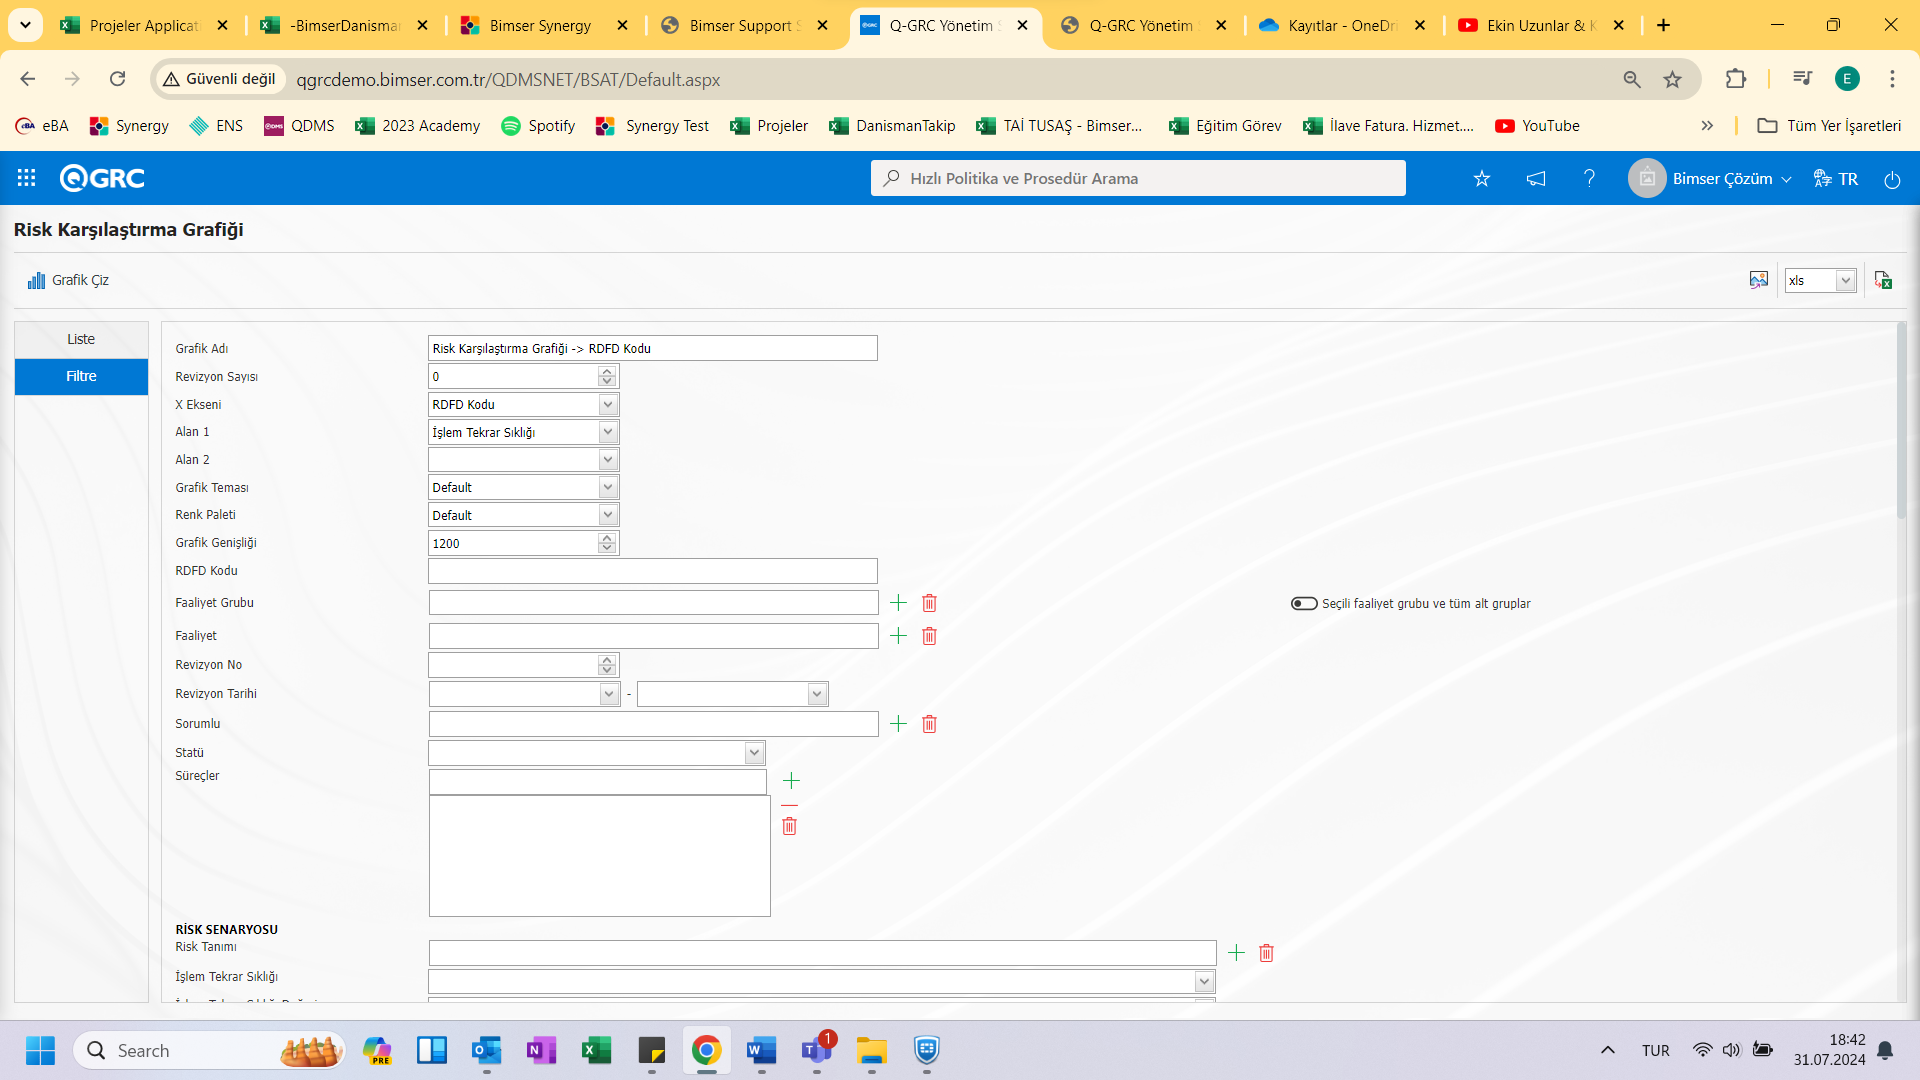
To get the Event Comparison Chart, click the Event Comparison Chart menu from the Charts menu.
With the help of the buttons located in the Ekrandaki;
: Plots the graph on the screen according to the specified properties.
: Converts the desired graphic to the format type (Excel, jpg, pdf, etc. ) selected from the drop-down menu and exports it to external media.
On the screen that opens, by filling in the fields where we want to get the chart comparison from the Filter tab (Draw Graph) button to make the necessary risk comparison.
<a id="_Toc173418845">``````</a>5.2.5.4. Event Revision Comparison Grafiği
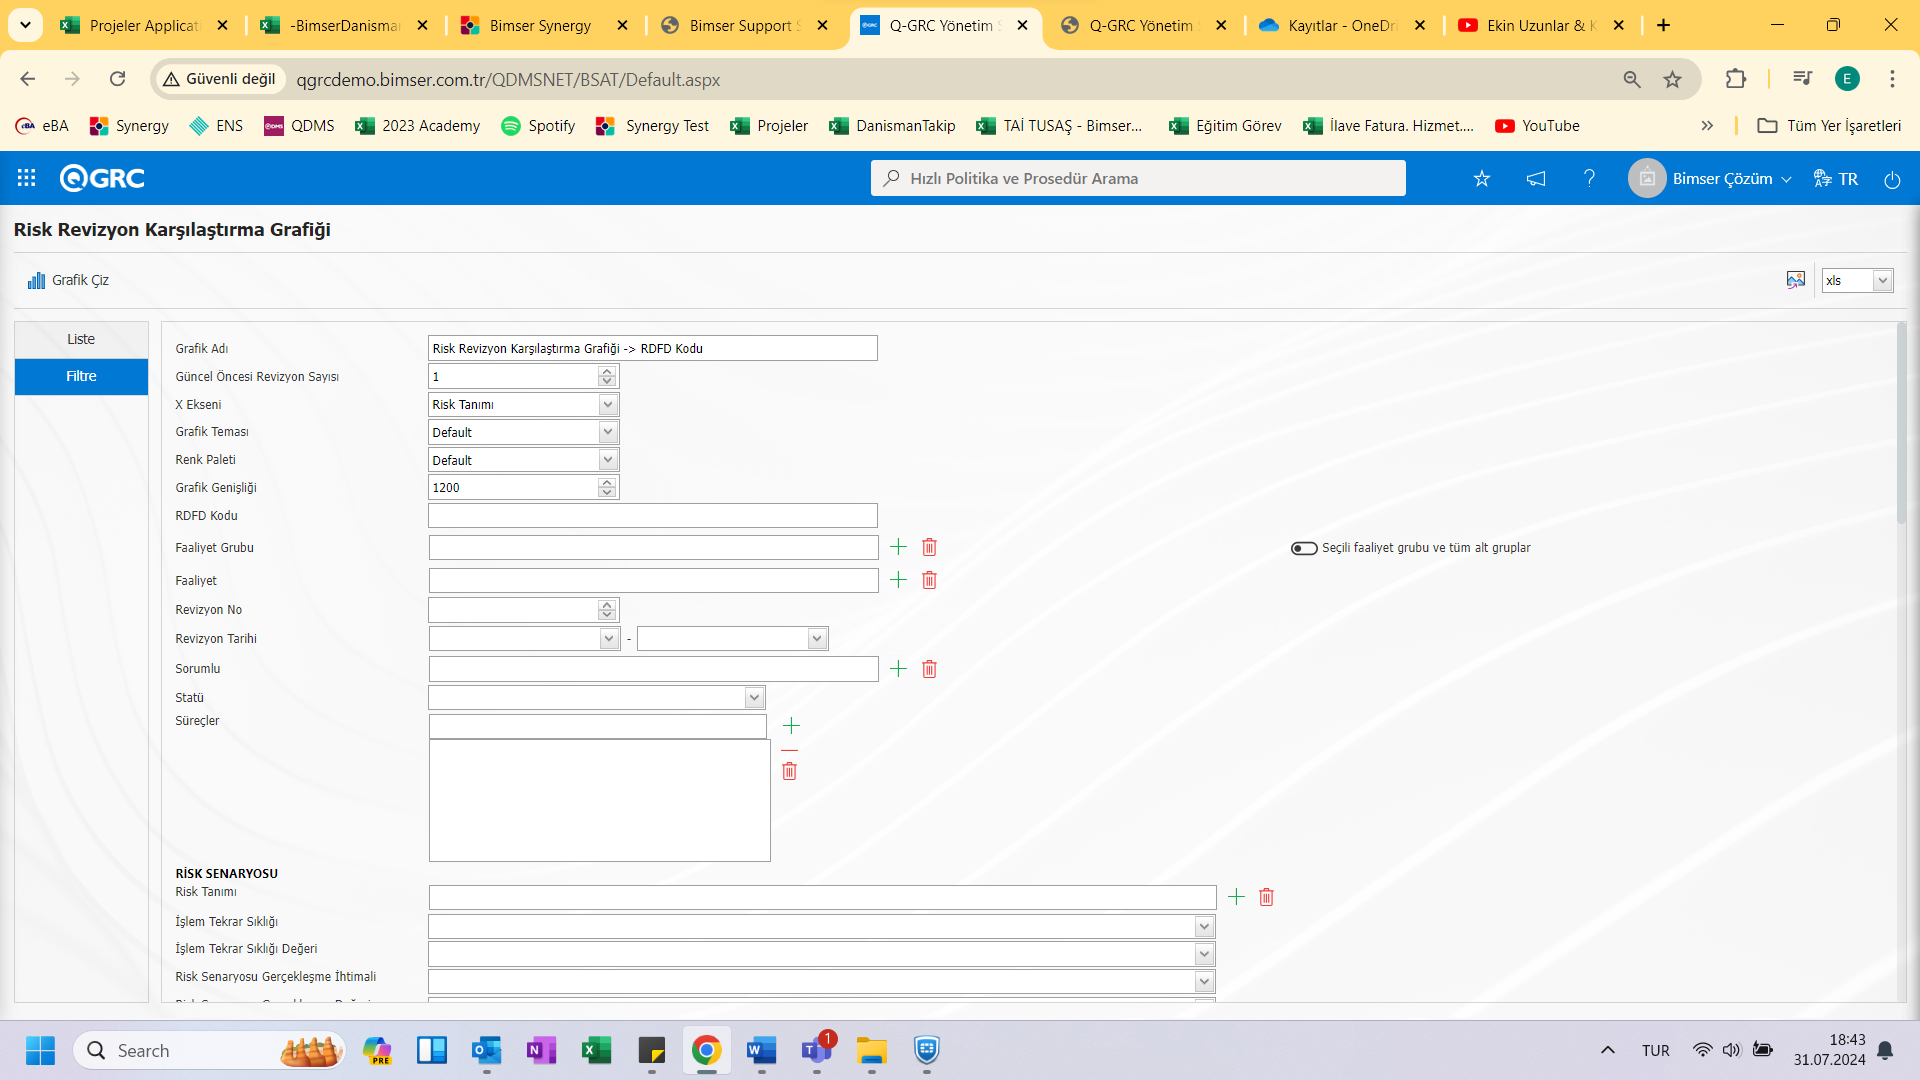
Menü Name: GRC Management system /Risk Disclosure/Graphs/ Incident Revision Comparison Chart
To get the Event Revision Comparison Chart, click the Event Revision Comparison Chart menu from the Charts menu.
With the help of the buttons located in the Ekrandaki;
: Plots the graph on the screen according to the specified properties.
: Converts the desired graphic to the format type (Excel, jpg, pdf, etc. ) selected from the drop-down menu and exports it to external media.
On the screen that opens, by filling in the fields where we want to get the chart comparison from the Filter tab (Draw Graph) button to compare the required risk revision. By selecting the number of revisions before the current and the x-axis, a graph is created with the Draw Graph Button.
