SYSTEM INFRASTRUCTURE DEFINITIONS USER HELP DOCUMENT
REV NO: <REV_NO>
REV. DATE: <REV_TARIHI>
Module Version: 5.26.1.1.
INGREDIENTS
- INPUT: 4
- OBJECTIVE 4
- RESPONSIBILITIES 4
- ABBREVIATIONS: 4
- APPS 5
- BSAT / Definitions 5
- Create Announcement ...
- Title Definition 5
- Department Identification8
- Personnel Identification9
- Position Identification13
- Defining User Groups 15
- Defining Authorization Groups18
- User Authorizations Definition 19
- Customer- Supplier Identification20
- Message Body Identification 22
- Workplace Identification 24
- Management System Definition 25
- Management System Item No Definition27
- User Consent Trnasfer Identification28
- BSAT / Configuration Settings29
- Reports 42
- BSAT / Definitions 5
<a id="_bookmark0">``````</a>GİRİŞ: "QGRS SYSTEM INFRASTRUCTURE DEFINITIONS", Personnel information is defined and other
It is the menu where the infrastructure required for the modules is constructed.
<a id="_bookmark1">AMAÇ</a>: Bu purpose of the help manual; To describe the working process of the QGRS "System Infrastructure Definitions" Module. Together with the definitions in the System Infrastructure Definitions, it aims to implement parametric adjustments and other technical infrastructure work.<a id="_bookmark2">``````</a>SORUMLULUKLAR: QGRC System Administrators
<a id="_bookmark3">``````</a>ABBREVIATIONS:
QGRC: Quality Governance Risk Compliance
<a id="_bookmark4">``````</a>APPS
<a id="_bookmark5">``````</a>BSAT / Definitions
With the System Infrastructure Definitions/ BSAT/ Definitions menu, QGRC infrastructure definitions are created in the system.
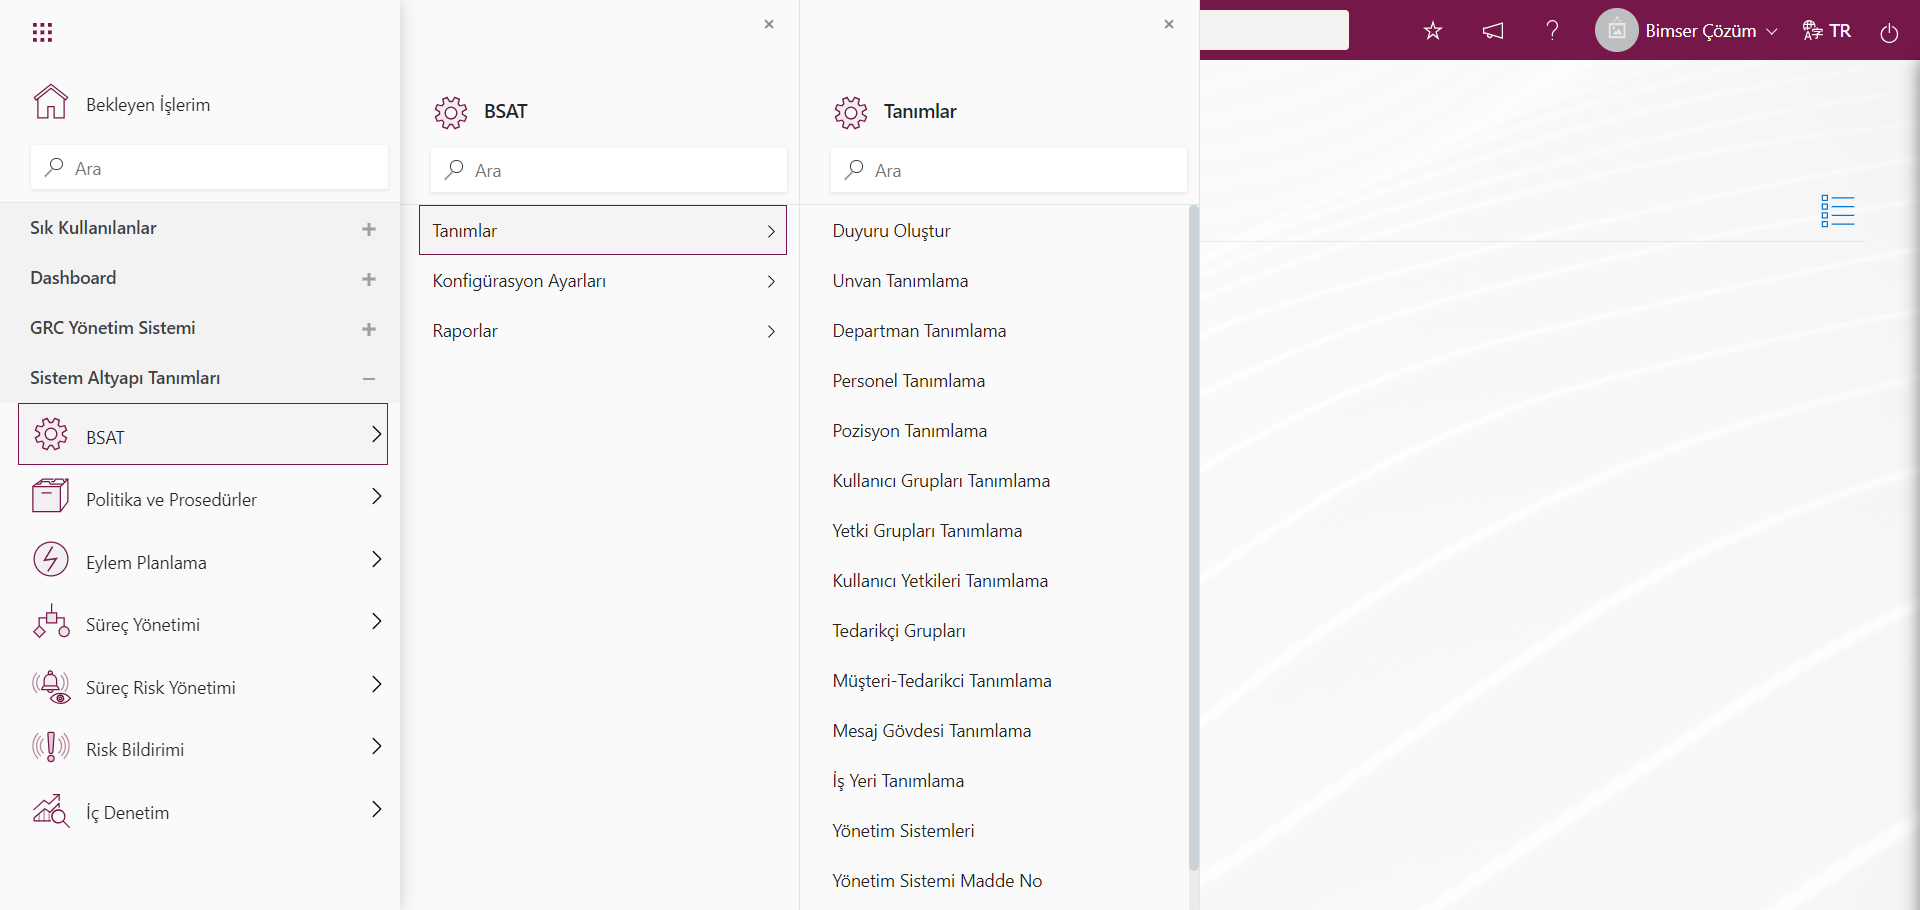
Important definitions made from the System Infrastructure Definitions / BSAT / Definitions screen are title, department, personnel and position definitions. If there is a program for HR Integration used by the company, these definitions can be pulled from the database of the companies with an integration. In such a case, there is no need to take any action in the first 4 menus. If personnel integration has been achieved in the company, when a new personnel is added or when a staff member leaves the job, the personnel status is automatically updated with the integration without the need to take any action in the system.
<a id="_bookmark6">``````</a>Title Definition
It is the menu where the titles required for personnel identification are defined. The titles used within the company are defined (such as Manager, Assistant Manager).
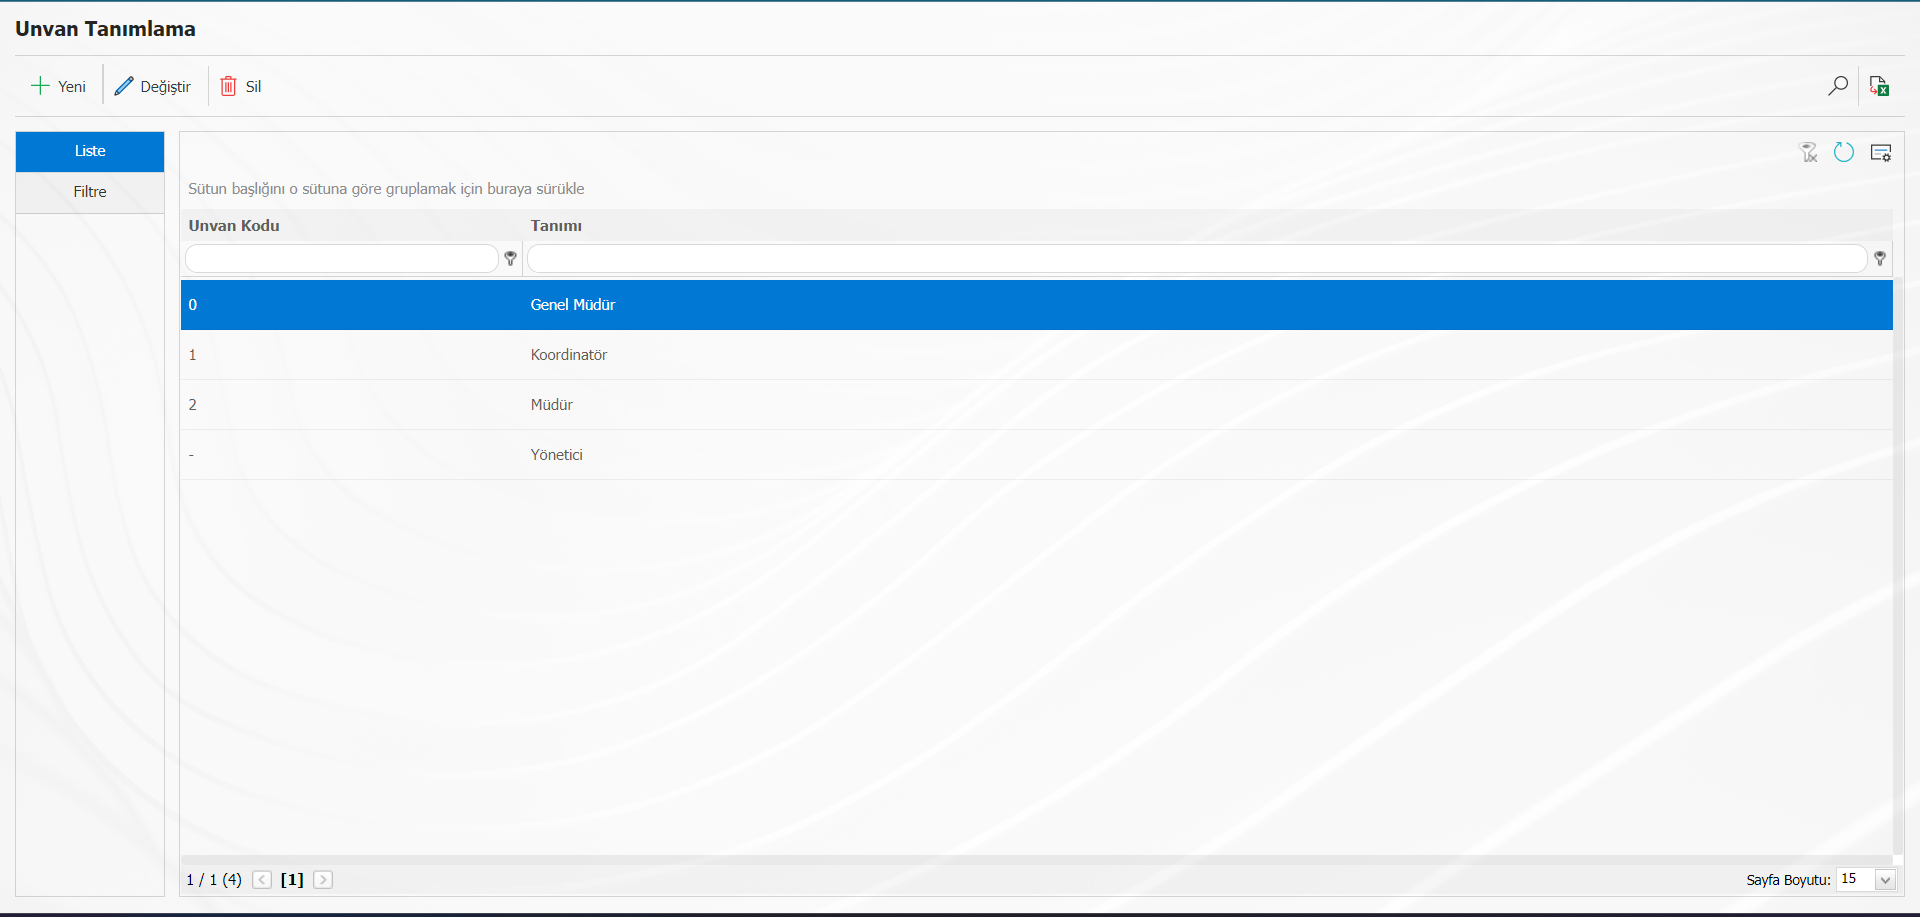
Titles are not user-specific, meaning multiple users can be given the same title and code.
With the help of the buttons on the screen that opens;
A new title is defined.
Any corrections, changes, or updates are made to the selected record.
Used to delete the selected record. If the title has not been used in any record, deletion is made, but if the relevant title has been used in any transaction, the system does not allow it to be deleted. Instead, its state is recorded passively.
Search by filtering. By coming to the filter tab, searches are made according to "Title Code", "Title Description" and "Status".
The data is exported to excel.
When you want to define a new title (new) button opens the registration screen.
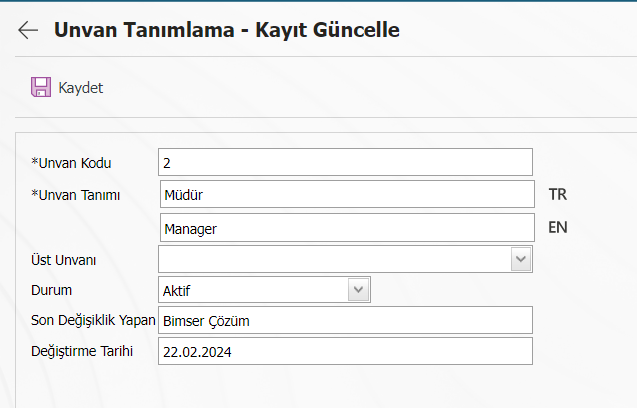
On the screen that opens, the title code, definition, and a higher title definition, if any, are made. For example; general manager, manager, manager, specialist, engineer, etc. Identification is made in such a way that it is. Defining
When doing it, it should be started from the top title. In this way, while the lower titles are defined, their relations with the upper titles can be established from this area.
If the title has not been used in any record, deletion can be made, but if the title has been used in any transaction, it is not allowed to be deleted by the system. Instead, the status information is recorded passively.
After all the definitions are made, the recording is performed with the save button on the screen.
<a id="_bookmark7">``````</a>Department Definition
It is the screen where all departments within the company are defined.
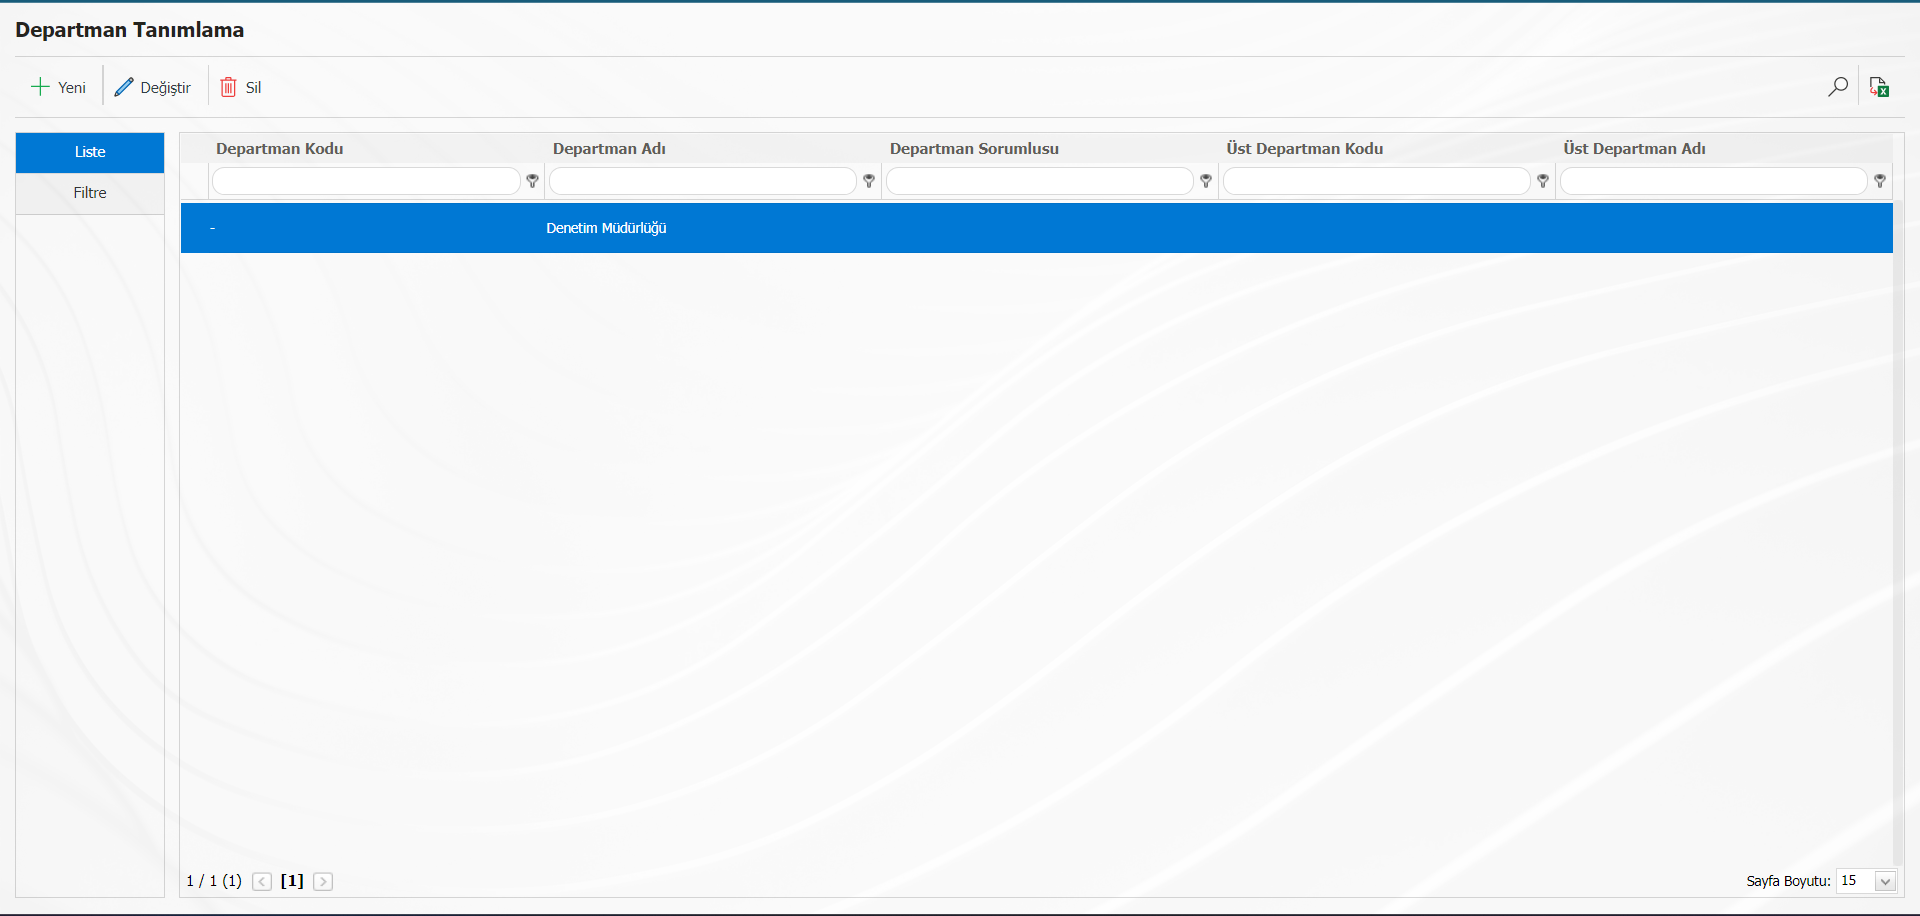
With the help of the buttons on the screen;
A new department is defined.
Any corrections, changes, or updates are made to the selected department.
The selected business unit is deleted. If the department has not been used in any record, deletion is done, but if the relevant department has been used in any process, the system does not allow it to be deleted. Instead, it is recorded passively.
Search by filtering.
The data is exported to excel.
When you want to define a new department! The registration screen opens with the button.
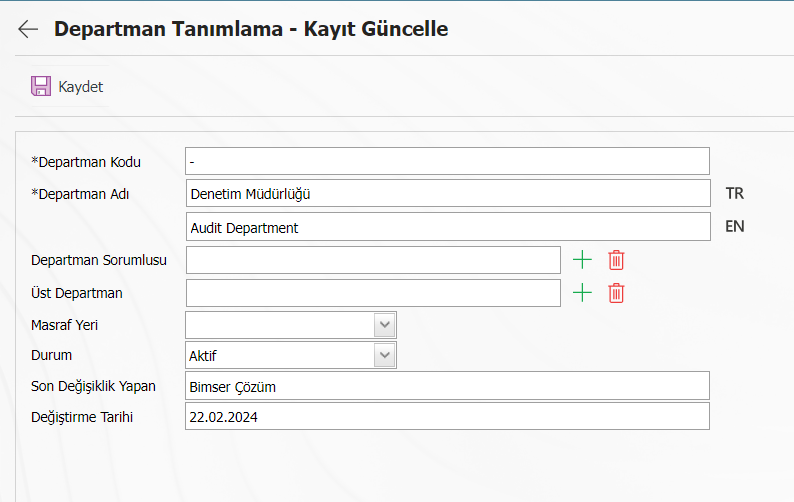
On the screen that opens, the code and name of the department are written. The head of the department is selected from the system. The fact that the department principals are full can be used in the flow of the relevant modules. Parent department information, if any, is entered.
Status information is divided into "Active" and "Passive". Those whose status is passive no longer appear when defining the department. It is a sign that it is no longer used in the system. When we search to see the unused departments, changing the status to "Passive" from the filter tab, it appears.
After all the definitions are made, the recording is performed with the save button on the screen.
<a id="_bookmark8">``````</a>Personnel Identification
It is used when defining personnel to the system.

With the help of the buttons on the screen;
A new staff member is defined.
Any corrections, changes, or updates are made to the selected personnel.
The selected staff member is deleted. If the personnel has not been used in any record, deletion is made, but if the relevant personnel has been used in any process, the system does not allow them to be deleted. Instead, it is recorded passively.
Search by filtering.
The data is exported to excel.
When you want to define a new staff! The button opens the registration screen.
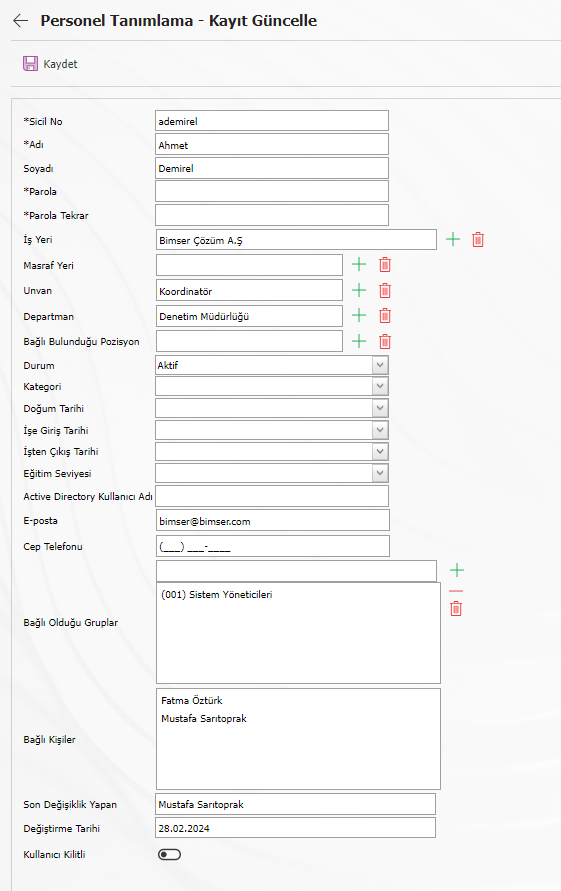
On the screen that opens, the registration number of the personnel, name, surname information, password is a mandatory field. According to the registration number entered, the user name is written on the login screen. Apart from this, the department to which the personnel belongs, the title, the superior to which they are affiliated, date of birth, date of employment, place of expense, etc. information is defined. For the personnel whose e-mail addresses are defined, e-mails from delays, which will ensure the continuity of the activities in the relevant modules, are sent.
The user groups in which the personnel are included are realized by selecting "Affiliated Groups". Likewise, if there are people to whom the personnel is affiliated, they are logged in with the "Connected Persons" selection.
After all the definitions are made, the recording is performed with the save button on the screen.
For a staff member who leaves the job in the system! By using the button, the employee left the job is selected from the status field and recorded. Then his position is emptied. If the vacant position is filled when the personnel who started with the same task arrive, the remaining jobs on the departing personnel are transferred to the new personnel.
Automatic transfer of personnel can be provided if desired. After the personnel information is filled in the master list, it is transferred by us. An example of a master list is below.
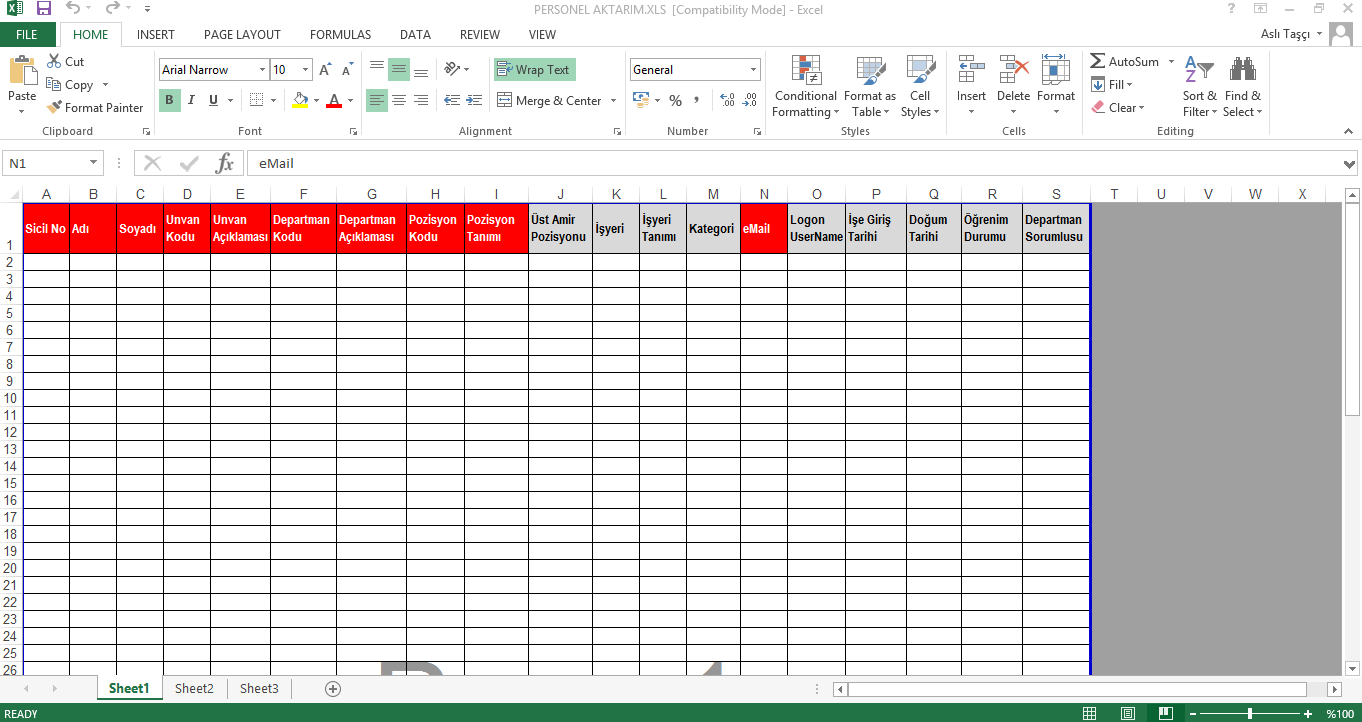
Registration number, name, surname, title code, title description (description), department code, department description, position code, position description and e-mail addresses of the personnel are defined, gray areas can also be filled in if desired. Here, the codes should be entered in the columns of the department manager and the senior supervisor position. If Active Directory integration is to be provided, the logon username part is filled.
After the personnel transfer template is filled in by the company and forwarded to Bimser, the personnel transfer is carried out by the Bimser Technical Team.
Not: No spaces or Turkish characters should be used when introducing Sicil No. In addition, when Active-Directory Integration is done, people can access QGRC with the passwords they enter on the computer.
<a id="_bookmark9">``````</a>Position Definition
It is the screen where all positions in the company are defined. Sample positions; knowledge
operations specialist, planning engineer, chief financial officer, etc.

In QGRC, authority proceeds through position. With position definition, jobs are facilitated by assigning them to positions. Because when the identification process is made to the normal personnel, it is necessary to carry out these procedures again in case of the departure of the personnel. However, when there are tasks defined for the position, even if the personnel who do the job leaves the job, the work will be performed by the new personnel appointed in that position.
With the help of the buttons on the screen;
A new position is defined.
Any corrections, changes, or updates are made to the selected position.
The selected position is deleted. If the employee has not been used in any record, deletion is made, but if the relevant position has been used in any transaction, the system does not allow it to be deleted. Instead, the current state is recorded passively.
Search by filtering.
Data is exported to excel.
When you want to define a new position, the registration screen opens with the button.
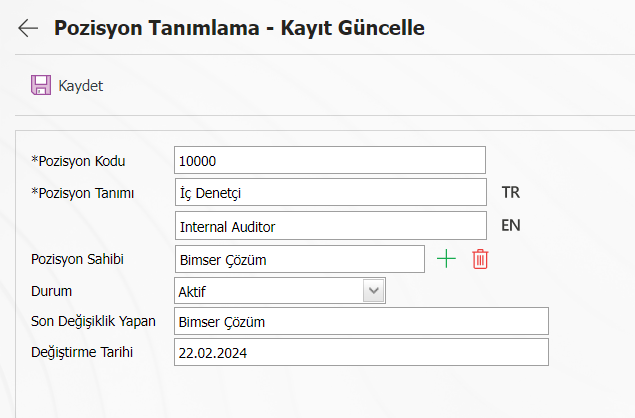
On the screen that opens, the position code and definition are written. The position holder is selected from the system. Whoever is currently in the position is designated as the owner of the position. In the future, when positions change, they are changed from this field. When the position status is inactive when the employee leaves the job, the position holder becomes vacant.
Status information is divided into "Active" and "Passive". Those whose status is passive no longer appear when defining positions. It is a sign that it is no longer used in the system. It comes up when we search by changing the status to "Passive" from the filter tab to see the unused positions.
After all the definitions are made, the recording is performed with the save button on the screen.
<a id="_bookmark10">``````</a>``````<a id="_bookmark11">``````</a>
<a id="_bookmark12">``````</a>Defining User Groups
Creating user groups provides ease of use in menu authorization processes, to use information areas more easily and effectively, to group personnel with equivalent competencies, to define user-based authorization for the policy and procedures module, and in some role-based flow situations. We can include a person in more than one group if necessary.
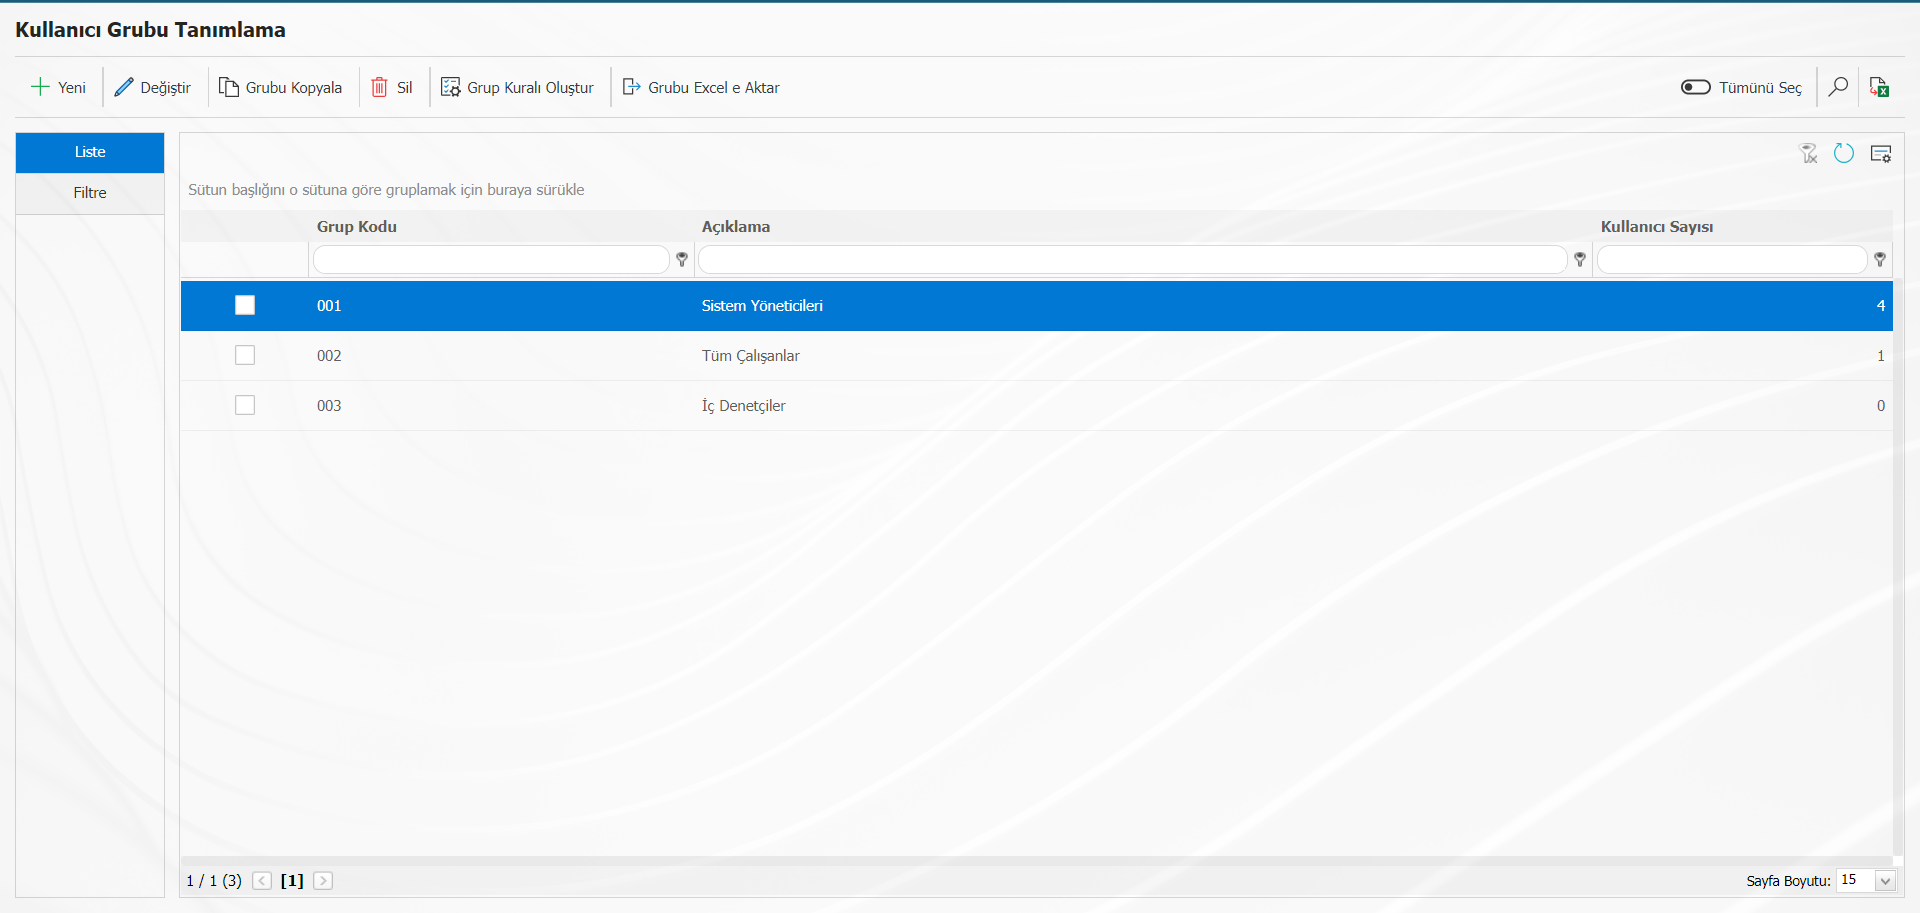
With the help of the buttons on the screen;
A new user group is created.
The selected record is updated.
The selected group is copied. People in an existing group can be renamed to another group name.
If it is to be used, the group is copied with the copy button. Group rules are created in various categories.
The user group is deleted.
Search by filtering.
The data is exported to excel.
The group and the personnel data within it are exported to excel.
When you want to define a new user group, the registration screen opens with the button.
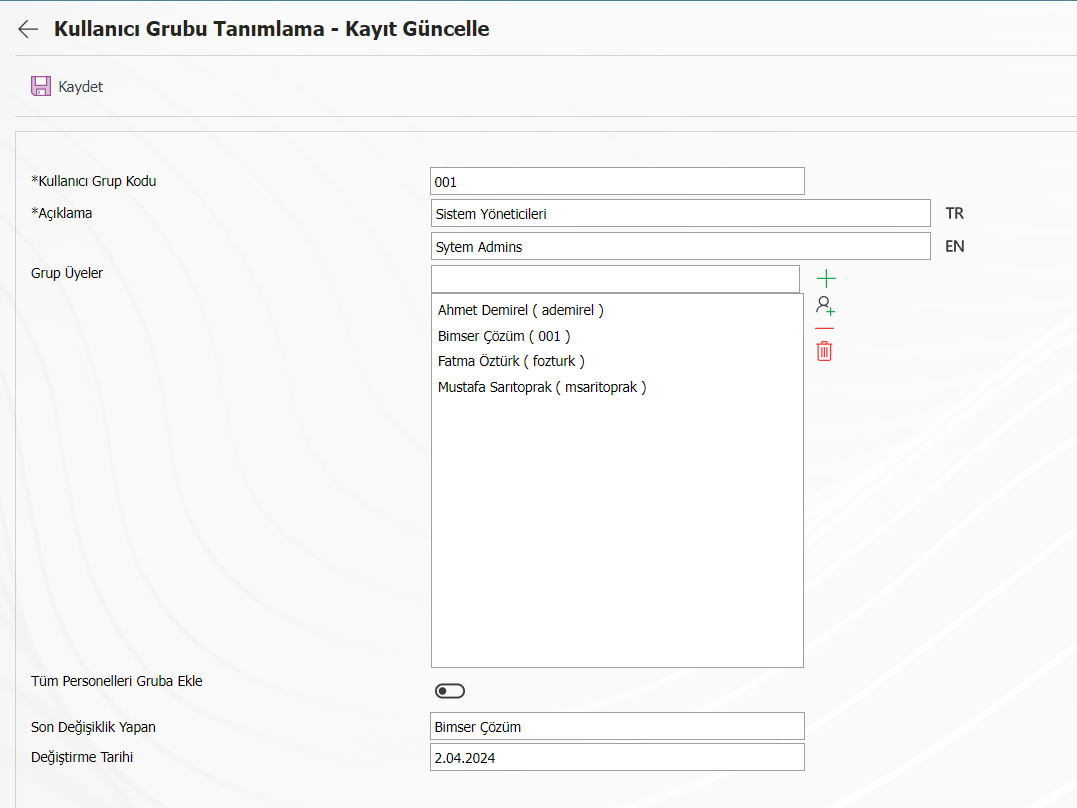
On the screen that opens, the user group code, description fields are filled, personnel are added to the group
User group identification is done.
On the user group definition screen, click ! A role can be defined for the user group with the button. These roles work in situations where there is HR integration. When the integration is running, it transfers the personnel to the relevant user group according to the roles created on this screen.
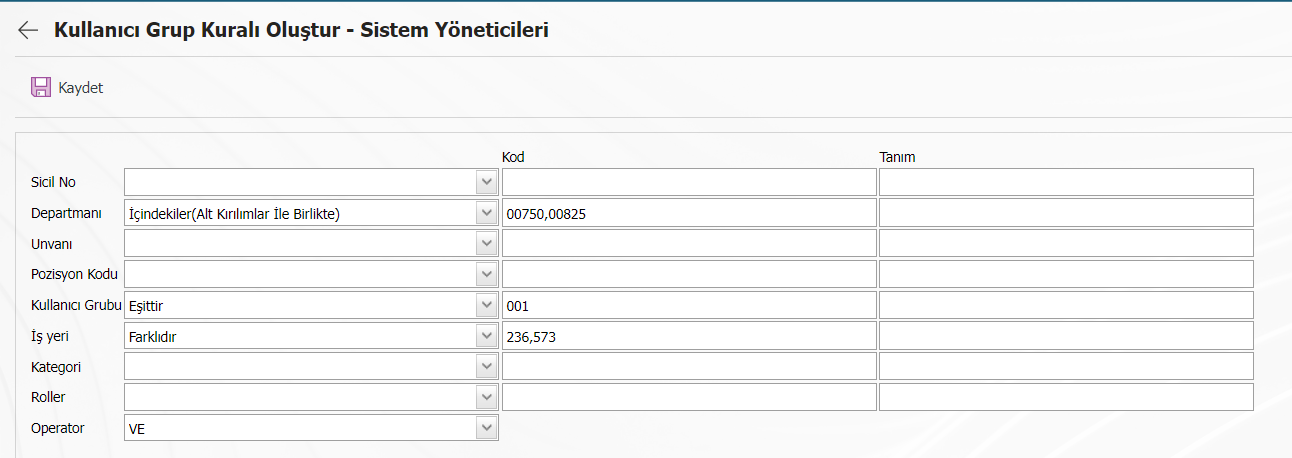
If we go through the example: the department code is 00750,00825, the rule of automatically add those who are in the user group 001 and whose workplace is other than 236,573 to this group is provided. The process is terminated by clicking the save button in the upper left corner.
NOT: In the option where Kural is specified, if it uses "Similar", a % sign should be placed at the end of the code that appears. For example, if the rule of 50000498 similarities from positions such as 50000498-01, 50000498-02 is to be set, it should be written as 50000498%.
If it is desired to add everyone included in the system to the All Users Group, then Equals should be selected from the Category field and 0 (zero) should be written in the relevant field.
The conjunction "and – or", which we call Operator here, is very important. And if we use it as , it will add the group to the person if it meets all of the rules. Or, if we use it as or if it satisfies only one of the rules, it will add the group to the person.
<a id="_bookmark13">``````</a>Defining Authority Groups
It is the function that sets which menus users will see on the QGRC. Module, department, etc. The menu that can be accessed according to the criteria is authorized.

With the help of the buttons on the screen;
A new authorization group is created.
The selected record is updated.
The selected authorization group is deleted.
The data is exported to excel.
When you want to define a new authorization group, the registration screen opens with the button.
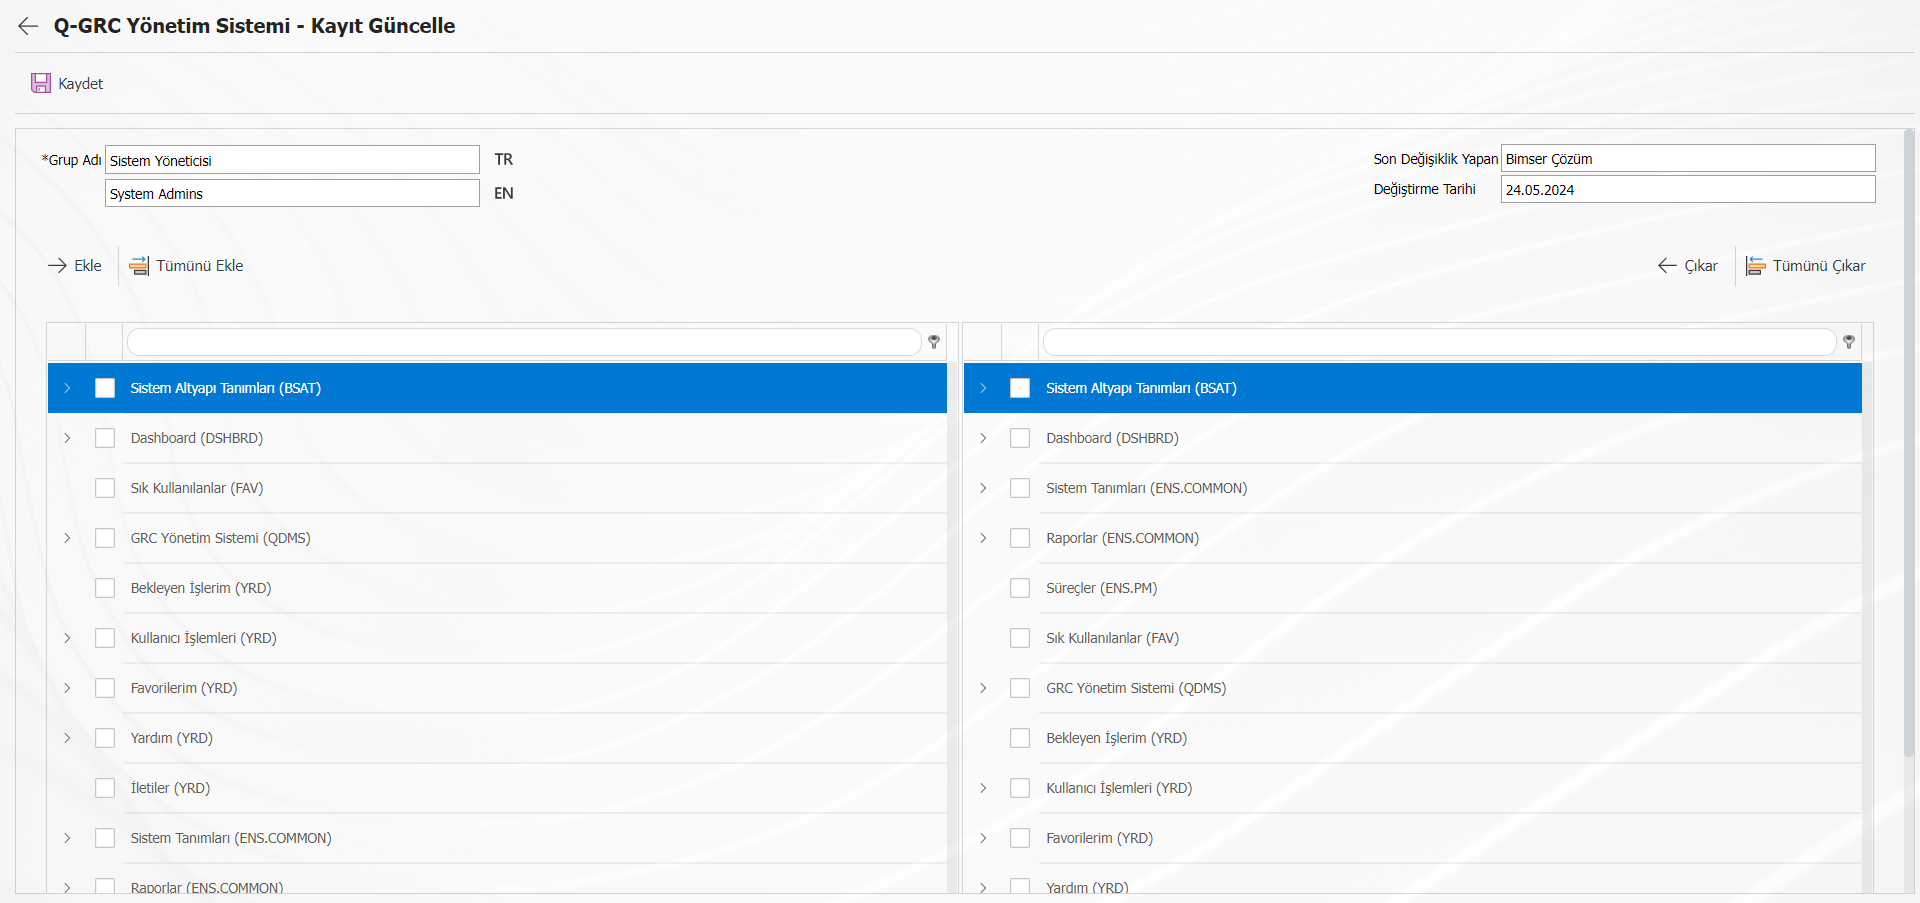
On the screen that opens, the name of the authorization is written in the group name section. On the left side of the image, there are all the menus on the QGRC, and on the right, there is a ! The menu selected by the button is moved. ![A black and white textDescription automatically generated]Moves all menus with the help of the (/img/qgrc_sistem_altyapi_tanimlari/58.png) button. Menus moved to the right mean menus that will belong to the authority group. Then the registration process is carried out.
<a id="_bookmark14">``````</a>Defining User Privileges
This is the menu where user groups and authorization groups are matched. If we want the user groups we create to have which of the authorizations we have determined in the authorization group definition menu, we need to associate the relevant user group and authorization group. Thus, users are authorized to see menus in bulk.
 With the help of the buttons on the screen;
A new user authorization definition is created.
The selected record is deleted.
The data is exported to excel.
When a new user authorization definition is desired! The registration screen opens with the button.
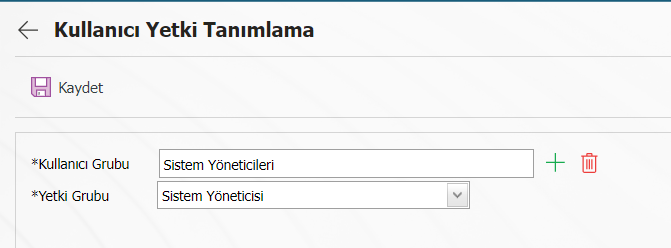
On the screen that opens, user groups and authorization groups are matched and which user group will have which authorization. The definition is saved with the Save button.
<a id="_bookmark15">``````</a>Customer- Supplier Identification
It is the menu where customers and suppliers are defined.  With the help of the buttons on the screen;
A new customer-supplier definition is created.
The selected record is updated.
The selected record is deleted.
Search by filtering.
The data is exported to excel.
When you want to define a new customer – supplier, the registration screen opens with the button.
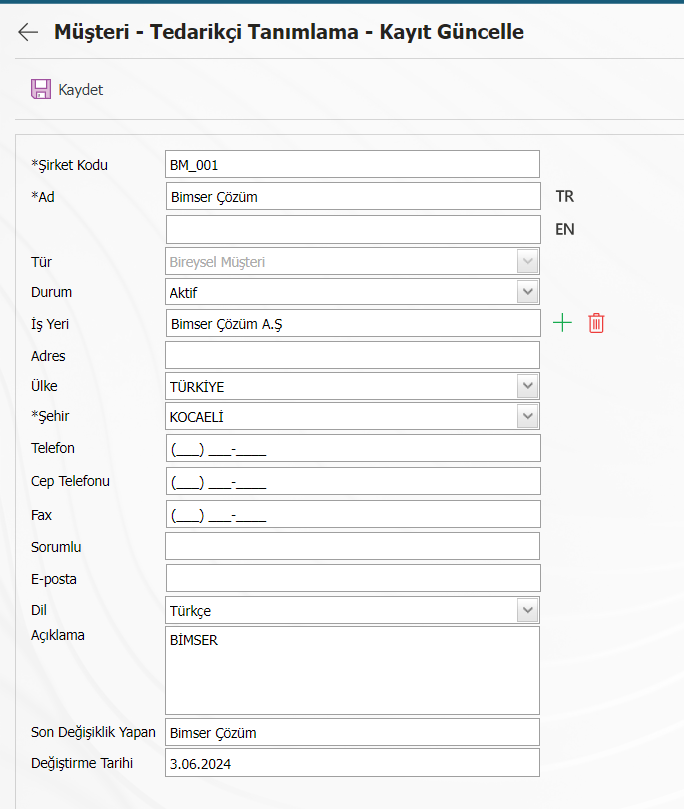
On the screen that opens, contact information such as company code, name, type (individual customer, corporate customer, supplier), e-mail address etc. can be defined. CAP, Customer complaint, etc. Customer-supplier information is used in the modules. If it is desired to send an information e-mail to the customer – supplier regarding the record opened in the relevant modules, e-mail definitions should be made.
<a id="_bookmark16">``````</a>``````<a id="_bookmark17">``````</a>``````<a id="_bookmark19">``````</a>Defining Message Body
It is the area where the contents of the e-mails that will be sent after the transactions made in the modules are defined. By default, message bodies are defined, when necessary, e-mail contents are updated or new message bodies can be defined.
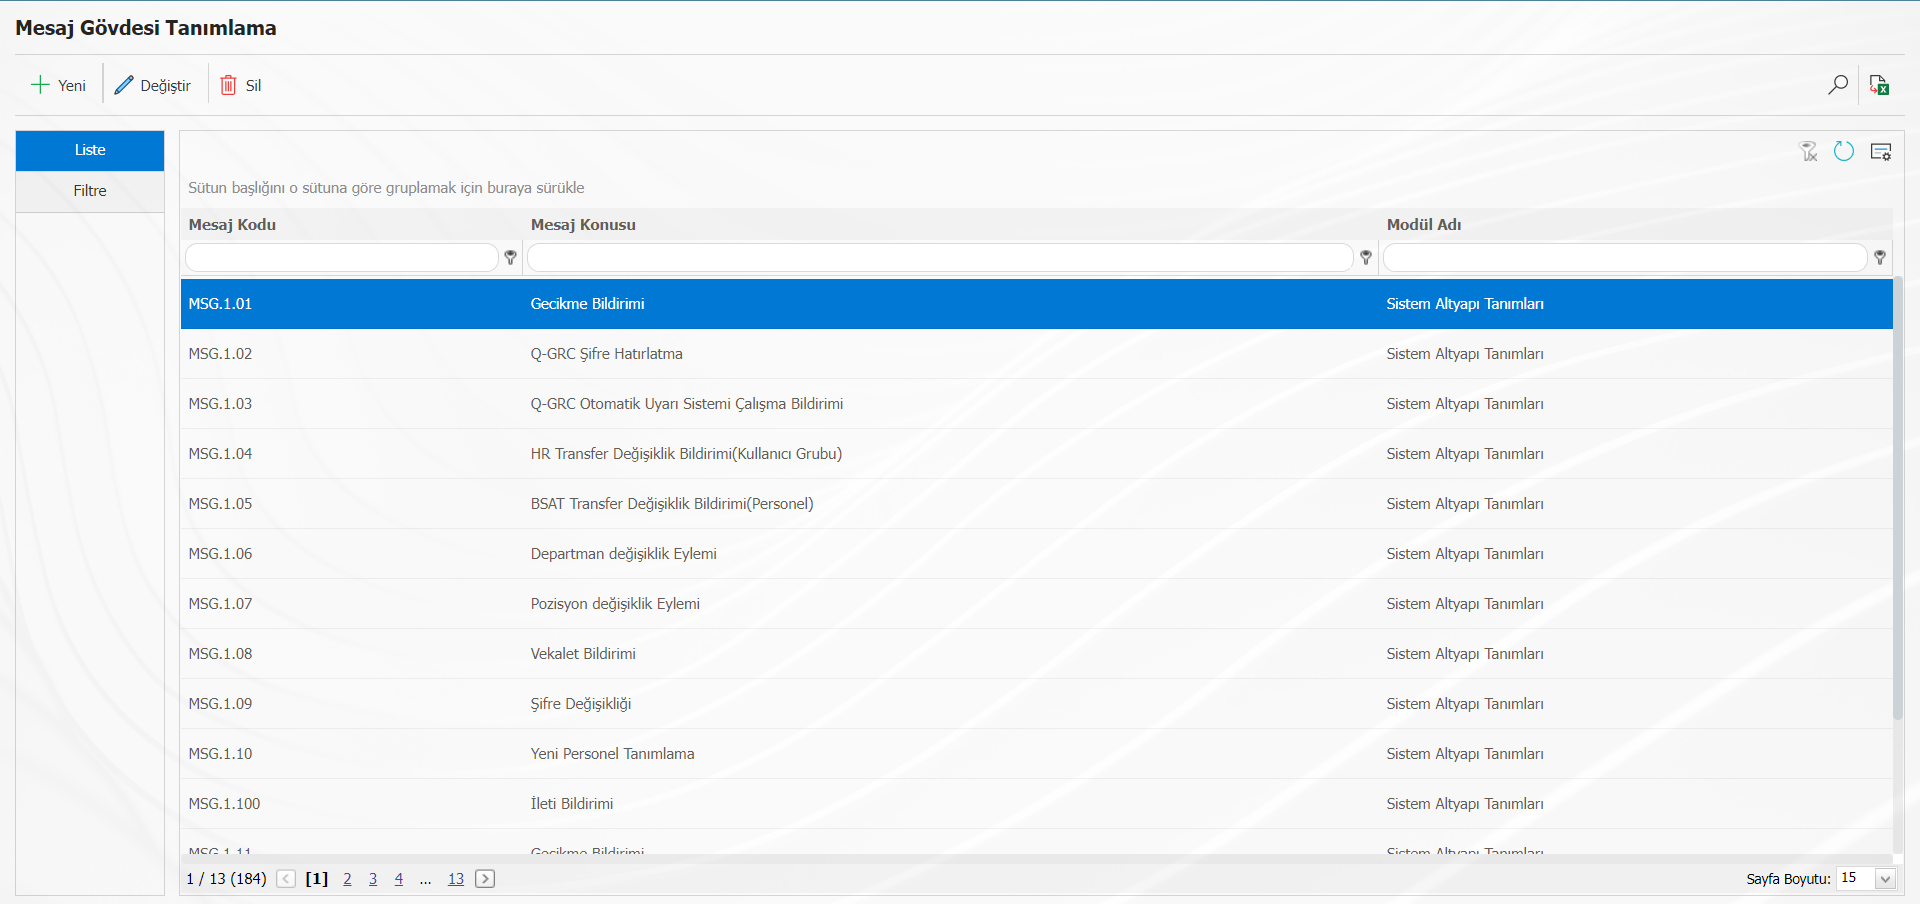
With the help of the buttons on the screen;
A new record is created.
The selected record is updated.
The selected record is deleted.
Filtering.
The data is exported to excel.
When you want to define a new message body! The registration screen opens with the button.
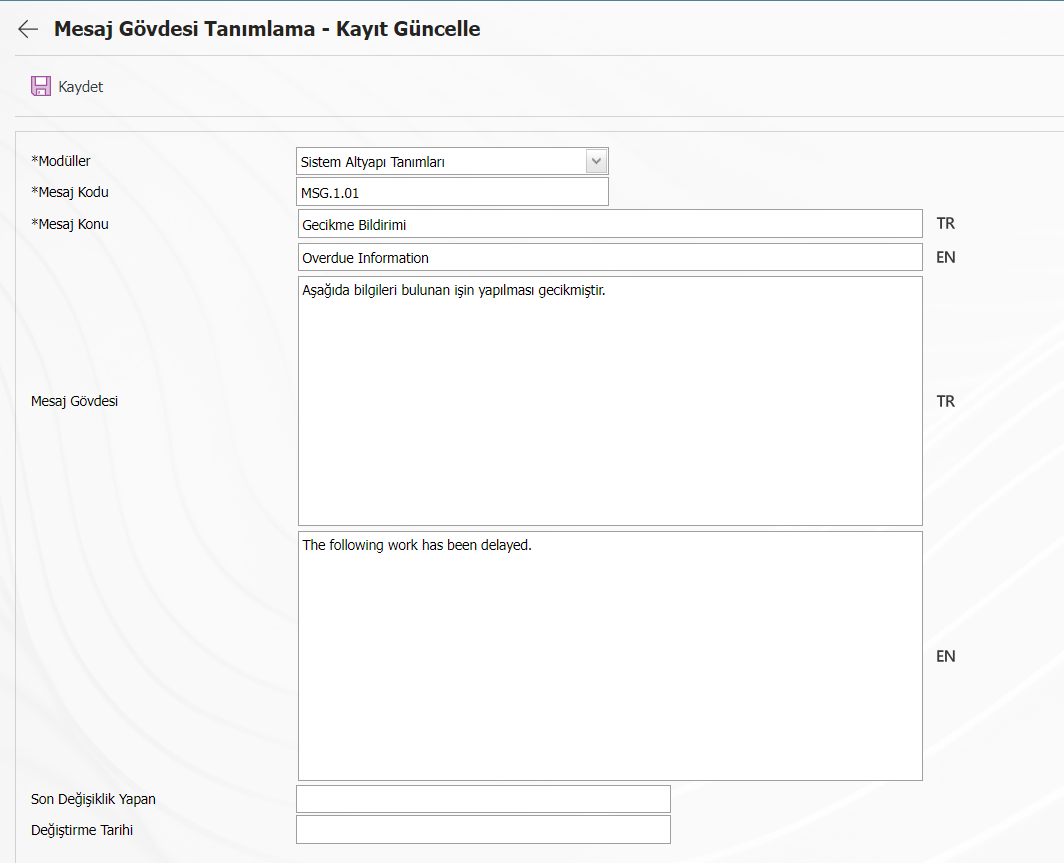
On the screen that opens, the relevant module is selected. The message code and subject are written. The message body is defined and
The registration process is complete.
If the company wants to make changes in the message bodies, click the change button
On the screen that opens, the desired places are changed.
When you want to change an existing message body! The button opens the corresponding message body. On the screen that opens, the message body is changed as desired by the company and the screen is closed with the save button.
<a id="_bookmark20">``````</a>Workplace Definition
Since there is a workplace connection in the modules, the locations and responsibilities of the company, if any.
must be determined.

With the help of the buttons on the screen;
A new record is created.
The selected record is updated.
The selected record is deleted.
Filtering is done
Data is exported to excel.
When you want to define a new workplace, the registration screen opens with the button.
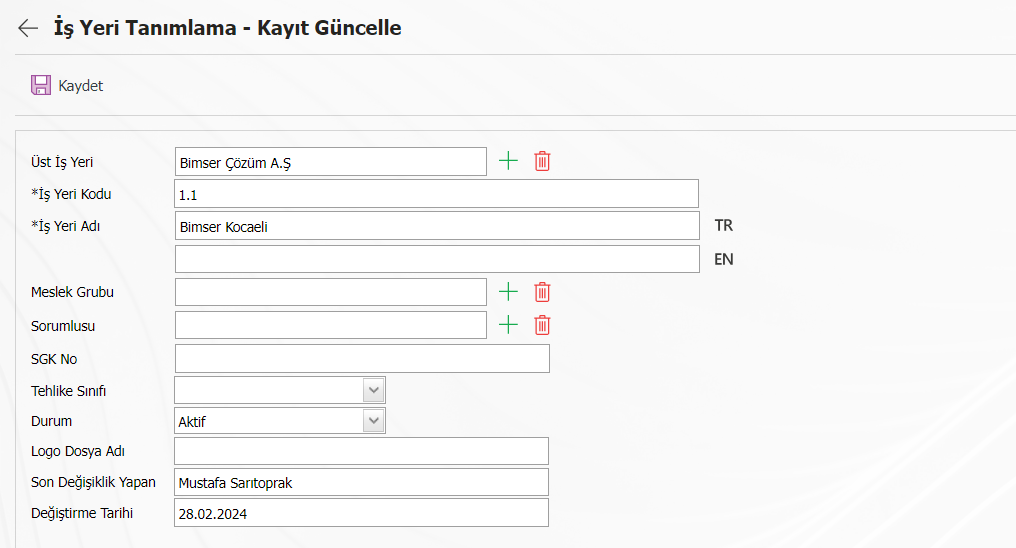
On the screen that opens, the business code and name are written. If any, the parent workplace is selected. After the workplace supervisor is selected from the system, the registration process is completed. <a id="_bookmark21">``````</a>``````<a id="_bookmark24">``````</a>
<a id="_bookmark25">``````</a>Defining a Management System
It is the screen where Management Systems are defined, certain management systems such as ISO 9001, OHSAS 18001, ISO 14001 have been defined by Bimser. A new management system can be added, an existing one can be updated, or deleted.
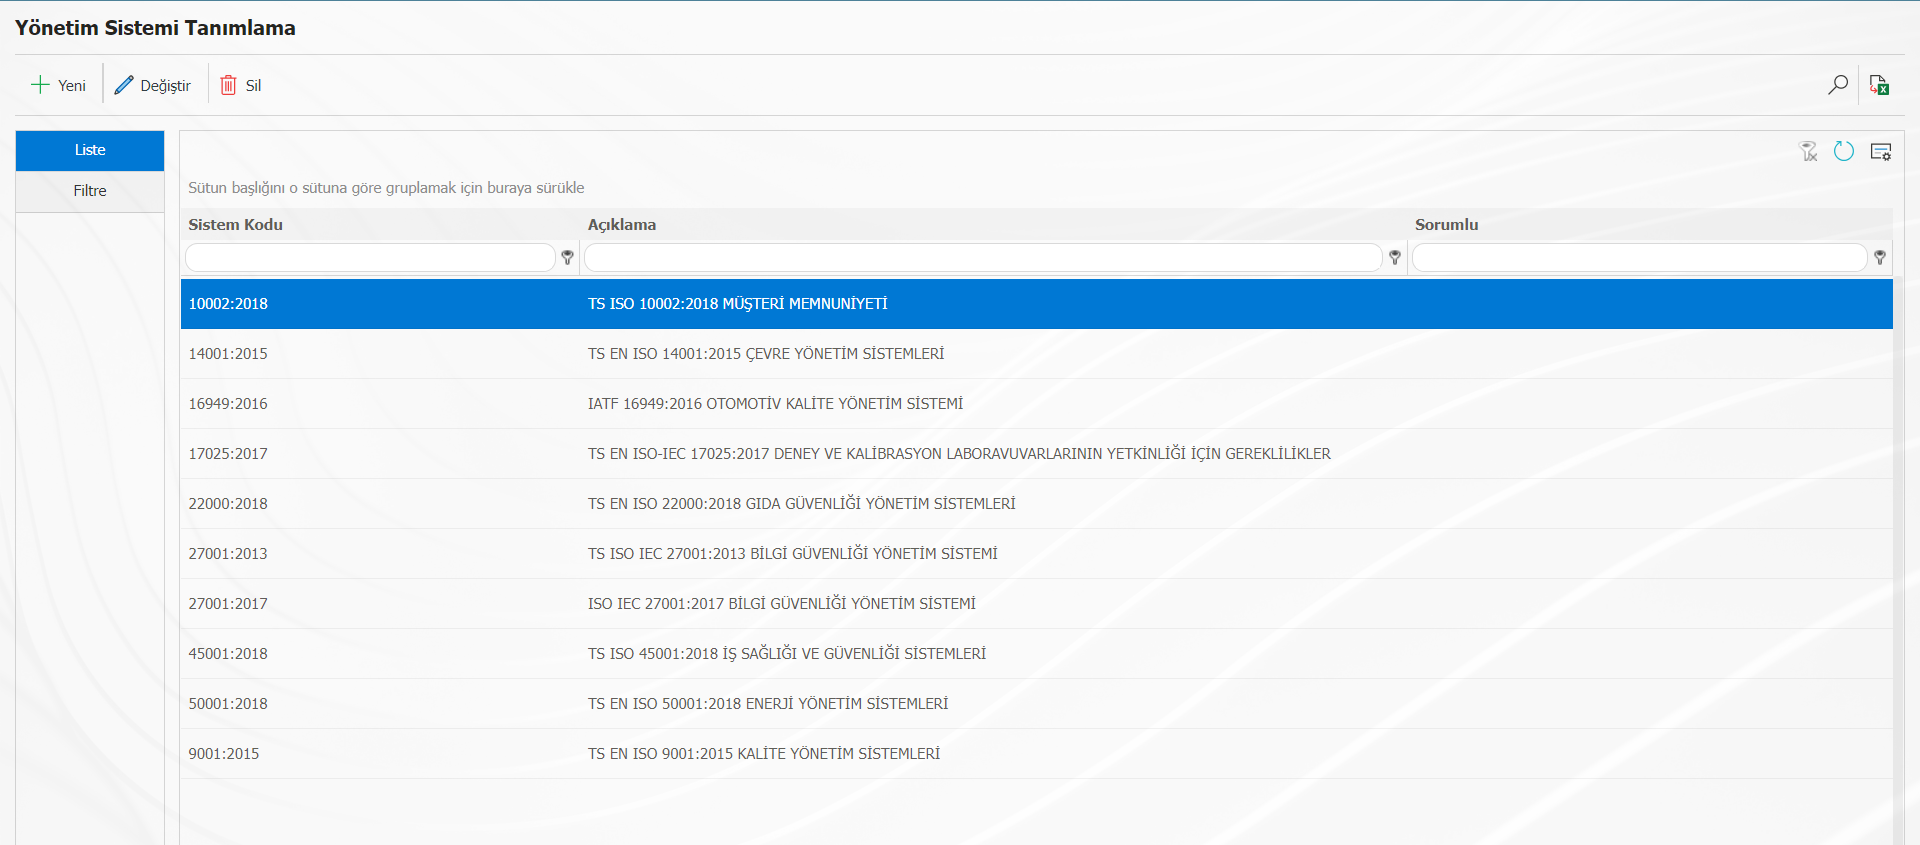
With the help of the buttons on the screen;
A new record is created.
The selected record is updated.
The selected record is deleted.
Filtering is done
Data is exported to excel.
A new record is opened with the button to add a standard that is used by the company but not defined in the system to the system.
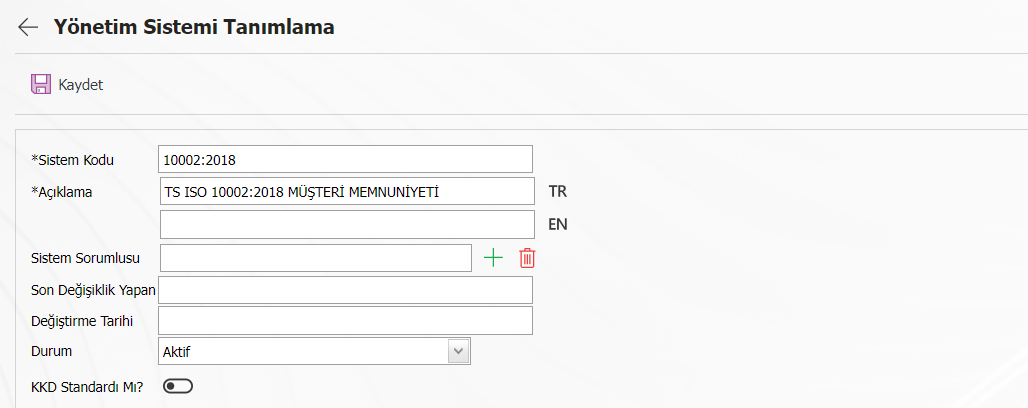
On the screen that opens, enter the System Code. In the description section, the name of the standard is written. If there is this
The responsible person of the standard is selected from the system and the registration is completed with the save button.
<a id="_bookmark26">``````</a>Management System Item No Definition
It is the screen where the item numbers of the Management Systems are defined, by default, the item numbers of the main management systems are defined. If necessary, management system item numbers can be added, edited and deleted.
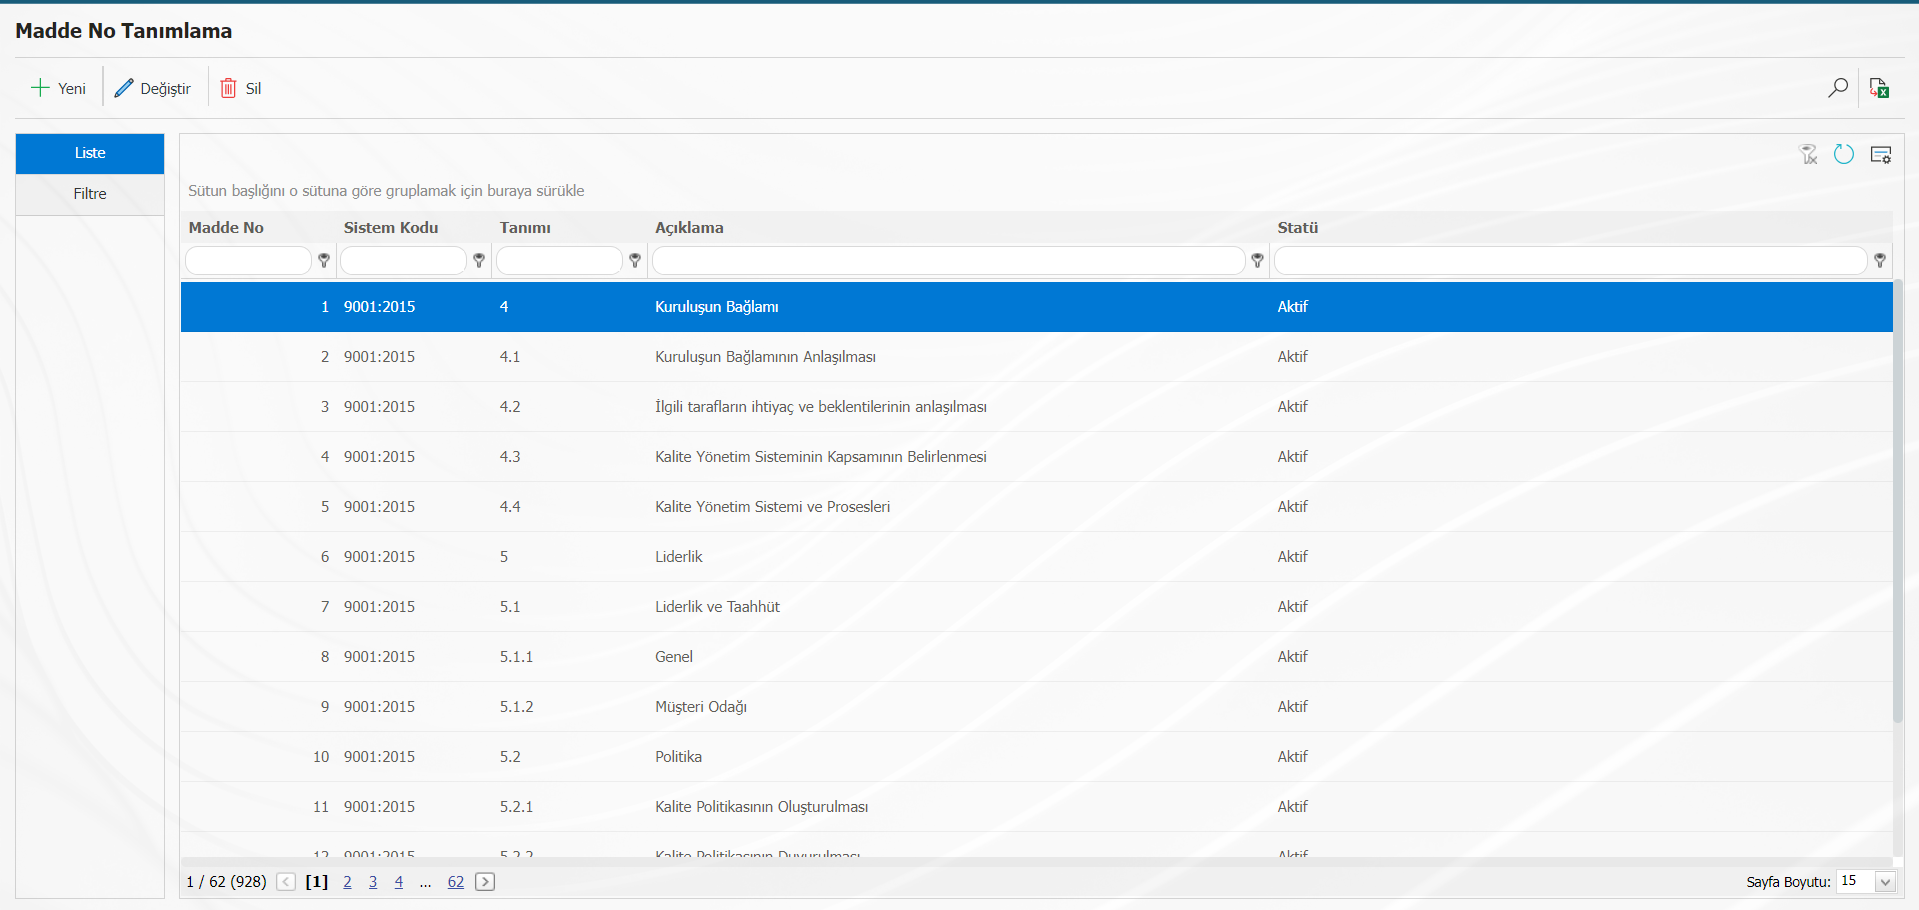
With the help of the buttons on the screen;
A new record is created.
The selected record is updated.
The selected record is deleted.
Filtering is done
The data is exported to excel.
<a id="_bookmark27">``````</a>
<a id="_bookmark29">``````</a>User Consent Trnasfer Definition
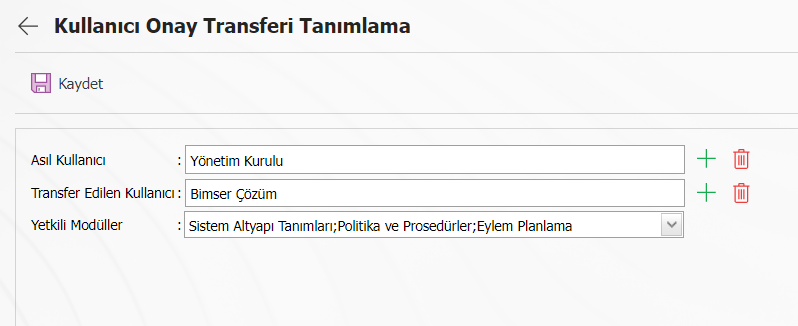
It is the transfer of approval to another user in the approval mechanism.
With the new button On the screen that opens, there is the main user in the first column and the transferred user in the 2nd column. A person can look at the transfer of more than one person, but a person cannot be transferred to more than one person.
<a id="_bookmark30">``````</a>BSAT / Configuration Settings
<a id="_bookmark31">``````</a>Parameters
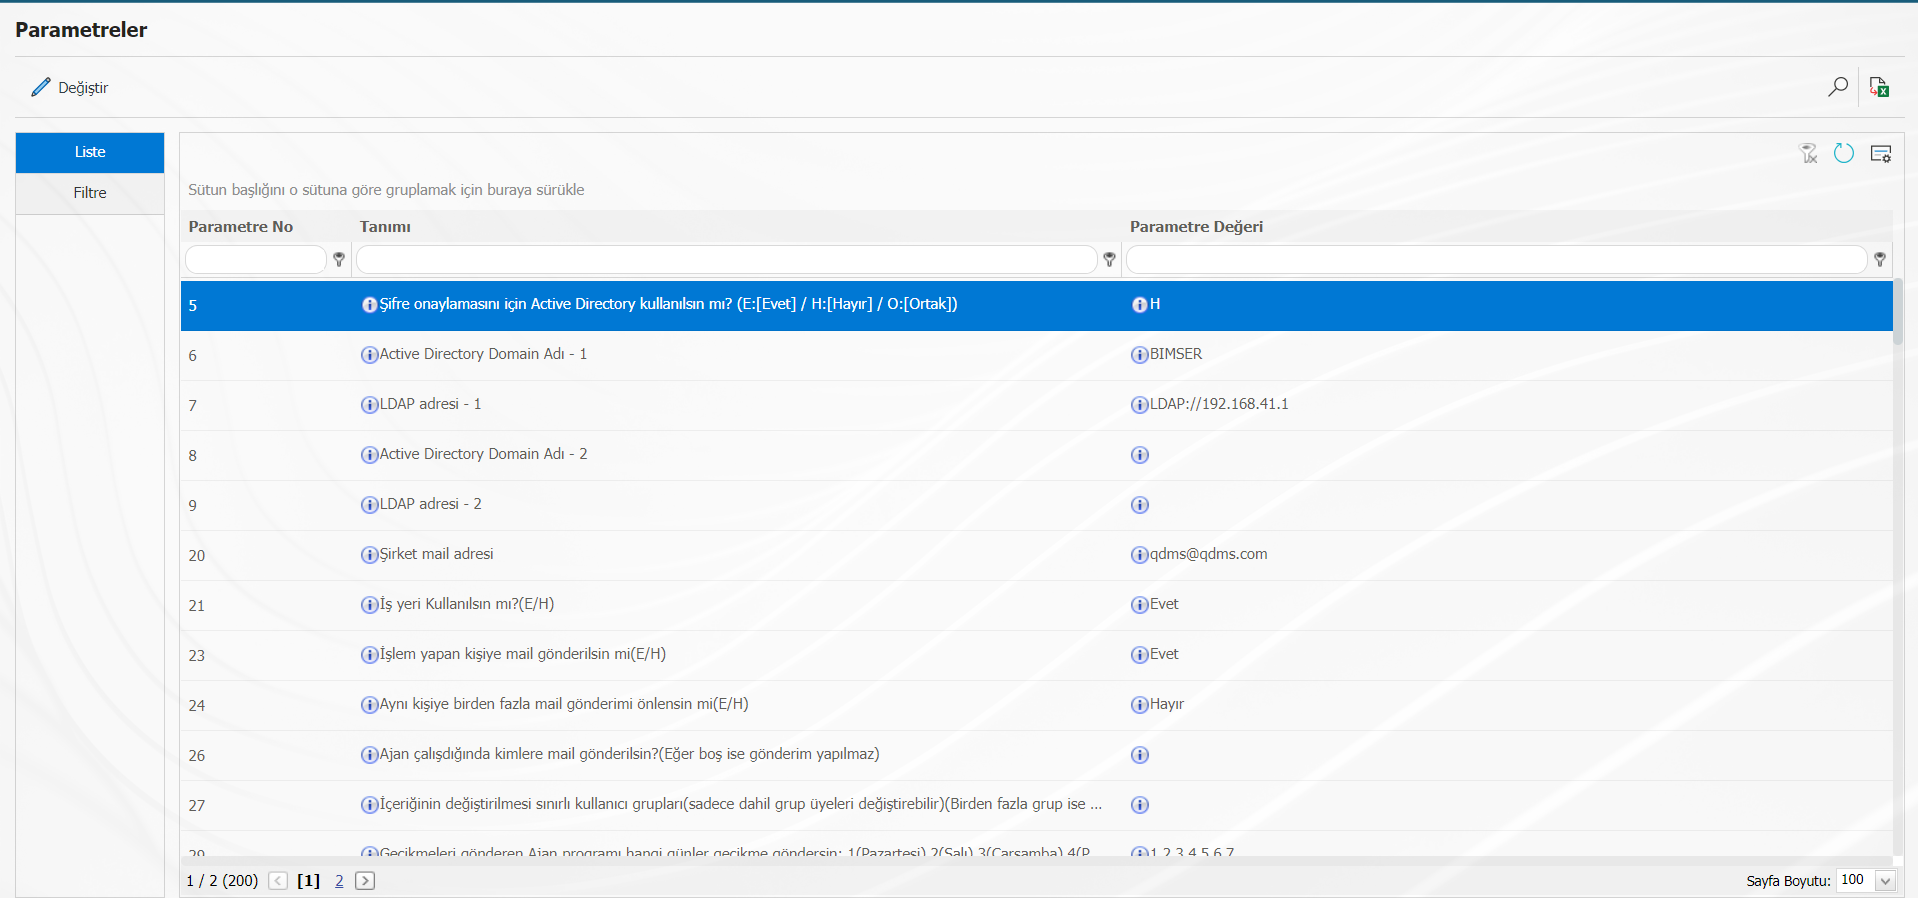
It is the section where parametric adjustments of all modules are made. Purpose module to be used
is to try to adjust it according to the company.
With the help of the buttons on the screen;
The selected record is updated.
Filtering is done
The data is exported to excel.
When the appropriate module is selected from the filter tab on the screen that opens, the parameters of the searched module are displayed. 
<a id="_bookmark33">``````</a>Module Definition
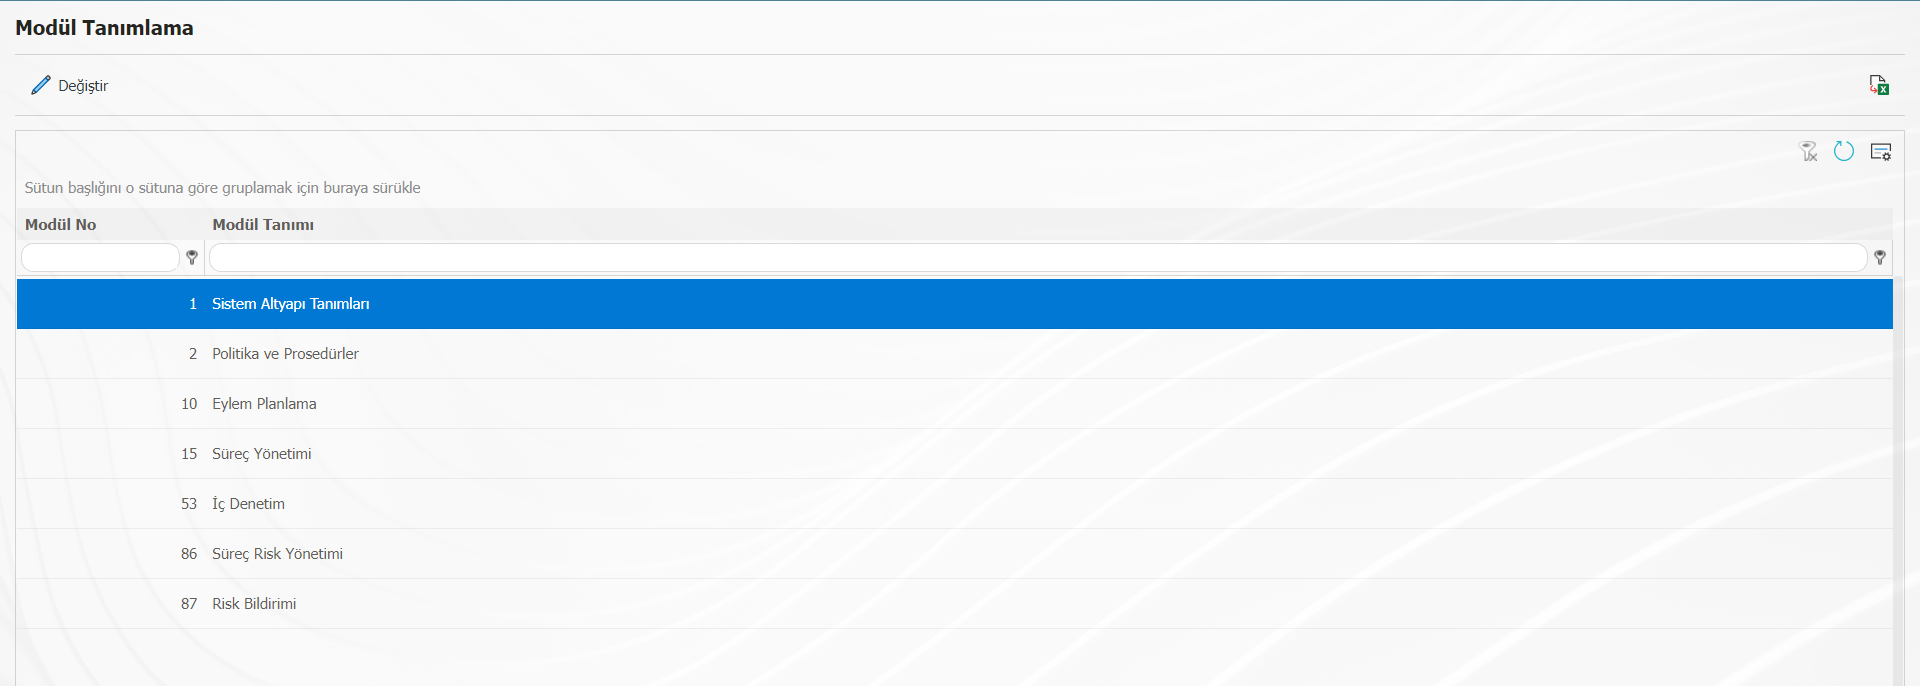
QGRC modules are included. All module definitions to be used by the company have been made by Bimser in this area, and no action is taken by admin users.
With the help of the buttons on the screen;
The selected record is updated.
The data is exported to excel.
<a id="_bookmark34">``````</a>Define Submodules
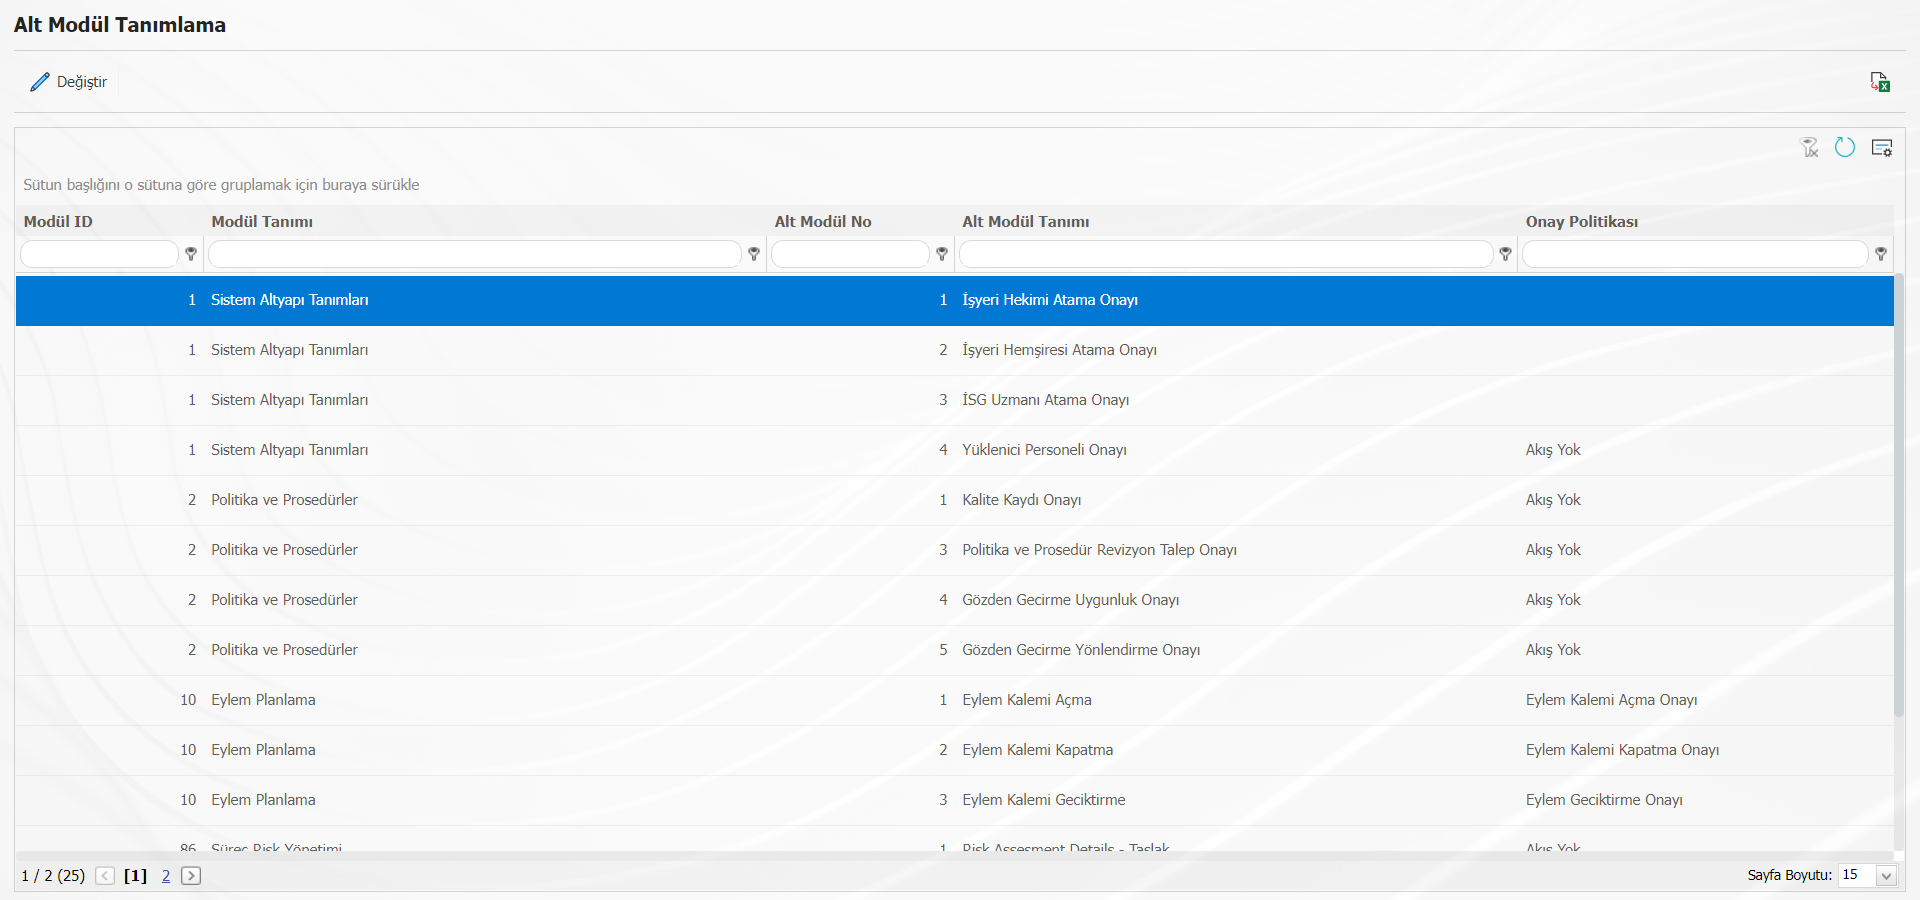
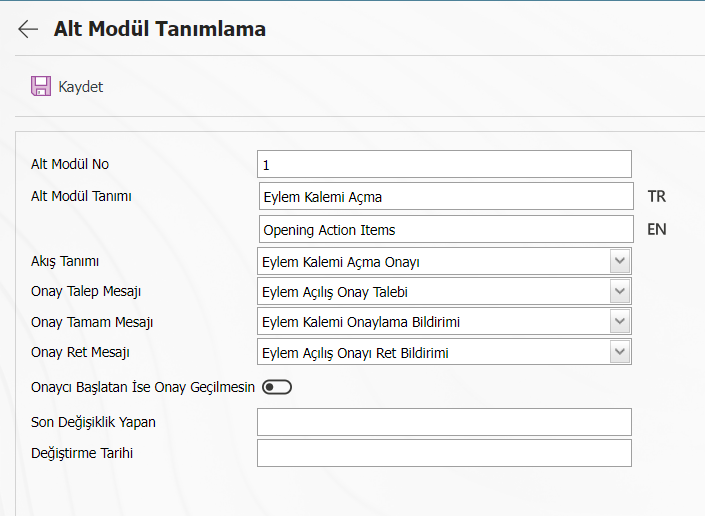
The flows used for opening, performing, delaying, closing approvals existing in the modules are introduced to the modules; It is the menu where approval request, notification and rejection messages are associated.
With the help of the buttons on the screen;
The selected record is updated.
The data is exported to excel.
After you get to the Submodule definition menu, click "Change" on the appropriate module definition
Flow definition is made by using the button.
<a id="_bookmark35">``````</a>Role Definition
Role definitions are made for the flows used in the modules. Role definitions for each module in the system
Available. When deemed necessary, new role definitions are made.
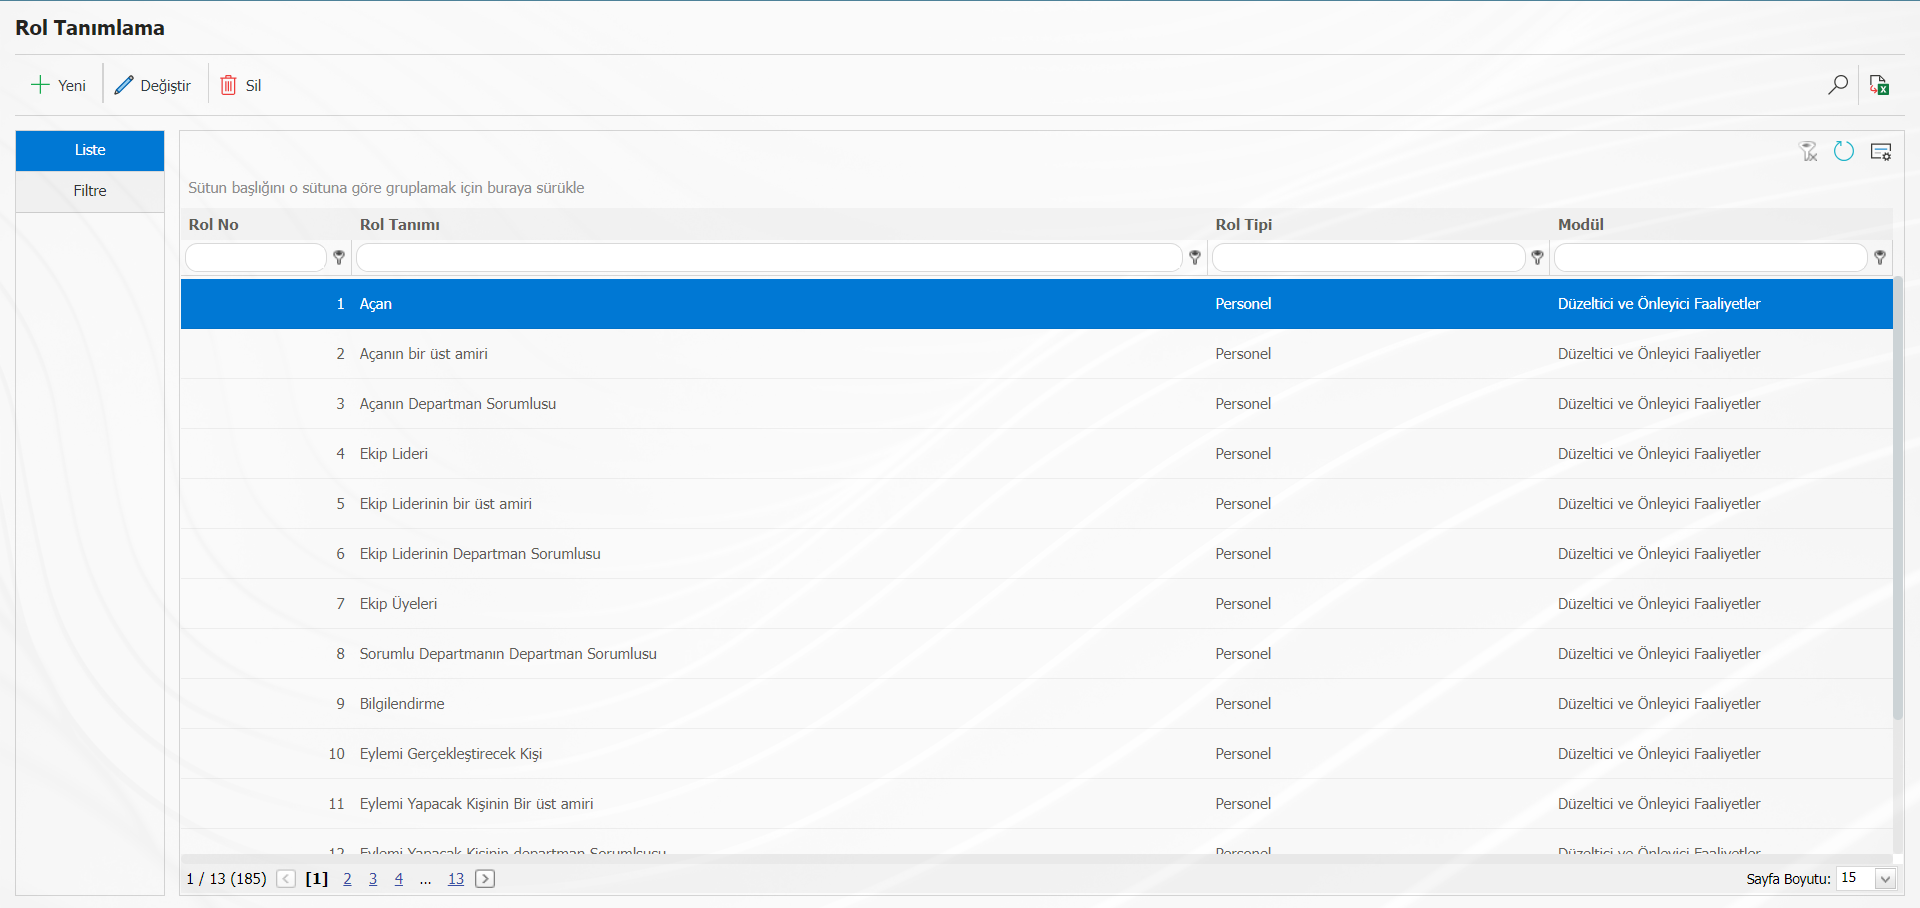
With the help of the buttons on the screen;
A new record is created.
The selected record is updated.
The selected record is deleted.
Filtering is done
The data is exported to excel.
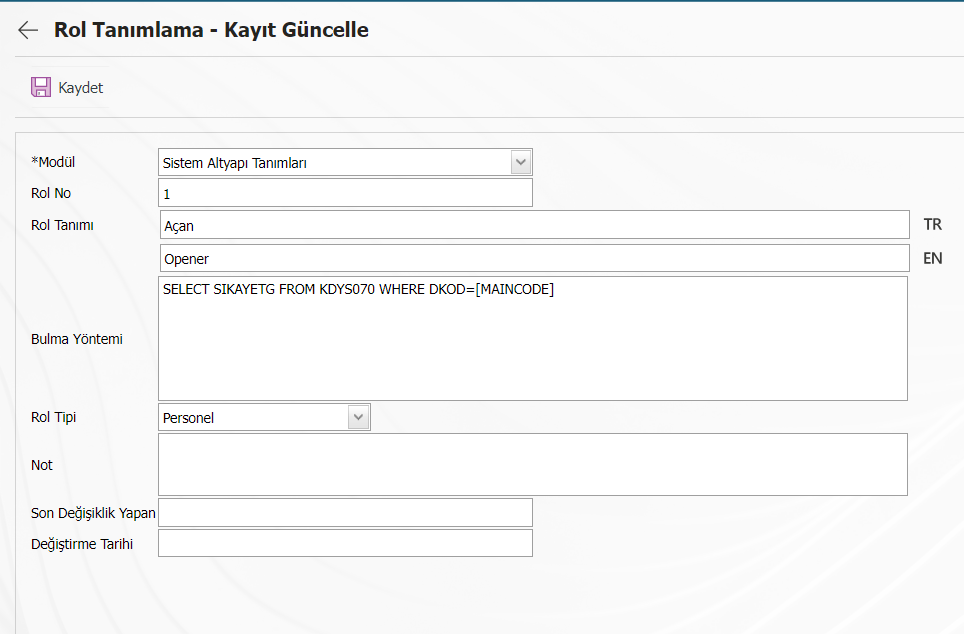
The registration process is performed by selecting the role to be changed and typing the role definition and finding method on the screen opened with the change button. Roles are defined in the system. However, when these roles are desired to be changed or a new role is defined, support should be obtained from the Bimser Solution Team.
<a id="_bookmark36">``````</a>Stream Definition
Descriptions of the flows used in the modules are included. Which role for the corresponding flow
If it is desired to be used, that role must be selected.
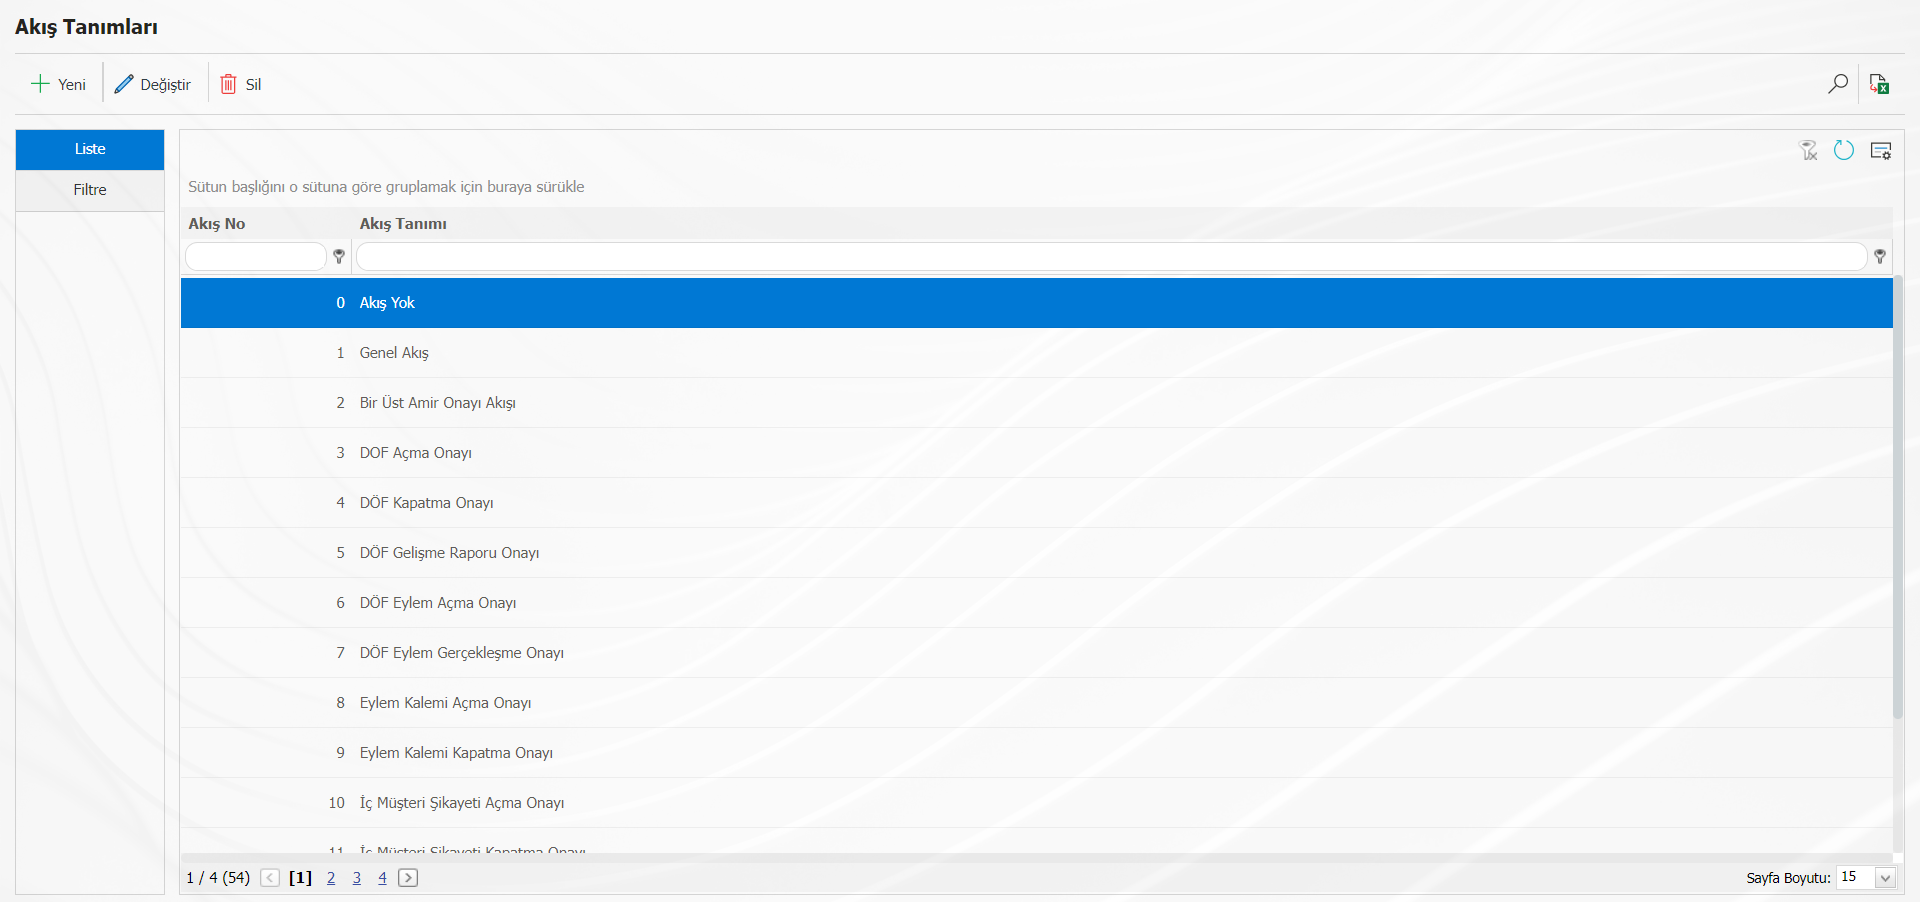
With the help of the buttons on the screen;
A new record is created.
The selected record is updated.
The selected record is deleted.
Filtering is done
The data is exported to excel.
For example, it can make adjustments to the approval of opening an Action Item.

With the help of the buttons on the screen;
The role is added.
The selected record is deleted.
When the Add button is clicked, the roles in the role definition are opened. The role is selected and saved. As shown in the example image, the approval to open the Action Item will be given by the requester of the main action.
Multiple flow approvers can be defined. The sequence number on the screen indicates the order in which the approver will approve. Hierarchy is done. With sequence numbers such as 0, 1, 2, it can be ensured that it comes to the last zero-approver. If a group is selected as an approver without defining a role, the number of approvers on the screen shows how many personnel from that group will be sufficient to approve.
<a id="_bookmark37">``````</a>Editing Report Formats
It is the menu where the necessary arrangements are made in the formats of the reports in the modules. The report to be changed is downloaded and the relevant edits are made (Adding fields, removing fields, editing the formats of the fields, etc.) and then it is restored to the system.
(an example can be made, e.g. editing an audit report)
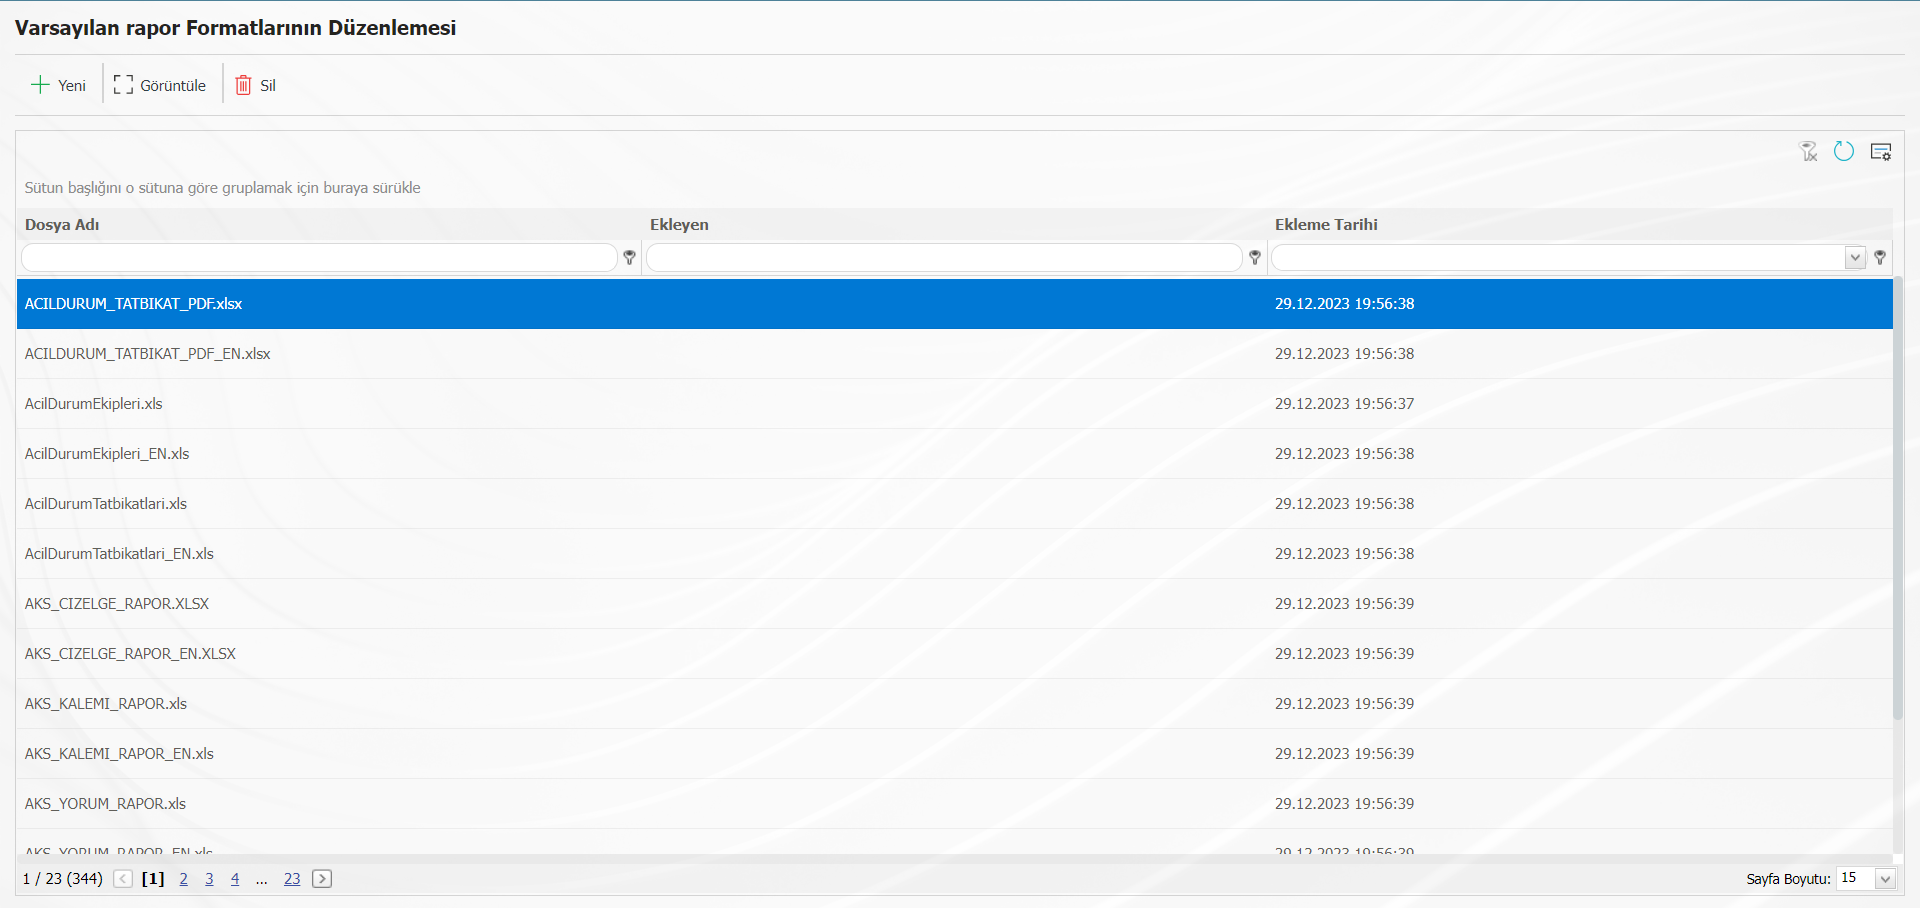
With the help of the buttons on the screen;
The new report format is uploaded to the system.
The selected report is displayed and downloaded.
The selected report is deleted.
<a id="_bookmark38">``````</a>Power Proxy Viewer
The start-end dates of the persons who give and receive the power of attorney, the information of the persons, the date they make the transaction, etc. information is included.
 With the help of the buttons on the screen;
Filtering.
The data is exported to excel.
<a id="_bookmark39">``````</a>Admin Definition
This is the menu where module admins are defined. While the manager is defined, the relevant module and the personnel defined in the QGRC who will be the manager of the module are selected and saved. Personnel who are module administrators, update rights on modules, record maintenance rights, etc. Their ability to make transactions is increasing.
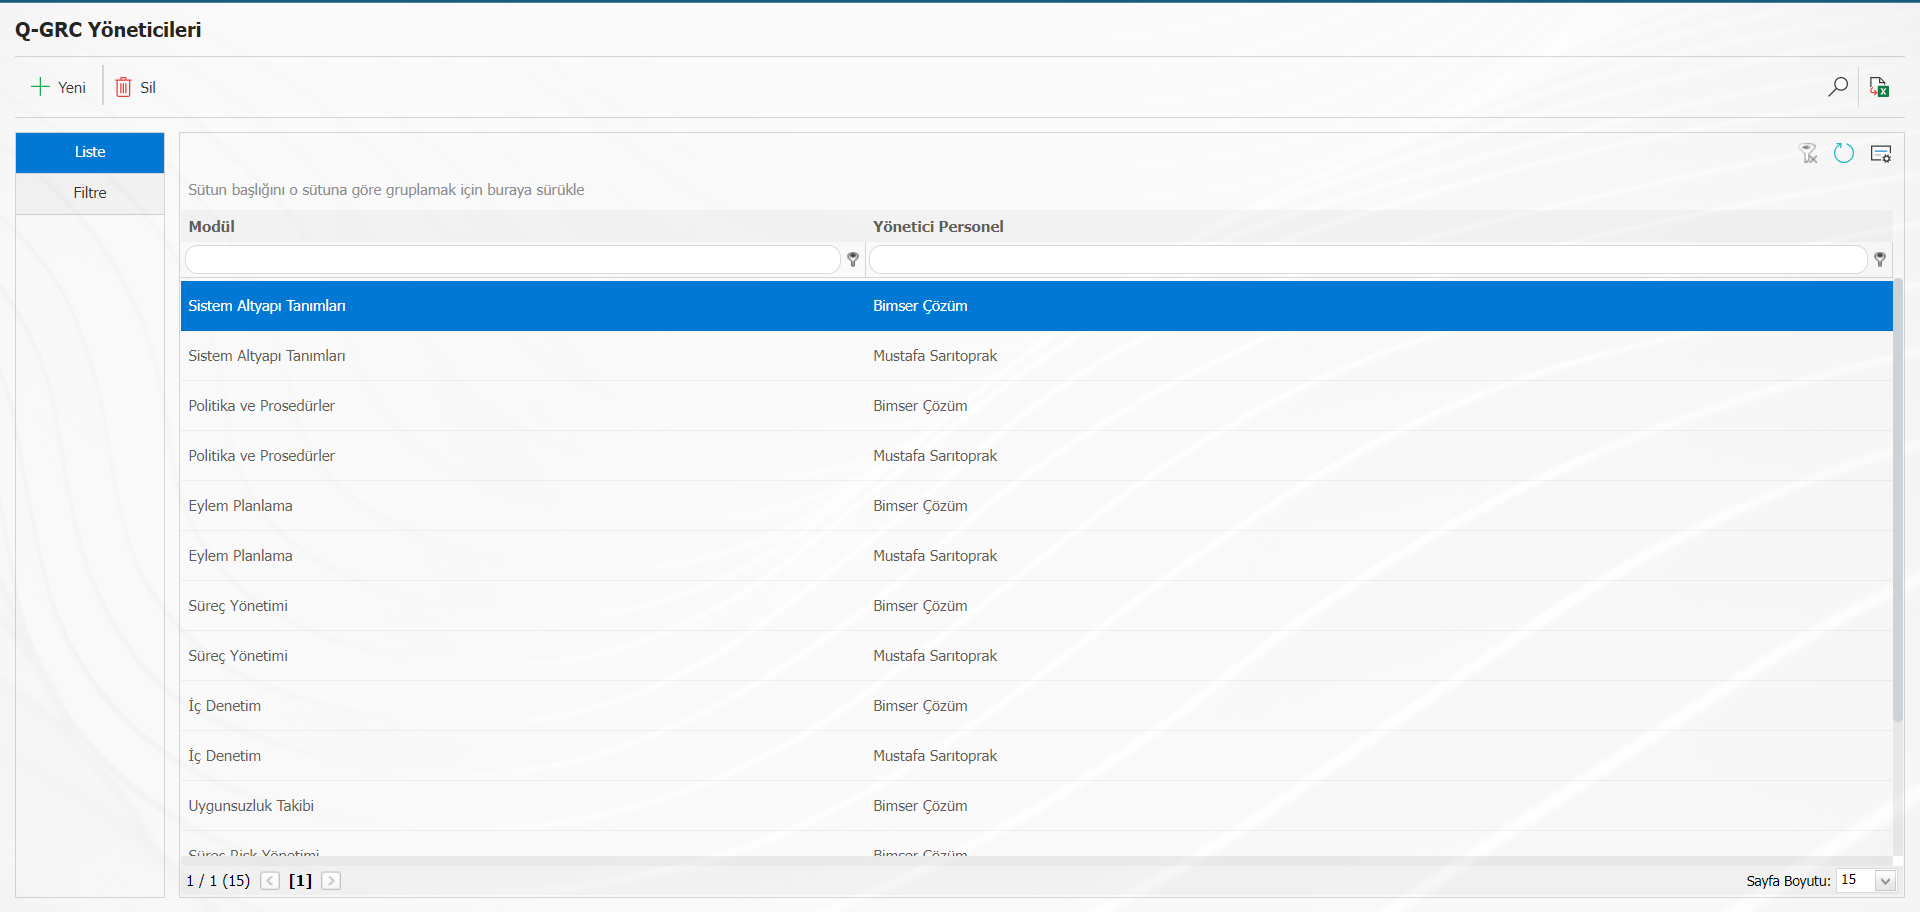
With the help of the buttons on the screen;
A new record is created.
The selected record is updated.
The selected record is deleted.
Filtering is done
The data is exported to excel.
To define a new module manager, the relevant module and module manager are selected on the screen opened with the button and the registration process is performed.
<a id="_bookmark40">``````</a>Language Settings
From the language settings menu, the names of the menus seen on the QGRC and the names of the fields can be changed. New fields can be added to modules. The necessity status of existing fields can be edited. The order in which the fields appear on the screen can be changed.
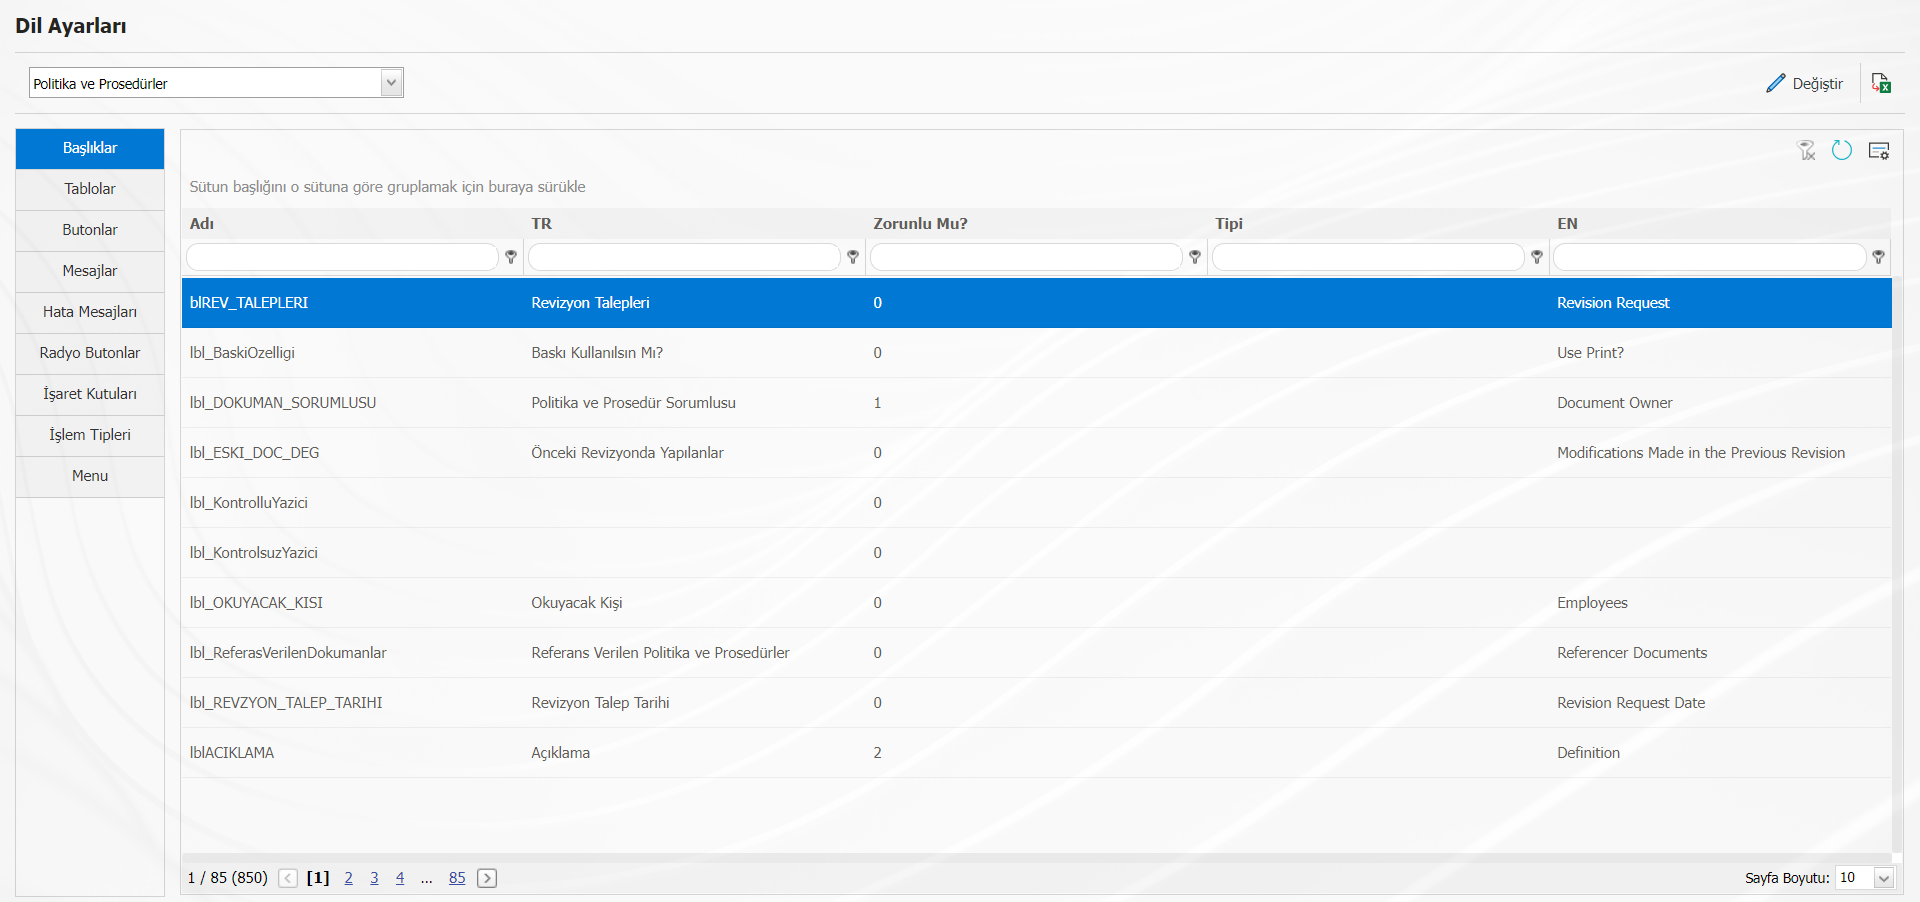
When an existing field is desired to be changed, the TR part is selected. By selecting the relevant field, the field to be changed (name change, obligation status, etc) is opened with the update button. On the screen that opens, the parts to be changed are changed and saved.
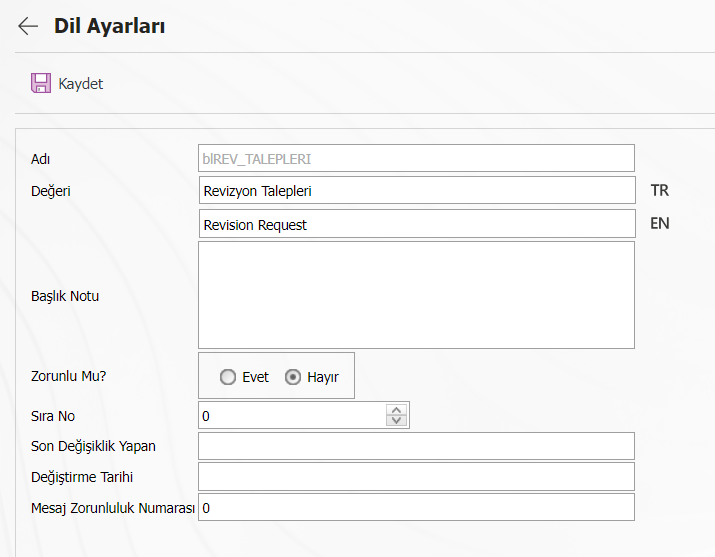
When new fields need to be added to the modules, it is necessary to know the explanations expressed by the label codes.
We can use parametric fields to define a new field for modules. Lblparam : Refers to the field in text type.
LblDparam: Refers to the field of type date. LblNparam: Refers to the field of numeric type. LblLparam: Refers to the field of type list. <a id="_bookmark41">``````</a>
Position Code Switching
The position codes of the personnel may have been entered incorrectly or may need to be changed. In such a case, the position code change function is used. The old position code is written, the new position code is also typed and the "change position" button is clicked.
In companies that use HR programs, new position codes are given to new personnel. After the personnel is transferred to the system with the integration, the code of the position taken over for the new personnel should be changed from this menu.
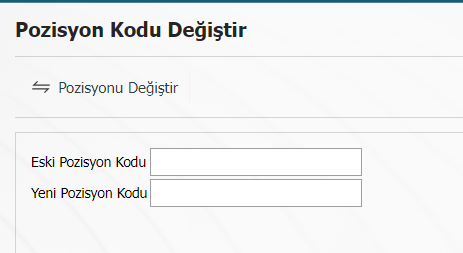
position is changed.
<a id="_bookmark42">``````</a>
<a id="_bookmark43">``````</a>Task Transfer
It allows the transfer of existing jobs on the position. It is used to transfer the work on the departing personnel or the work of one staff member to another staff.

With the help of the buttons on the screen;
The selected tasks are transferred.
Filtering is done.
An informative e-mail is sent to the owner of the position to which the tasks are transferred.
The current job can be transferred to a different position by selecting the person who is currently waiting for the job in the Person to do field and selecting the position field to which the tasks will be transferred. After the relevant module is selected, the process is performed by clicking the "Transfer selected tasks" button.
<a id="_bookmark44">``````</a>Transfers
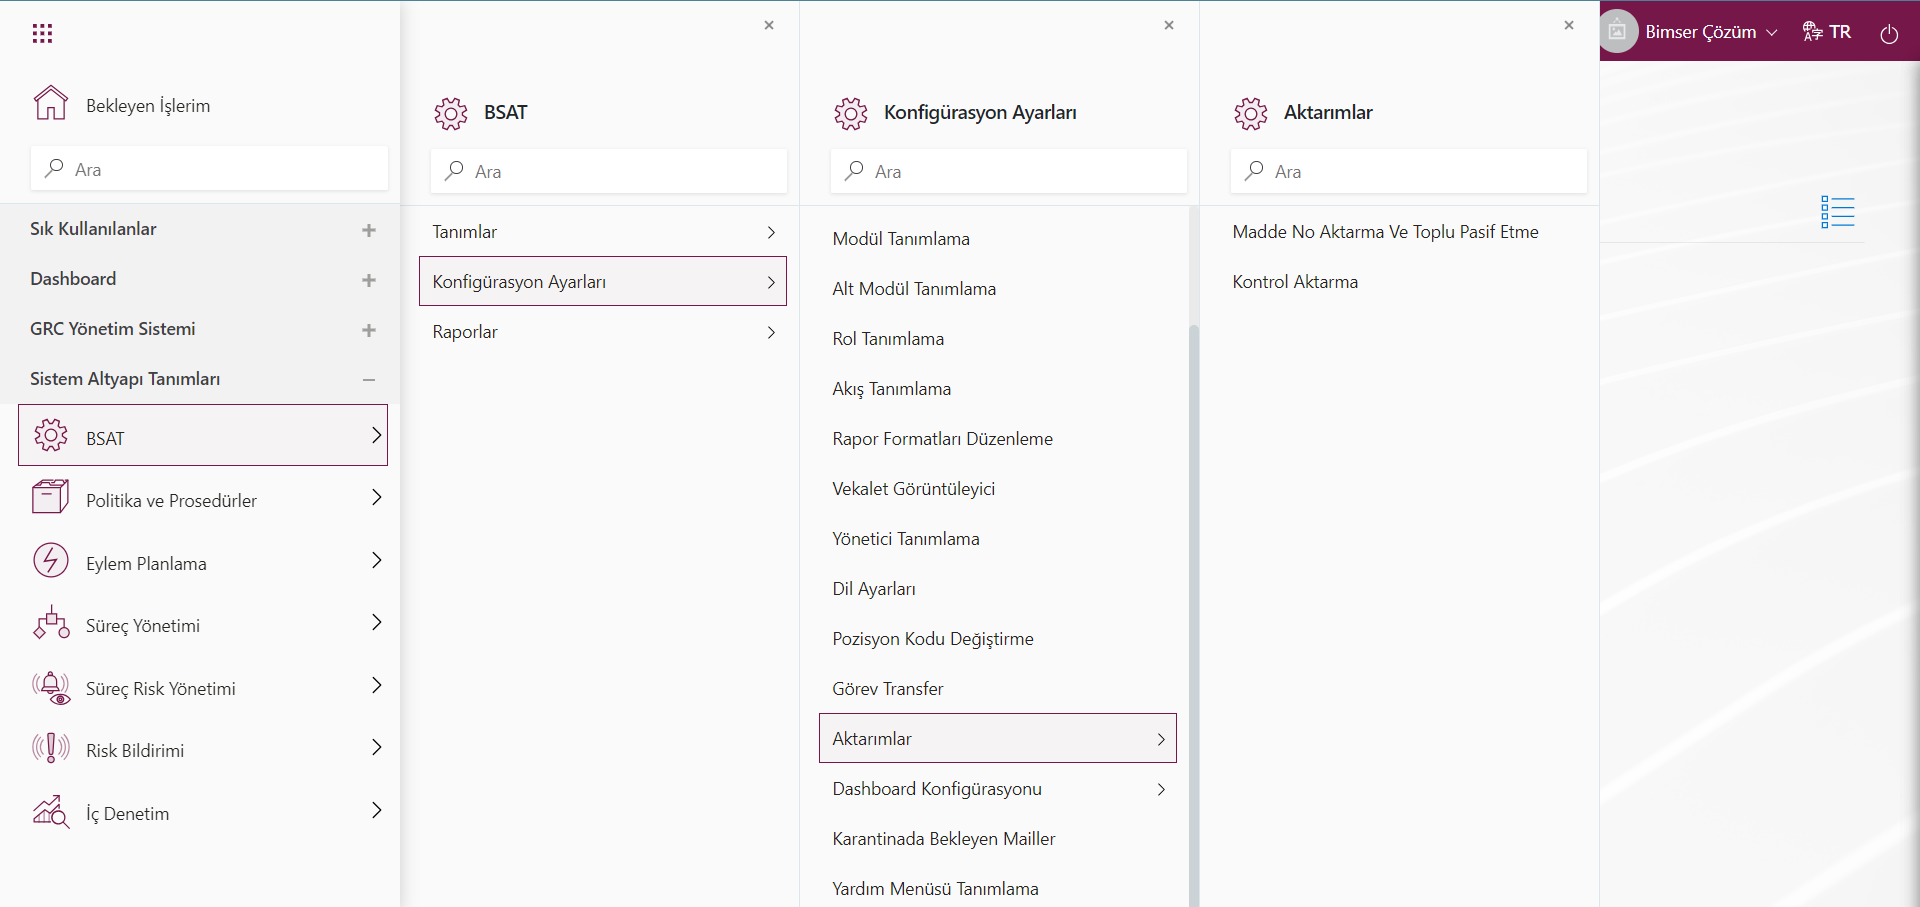
In the Transfers menu, there are relevant templates for Item No Transfer and Bulk Deactivation, Control Transfer operations. The definitions to be used in the relevant modules are transferred.

With the help of the buttons on the screen that opens;
: The corresponding template is downloaded to the computer.
: The filled template is loaded into the system.
: It is used to check whether the template created and uploaded to the system gives an error.
The template is downloaded with the "download template" button on the screen, after the necessary information is filled in
It is loaded into the system with the "Upload template" button. To ensure the control of the information entered,
The "Check" button is used. If the transferred data is suitable for transfer, "transfer" button
transmission is taking place through.
<a id="_bookmark45">``````</a>Dashboard Configuration
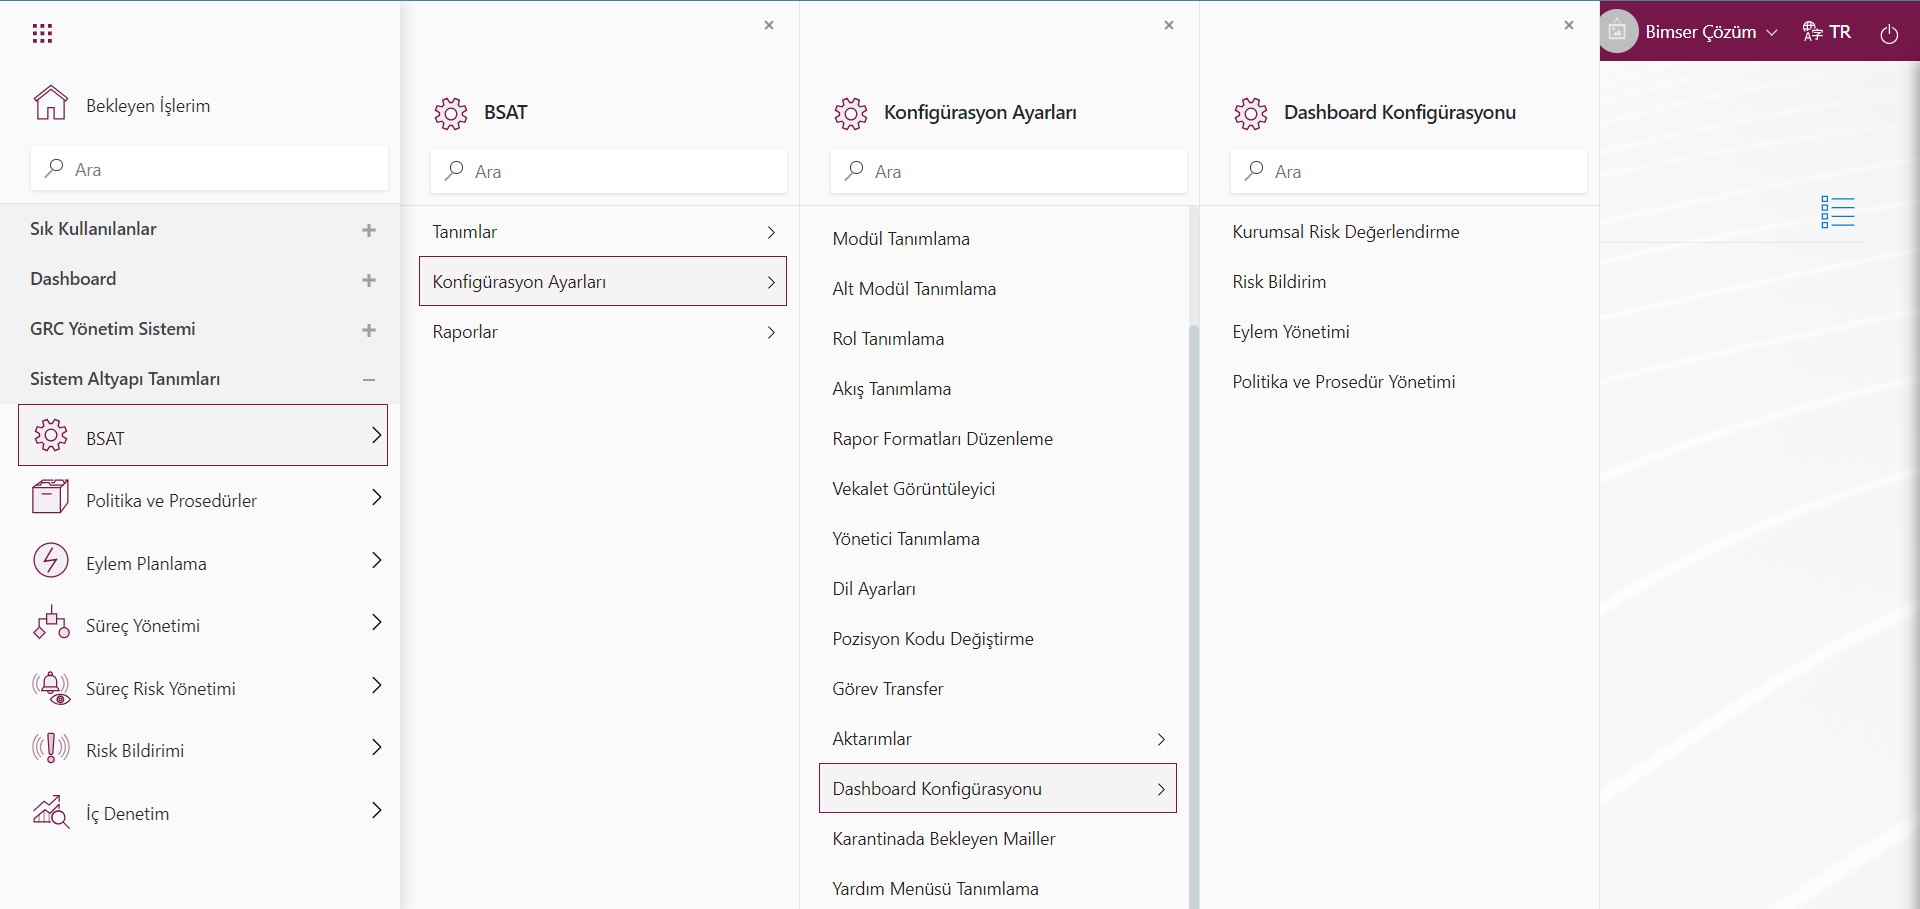
It is the menu where Dashboard configurations of all Modules are made and graphic definitions are made.
Pending Emails in Quarantine
Users whose quarantine e-mail addresses are specified in the parameters that are not asked to send e-mails
used to display.

If the system administrators want the relevant message to be sent to the e-mail addresses in the quarantine, the message is sent with the send mail button.
With the help of the buttons on the screen;
: Used to display the mail in the quarantine.
: Used to forward quarantined mail.
: Used to delete quarantined mail.
<a id="_bookmark46">``````</a>Reports
<a id="_bookmark47">``````</a>
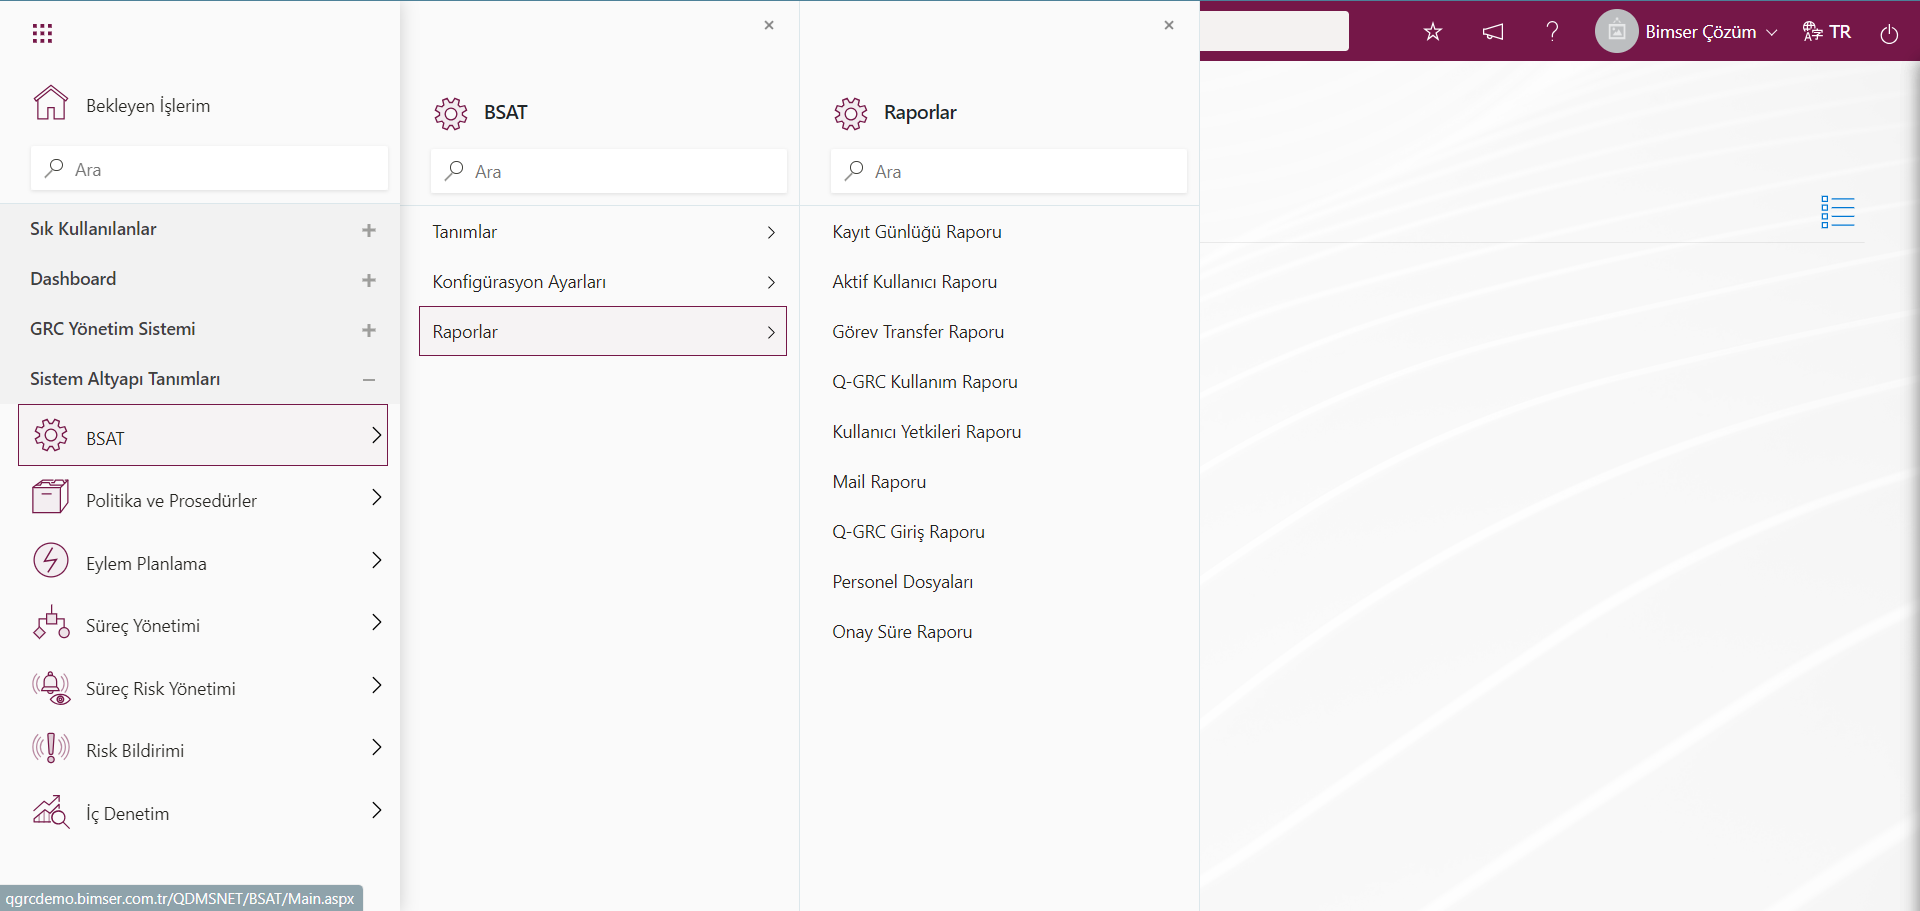
<a id="_bookmark48">``````</a>Log Report
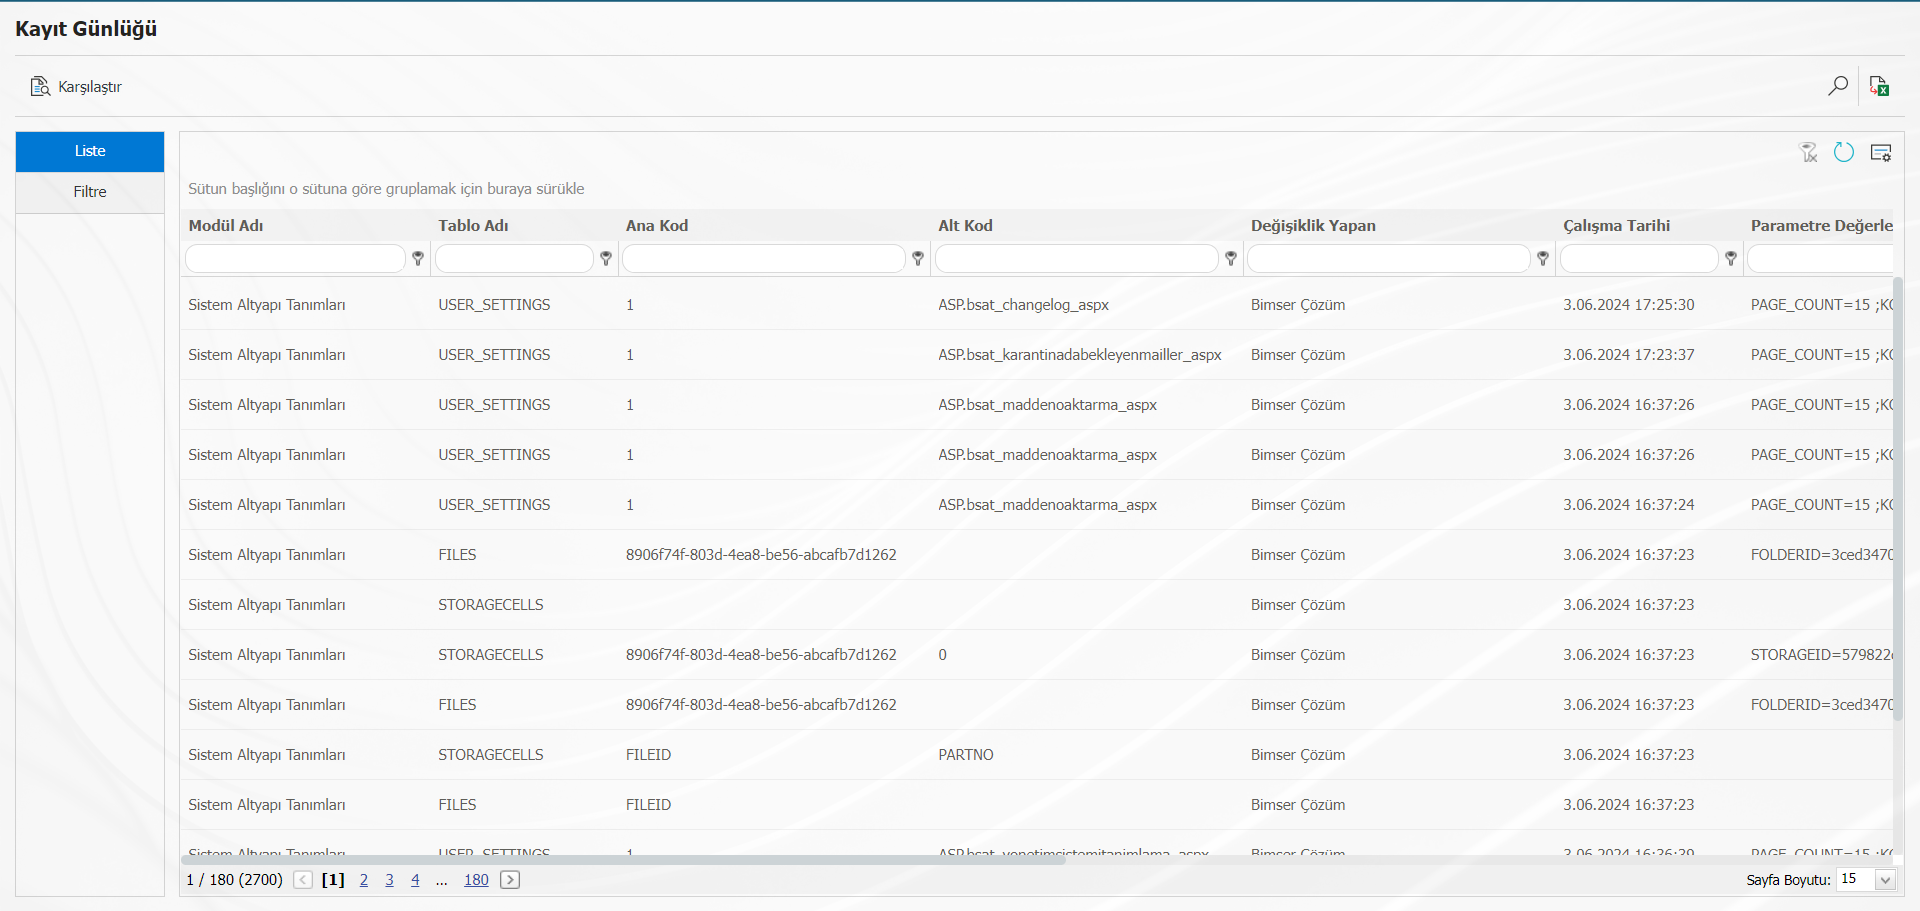
In the Log Log report, records are taken for each transaction made.
<a id="_bookmark49">``````</a>Q-GRC Usage Report
It is the report that keeps the number of entries to QGRC on the basis of users.
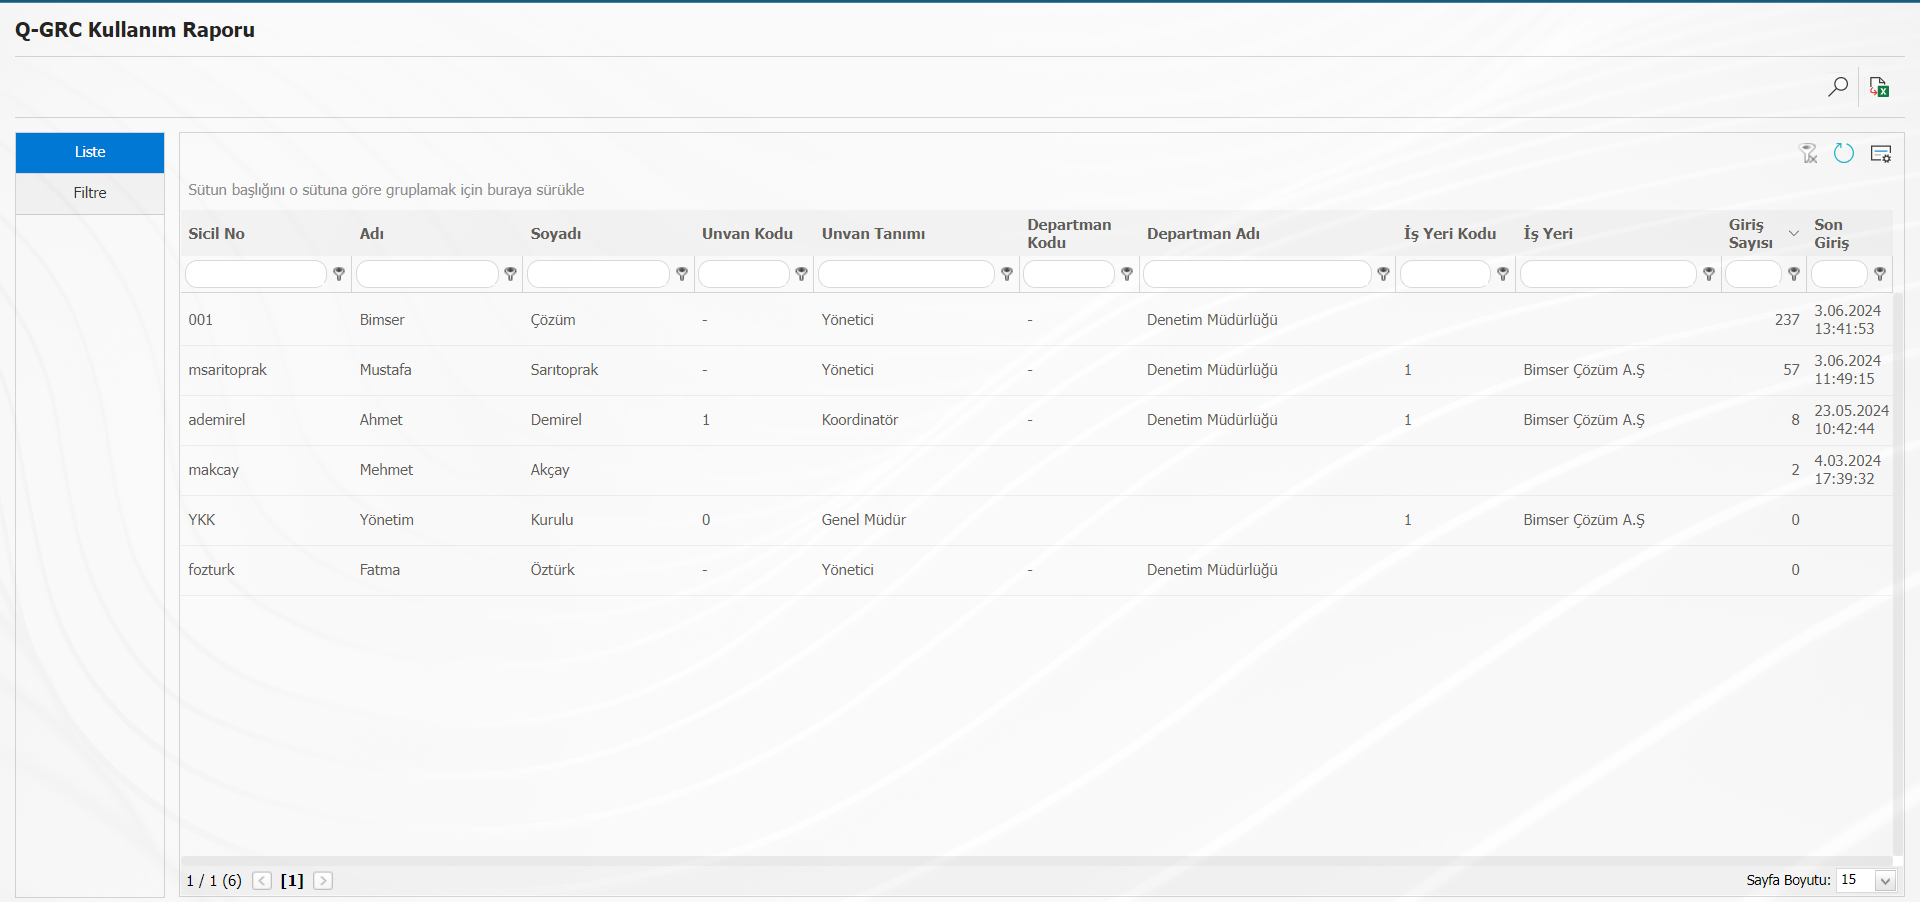
With the help of buttons on the screen;
Filtering is done.
The data is exported to excel.
User Authorization Report
It is the menu where the report of which user group, which authorization the personnel defined in QGRC have, and which menu they can access in which module.
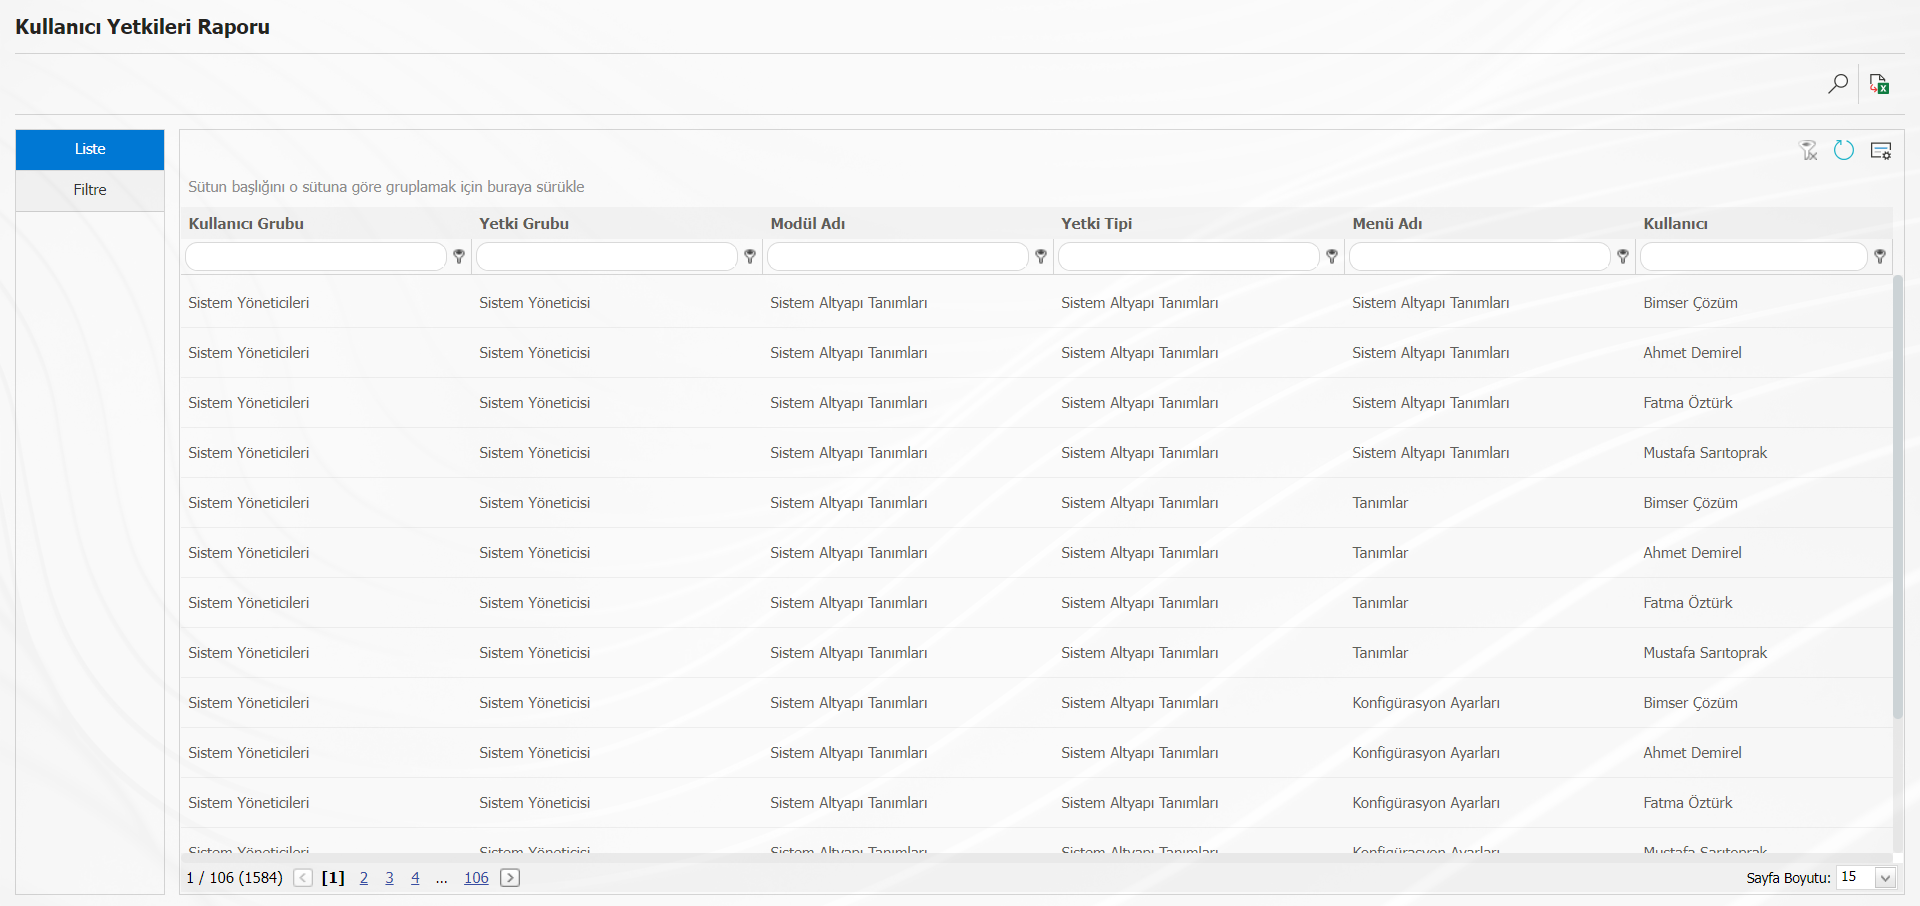
With the help of buttons on the screen;
Filtering.
The data is exported to excel.