User Manual
With this document, you will learn how to use the Bimser Synergy Capture application.
Capture Settings
In some cases, you may want to update the settings you entered while installing the application. You don't need to reinstall the app to update these settings. You can easily update all the settings if you follow the steps below.
- Run the app.
- Right-click on the running application icon and press the "Settings" button.
<img src="https://docsbimser.blob.core.windows.net/imagecontainer/as-64555270-6850-4a73-ae78-167c483f1b41.png" style={{padding: "8px", border: "1px solid #DADDE1", backgroundColor: "#cccccc"}} />
After following these steps, you will be greeted with a screen like the one below.
<img src="https://docsbimser.blob.core.windows.net/imagecontainer/a-198f4f2d-f49f-479a-a6f1-a5dbed40cfe4.png" style={{padding: "8px", border: "1px solid #DADDE1", backgroundColor: "#cccccc"}} />
You can update all the settings you have entered on this screen.
Opening the App
You can open the app by following the steps below.
- Open the Bimser Synergy Capture service.
>NOTE: If you have not installed the service, you can do so through the article here. - Go to the Document Management module via the CSP Interface.
- Navigate to the repository where the scanned data will be uploaded.
- Specify the folder where the installation will be made.
- Press the "New" button.
<img src="https://docsbimser.blob.core.windows.net/imagecontainer/kullanim1-b39bfcce-4ee5-4048-9925-28fc0c72a714.png" style={{padding: "8px", border: "1px solid #DADDE1", backgroundColor: "#cccccc"}} />
6. Press the "New File" button.
<img src="https://docsbimser.blob.core.windows.net/imagecontainer/kullanim2-af559fa0-0e05-47e0-8dd1-f3467109d5a3.png" style={{padding: "8px", border: "1px solid #DADDE1", backgroundColor: "#cccccc"}} />
7. Press the "Scan" button.
<img src="https://docsbimser.blob.core.windows.net/imagecontainer/kullanim3-fe113232-cde9-4adb-9663-b215ac158a4d.png" style={{padding: "8px", border: "1px solid #DADDE1", backgroundColor: "#cccccc"}} />
>NOTE: If you cannot view the "Scan" button, you need to take a look at the permission setting.
As a result of these processes, you will be able to access the interface of the Bimser Synergy Capture application.
Application Sections
1. Scanner List and Scan Initiation
<img src="https://docsbimser.blob.core.windows.net/imagecontainer/kullanim5-4c29e9ec-eab2-4e47-969c-7a0f3328874f.png" style={{padding: "8px", border: "1px solid #DADDE1", backgroundColor: "#cccccc"}} />
1.1 Browser List
This is a list of browsers that are connected to your computer. You need to choose which browser you want to trade with from this list.
1.2 Start Button
This button, which is active after selecting the scanner, starts your scanning process. If you have previously scanned documents, you will see the following popup.
<img src="https://docsbimser.blob.core.windows.net/imagecontainer/kullanim6-15477b45-75e4-474f-98e0-9aaabb5781f9.png" style={{padding: "8px", border: "1px solid #DADDE1", backgroundColor: "#cccccc"}} />
2. Zoom in / Out Operations
<img src="https://docsbimser.blob.core.windows.net/imagecontainer/kullanim6-1be87db4-3914-4594-95c0-459998640cda.png" style={{padding: "8px", border: "1px solid #DADDE1", backgroundColor: "#cccccc"}} />
2.1 Zoom Bar
Thanks to this bar, you can zoom in and out precisely on the open image. You can also increase or decrease your zoom degree with the buttons on the left and right. Your current zoom range is displayed in the list on the right side of the bar.
<img src="https://docsbimser.blob.core.windows.net/imagecontainer/kullanim8-49dcc248-1580-43cc-9fcb-456f8b9b74a2.png" style={{padding: "8px", border: "1px solid #DADDE1", backgroundColor: "#cccccc"}} />
2.2 Zoom List
You can use the previously determined static degrees through this list.
<img src="https://docsbimser.blob.core.windows.net/imagecontainer/kullanim7-740d8651-d257-447e-8317-31ecca78f5bc.png" style={{padding: "8px", border: "1px solid #DADDE1"}} />
2.3 Full Screen Fitting
It allows the open image to fill the screen both transversely and longitudinally.
<img src="https://docsbimser.blob.core.windows.net/imagecontainer/kullanim9-f51e4c76-a32f-4f10-ad65-fd80e1e98562.png" style={{padding: "8px", border: "1px solid #DADDE1", backgroundColor: "#cccccc"}} />
2.4 Transverse Fitting
Allows the open image to maximize the transverse screen.
<img src="https://docsbimser.blob.core.windows.net/imagecontainer/kullanim10-7377484d-8ee6-449e-9eea-cdbf97612182.png" style={{padding: "8px", border: "1px solid #DADDE1", backgroundColor: "#cccccc"}} />
2.5 Longitudinal Fit
Allows the open image to maximize the screen longitudinally.
<img src="https://docsbimser.blob.core.windows.net/imagecontainer/kullanim11-c75b633d-2738-4c8e-a010-364f63f0caec.png" style={{padding: "8px", border: "1px solid #DADDE1", backgroundColor: "#cccccc"}} />
3. List of Scanned Documents
<img src="https://docsbimser.blob.core.windows.net/imagecontainer/kullanim13-4e9fe539-ce3e-4592-9280-31b2587bdc34.png" style={{padding: "8px", border: "1px solid #DADDE1", backgroundColor: "#cccccc"}} />
With the scanning process, each scanned document comes here instantly. The documents here can be selected as single or multiple.
4. Image Editor Area
<img src="https://docsbimser.blob.core.windows.net/imagecontainer/dsatir.bimser.local_%20(13)-1a12b233-0113-47a9-b896-e8918979c19b.png" style={{padding: "8px", border: "1px solid #DADDE1", backgroundColor: "#cccccc"}} />
The process of processing the selected documents and merging the documents before uploading them is done in this area. The selected document is located on this screen.
Selecting Documents
1. Single Select
<img src="https://docsbimser.blob.core.windows.net/imagecontainer/tekli-235515cd-eebd-4f66-8826-2314665de1fd.png" style={{padding: "8px", border: "1px solid #DADDE1", backgroundColor: "#cccccc"}} />
2. Multi-Select
2.1 Using CTRL
<img src="https://docsbimser.blob.core.windows.net/imagecontainer/ctrl-07444ba7-7619-4713-9309-498576be17ac.png" style={{padding: "8px", border: "1px solid #DADDE1", backgroundColor: "#cccccc"}} />
2.2 Using SHIFT
<img src="https://docsbimser.blob.core.windows.net/imagecontainer/shift-0b36cc78-bf85-4114-b315-175017ae2440.png" style={{padding: "8px", border: "1px solid #DADDE1", backgroundColor: "#cccccc"}} />
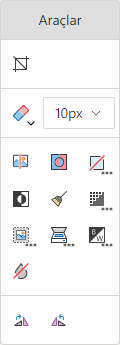
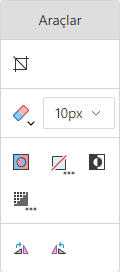
Tools
Through the buttons inside, it allows you to perform operations on selected documents. Some of the tools included in it are part of the ABBYY FineReader Engine and cannot be used without the corresponding product.
 |
|---|
| When using ABBYY |
 |
|---|
| When ABBYY is not in use |
1. Clipping
Crops the selected area on the document.
 |
|---|
| Icon |
 |
|---|
| Sample cropping process |
2. Eraser
Deletes the document.
 |
|---|
| Icon |
 |
|---|
| Instance deletion |
3. Inverting Colors
Inverts the colors of the document.
 |
|---|
| Icon |
 |
|---|
| Process of inverting sample colors |
4. Color Extraction
Subtracts the selected color from the document.
 |
|---|
| Icon |
 |
|---|
| Sample color extraction process |
5. Convert to Black and White
Converts the document to black and white format.
 |
|---|
| Icon |
 |
|---|
| Sample black and white operation |
6. Changing Resolution
Resizes the document to the dimensions you choose.
 |
|---|
| Icon |
7. Skew Correction
Corrects the curvature of the document.
>NOTE: You can use this tool only if you have ABBYY FineReader Engine.
-95756468-BCE5-4C30-99B3-35CC39E15C92.png) |
|---|
| Icon |
<img src="https://docsbimser.blob.core.windows.net/imagecontainer/egri-e20bb34c-64a3-4cdf-b4b4-2076b4761009.png" width="250" /> | → | <img src="https://docsbimser.blob.core.windows.net/imagecontainer/duz-57781b9d-0d14-44cb-a7fa-05ebd5013df8.png" width="250" /> |
|---|
 |
|---|
| Example curvature correction |
8. Eliminating Impurities
It eliminates the pollution of the document.
>NOTE: You can use this tool only if you have ABBYY FineReader Engine.
-3c9f5e8f-6012-4063-841a-27a27f2edf0c.png) |
|---|
| Icon |
 |
|---|
| Sample impurities removal process |
9. Colored Object Removal
Removes the colored (red, green, blue or yellow) object (all objects, seal or stamp) in the document.
>NOTE: You can use this tool only if you have ABBYY FineReader Engine.
-d3f284f0-9e98-462c-a4a6-987c31b1ff80.png) |
|---|
| Icon |
<table>
<tr>
<td>``````<img src="https://docsbimser.blob.core.windows.net/imagecontainer/remove-stamp1-8c116dcc-fef8-4916-b8a6-4234be0e2508.png" width="250" />``````</td>
<td>→</td>
<td>``````<img src="https://docsbimser.blob.core.windows.net/imagecontainer/remove-stamp-9b41aa53-90b9-4eb0-b977-f36306ce6fd4.png" width="250" />``````</td>
</tr>
<tr>
<td colspan="3" align="center">Remove blue stamps</td>
</tr>
</table>
<table>
<tr>
<td>``````<img src="https://docsbimser.blob.core.windows.net/imagecontainer/subtract-color-94efe716-d2c6-4c54-8e31-ae26a91087a1.png" width="250" />``````</td>
<td>→</td>
<td>``````<img src="https://docsbimser.blob.core.windows.net/imagecontainer/subtract-color-c4ecf639-e19e-4238-9ca6-6af170d8a1ec.png" width="250" />``````</td>
</tr>
<tr>
<td colspan="3" align="center">Remove a blue background</td>
</tr>
</table>
 |
|---|
| Sample color object extraction |
10. Clear the scan image
Clears associated or white noise in the document.
>NOTE: You can use this tool only if you have ABBYY FineReader Engine.
-5d95f7b0-ec6a-4c57-9cbe-dbf7637bd9b6.png) |
|---|
| Icon |
 |
|---|
| Process of clearing the sample scan image |
11. Background Sync
Equalizes the background of the document. It should be specified whether the document background color is white or not.
>NOTE: You can use this tool only if you have ABBYY FineReader Engine.
-a5a0ae04-dd2f-4bb4-bd19-6f1d2aeeaa63.png) |
|---|
| Icon |
<table>
<tr>
<td>``````<img src="https://docsbimser.blob.core.windows.net/imagecontainer/even-background-bd620544-60df-482b-a844-61018f3a4556.png" width="250" />``````</td>
<td>→</td>
<td>``````<img src="https://docsbimser.blob.core.windows.net/imagecontainer/even-background-71db60e1-4753-4d3a-a2f2-e71b67abd88f.png" width="250" />``````</td>
</tr>
<tr>
<td colspan="3" align="center">If white background is selected</td>
</tr>
</table>
<table>
<tr>
<td>``````<img src="https://docsbimser.blob.core.windows.net/imagecontainer/even-background-bd620544-60df-482b-a844-61018f3a4556.png" width="250" />``````</td>
<td>→</td>
<td>``````<img src="https://docsbimser.blob.core.windows.net/imagecontainer/even-background-9d889661-938b-47d1-a352-cd88c2f31de4.png" width="250" />``````</td>
</tr>
<tr>
<td colspan="3" align="center">If the background is not white is selected</td>
</tr>
</table>
 |
|---|
| Process of clearing the sample scan image |
12. Eliminating Blurs
Removes blur on the document.
>NOTE: You can use this tool only if you have ABBYY FineReader Engine.
-b4db6022-9602-4ec2-82f7-0764e6d37e0a.png) |
|---|
| Icon |
 |
|---|
| Sample blur removal process |
13. Turn Left
Turns the document to the left.
 |
|---|
| Icon |
<img src="https://docsbimser.blob.core.windows.net/imagecontainer/a-c39f82e6-0d78-4b7d-bff1-c8aed4dc753a.png" width="250" /> | → | <img src="https://docsbimser.blob.core.windows.net/imagecontainer/a-ecbe539b-2089-4307-bf97-b8497ead7b47.png" width="358" /> |
|---|
 |
|---|
| Example left-turn operation |
14. Turn Right
Flips the document to the right.
 |
|---|
| Icon |
<img src="https://docsbimser.blob.core.windows.net/imagecontainer/a-c39f82e6-0d78-4b7d-bff1-c8aed4dc753a.png" width="250" /> | → | <img src="https://docsbimser.blob.core.windows.net/imagecontainer/sadg-7f782594-8386-4af5-a68e-ab30747b2949.png" width="358" /> |
|---|
 |
|---|
| Example right-flip operation |
Image Editor Header
<img src="https://docsbimser.blob.core.windows.net/imagecontainer/asd-fbd61a6f-54eb-4a3c-8bf0-c4adf7e17b4b.png" style={{padding: "8px", border: "1px solid #DADDE1", backgroundColor: "#cccccc"}} />
1. Cancel All Changes Button
It cancels all previous changes made on the document and returns to the original file.
 |
|---|
| Icon |
2. Back Button
Undoes the last change made to the document.
 |
|---|
| Icon |
>NOTE: Cannot be used in multi-document edits. It is intended to be used in single document edits only.
3. Next Button
Restores the undone change to the document.
 |
|---|
| Icon |
>NOTE: Cannot be used in multi-document edits. It is intended to be used in single document edits only.
4. Save Button
This button dynamically changes its name according to the number of documents selected. If only one document is selected, click "Save"; If many documents are selected, it will appear as "Save All". It allows you to merge selected files with specific parameters.
 |
|---|
| Single Select Icon |
 |
|---|
| Multi Select Icon |
Saving Documents
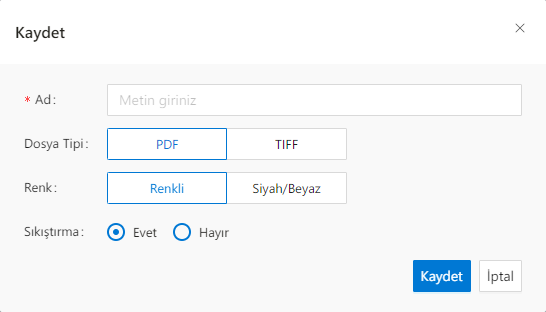
After scanning and editing your documents, you can upload them to the Document Management module. The first step in the upload process is to select and save the relevant documents.
>NOTE: Saving does not load the selected documents into the Document Management module. Instead, it allows selected documents to be combined into a loadable format.
 |
|---|
| Screen for saving selected documents |
>NOTE: The name to be entered here represents the name of the file that will be created.
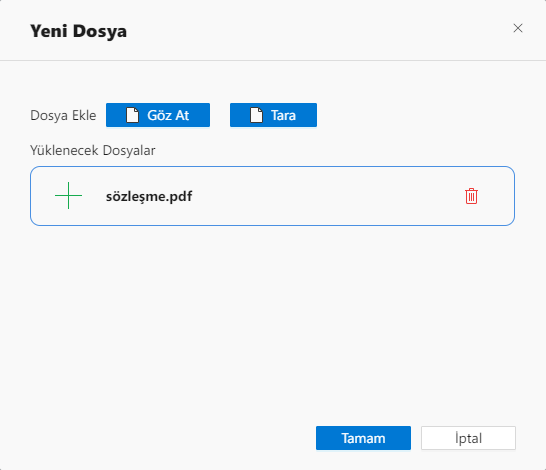
After filling in the necessary information here and saving, process the other documents you want to save. When all your operations are done, close the "Scan" window.
 |
|---|
| The area where the saved documents come from |
Under this window are the documents you have saved. You can press the "OK" button to start the installation.