eBA Garnet Installation
This document describes the arguments and configurations required for the installation and operation of the Garnet Cache Database in the eBA application.
Important Notice
Garnet does not support the Sentinel architecture that can be done on Redis. Those using the Sentinel architecture can continue to use Redis on Linux machines.
Preparation
.NET 10 SDK Installation
Before starting the installation of Garnet, it is necessary to install the .NET 10 SDK in order to compile the source code of Garnet. You can download and install it from the link below.
.NET 10 Runtime Installation
Once Garnet's source code has been compiled, the .NET 10 Runtime must be installed to run Garnet's .Net 10 Release. You can download and install it from the link below.
Downloading and Compiling Garnet Source Code
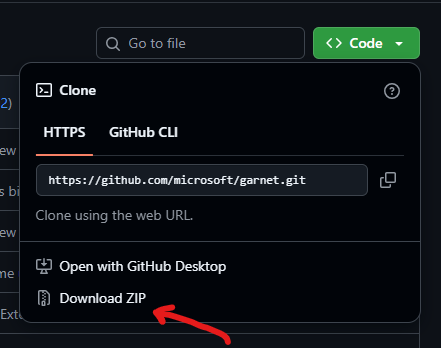
Garnet's source code should be downloaded as '.zip' from the GitHub link below. Once the downloaded '.zip' file has been extracted, the extracted folder should be moved to 'C:\garnet'.
After the move process, the location of the 'Garnet.slnx' file in the folder moved via CMD is reached. The following command is then executed, compiling all components of Garnet. This process may take 2-3 minutes.
'dotnet build -c Release'
Preparing the garnet.conf File
There is a 'garnet.conf' file on the Redis side with the name 'redis.windows-service.conf' and a 'garnet.conf' file on the Garnet side that performs the same task as this file. This file does not come by default, we need to create it. Its content is in JSON format. It is necessary to create this file in the following location as follows.
'C:\garnet\hosting\Windows\Garnet.worker\bin\Release\net10.0\garnet.conf'
garnet.conf '''json { "Port": 6380, "Address": "127.0.0.1", "AuthenticationMode": "Password", "Password": "Password", "EnableLua": true }
If you need the necessary configurations other than the settings specified in the 'garnet.conf' file above, you can access all configuration parameters via this [link](https://microsoft.github.io/garnet/docs/getting-started/configuration).
### Making Garnet.worker.exe a Windows Service
After compiling and preparing the 'garnet.conf' file, Garnet Worker's Release publish will appear at 'C:\garnet\hosting\Windows\Garnet.worker\bin\Release\net10.0'. The **Garnet.worker.exe** in this folder is converted to Windows Service with the following command.
'sc.exe create "Garnet Service" binPath= "C:\garnet\hosting\Windows\Garnet.worker\bin\Release\net10.0\Garnet.worker.exe --config-import-path C:\garnet\hosting\Windows\Garnet.worker\bin\Release\net10.0\garnet.conf"'
This Windows Service, which is then created under the name **Garnet Service**, is started through Services.

After this stage, Garnet was made active on the machine.
## eBA and Garnet Connection
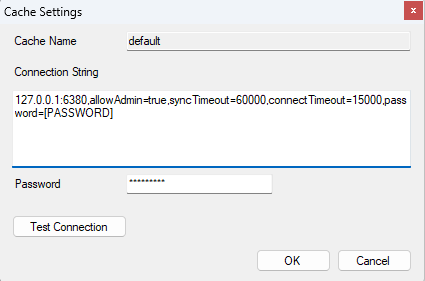
In the 'eBAServerConfigurationEditor.exe' section, the connection will be established in the same way as we connected to Redis before. There are no differences.
## Garnet FLUSHALL
The flush mechanism is also available on the Garnet side, optionally on the Redis side or when restarting eBA services.
If Garnet FLUSHALL is to be done optionally, it is sufficient to use the following command.
'''cmd
cd "C:\Program Files\Redis"
.\redis-cli.exe -h 127.0.0.1 -p 6380 -a Password FLUSHALL
Or, if you want to do Garnet FLUSHALL while restarting eBA Services, you can directly change the content of the 'eBARestart.bat' as follows.
'''bat net Stop eBAServer timeout /t 2 net stop WAS /y Pause "C:\Program Files\Redis\redis-cli.exe" -h 127.0.0.1 -p 6380 -a Password FLUSHALL timeout /t 2 net Start eBAServer timeout /t 2 net start w3svc