Emergency Situations
Information
You can quickly reach the relevant topic with the help of navigation on the right side.
Emergency Situations Module (v.5.26) User Help Document
Module Version: 5.26
1. INTRODUCTION:
According to Article 11 of the Occupational Health and Safety Law No. 6331, employers are obligated to assess potential emergencies that may arise by considering the working environment, materials used, work equipment, and environmental conditions; identify emergencies that may affect employees and the working environment; and take preventive and mitigating measures to minimize their adverse effects. It is mandatory to conduct the necessary measurements and assessments to protect against the adverse effects of emergencies at workplaces and to prepare emergency response plans. According to Article 1 of the Occupational Health and Safety Law No. 6331, in the event of a serious, imminent, and unavoidable danger, employers are obligated to make the necessary arrangements in advance and provide the necessary instructions to employees so that they can immediately leave their workplaces and go to a safe place. A safe assembly point must be designated at the workplace, and employees must be informed about it.
The work to be carried out in this regard must be conducted in accordance with the provisions of the “Regulation on Emergency Situations at Workplaces,” published in the Official Gazette dated June 18, 2013, and numbered 28681.
2. PURPOSE:
The purpose of this guide is to determine the steps that organizations using QDMS should follow during and after the implementation of the Emergency Situations Module.
3. RESPONSIBILITIES:
Workplace Physician, Occupational Safety Specialist, Administrative Affairs Officer, Employer
4. ABBREVIATIONS
ES: Emergency Situations
5. Emergency Situations Module
An emergency situation refers to events that may occur in the entire workplace or a part of it, such as fires, explosions, the spread of hazardous chemicals, or natural disasters, which require immediate intervention, response, first aid, or evacuation. This module covers the preparation of emergency plans in workplaces, the necessary measures for prevention, protection, evacuation, firefighting, first aid, and similar matters, the safe management of such situations, the identification of employees responsible for these tasks, and the establishment of emergency response teams to intervene in emergencies.
This module covers the following features.
- Identification of emergency types such as fire, flood, and earthquake
- Identification of emergency response teams such as protection, firefighting, and search and rescue teams within the organization
- Ability to establish different teams for each type of disaster
- System settings can be customized according to user requests and needs.
- Conducting drills based on the workplace
- Ability to revise emergency response teams
- Displaying information about the training received by team members added to emergency response teams
- Automatic notifications by the system based on the review period of emergency response teams
- Ensuring that a notification email is sent to the drill supervisor when it is time for the drill
- Displaying which team is at which workplace with “Emergency Emergency Teams” and viewing team member information, and generating reports according to the desired criteria in the filter section.
- “Emergency Exercises” allows you to view exercise lists according to the workplace and generate reports according to the desired criteria in the filter section.
5.1. System Infrastructure Definitions/Emergency Situations
This menu is where the infrastructure of the Emergency Situations module is created and definitions are made. Data appears based on these definitions made in the Integrated Management System menu.
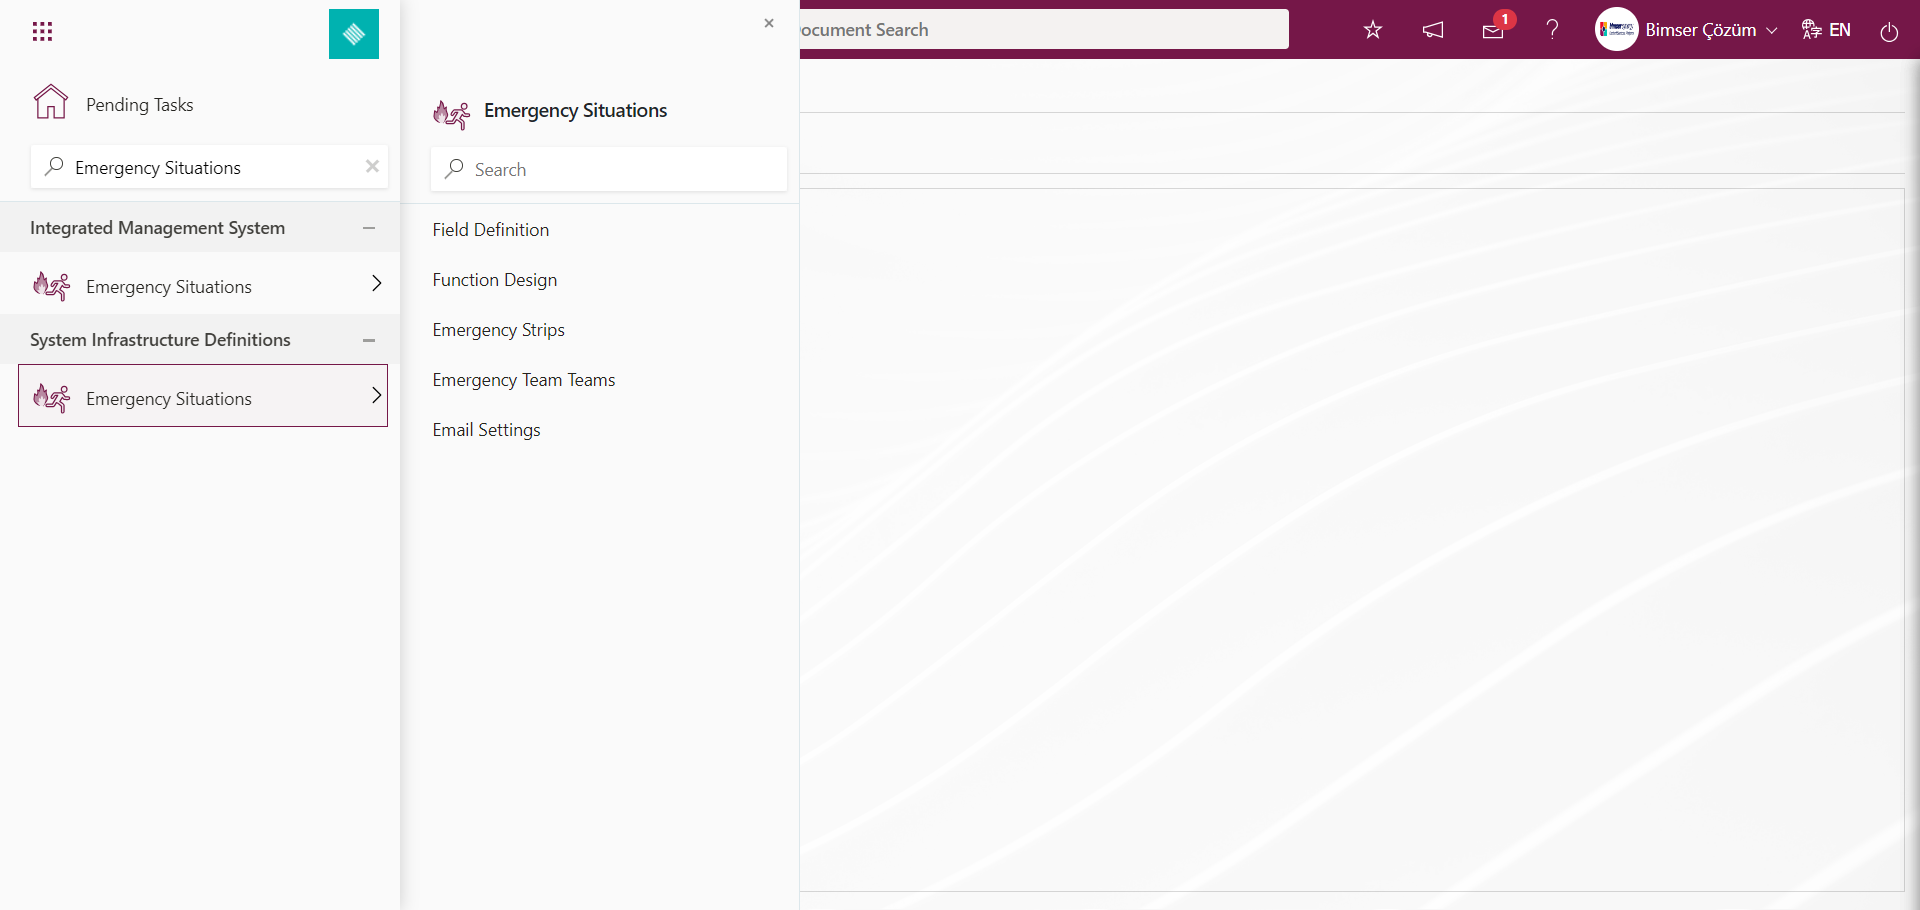
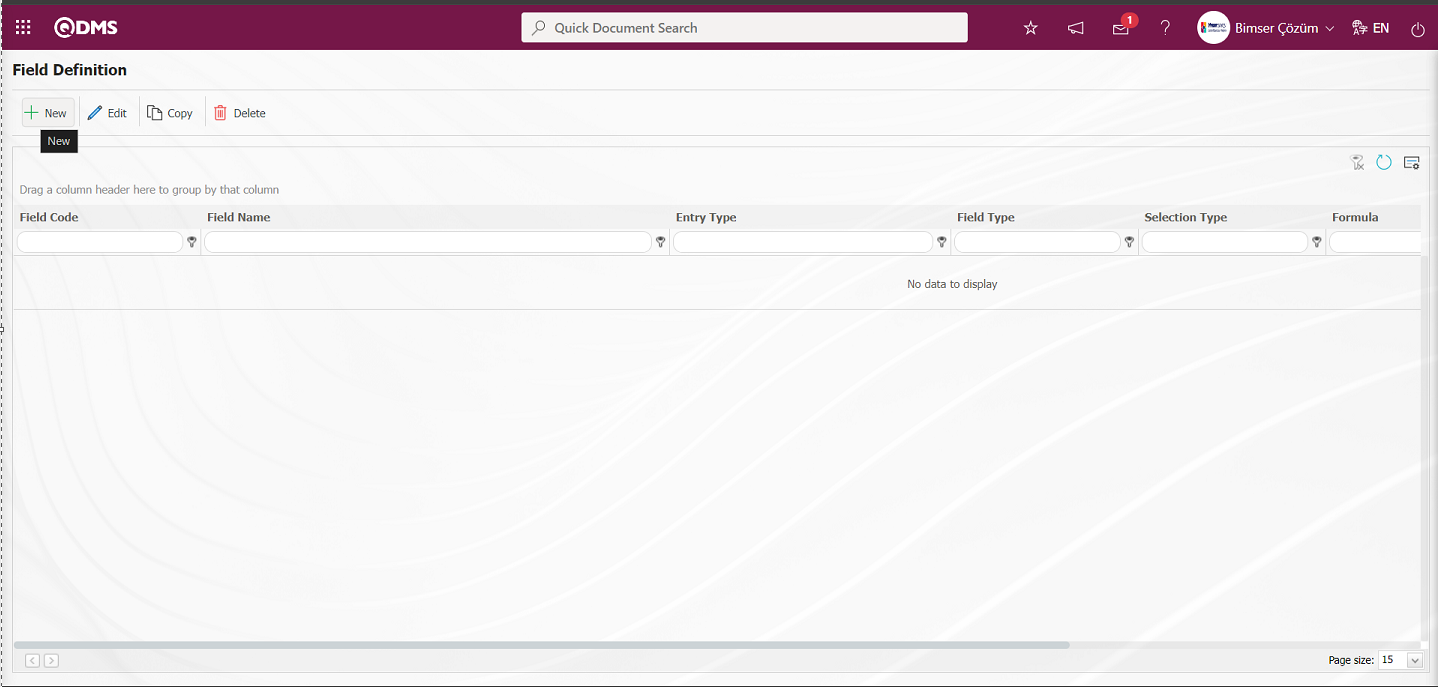
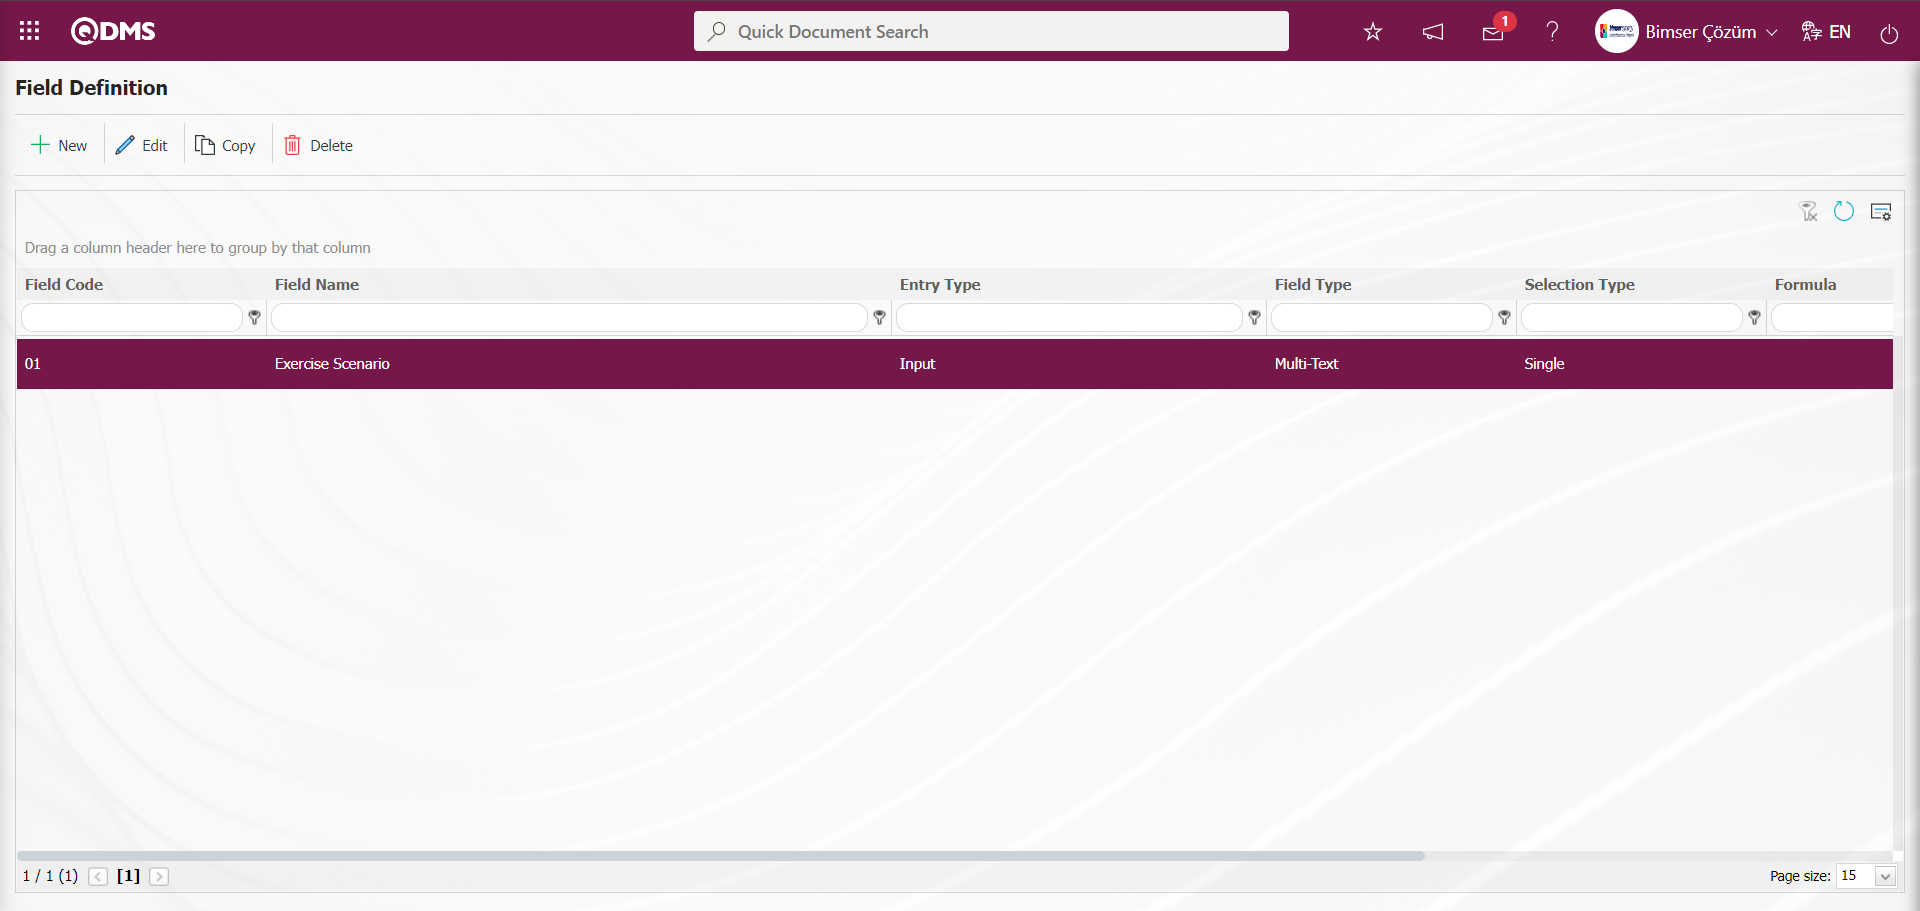
5.1.1. Field Definition
Menu Name: System Infrastructure Definitions/Emergency Situations/Field Definition
This menu defines the fields that should be displayed in the Emergency Team Identification, Emergency Team Member Identification and Emergency Exercise Definition menus located under the Integrated Management System menu. The fields created here are added to the field pool.
With the help of the buttons on the screen;
 : Add a new field.
 : Modification/editing/updating operations are performed on the selected field information in the list.
 : Selected field information in the list is copied.
 : Delete the field information selected in the list.
 : Values of the field are defined.
To add a new field to the Field Definition screen, click the button on the top left corner of the screen to open the Field Definition-New Record screen.


Related fields are defined on the screen that opens;
Field Code: It is the mandatory field where the Field Code information is entered on the Field Identification-New Record screen. It should be defined without using characters such as spaces and Turkish characters, so that it is not the same as previously defined fields. Ex. '001' , 'RK'
Field Name: This is the field where the Field Name information is entered on the Field Definition-New Record screen.
Title Note : It is the field where the note information containing explanatory information about the field data entry is entered on the Field Definition-New Record screen. It is the information displayed when the mouse hovers over the field.
Entry Type: This is the field where the entry type can be selected as Calculated or Data Entry type on the Field Definition-New Record screen. Entry Type option shows whether the created field will be determined manually by data entry or by calculation method. For example; Input
Field Type: This is the field where the field type information can be selected on the Field Definition-New Record screen. Field Type indicates which type of the created field is text, numeric, date, list, etc.
Condition of Appearance: This is the field where the Condition of Appearance information is entered on the Field Definition-New Record screen. If a field will be seen depending on the condition of another field, the condition of appearance is used. It allows the field created according to the values of the list-type field to be displayed. Its usage is [ALANKODU]=ALAN_DEĞERİ etc. For example, Is there an opportunity? Field's field code is 01 and Opportunity field's field code is 02. If the “Opportunity” Field needs to be seen if the “Yes” value with value code 100 is selected from the options in the “Is there an Opportunity?” Field, the 02 numbers
Status: This is the field where the status can be selected as “Active” or “Inactive” on the Field Definition-New Record screen.
After filling in the required fields on the Field Definition-New Record screen, the field definition record process is performed by clicking the  button in the upper left corner.
The full list of field types available in the system is given below;
Text: Adds a text box.
Multi-Text: Adds a multi-line text box.
Numeric-Money: Allows numerical input as a monetary value.
Numeric-Unit: Allows numerical input as a unit.
Date: Adds a calendar field.
List: Allows a single selection from multiple elements.
Point List: Allows a single selection from a drop-down menu; list elements have point values.
List with search option: Allows multiple selections from a drop-down menu.
Tree List: Allows multiple selections from a tree-branching menu.
Employee: Allows selection of person information from the QDMS Personnel database.
Title: Allows selection of title information from the QDMS title database.
Document: Allows selection of documents from the QDMS document database.
Administration System: Allows you to select management system information from the QDMS Administration System database.**
Customer: Allows you to select customer information from the QDMS Customer database.
Supplier: Allows you to select supplier information from the QDMS Supplier database.
Company Profile: Allows you to select company profile information from the QDMS Company Profile database.
File: Adds files.
Image: Adds images.
Image List: Allows selection from an image list.
Multi-image: Allows selection of multiple images.
Table: Enables the use of table data.
Query: Enables selection in the form of a query.
Query Tree: Enables queries to be made in a tree structure.
Tab: Creates a new tab where fields can be viewed in relation to each other, apart from the tab where they are currently located in the risk assessment form.
Check Box List: This is a list-type field that allows users to select one or more options based on their preferences.
Risk: Enables values to be selected from risk-based modules. After adding this type of field, the module from which the values will be sourced must be selected in the field definition screen.
Annotated List: This field type allows you to write a description next to the selected list value. When defining field values in the Field Definition menu, you must select whether the description box will be active for each value. Depending on the selection made here, when the relevant selection is made in the menu where this field will be displayed under the Integrated Management System menu, a box will be opened next to the field value so that the user can write a description.
Position: Enables selection of position information from the QDMS position database.
Time: Adds a time field.
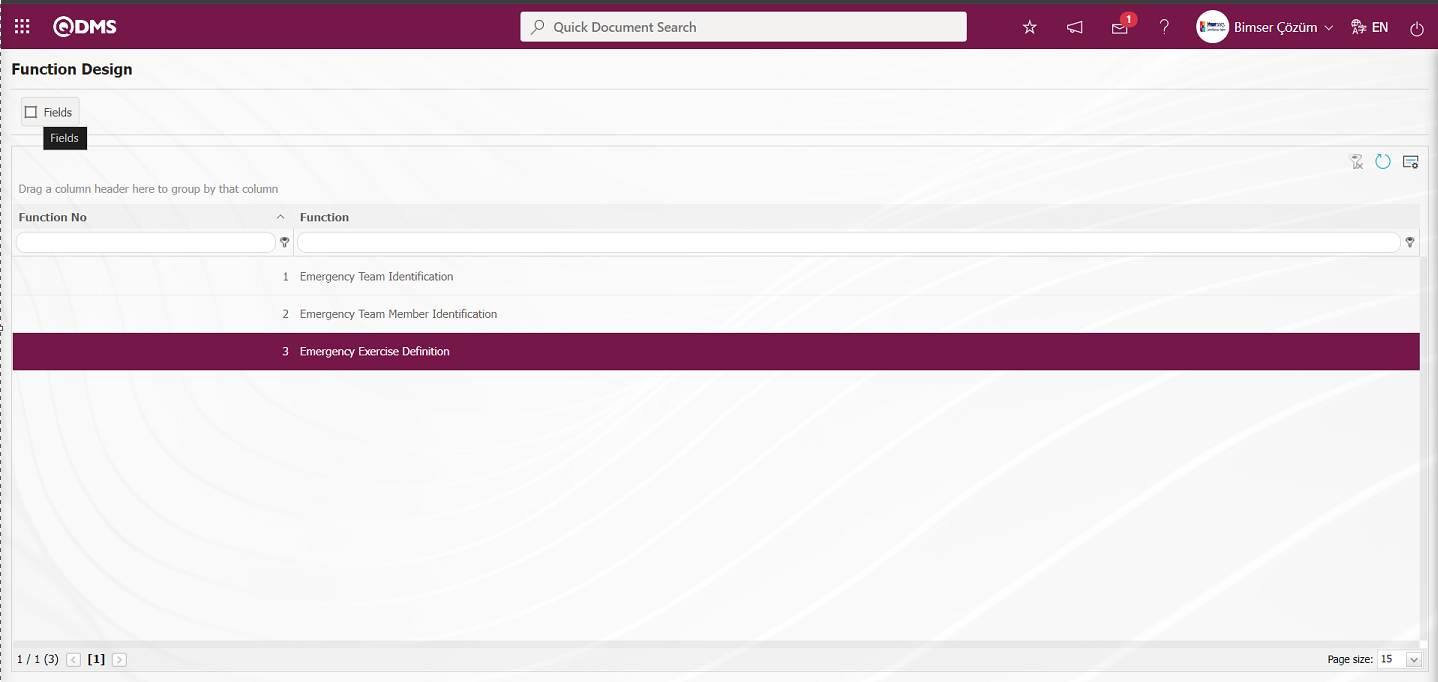
5.1.2. Function Design
Menu name: System Infrastructure Definitions/ Emergency Situations/ Function Design
Fields added to the field pool with the Function Design menu can be associated with the relevant functions of the Emergency Situations module. To do this, go to the Function Design menu under System Infrastructure Definitions/ Emergency Situations. The screen that opens will list the functions of the Emergency Situations module where fields can be added. In this screen, the fields to be used in the Emergency Team Identification, Emergency Team Member Identification and Emergency Exercise Definition functions, their order, and the hierarchy details for approval processes are defined.
With the help of the buttons on the screen;
 : Fields are associated with functions.
 : The search criteria on the menu screens are used to clean the data remaining in the filter fields in the grid where the search operation is performed.
 : The menu screen is restored to its default settings.
 : User-based designing of the menu screen is done with the show-hide feature, that is, the hiding feature of the fields corresponding to the columns on the menu screens.
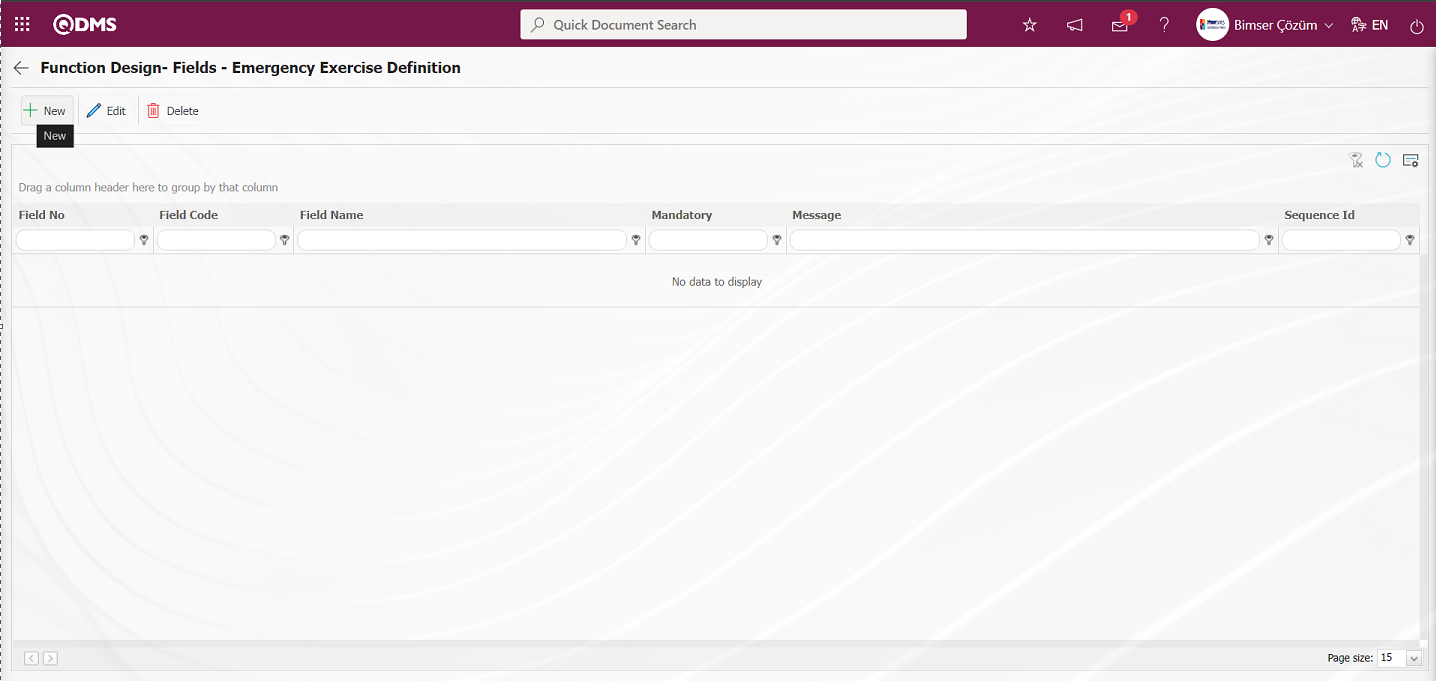
In the Function Design screen, select the relevant function and click the  button.
With the help of the buttons on the screen;
 : A new field is added to the selected function in the list.
 : Changes / edits / updates are made on the field information added to the selected function in the list.
 : Delete the field information added to the function selected in the list.
: The search criteria on the menu screens are used to clean the data remaining in the filter fields in the grid where the search operation is performed.
: The menu screen is restored to its default settings.
: User-based designing of the menu screen is done with the show-hide feature, that is, the hiding feature of the fields corresponding to the columns on the menu screens.
Click the  button on the screen that appears to display the Field Definition-Functions-New Record screen.
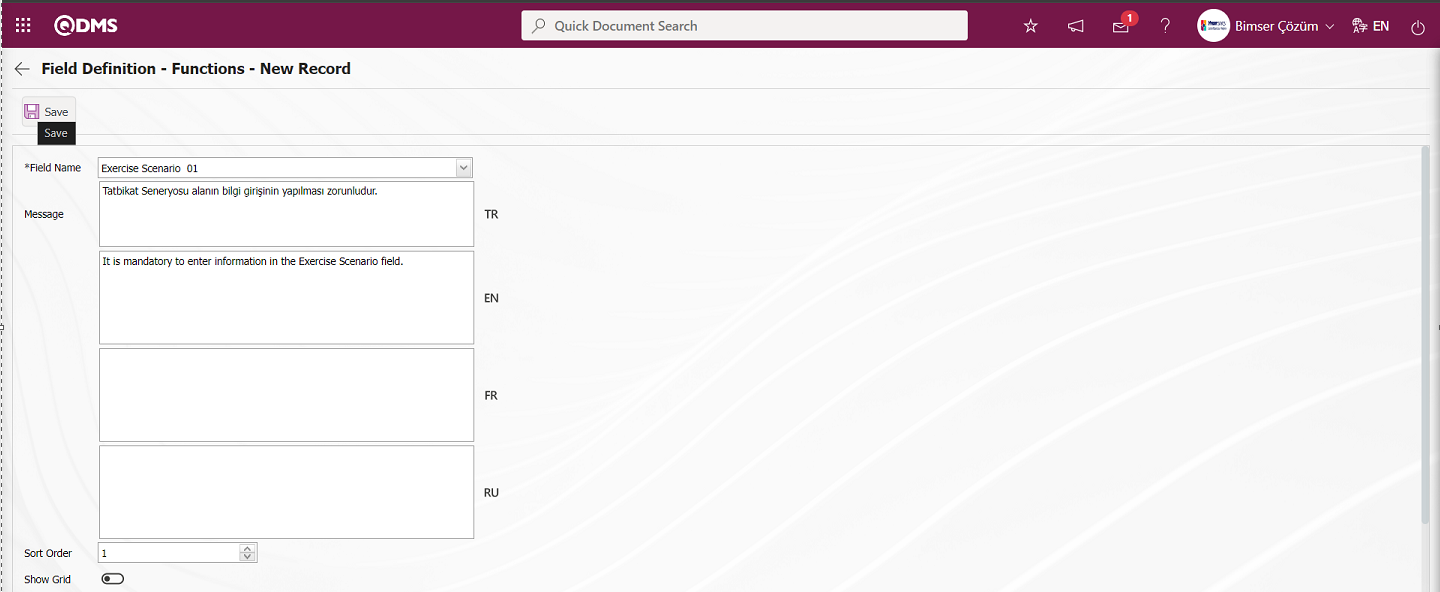
Related fields are defined on the screen that opens:
Field Name: This is the field where the field selection is made from the fields defined on the Field Definition - Functions - New Record screen.
Message: This is the field where the warning message information to be given when the required field is not filled in the Field Definition - Functions - New Record screen is written.
Sort Order: It is the field where the sequence number of the field is determined on the Field Definition - Functions - New Record screen.
Show Grid: Field Definition - Functions - If the field should be shown in the grid on the New Record screen, the relevant check box is the field to be checked.
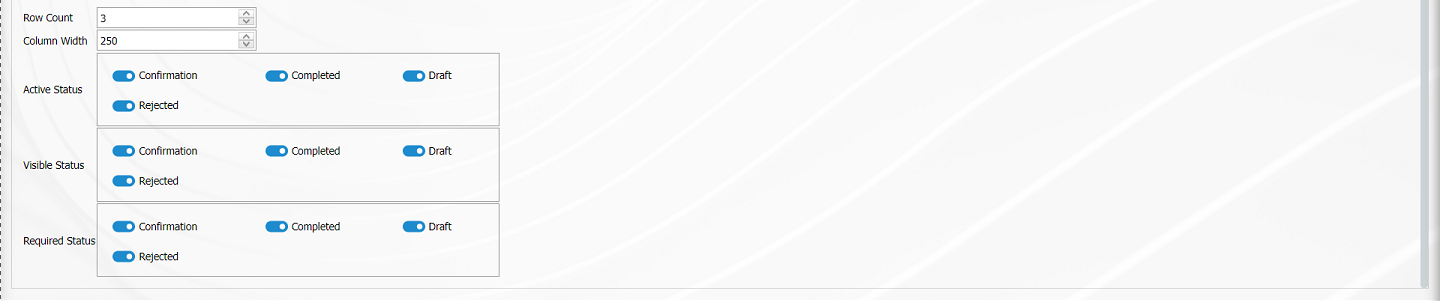
Row Count: Field Definition - Functions - If the related field on the New Record screen is multiple rows, it is the field where it is determined how many rows should appear on the data entry screen.
Column Width: Field Definition - Functions - Determines the column width of the field in the list (grid) of the records entered in the relevant module on the New Record screen. Average for fields with long data. It is ideal to use 250 and 75 for fields where only numbers are entered. Considering the data to be entered in the field, it would be appropriate to use a value in these ranges.
Active Status: On the Field Definition - Functions - New Record screen, it is the field in which the status of the field defined in the system will be active. In the statuses marked in this field, operations can be performed according to the type of the related field.
Visible Status: Field Definition - Functions - New Record screen is the field where it is determined in which of the statuses defined in the system the field will be visible. For the fields whose active status is selected, it should also be determined so that the visible status has at least the statuses marked in the active status field.
Required Status: Field Definition - Functions - New Record is the field where it is determined in which of the statuses defined in the system the field will be mandatory.
After filling in all the required fields in the Field Definition - Functions - New Record screen, click the  button in the upper left corner of the screen to link the field to the Emergency Exercise Definition function.
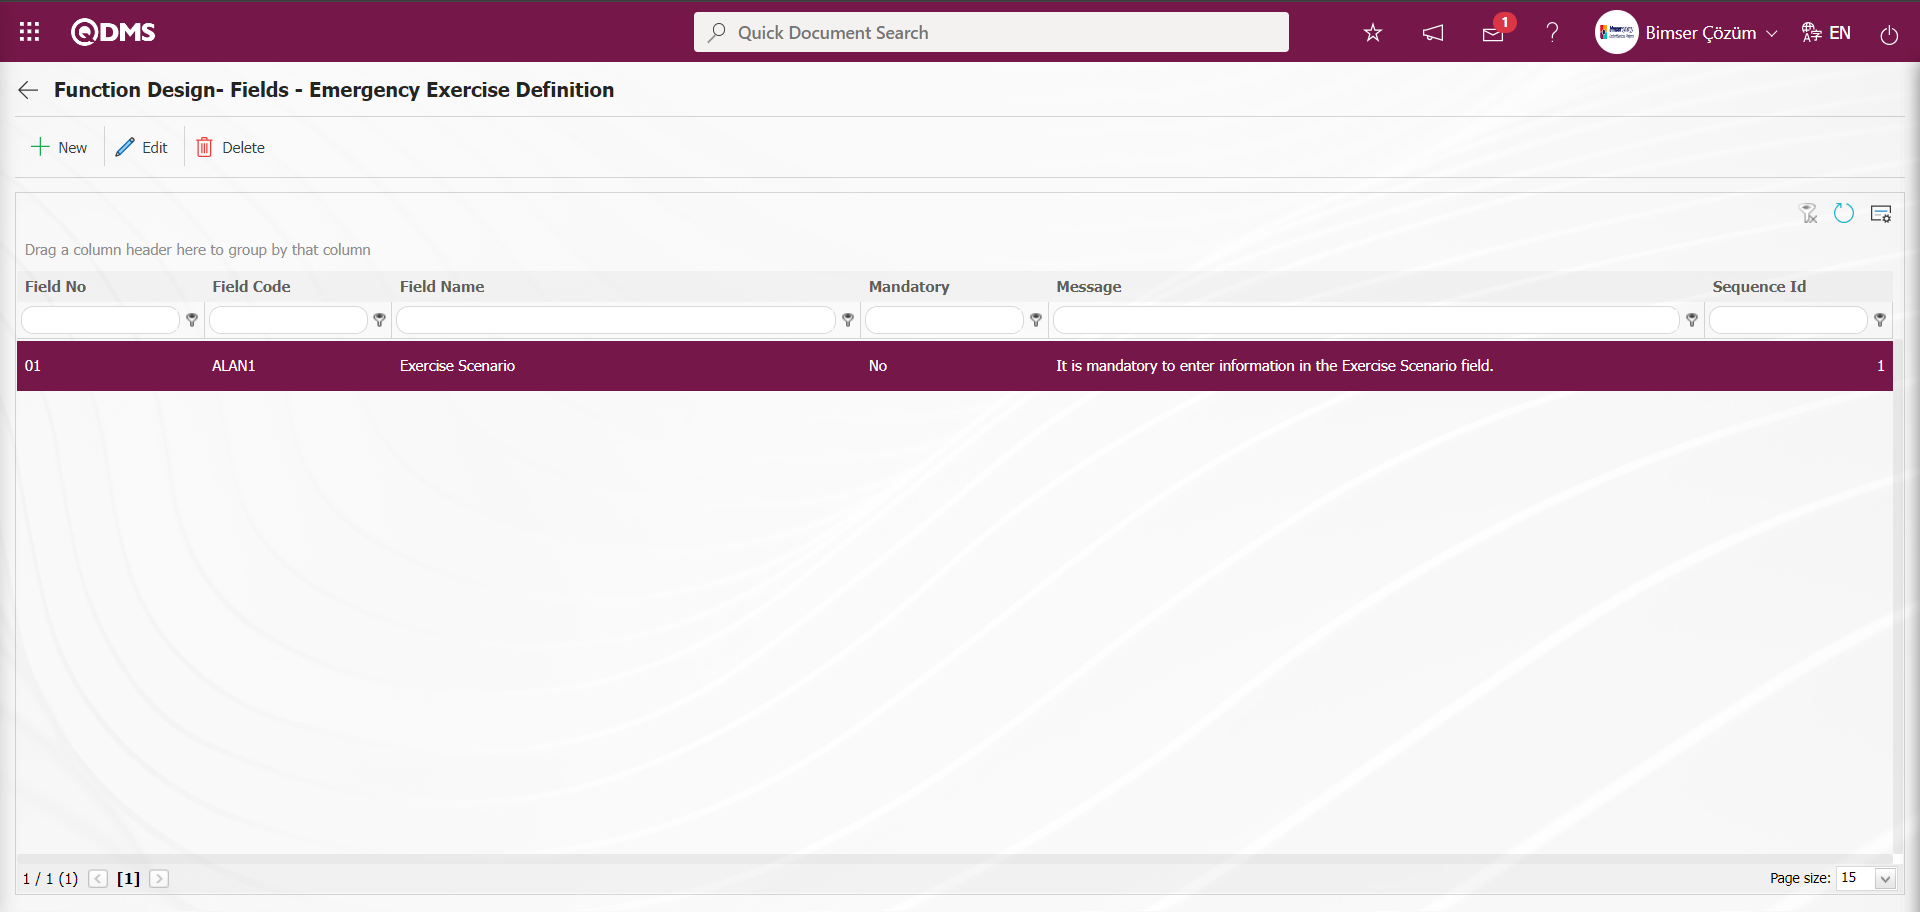
After the defined field is linked to the relevant function, it appears on the Emergency Exercise Definition screen. Since the Active status, Visible status, and Mandatory status of the defined field are checked, the field is displayed, data entry is required, and it is marked with an asterisk to indicate that it is a mandatory field. When the mouse hovers over the field, the header note information is displayed.
After filling in all the required fields on the Emergency Exercise Definition screen, click the button in the upper left corner of the screen to save the Emergency Exercise Definition.
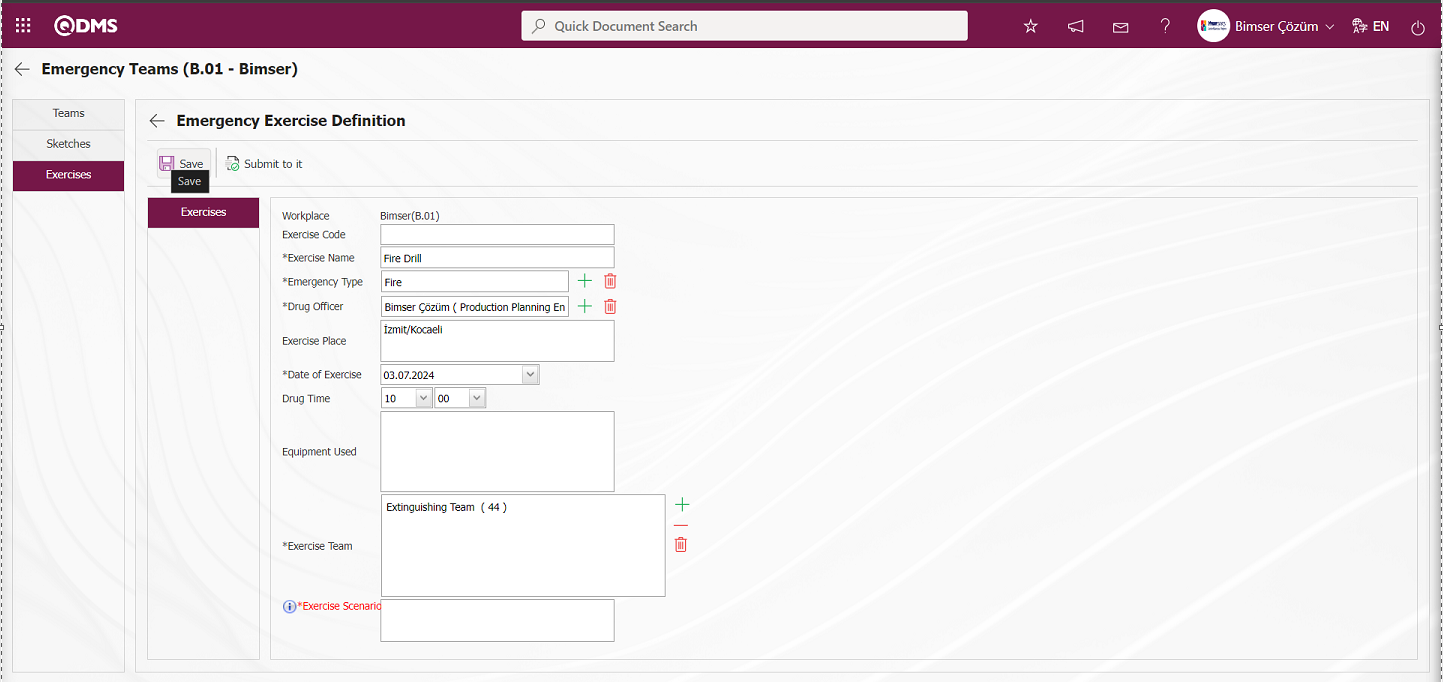
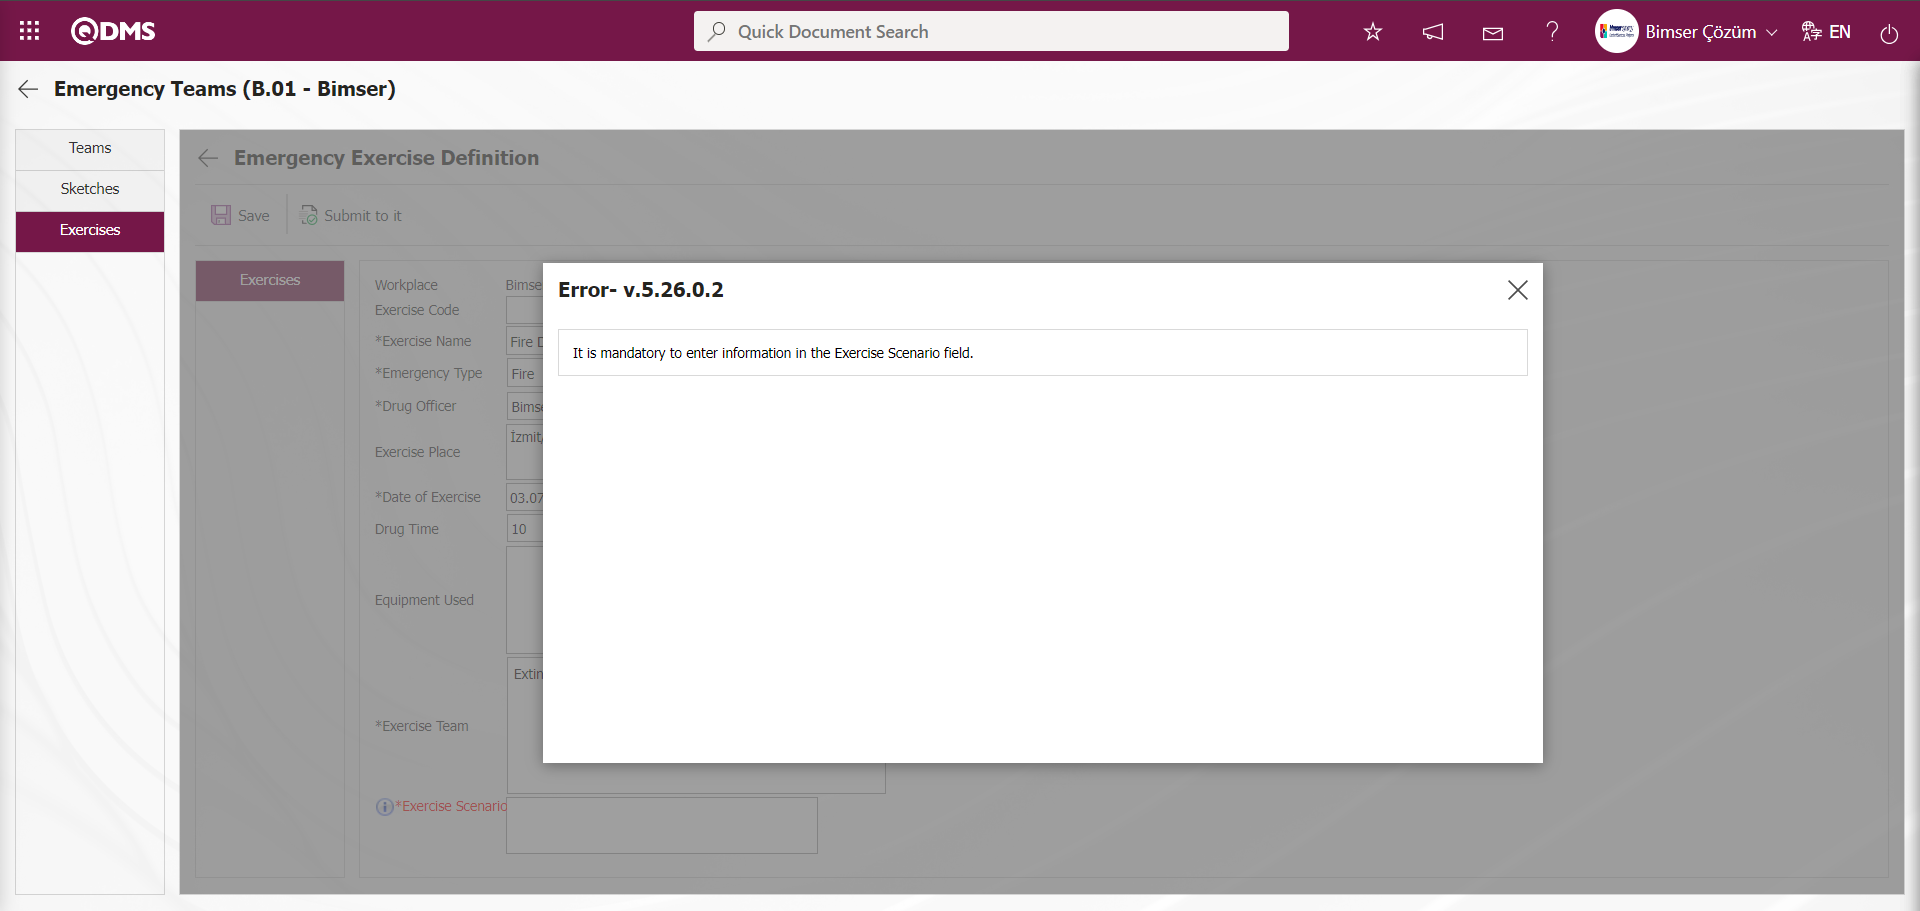
Emergency Exercise Definition does not allow the registration process to proceed if the mandatory field defined in the registration process is not filled in, and displays a message indicating that the field is mandatory.
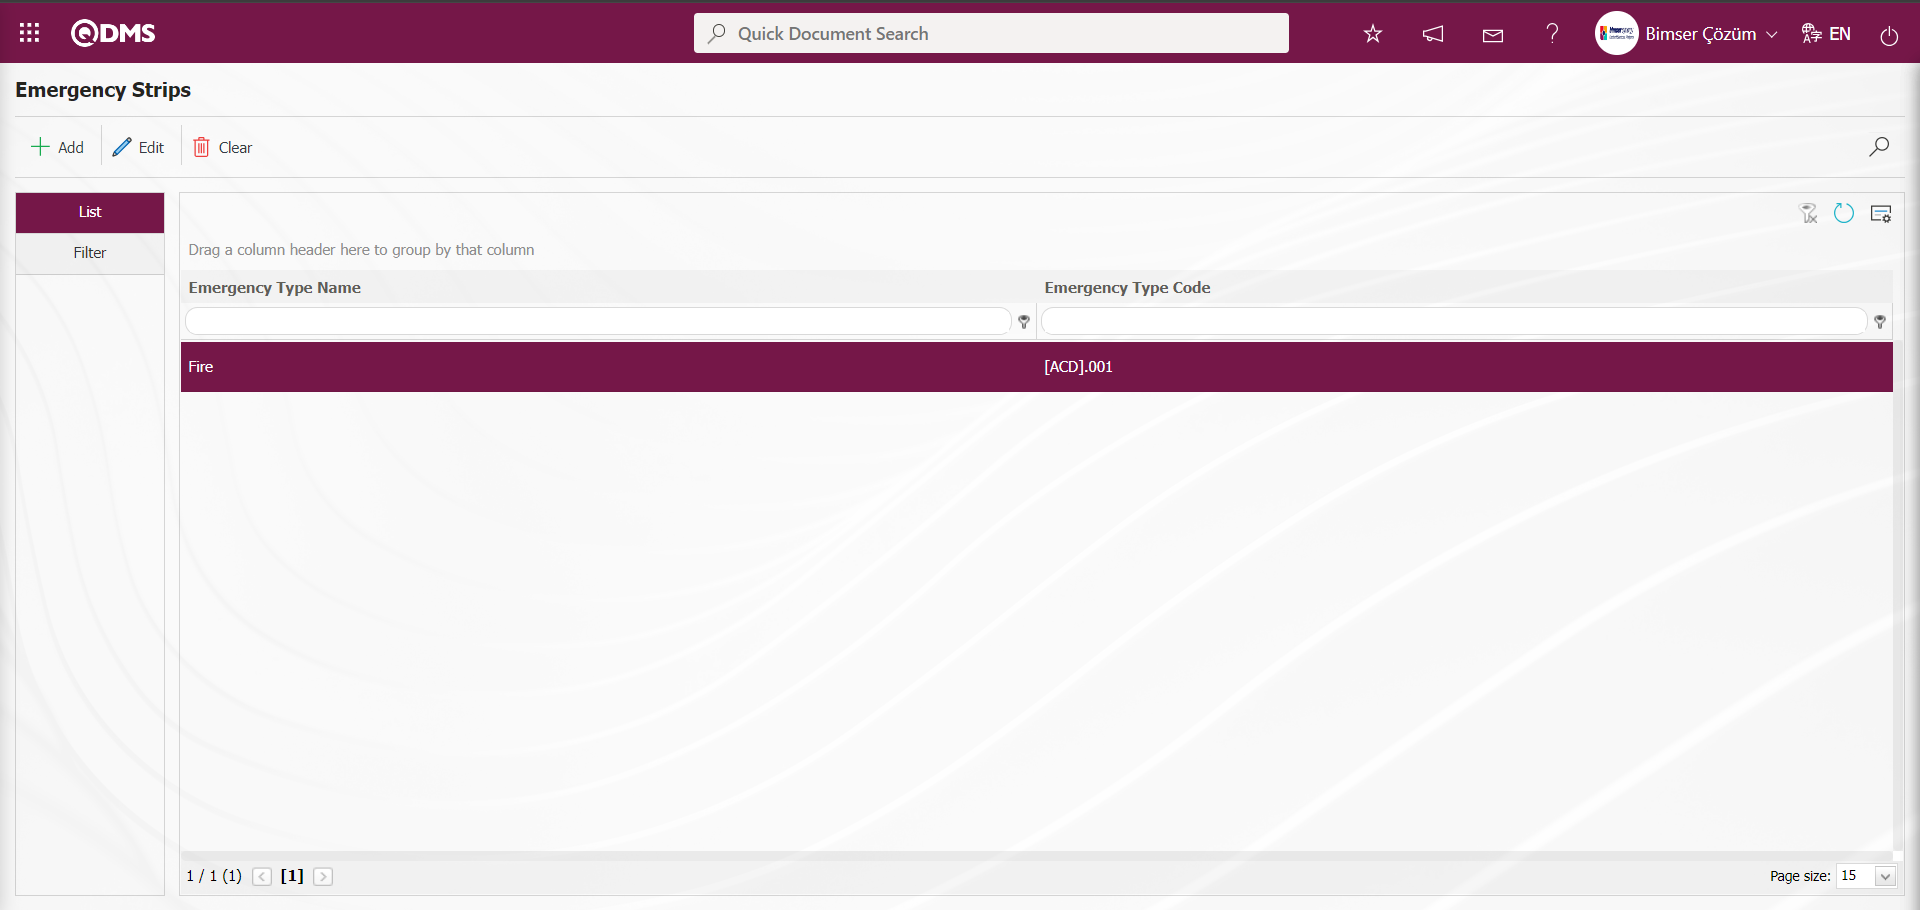
5.1.3. Emergency Strips
Menu name: System Infrastructure Definitions/ Emergency Situations / Emergency Strips
This menu is used to define emergency situation types. All events that may occur throughout the workplace or in part of it and require emergency response, intervention, first aid, or evacuation, such as fire, flood, earthquake, sabotage, or natural disasters, are defined here.

With the help of the buttons on the screen;
 : New emergency type is defined.
 : Editing/updating/changing is made on the emergency type information selected in the list.
 : Deletes the emergency type information selected in the list.
 : Records can be searched by filtering.
 : The search criteria on the menu screens are used to clear the data remaining in the filter fields in the grid where the search operation is performed.
 : The menu screen is restored to its default settings.
 : User-based designing is done on the menu screen with the show-hide feature of the fields corresponding to the columns on the menu screens, that is, the hiding feature.
To add a new emergency type to the Emergency Strips screen, click the button in the upper left corner of the screen to display the Emergency Type Description screen.
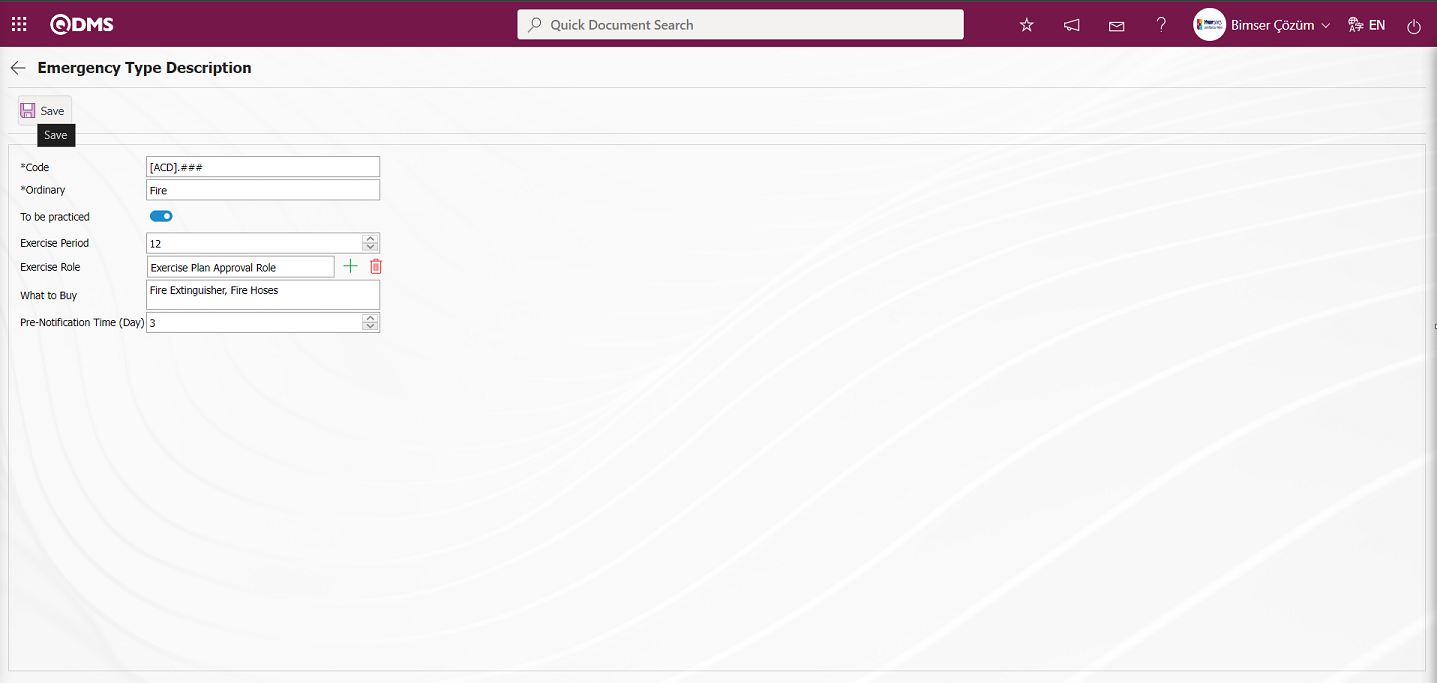
The relevant fields are defined on the screen that opens:
Code: This is the field where the code template for the emergency type is entered on the Emergency Type Definition screen. In the System Infrastructure Definitions/BSID/Configuration Settings/Parameters menu, select the Emergency Situations module in the Module field, and in the Emergency Situations Module parameters, the system automatically defines the code template based on the code structure defined in the value of the first parameter, “Emergency Code Type Auto Template.”
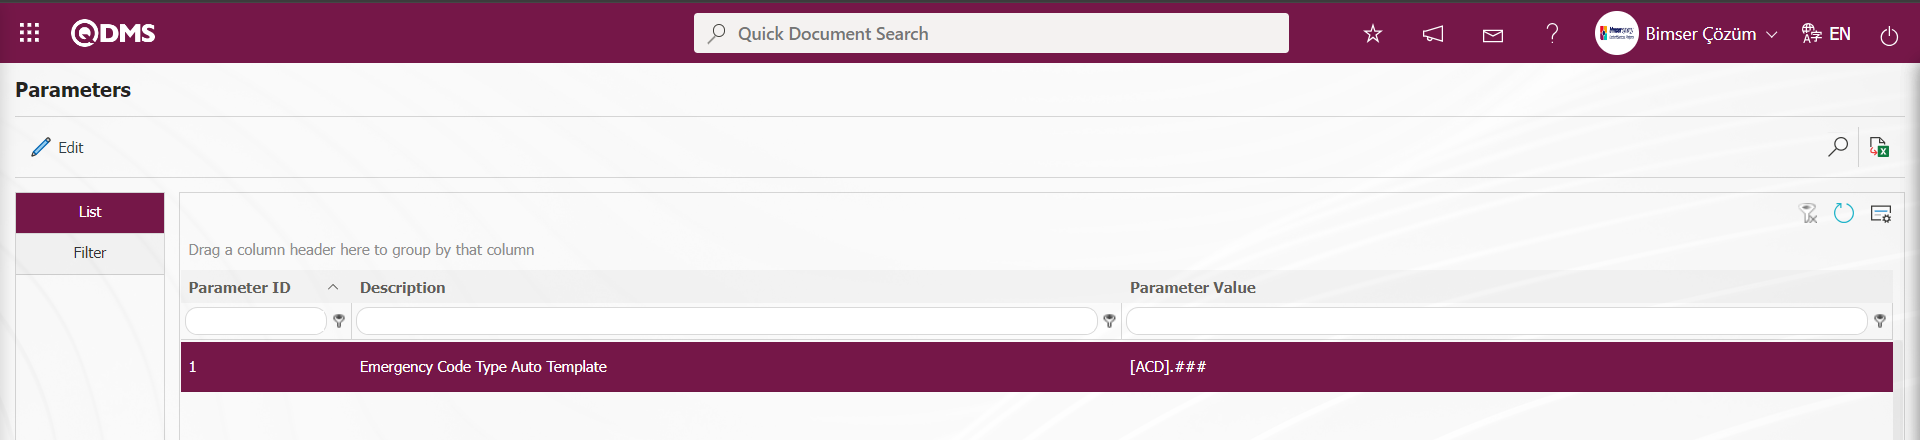
In the Emergency Situations Module parameters, the code template start value is determined based on the counter value assigned to the parameter value of parameter number 2, “Emergency Counter Type.”
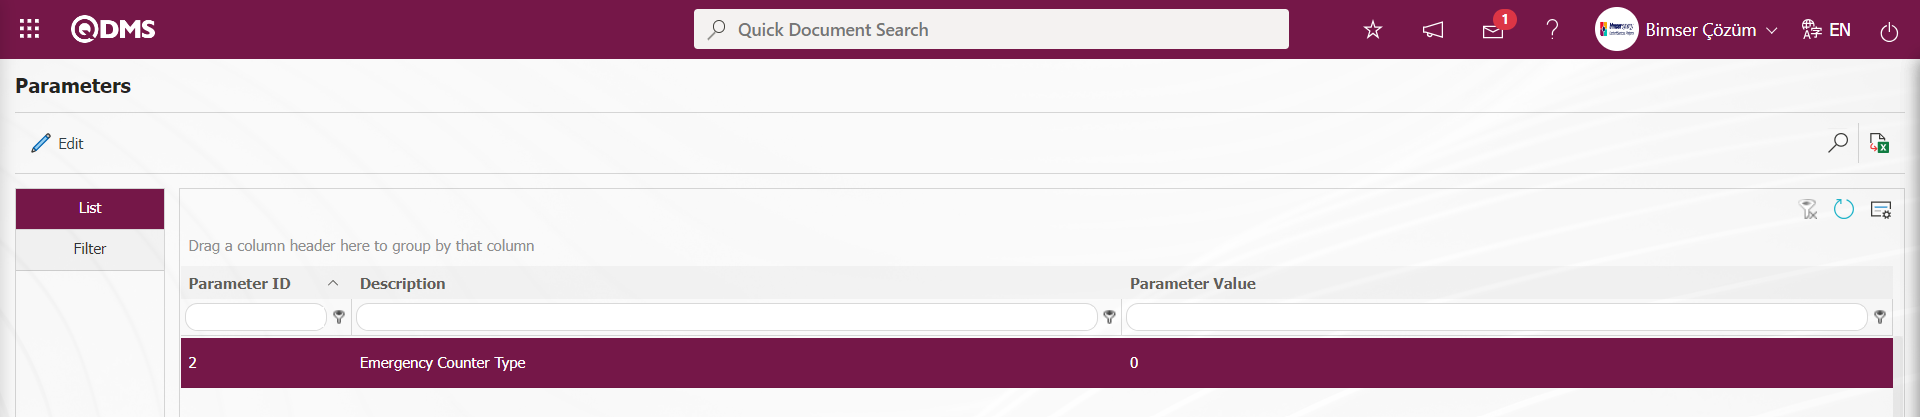
When the counter value is “0” in the Emergency Type Description screen [ACD].001, [ACD].002, [ACD].003, the code template is automatically identified.
Ordinary: This is the field where the description of the emergency type is entered in the Emergency Type Description screen.
To be practiced: If the “To be practiced” information is to be activated on the Emergency Type Description screen, the relevant check box is selected. If the relevant check box is selected, two fields appear: Exercise Period and Exercise Role.
Exercise Period: The field where the exercise period information is entered in the Emergency Type Description screen.
Exercise Role: The field where the role performing the exercise is selected from the role definitions in the Emergency Type Description screen. The role performing the exercise is obtained from the System Infrastructure Definitions/BSID/Configuration Settings/Role What to Buy: The “Emergency Type Description” screen displays the information that needs to be taken. These are the requirements needed during the drill.
Pre-notification Period (Days): This field is where the pre-notification period is specified in days on the Emergency Type Description screen. This field is where you enter the number of days in advance that notification is given before the drill.
After filling in the required fields on the Emergency Type Description screen, click the button in the upper left corner to register the information on the Emergency Type Definition screen.
On the Emergency Strips screen, enter data in fields such as Code, Ordinary, and What to Buy in the Filter tab, then click the  (Search) button to filter according to the search criteria.
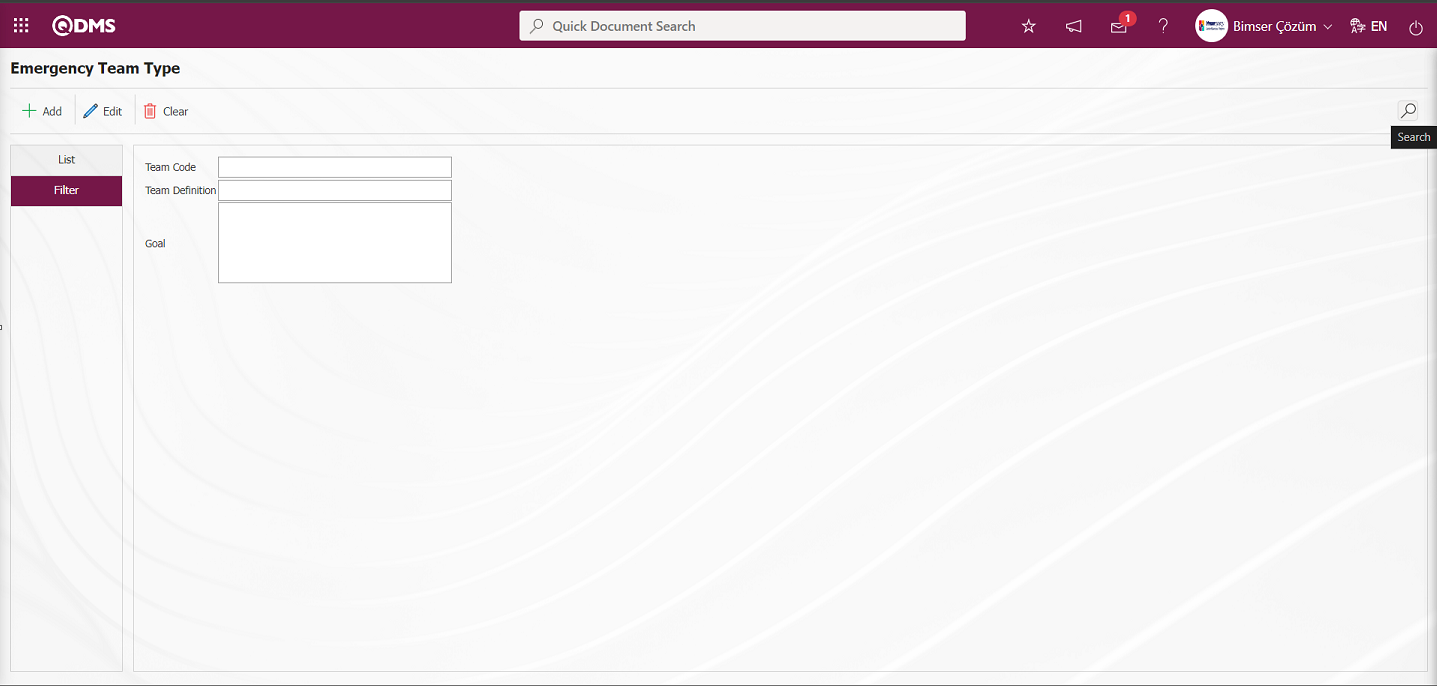
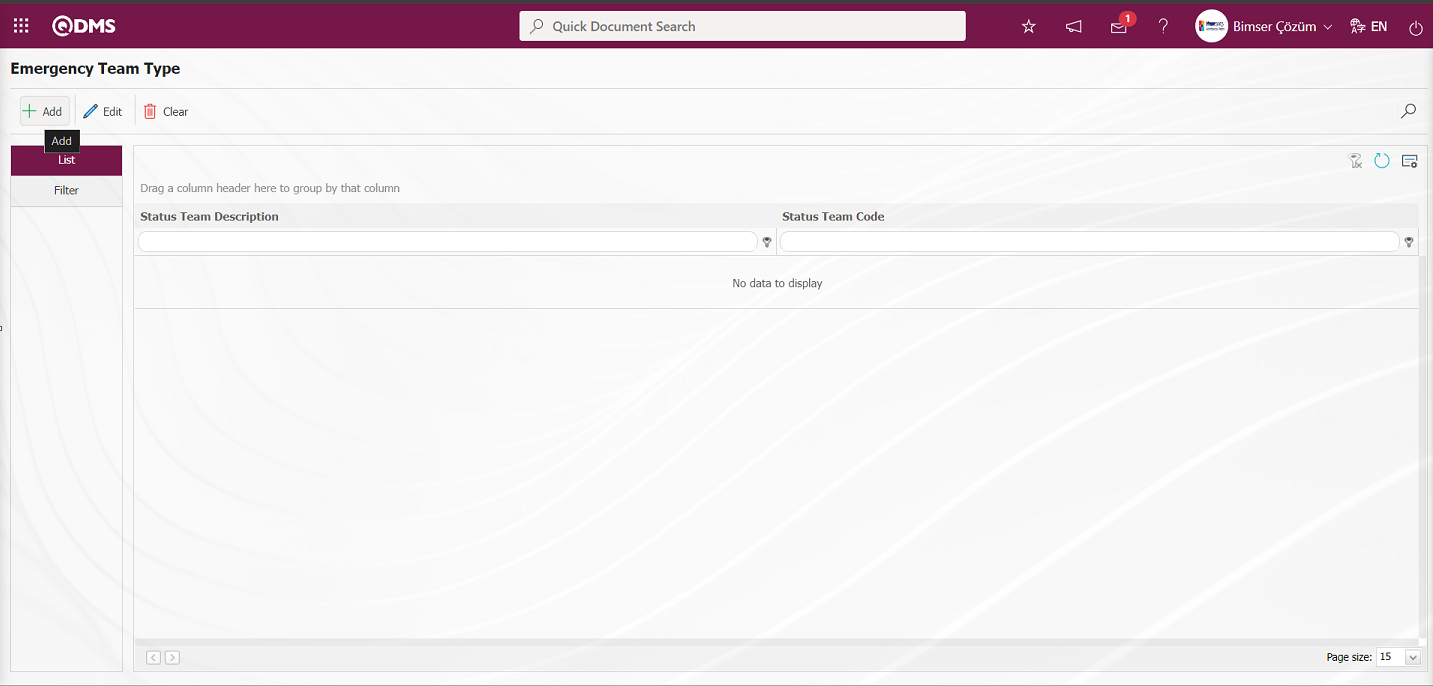
5.1.4. Emergency Team Teams
Menu name: System Infrastructure Definitions/ Emergency Situations/ Emergency Team Teams
This menu is used to define the types of emergency teams available in the company in Qdms (protection, firefighting, search and rescue, first aid, etc.).
Using the buttons on the screen;
 : A new emergency team type is added.
: The selected emergency team type information in the list is edited/updated/changed.
 : The selected emergency team type information in the list is deleted.
: Records can be searched by filtering.
: The search criteria on the menu screens are used to clear the data remaining in the filter fields in the grid where the search operation is performed.
: The menu screen is restored to its default settings.
: User-based designing is done on the menu screen with the show-hide feature of the fields corresponding to the columns on the menu screens, that is, the hiding feature.
To add a new emergency team type to the Emergency Team Type screen, click the button in the upper left corner of the screen to display the Emergency Team Type Description screen.
The relevant fields are defined on the screen that opens:
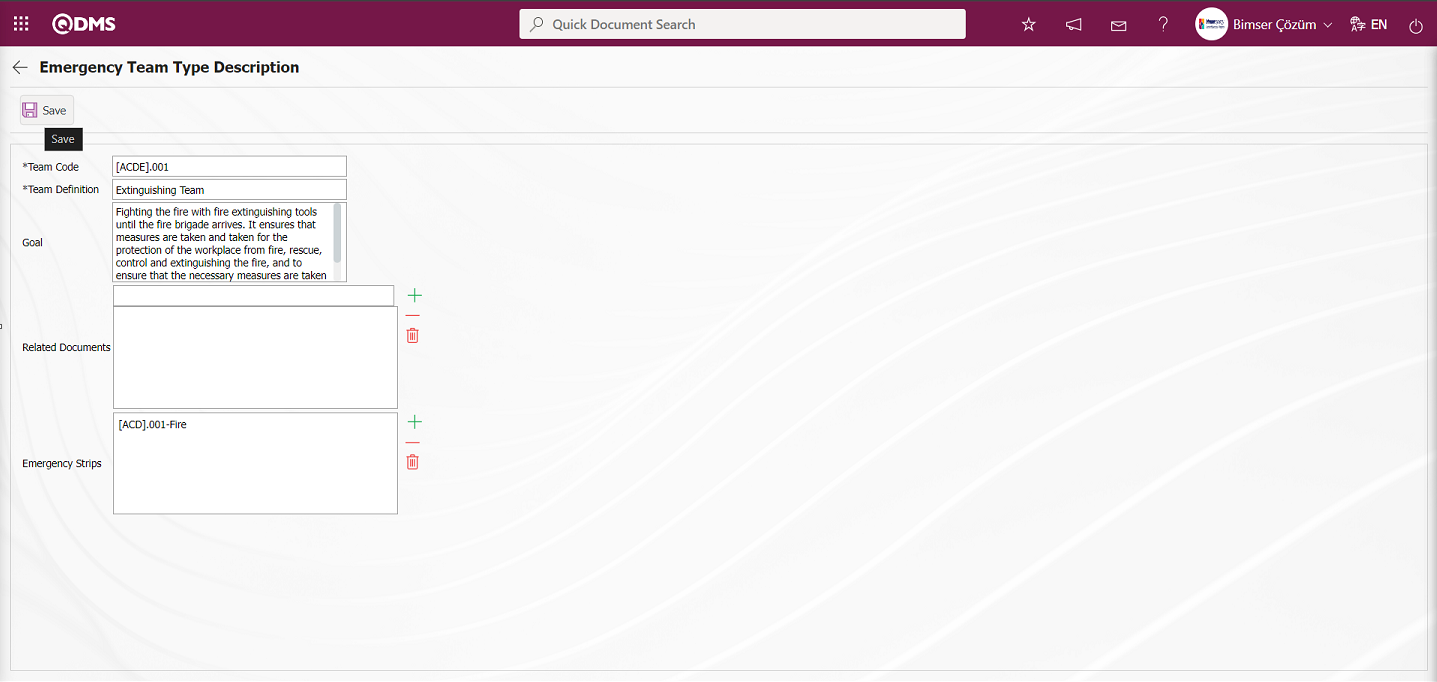
Team Code: This field is where the code for the emergency team type is entered from the Emergency Team Type Description screen. In the System Infrastructure Definitions/BSID/Configuration Settings/Parameters menu, select the Emergency Situations module in the Module field. In the Emergency Situations Module parameters, the system automatically defines the code template based on the code structure defined in the 3rd parameter “Emergency Response Team Type Code Template.”

In the Emergency Situations Module parameters, the parameter value assigned to parameter number 4, “Emergency Response Team Type Meters,” determines the starting point of the code template based on the meter value.

From the Emergency Team Type Description screen, the code template is automatically identified when the counter value is “0” in the order [ACDE].001, [ACDE].002, [ACDE].003.
Team Definition: This field is where the definition information for the emergency team type is entered in the Emergency Team Type Description screen.
Goal: The Emergency Team Type Description screen is where the goal information for the emergency team type is entered.
Related Documents: The Emergency Team Type Description screen is where the documents related to the emergency team type are selected from the list of documents defined in the system that opens when the  (Add) button is clicked.
Emergency Strips: The Emergency Team Type Description screen displays the emergency types associated with the emergency team type, which can be selected from the list of emergency team types defined in the system by clicking the (Add) button. The Emergency Team Type list is defined in System Infrastructure Definitions/Emergency Situations /** Emergency Strips
After filling in the required fields on the Emergency Team Type Description screen, click the button in the upper left corner to complete the emergency team type definition registration process.
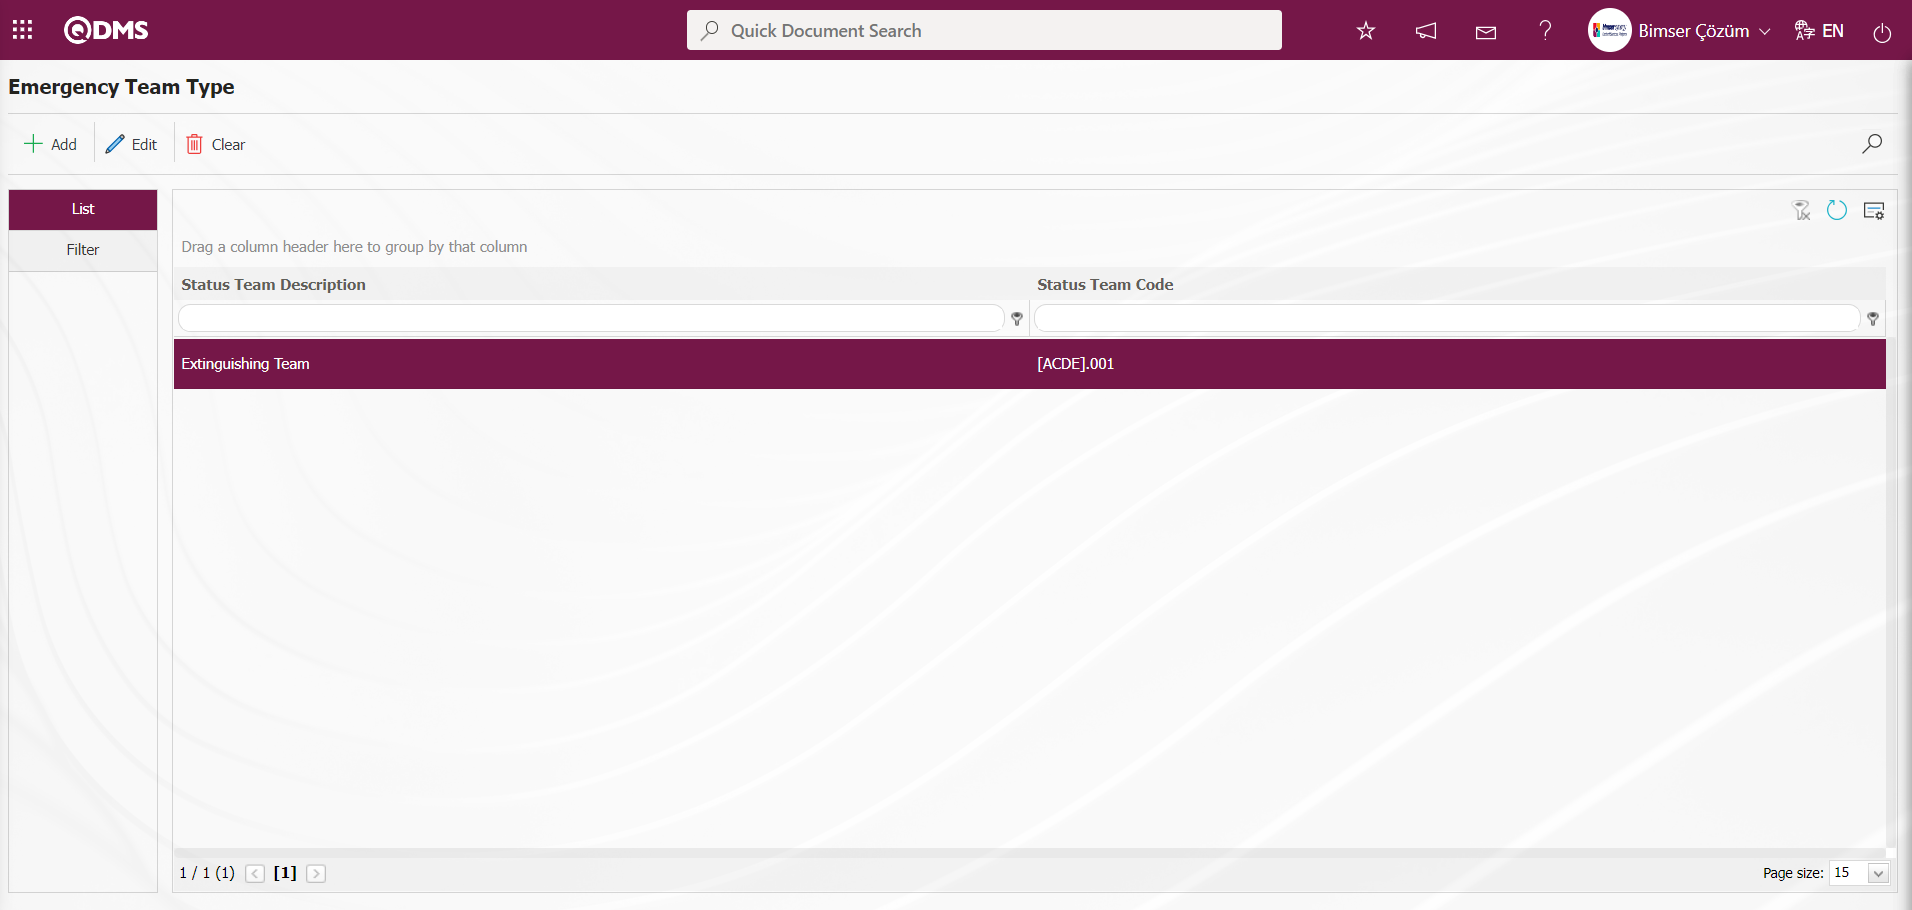
In the Emergency Team Type screen, enter data in fields such as Team Code, Team Definition, and Goal in the Filter tab, then click the (Search) button to filter according to the search criteria.

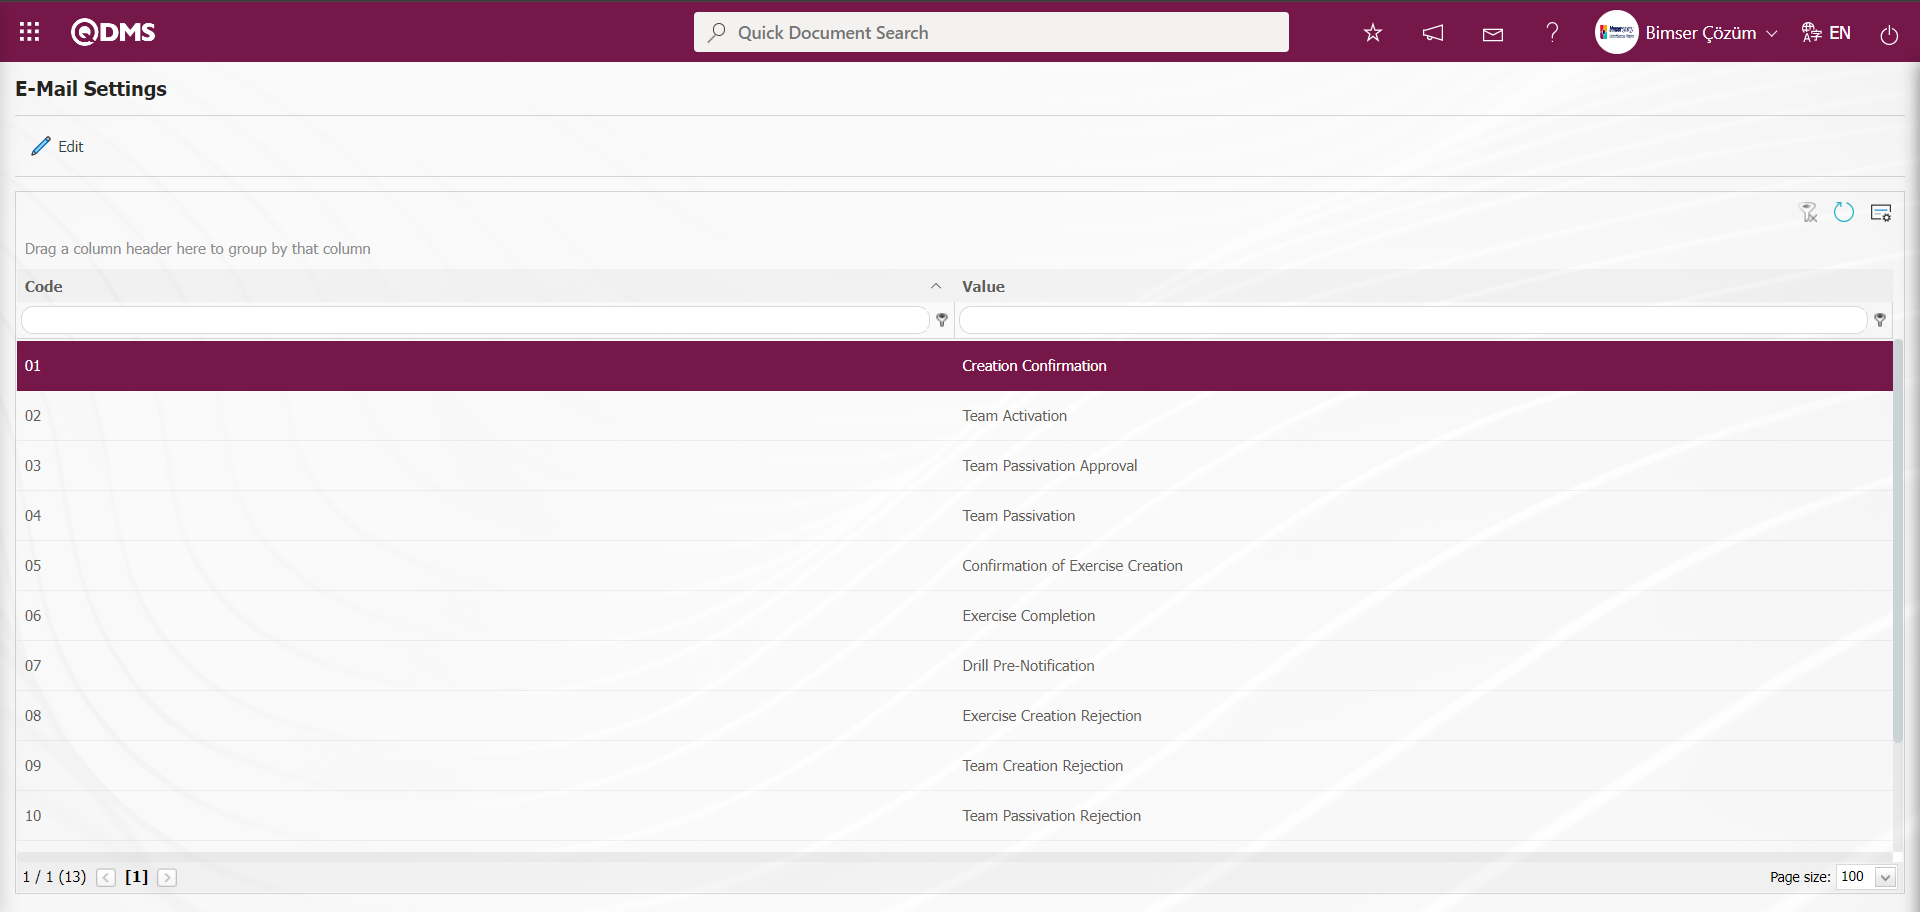
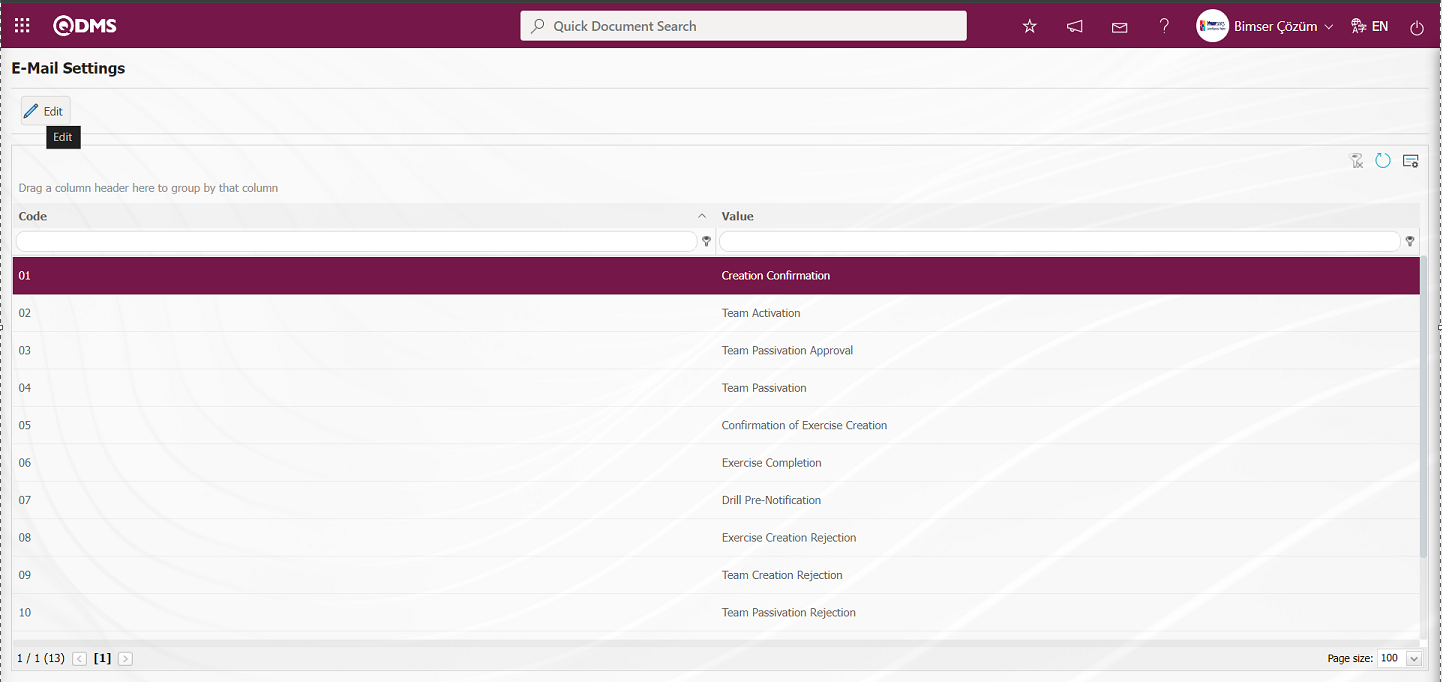
6.1.5. Email Settings
Menu Name: System Infrastructure Definitions/ Emergency Situations /Email Settings
The Email Settings screen is the menu where you can specify who will receive emails and SMS messages and at which stage of the Emergency Situations Module processes.
With the help of the buttons on the screen;
 : Editing/changing/updating is done on the value of the e-mails selected in the list.
: Clearing the data remaining in the filter fields in the grid where the search criteria search operation on the menu screens is performed
: The process of returning the menu screen to its default settings is done.
: User-based designing of the menu screen is done with the show-hide feature, that is, the hiding feature of the fields corresponding to the columns on the menu screens.
If SMS notification will be used in E-mail Settings;
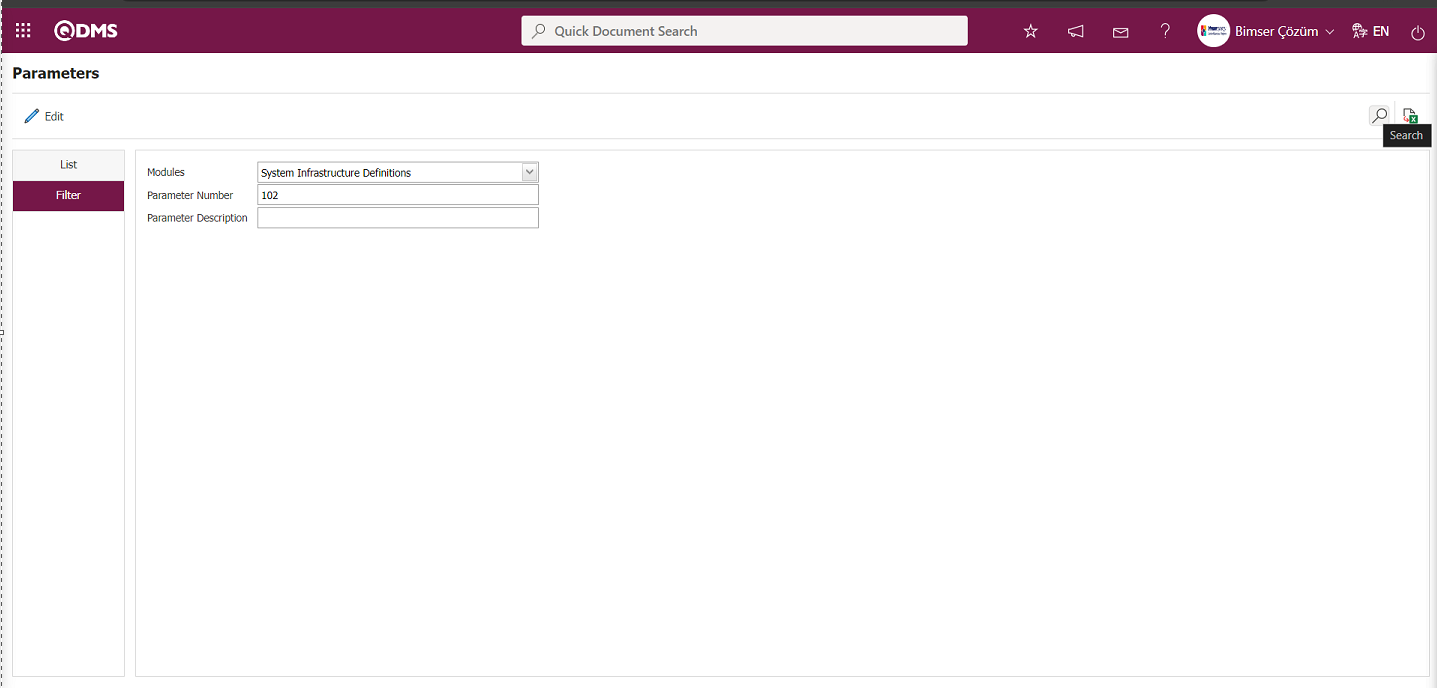
Click on System Infrastructure Definitions/BSID/Configuration Settings/ Parameters menu. In the parameters of the System Infrastructure Definitions module parameters listed on the Parameters screen, the parameter number 102 “Will using SMS notification?” is selected by typing the parameter number in the parameter no field in the Filter tab on the parameters screen and clicking the  (Search) button.
After selecting parameter 102 “Will using SMS notification? ” in System Infrastructure Definitions module parameters, click  button.

Select the parameter value ‘Yes’ on the parameters screen.
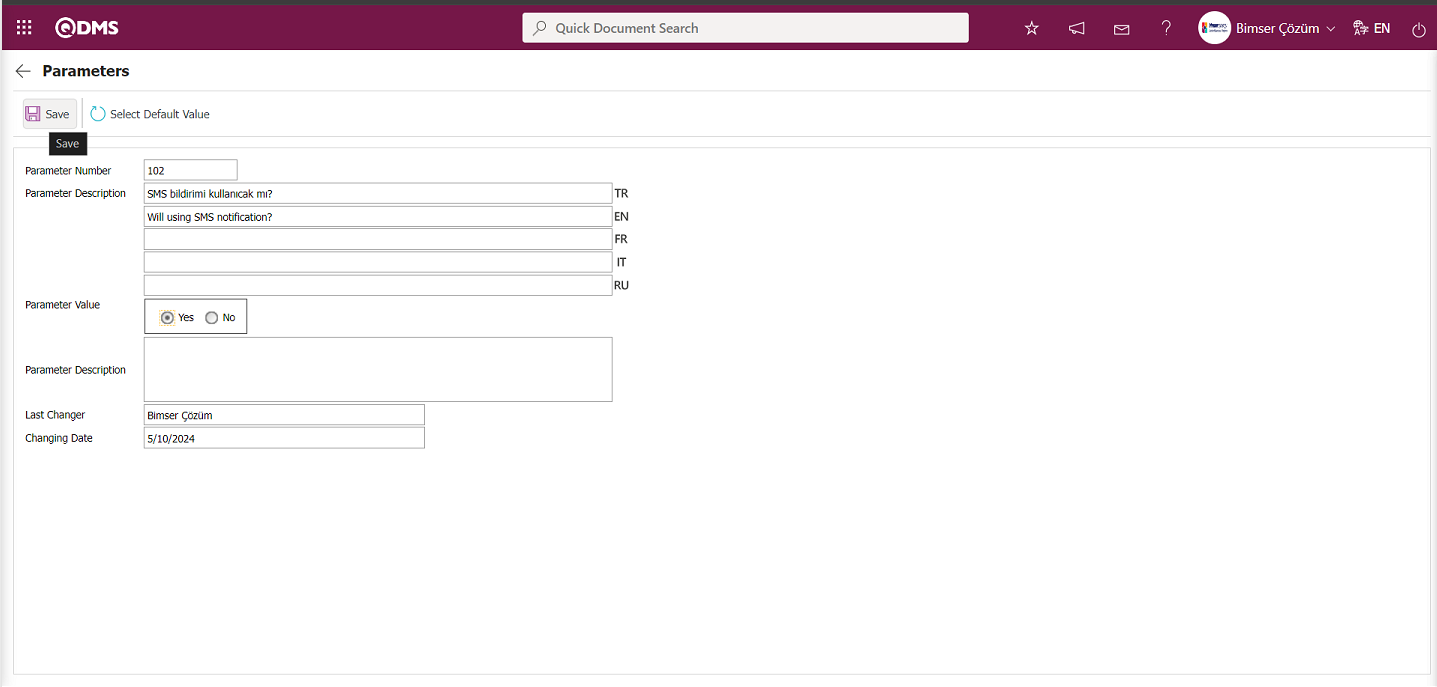
After selecting the parameter value ‘Yes’ on the Parameters screen, the  button on the top left of the screen is clicked and the parameter is activated.

After the parameter is activated, the check box related to the “Send SMS” field related to the use of SMS notification is displayed on the E-Mail Settings screen. By checking the relevant check box, SMS notification is used in E-Mail settings.
Select which step you want to send e-mail/message and click the  button.
For example: On the E-Mail Settings screen, select the “Creation Confirmation” step and click the  button.
The E-Mail Settings/ Creation Confirmation screen is displayed. The Roles section shows the role to which my e-mail and message notification will go.
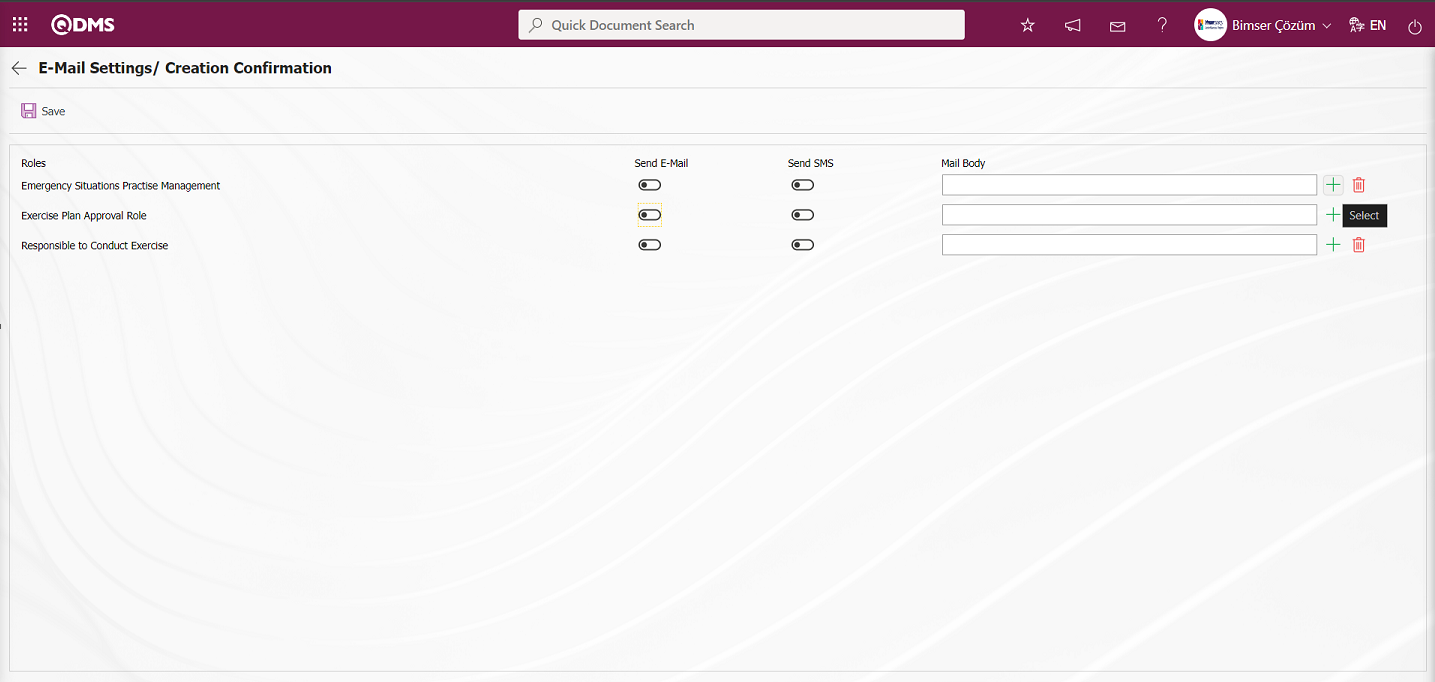
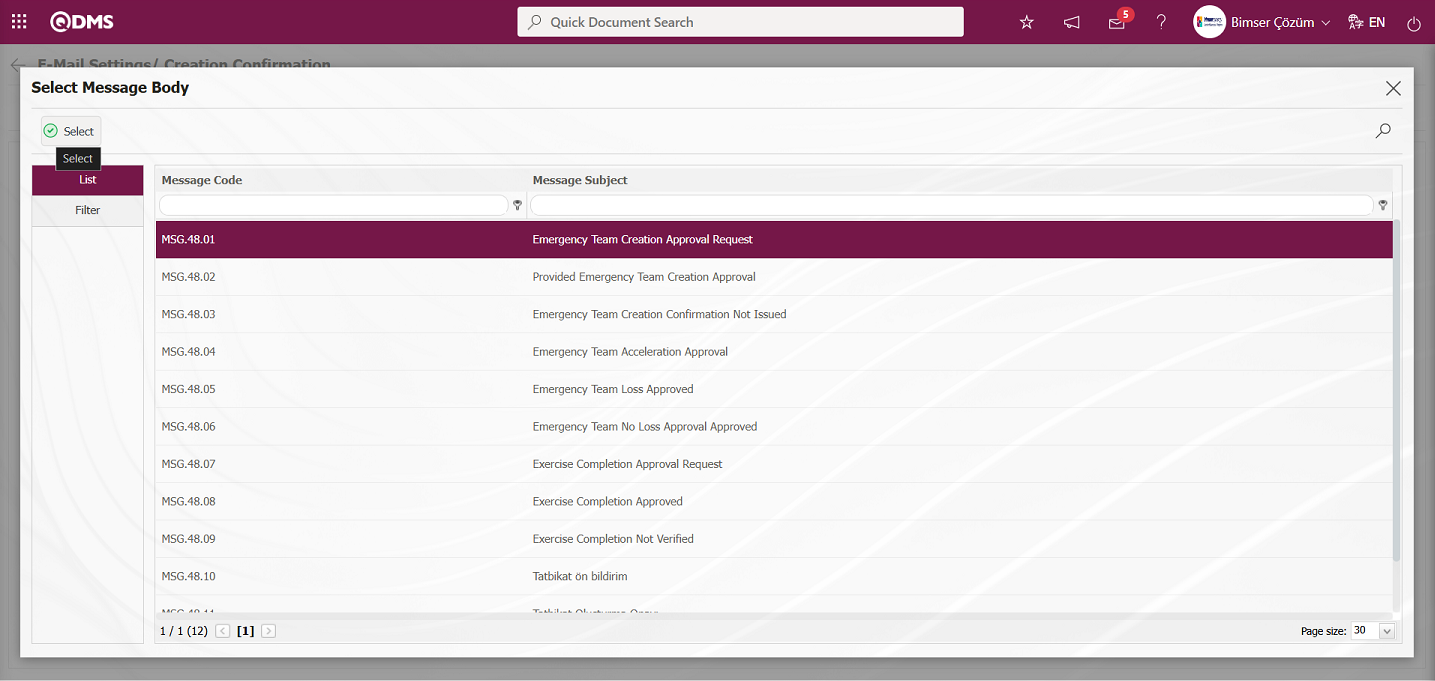
On the E-Mail Settings/ Creation Confirmation screen, click the  (Select) button and select the message body to be sent from the relevant list in the Message Body list defined in the system. The
  (Delete) button is used to delete an incorrectly added message body.
The message bodies to be sent for the relevant roles are selected by selecting the message body in the message body list and clicking the  button.
If you want to send an e-mail to whom, the “Send E-Mail / Send SMS” check box related to that role is checked. The mobile phone number of the person defined in the role must be defined on the personnel identification screen in order to send a message
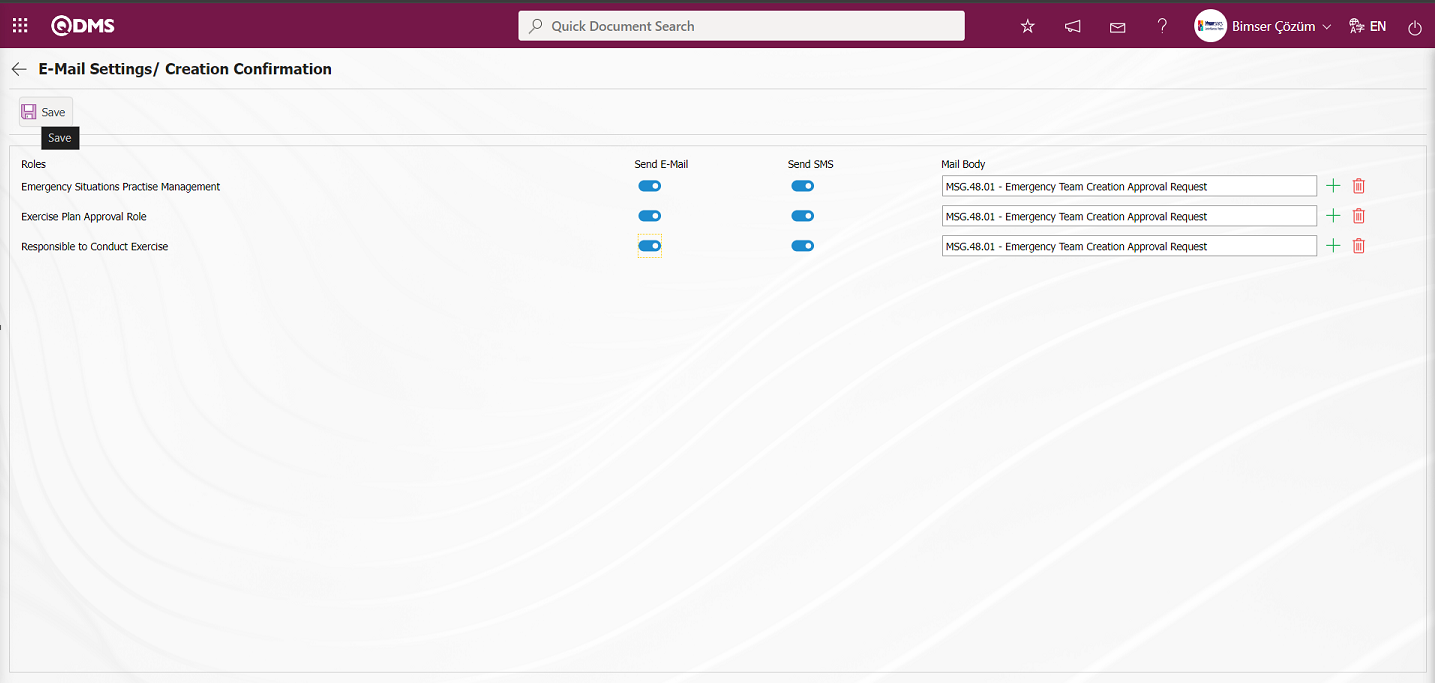
On the E-Mail Settings/ Creation Confirmation screen, after the “Send E-Mail / Send SMS” check box related to the roles to send e-mail is checked, the E-Mail Settings registration process is performed by clicking the  button in the upper left corner of the screen
5.1.6. Emergency Situations Module Parameters
Menu Name: System Infrastructure Definitions/BSID/Configuration Settings/Parameters
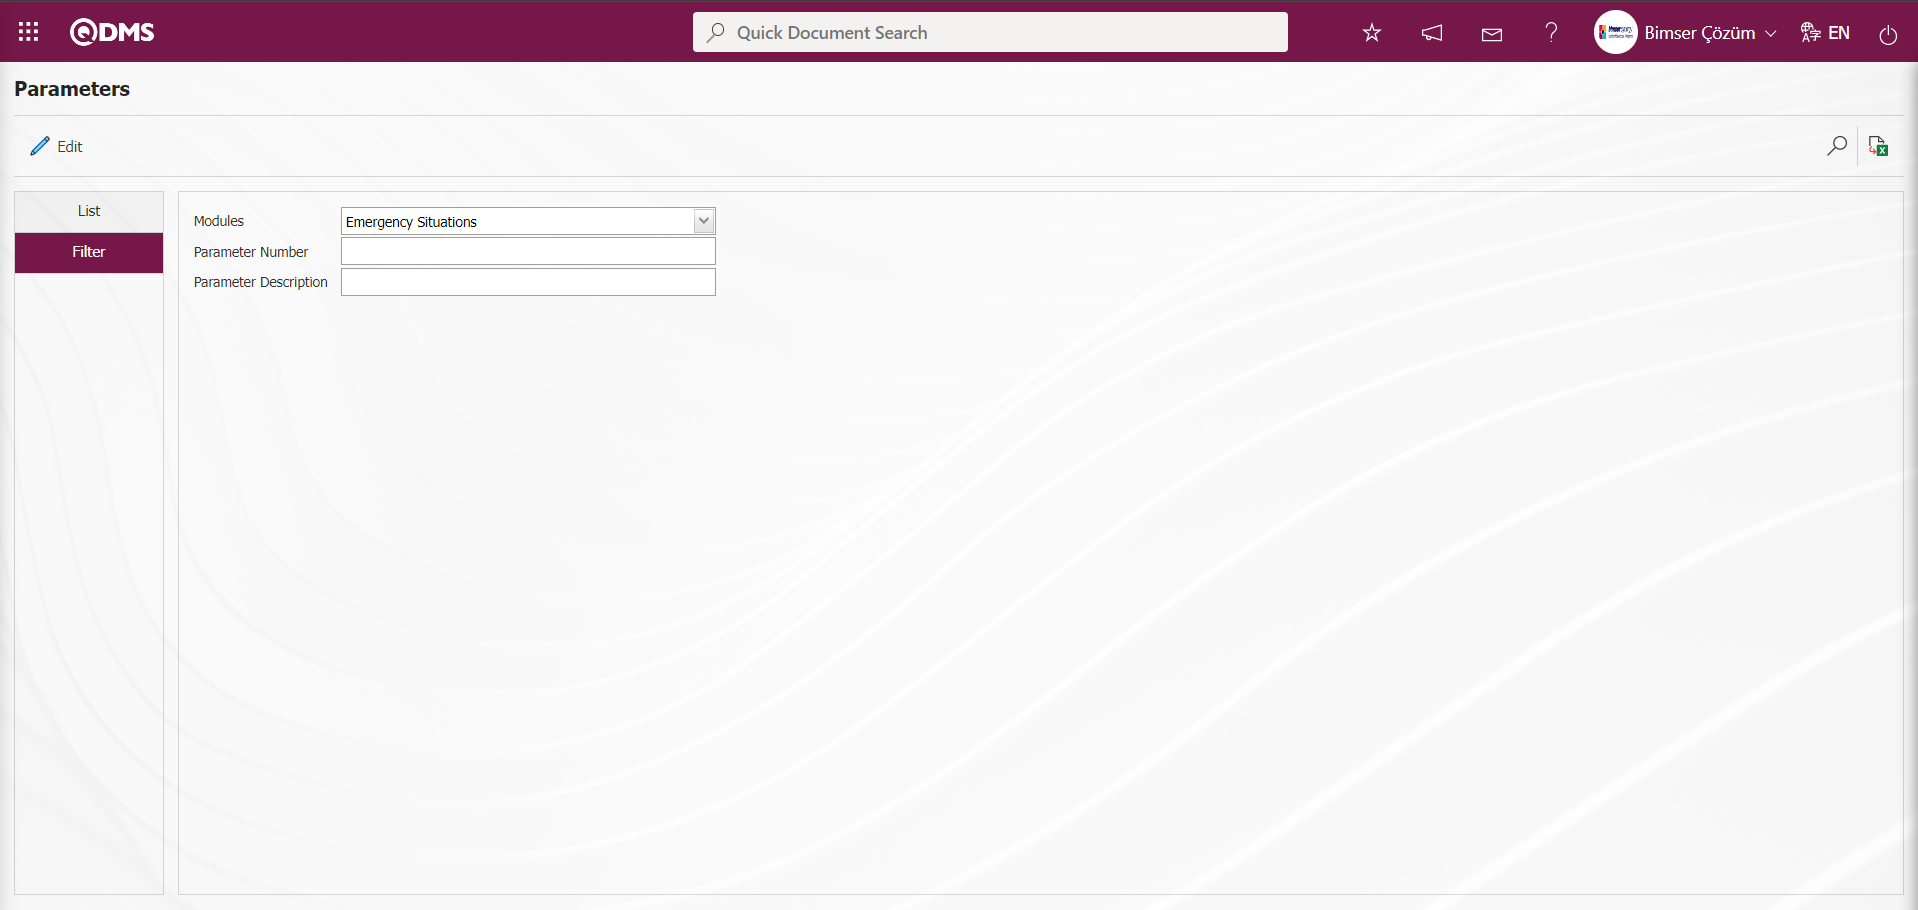
This menu allows users to make various adjustments according to their requests and needs for the Emergency Situations Module and to define (select) the parameters accordingly. Changes made to the parameters apply to all Qdms users. Click the System Infrastructure Definitions/BSID/Configuration Settings/Parameters menu. The Parameters screen opens, displaying the List and Filter tabs.
With the help of the buttons on the screen;
 : Changes and edits are made on the parameter selected in the list.
 : Records are filtered and searched.
 : Data is transferred to Excel.
In the Parameters screen, click the drop-down list in the Modules field of the Filter tab, select the Emergency Situations module from the list of modules defined in the system, and click the  (Search) button.
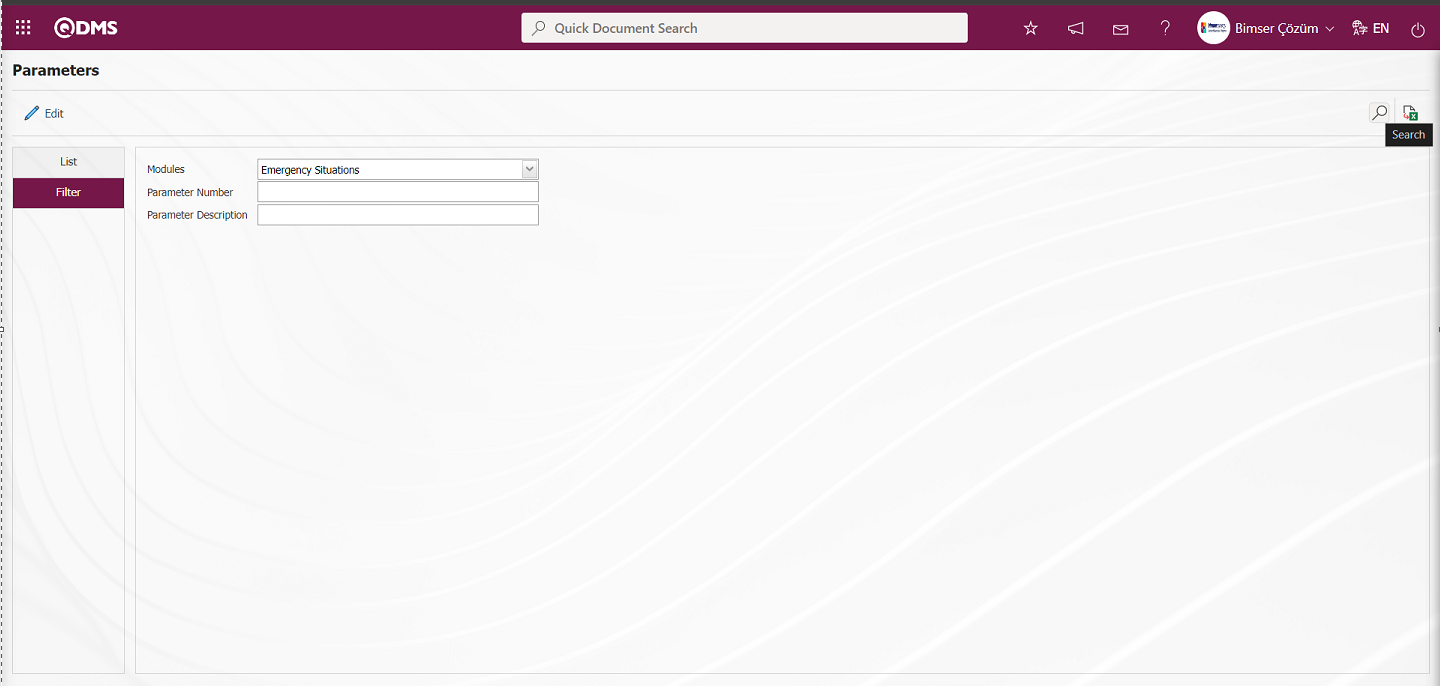
The parameters related to the Emergency Situations module are listed in the list section.
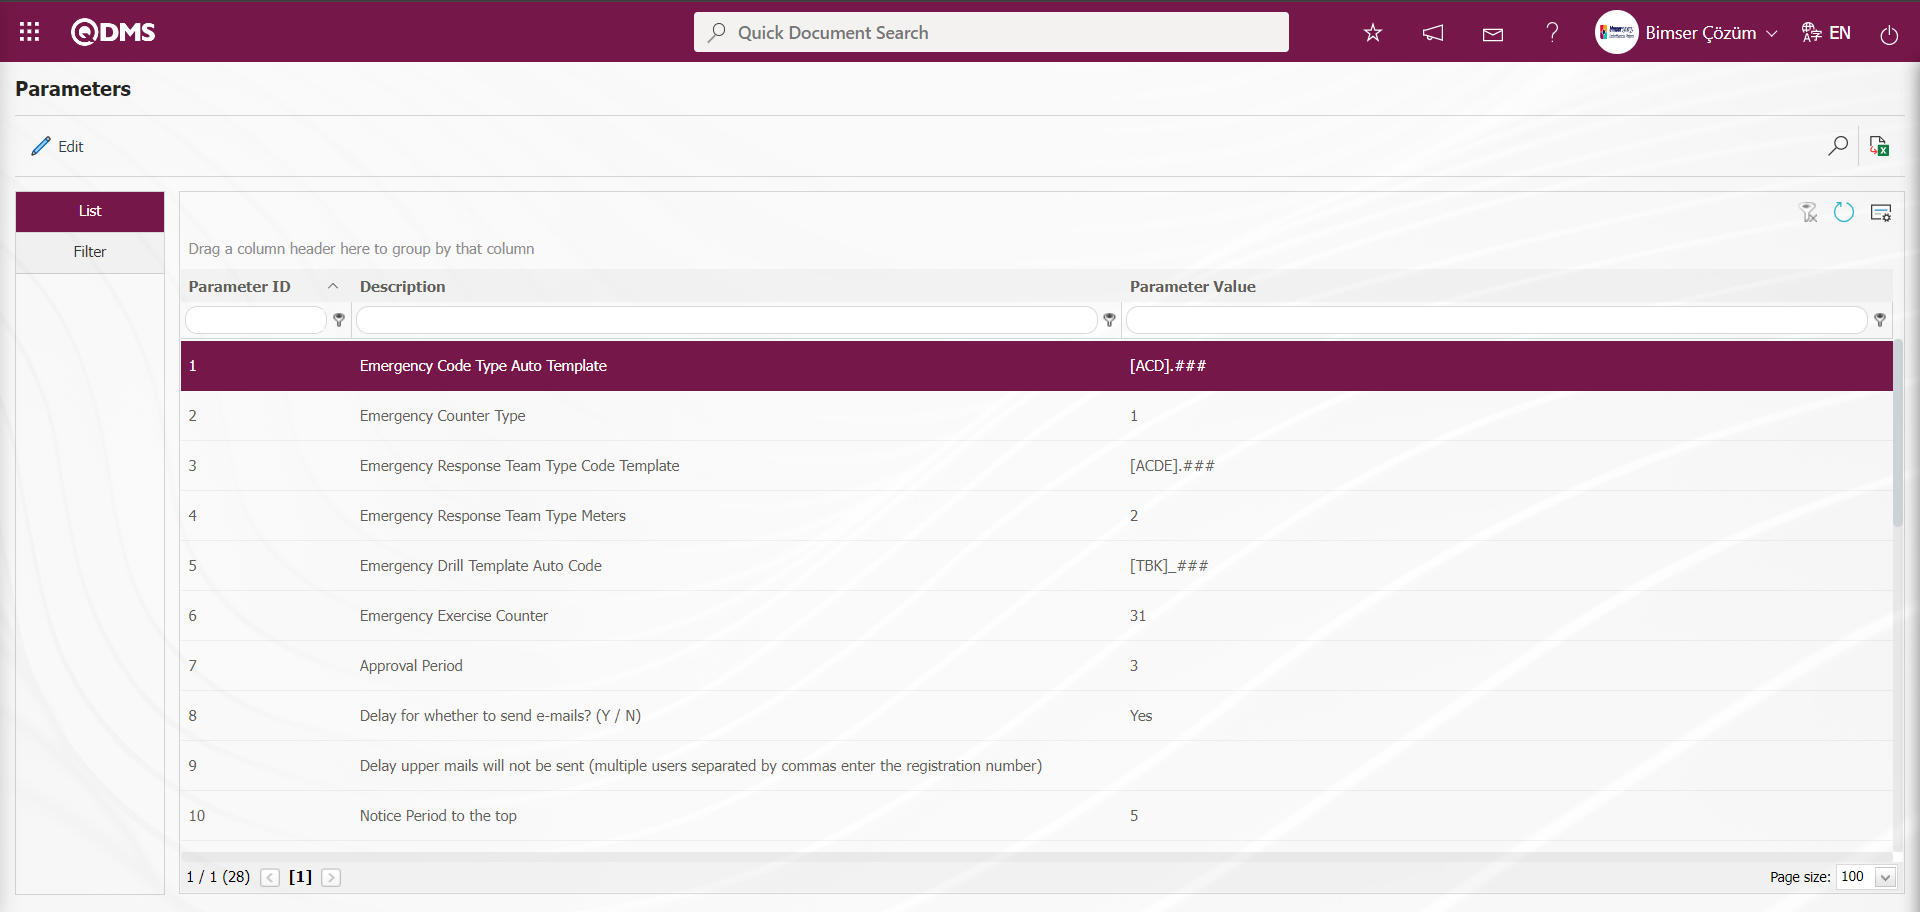
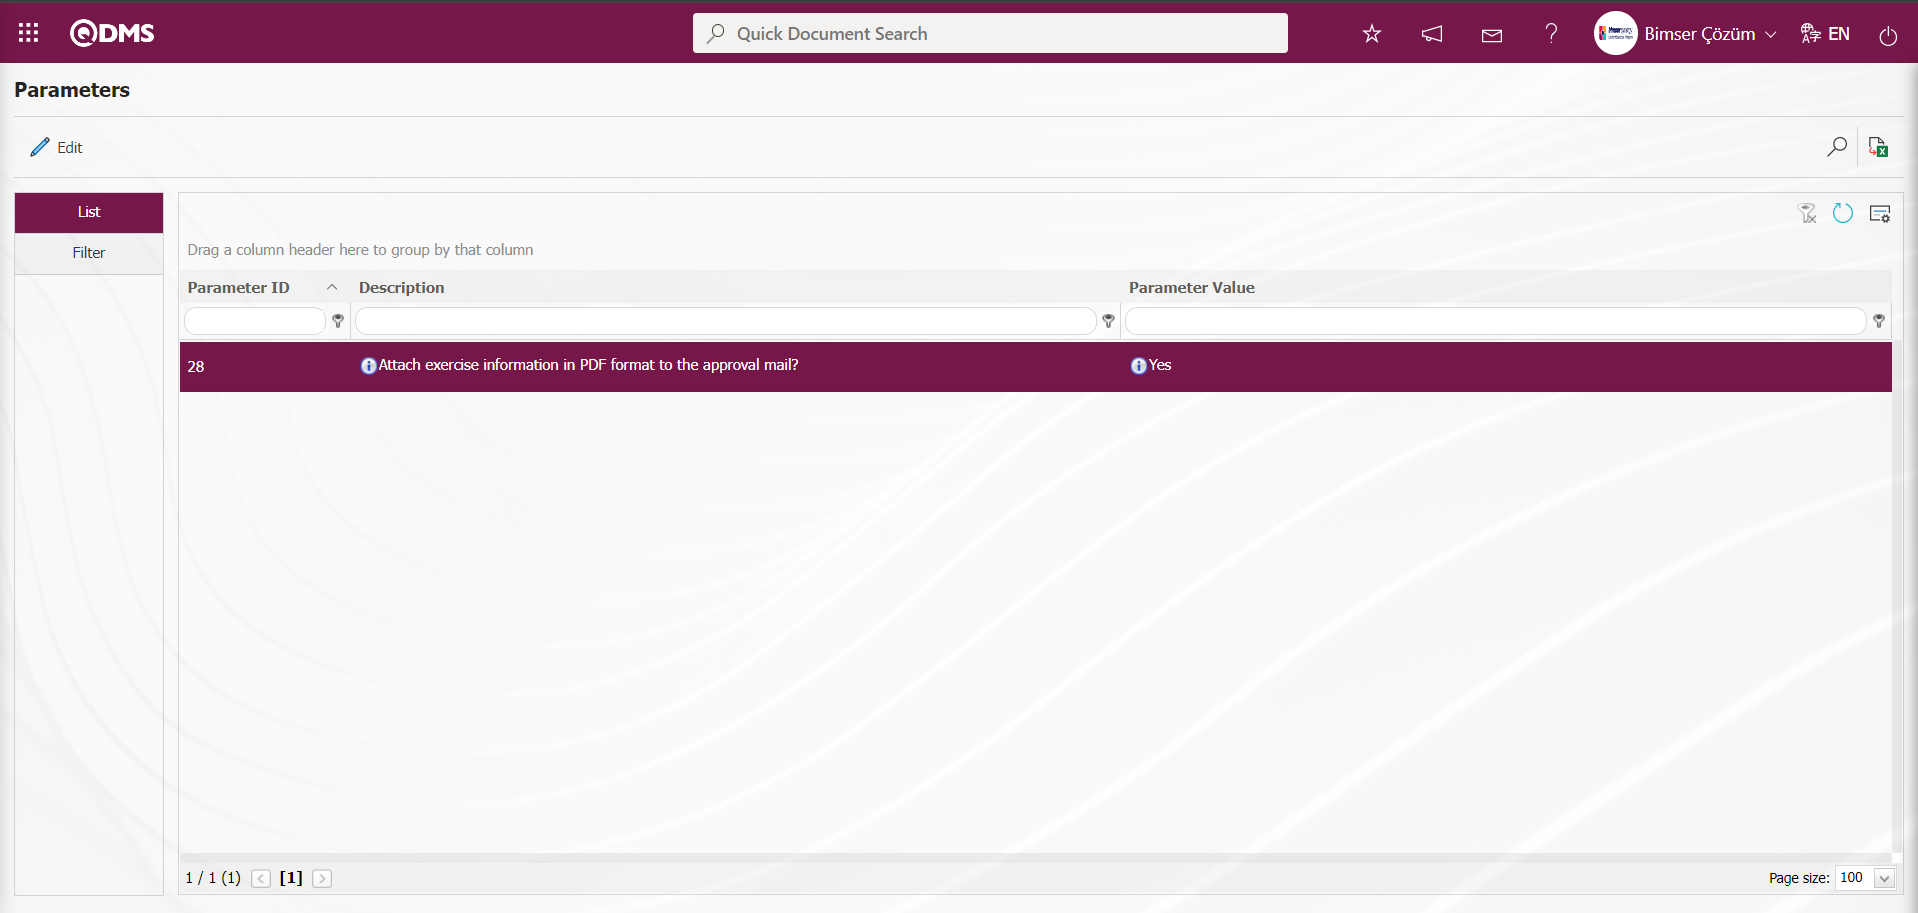
In the Emergency Situations Modules Parameters screen, you can activate a parameter by selecting “Yes” for the parameter value, deactivate a parameter by selecting “No” for the parameter value, enter parameter value information, and change the entered parameter value information
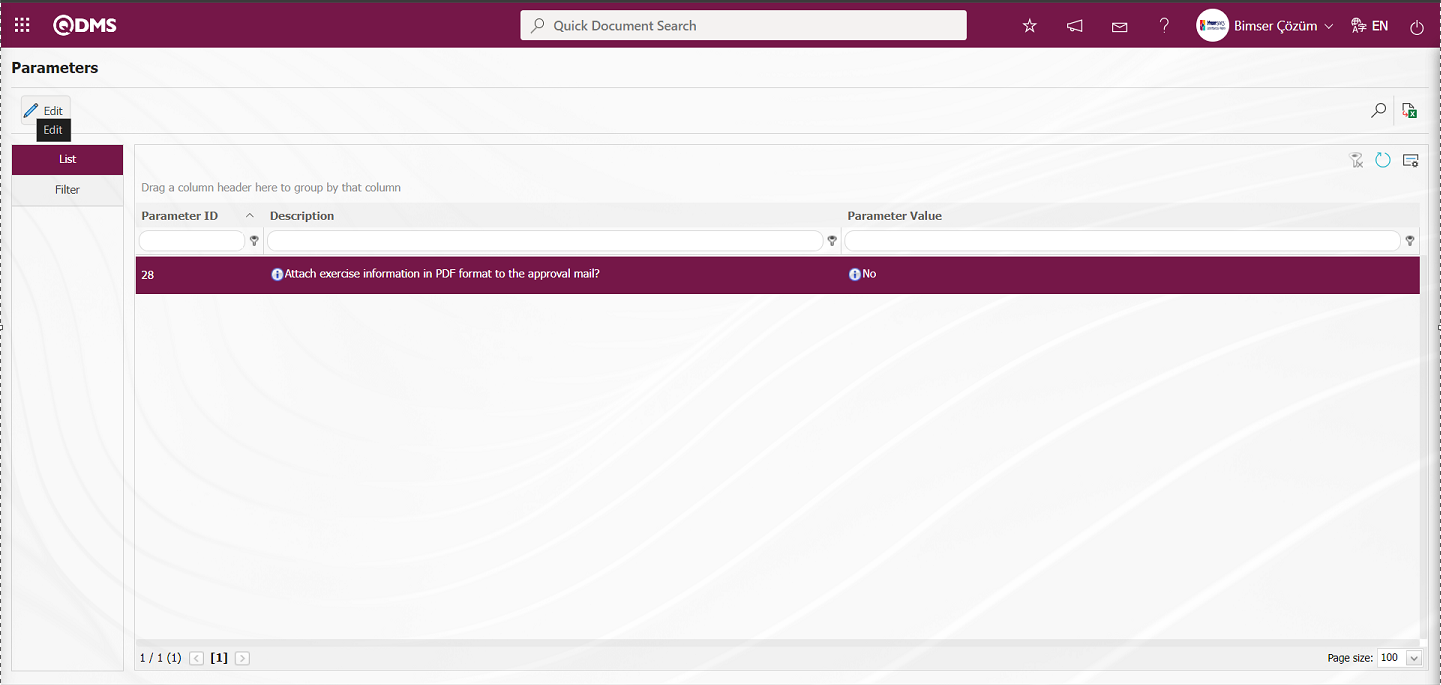
Example: When the “Attach exercise information in PDF format to the approval email?” parameter (number 28) is selected in the Emergency Situations Module parameters, the button is clicked.
In the parameters screen that opens, select “Yes” for the parameter value.
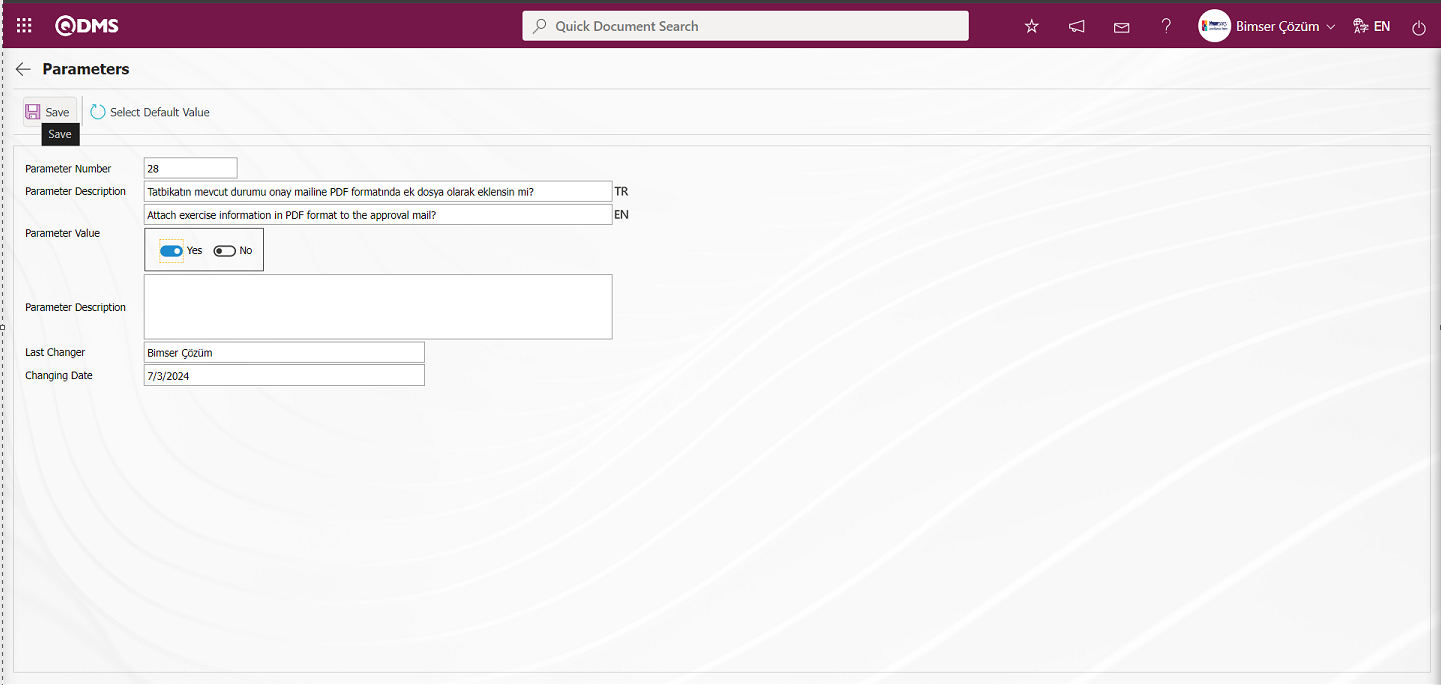
In the Parameters screen, select “Yes” for the parameter value, make the necessary changes to the relevant fields, and then click the  button in the upper left corner of the screen to update the parameter settings.
The same steps are followed to deactivate the parameter by selecting “No” as the parameter value, and then the parameter value is updated by entering the new value. Alternatively, the parameter value can be modified.
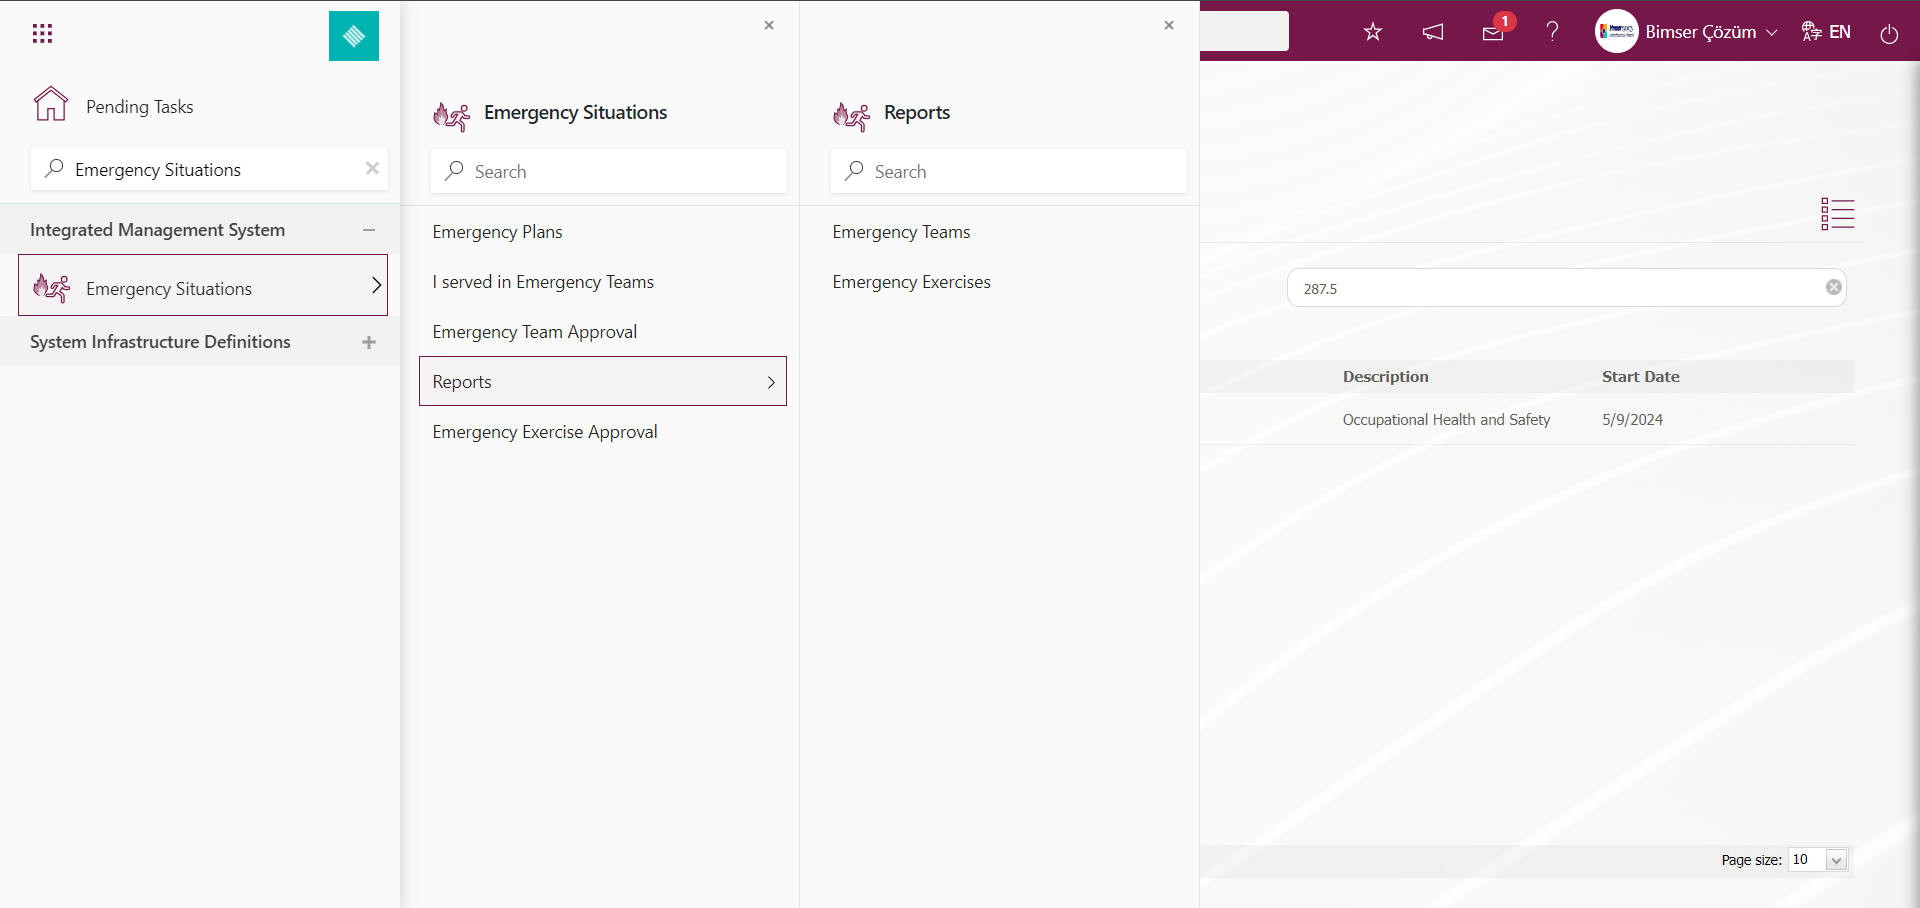
5.2. Integrated Management System/Emergency Situations
This section defines emergency plans, shows emergency teams assigned to specific tasks, collects reports in Excel format, and performs Emergency Team and Emergency Exercise approval processes.
5.2.1. Emergency Plans
Menu name: Integrated Management System/ Emergency Situations/Emergency Plans
This menu is where emergency teams are established and drills are planned on a workplace basis.
The screen that opens displays a list of workplaces in a tree structure. Select the workplace you want to work on and click the  button. This screen has three different tabs.
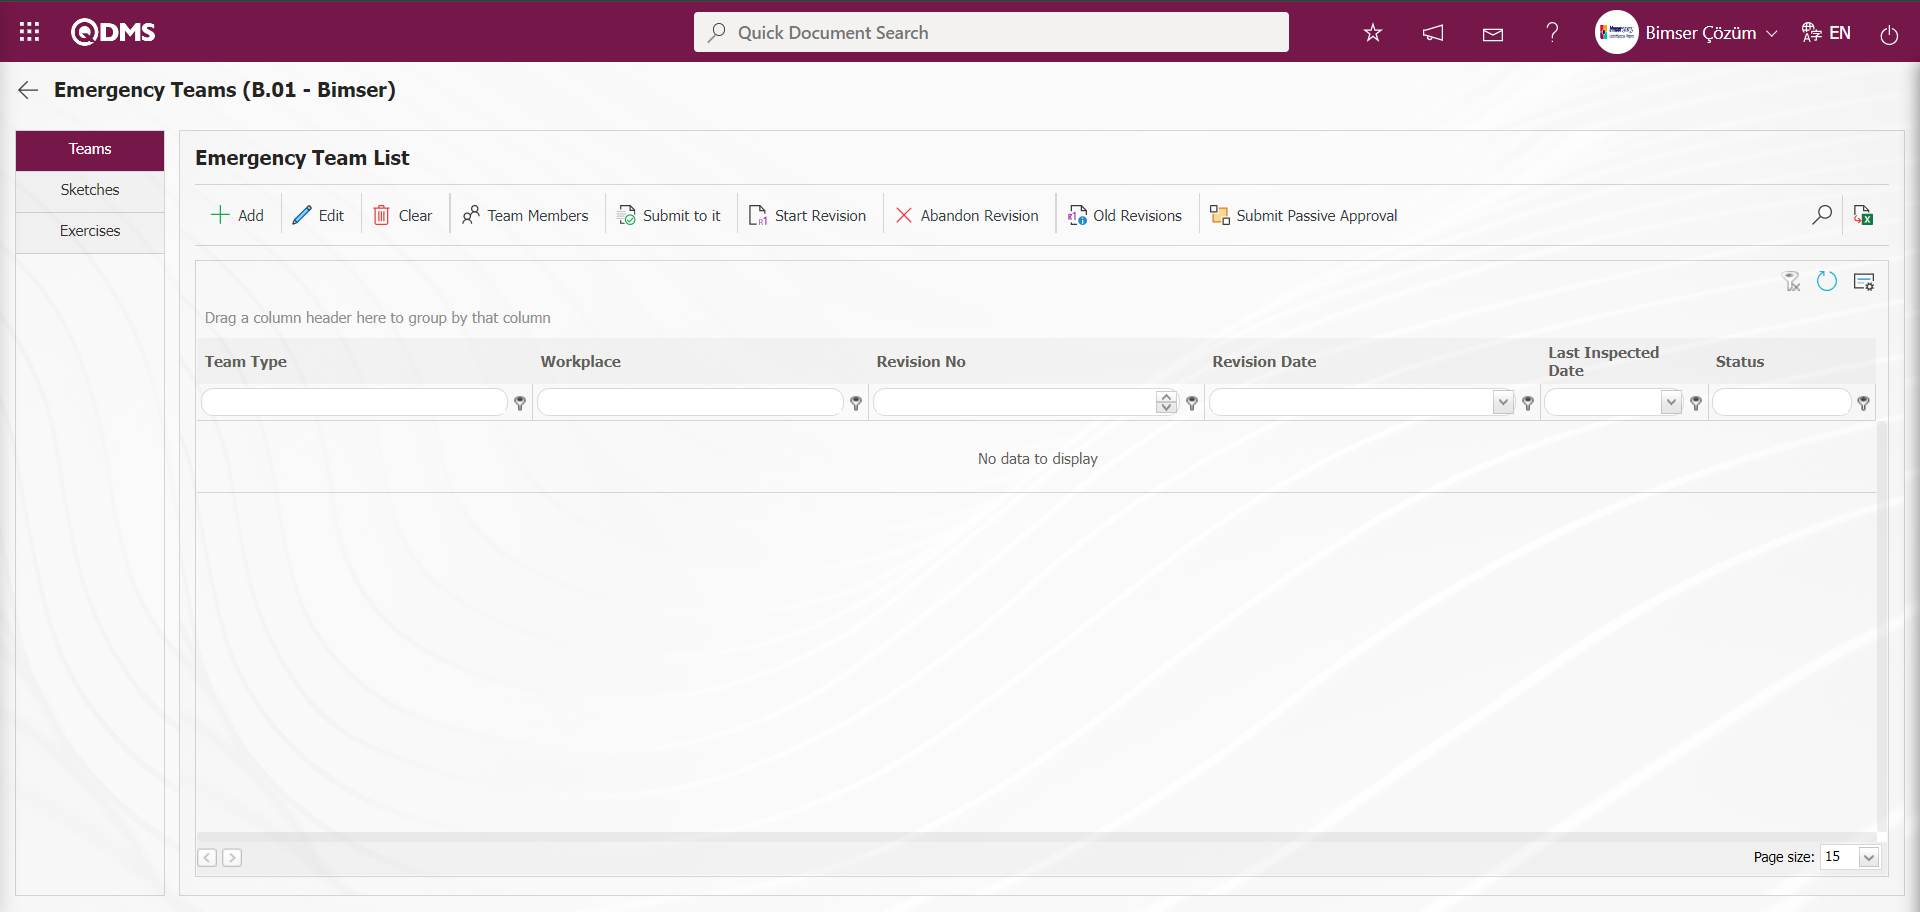
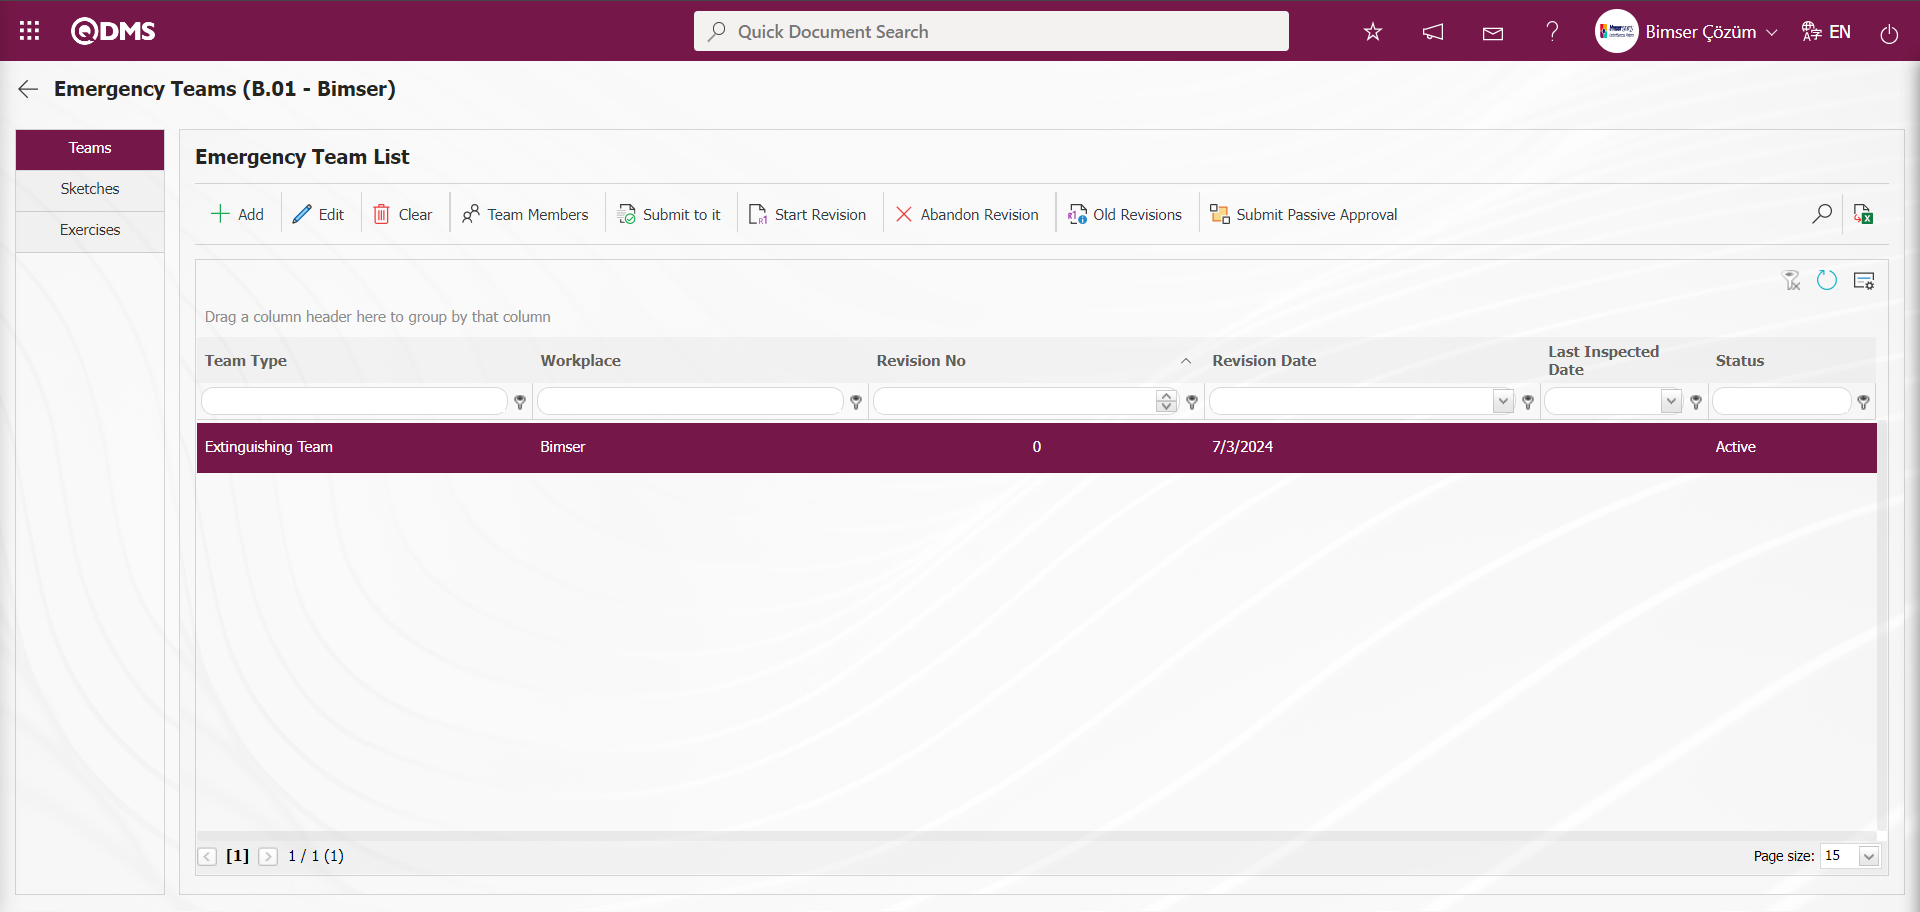
The following actions can be performed using the buttons in the Teams tab on the Emergency Team List screen:
 : A new emergency team is added.
 : The selected emergency team information in the list is edited/changed/updated.
 : The selected emergency team information in the list will be deleted.
 : A team member is added to the selected emergency team in the list.
 : The selected emergency response team in the list is sent for approval. (Only emergency response teams in Draft status can be sent for approval.)
 : The revision initiation process is performed for the selected emergency response team in the list. (The revision initiation process is only performed for emergency response teams with an Active status.)
 : Used to cancel a revision.
 : If there is an emergency team selected in the list, the old revisions will be displayed.
 : The selected emergency team in the list with an active status is sent for passive approval.
: Records are filtered and searched.
: Data is transferred to Excel.
 : The search criteria on the menu screens are used to clear the data remaining in the filter fields in the grid where the search operation is performed.
 : The menu screen is restored to its default settings.
: User-based designing of the menu screen is done with the show-hide feature, that is, the hiding feature of the fields corresponding to the columns on the menu screens.
To add a new team, click the  button in the upper left corner of the screen.
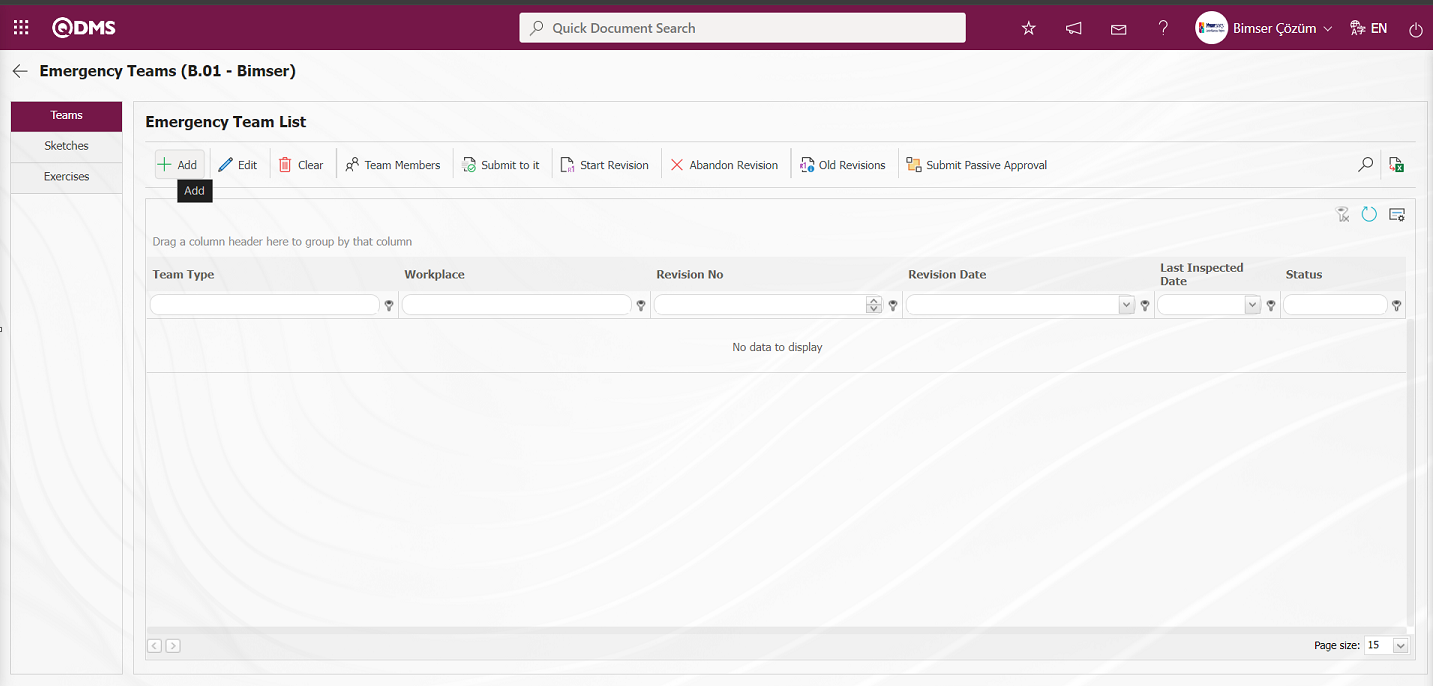
The Emergency Exercise Definition screen appears.
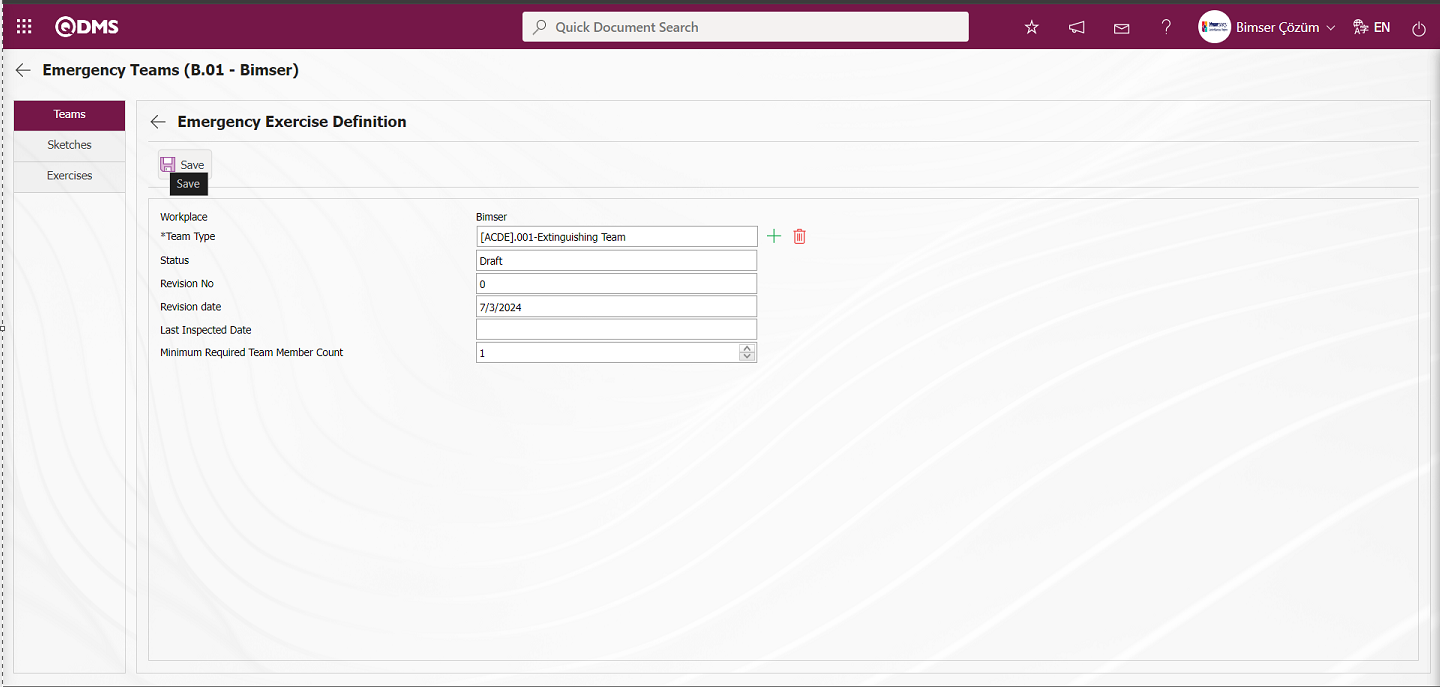
The relevant fields are defined on the screen that opens:
Workplace: The workplace information provided by the system is displayed in the Emergency Exercise Definition screen.
Team Type: The Emergency Exercise Definition screen displays the Team Type information  (Select) button, which opens a system-defined Emergency Team Type list for selection. (The Emergency Team Type list is defined in the System Infrastructure Definitions/Emergency Situations/Emergency Team Types menu.)
Status: The field where the emergency team's status information is provided by the system on the Emergency Exercise Definition screen.
Revision No: This is the field where the system displays the revision number of the Emergency Response Team in the Emergency Exercise Definition screen.
Revision Date: This field displays the revision date of the Emergency Response Team as provided by the system on the Emergency Exercise Definition screen.
Last Inspected Date: The Emergency Exercise Definition screen displays the date when the Emergency Team last inspection was conducted.
Minimum Required Team Member Count: This field is where you enter the minimum number of team members required for the Emergency Exercise Definition screen. It represents the minimum number of team members required for the Emergency Team to proceed to approval. If the minimum team count is not added to the Emergency Team, the system will display a warning message indicating that the minimum team count has not been entered.
In the Emergency Exercise Definition screen that opens, the emergency team's team type is selected from the Emergency Team Type list defined in the system. The minimum number of team members required is entered. The emergency team's status information, revision number, revision date, and last review date are provided by the system. After the required fields are filled in, the button in the top left corner of the screen to complete the emergency team definition registration process.
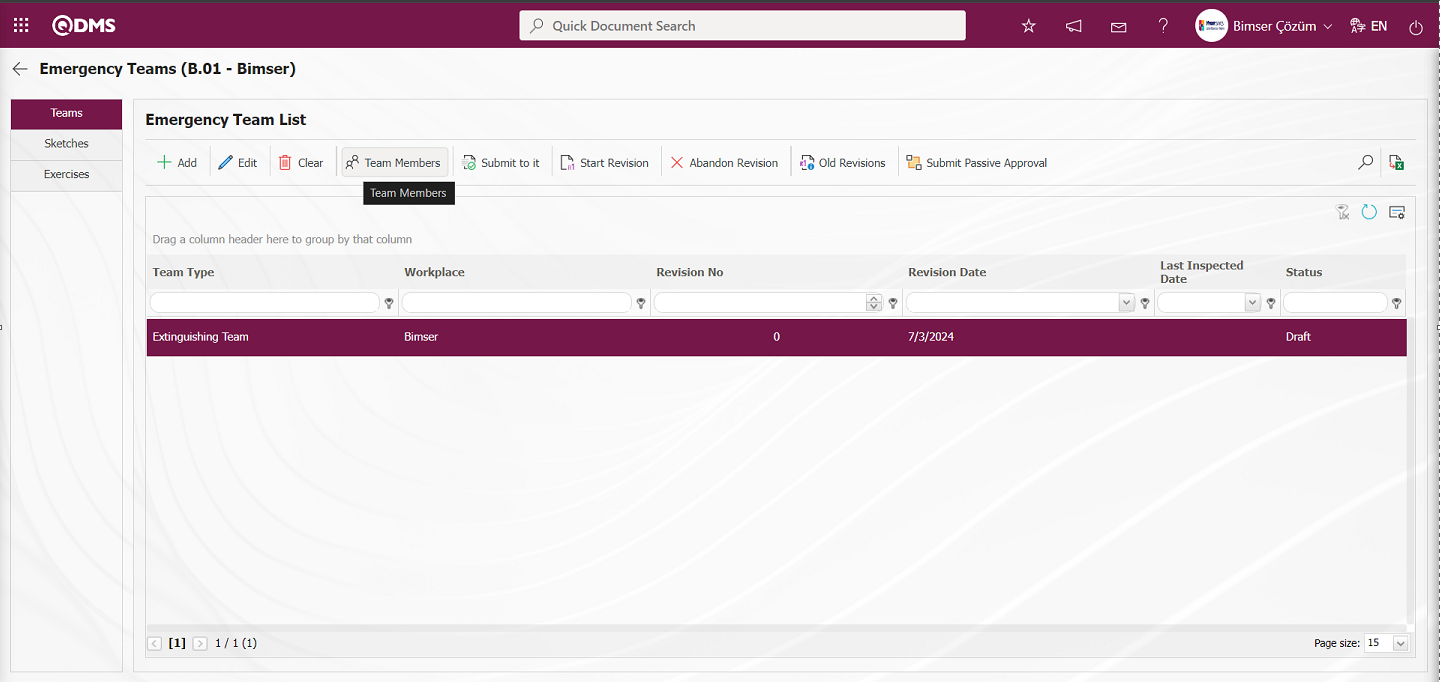
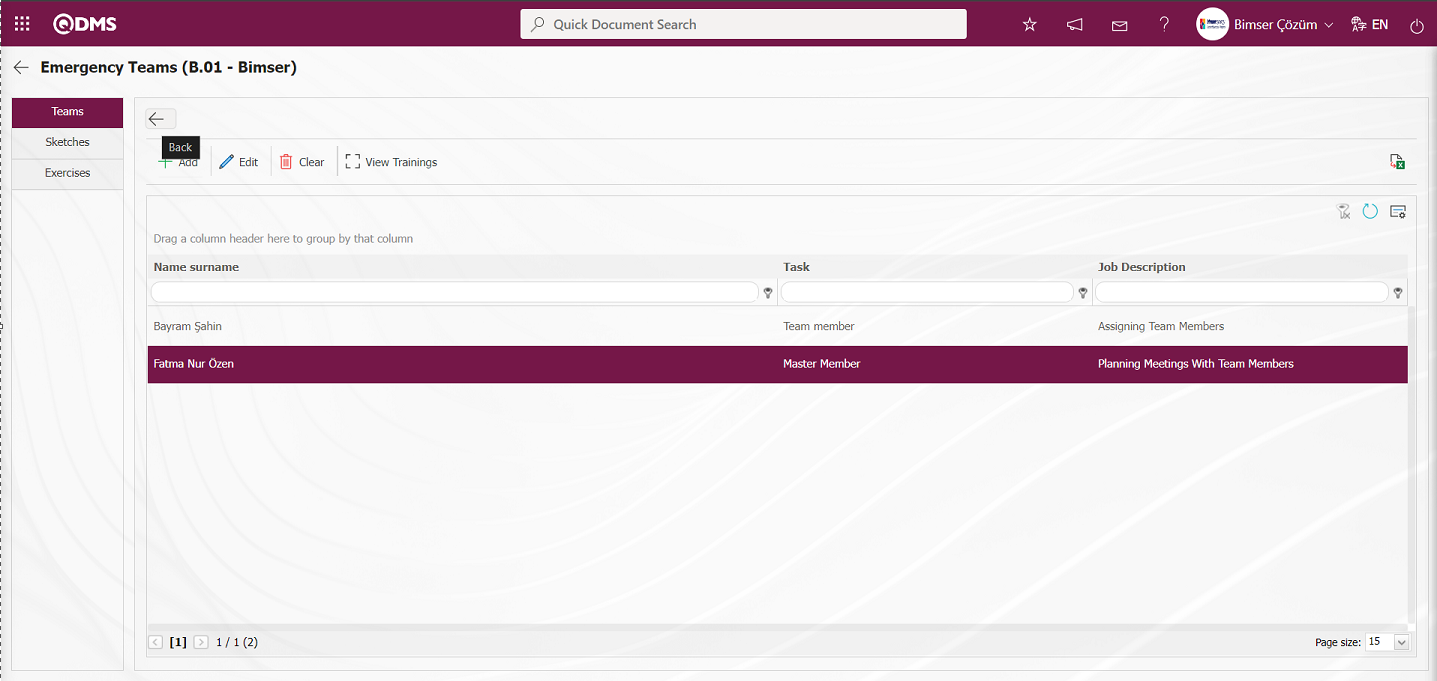
When the Emergency Team is selected on the Emergency Team List screen, click the  button to add a team member to the Emergency Team.

Using the buttons on the screen;
 : A new team member is defined.
: The information of the selected team member in the list is edited.
 : The information of the selected team member in the list is deleted.
 : The training courses taken by the selected team member in the list are displayed.
To add a new team member to the emergency team, click the button in the upper left corner of the screen to display the Emergency Team Identification screen.
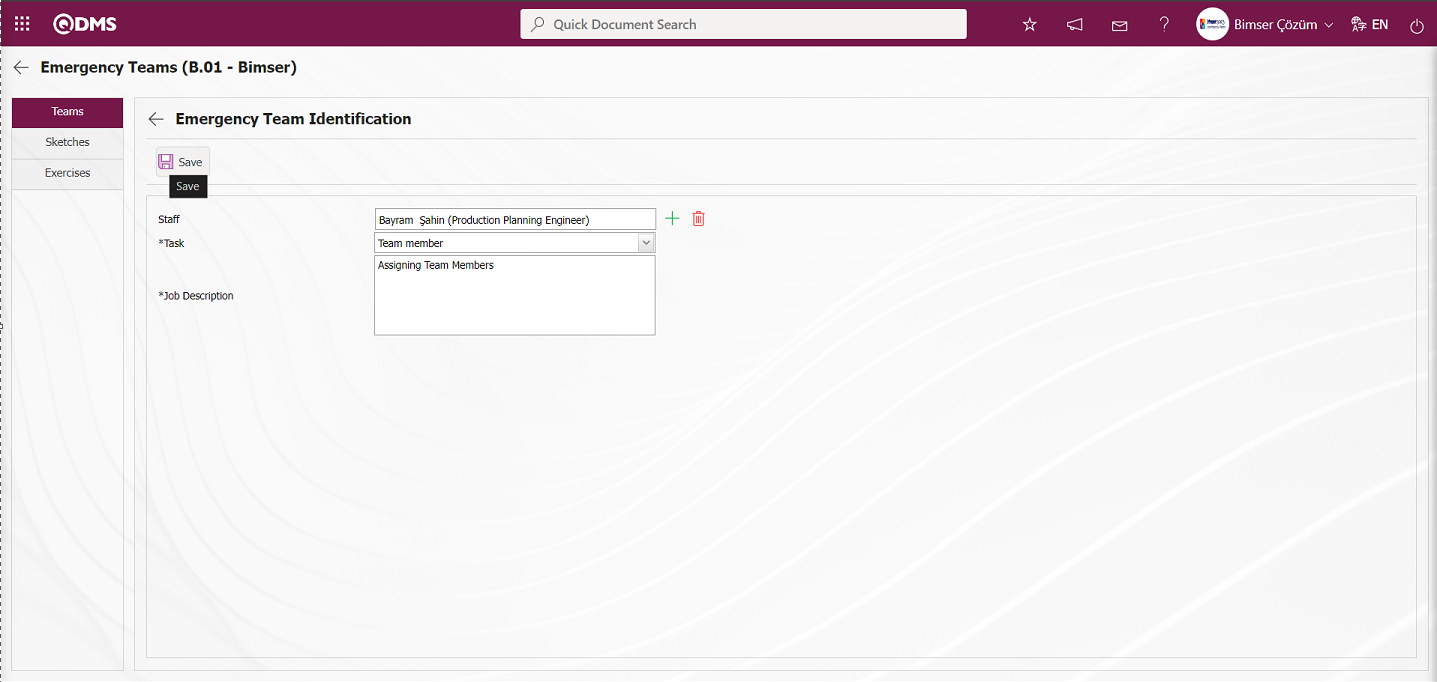
The relevant fields are defined on the screen that opens:
Staff: This is the field where the emergency team member is selected from the list of personnel defined in the system by clicking the  (Select) button on the Emergency Team Identification screen.
Task: This is the field where the emergency team member's task information is selected from the list of tasks defined in the system by clicking the drop-down list on the Emergency Team Identification screen. The task list information is accessed by selecting the Emergency Situations module under the Modules section in the System Infrastructure Definitions/BSID/Configuration Settings/Constants menu, which displays the list of constants related to the Emergency Situations module. Select the Emergency Team Tasks constant definition and click the button.

In the constants screen that opens, select the emergency team task listed in the value section and click the button again.
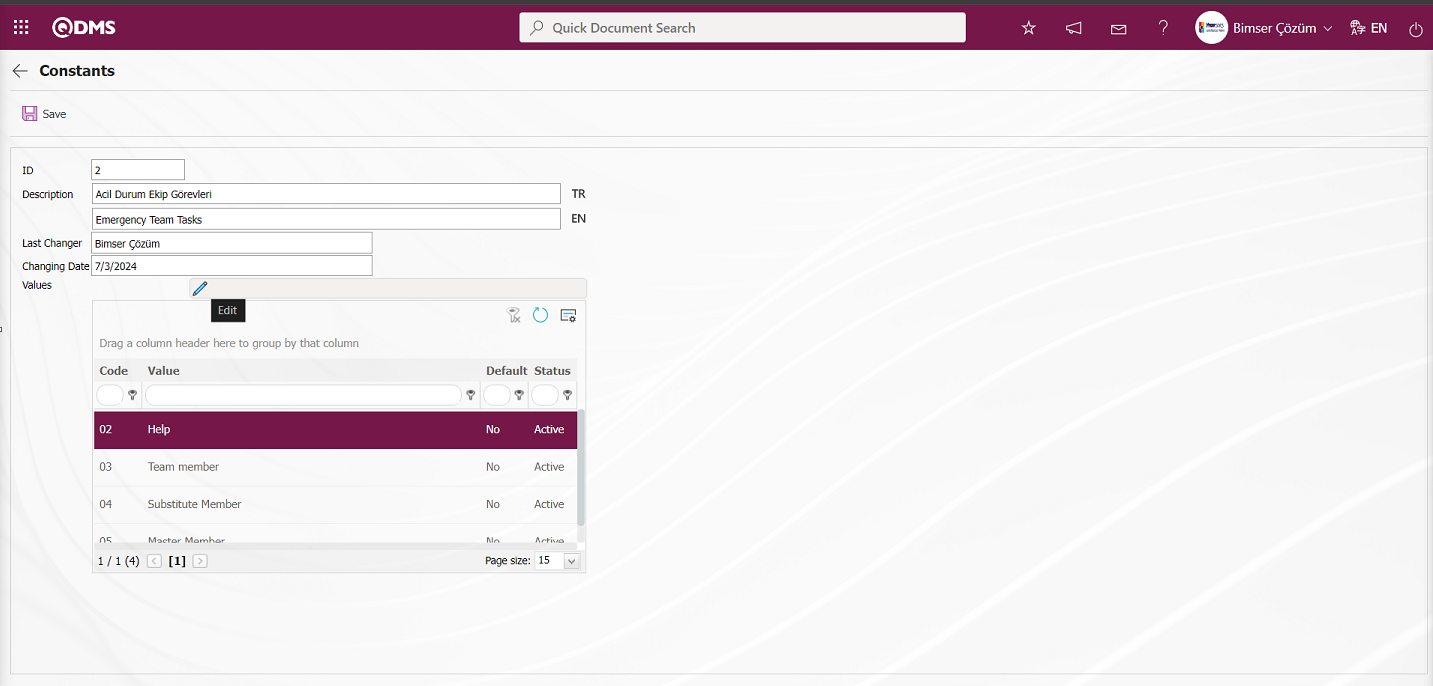
The contents of the opened constants are changed, and they are made active or passive. Task definitions are displayed in the relevant area and made visible.
Job Description: This is the field where the job description information of the emergency team member is written on the Emergency Team Identification screen.
In the Emergency Team Identification screen that opens, the emergency team member is selected from the list of personnel defined in the system. The selected personnel's job description is chosen from the tasks defined in the system. For example, the job description information for personnel assigned roles such as assistant or team member is entered. After entering the required information in the relevant fields, the button in the top-left corner of the screen is clicked to complete the emergency team member identification registration process.
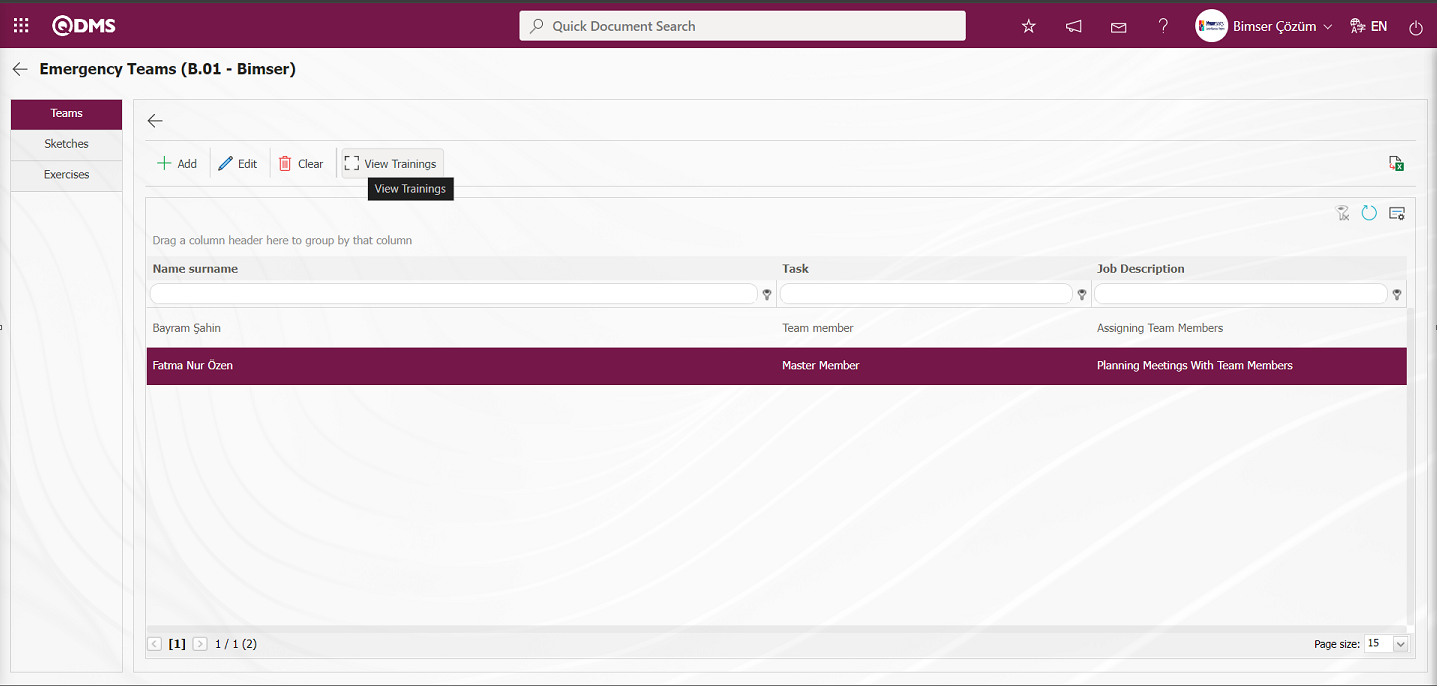
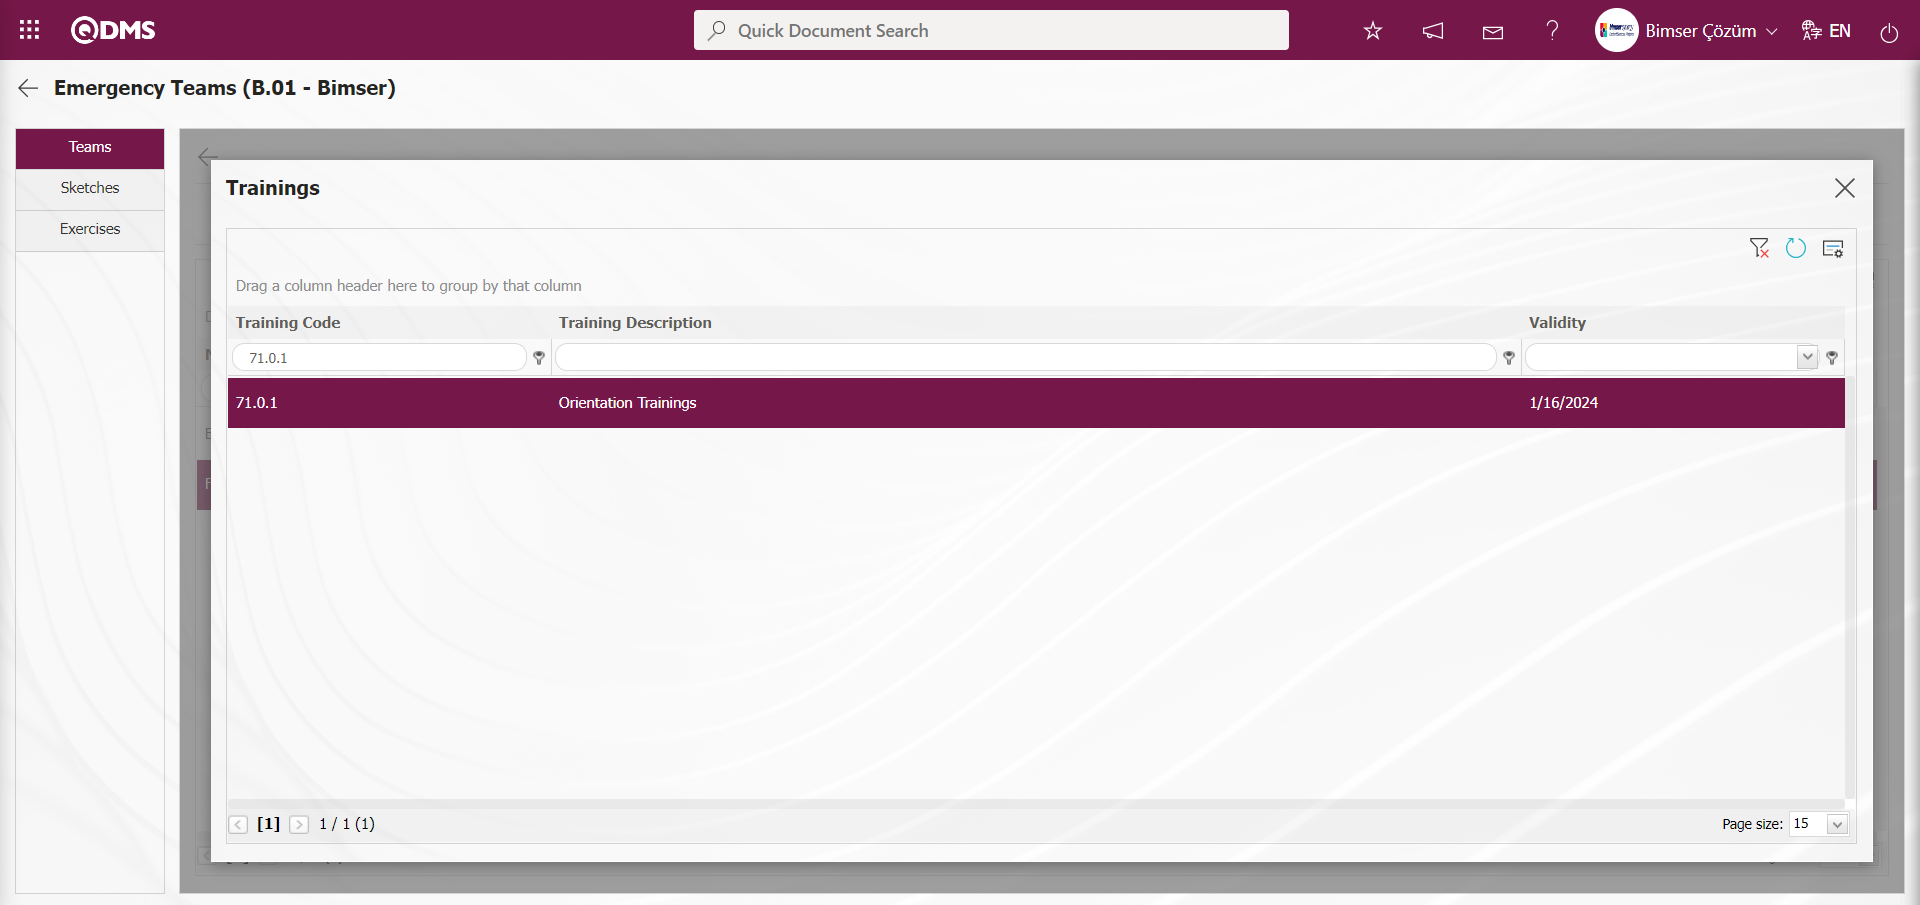
On the Emergency Teams screen, when a team member is selected, clicking the  button displays the training courses taken by the team member and their expiration dates.
Click the  (Back) button on the Emergency Teams screen.
After the teams are formed, they are sent for approval using the 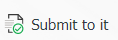 button.
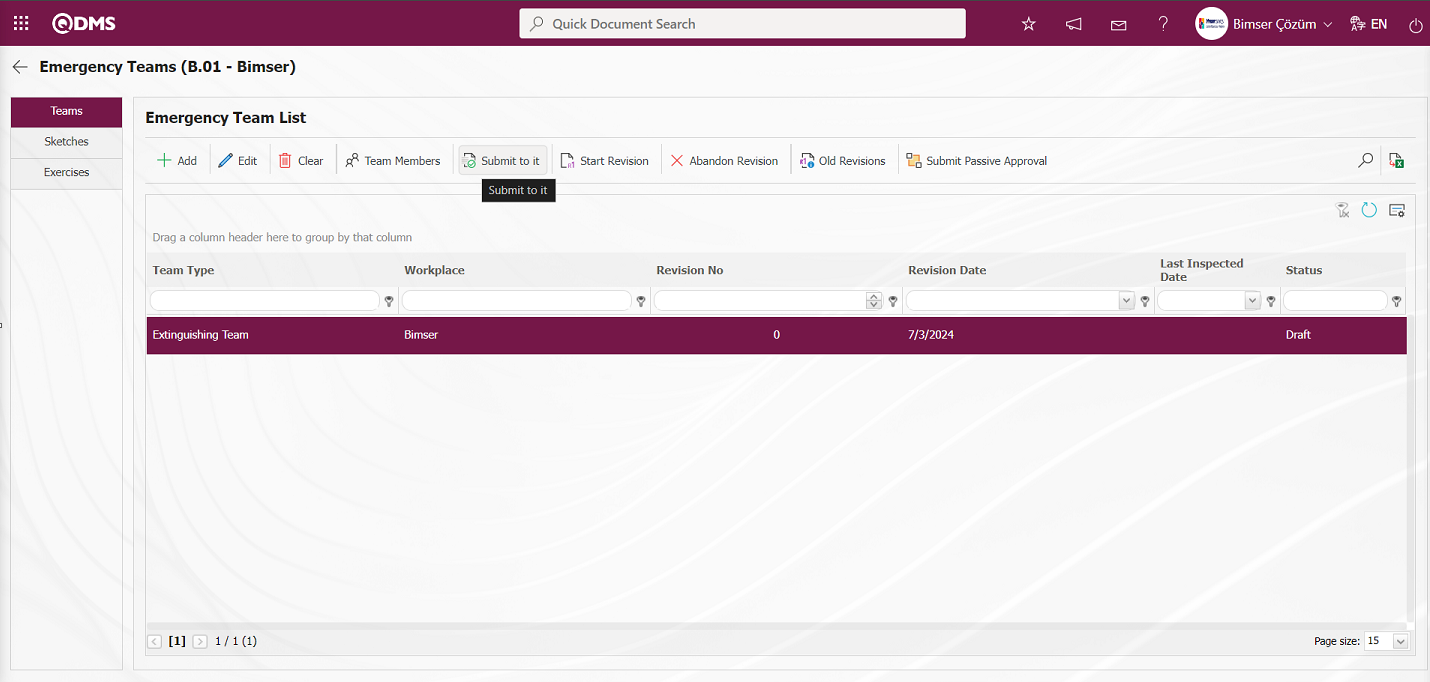
All team types to be used in the firm are defined in this way, saved as drafts, and then sent for approval.

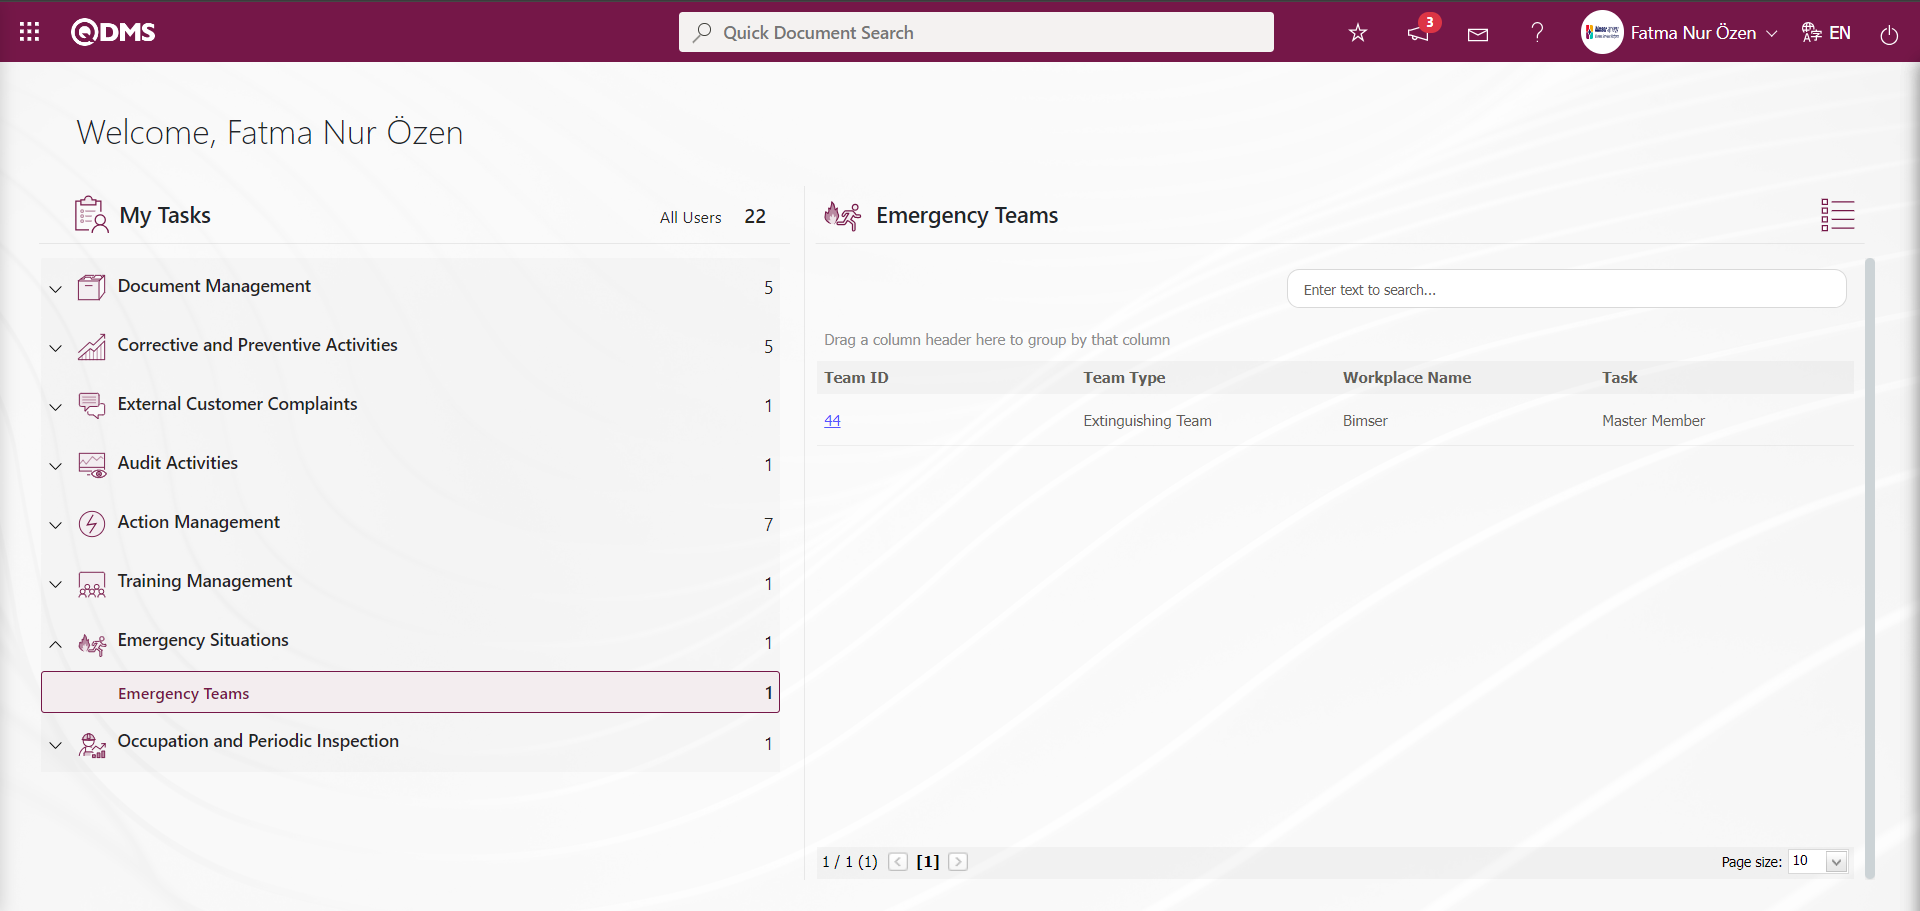
The task is assigned to my pending tasks as “Emergency Teams Pending Approval”.
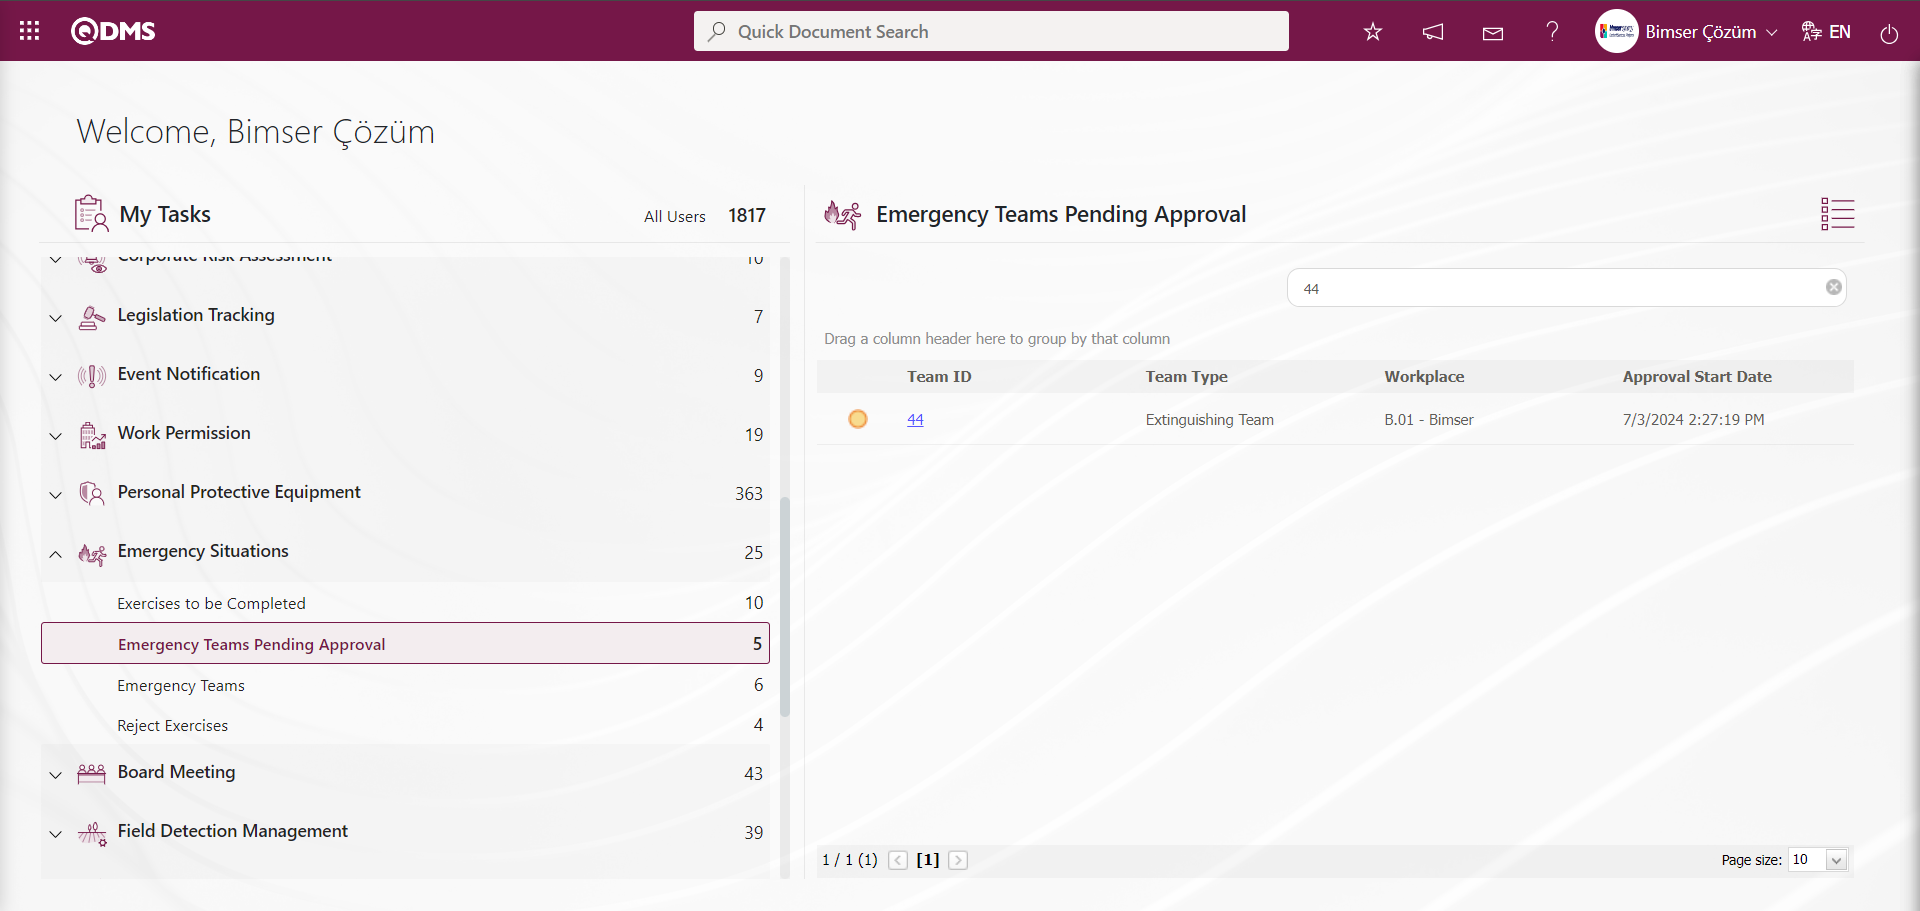
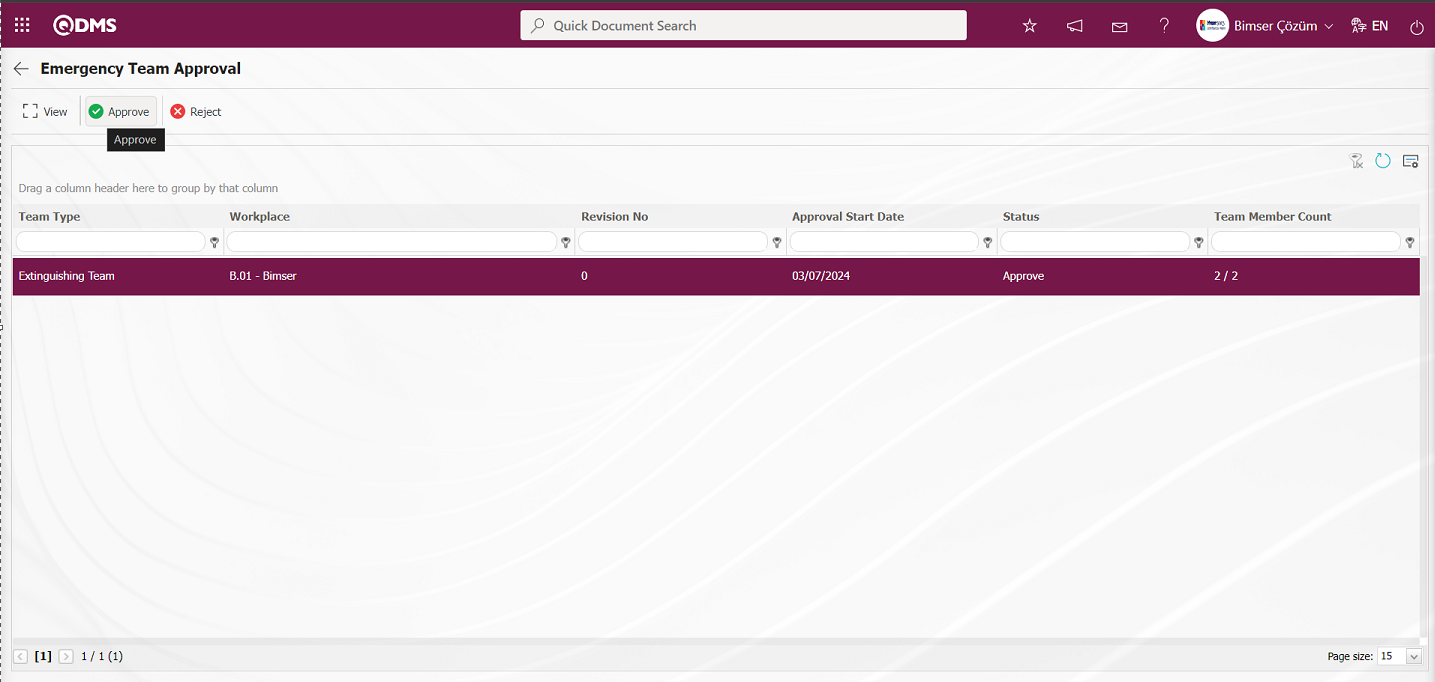
The Emergency Team Approval screen opens by clicking the link in the Team ID code field of the relevant task of the emergency team. In the Emergency Team Approval screen that opens, the emergency team approves or rejects the task using the buttons
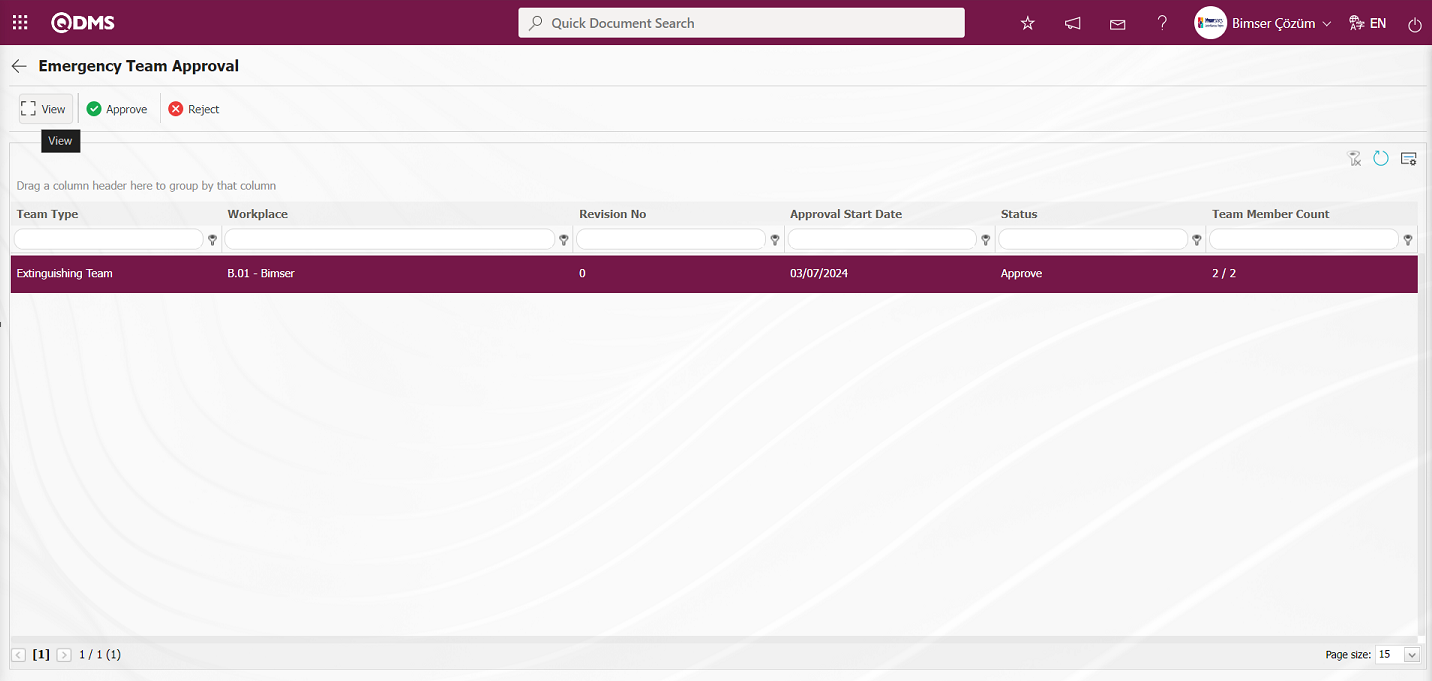
Using the buttons on the screen;
 : The selected emergency team in the list is displayed.
 : The selected emergency team in the list is approved.
 : The selected emergency team in the list is rejected.
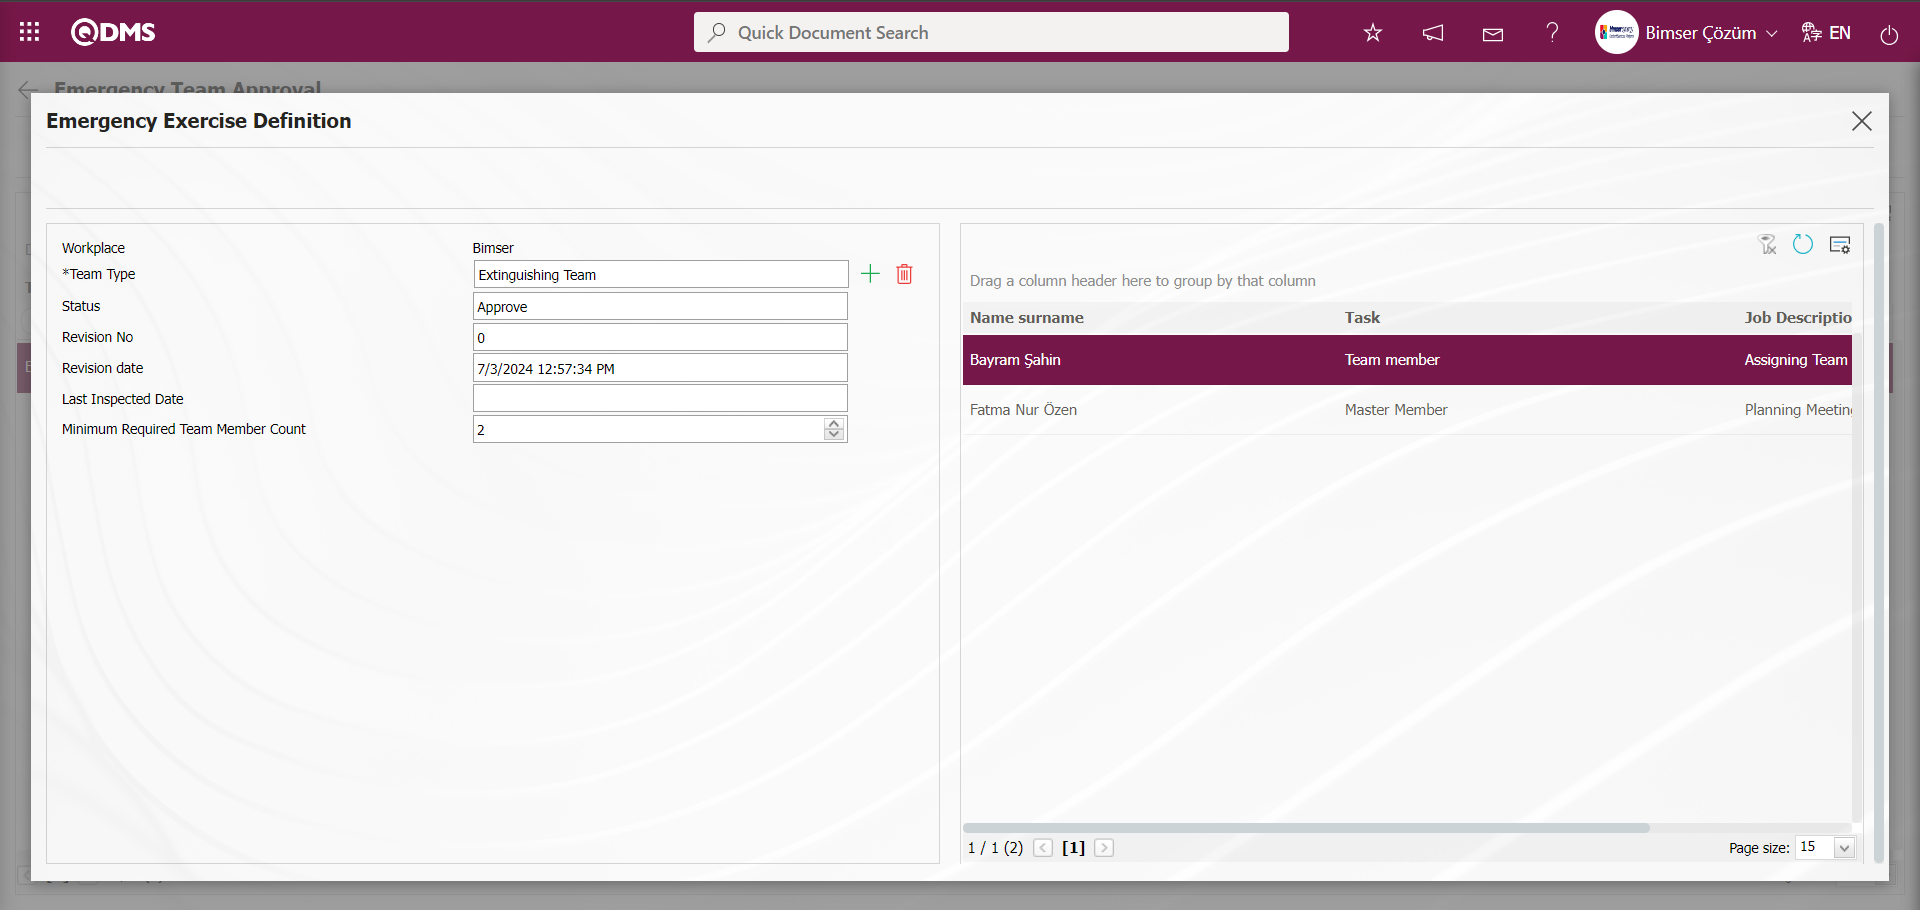
When the Emergency Teams Pending Approval screen is displayed and an emergency team is selected in the list, clicking the button displays the Emergency Exercise Definition screen.
On the Emergency Teams Pending Approval screen, click the button while an emergency team is selected in the list.
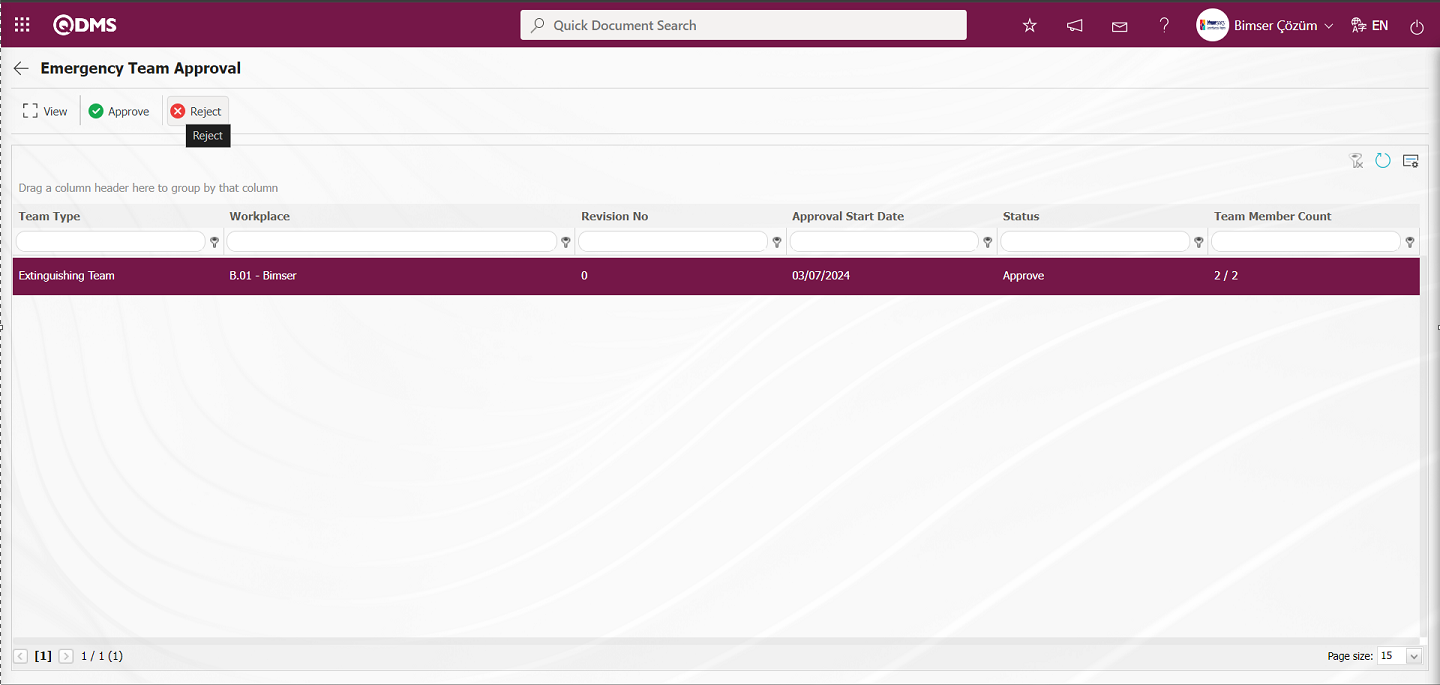
In the Rejection screen that opens, select Reject and the emergency team will be notified. 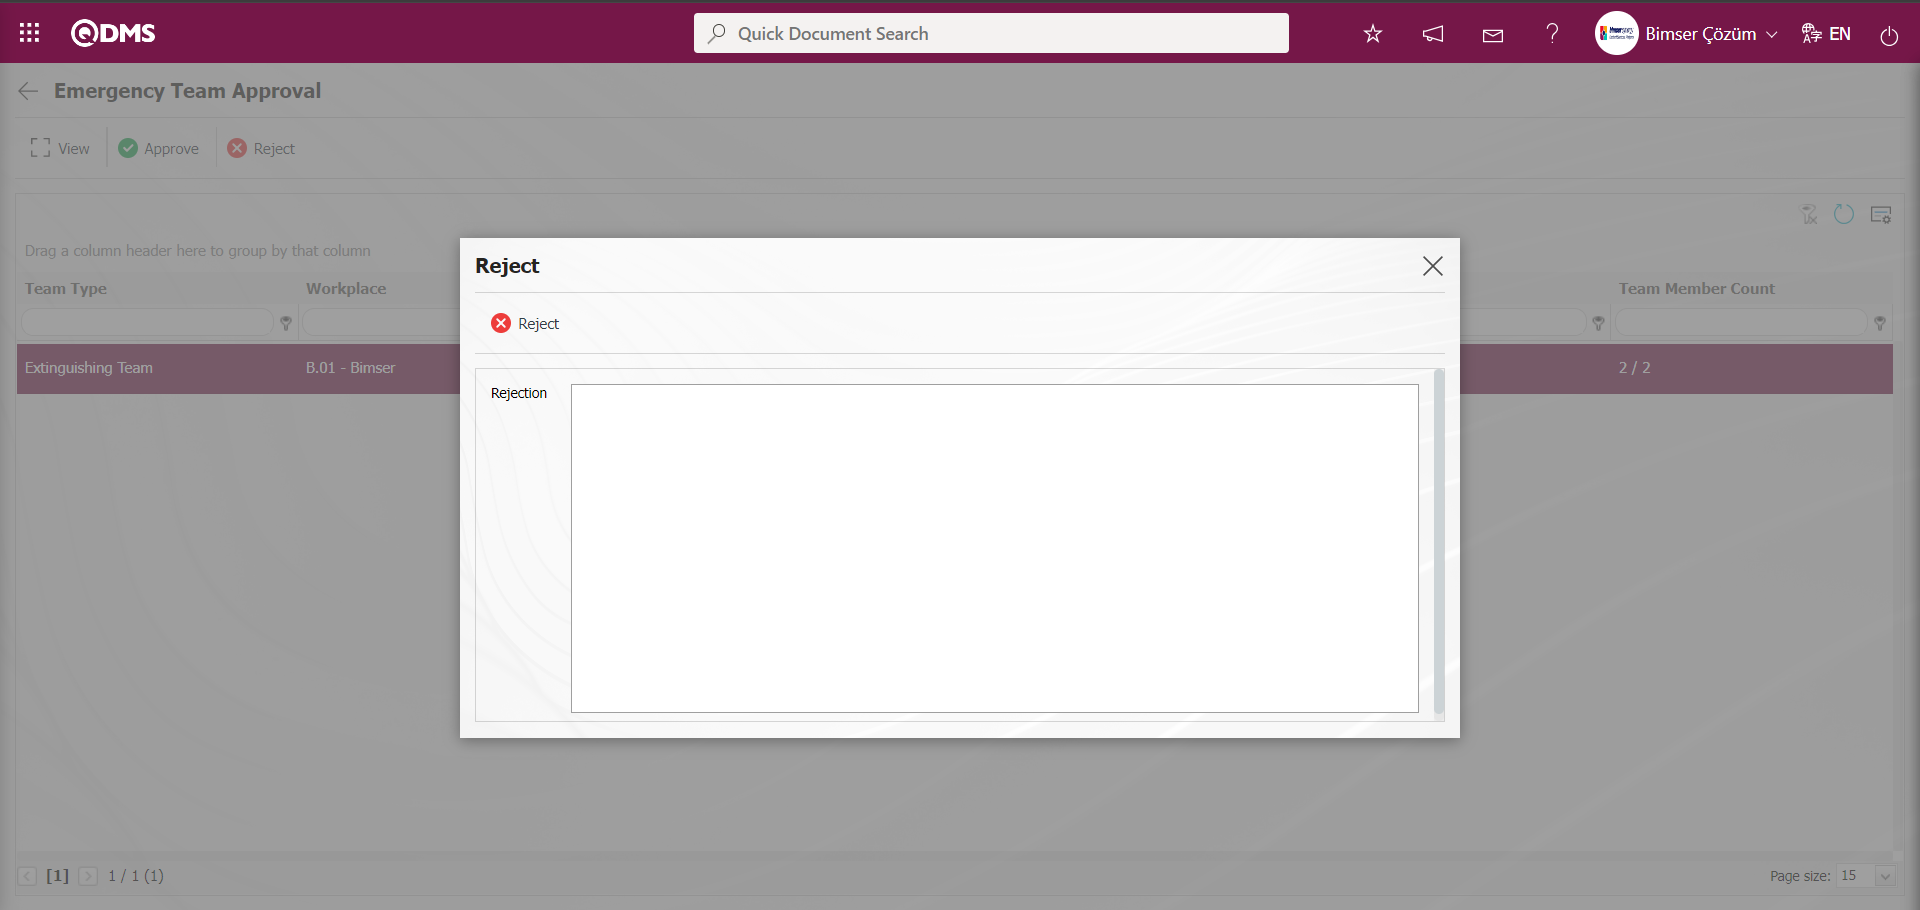
When the emergency team is selected in the Emergency Teams Pending Approval screen, click the button.
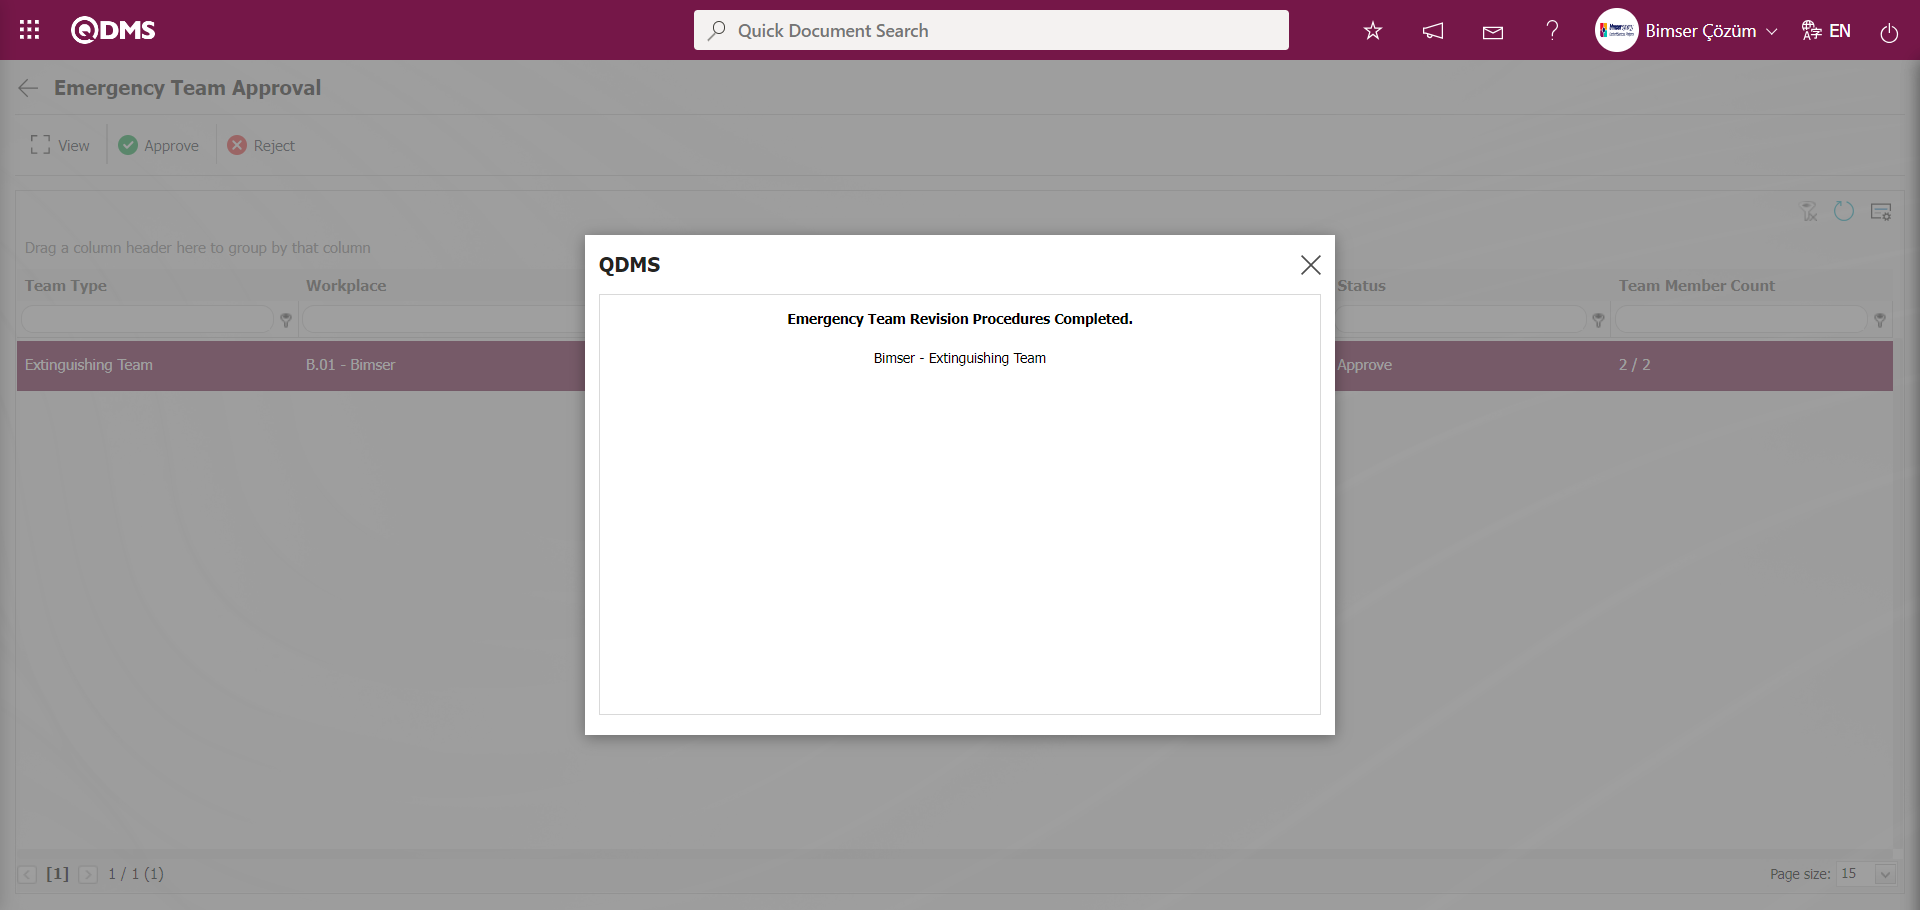
The approved emergency team list is sent to the person by email. The approved emergency team list appears as a task in the “Pending Tasks” menu of the team members as “Emergency Teams.”
Select the workplace in the Integrated Management System/Emergency Situations/Emergency Plans menu and click the  button.

Three tabs appear on the Emergency Response Teams screen: Teams, Sketches, and Exercises.
In the Teams tab;
Emergency Teams are defined and the list of defined Emergency Teams is displayed.
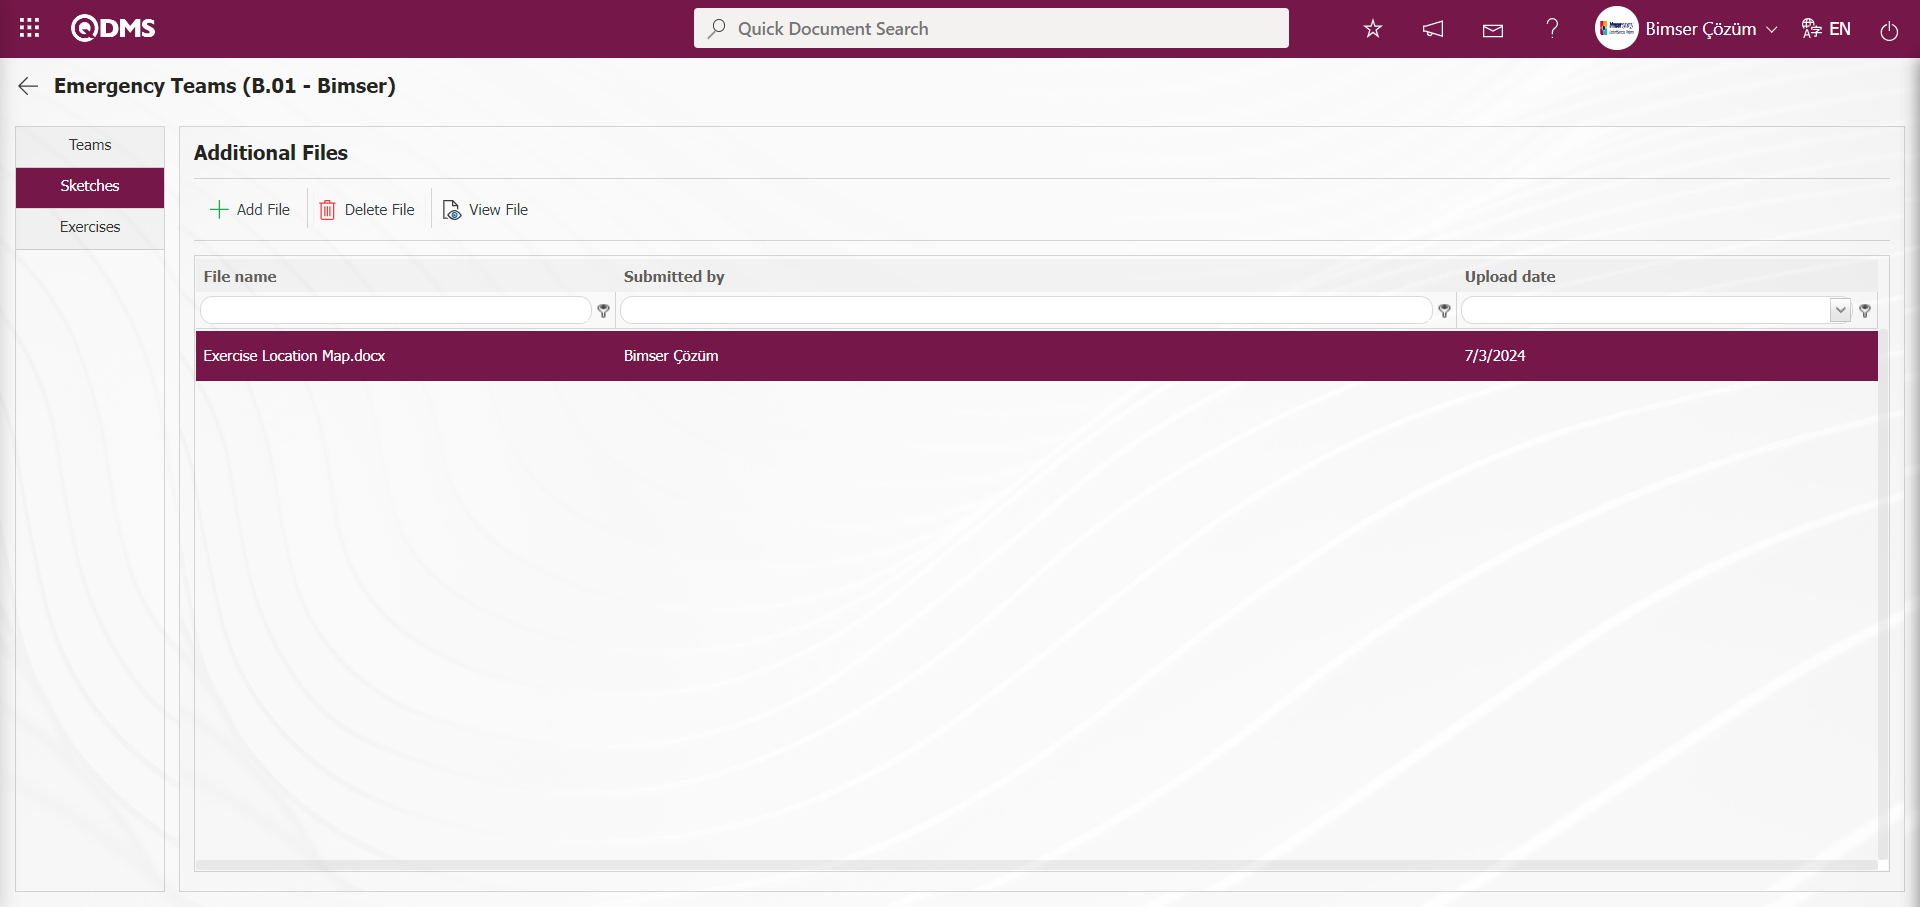
Sketches tab;
The Sketches tab is where you can upload sketches related to emergency plans as additional files, view uploaded additional files, and delete them.
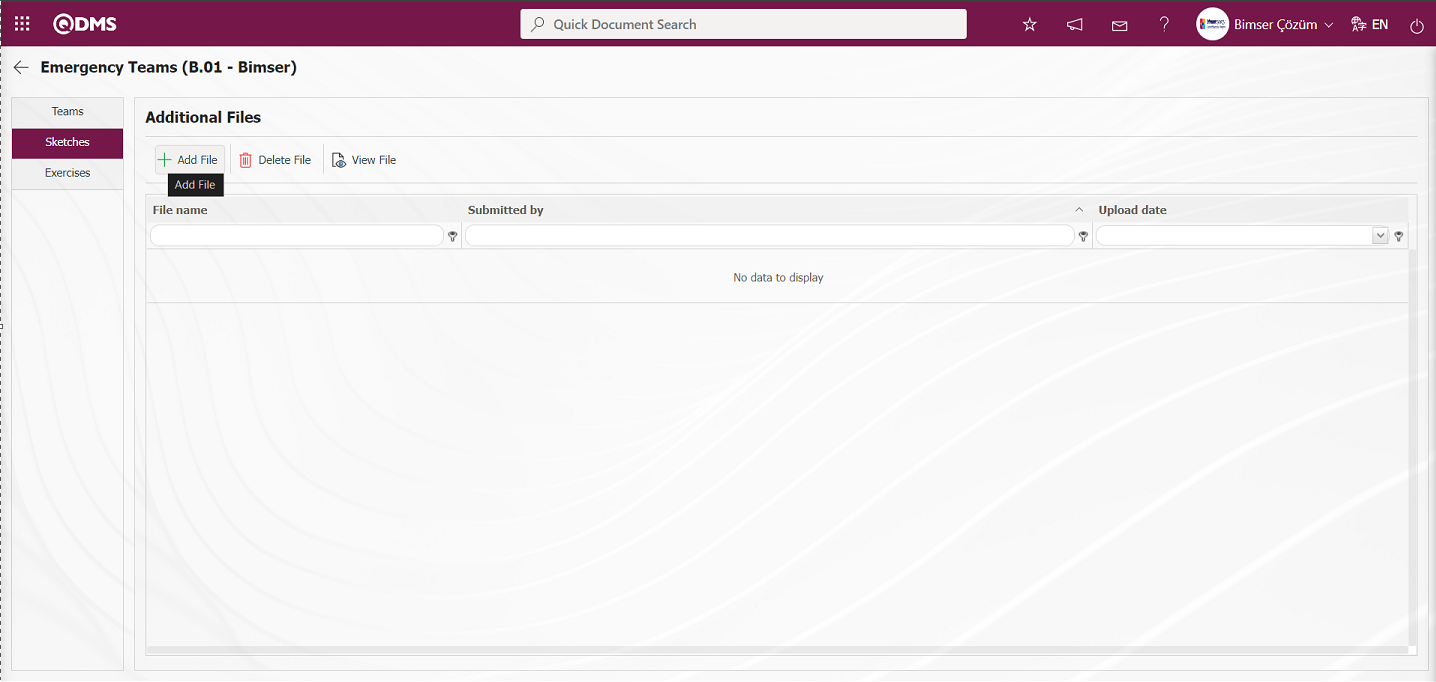
Using the buttons on the screen;
 : An additional file is uploaded to the system.
 : The information about the uploaded additional file is deleted.
 : The information about the uploaded additional file is displayed.
In the Sketches tab, click the button on the Additional Files screen to add additional files with Emergency Plans. Multiple additional files can be added.
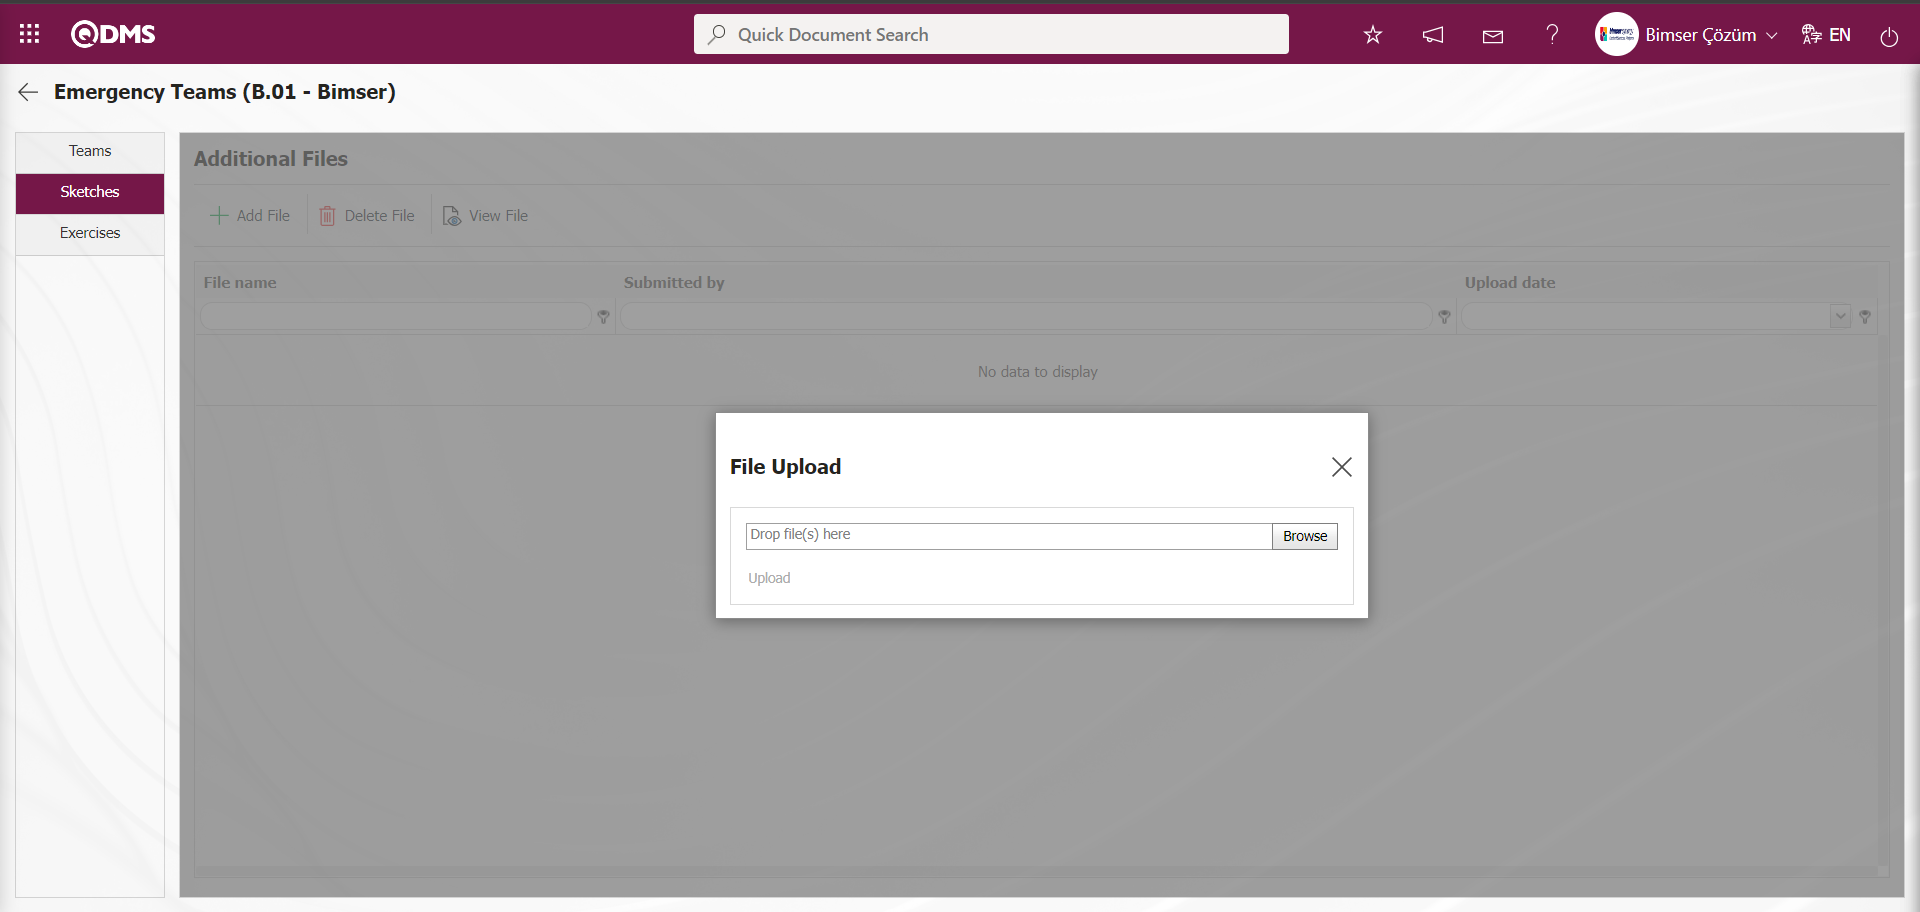
In the File Upload screen, click the  button, select the relevant document, and upload it to the system.

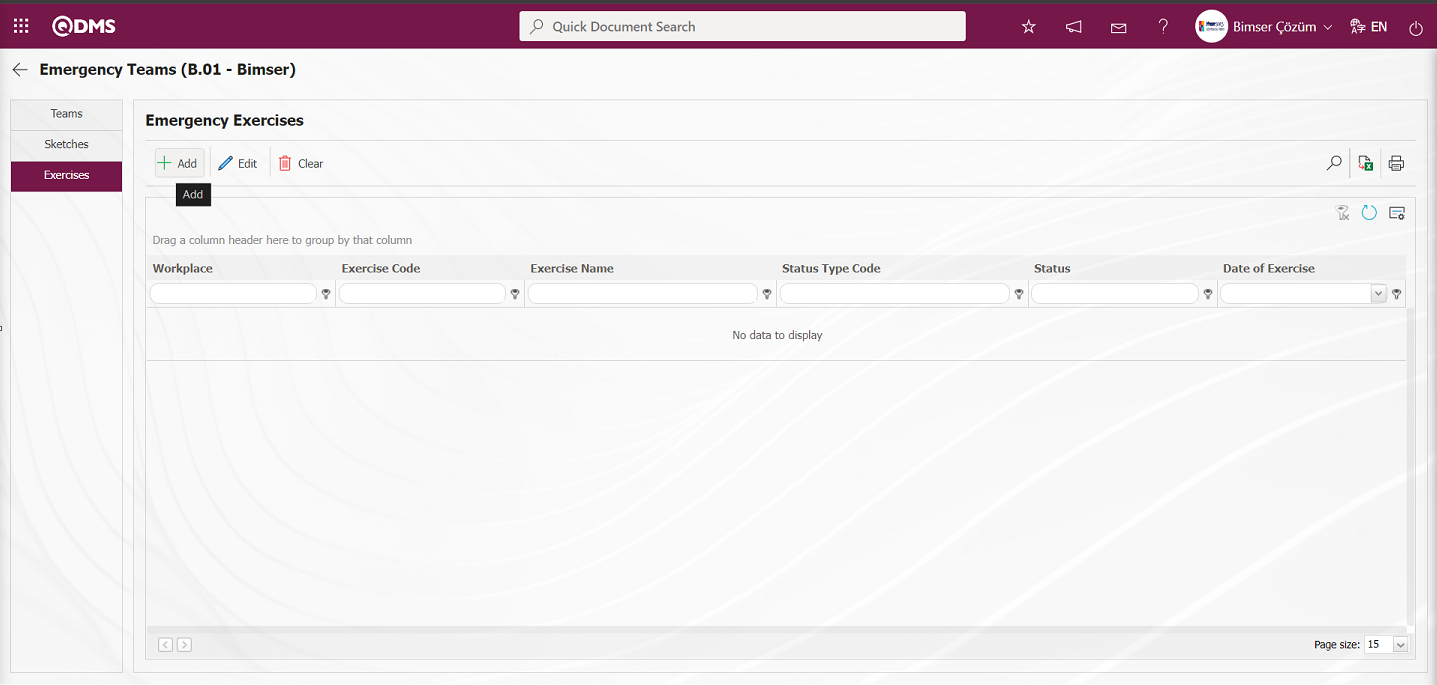
Exercises tab;
This tab is where emergency plans and drills are defined, and where selected exercises in the list can be edited and deleted.
Using the buttons on the screen;
 : A new exercise definition process is performed.
 : The exercise information selected in the list is edited/changed/updated.
 : The exercise information selected in the list is deleted.
: Records are filtered and searched.
: Data is transferred to Excel.
 : Emergency exercise images in PDF format.
: The search criteria on the menu screens are used to clear the data remaining in the filter fields in the grid where the search operation is performed.
: The menu screen is restored to its default settings.
: User-based designing of the menu screen is done with the show-hide feature, that is, the hiding feature of the fields corresponding to the columns on the menu screens.
To add a new drill on the Emergency Exercises screen, click the  button to open the Emergency Exercise Definition screen.
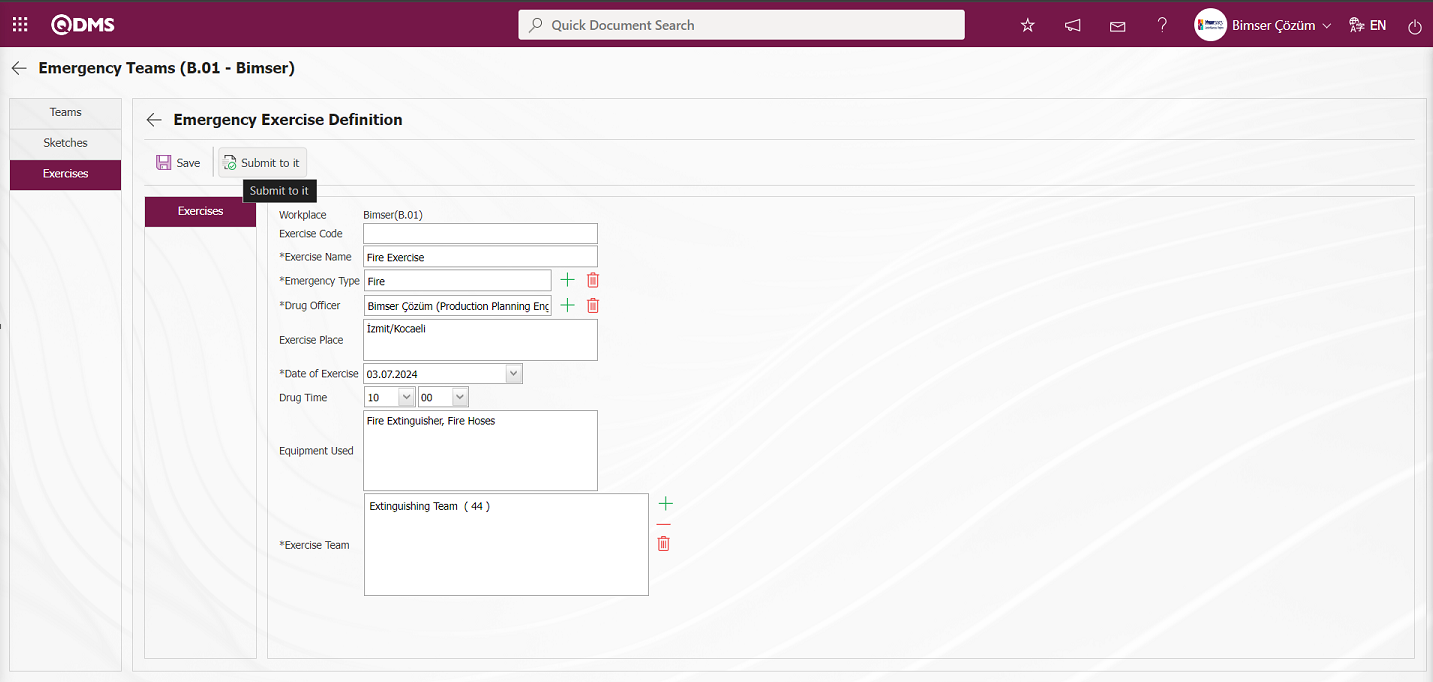
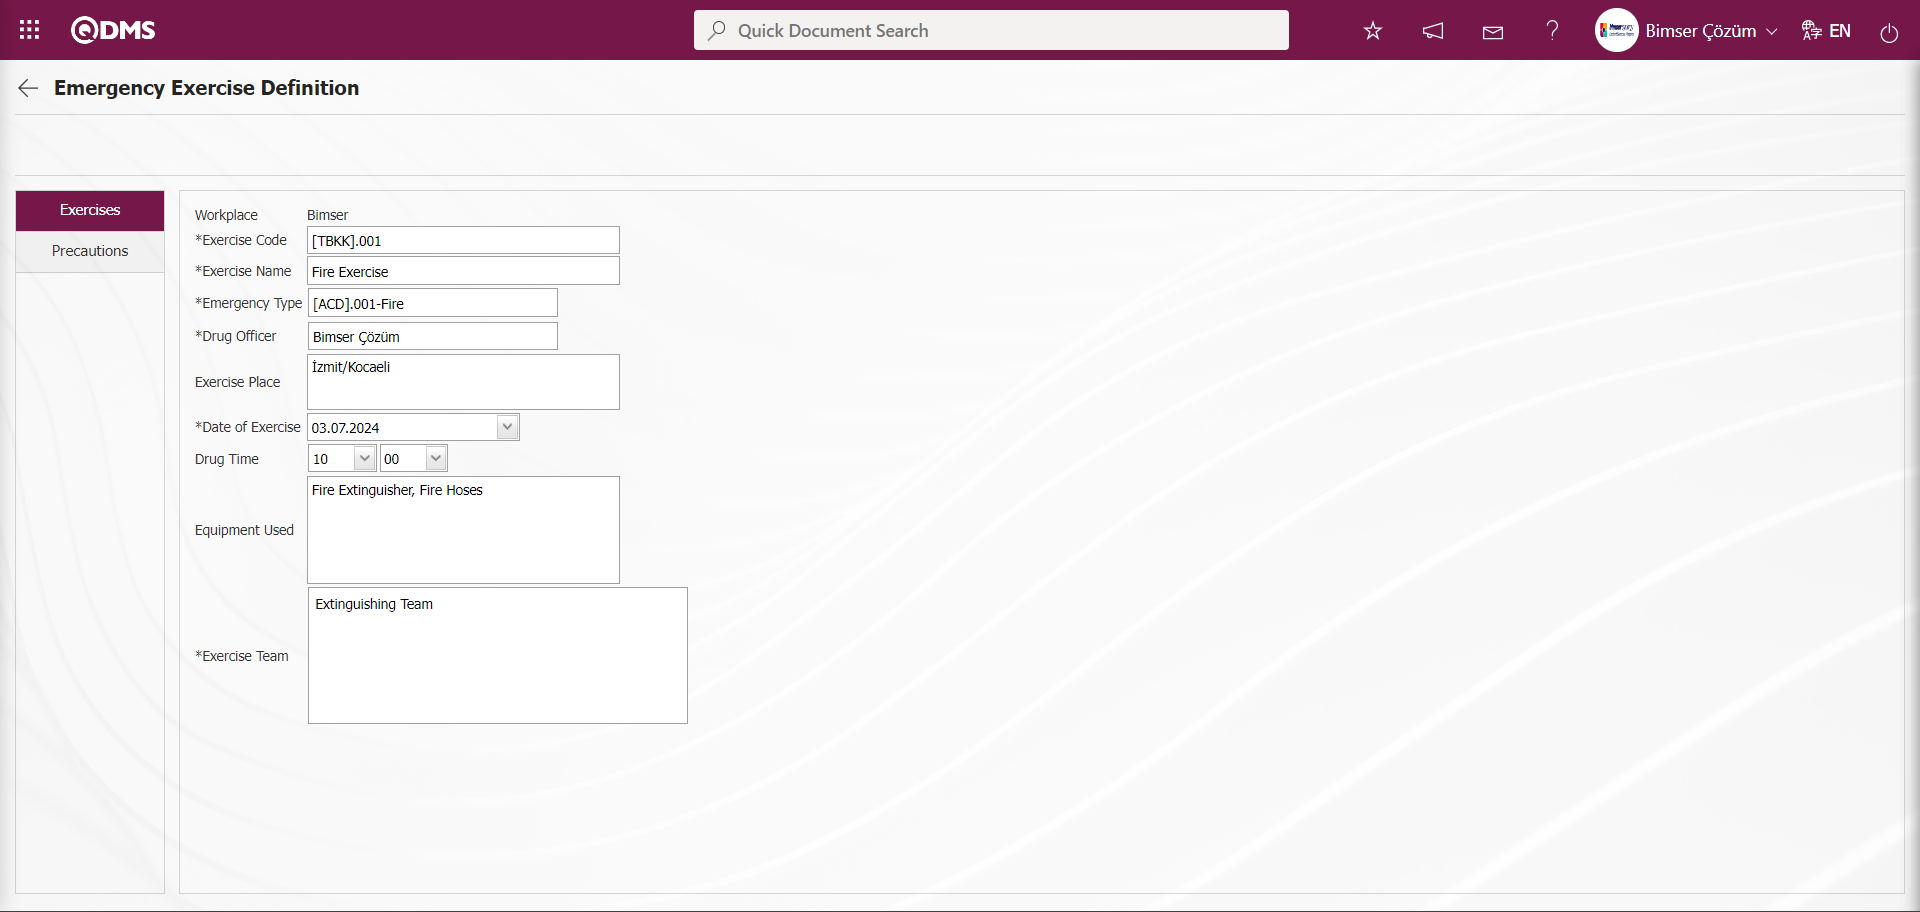
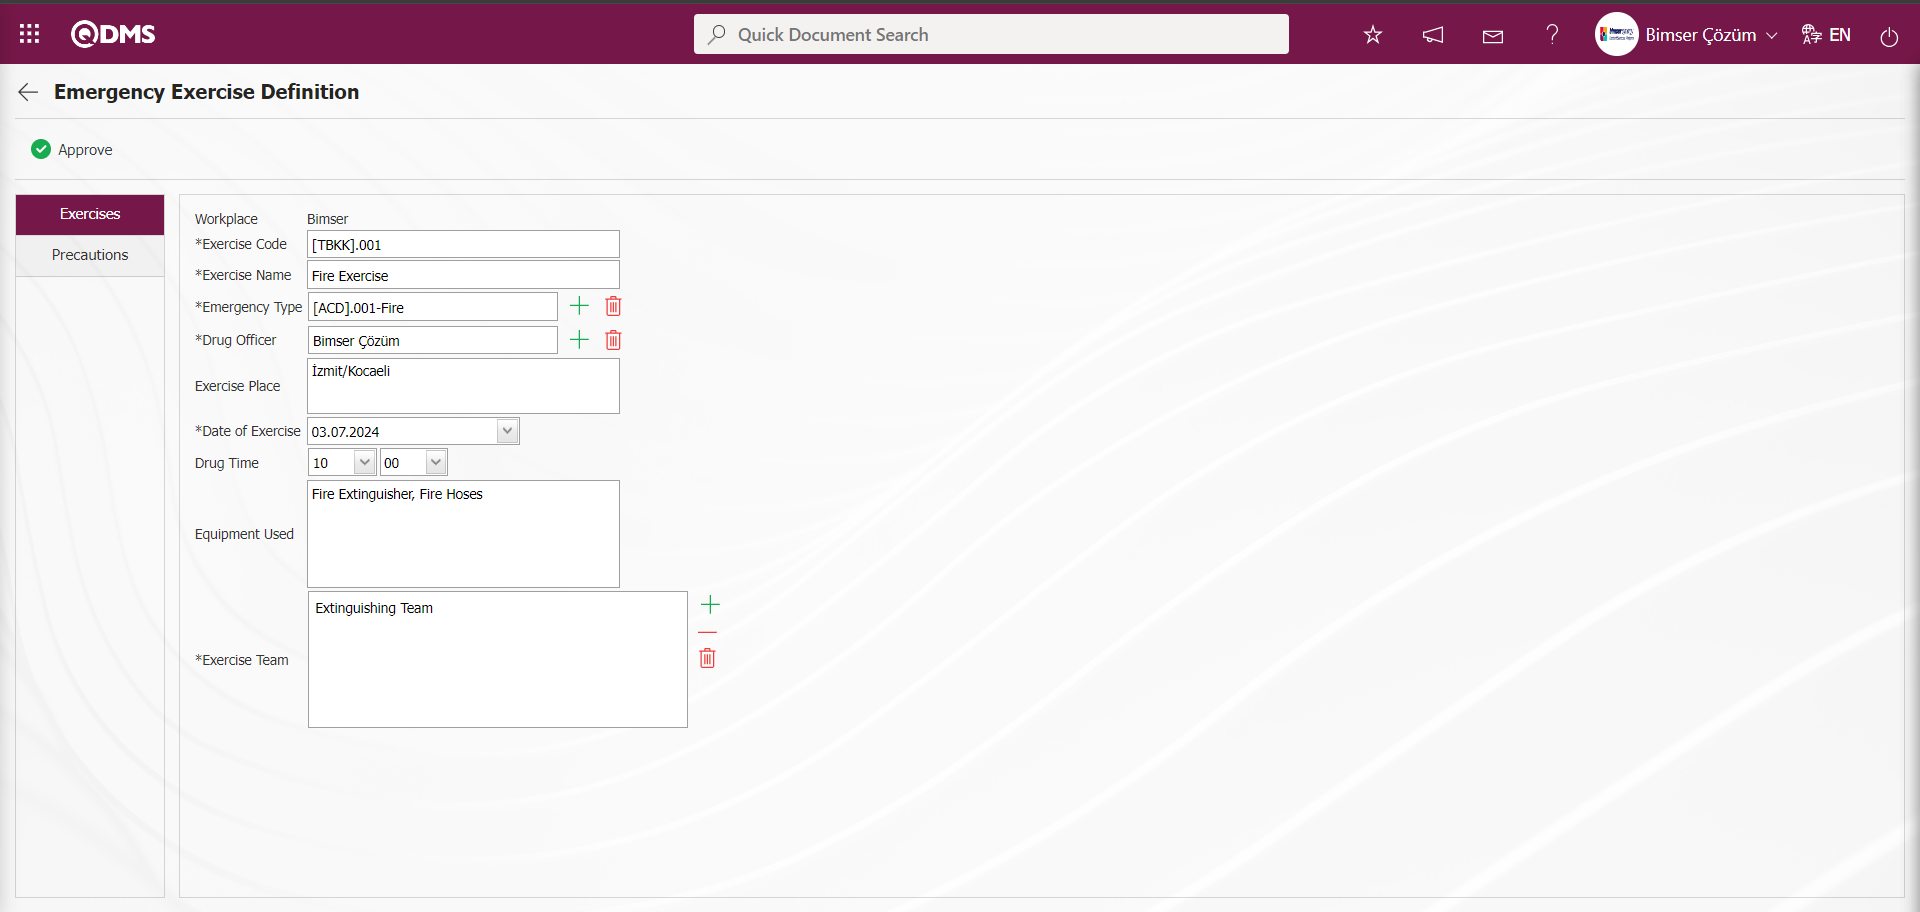
The relevant fields are defined on the screen that opens:
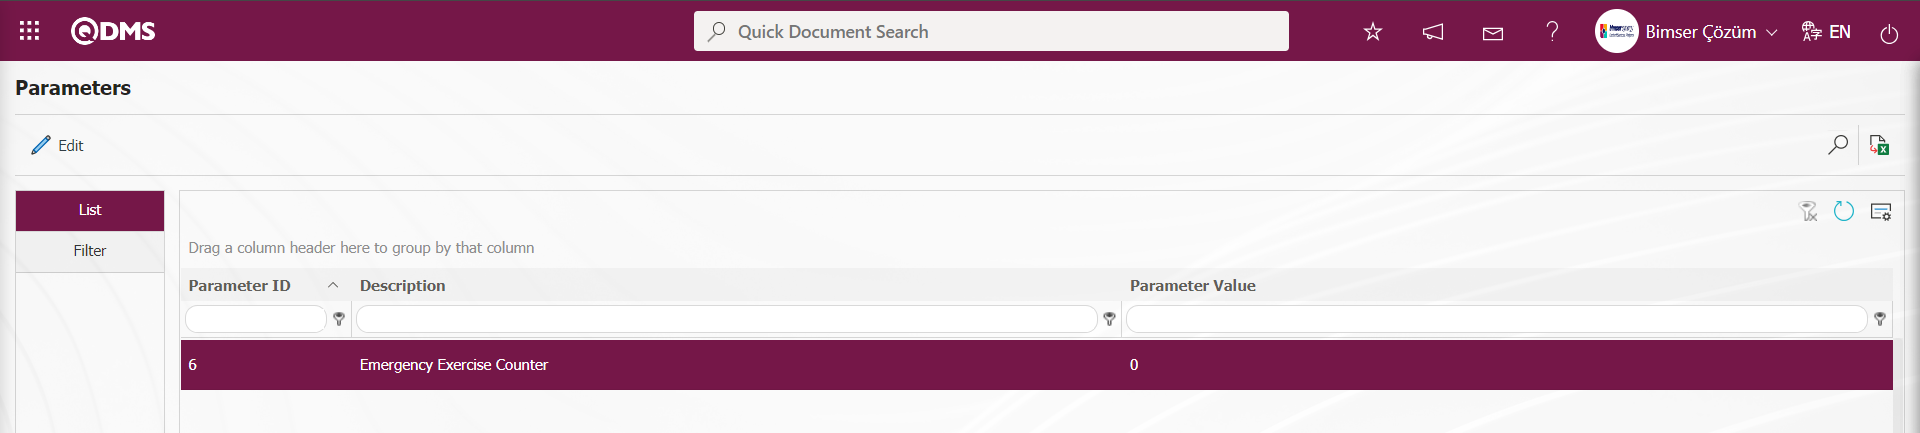
Exercise Code: This is the field in the Emergency Exercise Definition screen where the exercise code information is automatically provided by the system depending on the parameter.The code template defined in parameter number 5 “Emergency Drill Template Auto Code” in the Emergency Situations Module parameters is defined.

The code template is automatically assigned to the relevant field based on the counter value in the “Emergency Exercise Counter” parameter numbered 6. According to the defined code template, the system automatically assigns codes to the counter value in parameter 6 as [TBKK].001, [TBKK].002, and so on, starting from 0.
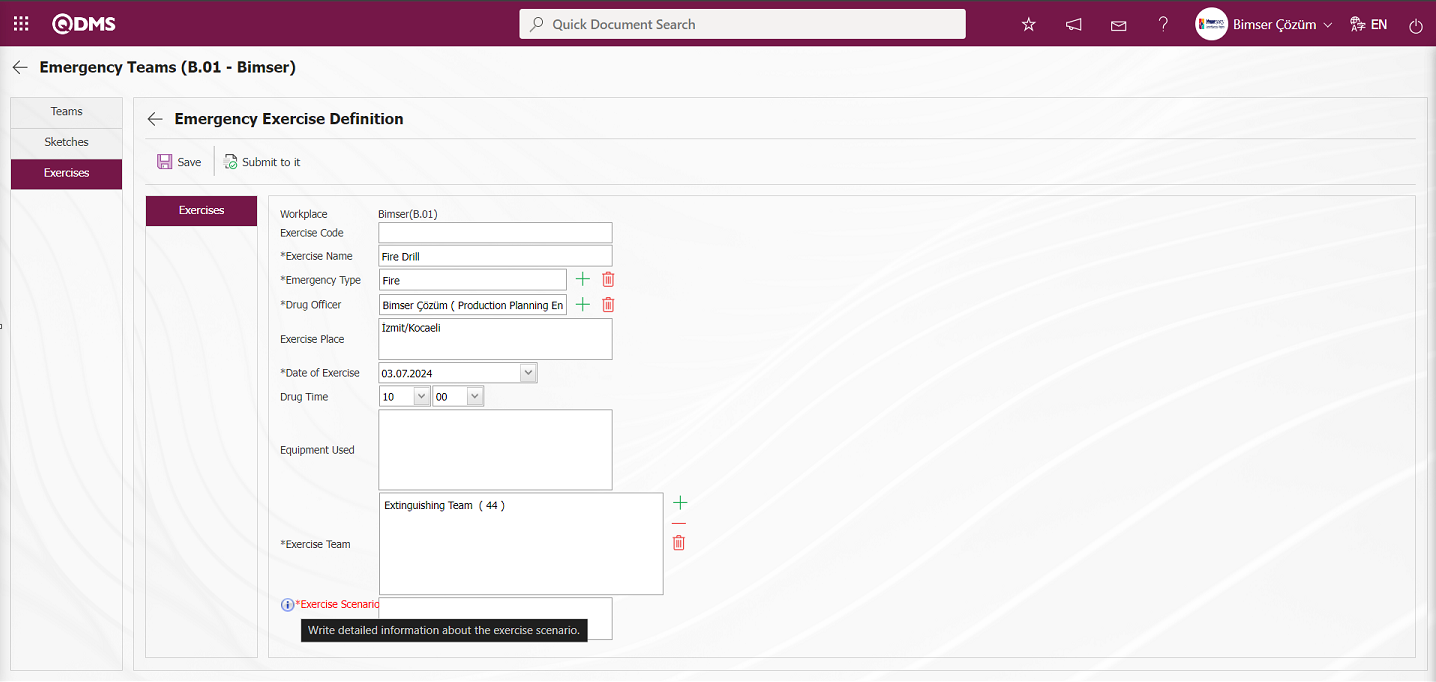
Exercise Name: The field where the exercise name is entered in the Emergency Exercise Definition screen.
Emergency Type: This field is where the emergency type is selected from the list of emergency types defined in the system by clicking the  (Select) button in the Emergency Exercise Definition screen. (The Emergency Type list is defined in the System Infrastructure Definitions/Emergency Situations/Emergency Strips menu.)
Drug Officer: The field where the Drug Officer information is selected from the list of personnel defined in the system by clicking the (Select) button on the Emergency Exercise Definition screen.
Exercise Place: The area where the exercise place information is entered on the Emergency Exercise Definition screen.
Date of Exercise: The date of the exercise is selected in the Calendar field that opens in the Emergency Exercise Definition screen.
Exercise Time: The area where the exercise time information is selected on the Emergency Exercise Definition screen.
Equipment Used: This field is where the equipment used in the Emergency Exercise Definition screen is listed.
Exercise Team: The Exercise Team information (Select) button on the Emergency Exercise Definition screen opens a system-defined Emergency Team list, from which the team can be selected. (The Emergency Team list is defined in System Infrastructure Definitions/Emergency Situations/Emergency Team Teams.)
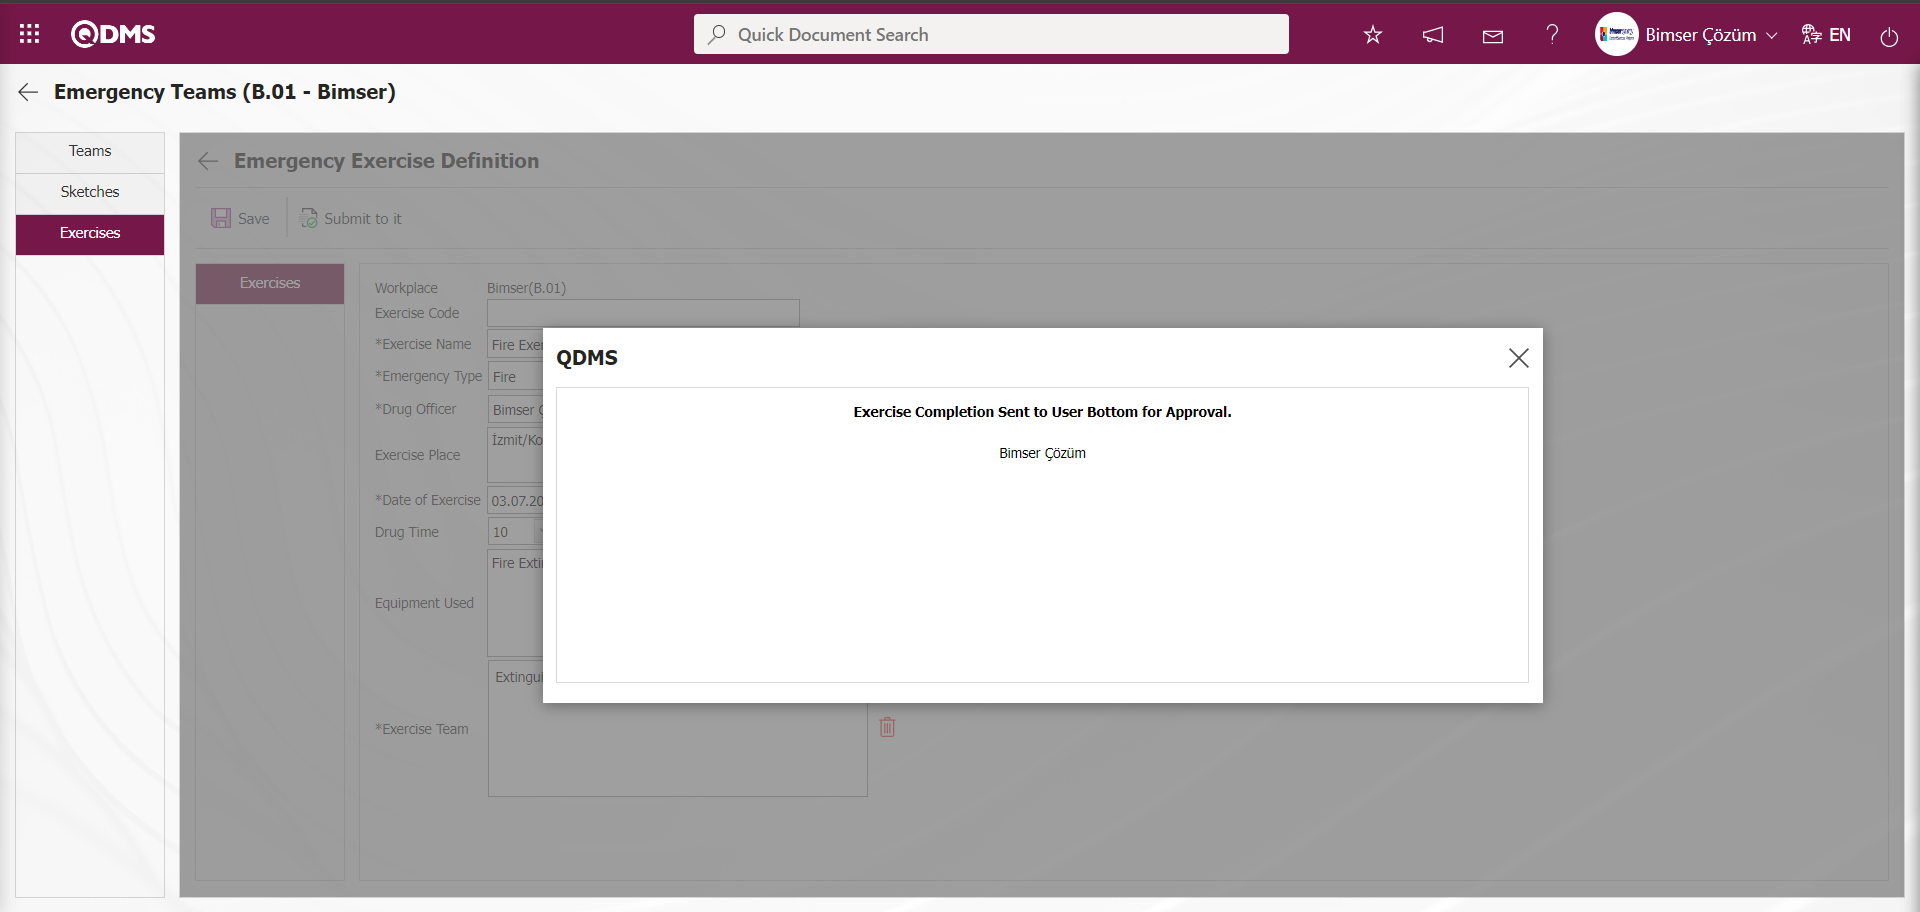
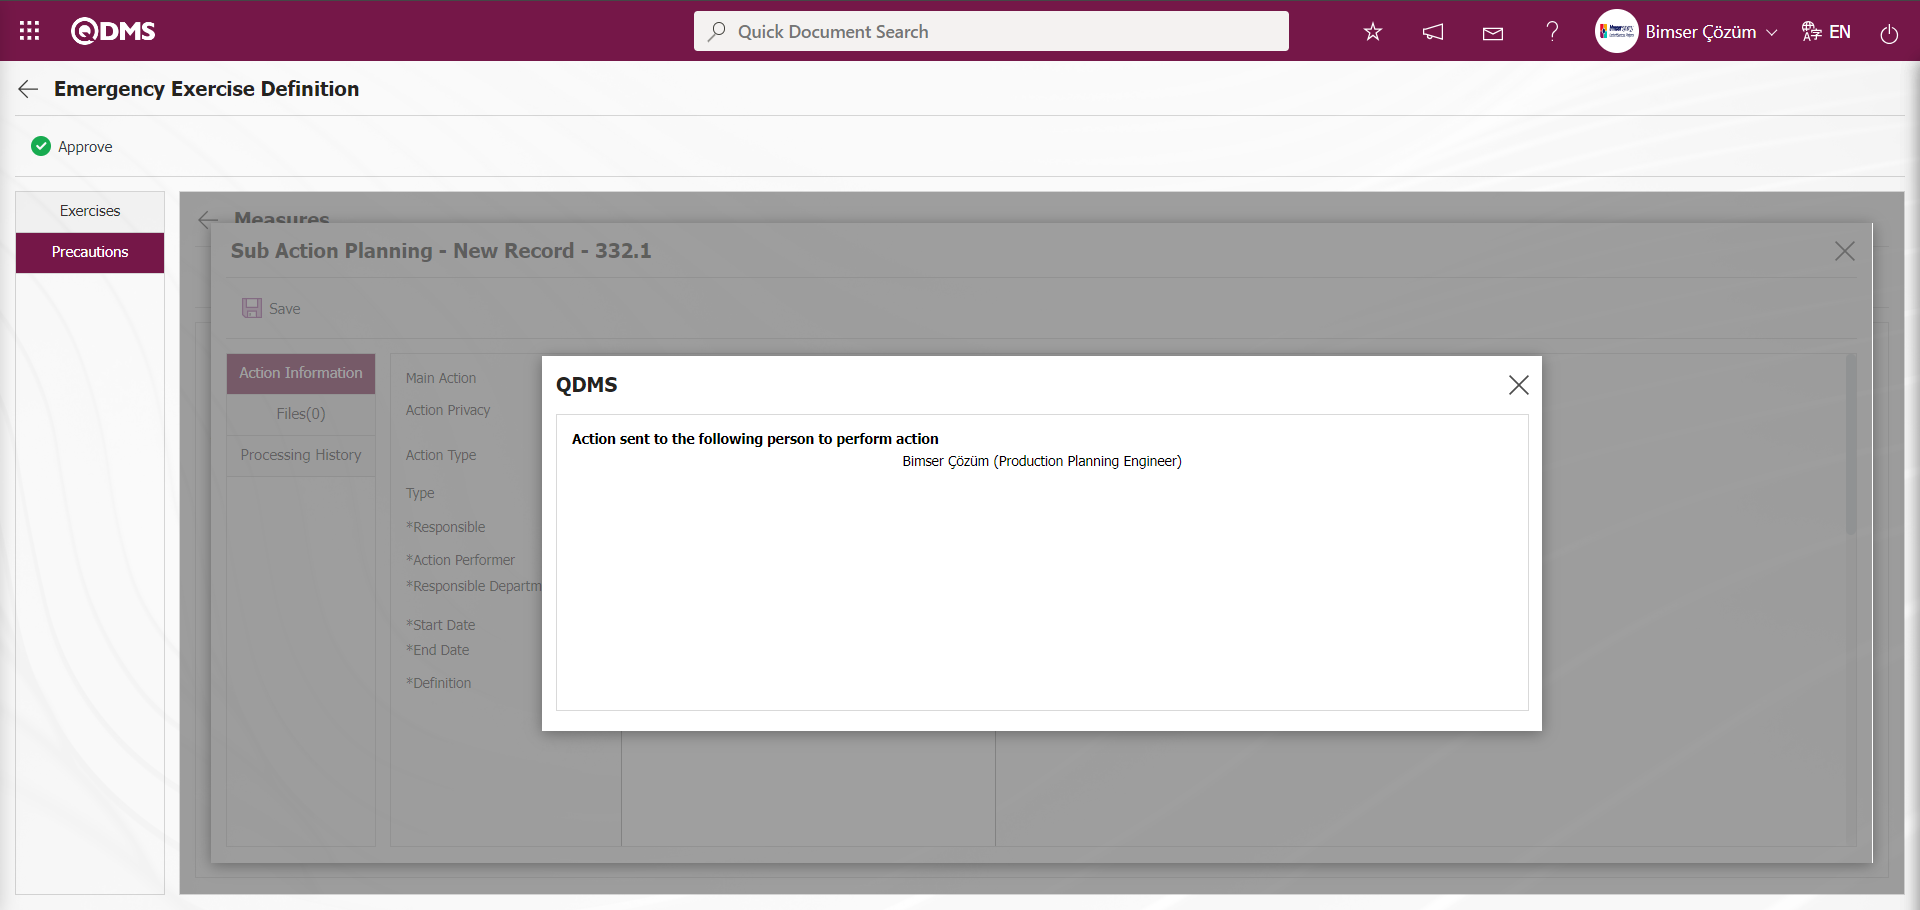
The exercise code is automatically generated by the system on the screen that opens. The name of the exercise is defined, the emergency type information is selected from the Emergency Team Type list defined in the system, and the exercise officer is selected from the personnel list defined in the system. The location of the exercise is entered, and the date and time of the exercise are entered. If any equipment is used, it is listed. After entering the required information in the relevant fields, click the button in the top left corner of the screen to complete the exercise definition registration process. The exercise team is selected from the emergency team list defined in the system. When the exercise time arrives, a notification email is sent to the exercise coordinator. When the exercise is selected, clicking the  button sends it to the person in the approval flow for approval.
The exercise that is being approved is assigned to the “Pending Tasks” “Exercises to be Completed” task.
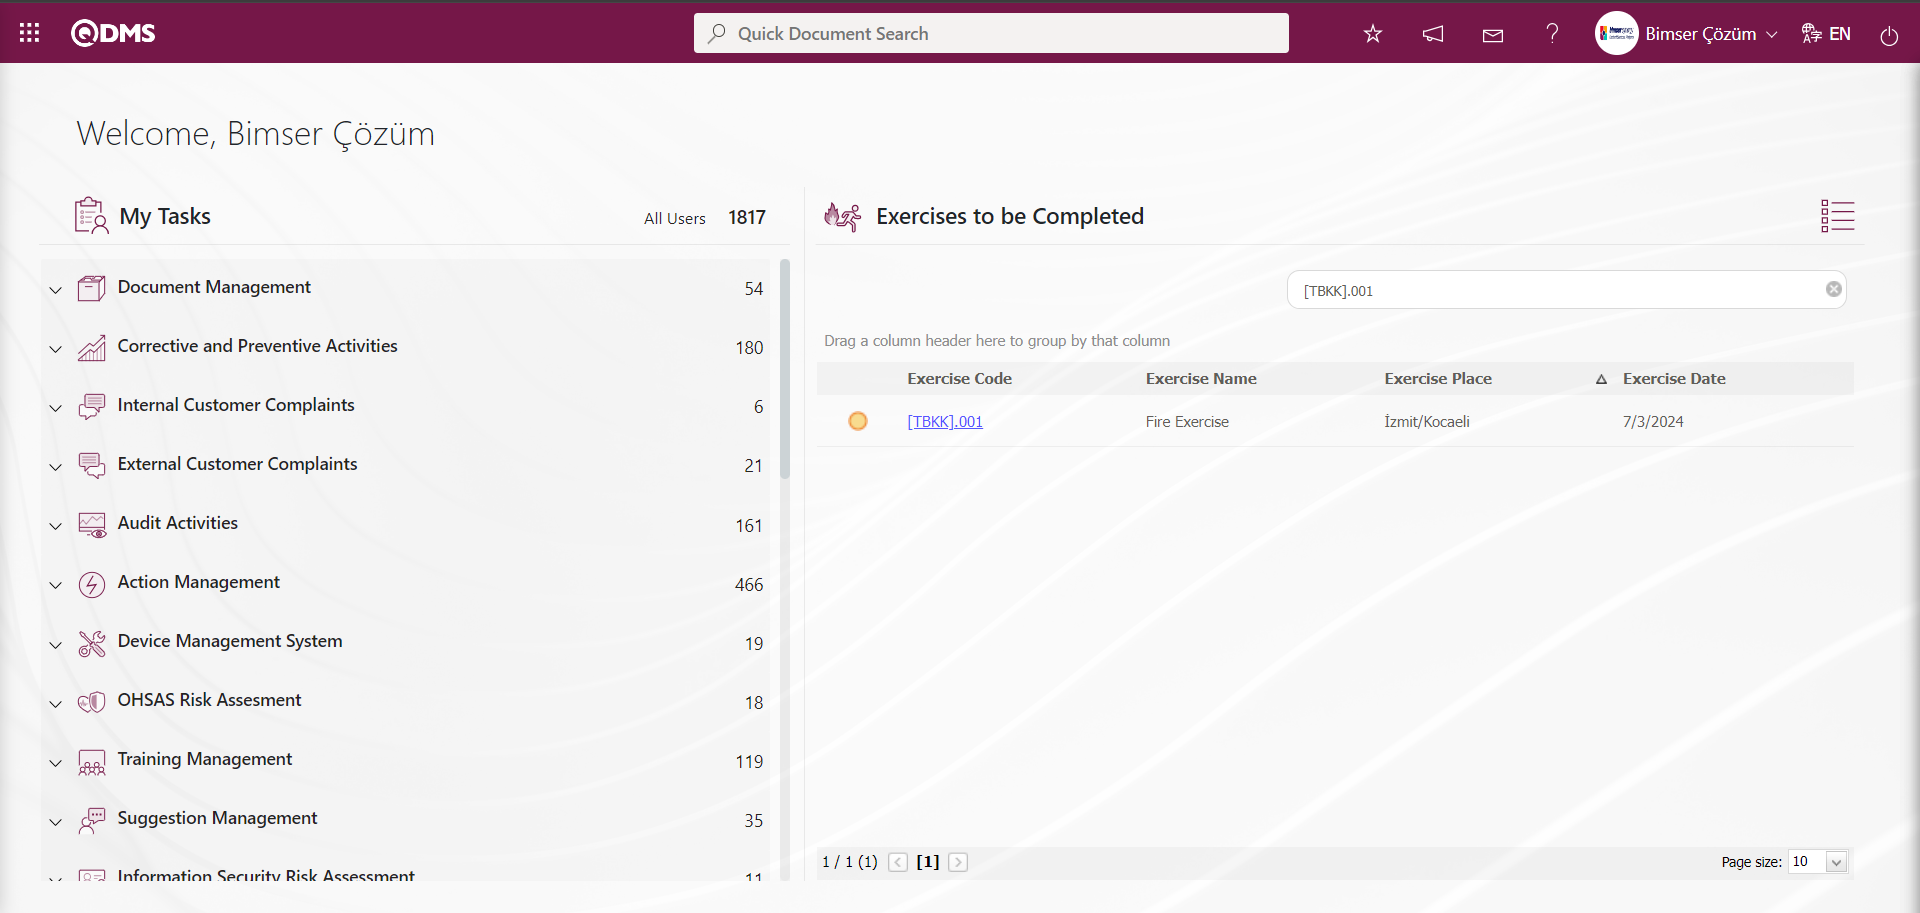
Click the link in the Exercise Code field of the relevant task to open the Emergency Exercises screen. 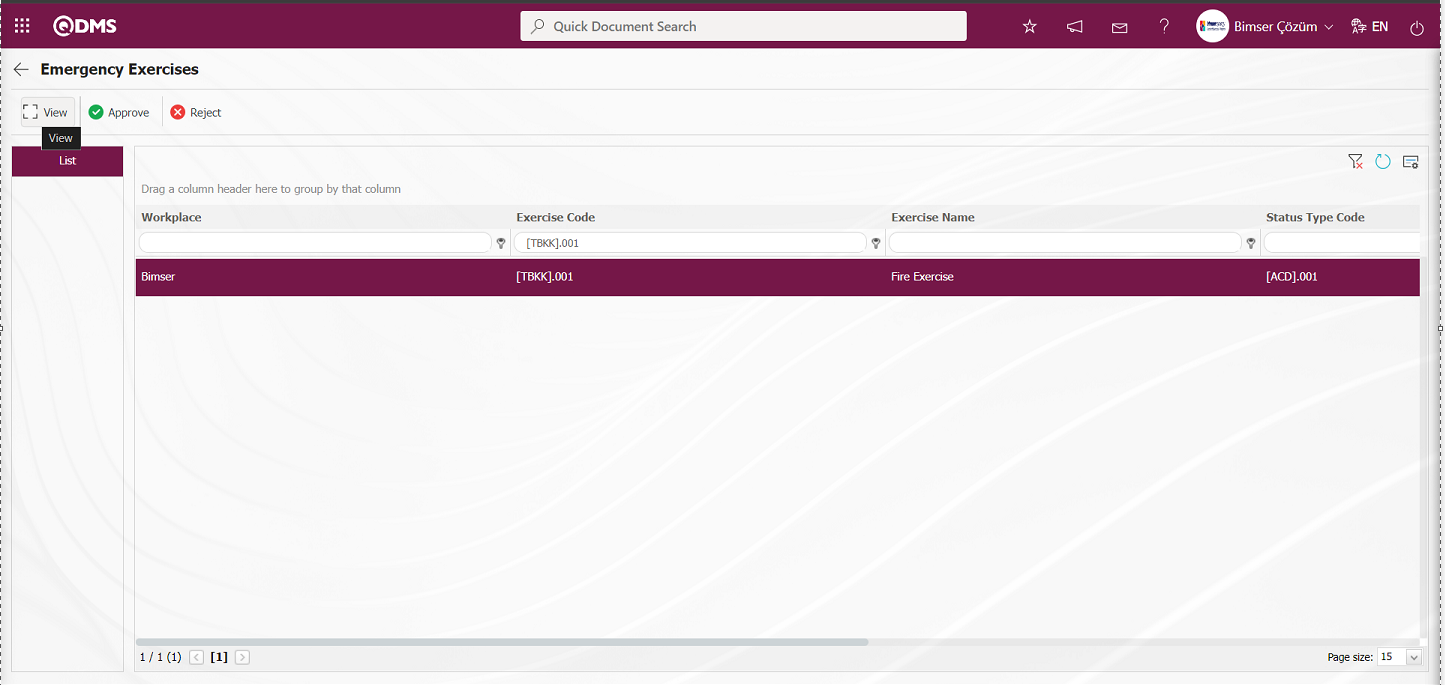
Using the buttons on the screen;
 : The selected Emergency Exercise information in the list is displayed.
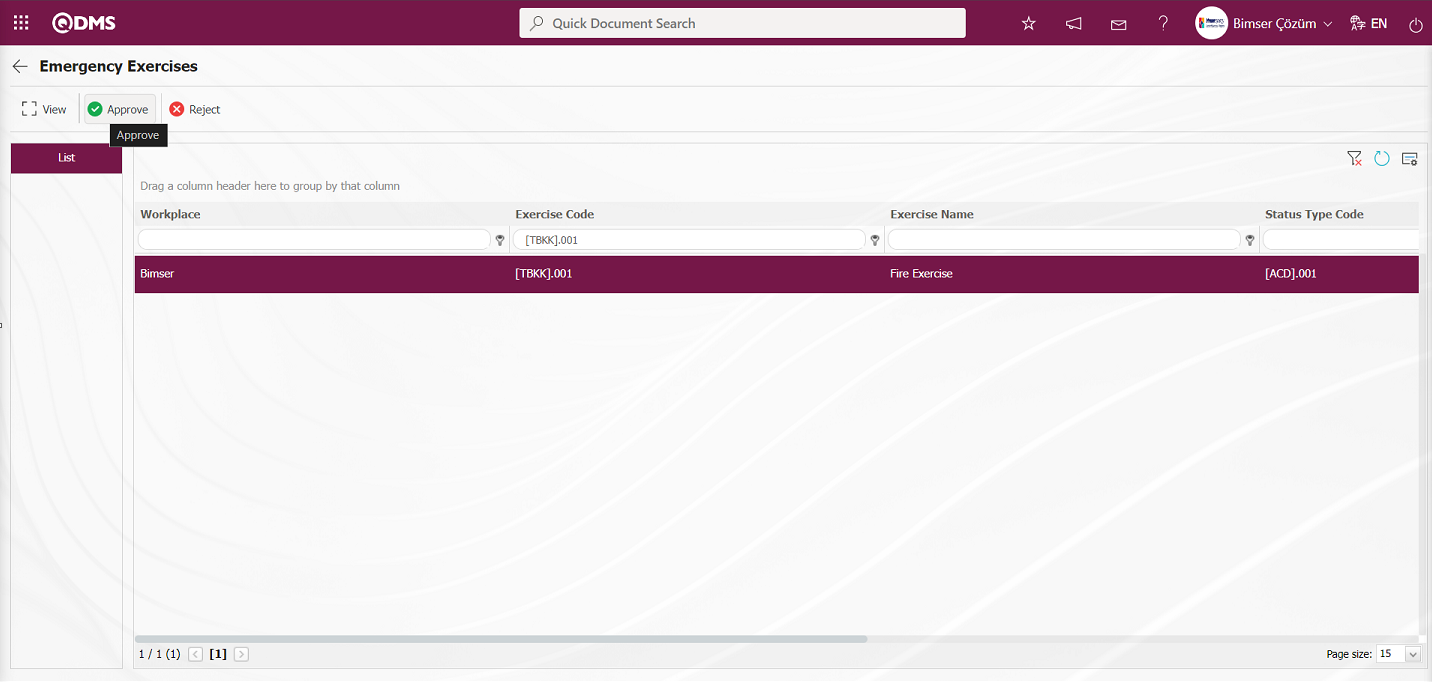
 : The selected Emergency Exercise information in the list is confirmed.
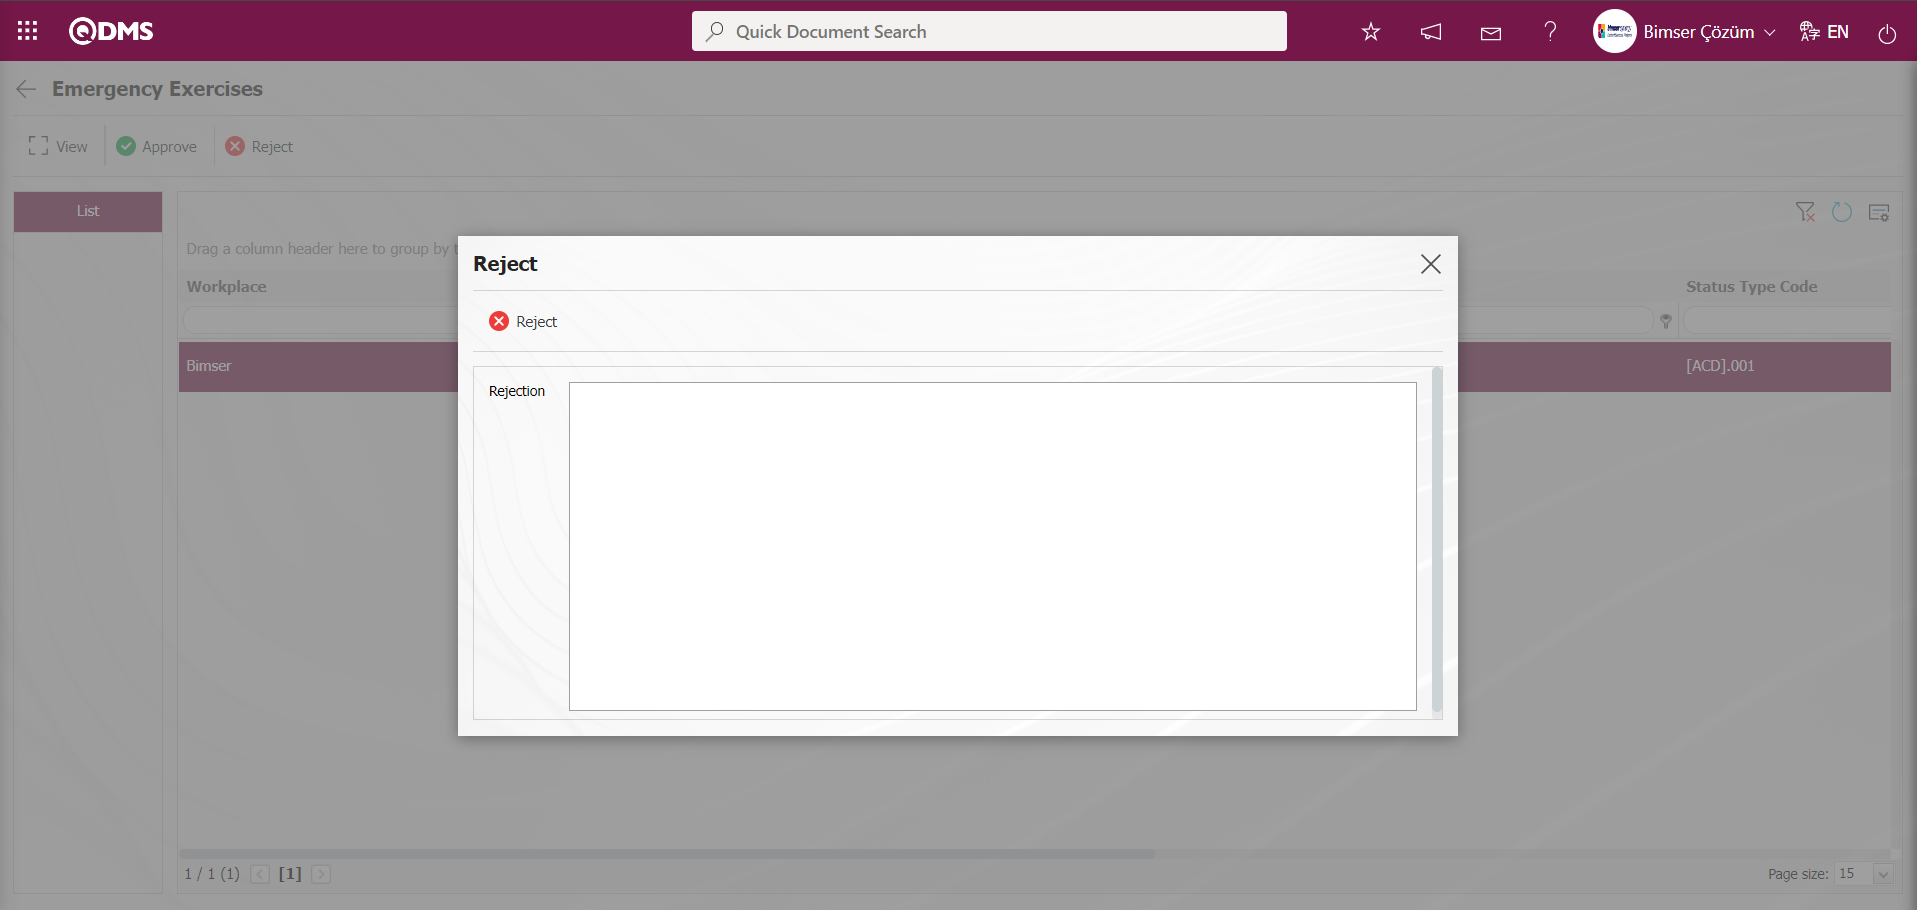
 : The selected Emergency Exercise information in the list is rejected with the reason for rejection.
On the Emergency Exercises screen, click the button while Emergency Exercise is selected in the list.
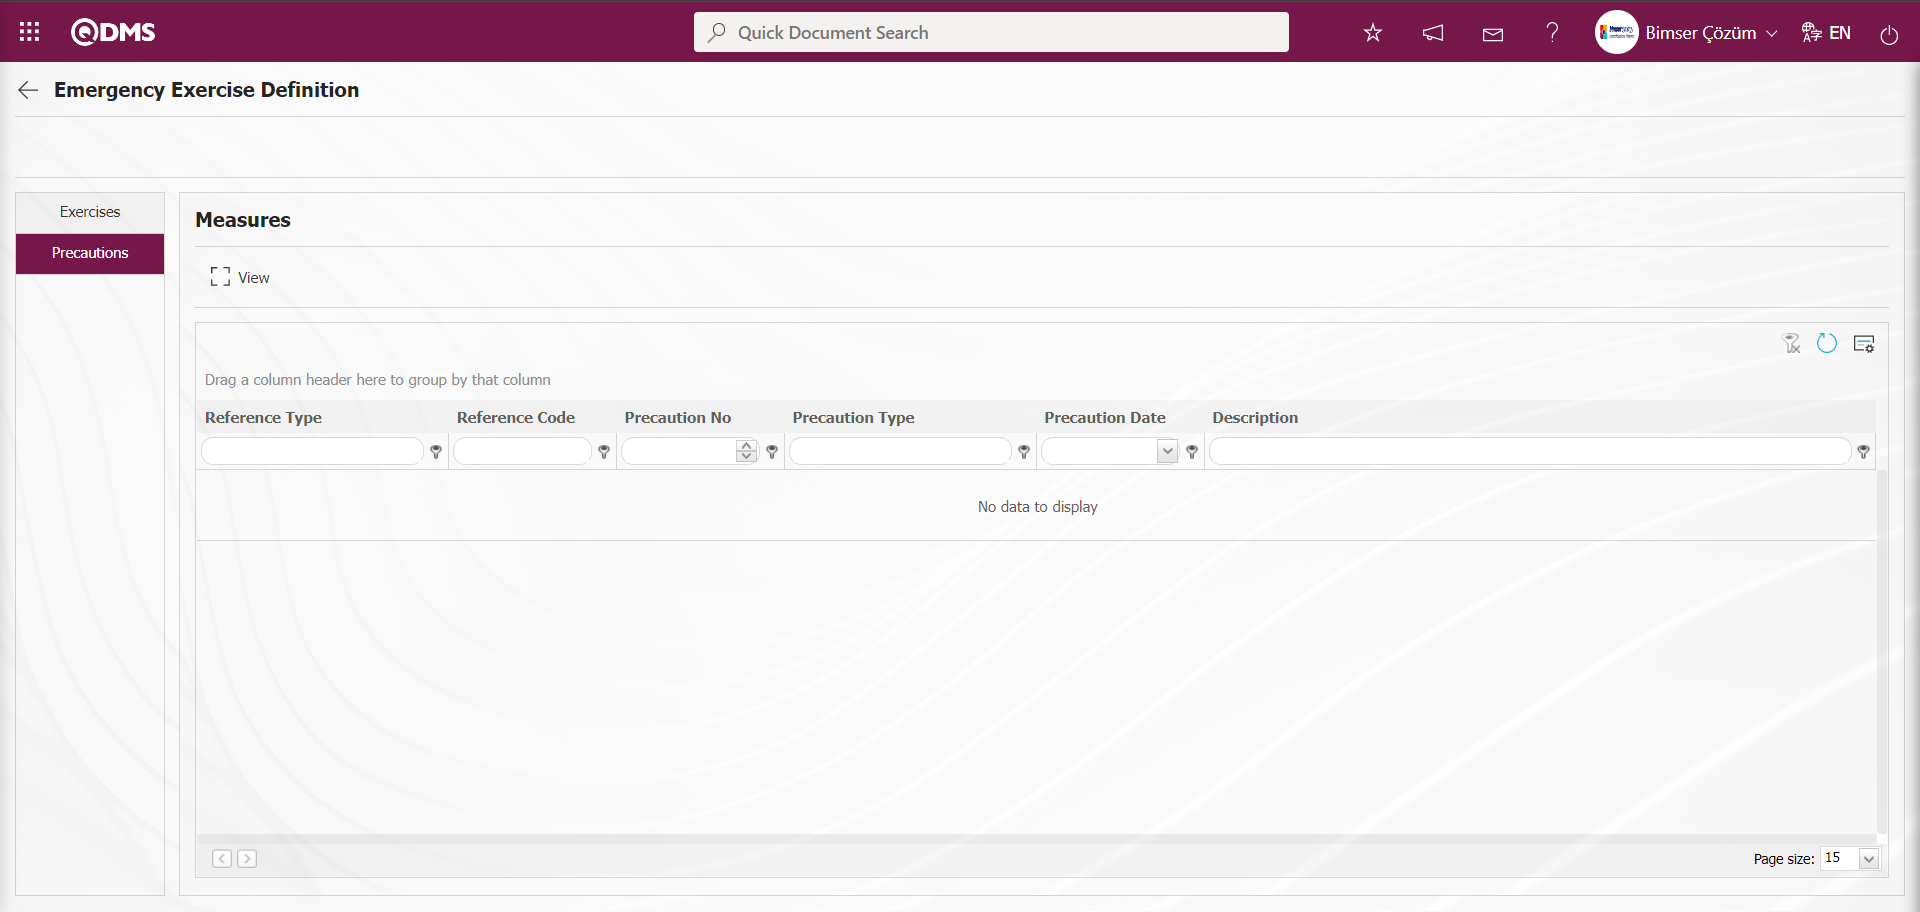
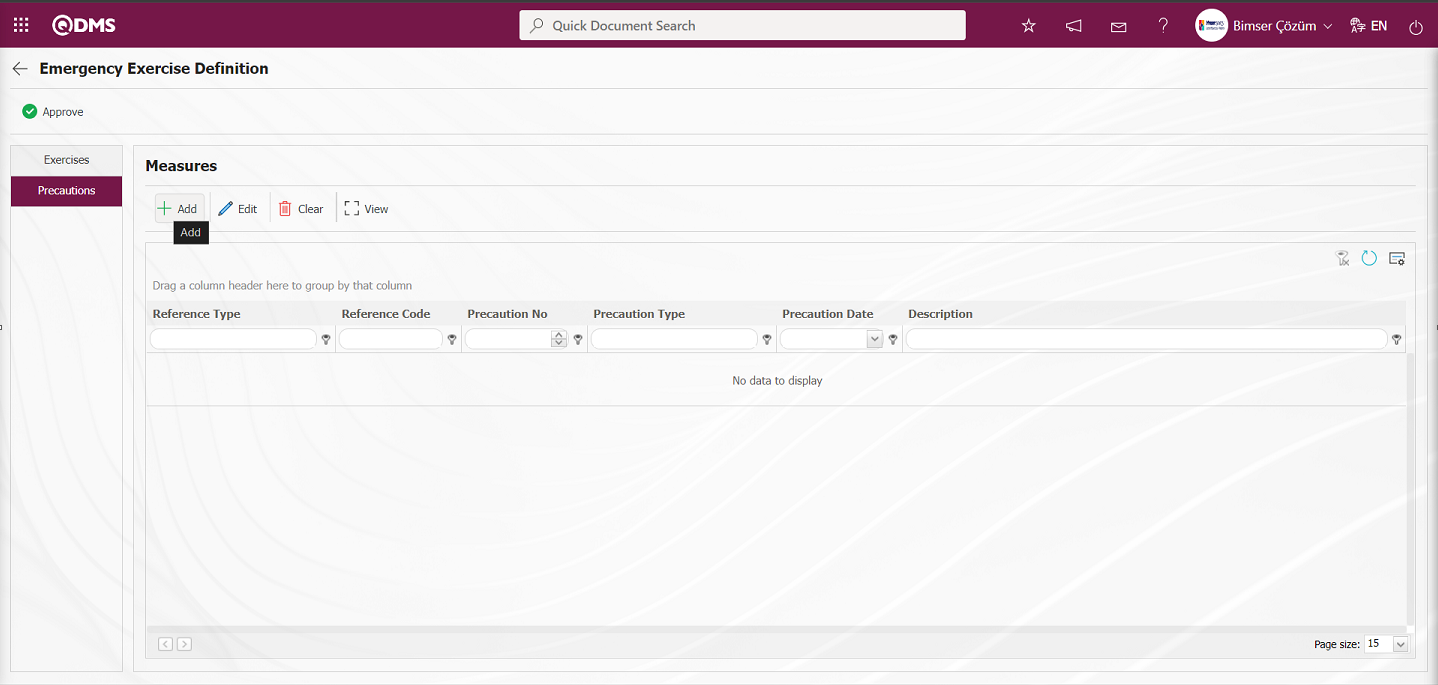
The Emergency Exercise Definition** screen opens with two tabs: Exercises and Precautions.
Exercises tab: Displays detailed information about the exercise defined for the Emergency Response Team.
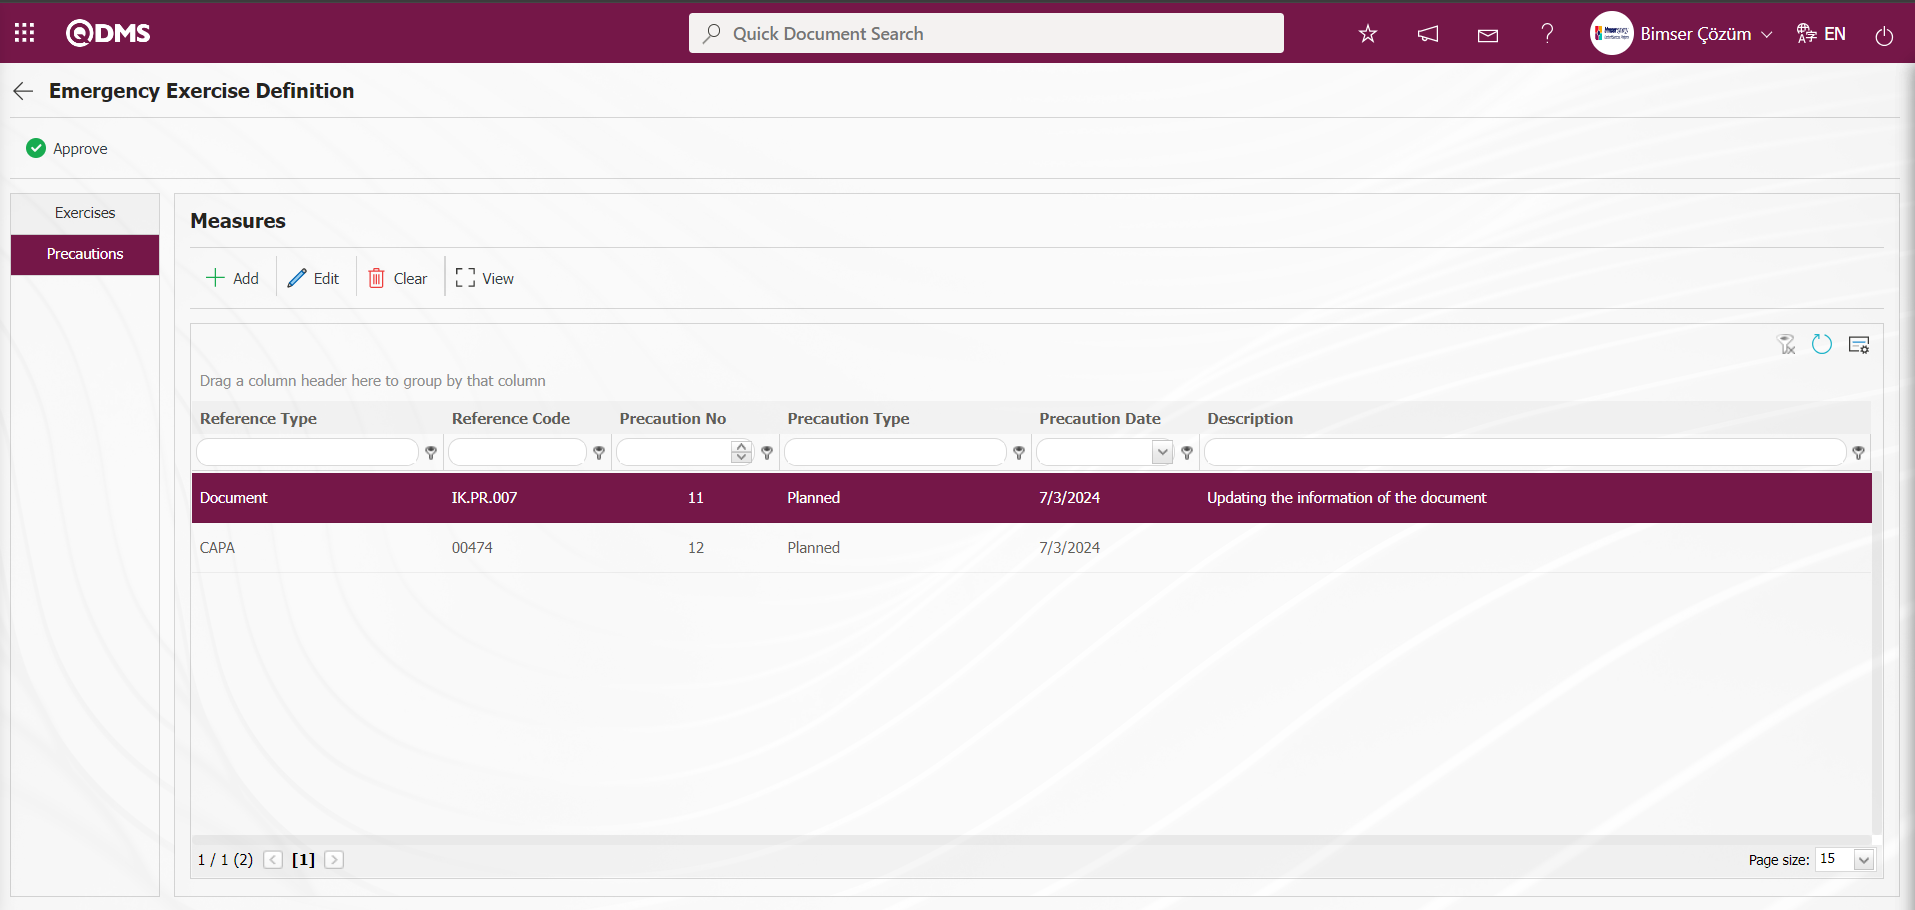
Precautions tab: This tab displays the precautions taken in relation to the defined drill for the Emergency Response Team.
Using the buttons on the screen;
 : The selected precaution information is displayed in the Precautions tab of the Emergency Exercise Definition screen.
Click the  button on the Emergency Exercise Definition screen.

In the Reject pop-up window, the reason for rejection is entered and the Emergency Exercise approval is rejected.
Click the button on the Emergency Exercise Definition screen.
The Emergency Exercise Definition screen opens, displaying the Exercises and Precautions tab.
Exercises tab: Displays detailed information about the exercise defined for the Emergency Response Team.
Precautions tab: This tab is used to add precautions to be taken in relation to the defined drill for the Emergency Response Team, edit the selected precaution information in the list, and delete it.
Using the buttons on the screen;
: Add a new measure in the Precautions tab of the Emergency Exercise Definition screen.
 : Edit the selected measure information in the Precautions tab of the Emergency Exercise Definition screen.
 : Delete the selected precaution information in the Precautions tab of the Emergency Exercise Definition screen.
 : Display the selected precaution information in the Precautions tab of the Emergency Exercise Definition screen.
To add a new Precaution on the Emergency Exercise Definition screen, click the button to open the Precautions screen.
The relevant fields are defined on the screen that opens:
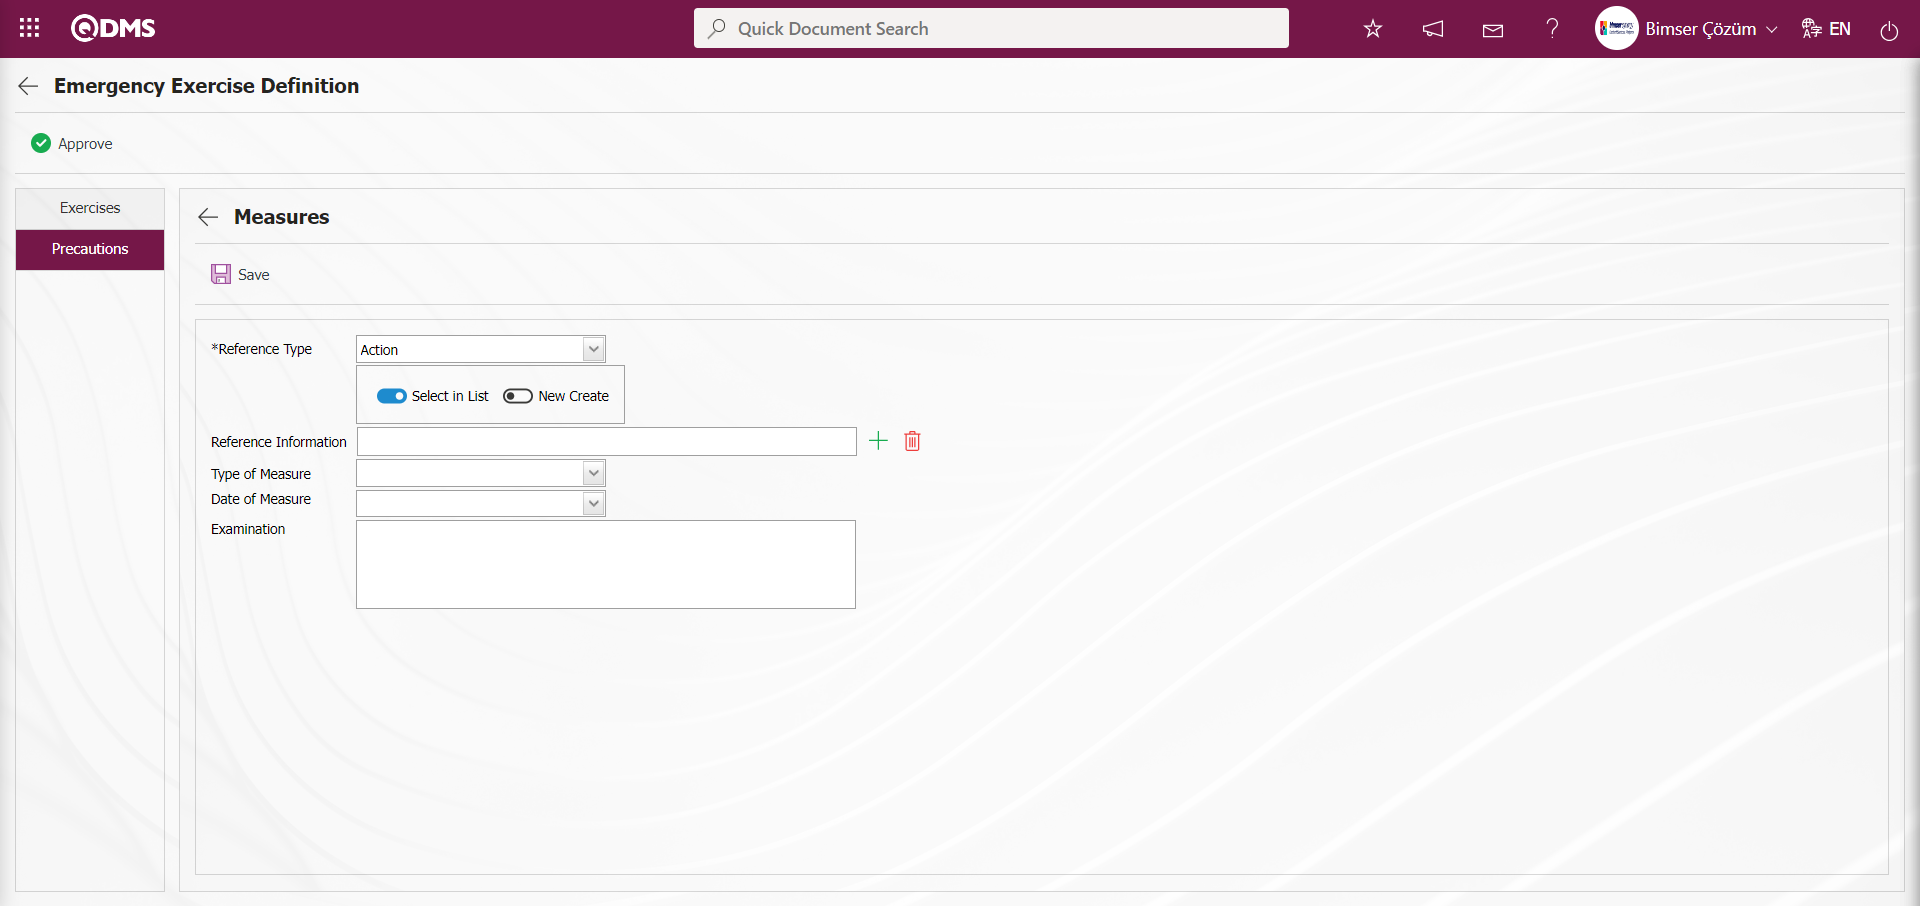
Reference Type: This is the field where you select Document, CAPA, or Action as the measure in the Precautions tab.
When the Reference Type Document is selected;
When the reference information document is selected, the  (Select) button in the reference information field is clicked to open the system, and the document is selected from the list of defined documents. Documents uploaded in the Document Management Module are displayed in the Document list.
When the CAPA reference type option is selected;The field displaying the option to select an existing CAPA record from the list or define a new CAPA record appears. When the “Select from list” option is selected, the reference type field opens, allowing you to select from the CAPA records defined in the system. When the “New Create” option is selected, the CAPA Activities - New Record screen opens, where you can define a new CAPA record.
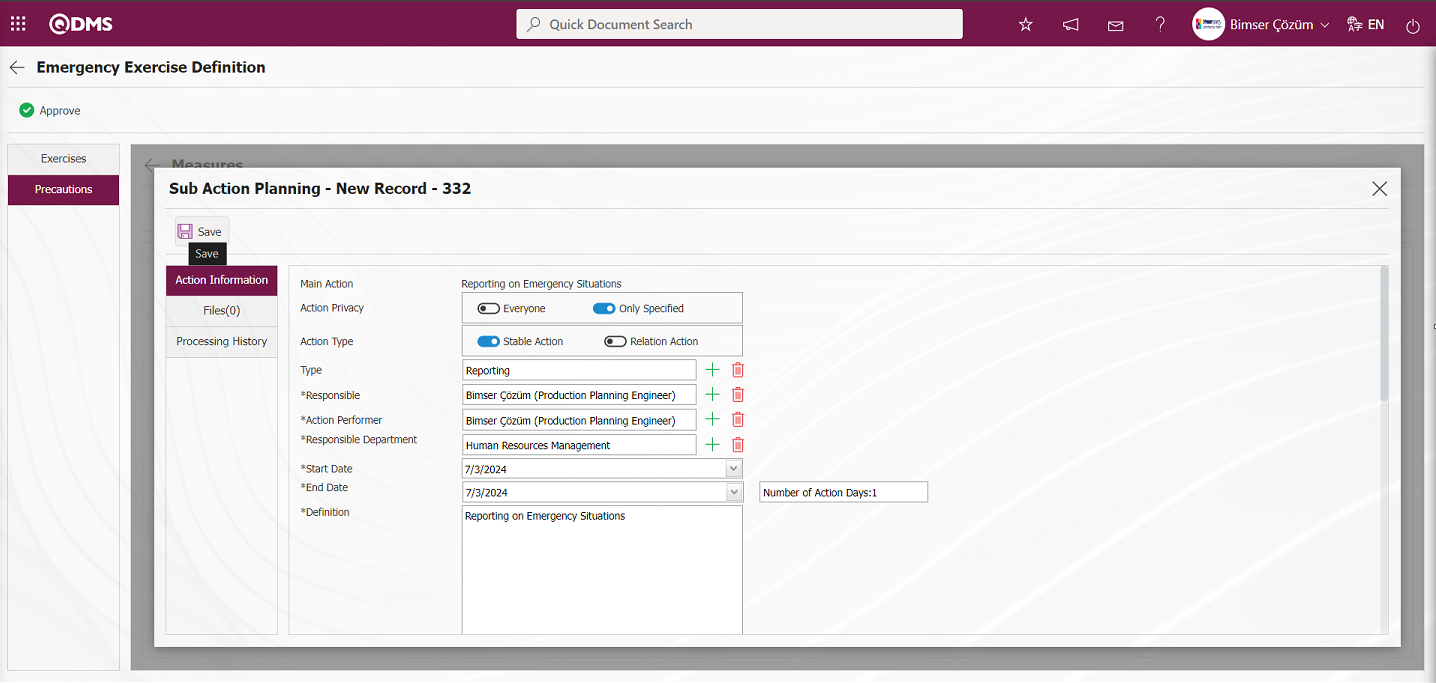
When the “Action” option is selected in the “Reference type” option: The field where the action record is selected from the existing list or where a new action is defined will be displayed. If the “Select from list” option is selected, a selection is made from the existing actions defined in the system. When the “New Create” option is selected, the Sub Action Planning - New Record screen opens, allowing you to define a new Action Item.
The main action code is defined in parameter 21 of the Emergency Situations Module parameters.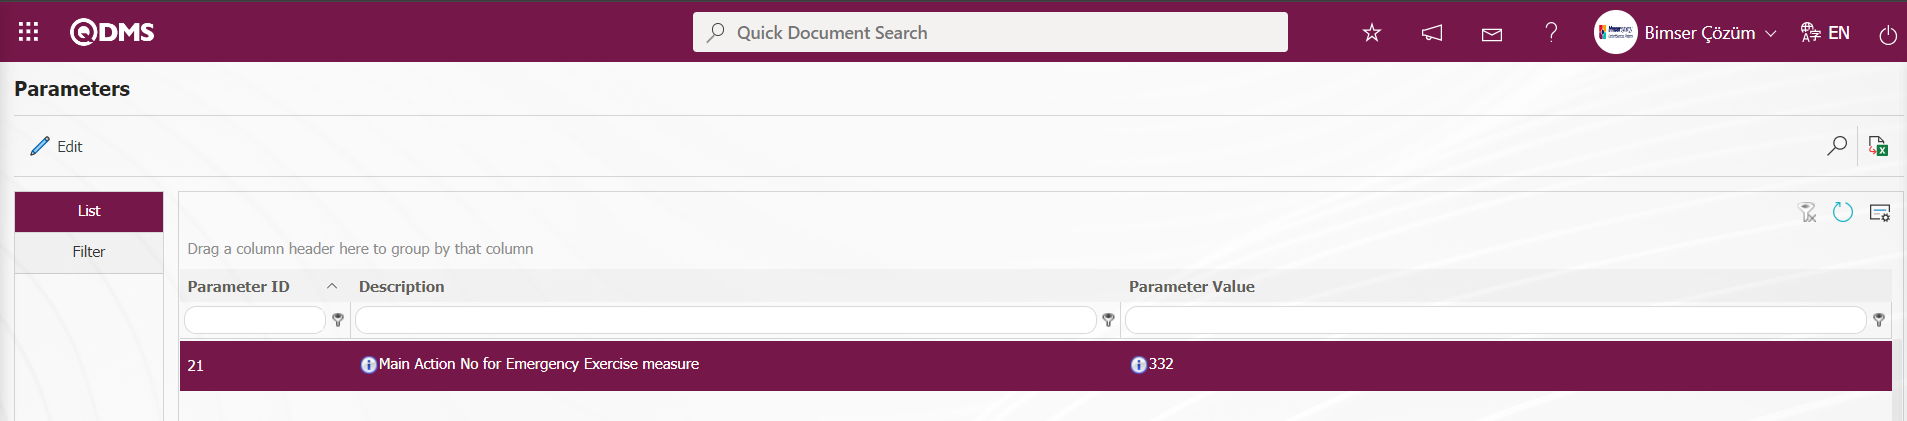
The Main Action Code information is obtained from the Action Management module in the Action Planning screen. When an action is taken as an Emergency Exercise measure, these actions are opened based on the parameter-defined main action.
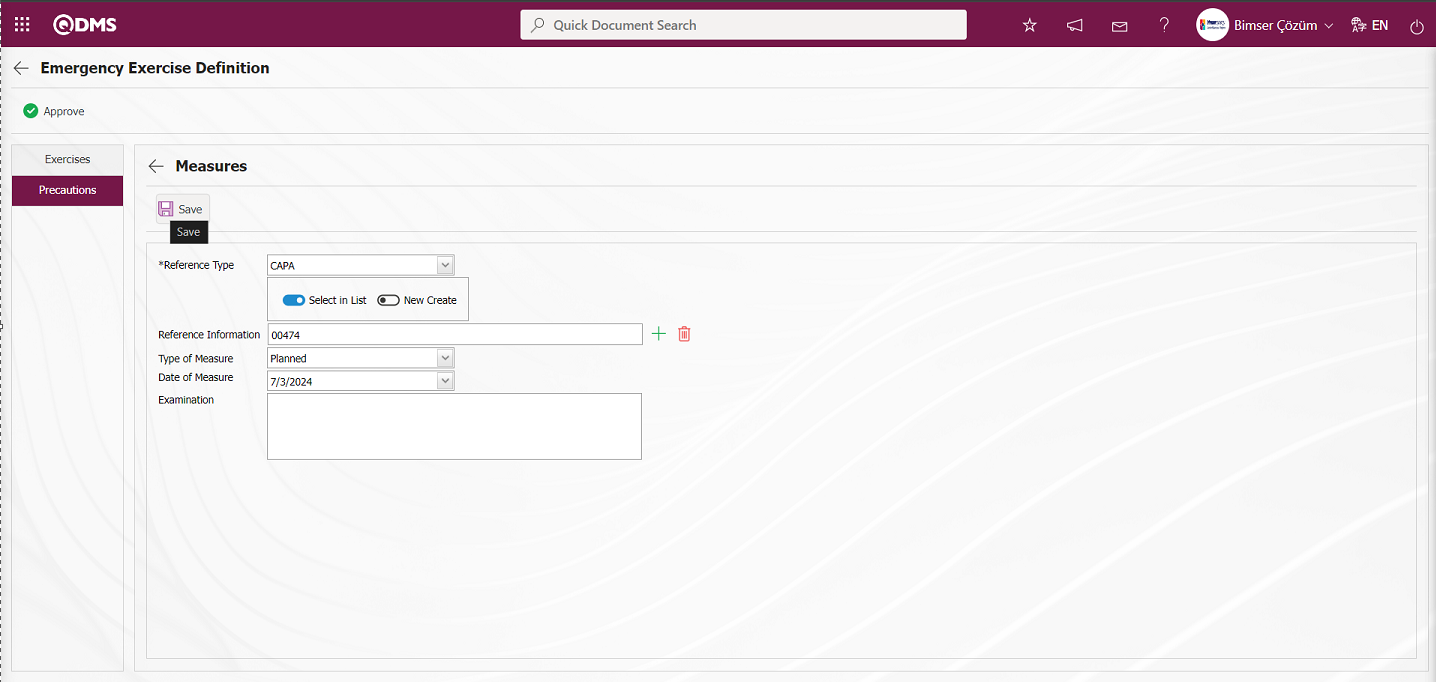
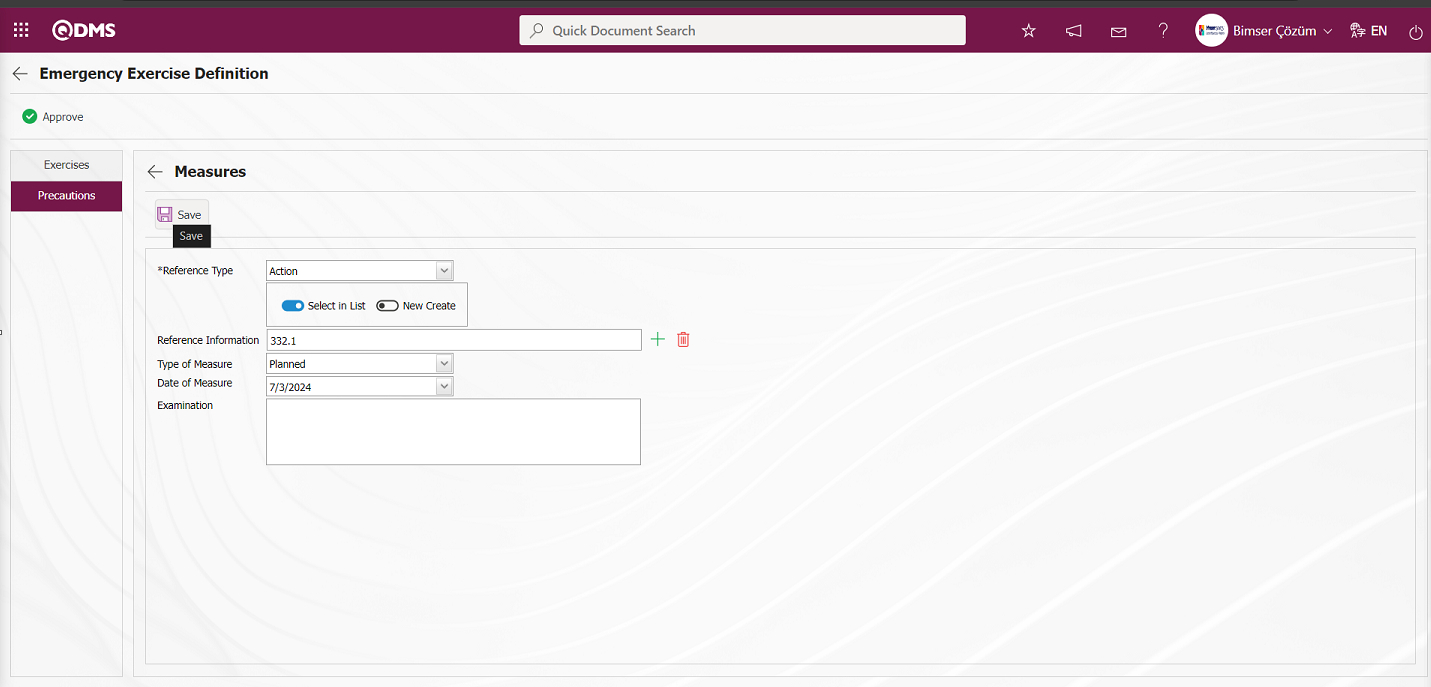
Type of Measure: This is the area where you select Current and Planned in the Measures tab. When you select Current, CAPA and Actions registered in the system are selected as measures. When you select Planned, you can either open a new CAPA record as a new measure or define a new Action as a measure.
Date of Measure: This is the field where the date of the measure to be defined in the Measures tab is selected from the drop-down calendar.
Explanation: This field is used to enter explanatory information about any measures defined in the Measures tab.
If Reference Type Document is selected;
In the Emergency Response Team Definition screen, select Reference Type document in the Measures tab and enter the relevant information in the corresponding fields.
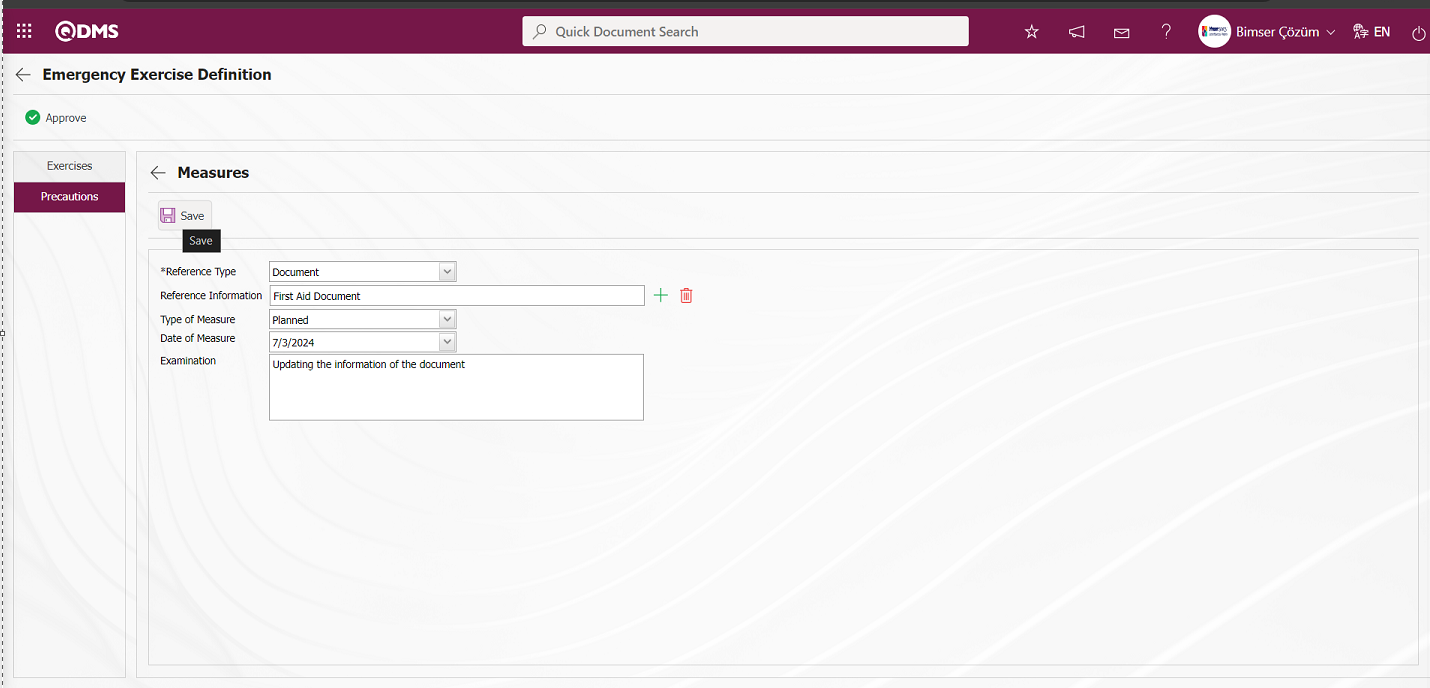
After entering the required information in the fields on the screen that opens for the measure with the defined reference type Document, click the  button in the upper left corner of the screen to complete the measure definition process.

When the CAPA option is selected for the reference type;
To add a new measure in the Emergency Exercise Definition screen, click the  button to open the Measures screen.

In the Emergency Exercise Definition screen, select CAPA as the Reference Type in the Measures tab and enter the relevant information in the appropriate fields. In the CAPA Activities - New Record screen, enter the information for the fields associated with the CAPA record.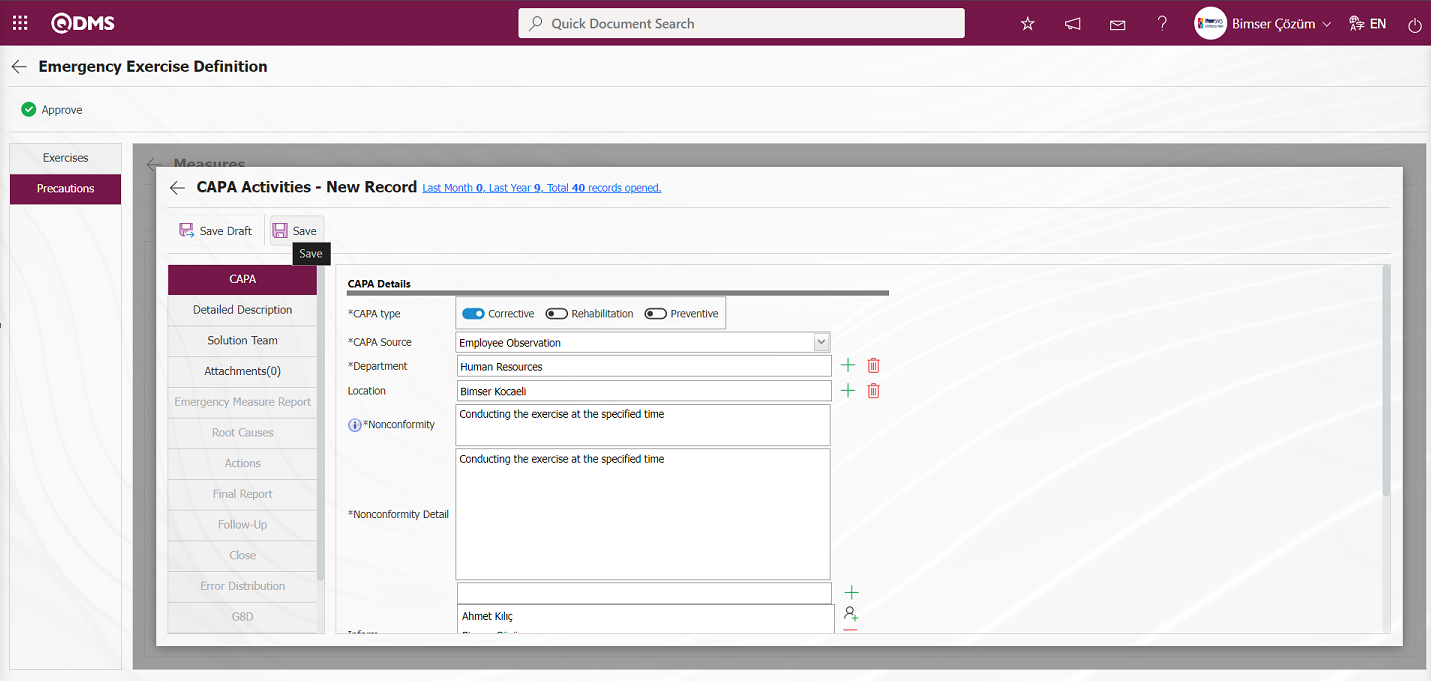
After entering the required information in the relevant fields, click the  button in the upper left corner of the screen to define the CAPA reference type measure.
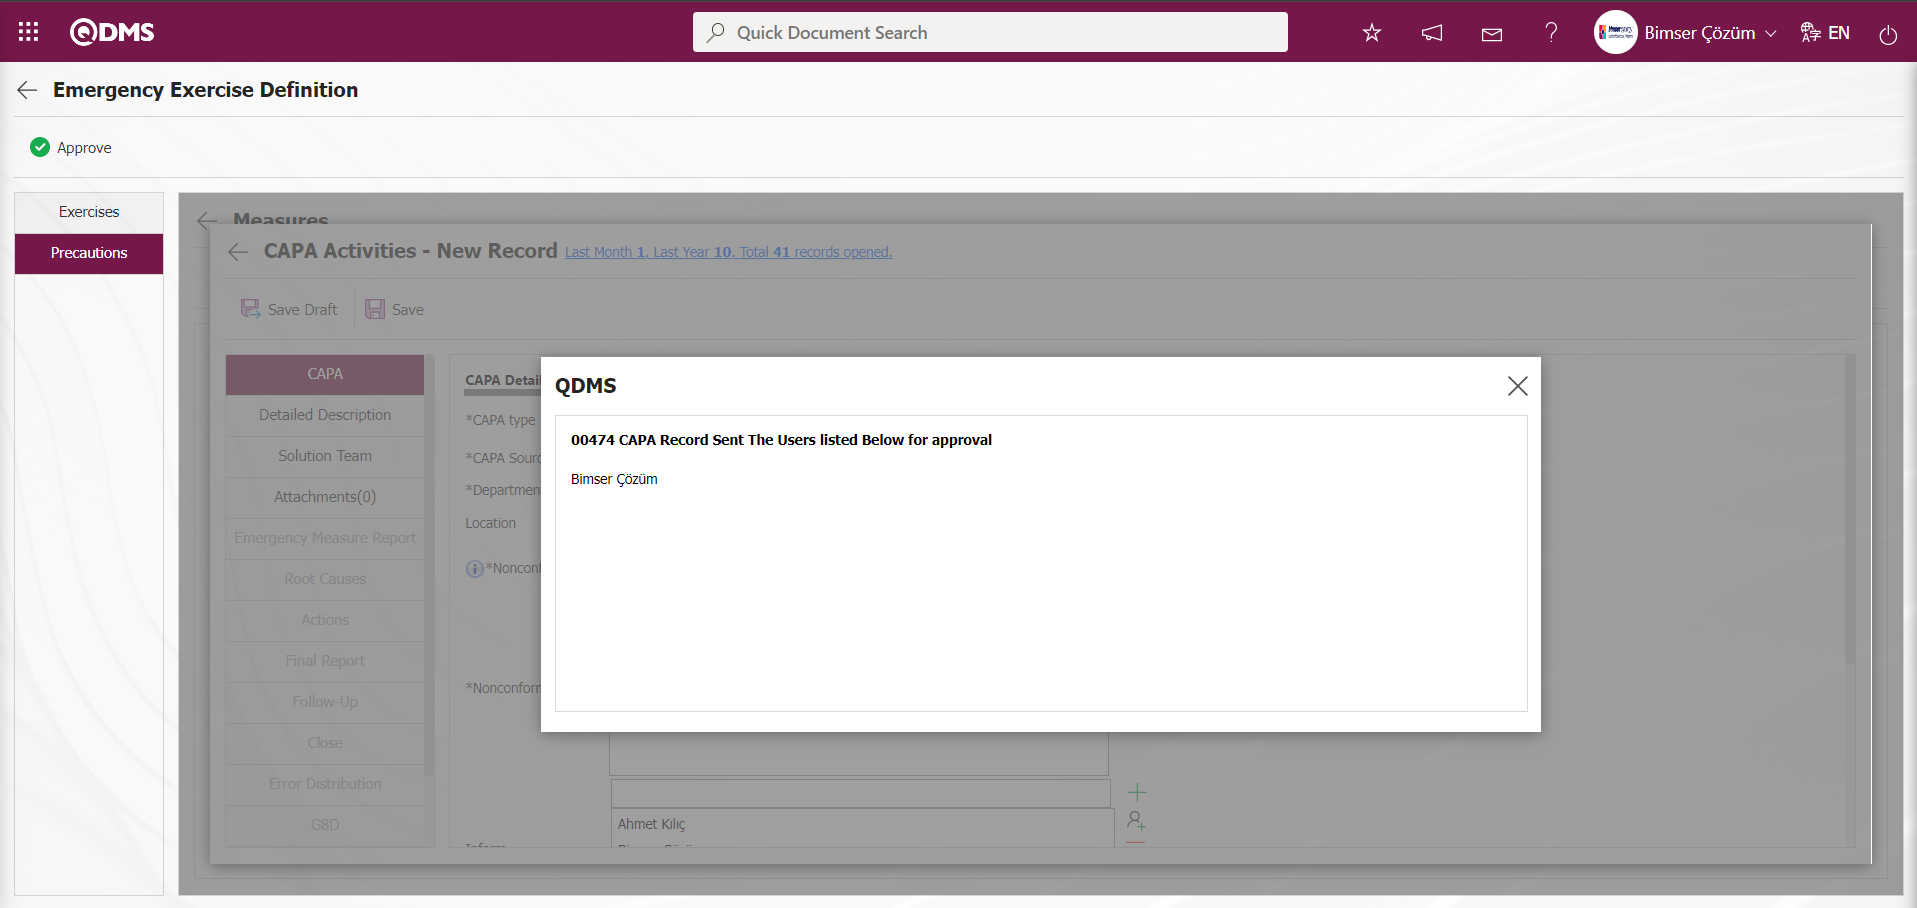
After entering the required information in the fields on the screen opened for the measure with the defined reference type CAPA, click the button in the upper left corner of the screen to complete the measure definition process.
When the Reference type action is selected;
To add a new Measure in the Emergency Exercise Definition screen, click the button to open the Measures screen.

In the Emergency Response Team Definition screen, select the Reference Type action in the Measurements tab and enter the relevant information in the appropriate fields. In the Sub Action Planning - New Record screen, enter the information in the fields related to the action record.
After entering the required information in the relevant fields, click the button in the upper left corner of the screen to define the measure with the reference type Action.
After entering the required information in the fields on the screen opened for the measure with the defined reference type Action, click the  button in the upper left corner of the screen to complete the measure definition process.

After defining the measures related to the exercise, click the  button to complete the exercise.
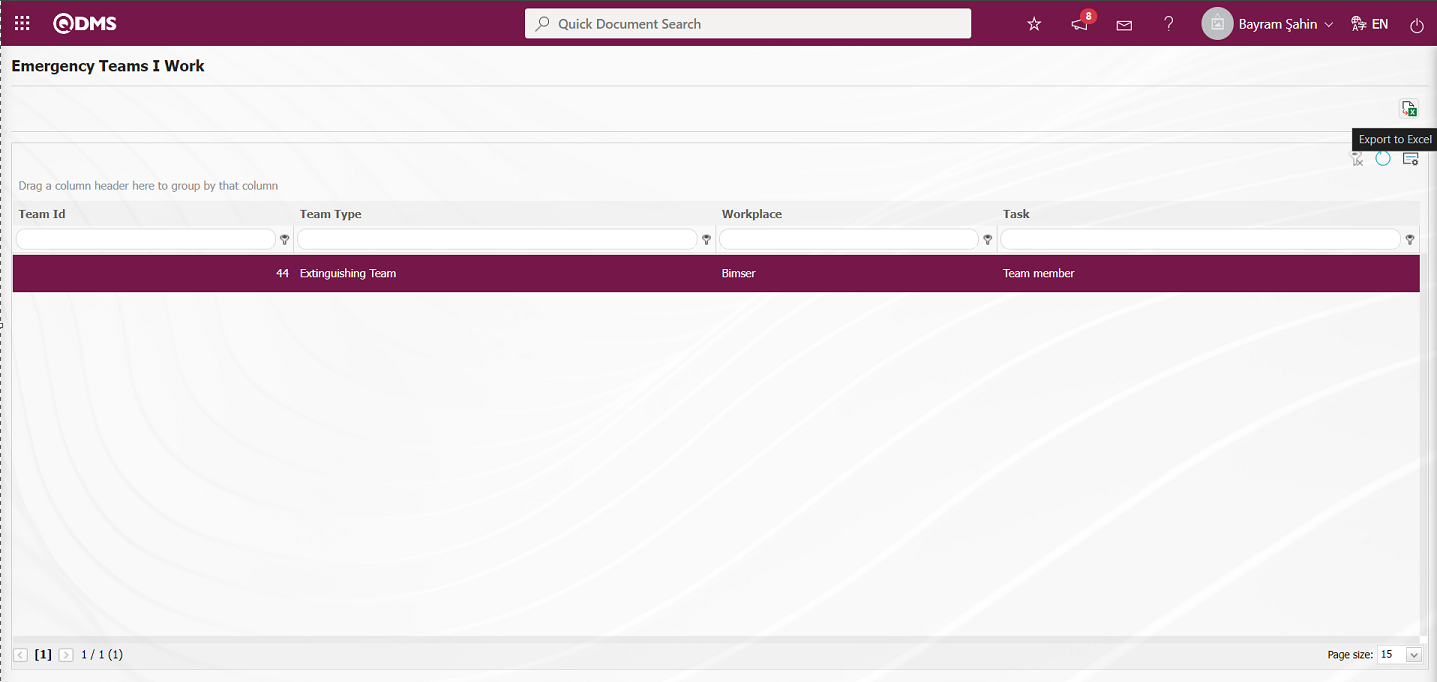
5.2.2. I served in Emergency Team Served
Menu name: Integrated Management Systems/ Emergency Situations/ Emergency Team Served
This menu shows the emergency teams assigned to team members.
Using the buttons on the screen;
 : The data is transferred to Excel.
: The search criteria on the menu screens are used to clean the data remaining in the filter fields in the grid where the search operation is performed.
: The menu screen is restored to its default settings.
: User-based designing is done on the menu screen with the show-hide feature, that is, the hiding feature of the fields corresponding to the columns on the menu screens.
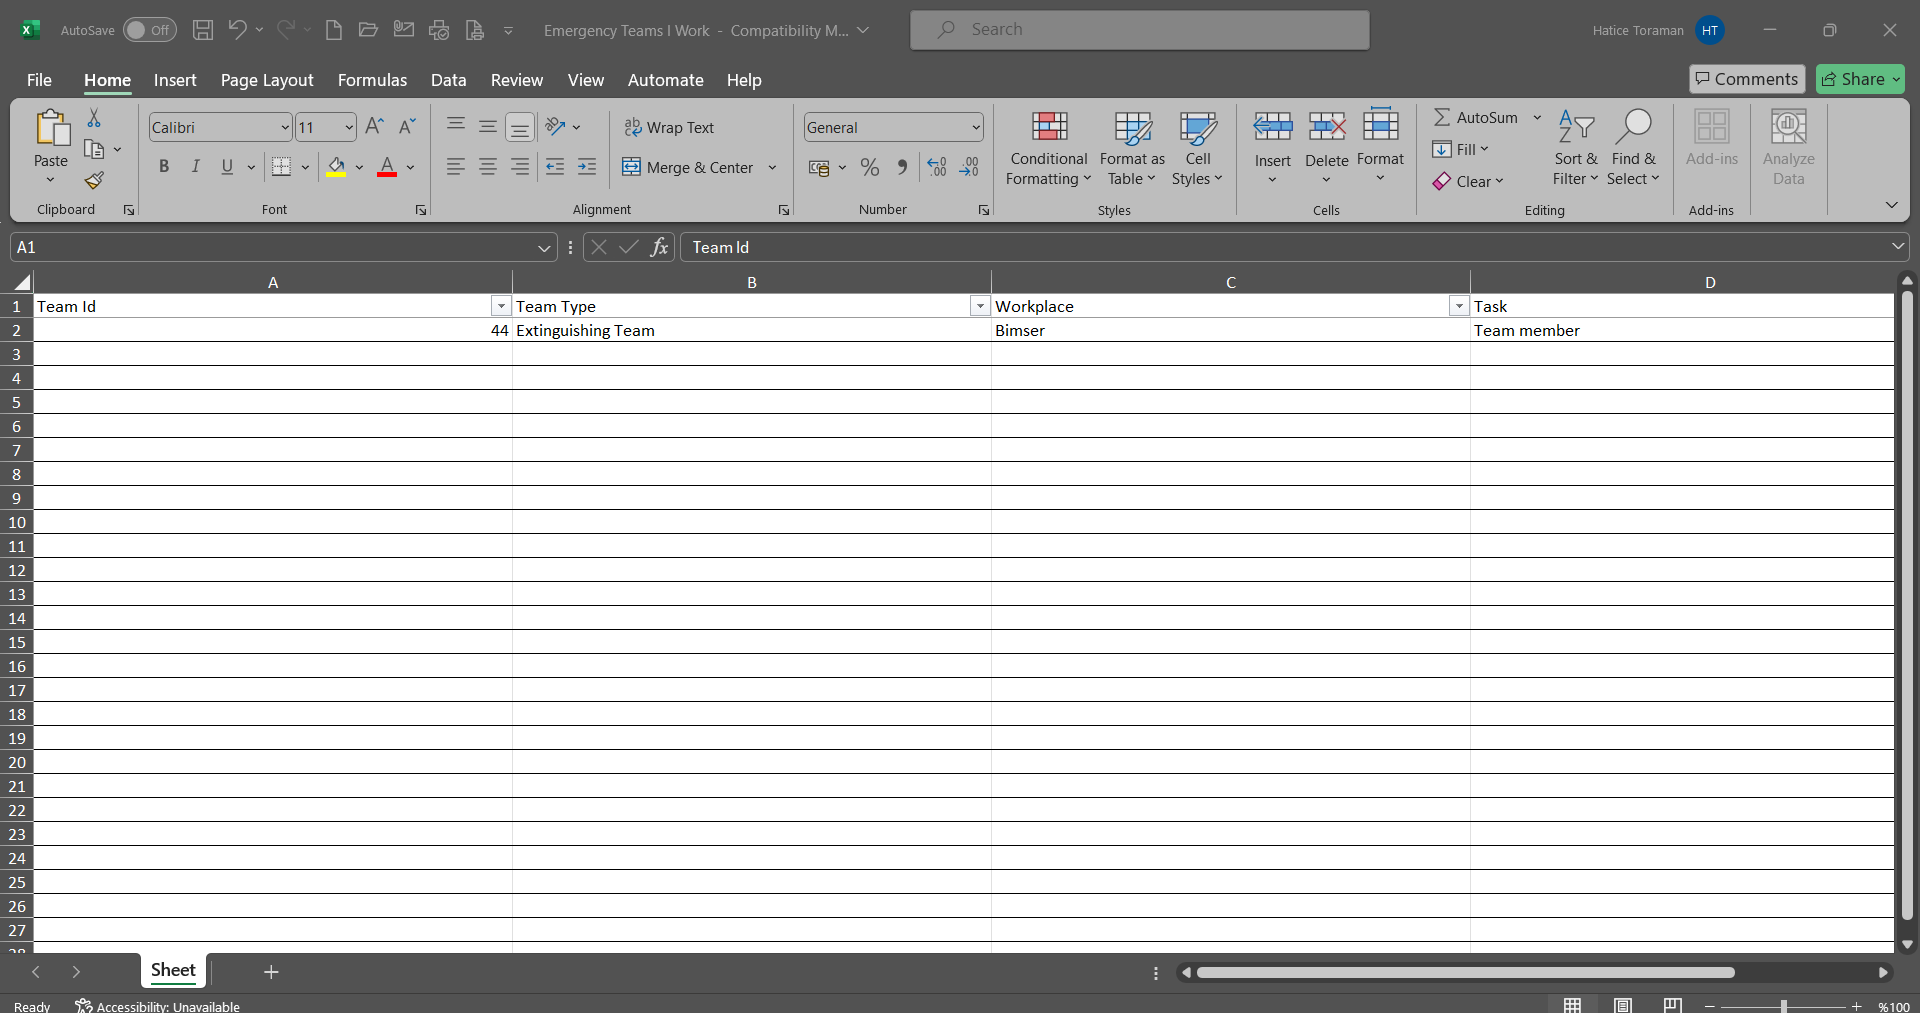
By clicking the “Emergency Teams I Work” button (export to Excel), the system automatically displays the Emergency Teams I Work list to the user in Excel format.
5.2.3. Emergency Team Approval
Menu name: Integrated Management Systems/ Emergency Situations /Emergency Team Approval
This menu is used to approve emergency teams that have been created.
Using the buttons on the screen;
: The selected emergency team in the list is displayed.
: The selected emergency team in the list is approved.
: The selected emergency team in the list is rejected.
When the Emergency Team Approval screen is displayed and the emergency team is selected in the list, clicking the button displays the Emergency Exercise Definition screen.
On the Emergency Team Approval screen, click the button while the emergency team is selected in the list.
In the Reject screen that opens, write the reason for rejection and the emergency team will be notified.
On the Emergency Team Approval screen, click the button while the emergency team is selected in the list.
5.2.4. Emergency Exercise Approval
Menu name: Integrated Management Systems/Emergency Situations/Emergency Exercise Approval
This menu is used to approve emergency exercise procedures.
Using the buttons on the screen;
: The selected Emergency Exercise information in the list is displayed.
: The selected Emergency Exercise information in the list is confirmed.
: The selected Emergency Exercise information in the list is rejected with the reason for rejection.
On the Emergency Exercises screen, click the button while Emergency Exercise is selected in the list.
The Emergency Exercise Definition screen displays two tabs: Exercises and Precautions.
Exercises tab: Displays detailed information about the exercise defined for the Emergency Response Team.
Precautions tab: This tab displays the precautions taken in relation to the defined exercise for the Emergency Response Team.
Using the buttons on the screen;
: The selected precaution information is displayed in the Precautions tab of the Emergency Exercise Definition screen.
Click the button on the Emergency Exercises screen.
In the Reject pop-up window, the reason for rejection is entered and the Emergency Exercise approval is rejected.
Click the button on the Emergency Exercises screen.
The Exercises and Precautions tab is displayed on the Emergency Exercise Definition screen that opens.
Exercises tab: Displays detailed information about the exercise defined for the Emergency Team.
Precautions tab: This tab is used to add precautions to be taken in relation to the defined exercise for the Emergency Team, edit the selected precaution information in the list, and delete it.
Using the buttons on the screen;
: Add a new measure in the Precautions tab of the Emergency Exercise Definition screen.
: Edit the selected measure information in the Precautions tab of the Emergency Exercise Definition screen.
: Delete the selected precaution information in the Precautions tab of the Emergency Exercise Definition screen.
: Display the selected precaution information in the Precautions tab of the Emergency Exercise Definition screen.
To add a new Precaution on the Emergency Exercise Definition screen, click the button to open the Precautions screen.
The relevant fields are defined on the screen that opens:
Reference Type: This is the field where you select Document, CAPA, or Action as the measure in the Precautions tab.
When the Reference Type Document is selected;
When the reference information document is selected, the (Select) button in the reference information field is clicked to open the system, and the document is selected from the list of defined documents. Documents uploaded in the Document Management Module are displayed in the Document list.
When the CAPA reference type option is selected;The field displaying the option to select an existing CAPA record from the list or define a new CAPA record appears. When the “Select from list” option is selected, the reference type field opens, allowing you to select from the CAPA records defined in the system. When the “New Create” option is selected, the CAPA Activities - New Record screen opens, where you can define a new CAPA record.
When the “Action” option is selected in the “Reference type” option: The field where the action record is selected from the existing list or where a new action is defined will be displayed. If the “Select from list” option is selected, a selection is made from the existing actions defined in the system. When the “New Create” option is selected, the Sub Action Planning - New Record screen opens, allowing you to define a new Action Item.
The main action code is defined in parameter 21 of the Emergency Situations Module parameters.
The Main Action Code information is obtained from the Action Management module in the Action Planning screen. When an action is taken as an Emergency Exercise measure, these actions are opened based on the parameter-defined main action.
Type of Measure: This is the area where you select Current and Planned in the Measures tab. When you select Current, CAPA and Actions registered in the system are selected as measures. When you select Planned, you can either open a new CAPA record as a new measure or define a new Action as a measure.
Date of Measure: This is the field where the date of the measure to be defined in the Measures tab is selected from the drop-down calendar.
Explanation: This field is used to enter explanatory information about any measures defined in the Measures tab.
If Reference Type Document is selected;
In the Emergency Response Team Definition screen, select Reference Type document in the Measures tab and enter the relevant information in the corresponding fields.
After entering the required information in the fields on the screen that opens for the measure with the defined reference type Document, click the button in the upper left corner of the screen to complete the measure definition process.
When the CAPA option is selected for the reference type;
To add a new measure in the Emergency Exercise Definition screen, click the button to open the Measures screen.
In the Emergency Exercise Definition screen, select CAPA as the Reference Type in the Measures tab and enter the relevant information in the appropriate fields. In the CAPA Activities - New Record screen, enter the information for the fields associated with the CAPA record.
After entering the required information in the relevant fields, click the button in the upper left corner of the screen to define the CAPA reference type measure.
After entering the required information in the fields on the screen opened for the measure with the defined reference type CAPA, click the button in the upper left corner of the screen to complete the measure definition process.
When the Reference type action is selected;
To add a new Measure in the Emergency Exercise Definition screen, click the button to open the Measures screen.
In the Emergency Response Team Definition screen, select the Reference Type action in the Measurements tab and enter the relevant information in the appropriate fields. In the Sub Action Planning - New Record screen, enter the information in the fields related to the action record.
After entering the required information in the relevant fields, click the button in the upper left corner of the screen to define the measure with the reference type Action.
After entering the required information in the fields on the screen opened for the measure with the defined reference type Action, click the button in the upper left corner of the screen to complete the measure definition process.
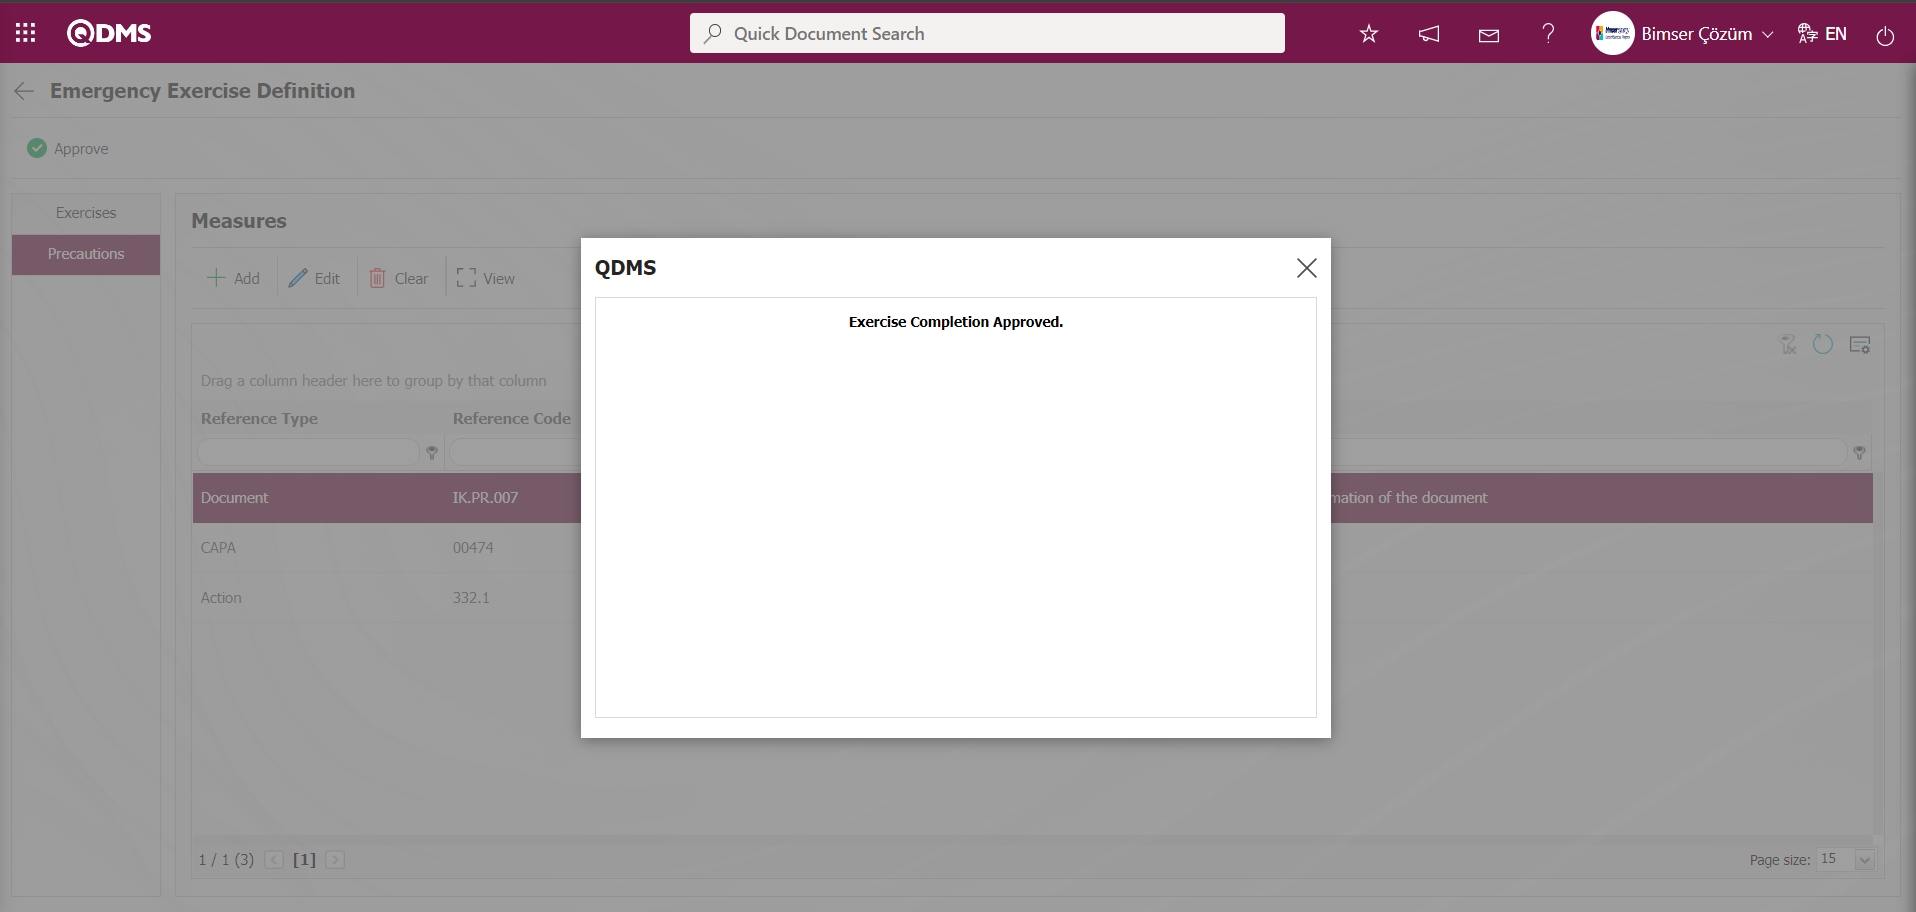
After defining the measures related to the exercise, click the button to complete the exercise.
After approving the exercise from the Emergency Exercise Definition screen, the exercise status will be displayed as “Completion”
The parameter value of parameter number 20 in the Emergency Situations module parameters is set to “Yes” to activate the parameter.
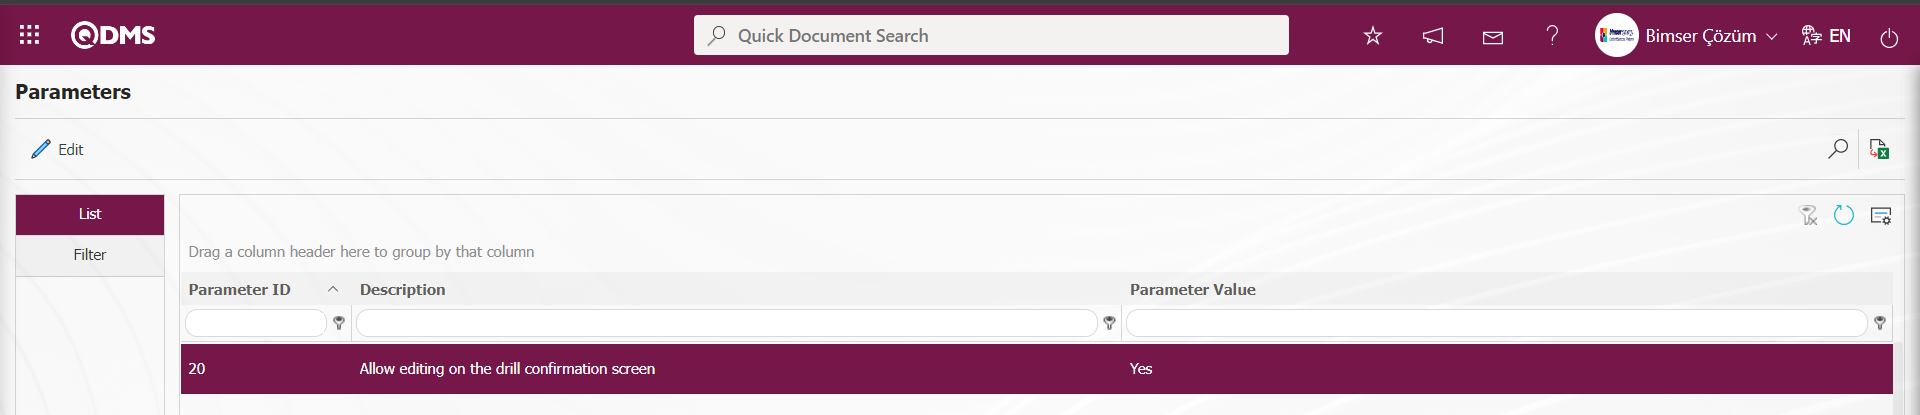
When the parameter is enabled, the system allows editing and modifying the relevant fields in the Exercises tab of the Emergency Exercise Definition screen in the Emergency Situations module during the exercise approval process. When the parameter value is set to “No,” the parameter is deactivated, and the buttons are not displayed in the Exercises tab of the Emergency Exercise Definition screen. The system does not allow editing of the displayed fields.
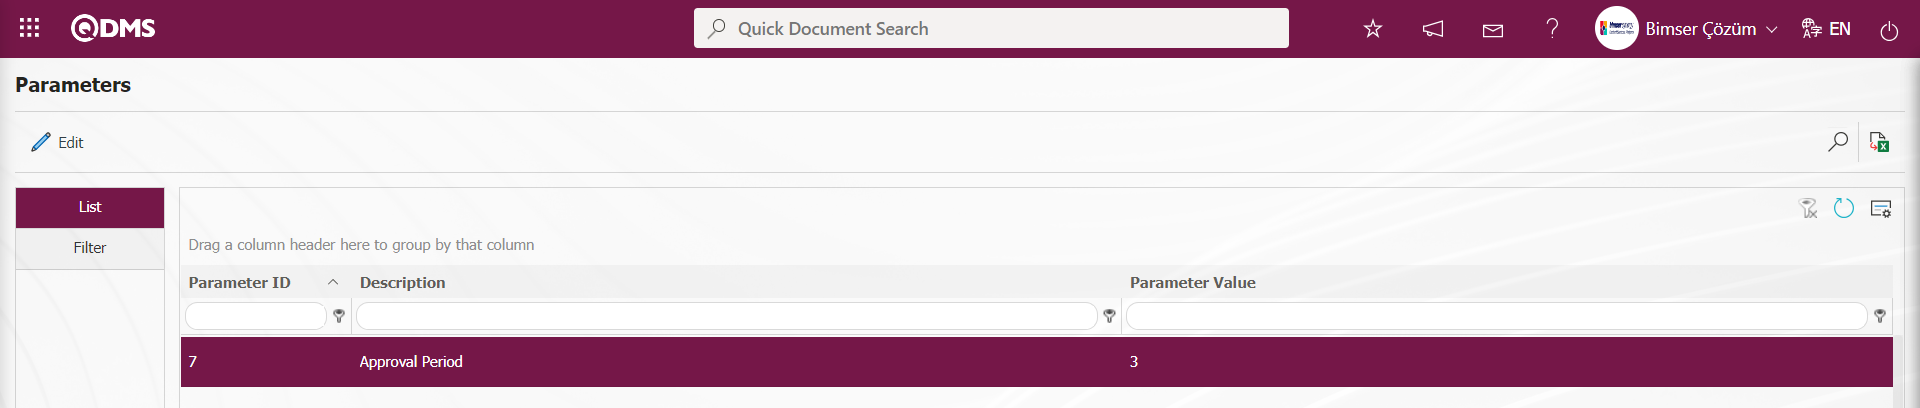
The Emergency Situations Module parameter 7 determines the time to be added to the start date of the approval process for exercises that must be completed based on the value entered in the parameter value.
5.2.5. Reports
Menu name: Integrated Management Systems/Emergency Situations/Reports
This section displays reports related to the Emergency Situations module and allows you to download reports in Excel format.
5.2.5.1.Emergency Teams
Menu name: Integrated Management Systems/ Emergency Situations/ Reports/Emergency Teams
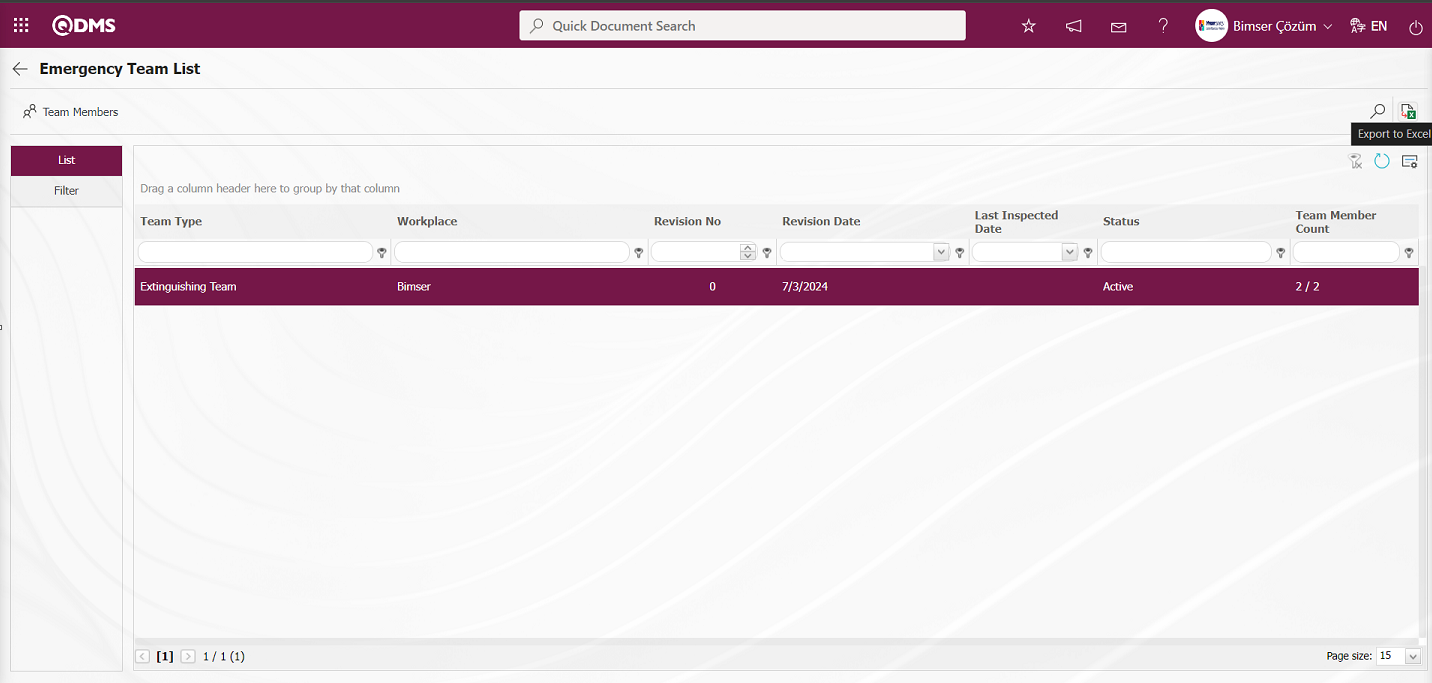
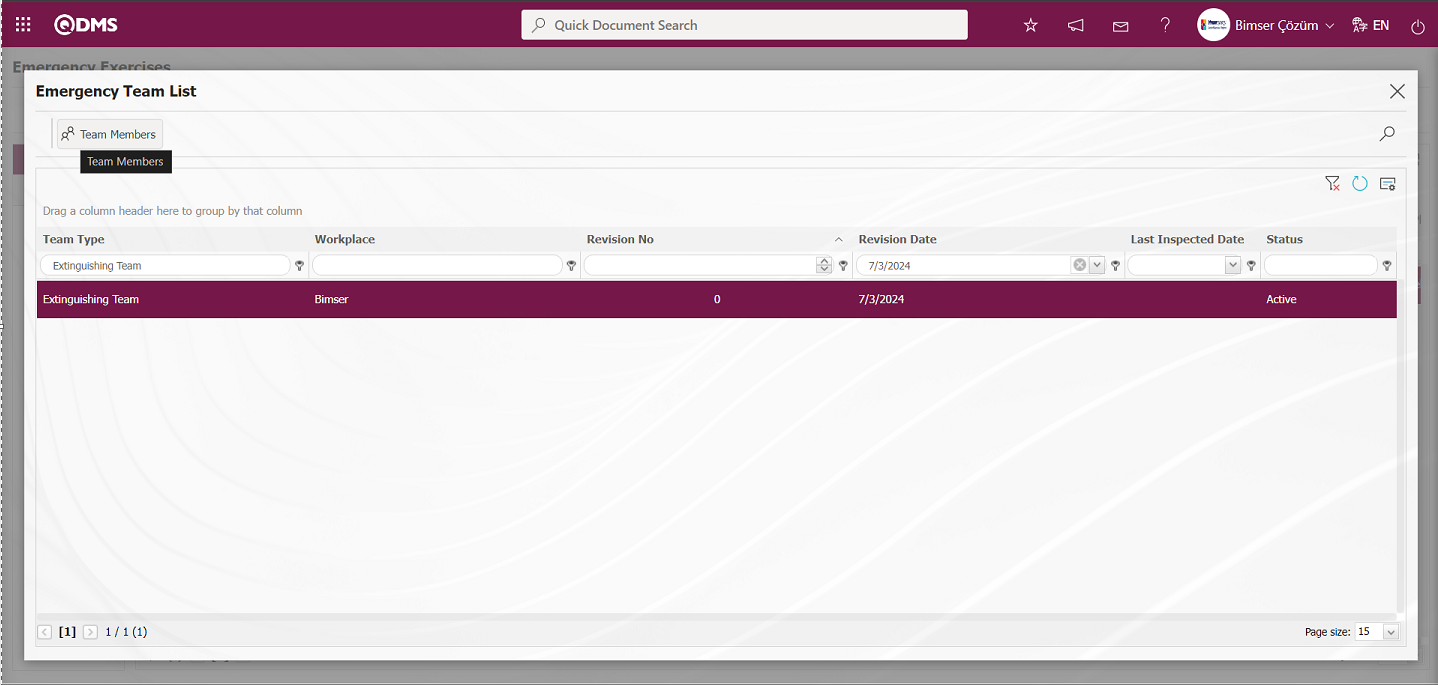
This report indicates which team is at which workplace. This report provides information on fields such as Team Type, Workplace, Revision No., Revision Date, and Status.
Using the buttons on the screen;
 : Team members view detailed information.
 : Records are filtered and searched.
: The data is transferred to Excel.
: The search criteria on the menu screens are used to clean the data remaining in the filter fields in the grid where the search operation is performed.
: The menu screen is restored to its default settings.
: User-based designing is done on the menu screen with the show-hide feature, that is, the hiding feature of the fields corresponding to the columns on the menu screens.
When the “Export to Excel” button is clicked on the Emergency Team List screen, the system automatically generates the Emergency Teams Report and presents it to the user in Excel format.

On the Emergency Team List screen, select the Emergency Team in the list tab and click the button.
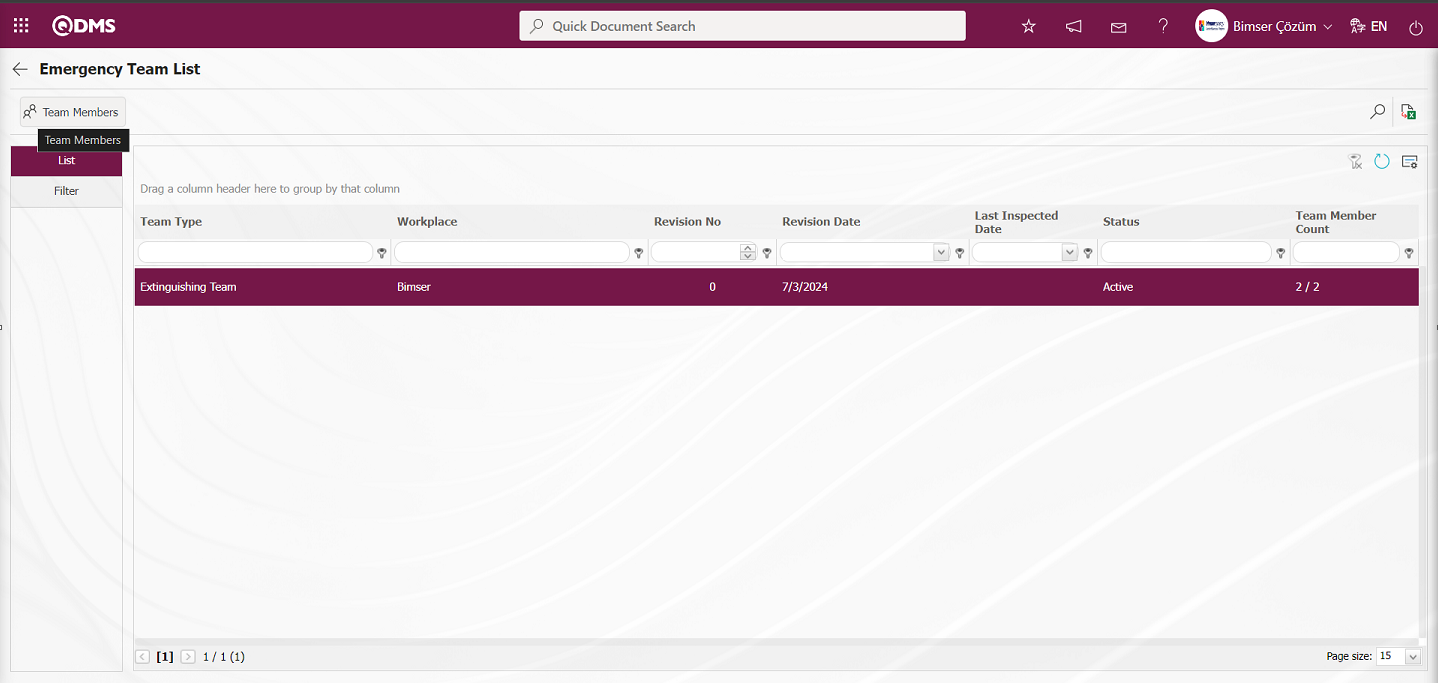
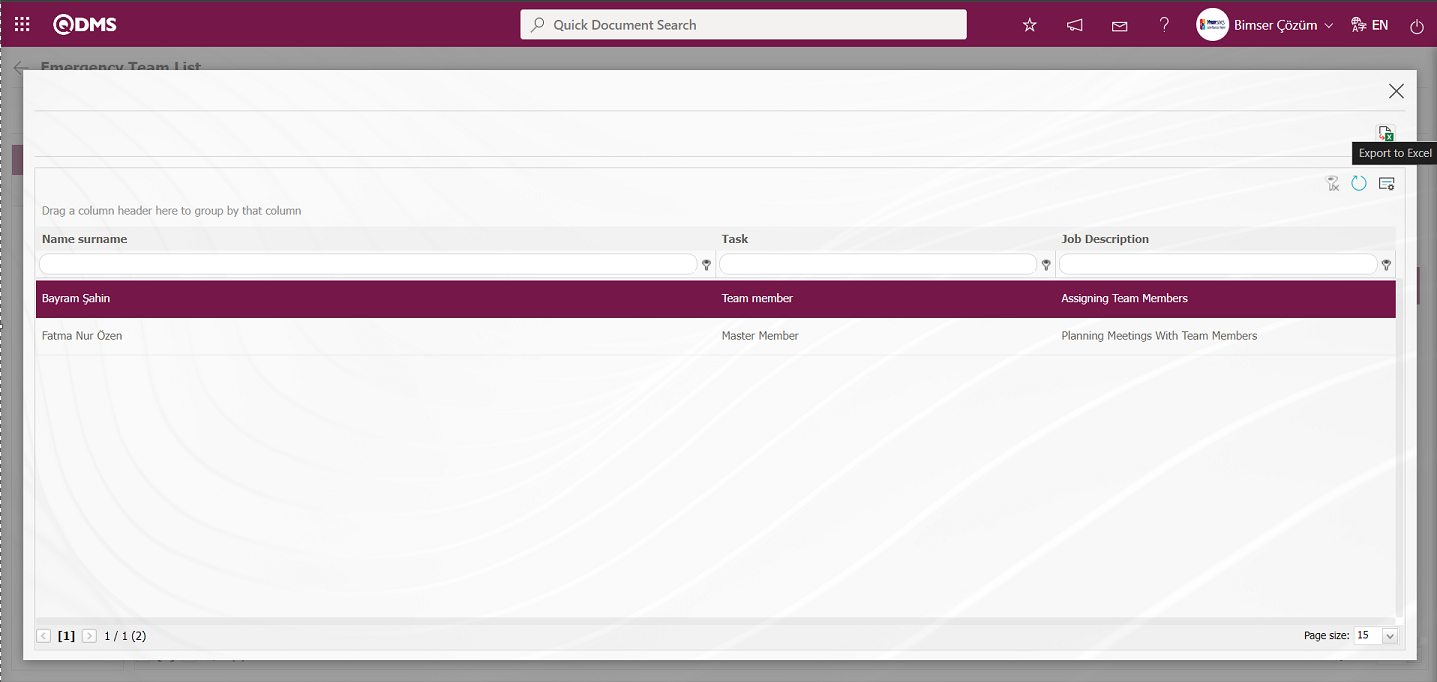
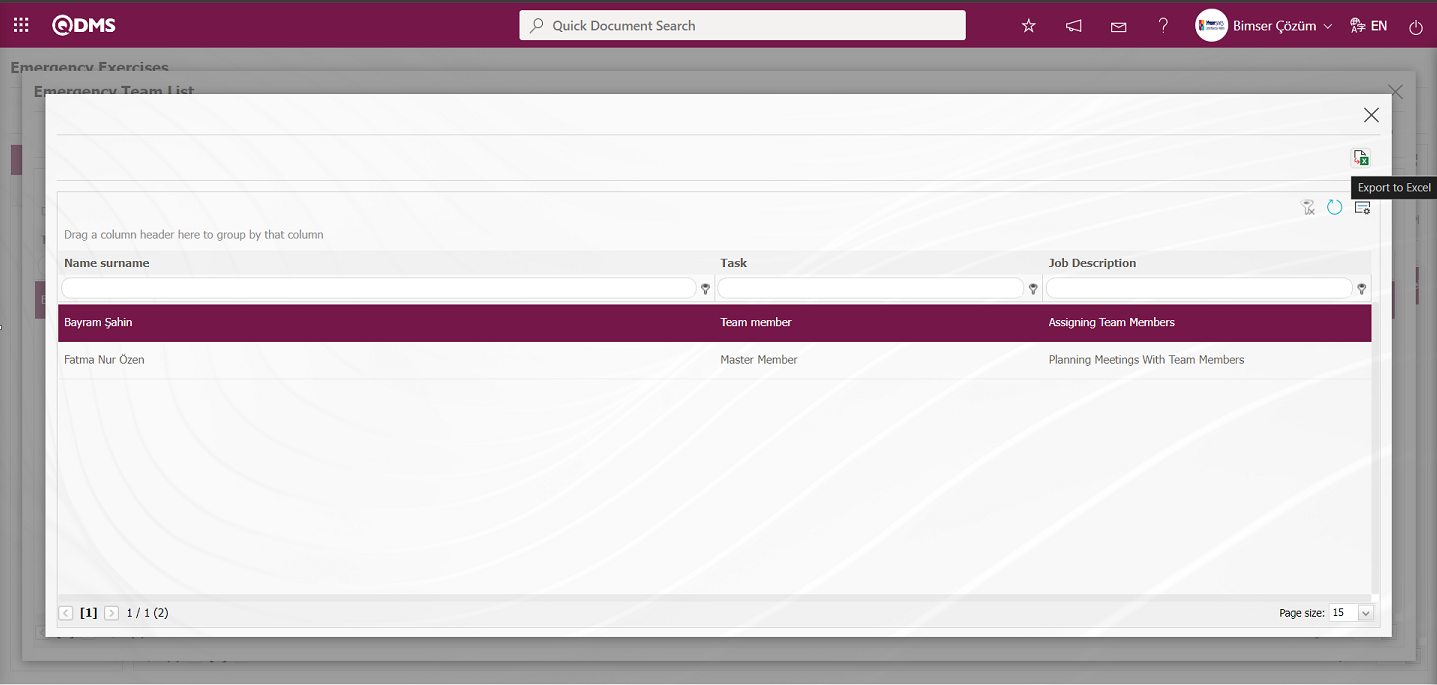
Team Member Details are displayed.
Using the buttons on the screen;
: The data is transferred to Excel.
: The search criteria on the menu screens are used to clean the data remaining in the filter fields in the grid where the search operation is performed.
: The menu screen is restored to its default settings.
: User-based designing is done on the menu screen with the show-hide feature, that is, the hiding feature of the fields corresponding to the columns on the menu screens.
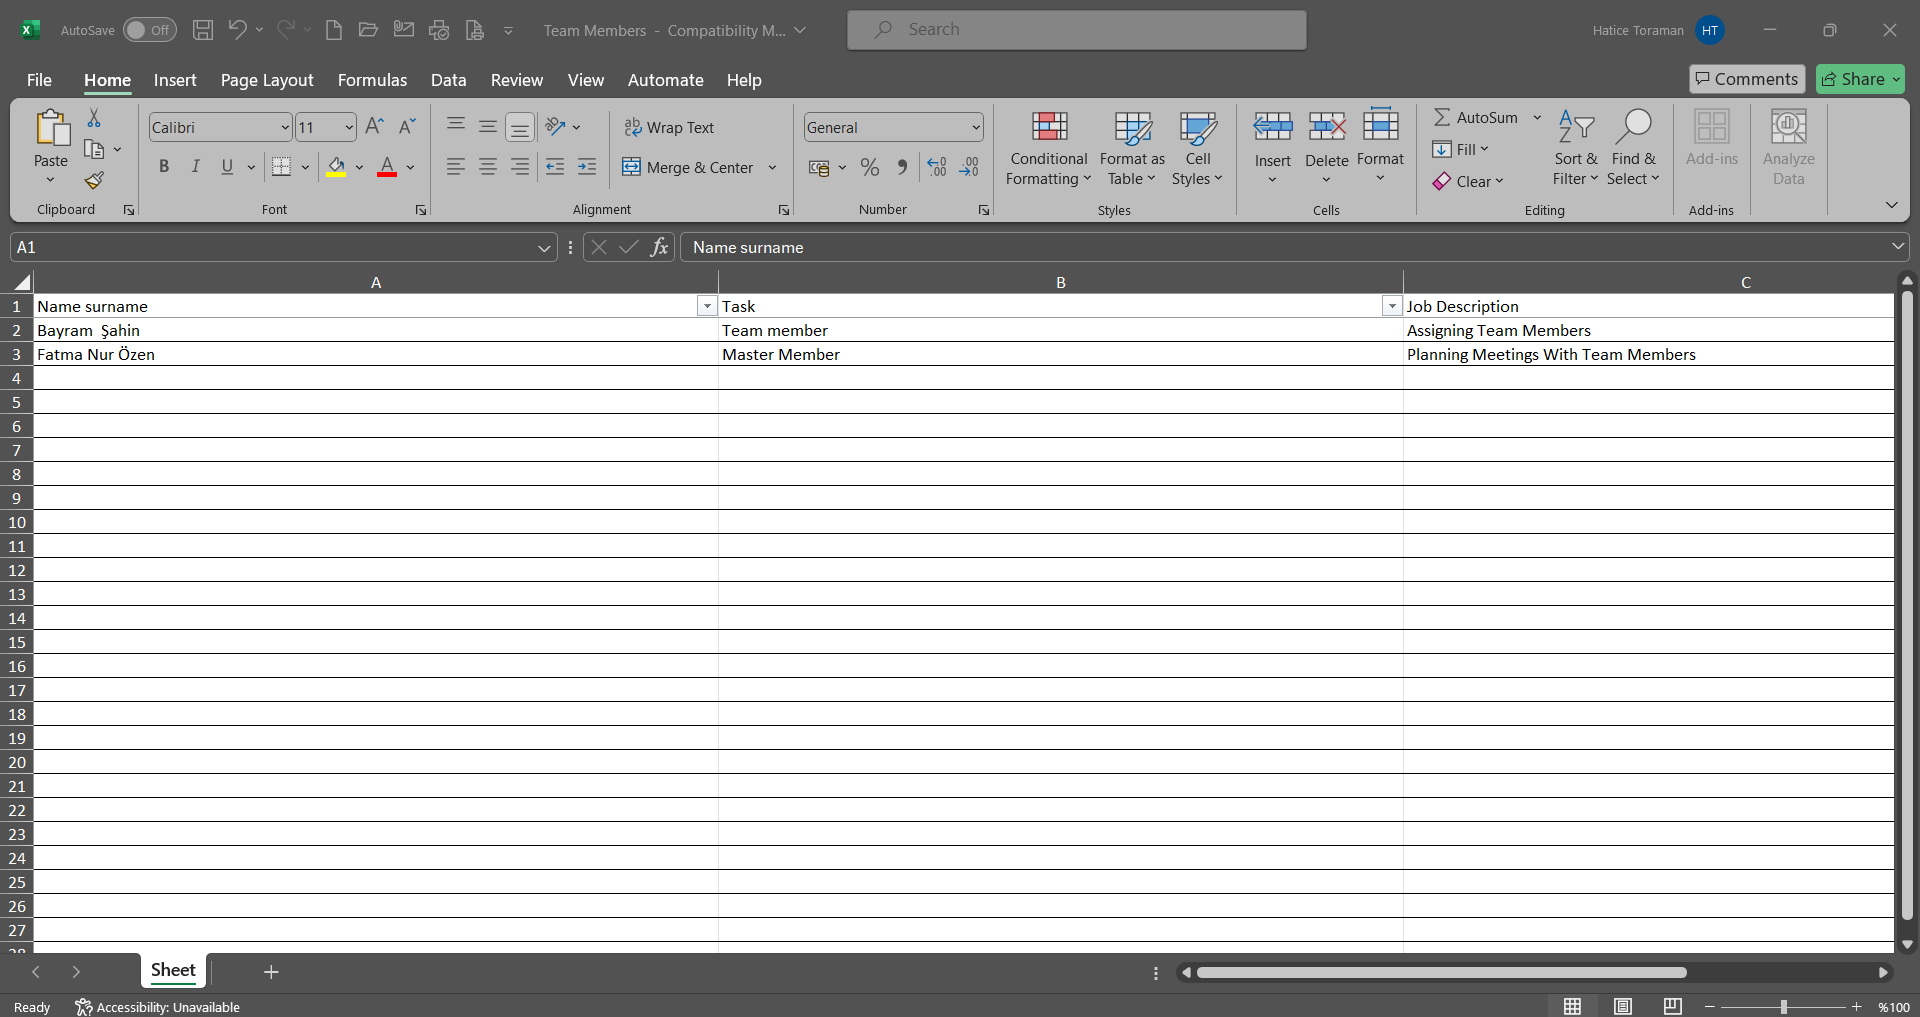
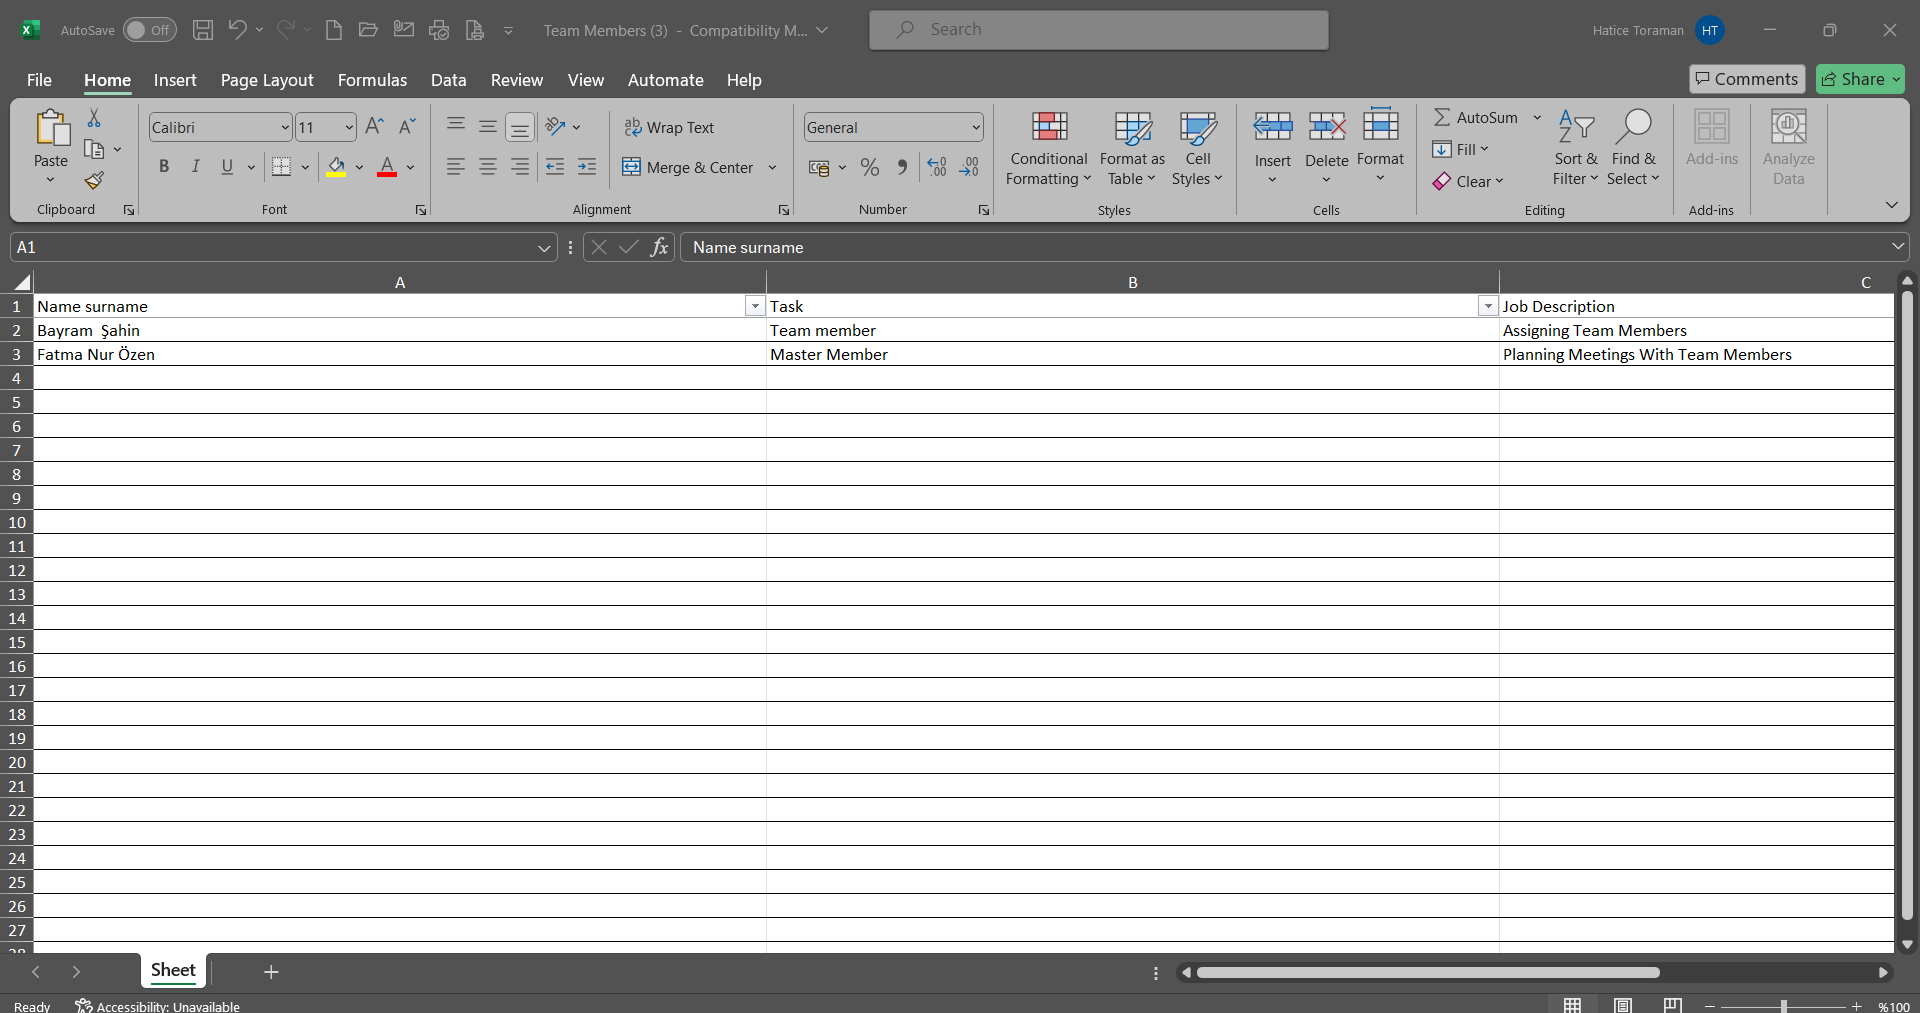
If you click the “Export to Excel” button, the system automatically provides the user with detailed information about the team members in Excel format.
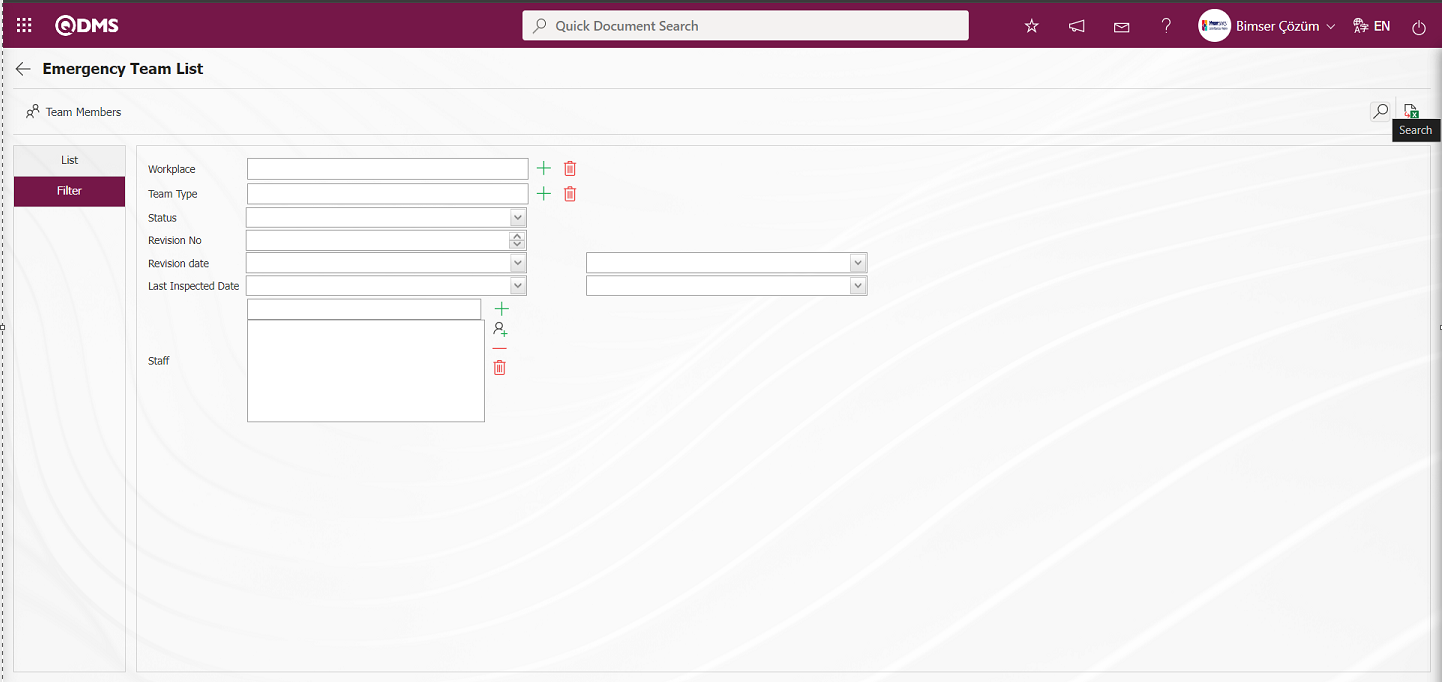
On the Emergency Team List screen, enter data in the search criteria fields such as Workplace, Team Type, Status, and Revision Number in the Filter tab, and then click the (Search) button to perform the filtering operation.
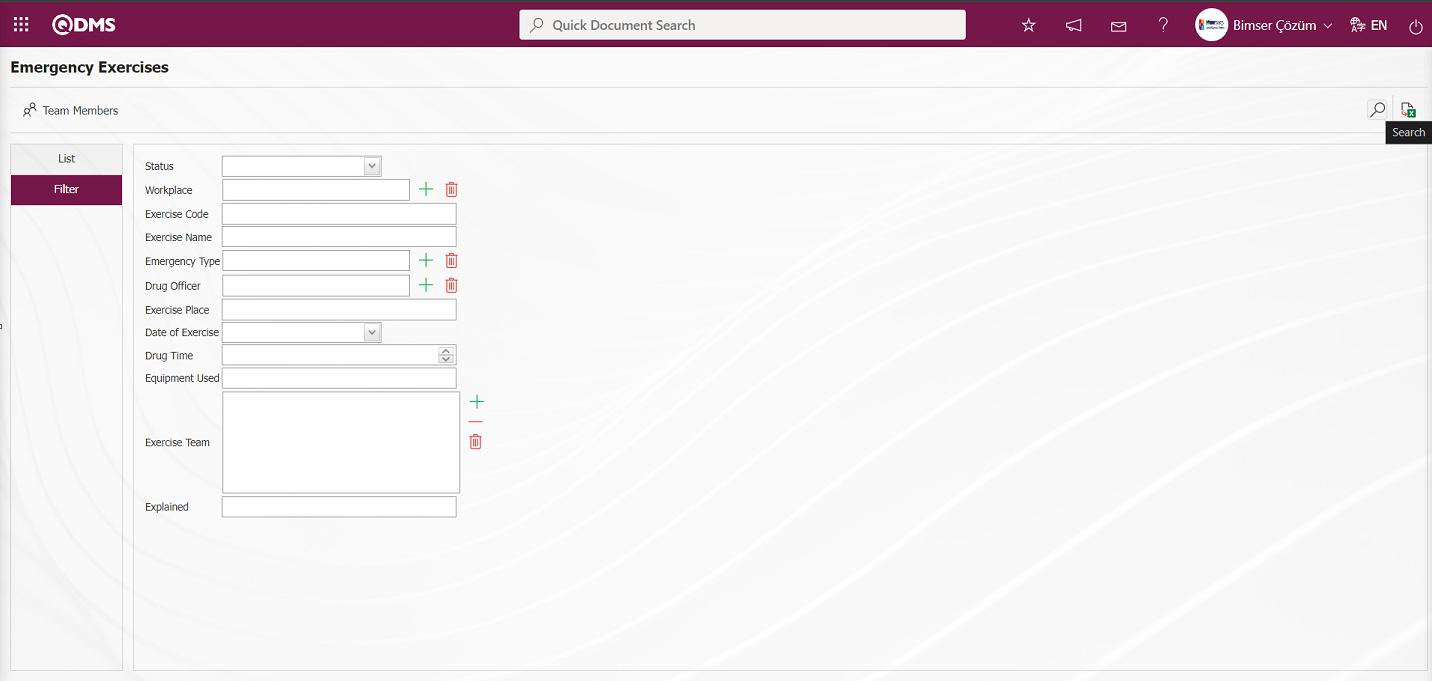
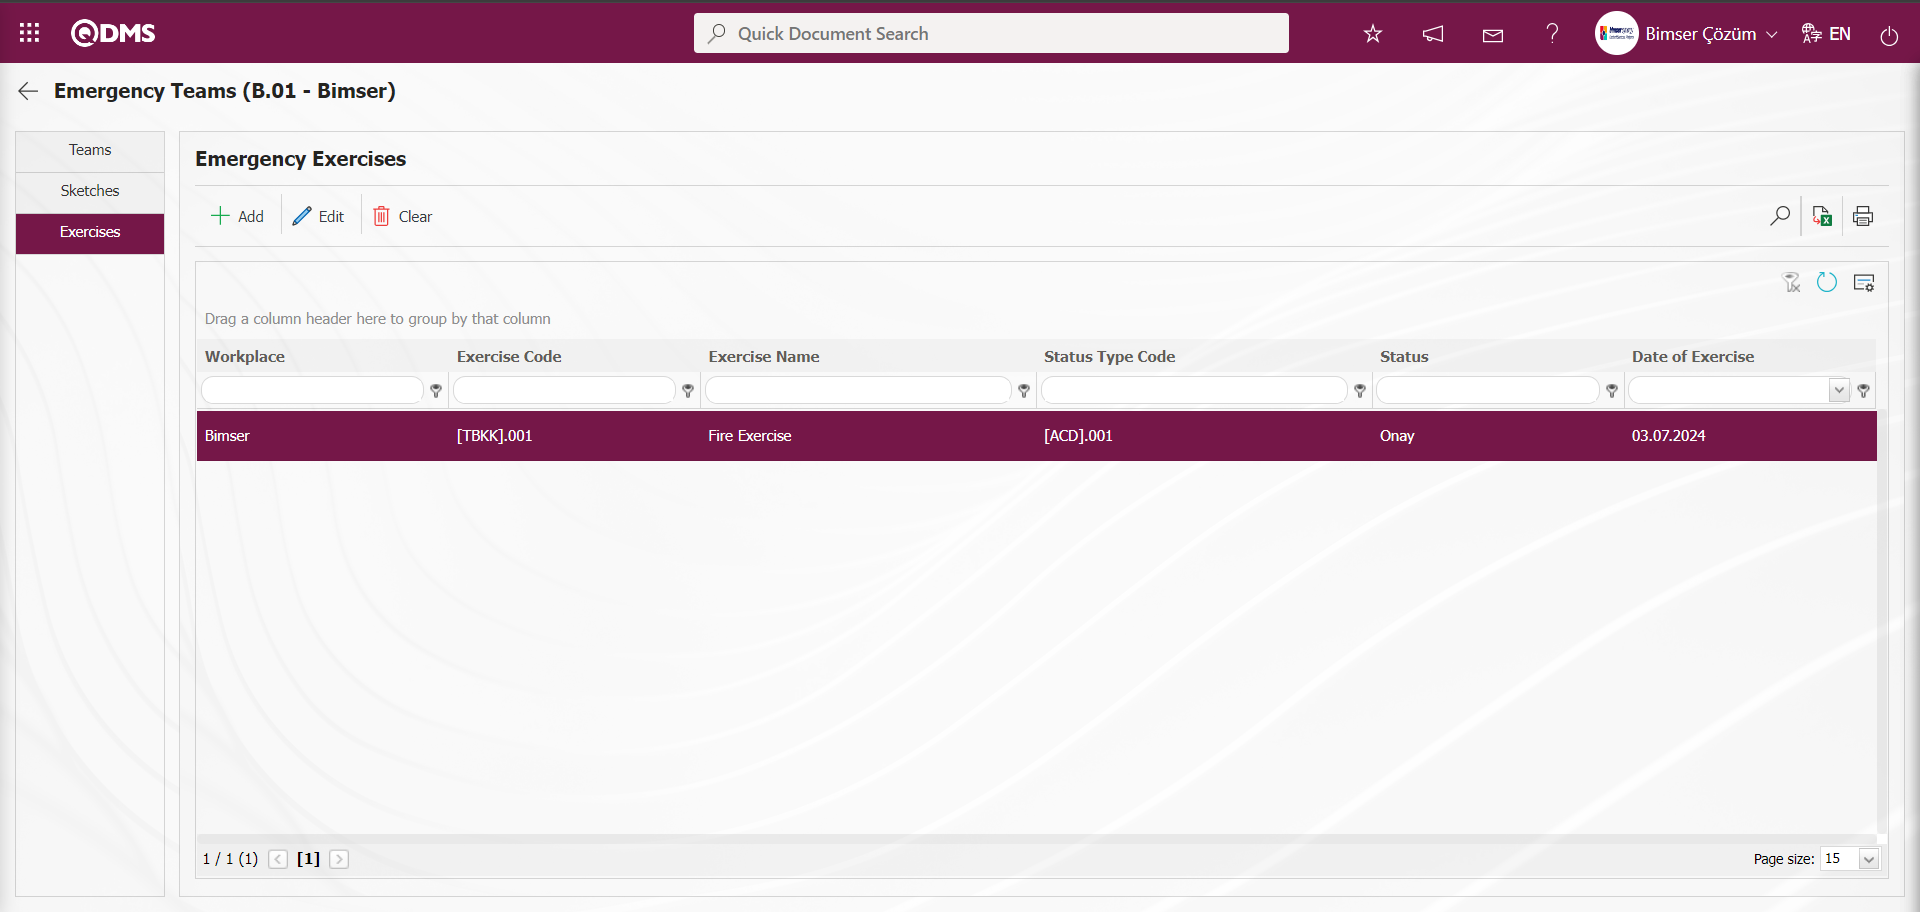
5.2.5.2. Emergency Exercises
Menu name: Integrated Management Systems/Emergency Situations/Reports/Emergency Exercises
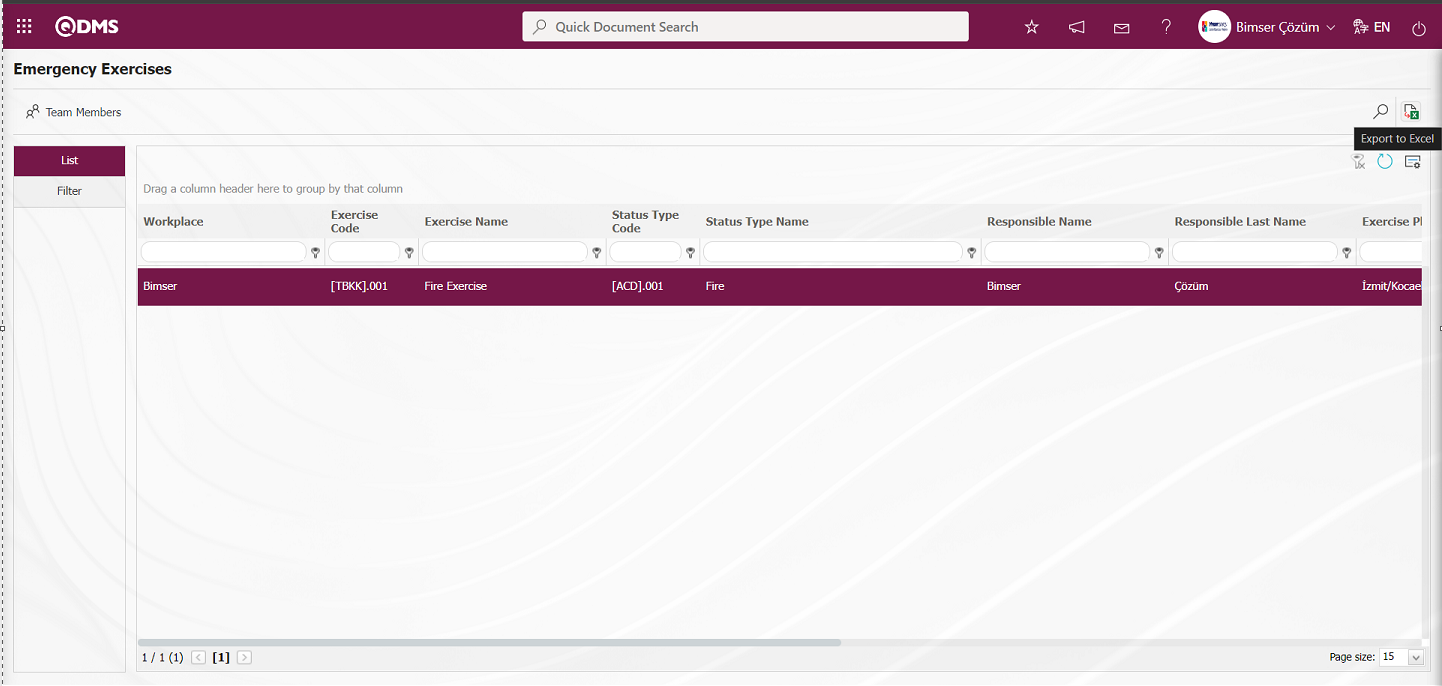
This report provides a list of exercises by workplace. This report provides general information about the exercises, such as Workplace, Exercise Code, Exercise Name, Status Type Code, Status Type Name, and Exercise Date.
Using the buttons on the screen;
 : Team members view detailed information.
: Records are filtered and searched.
: The data is transferred to Excel.
: The search criteria on the menu screens are used to clean the data remaining in the filter fields in the grid where the search operation is performed.
: The menu screen is restored to its default settings.
: User-based designing is done on the menu screen with the show-hide feature, that is, the hiding feature of the fields corresponding to the columns on the menu screens.
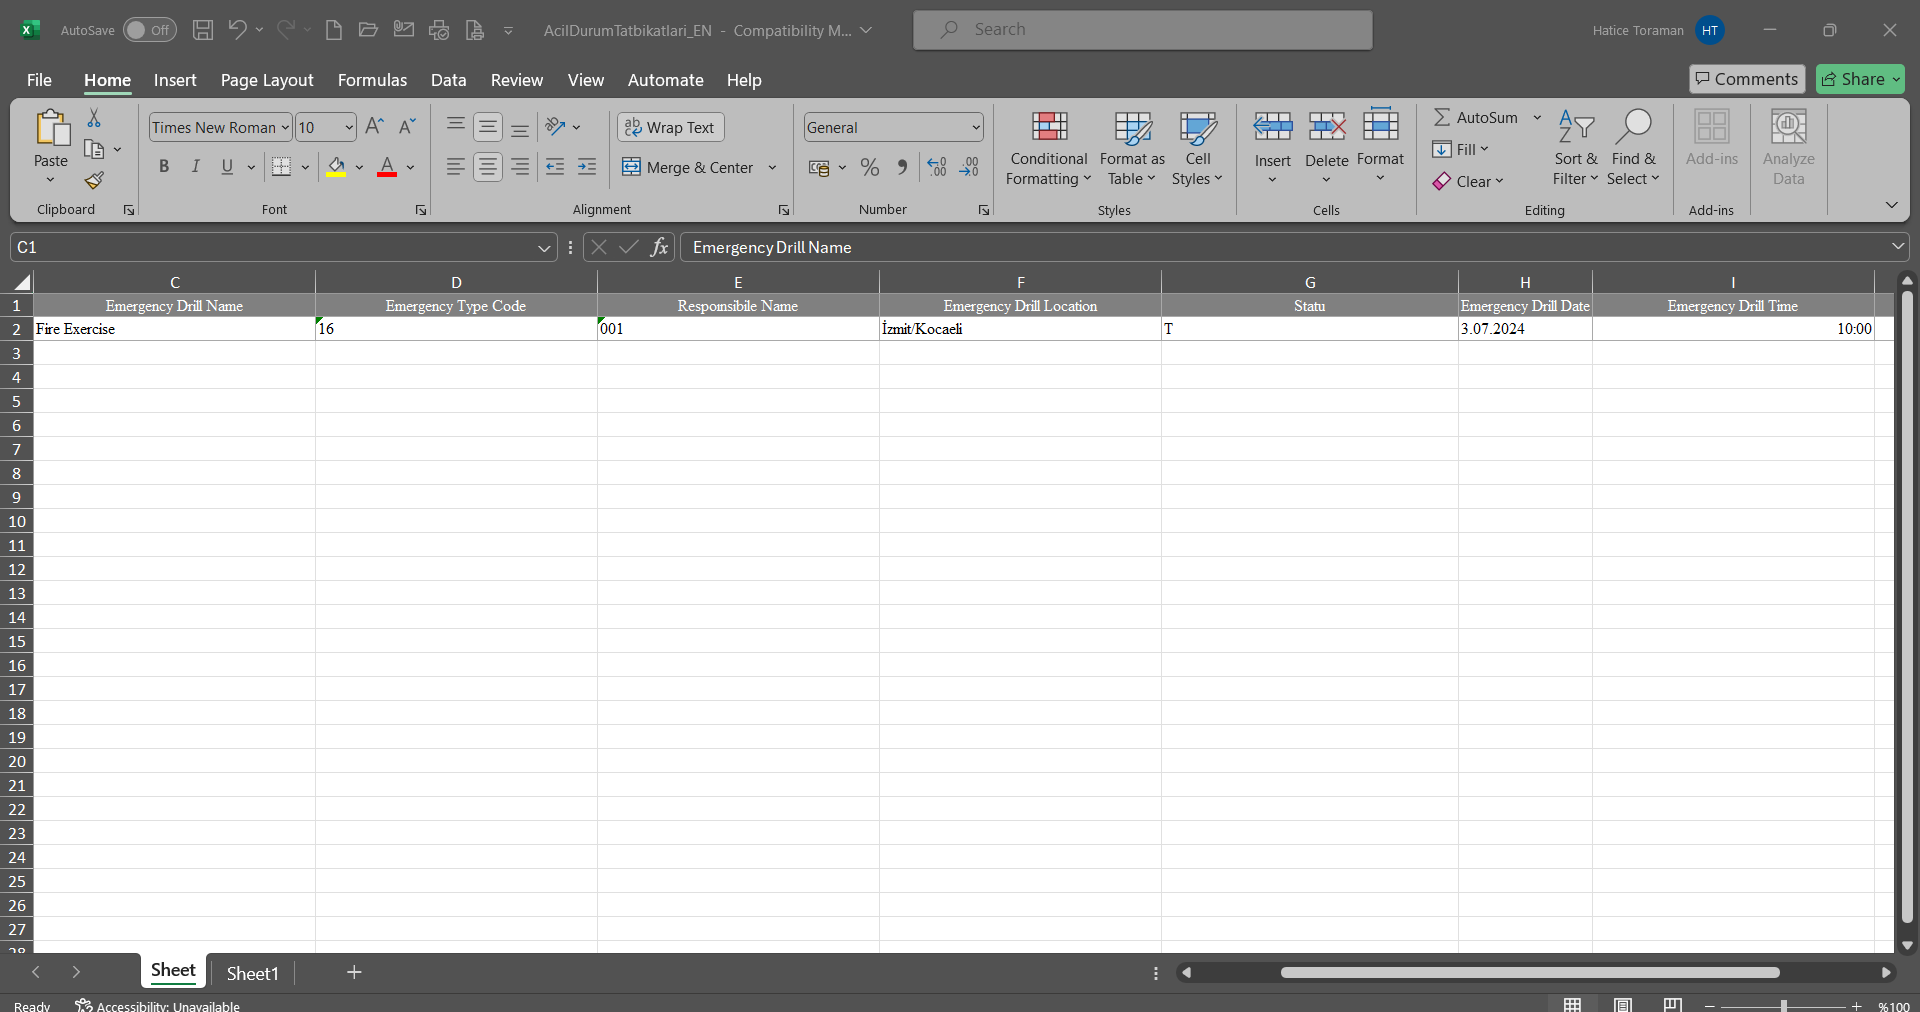
When the “Export to Excel” button is clicked on the Emergency Exercises screen, the system automatically generates the Emergency Exercises Report and presents it to the user in Excel format.
Click the button on the Emergency Exercises screen.
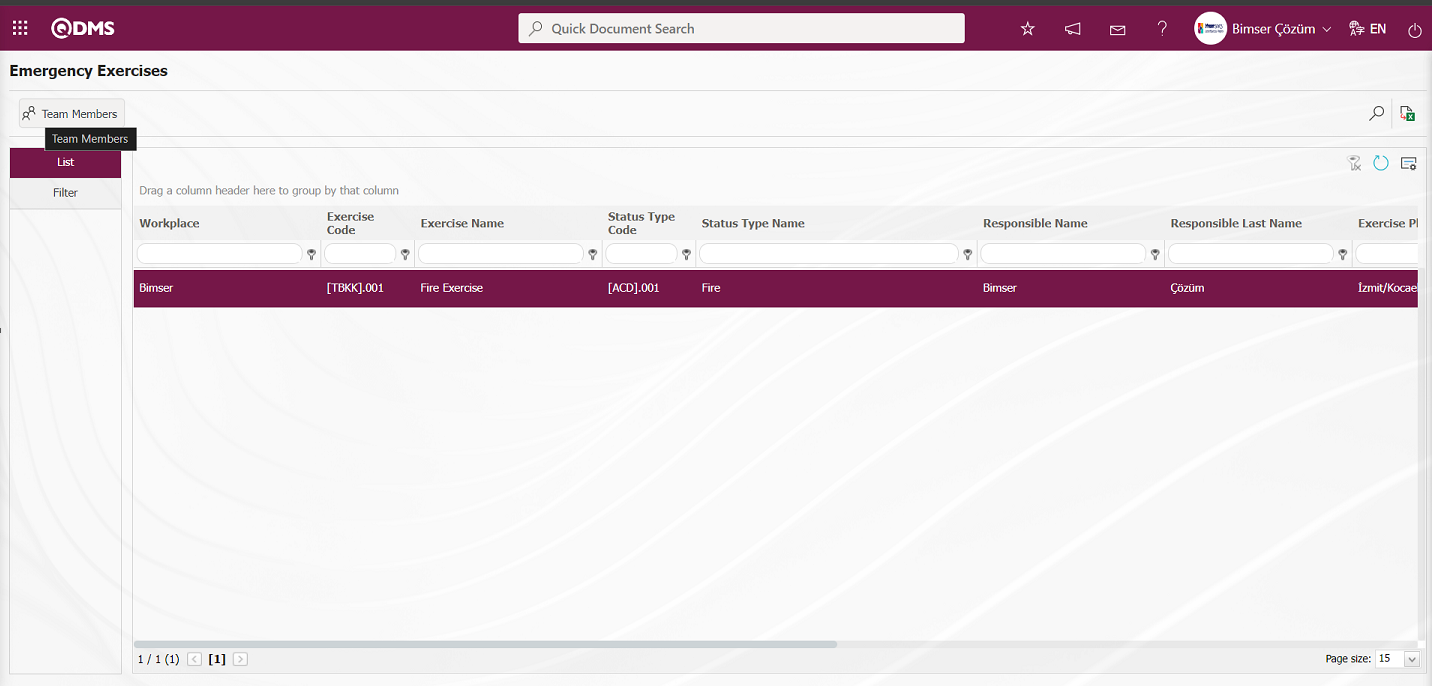
Emergency Team List detailed information is displayed.
The Emergency Team members for the selected Emergency are displayed by clicking the  button in the Emergency Team list.
The report can be downloaded in Excel format by clicking the “Emergency Team Members List  (Excel Export)” button.
On the Emergency Exercises screen, enter data into the search criteria fields such as Workplace, Exercise Code, Exercise Name, Status, and Exercise Date in the Filter tab, then click the (Search) button to filter the results.