Survey
Information
You can quickly reach the relevant topic with the help of navigation on the right side.
Survey Module (v.5.26) User Help Document
Module Version: 5.26
1. INTRODUCTION:
It is the QDMS Integrated Management System Module that enables the opinions of employees, customers and suppliers to be obtained through surveys. Its scope is determined as internal, external and standard survey.
2. PURPOSE:
The purpose of this help guide is to transfer the questionnaires to the electronic environment, to store and analyse the data generated. It aims to reach company employees by preparing internal questionnaires, customers-suppliers by preparing external questionnaires, and everyone who cannot reach the computer environment by preparing standard questionnaires.
3. RESPONSIBILITIES:
Survey Module Managers, All Company Employees, Customers and Suppliers, Standard Survey Filling Officers
4. ABBREVIATIONS:
QDMS Quality Document Management System
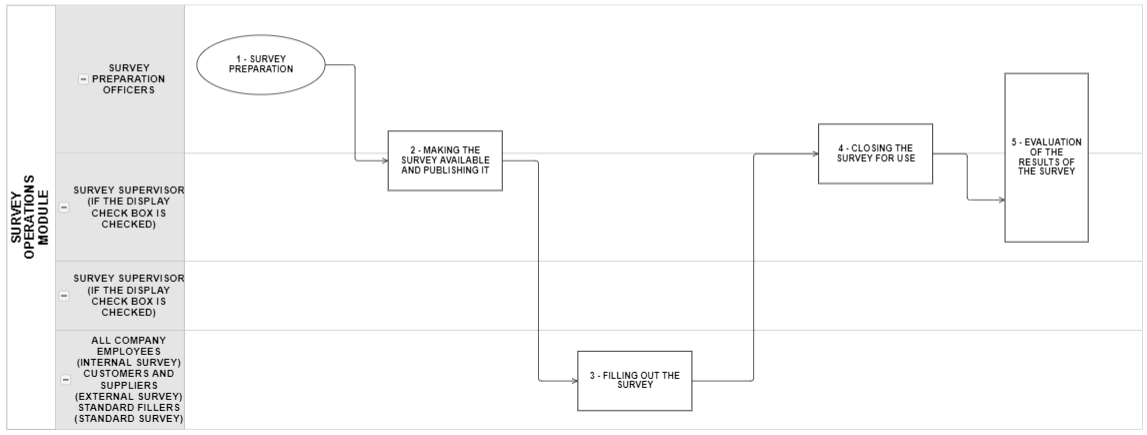
5. WORK FLOW:
6. Survey Module
It is the module where the information flow that will create internal, external customer and supplier surveys is provided and the results are reported. In this module, designing a survey with or without points, hiding or showing participant credentials, publishing surveys to undefined users, instant graphical display of results, authorization-based monitoring of results, determining the duration of the survey, and determining optional, ranking, multi-choice, related question types are performed. In addition, this module works integrated with audit, training CAPA and suggestion modules.
Bu modül içeriğinde aşağıdaki özellikleri kapsamaktadır.
- Preparation of survey types including Internal Surveys, External Surveys and Standard Surveys.
- With the “Internal Surveys Form Preparation” feature, a survey can be created for the use of people who can access the Qdms system.
- With the “External Survey Form Preparation” feature, it is possible to create surveys for customers, suppliers registered in the Qdms system and users who are not defined in the system.
- By creating internal and external surveys, it is ensured that surveys are sent to both employees and customers/suppliers through the system.
- With the “Standard Questionnaires Form Preparation” feature, it is ensured that a questionnaire is created to fill in the records of the people assigned on behalf of users who are thought to be unable to access the electronic environment.
- Ensuring that the survey identification process is carried out by entering the survey information by adding who will participate in the survey, the questions of the relevant survey and the additional file related to the survey, if any.
- Ensuring that the created questionnaire is prepared by the person who prepared the questionnaire, the questionnaire module administrator, and the people determined as admin in the questions selected during the creation of the questionnaire are provided to make changes and editing operations.
- Providing the survey deletion process to the people who prepare the created survey, survey module administrator, and the people who are determined as admin in the questions selected during the survey creation.
- Ensuring that the people who prepare the survey, survey module administrator, admin in the questions selected during survey creation can add questions in closed surveys.
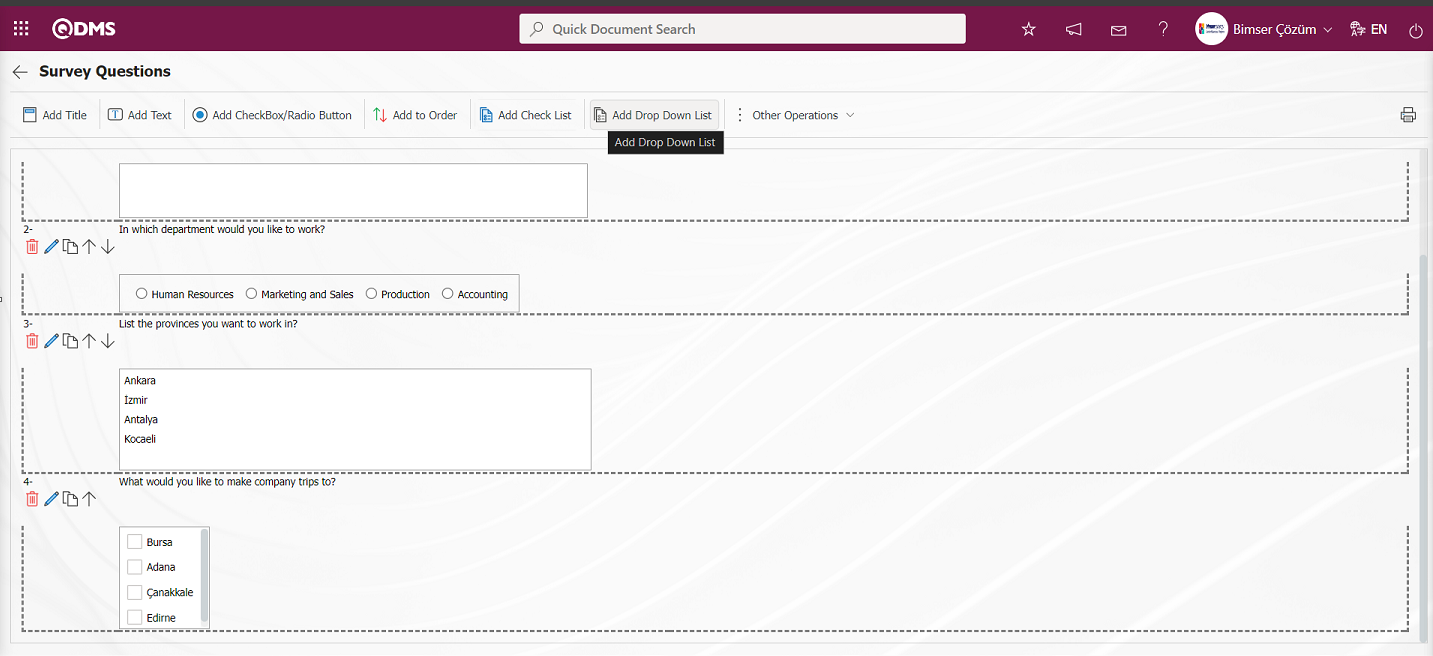
- Designing surveys by adding question types such as information entry, multiple selection list, drop-down list and predefined selection to the closed surveys created.
- By using the “Add Title” feature, it is possible to design a questionnaire by adding a title and making the questionnaire appear in a segmented way.
- By using the “Add Text” question type feature, it is possible to design a survey such as the appearance of questions in the form of entering free information to the people filling out the survey.
- By using the “Add CheckBox/Radio button” question type feature, it is possible to design a questionnaire such as the appearance of questions such as selecting the answers given to the people filling out the questionnaire within the options.
- By using the “Related Question” question type feature, it is possible to design a questionnaire in such a way that a question appears depending on the condition in the option of another question.
- By using the “Add to Order” question type feature, it is ensured that the options are ordered from many>to few or from few>to many, such as all options from the options of a question are preferred and the questions appear as listed in order of priority.
- Using the “Add Check List” question type feature, enabling the survey design process by defining a question to the people filling out the survey, if there are too many options in the question to be created and they will need to be selected like a check list.
- Using the “Add Drop Down List” question type feature, enabling the survey design process by defining a question such as the case of selecting a single answer from the drop-down list of questions
- By using the “Add Predefined Selection” feature, it is possible to design a survey by defining a question to be selected in the personnel, customer, department, product and company profile lists defined in Qdms.
- Using the “Add Date” feature, it is possible to design a survey by selecting the date in the calendar field opened to the user.
- With the “Normal Survey” feature, a normal survey can be prepared without establishing a relationship with the modules.
- Ensuring integrated operation of Audit Activities, Training, CAPA and Suggestion Modules by using the template survey feature of the survey operations module.
- Determining the validity date and the dates between which the survey will be in effect.
- The “Periodic Survey” feature enables the survey to be opened depending on a certain repetition interval.
- By using the hidden survey feature, the registration numbers of the users are hidden by the system so that the user information does not appear in the survey results.
- Ensuring that the information about which workplace the surveys are used in and which management system they are within the scope of can be selected in a single or multiple way.
- The process of adding-deleting participants in the lists of personnel and user groups in the created survey, ensuring that user group members are displayed as added participants.
- Authorizations to view survey results, make changes on the survey, and edit questions are given to different users other than the survey preparer or survey module administrator with the questions tab.
- “Authorized users can answer surveys on behalf of others” feature allows authorized users to fill out surveys on behalf of other users.
- “Open the survey for use” feature opens the survey for use in the system, sends a survey on Qdms to the users added as participants to fill out the survey and ensures that the users are dropped as a task to their pending jobs.
- With the “Close the survey for use” feature, the survey can be closed manually using this feature.
- Ensuring that surveys with expired validity dates are automatically closed by making systemic adjustments.
- With the “Publish” feature, surveys can be published via e-mail.
- Providing the user with the opportunity to have different weights of the questions when preparing the survey questions by checking the weighted score while preparing the questions.
- Ensuring that the notification of survey publication is sent to the participant via SMS.
- When the survey is associated with workplaces, it is ensured that only the employees working in that workplace can see the relevant survey within the authorization.
- Providing the process of designing surveys with and without points.
- By creating scored surveys, a certain success score can be created according to the result of the survey.
- Providing the process of publishing surveys to undefined users.
- Enabling authorization-based monitoring of survey results.
- Providing logo printing for external surveys.
- Ensuring that the people who are selected as participants are assigned as “Surveys will be filled out.” in their pending jobs.
- Hiding and showing the identity information of the participants.
- Ensuring that the survey results and the survey report are displayed.
- Ensuring that the survey results and the form of the questionnaire filled out by the survey participants are displayed.
- With the “Survey Analysis Chart”, graphical reports of surveys that are related to each other can be obtained on the basis of respondents and scores.
6.1. System Infrastructure Definitions/ Survey
Survey Operations is the part where the infrastructure definitions of the module are defined. In this section, there are the Question pool where the list of question categories is created, E-Mail Settings where E-Mail Settings operations are performed and External participants menus where the list of external participants is created. In these menus, the process steps related to the Survey Operations module are performed in this section.
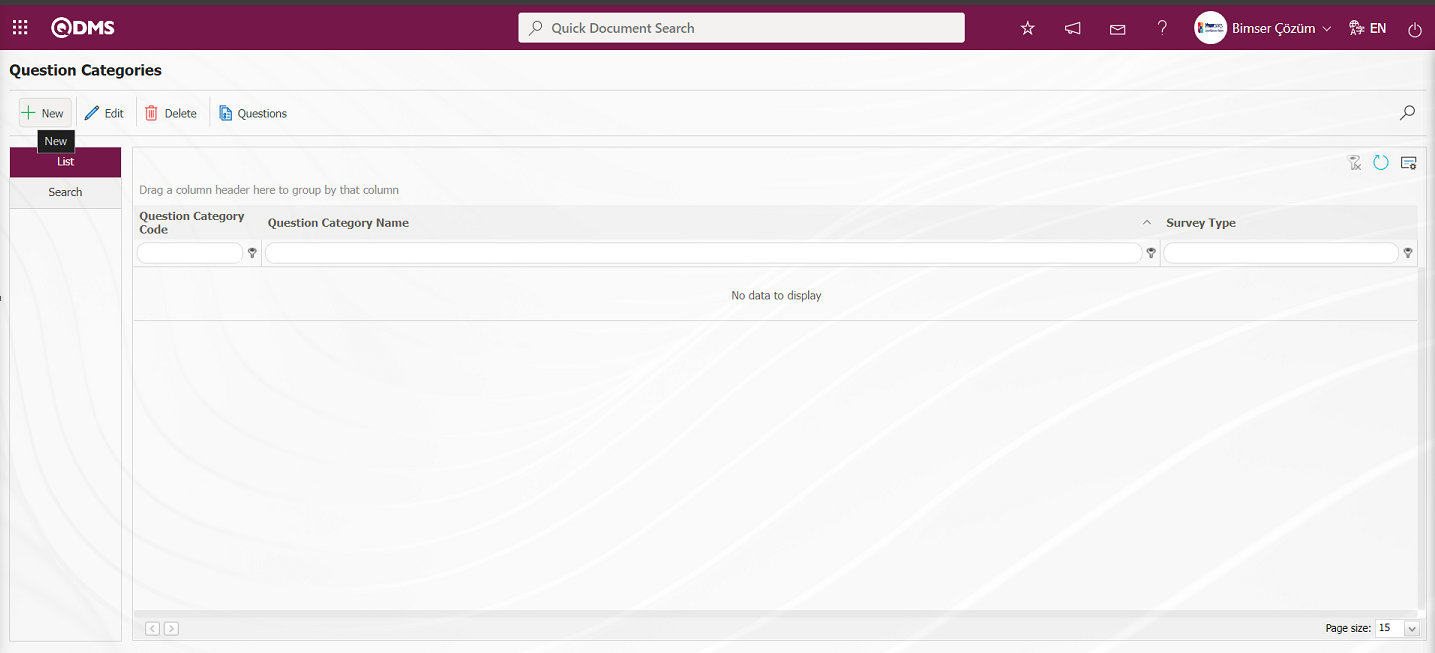
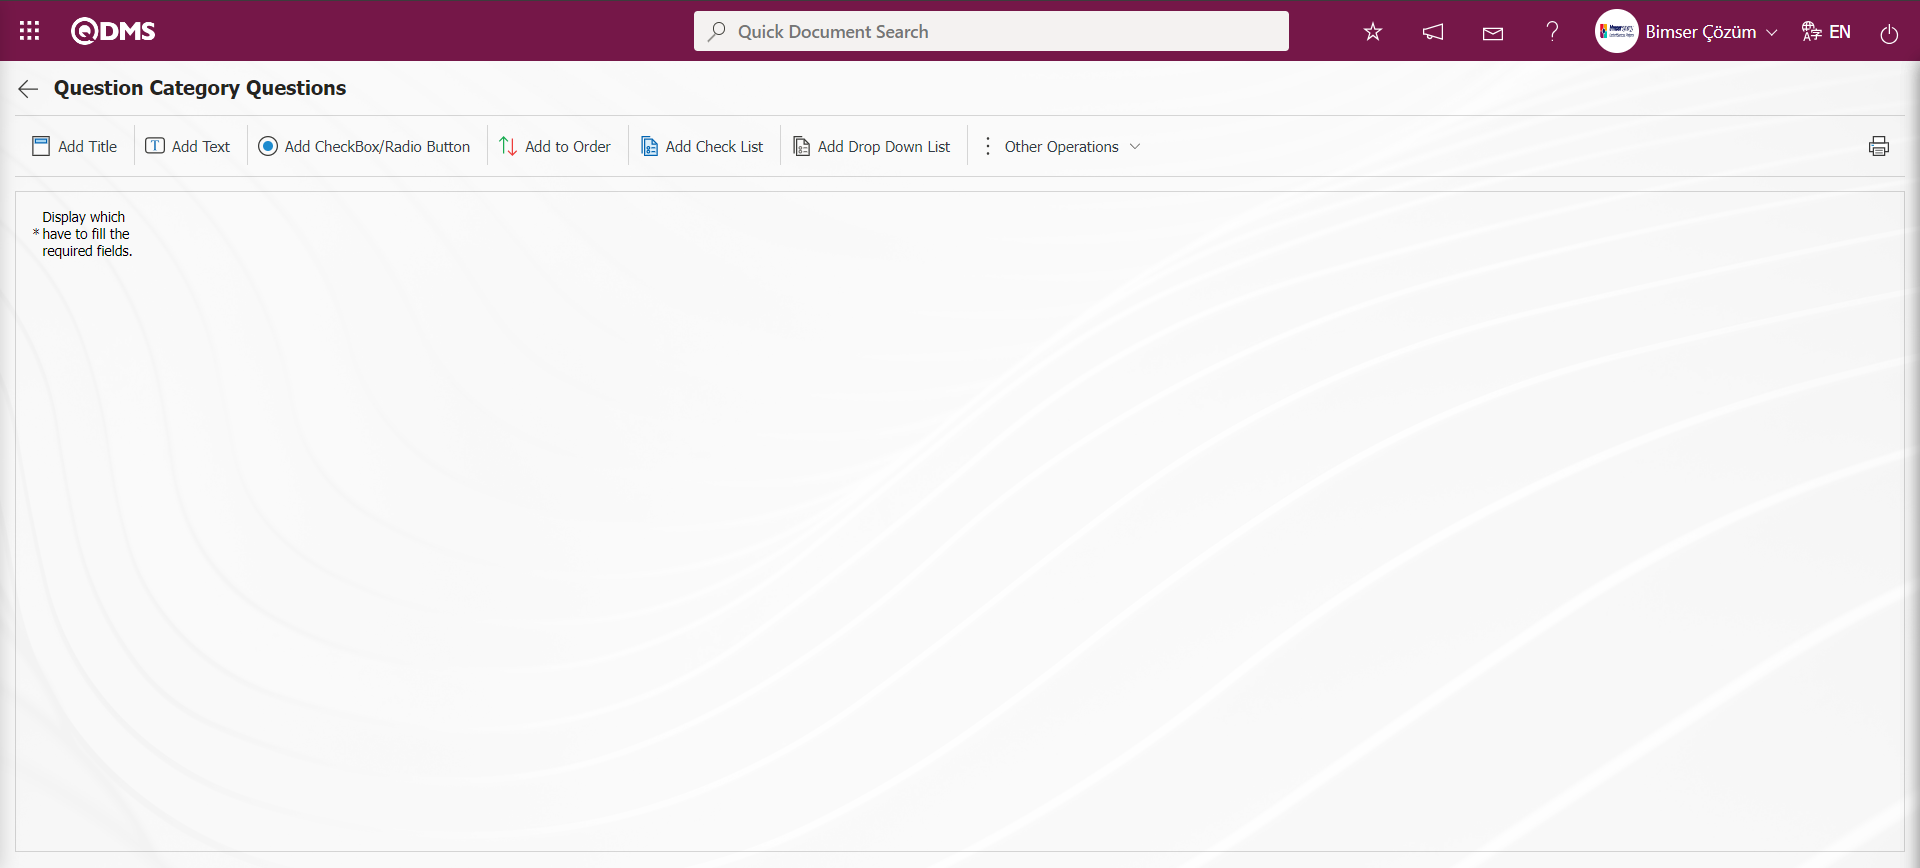
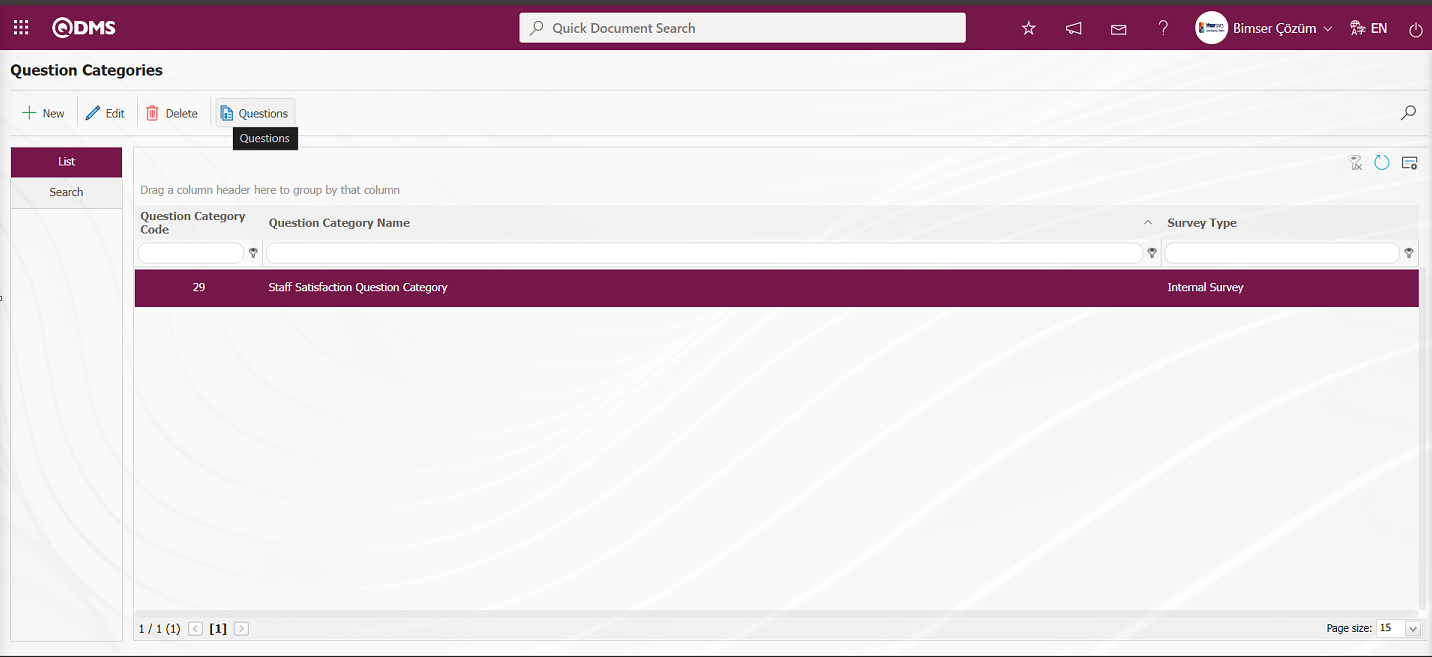
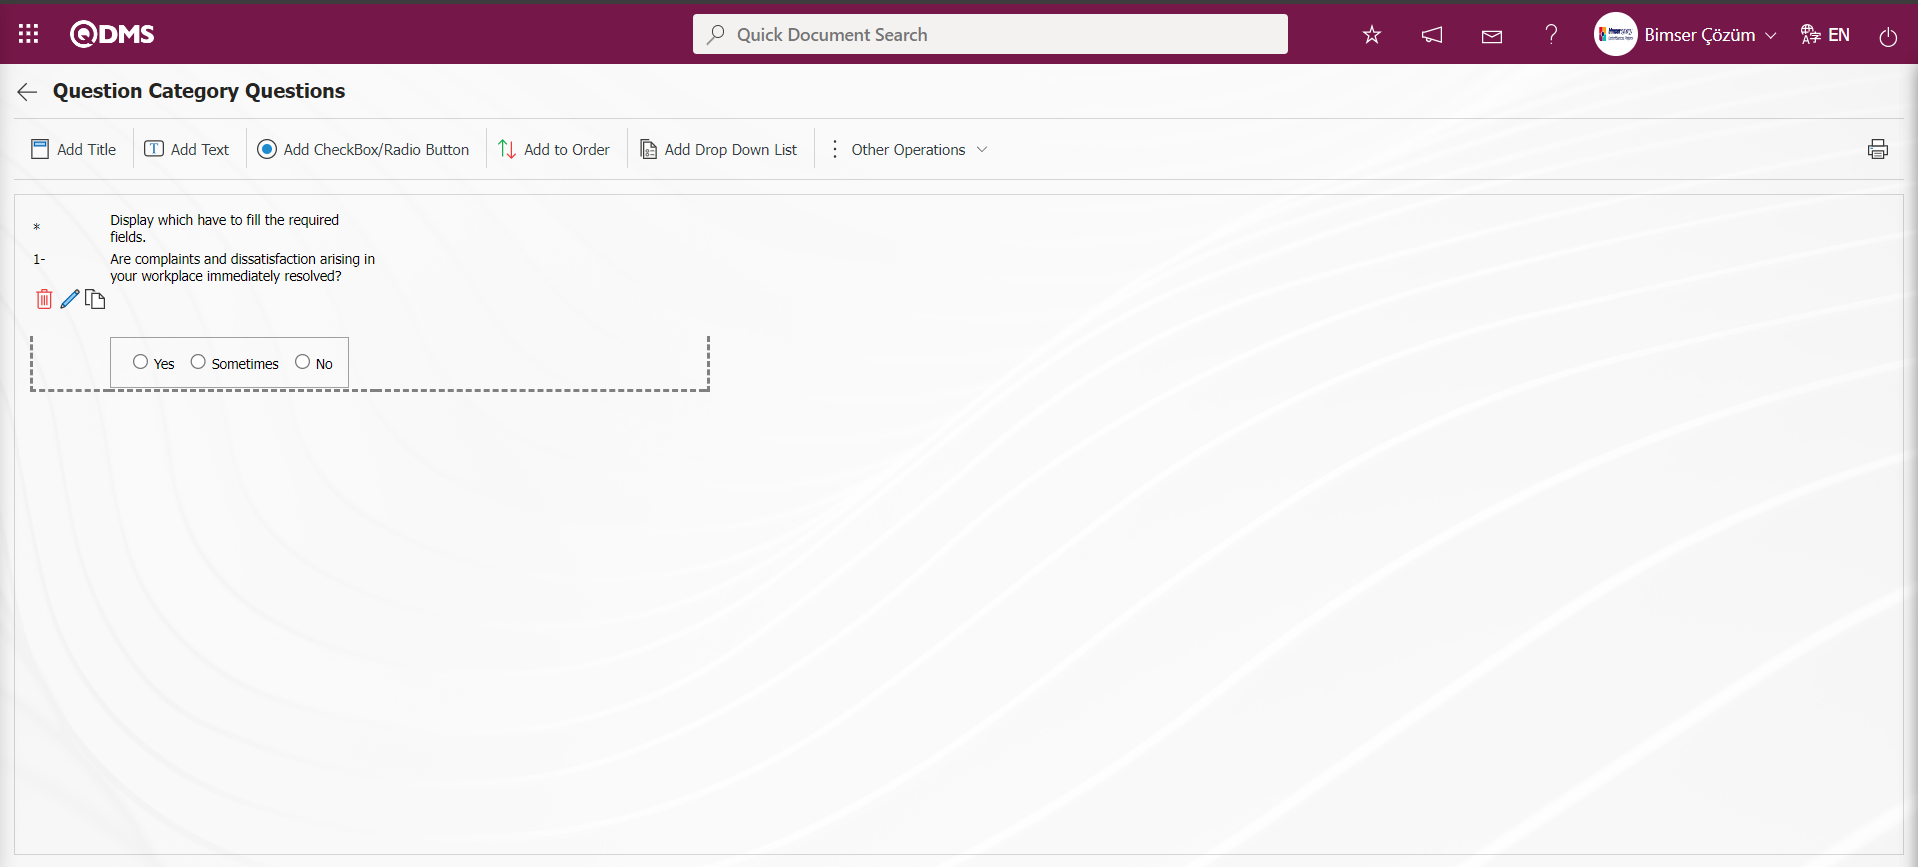
6.1.1. Question Pool
Menu Name: System Infrastructure Definitions/ Survey/ Question Pool
It is the menu where question categories are defined according to Internal, External and Standard survey types. In the process of defining question categories, after selecting the question categories and clicking the () button, the process of defining survey question types such as Add Title, Add Text, Add CheckBox/ Radio button and Add to Order is done. The defined question categories provide the selection process in the question category list that opens when the question pool is selected in the Select question type in the process of defining the questions of the survey defined in the Survey module. The question category list comes to the question category list according to the survey type selected in the definition phase. For example: When the question pool select question type is selected in the Internal Survey Identification phase, the question categories defined by selecting the internal survey type on the question categories screen are displayed in the list. The list of question categories is displayed according to the survey type.
With the help of the buttons on the screen;
 : Defining a new question category is done.
 : Changes and updates are made on the selected question category information in the list.
 : Deletes the selected question category information in the list.
 : Defining the questions of the selected question category in the list is done.
To add a new question category to the Question Categories screen, click on the button on the top left corner of the screen to open the Question Categories screen.

Related fields are defined on the screen that opens:
Question Category Name: This is the field where the name of the question category defined in the Question Category screen is written. In the English language option field, the language equivalent of the name of the question category is written. Users can write language equivalent information in the related language fields in the languages they want.
Questionnaire Type: It is the field where the question category defined in the Question Category screen is selected in the survey type options. Whichever questionnaire type is selected, the question category comes according to the selected questionnaire type when the question pool select question type is selected on the screen where the question types are added on the questionnaire definition screens.
With the help of the buttons on the screen;
 : Question Category registration process is done.
 : Question category registration process is done and the Question categories questions screen is navigated as in the screenshot below.
On the question categories screen, type the question category name and select the questionnaire type from the questionnaire type options. After entering the relevant information in the required fields, the question categories are registered by clicking the button in the upper left corner of the screen.

In the process of defining the Question Category, the  button is clicked for the process of defining the questions of the question category.
The Question Categories questions screen opens.
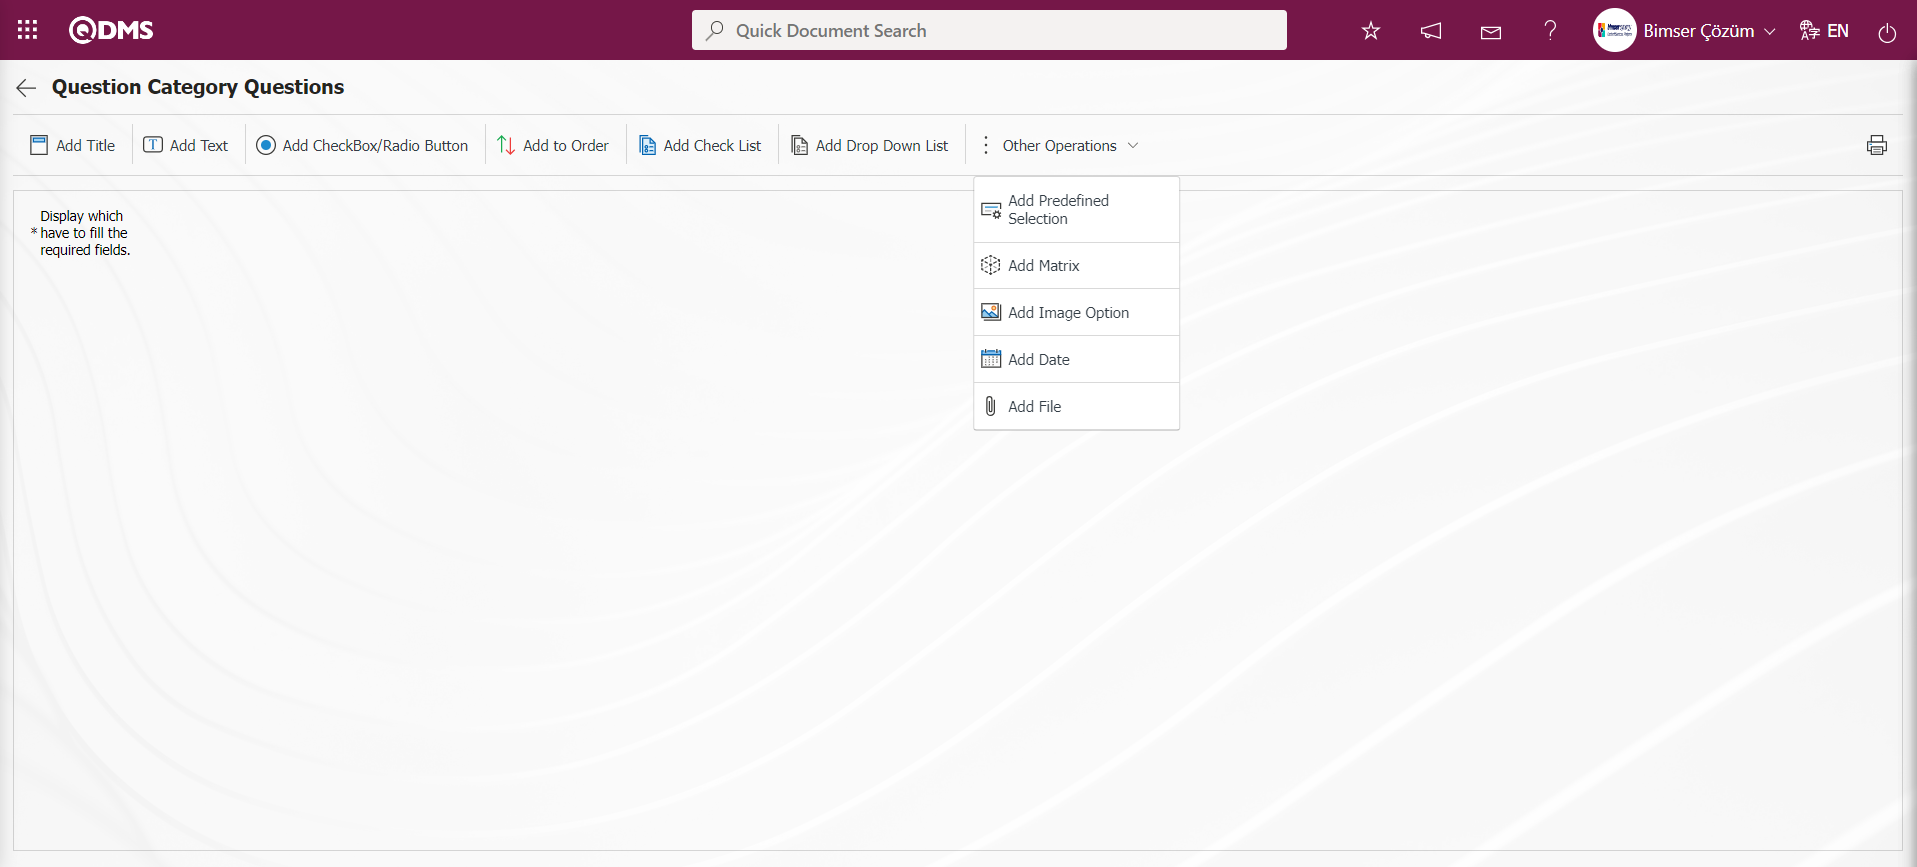
With the help of the buttons on the screen;
 : It is the button that allows you to print your questions.
 : This button is used if you want to section the questionnaire and add a title. After each title separator, the number of the defined question comes as 1.
 : It is the question type used when the people who fill out the questionnaire are asked questions that require free information.
 : It is used when the answers given are selected from the specified options.
 : It is used when all options of a question are preferred and listed in order of priority. The options are listed in order from most to least or from fewest to most.
 : If there are too many options in the question to be created and they need to be selected like a check list, a multiple choice list type question can be added.
 : This is the question type to be used in case of selecting a single answer from the drop-down list.
 : This question type allows the selection of lists in the fields of personnel, customer, department, company profile and product defined in Qdms.
 : It is a question type created in the form of a matrix in which sub-questions are defined under the question text.
 : It is a question type in the form of a matrix with pictures where pictures are added in the question text field and picture addition is made in the options.
 : On the screen opened by clicking, the user can add a question to select the date.
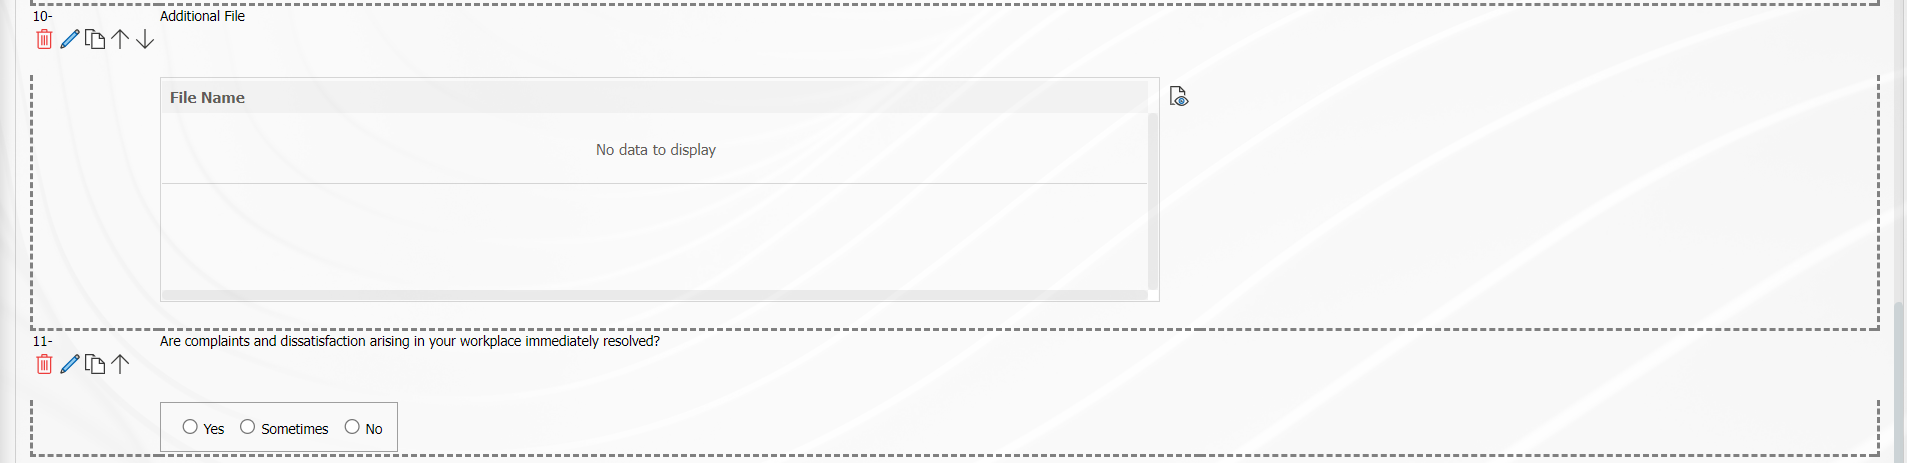
 : Creates an Additional File field for adding additional files to the questionnaire.
Question Category Question Addition process;
Adding questions to the question category is done by using question options types. Adding questions to the Question Category is done in the same way on the Internal/ External/ Standard Survey Form Definition screens. In the Internal Survey Form Definition menu, the addition process is explained according to the question types. The only difference is the Select from Question Pool option.
: It is a question type in which the answers given are selected from the specified options.
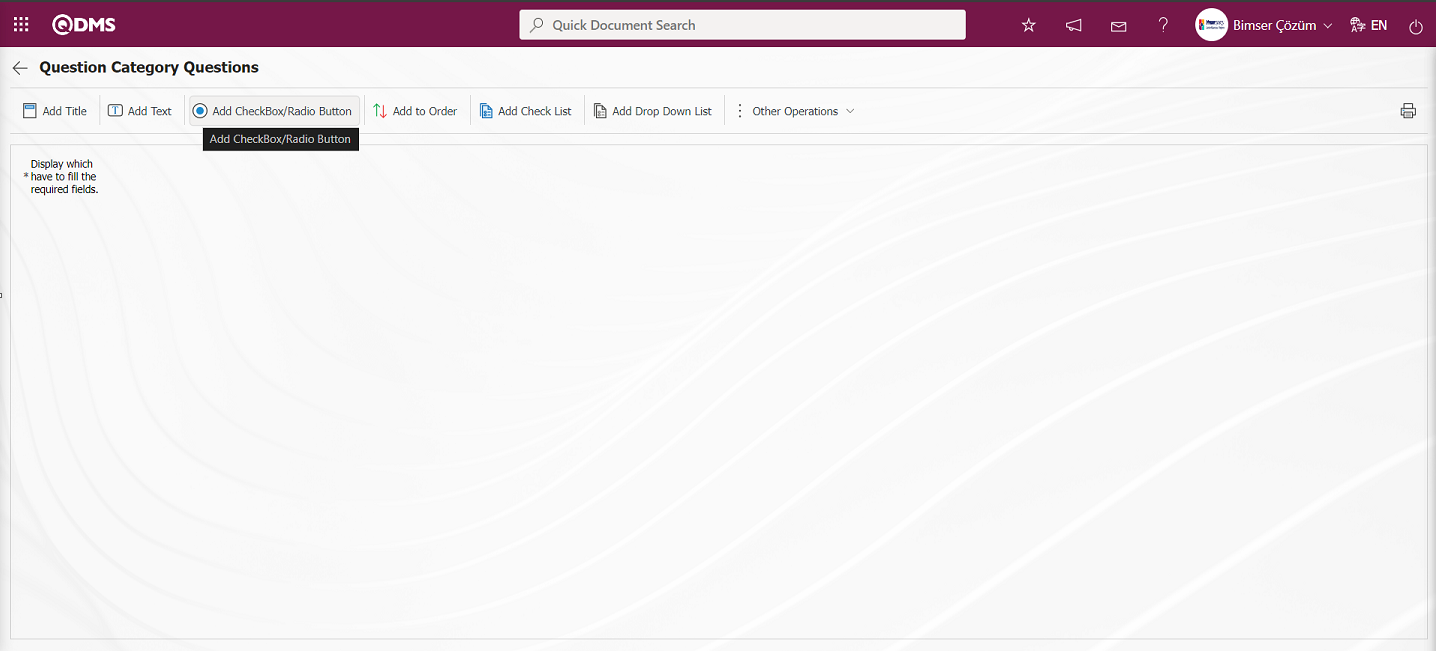
Click  button to add “Add CheckBox/Radio button” question type to the Question Category defined in the Question Category Questions screen.
The Add Option screen opens.
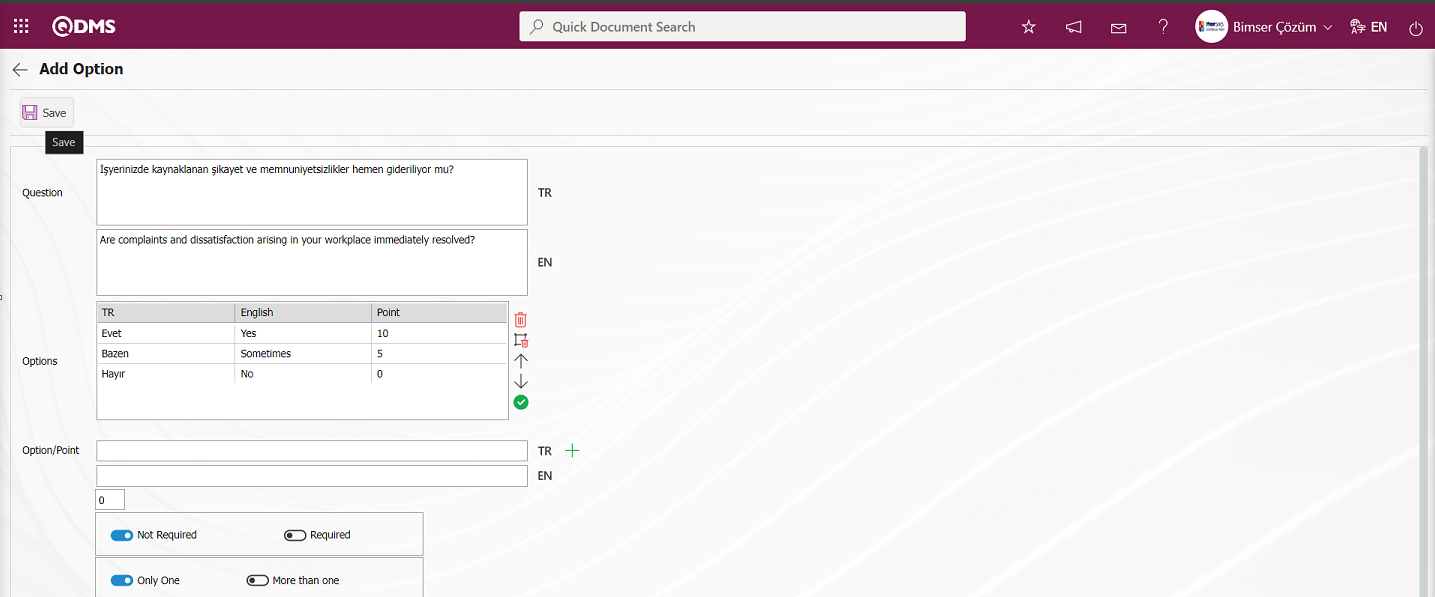

Related fields are defined on the screen that opens:
Question: This is the field where the question to be asked on the Add Option screen is written in the Turkish field. In case of use in other languages, the question data to be asked is entered in the field with the relevant languages.
Options: This field contains the list of options on the Add Option screen.
Option/Point: This is the field where the options of the question are written on the Add Option screen. If the survey will be a scored survey, the score is also written for the options entered.

With the help of the buttons on the screen
 (Delete Row): On the options screen, the selected option is removed from the option list.
 (Delete All): Delete all options on the options screen.
 (Up): In the options screen, the selected option is moved upwards in the option list.
 (Down): In the options screen, the selected option is scrolled down in the option list.
 (Select&Move): It is possible to edit and update the selected option on the options screen by moving it to the Option-Score field.
In the Option-Point field, the option and score information of the question is written and added to the Options list by clicking the (Add CheckBox/Radio button) button.

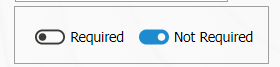
The obligation to answer the question to be asked is determined from this field. 
Selecting 1 or more than 1 of the options is determined according to the check box in this field. 
The options can be displayed side by side (Single Line) or stacked (Multi-Line). 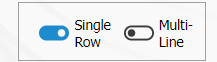
If the multiline option is selected, a field called number of columns will appear and the options of the question will be displayed in as many columns as the specified value. 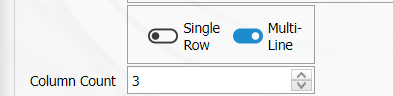
Calculate Method: In the Add Option screen, if the questionnaire is a scored questionnaire, this is the field where the method by which the scores given to the options of this question will be calculated is determined. For example; A question in a survey that 10 people will answer has 4 options and each option has its own points. Assuming that the score of the first option is 5, if 10 users choose the first option, it is determined whether these scores are added up (50) or averaged (5) and included in the average score of the survey.

Weighted Score: In the Add Option screen, if the questionnaire is a scored questionnaire, this is the field where the weight of the question in the questionnaire is determined. If all questions are equally weighted, a value of 1 should be entered. If it is written as 0, the survey score is not calculated.

After filling in the information related to the required fields on the Add Option screen, the registration process is realized by clicking the  button in the upper left corner of the screen.
In the same way, the definition of question types is done by clicking the buttons related to the question types. In the Internal Questionnaire Identification stage, when the question pool select question type is selected, the question categories defined by selecting the questionnaire type internal questionnaire on the question categories screen are displayed in the list. Since the questionnaire type is selected as internal in this question category definition screen, this question category appears in the question pool list.
6.1.2. E-Mail Settings
Menu Name: System Infrastructure Definitions/ Survey/ E-Mail Settings
In the e-mail settings screen, it is the menu where it is determined to whom e-mail and sms will be sent at which stage of the survey module processes.

With the help of the buttons on the screen;
 : Editing/changing/updating is done on the value of the e-mails selected in the list.
 : Clearing the data remaining in the filter fields in the grid where the search criteria search operation on the menu screens is performed
 : The process of returning the menu screen to its default settings is done.
 : User-based designing of the menu screen is done with the show-hide feature, that is, the hiding feature of the fields corresponding to the columns on the menu screens.
If SMS notification will be used in E-mail Settings;
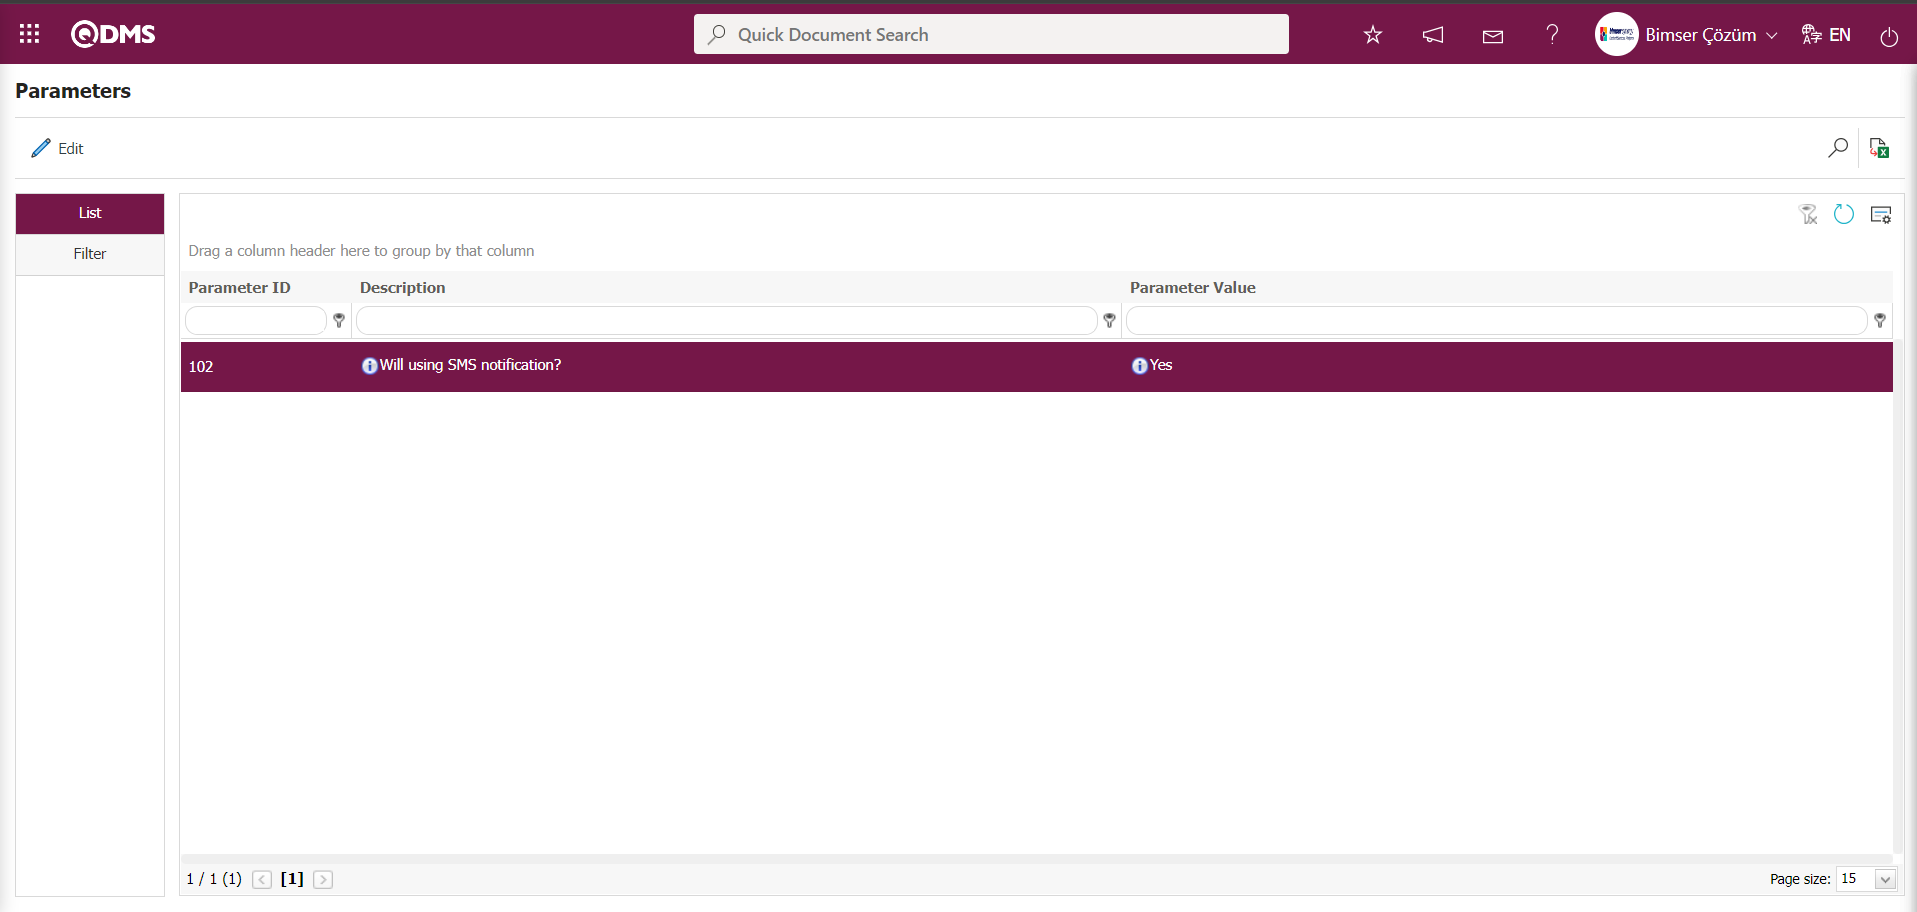
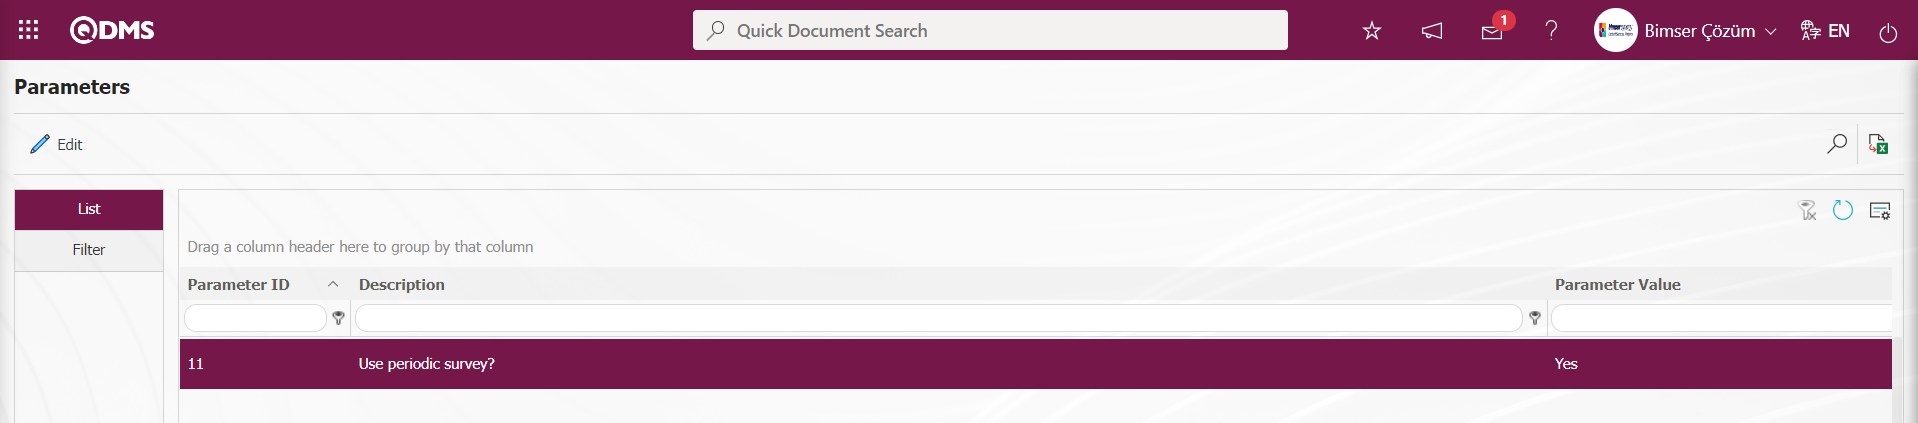
Click on System Infrastructure Definitions/BSID/Configuration Settings/ Parameters menu. In the parameters of the System Infrastructure Definitions module parameters listed on the Parameters screen, the parameter number 102 “Will using SMS notification?” is selected by typing the parameter number in the parameter no field in the Filter tab on the parameters screen and clicking the  (Search) button.

After selecting parameter 102 “Will using SMS notification? ” in System Infrastructure Definitions module parameters, click  button.

Select the parameter value ‘Yes’ on the parameters screen.
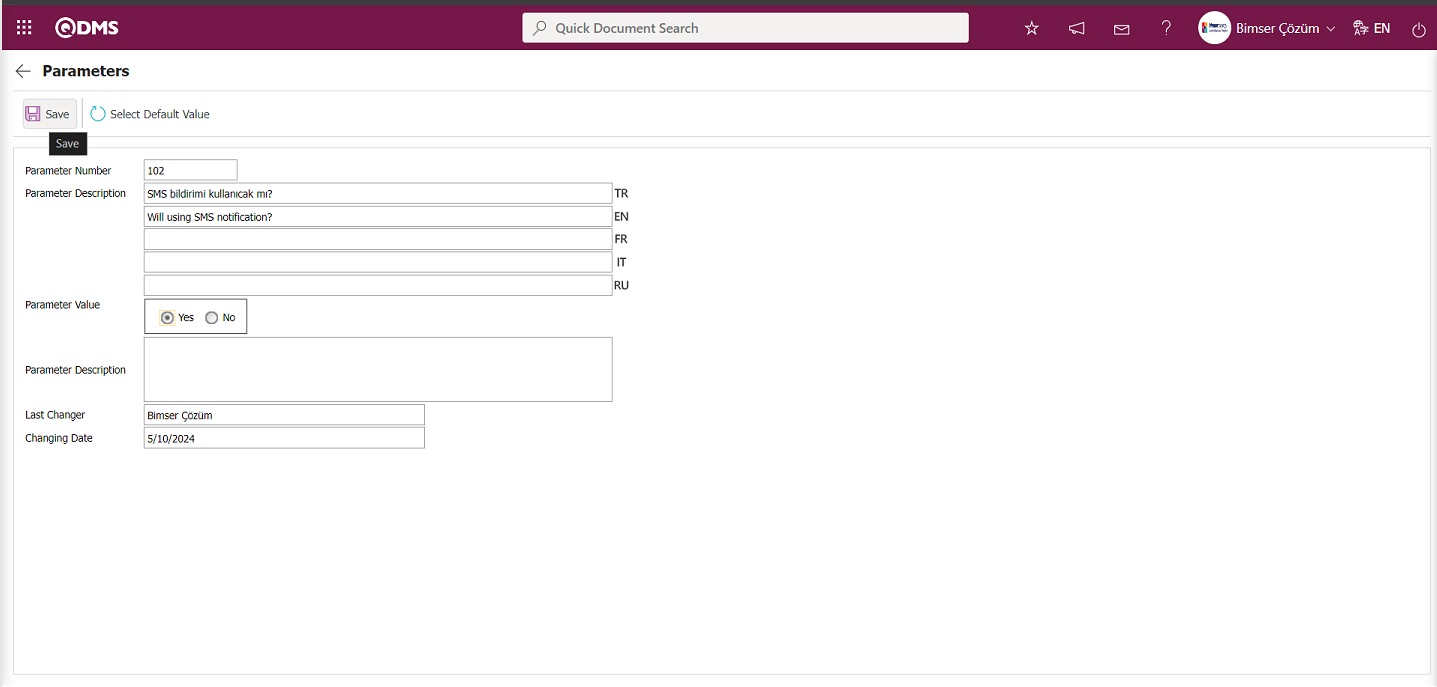
After selecting the parameter value ‘Yes’ on the Parameters screen, the  button on the top left of the screen is clicked and the parameter is activated.
After the parameter is activated, the check box related to the “Send SMS” field related to the use of SMS notification is displayed on the E-Mail Settings screen. By checking the relevant check box, SMS notification is used in E-Mail settings.
Select which step you want to send e-mail/message and click the  button.
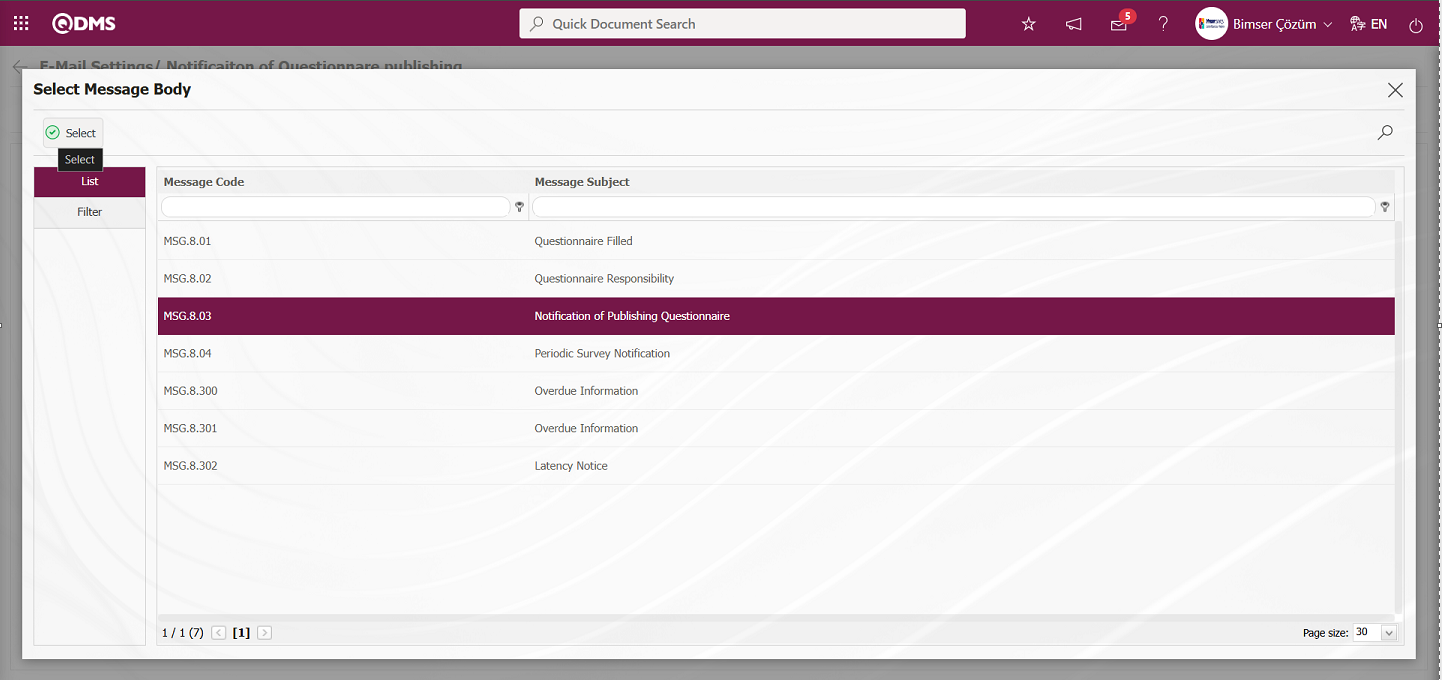
For example: On the E-Mail Settings screen, select the “Notificaiton of Questionnare publishing” step and click the  button.

The E-Mail Settings/Notificaiton of Questionnare publishing screen is displayed. The Roles section shows the role to which my e-mail and message notification will go.
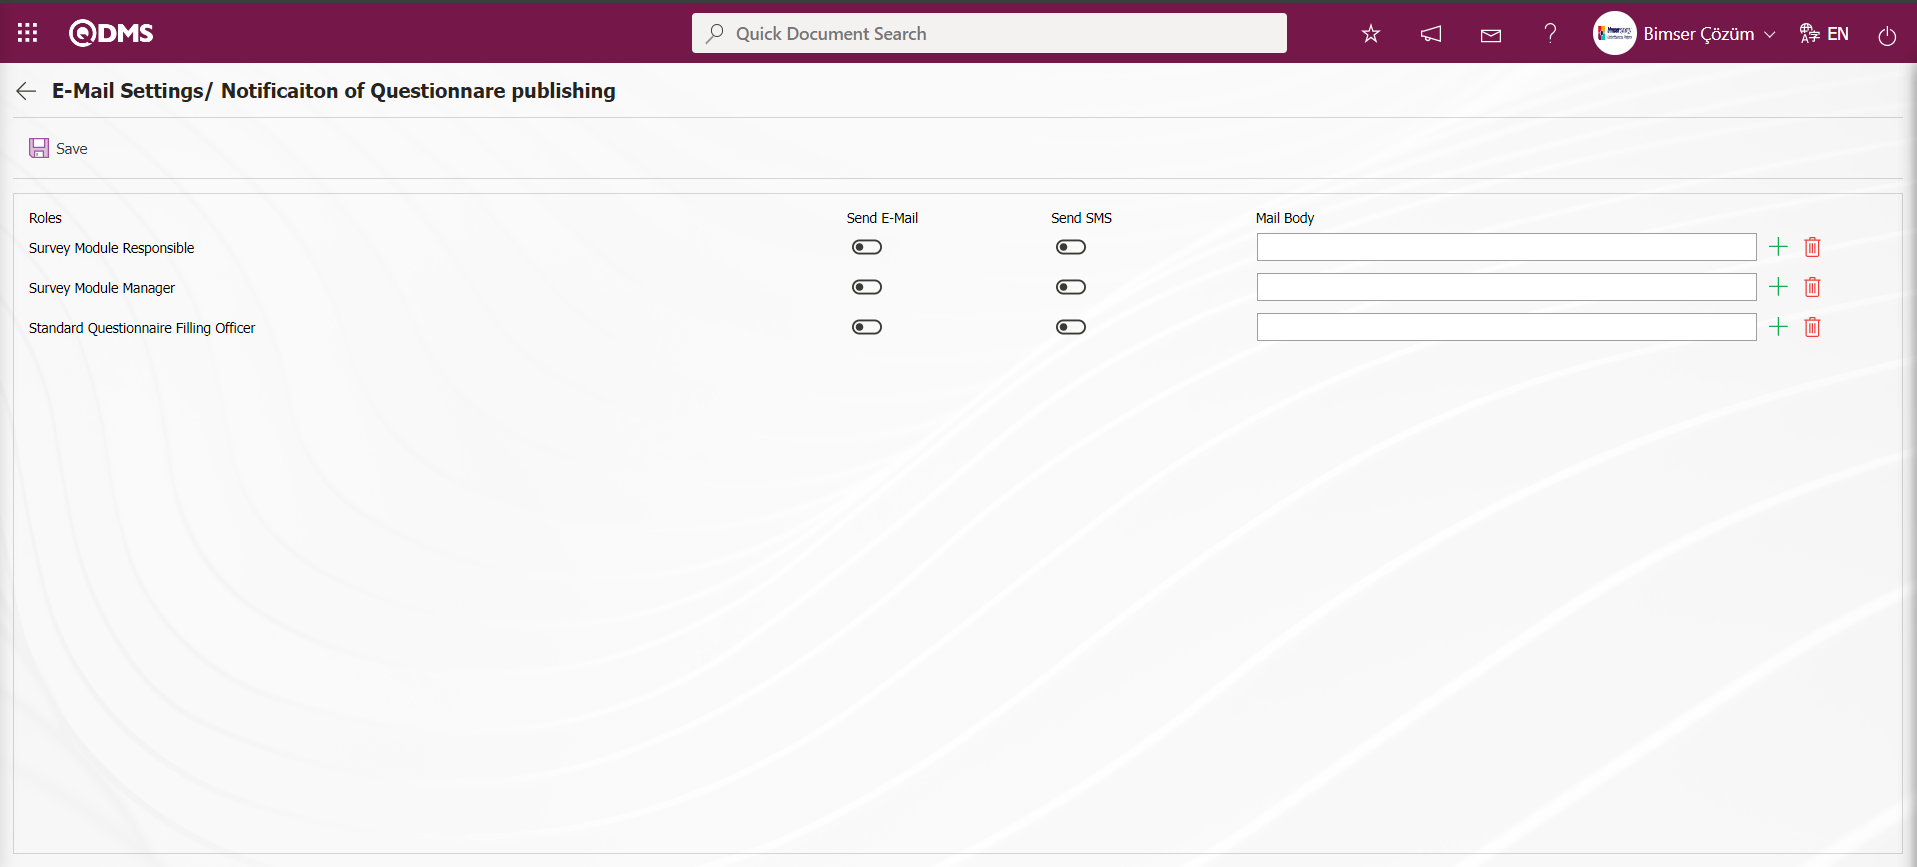
On the E-Mail Settings/ Notificaiton of Questionnare publishing screen, click the  (Select) button and select the message body to be sent from the relevant list in the Message Body list defined in the system. The
  (Delete) button is used to delete an incorrectly added message body.
The message bodies to be sent for the relevant roles are selected by selecting the message body in the message body list and clicking the  button.
If you want to send an e-mail to whom, the “Send E-Mail/ Send SMS” check box related to that role is checked. The mobile phone number of the person defined in the role must be defined on the personnel identification screen in order to send a message
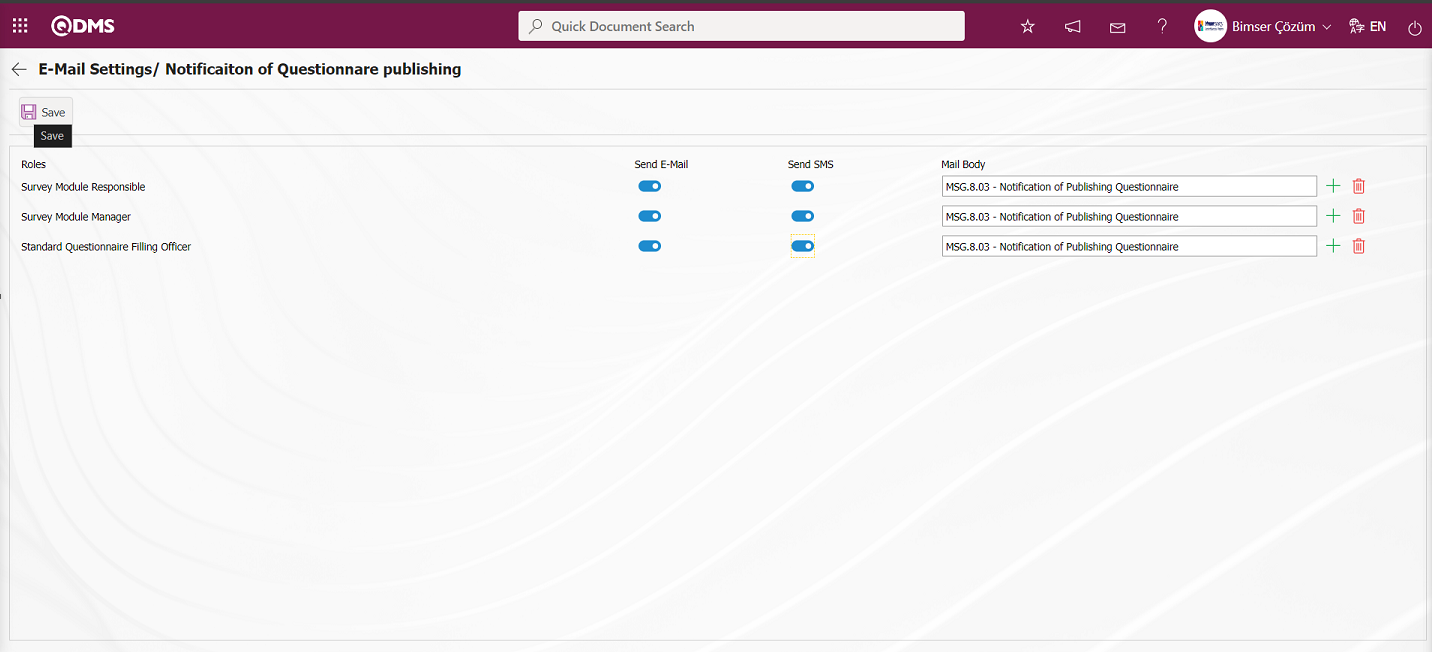
On the E-Mail Settings/ Notificaiton of Questionnare publishing screen, after the “Send E-Mail/ Send SMS” check box related to the roles to send e-mail is checked, the E-Mail Settings registration process is performed by clicking the  button in the upper left corner of the screen.
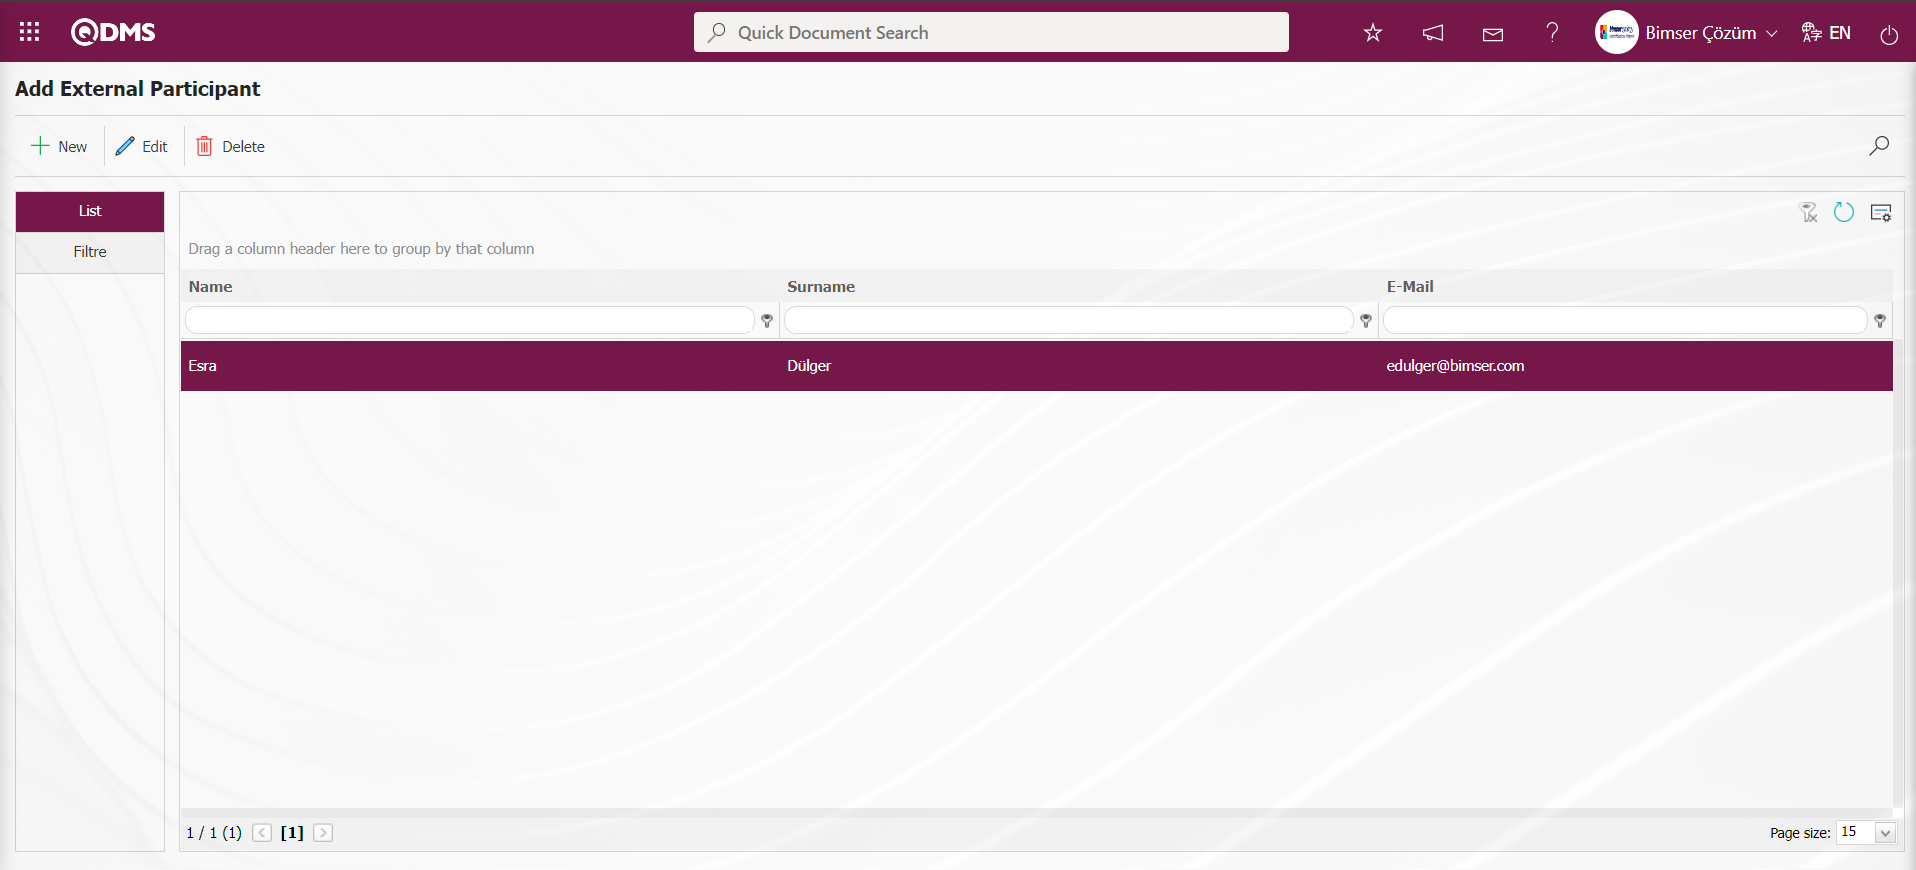
6.1.3. External Participants
Menu Name: System Infrastructure Definitions/Survey/ External Participants
This is the menu where the External Participant definition process is done. The defined external participants are included in the External Participant list opened by clicking the  button on the External Participant tab on the External Survey Form Definition screen, and the process of adding external participants to the survey is performed by making a selection in this external participant list. In this menu, the external participants whose check box related to the “Add to Pool” field is checked on the screen where the External Participant identification process is performed are included in the External Participant list.

With the help of the buttons on the screen;
 : Add a new external participant.
 : Correction/ change/ update is made on the selected external participant information in the list.
 : The external participant information selected in the list is deleted.
 : Records can be searched by filtering.
: The search criteria on the menu screens are used to clear the data remaining in the filter fields in the grid where the search operation is performed.
: The menu screen is restored to its default settings.
: User-based designing of the menu screen is done with the show-hide feature, that is, the hiding feature of the fields corresponding to the columns on the menu screens.
To add a new external participant to the Add External Participant screen, click on the button on the top left corner of the screen to open the Add External Participant - New Record screen.
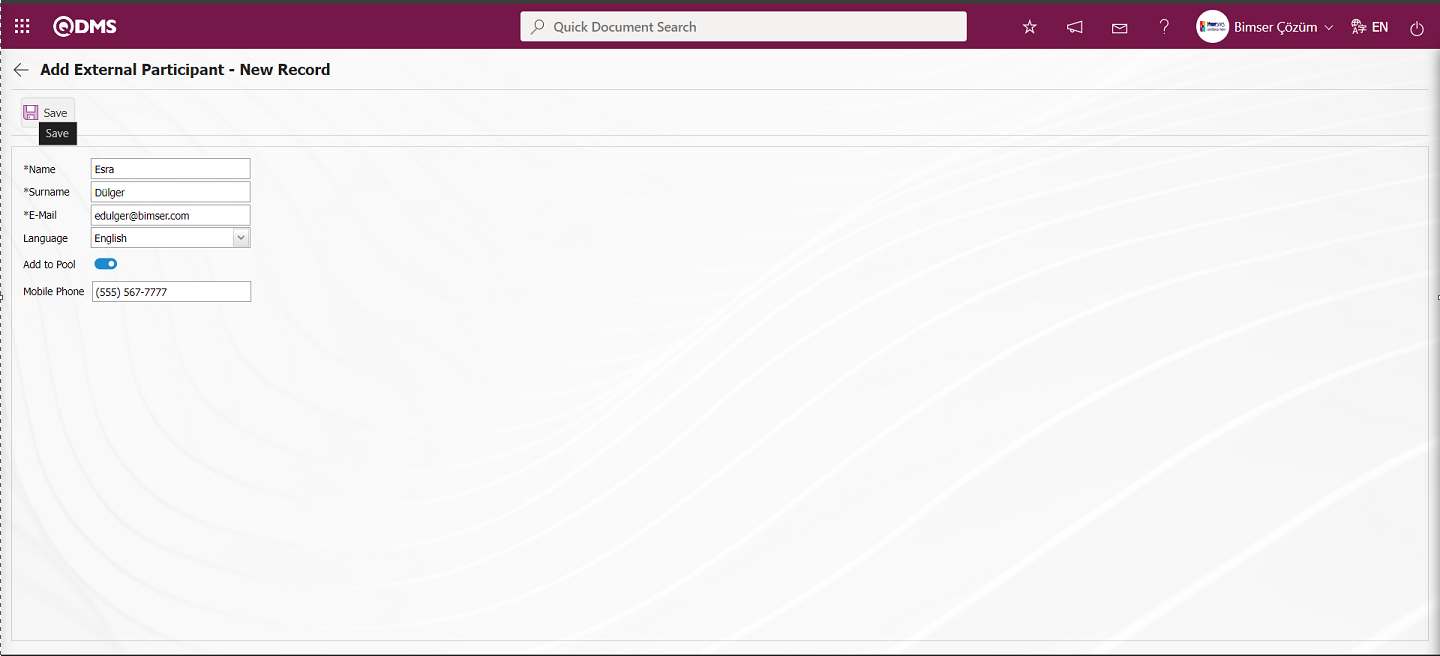
Related fields are defined on the screen that opens:
Name: This is the field where the name of the external participant defined in the Add External Participant - New Record screen is written.
Surname: This is the field where the surname information of the external participant defined in the Add External Participant - New Record screen is written.
E-mail: This is the field where the e-mail information of the external participant defined in the Add External Participant - New Record screen is written.
Language: This is the field where the language of the external participant defined on the Add External Participant - New Record screen is selected from the drop-down list.
Add to Pool: It is the field where the relevant check box is checked if the participant defined on the Add External Participant - New Record screen is desired to be added to the pool. When the check box related to the Add to Pool field is checked, the defined external participants are enabled to be included in the External Participant list opened by clicking the button in the External Participant tab on the External Survey Form Identification screen.
Mobile Phone: This is the field where the mobile phone information of the external participant defined on the Add External Participant - New Record screen is written.
After entering the relevant information in the required fields on the Add External Participant - New Record screen, the external participant identification process is done by clicking the  button in the upper left corner of the screen.
6.2. Integrated Management System/ Survey
Internal, External and Standard Questionnaire Form Preparation, Survey Results are displayed, filled in and Survey Analysis Graphs are taken and related menus are available.
6.2.1. Preparing Internal Survey Form
Menu Name: Integrated Management System/ Survey/ Prepare Internal Servey form
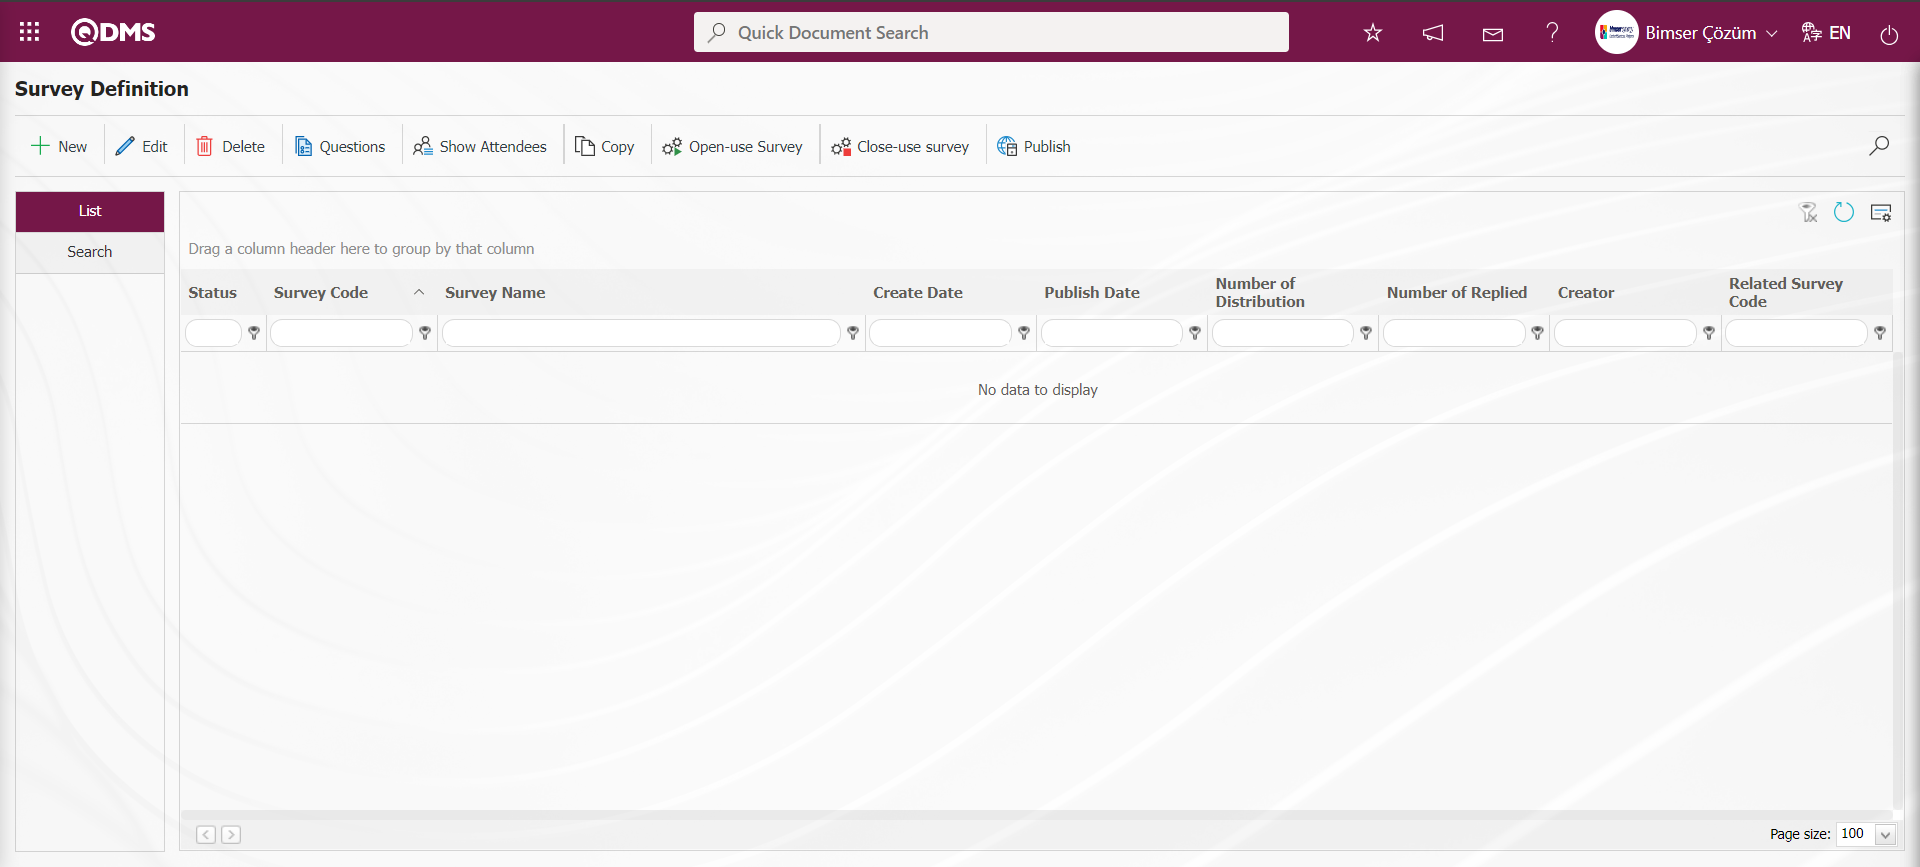
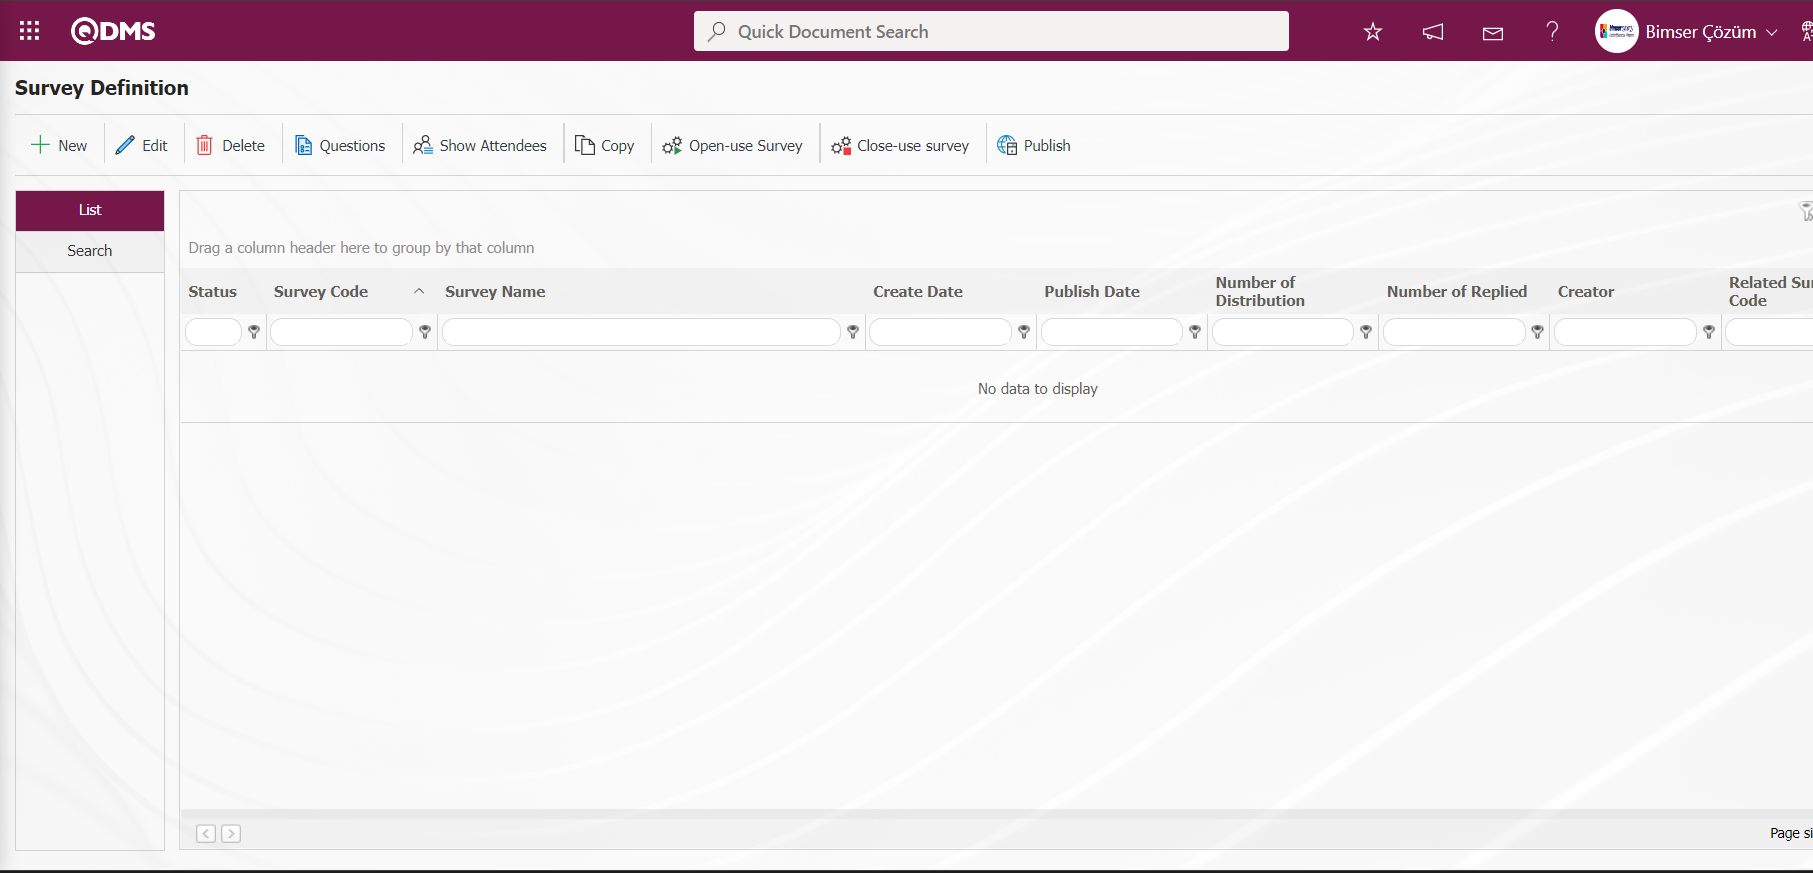
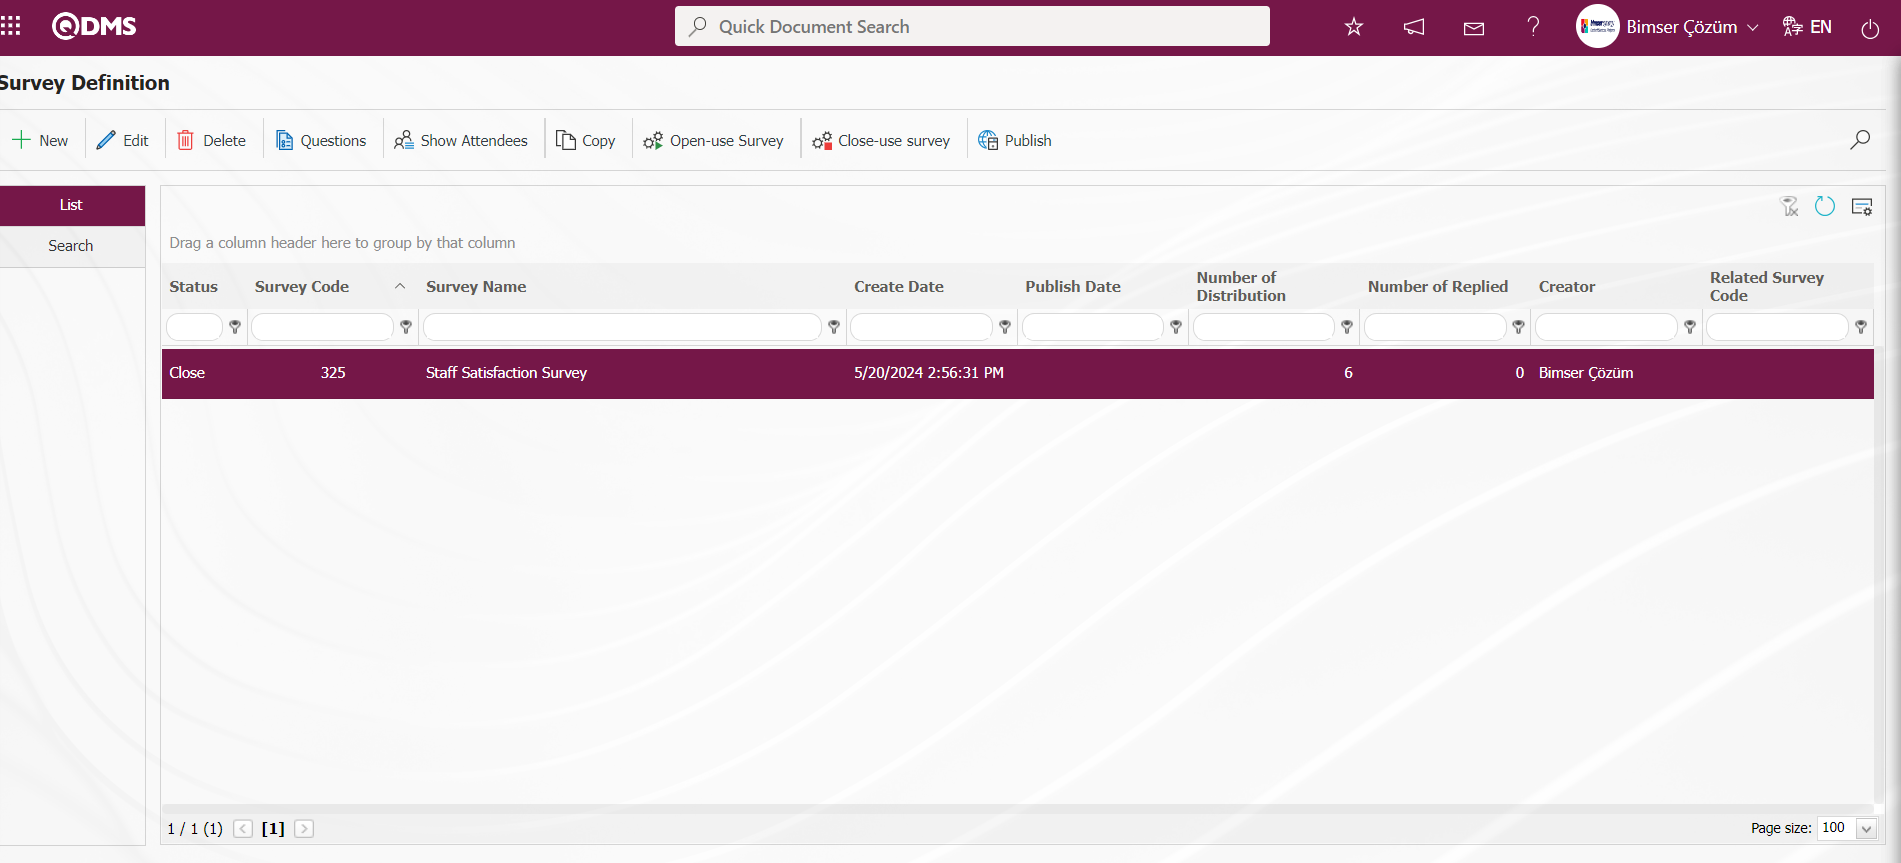
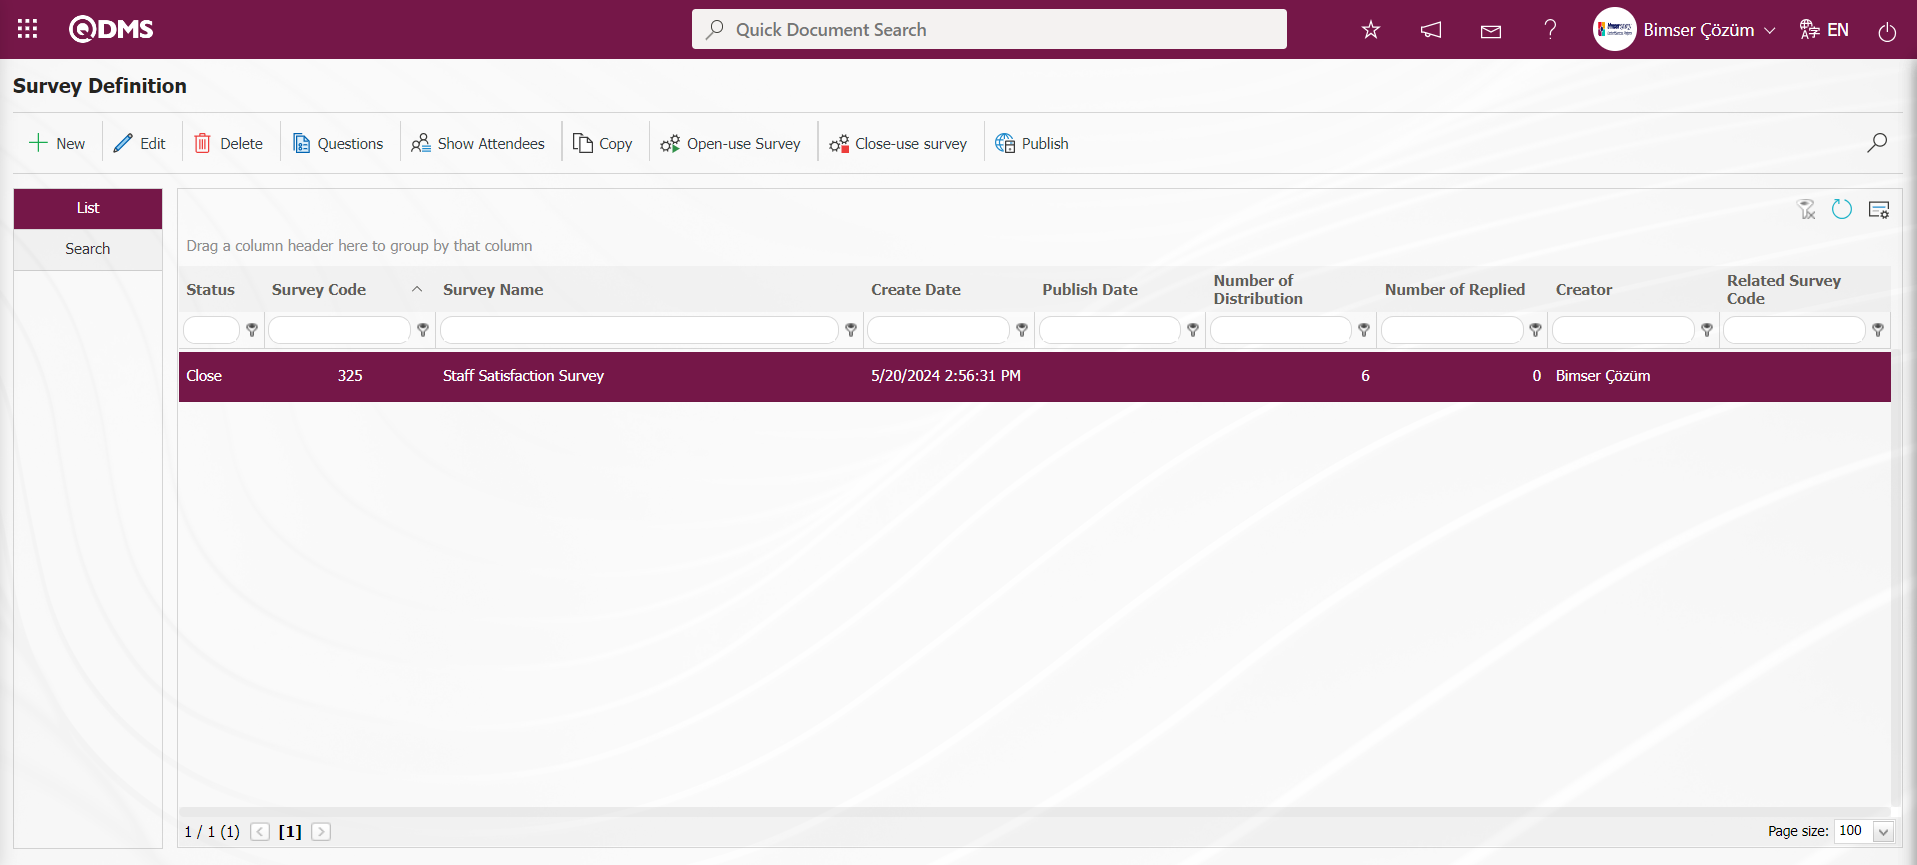
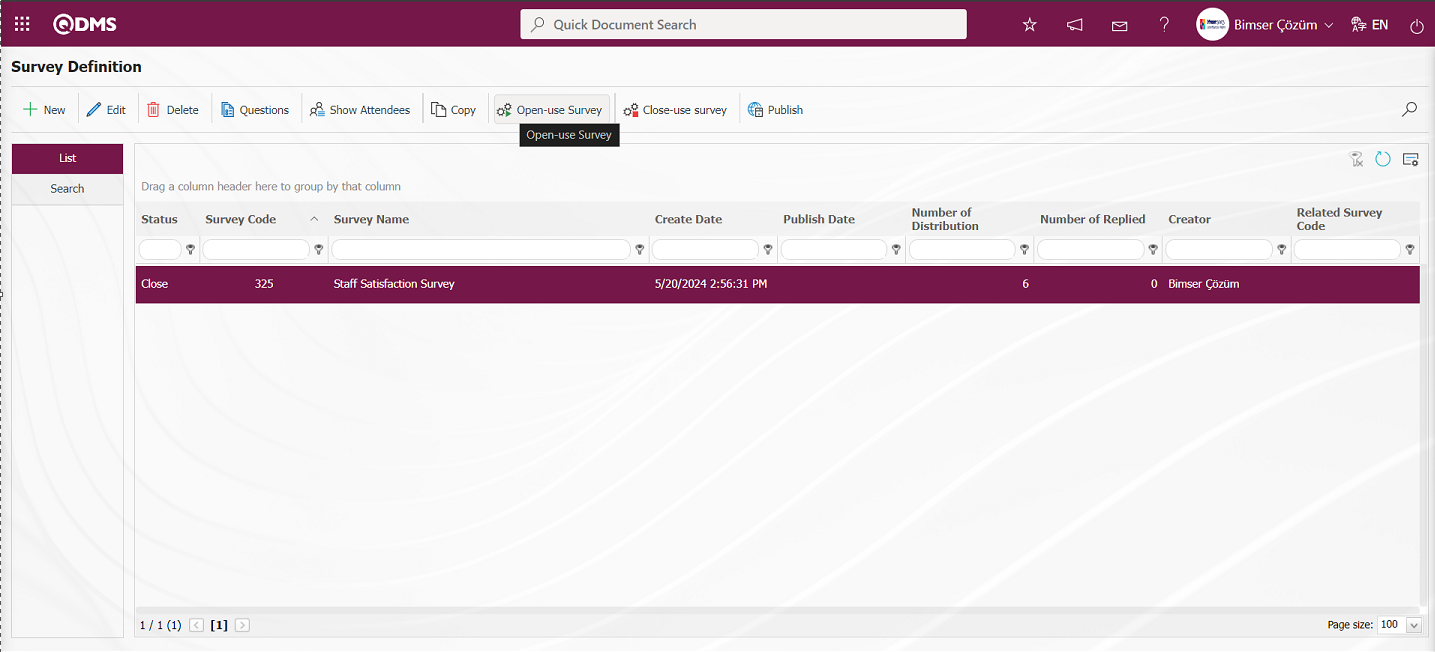
This is the menu where the Internal Survey Form is defined. Internal survey form preparation, external survey form preparation and standard survey form preparation stages are functionally the same screens. Survey types are functionally separated. Internal questionnaires are the type of questionnaire created for the use of people who can enter the Qdms system and the form preparation and definition process for this type of questionnaire is done from this menu. To prepare an internal survey, click on the Integrated Management System/ Survey/ Prepare Internal Servey form menu, the survey definition menu is reached. This menu also includes previously created questionnaires. There are two tabs on the Internal Questionnaire Definition screen: List and Filter tabs.
List tab;
The operation steps are performed using the buttons displayed on the Survey Definition screen. Process steps such as defining a questionnaire, editing, deleting, copying the selected survey information in the list and adding participants in the defined survey are done with the help of the buttons displayed.
With the help of the buttons on the screen;
 : This button is used to create a new survey. The screen where the information of the survey is entered, who will participate in the survey, the responsible persons of the relevant survey and the additional files related to the survey, if any, will appear. Only the standard survey does not have a participant tab.
 : The edit button can be used if the admin check box is checked in the survey creator, the survey module manager and the responsibles we select during survey creation. Apart from this, editing cannot be done in other cases that are not authorized. It is used to make corrections, additions and deletions in the existing survey.
 : It is used to delete erroneous surveys from the system. Deleted questionnaires are not stored, they are completely deleted with the information in them. Surveys in open status cannot be deleted. The authorization to delete the survey is available to the survey creator, the survey module manager and the responsible persons we select during survey creation if the admin check box is checked.
 : For surveys whose status is closed, the users who prepared the survey, the survey module manager and the users whose admin check box is checked in the responsibilities we selected during survey creation add questions to the survey with this button.
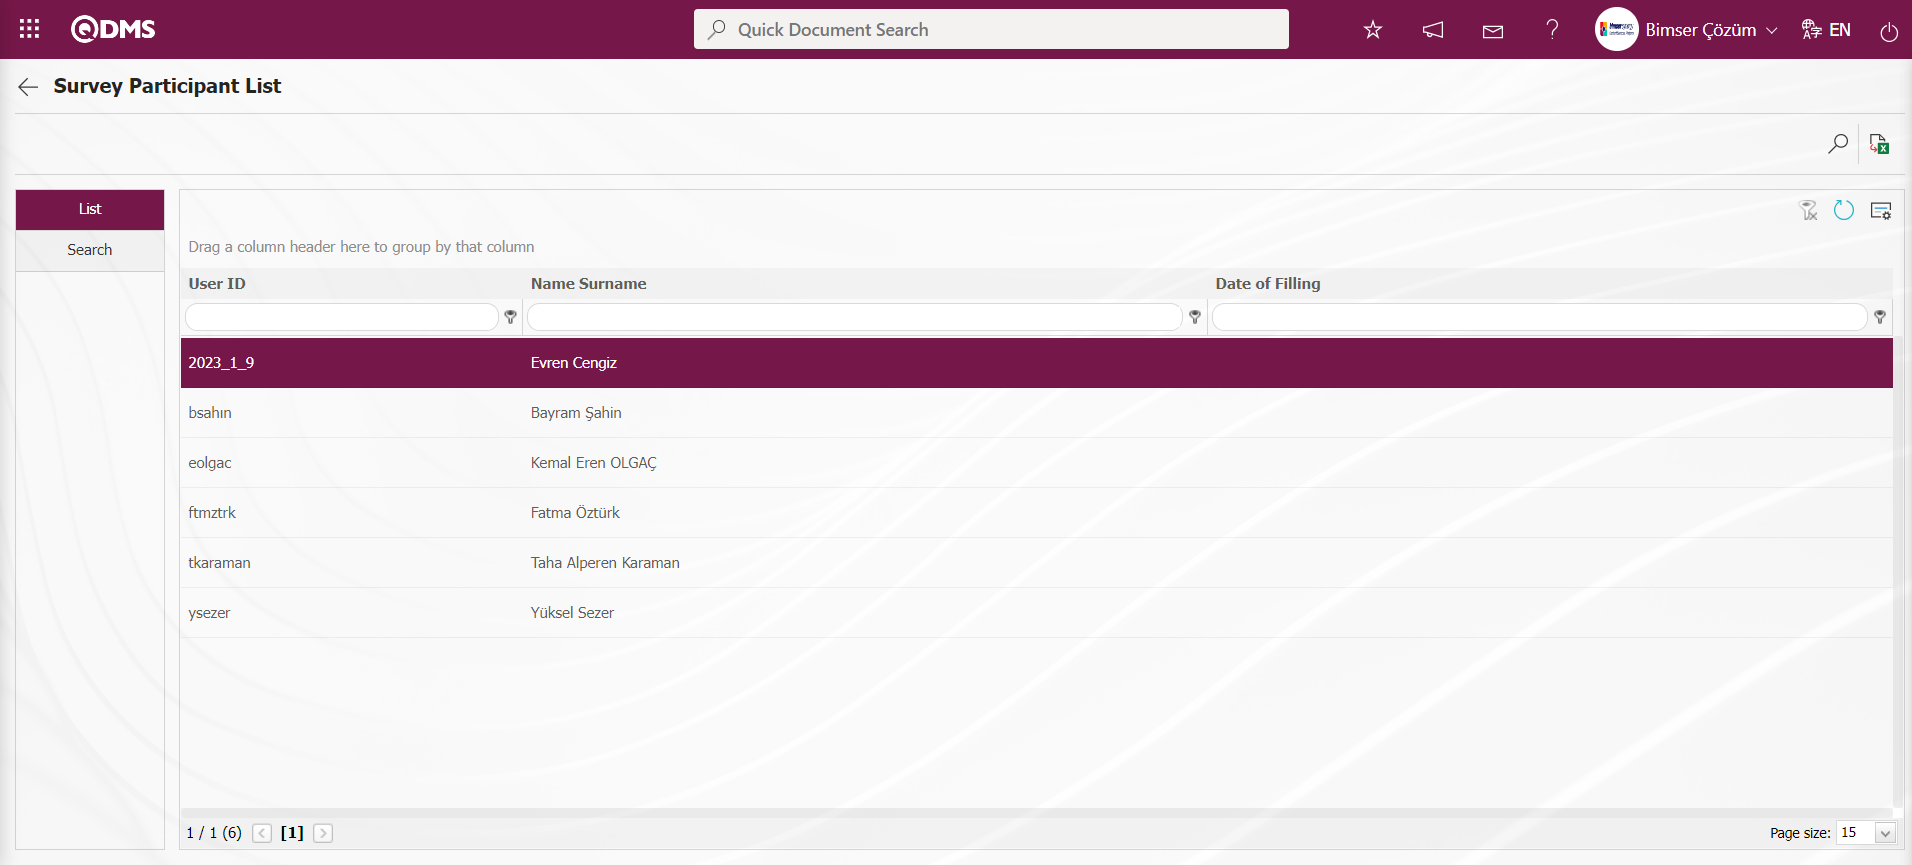
 : Shows the participants in the survey. Clicking this button displays the survey participation list.
Click the button while the Survey is selected on the Survey Definition screen.
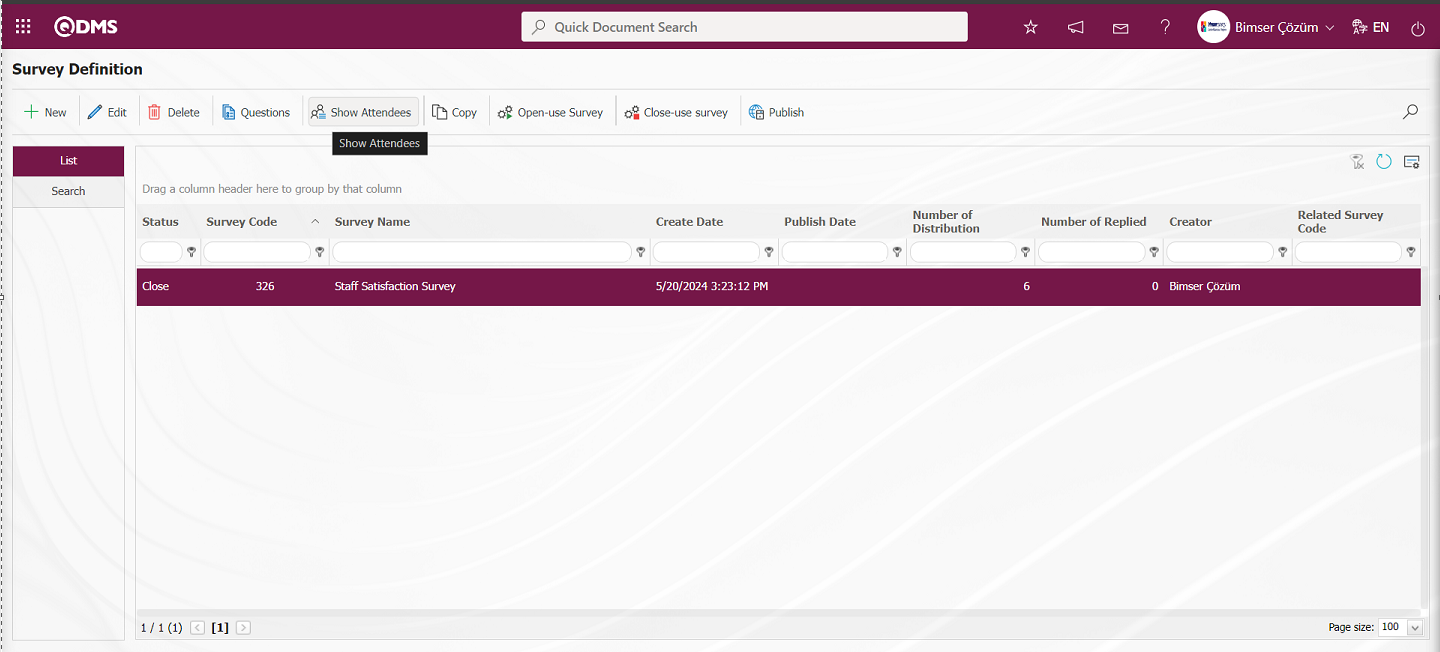
On the Survey Participant List screen, the participation list is taken in the list tab.
 : It is used to copy a new survey from the selected Survey in the list.
On the Survey Definition screen, click the button while the survey is selected in the list in the list tab.
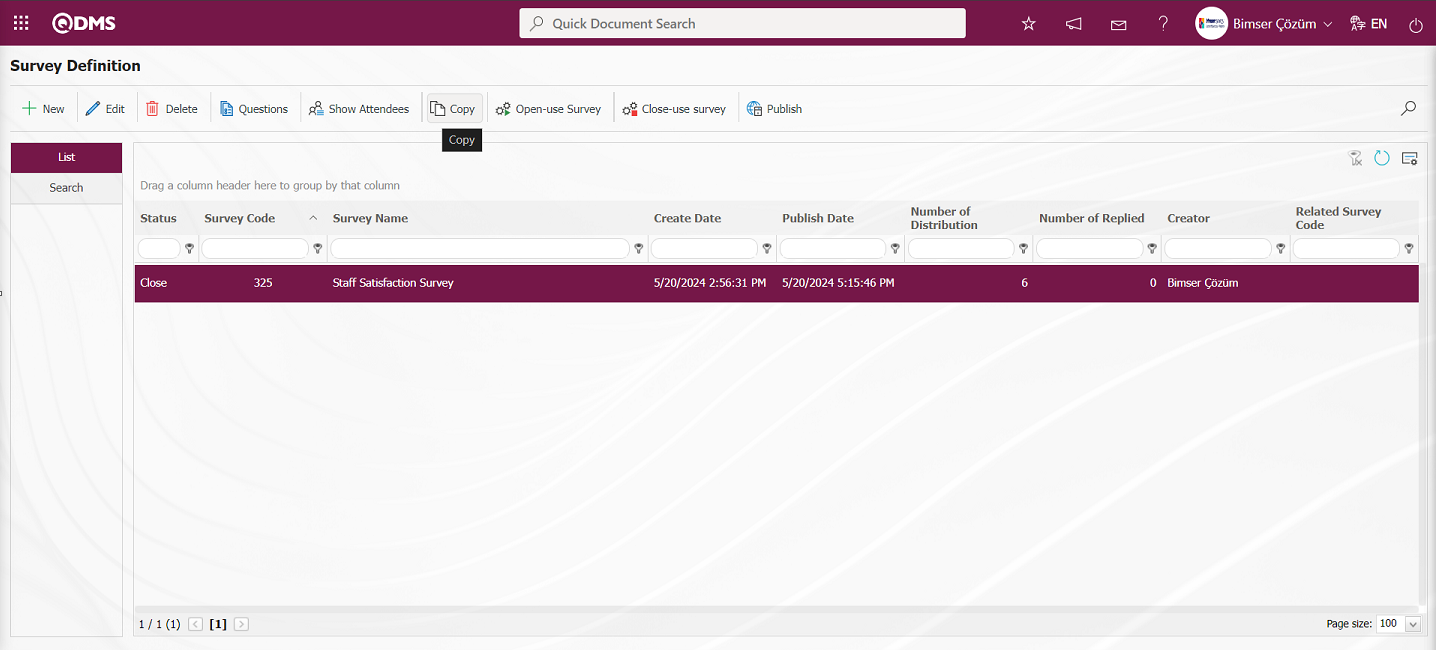
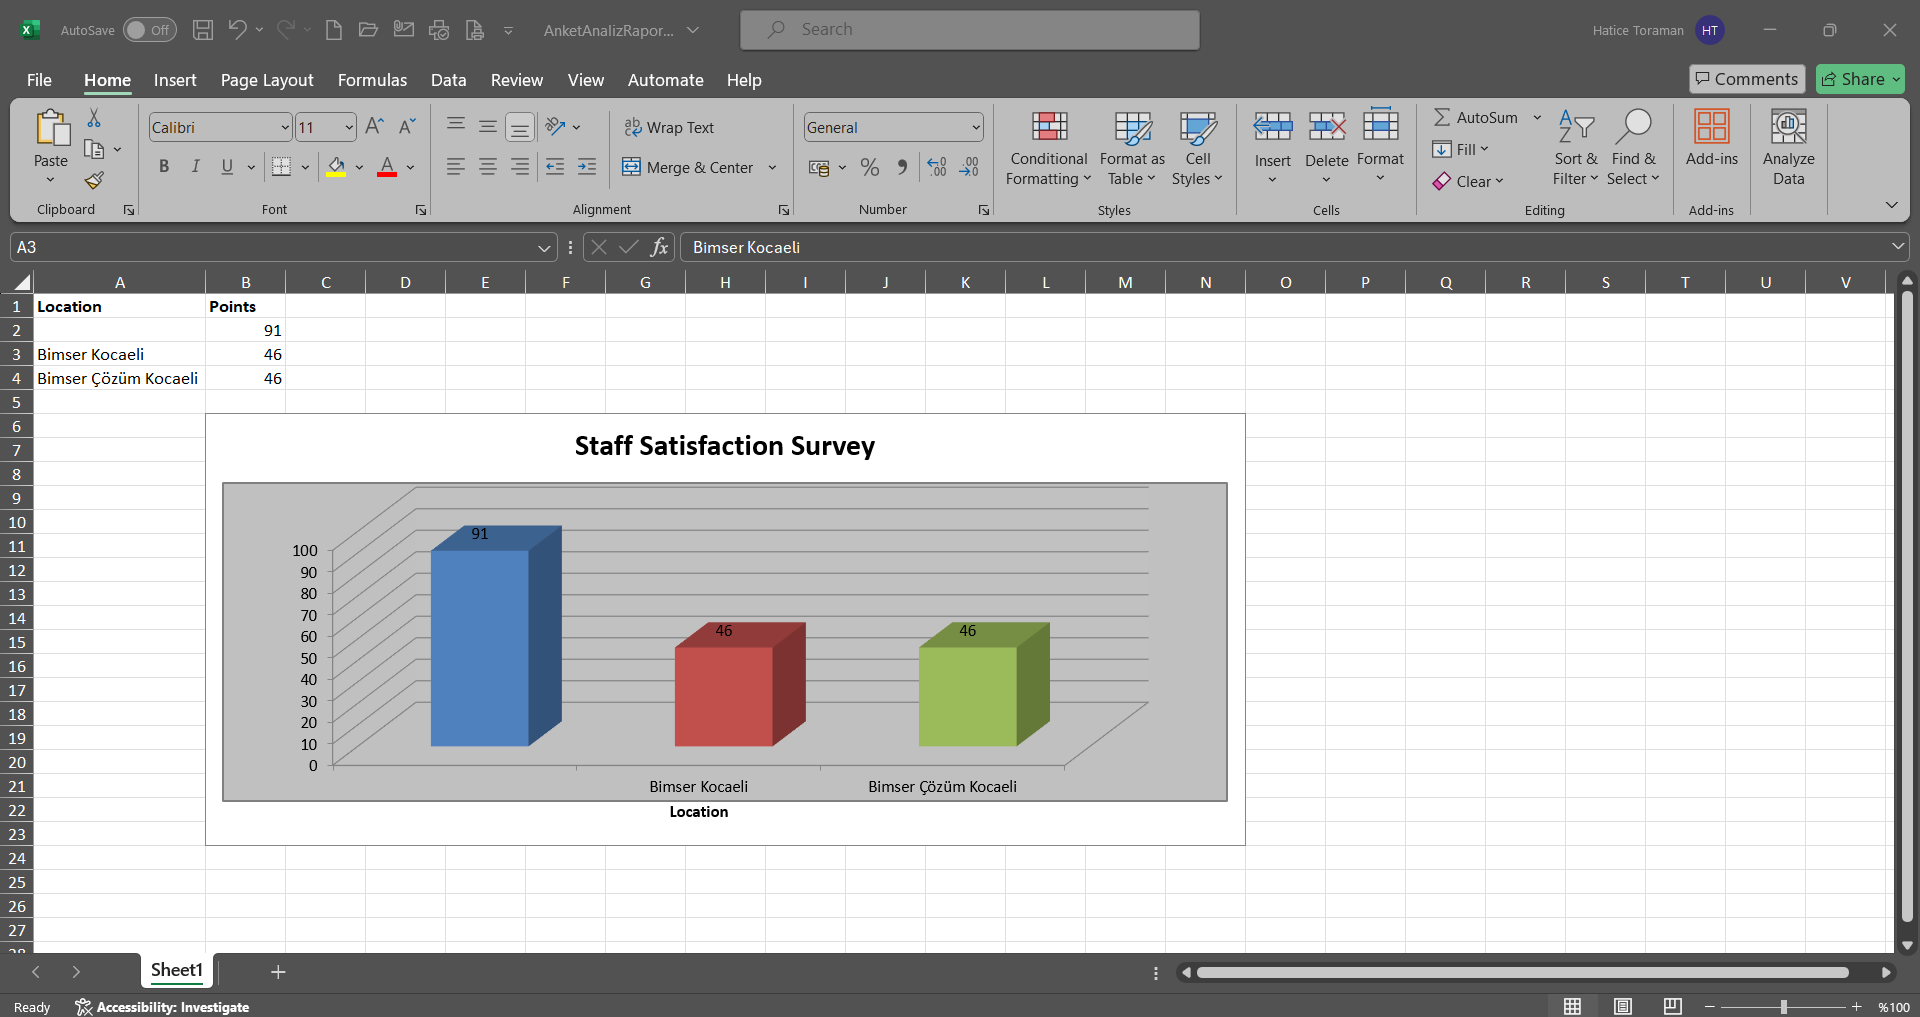
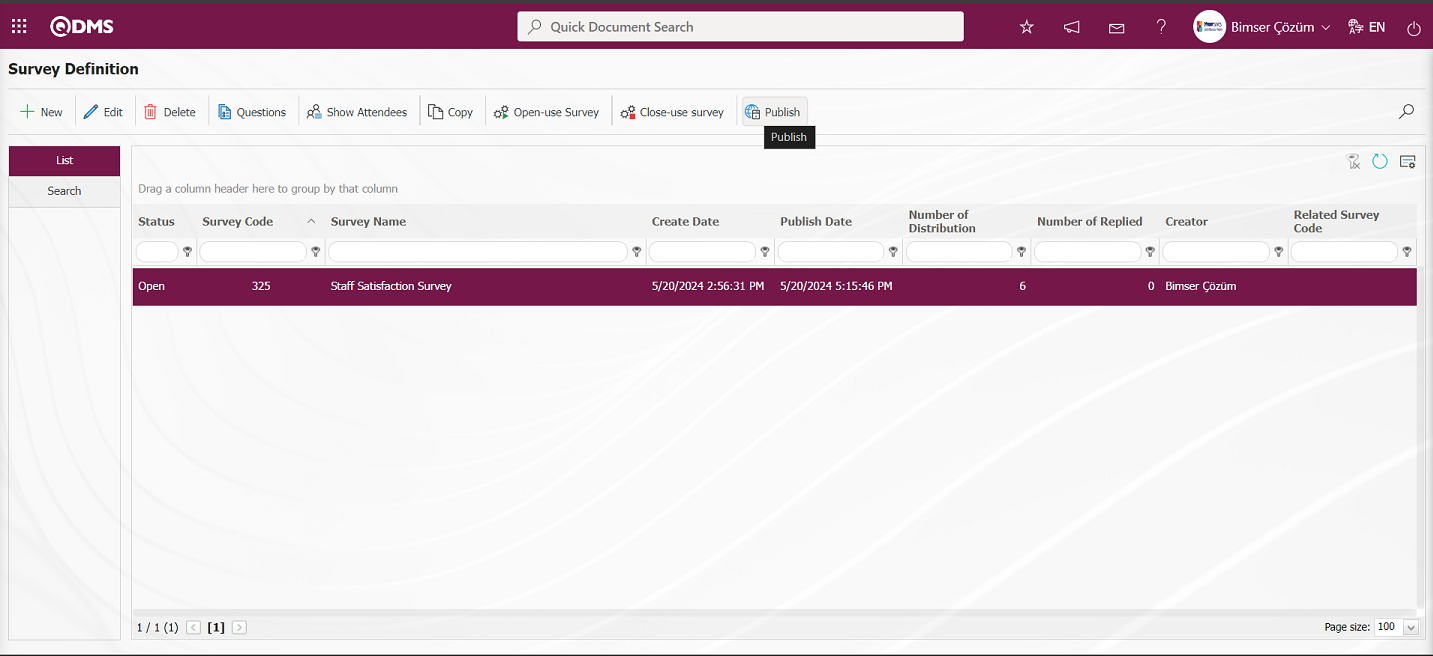
For example: “Staff Satisfaction Survey” with survey code 325 is defined as “Staff Satisfaction Survey” with survey code 326 in case of copying the survey. While the copied survey is selected, the  button is clicked and changes and edits are made on the information of the survey. Copying is done for surveys containing similar information.

 : It is used to make the survey available in the system. The users we add as participants will be sent a survey on QDMS to fill out the survey and the users will be assigned to their pending tasks. After the survey record is created and questions are added, this button must be clicked for users to view and fill out the survey.
 : The survey should be closed manually by clicking this button. The parameter value of the parameter number 7 “Validity date are completed surveys automatically closed?” in the survey module parameters is activated by selecting “Yes”.

When the parameter is activated, the survey with expired validity date is closed without using this button.
 : If you want the survey to be published by e-mail, click on the button.
 : In case of a large number of surveys, filtering is done with the search button by typing the data in the available fields in the search tab..
 : The search criteria on the menu screens are used to clear the data remaining in the filter fields in the grid where the search operation is performed.
 : The menu screen is restored to its default settings.
 : User-based designing of the menu screen is done with the show-hide feature, that is, the hiding feature of the fields corresponding to the columns on the menu screens.
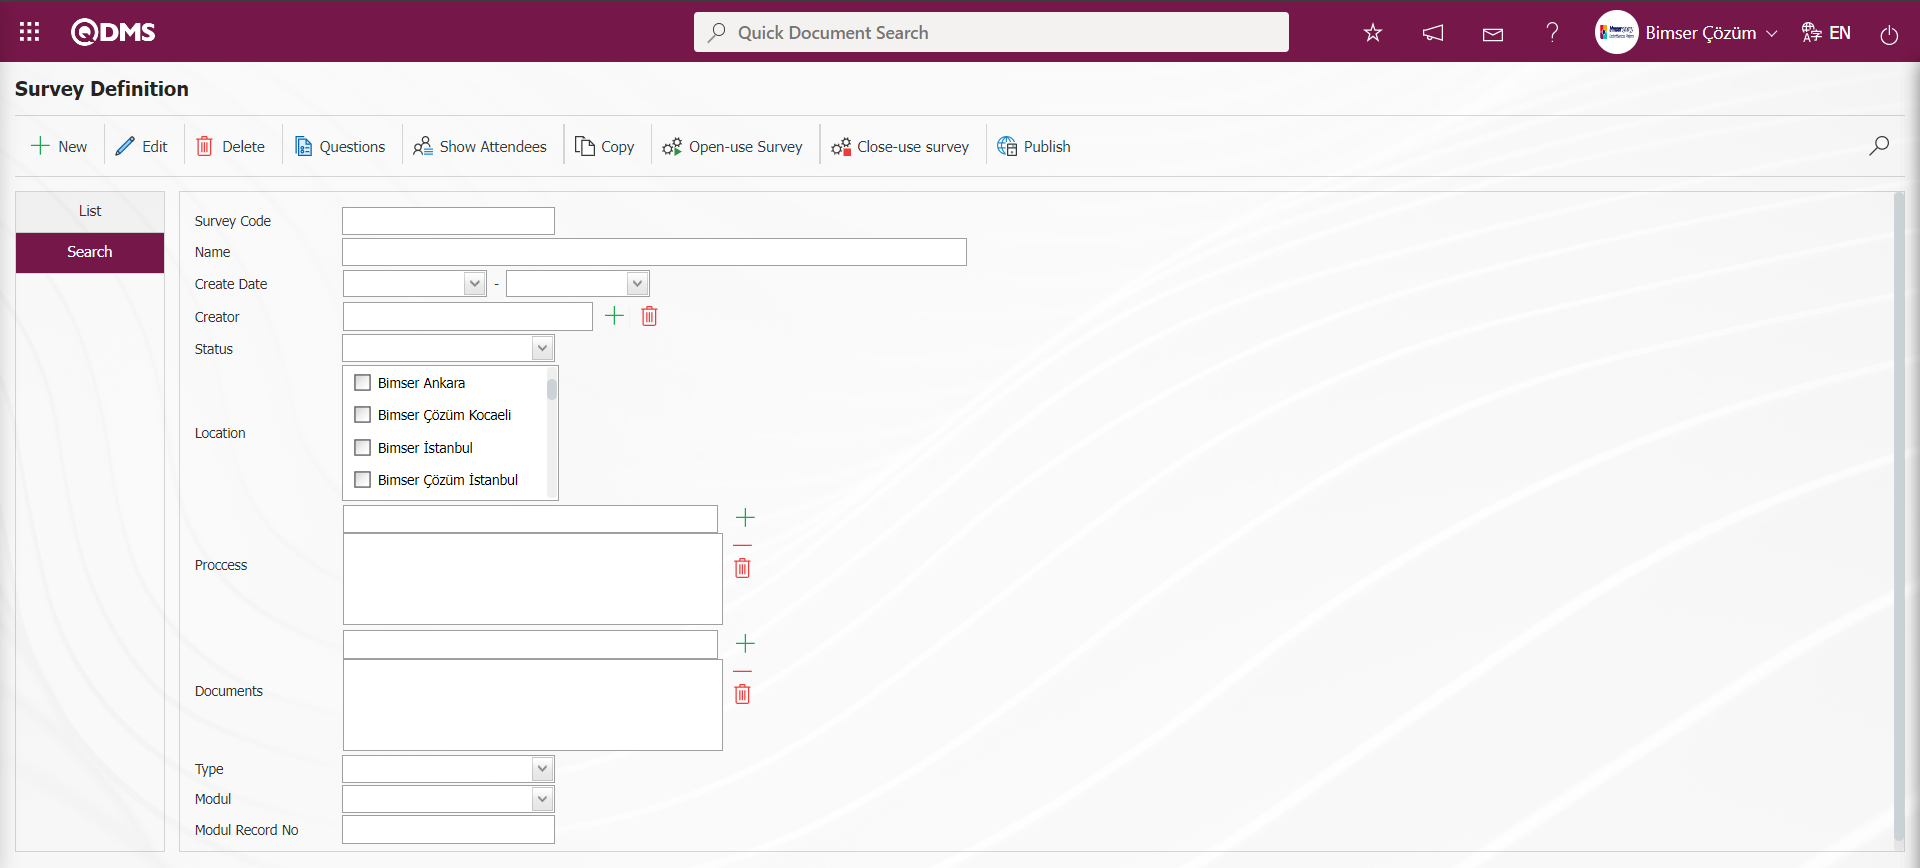
Search tab;
In the Search tab, data is entered in the fields with search criteria and filtering is done according to the search criteria.
6.2.1.1. Preparing a New Questionnaire
Menu Name: Integrated Management System/Survey /Prepare Internal Servey form menu is clicked to open the survey definition screen.
Click the  button on the top left corner of the screen to define a new survey.
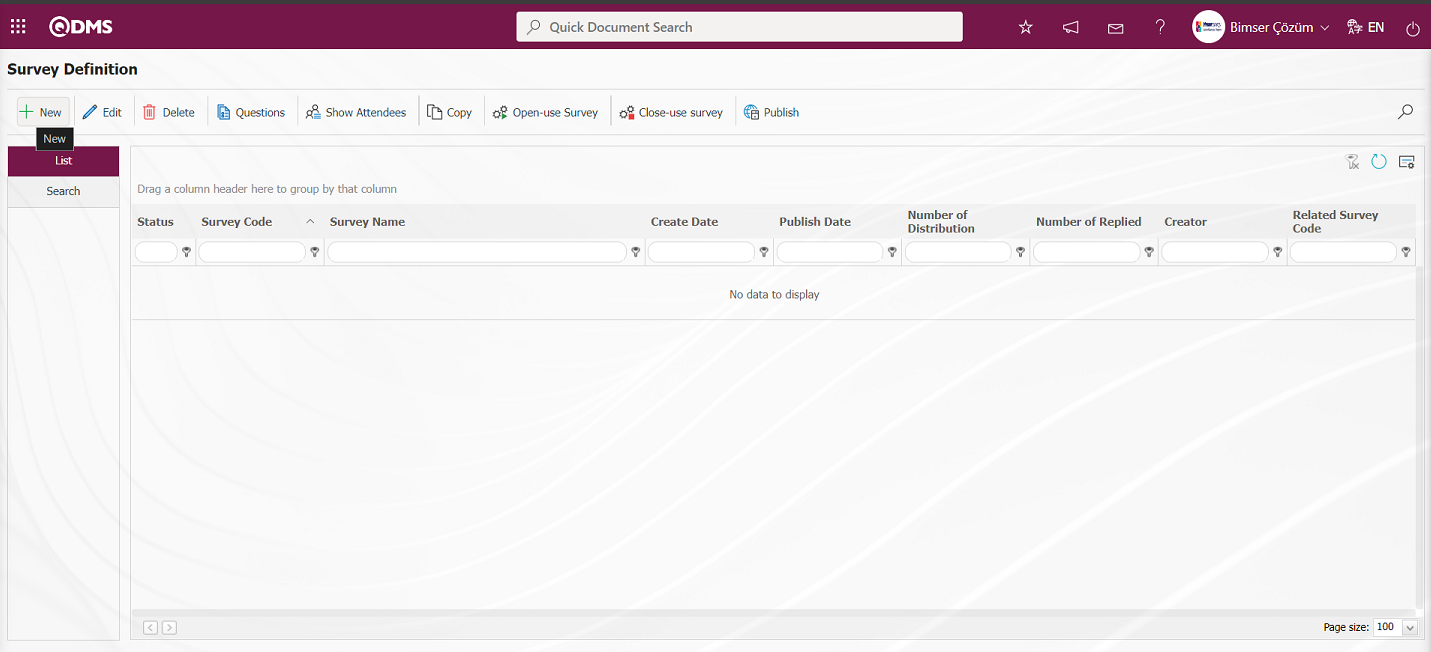
The Survey Definition screen opens.
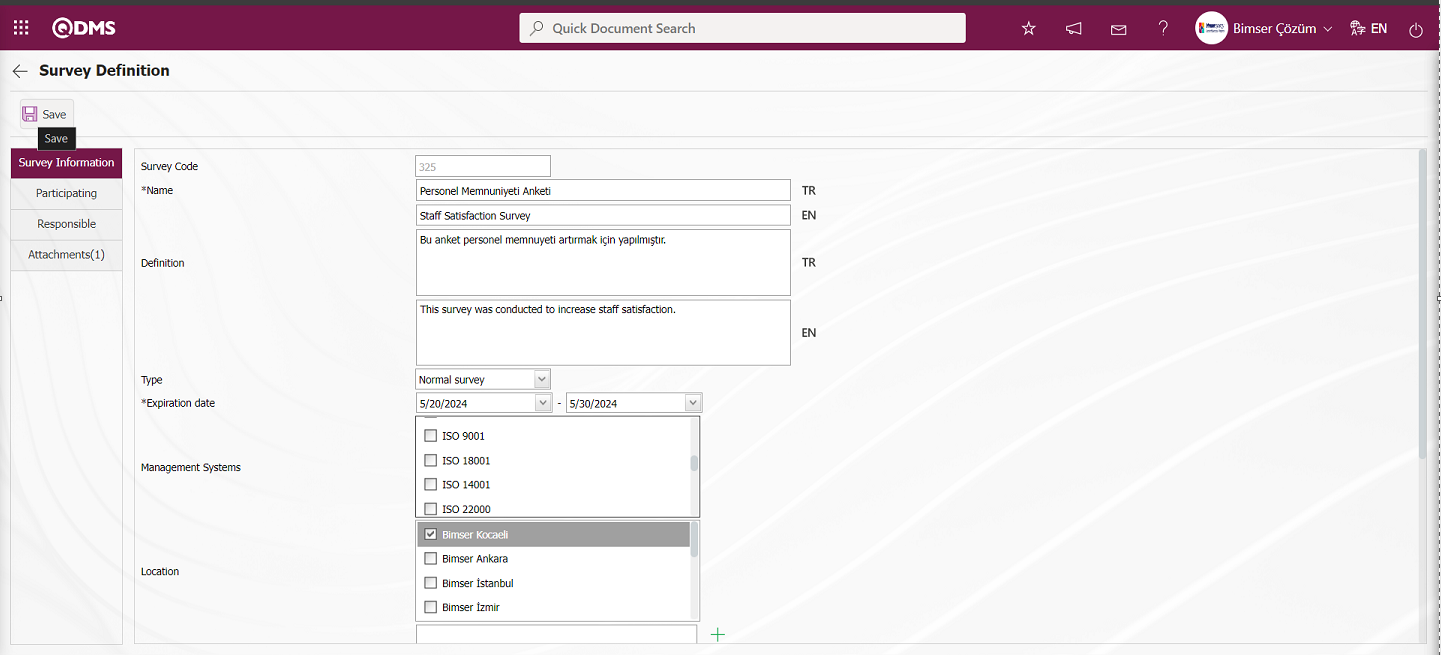
Survey Information Tab: General information about the survey is filled in. For example: Survey code, Survey name, Description and Survey type.
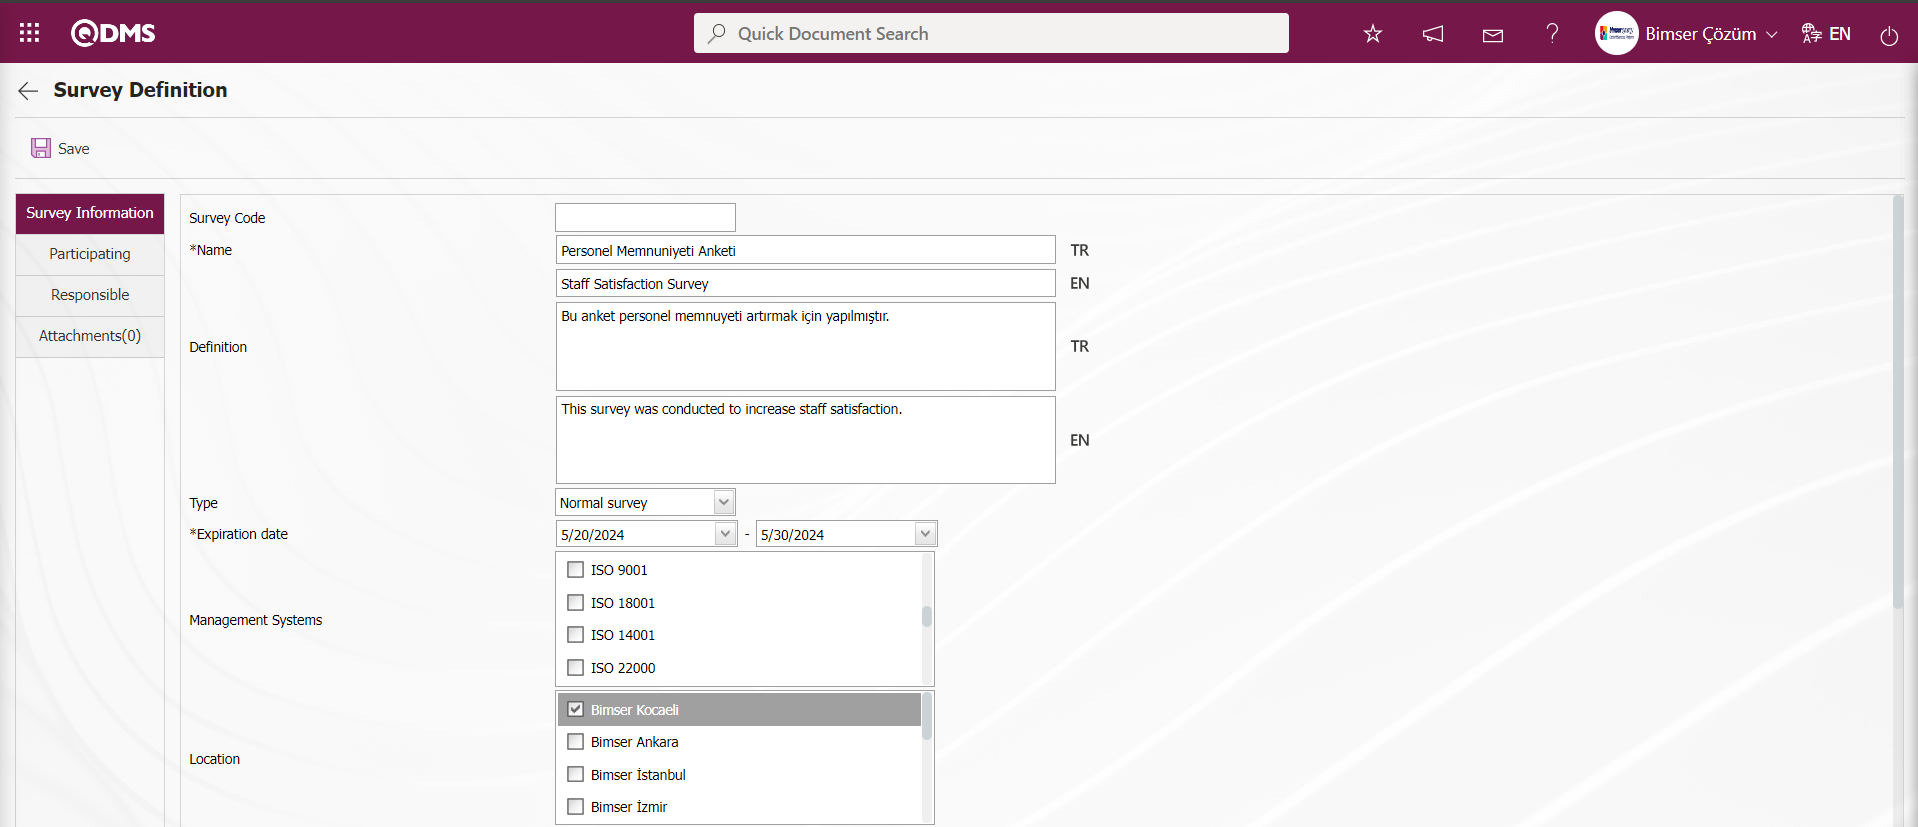
Define the relevant fields on the screen that opens:
Survey Code: It comes automatically by the system.
Name: This is the field where the name of the survey is entered. For example: Staff satisfaction survey, service services survey. In case of use in other languages, the survey names should be written in the field for other languages.
Definition: The descriptions to be entered about the created survey should be written in this field.
Type: There are 2 different survey types. These are normal survey and template survey. The normal survey type is selected for surveys that we prepare without establishing a relationship with the modules. For use in other modules (for example: CAPA activity evaluation survey), the template survey type is selected.
Expiration Date: Determines the dates between which the survey will be in effect. The survey is opened and closed manually for users. However, if the parameter value of the survey parameter number 7 “Validity date are completed surveys automatically closed?” is “Yes”, the survey closes the survey automatically on the specified deadline based on the effective date.
Management System: Select which management system is in the scope of the survey. Multiple selection is possible.
Location: Enter the location where the survey will be used. Multiple selection can be made.
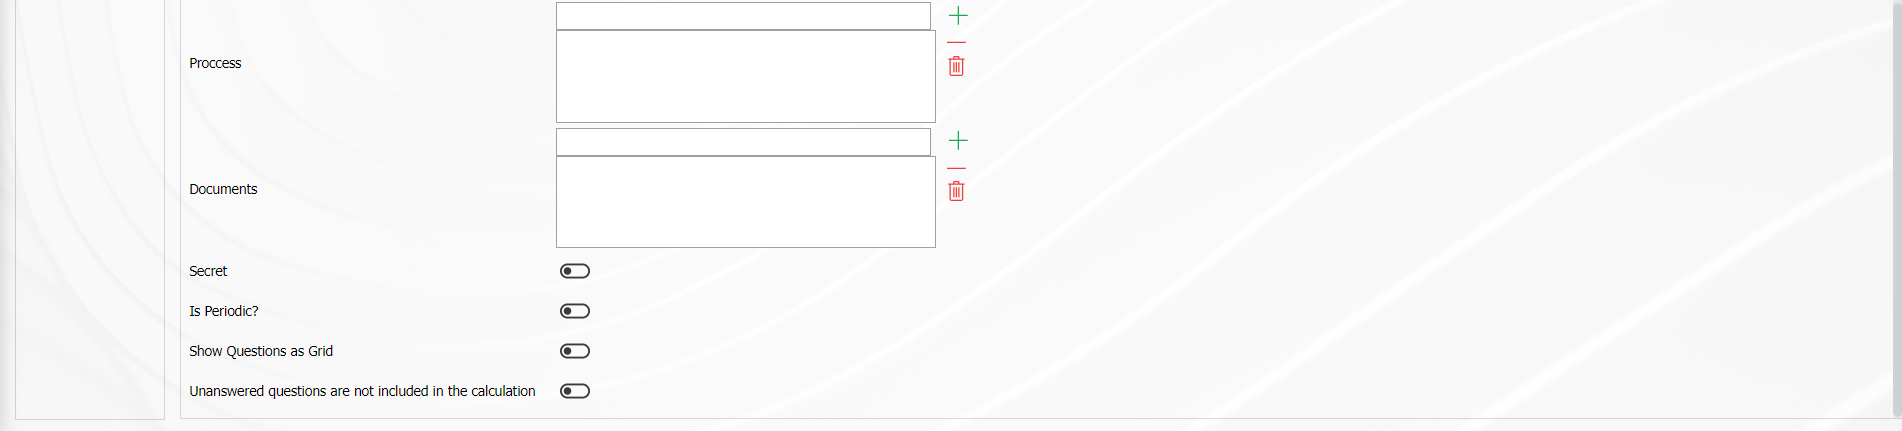
Process: The survey created with this button can be associated with processes.
Secret: There is a “ Secret” check box at the bottom of the survey information page. When this check box is checked, the registration numbers of the people who fill out the relevant survey are hidden by the system.
Periodic Survey: When the parameter number 11 “Use periodic survey?” from the Survey module parameters is activated by selecting the parameter value “Yes”, it allows the created survey to be opened periodically depending on a certain repetition interval.
The parameter value of parameter 12 “Will periodic surveys be posted automatically to participants?” from the survey module parameters is activated by selecting “Yes”.
 After the parameter is activated, periodic surveys are automatically published to the survey participants.
Show Questions as Grid: In the defined survey, the relevant check box for “Show Questions as Grid” is checked. After the “Show Questions as Grid” option is selected, only option and multiple choice type questions are defined on the Survey Questions screen. If the question type defined first on the Survey Questions screen, for example, an optional question is defined, the process of continuing to define questions in the optional question type is performed. However, the button to define questions in multiple choice type is removed and no question definition process is performed in this type. According to the question type defined first on the Survey Questions screen, the button to define the question type of that type remains on the screen and the process of defining questions in that question type continues.
Unanswered questions are not included in the calculation: If you do not want the questions not answered in the defined questionnaire to be included in the calculation, check the relevant check box.
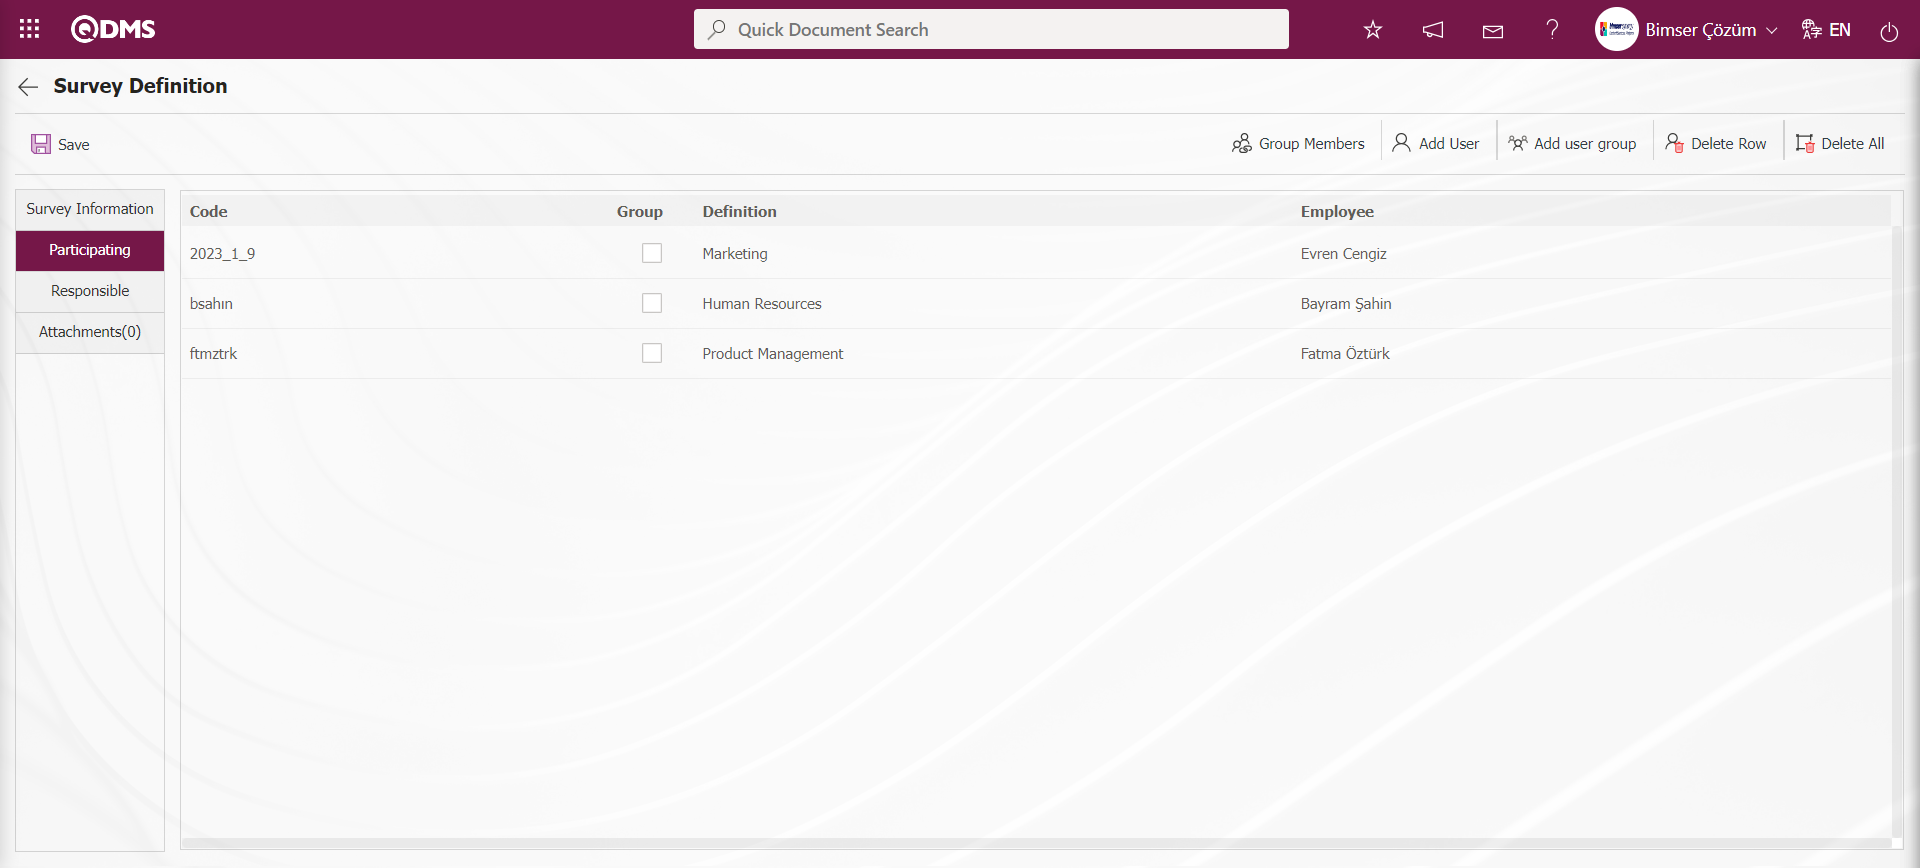
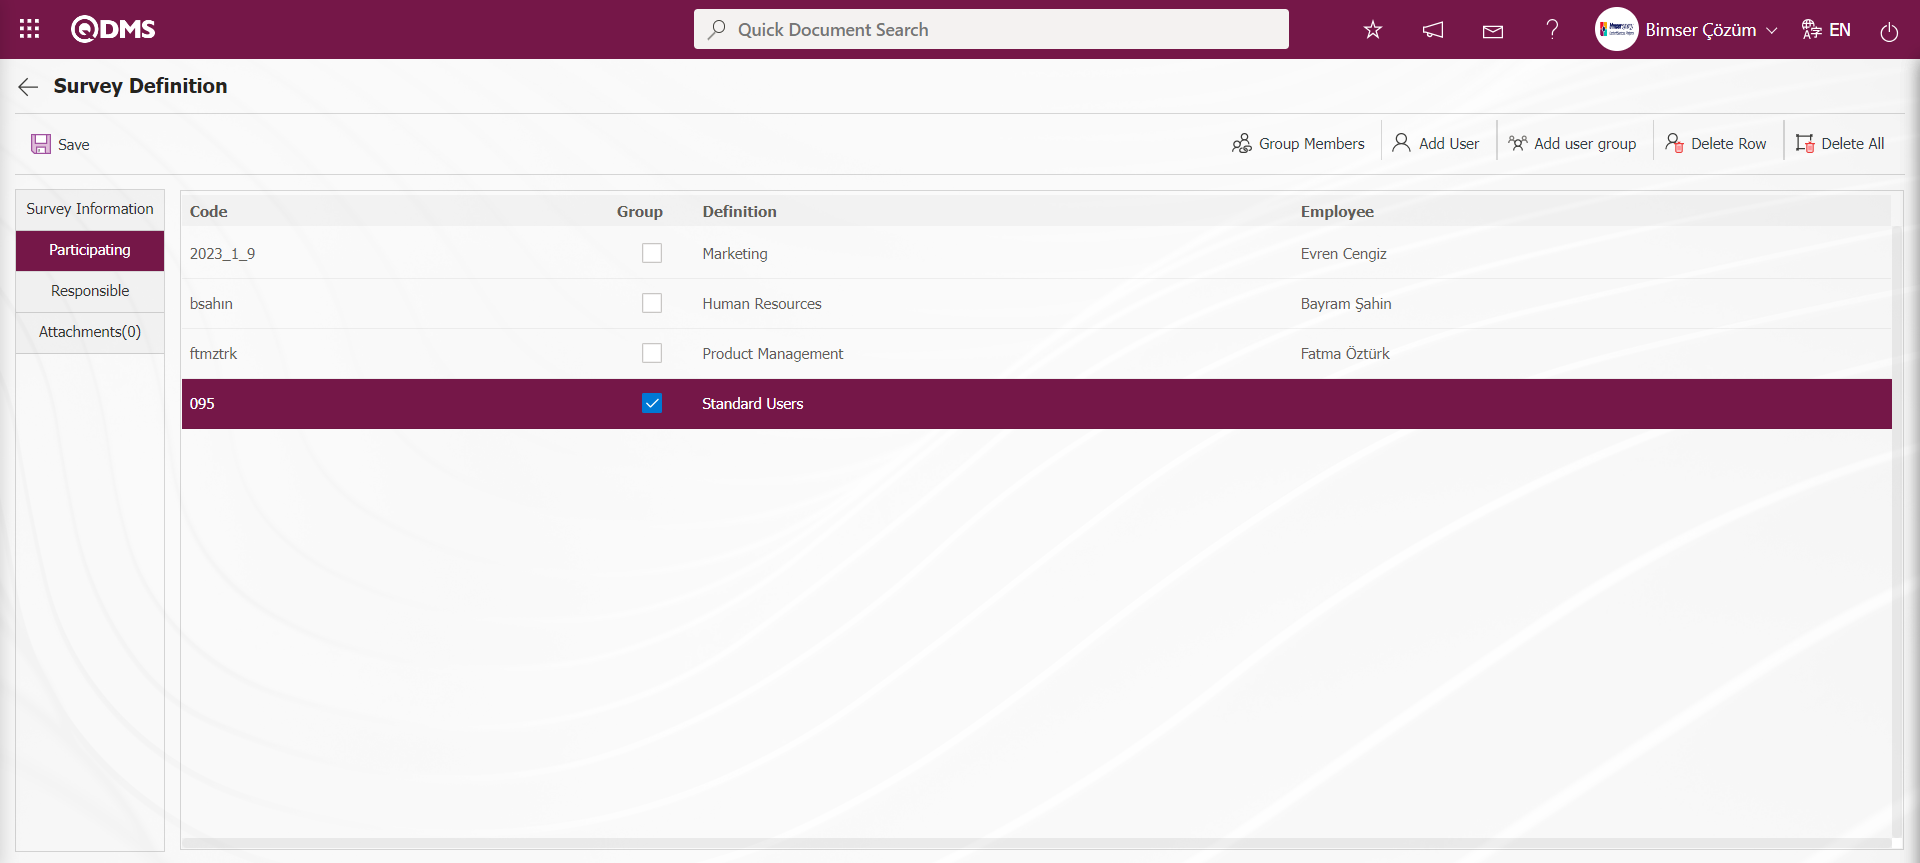
Participating Tab: Users who are requested to participate in the created survey are selected from this tab.

With the help of the buttons on the screen;
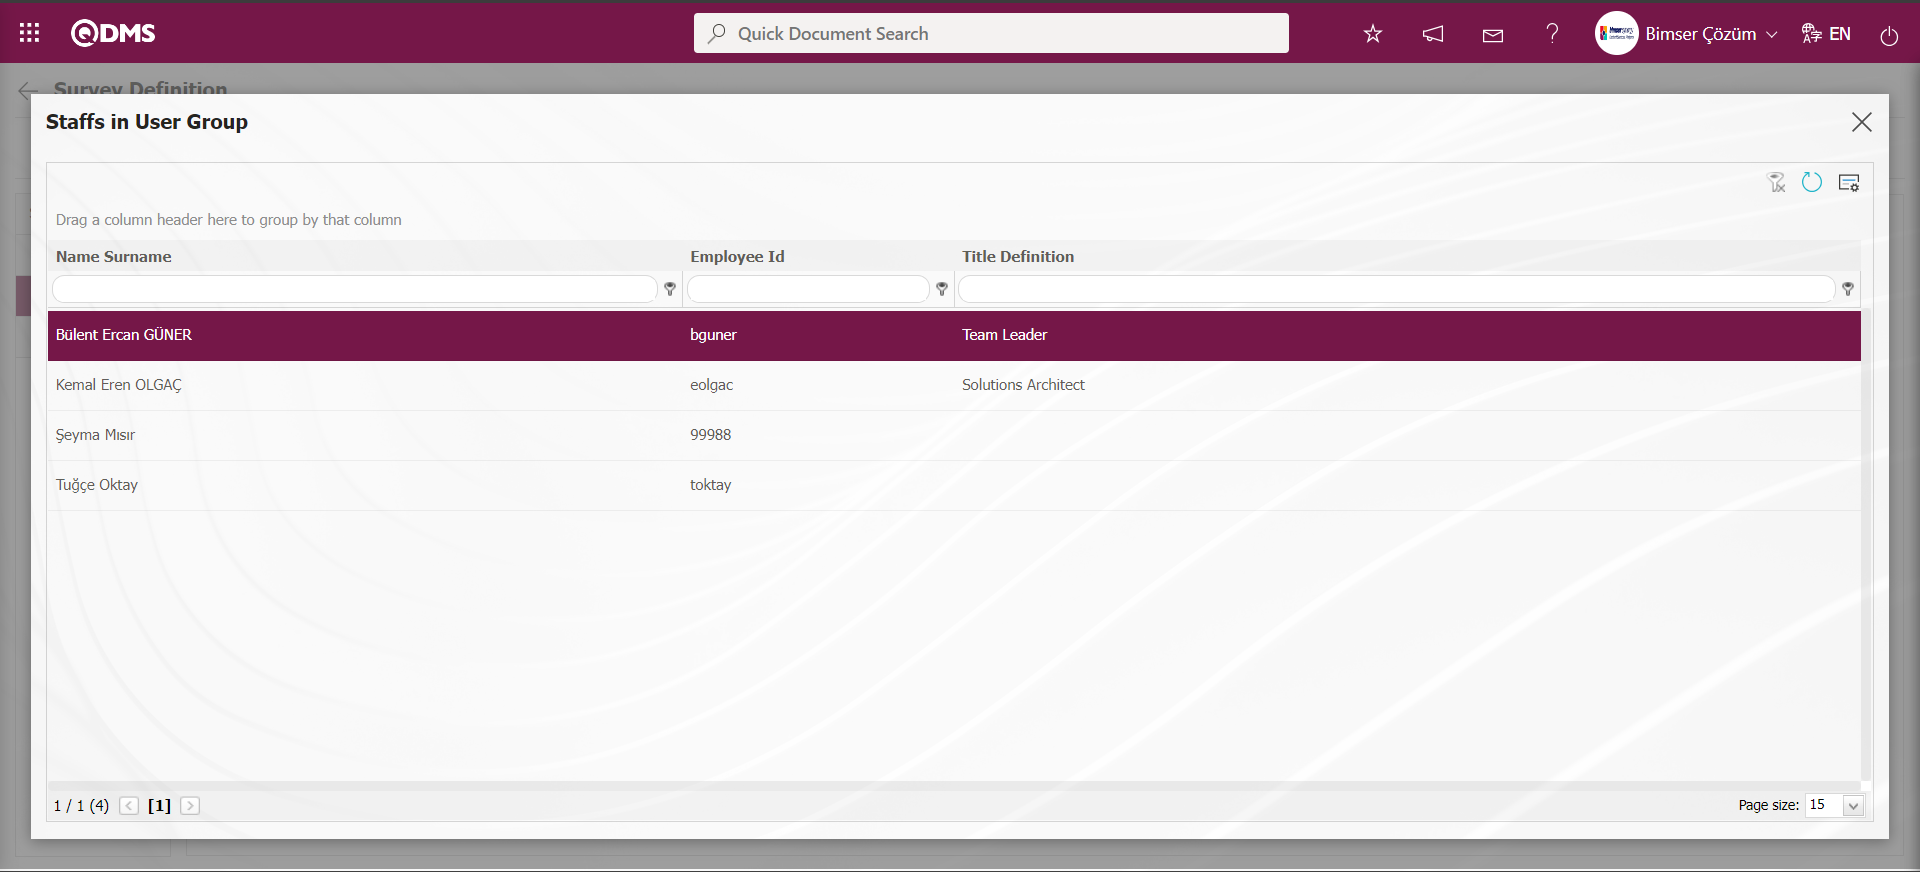
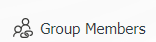 : When the user group is added as a participant, this button is used to display the group members.
 : This button is used to add participants as a position.
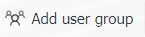 : This button is used to add participants as user group.
 : This button is used to delete the line added as a participant.
 : It is the button where all added participants can be deleted.
Click on the button on the Participant tab on the Survey Definition screen.

In the list of personnel defined in the system, the personnel are selected and the  button is clicked.
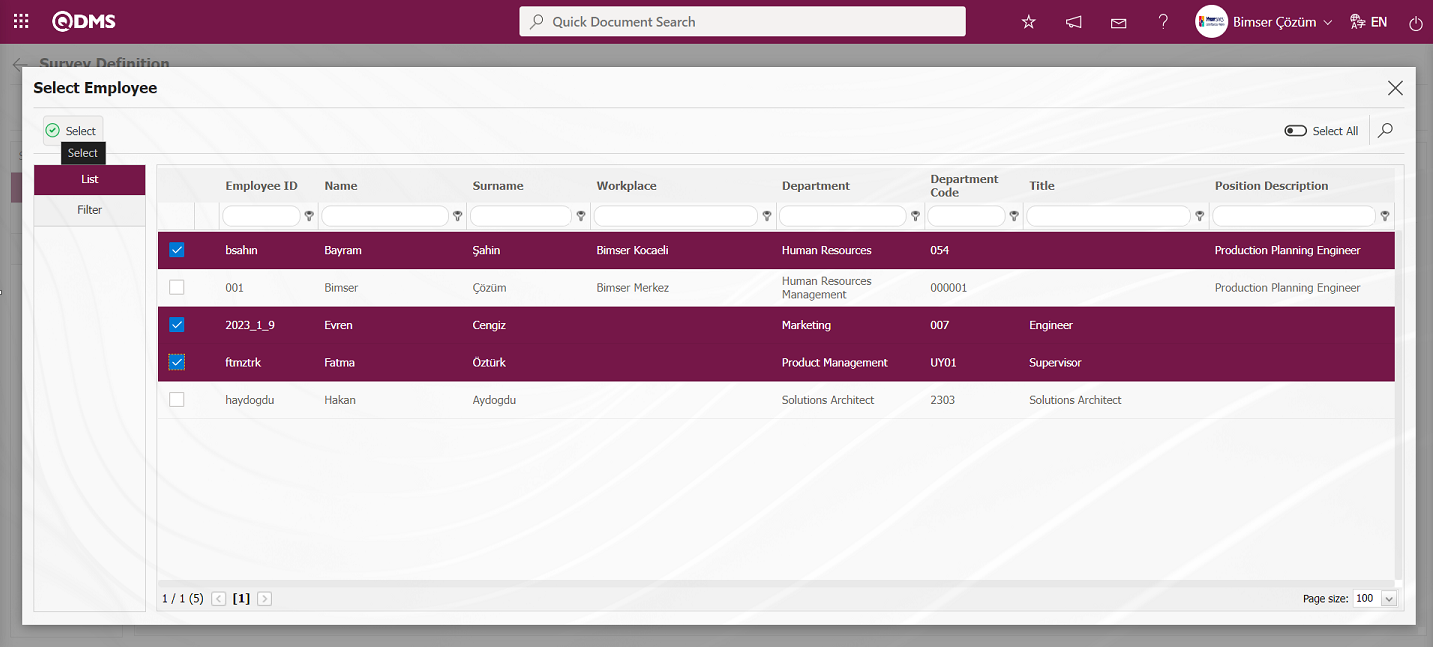
Adding participants to the survey in the personnel list.
Click on the button in the Participating tab on the Survey Definition screen.

User groups are selected from the user group list defined in the system and the button is clicked.

Adding participants to the survey in the user group list.
Click the 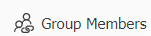 button while the user group added in the Participating tab on the Survey Definition screen is selected.
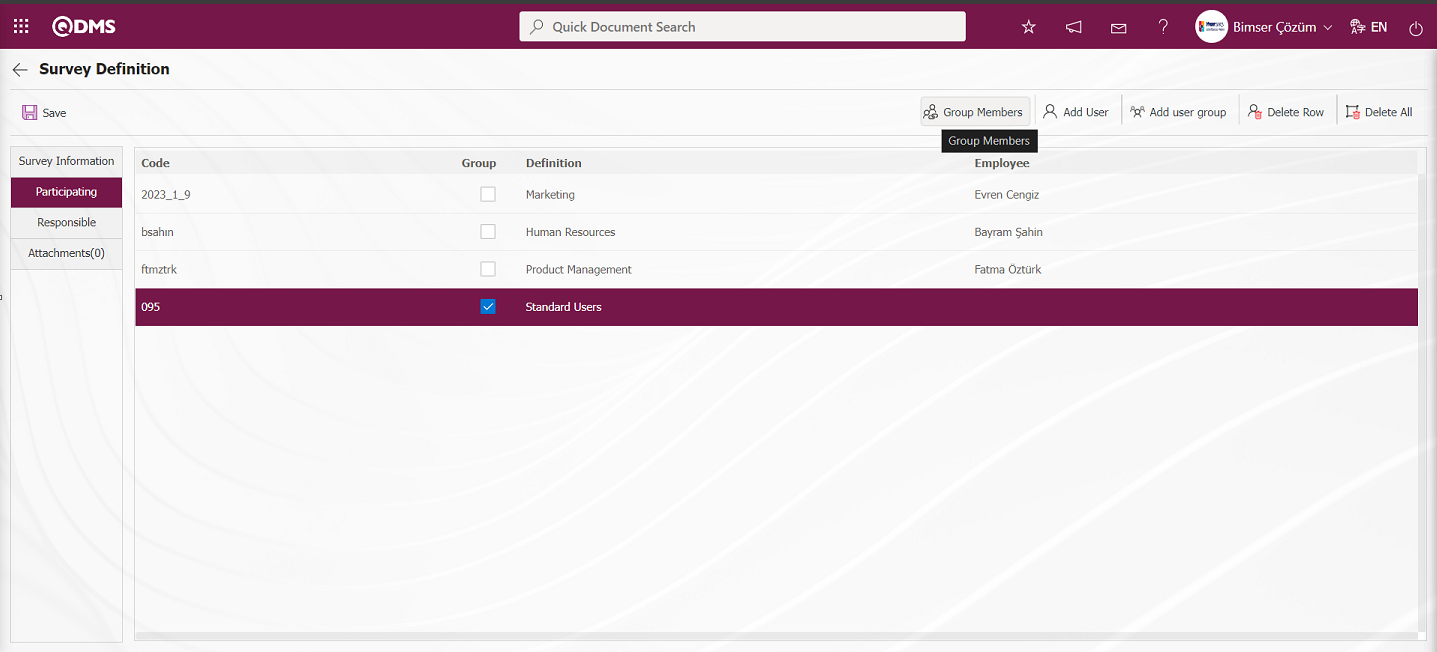
On the screen that opens, the list of personnel in the user group added as a participant is displayed.
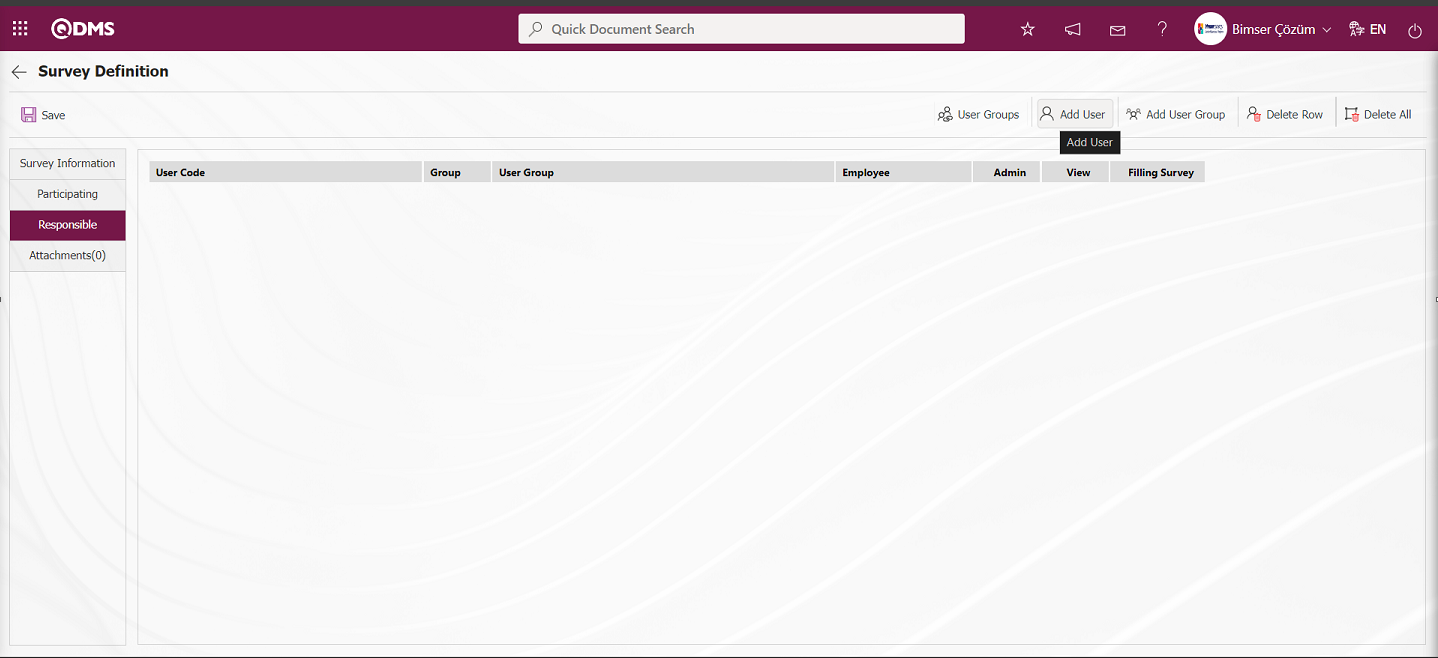
Responsibles Tab: The Responsibles tab should be used when it is desired to give the authorizations to view the survey results, make changes on the survey, and edit questions to different users other than the survey preparer or the manager of the survey module. The admin check box should be checked for the user or user group added for the authorization to make changes to the survey and edit questions. The user or user group added for the authorization to view the survey results should be given the view authorization. The parameter value of the parameter number 17 “Adding responsible for defining the survey mandatory? '” from the Survey module parameters is activated by selecting “Yes”.
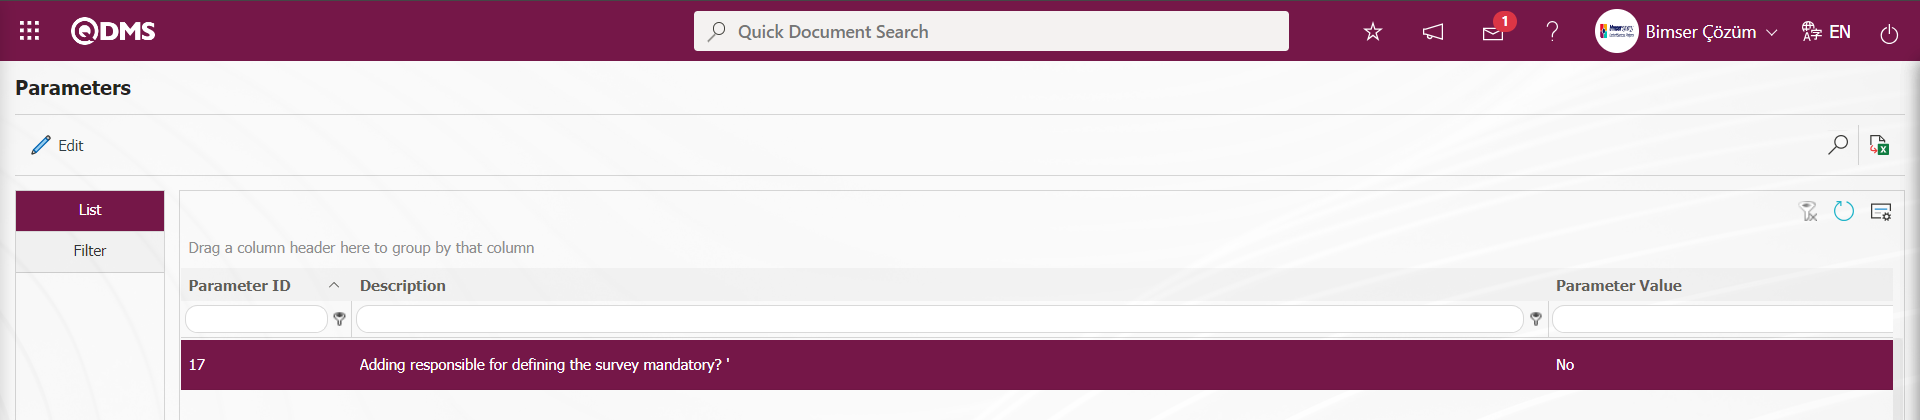
After the parameter is activated, it is mandatory to add a responsible person in the responsible persons tab on the Survey Definition screen. When the responsible person is not added in the responsible person tab on the Survey Definition screen, a warning message is given by the system when the registration process is performed.
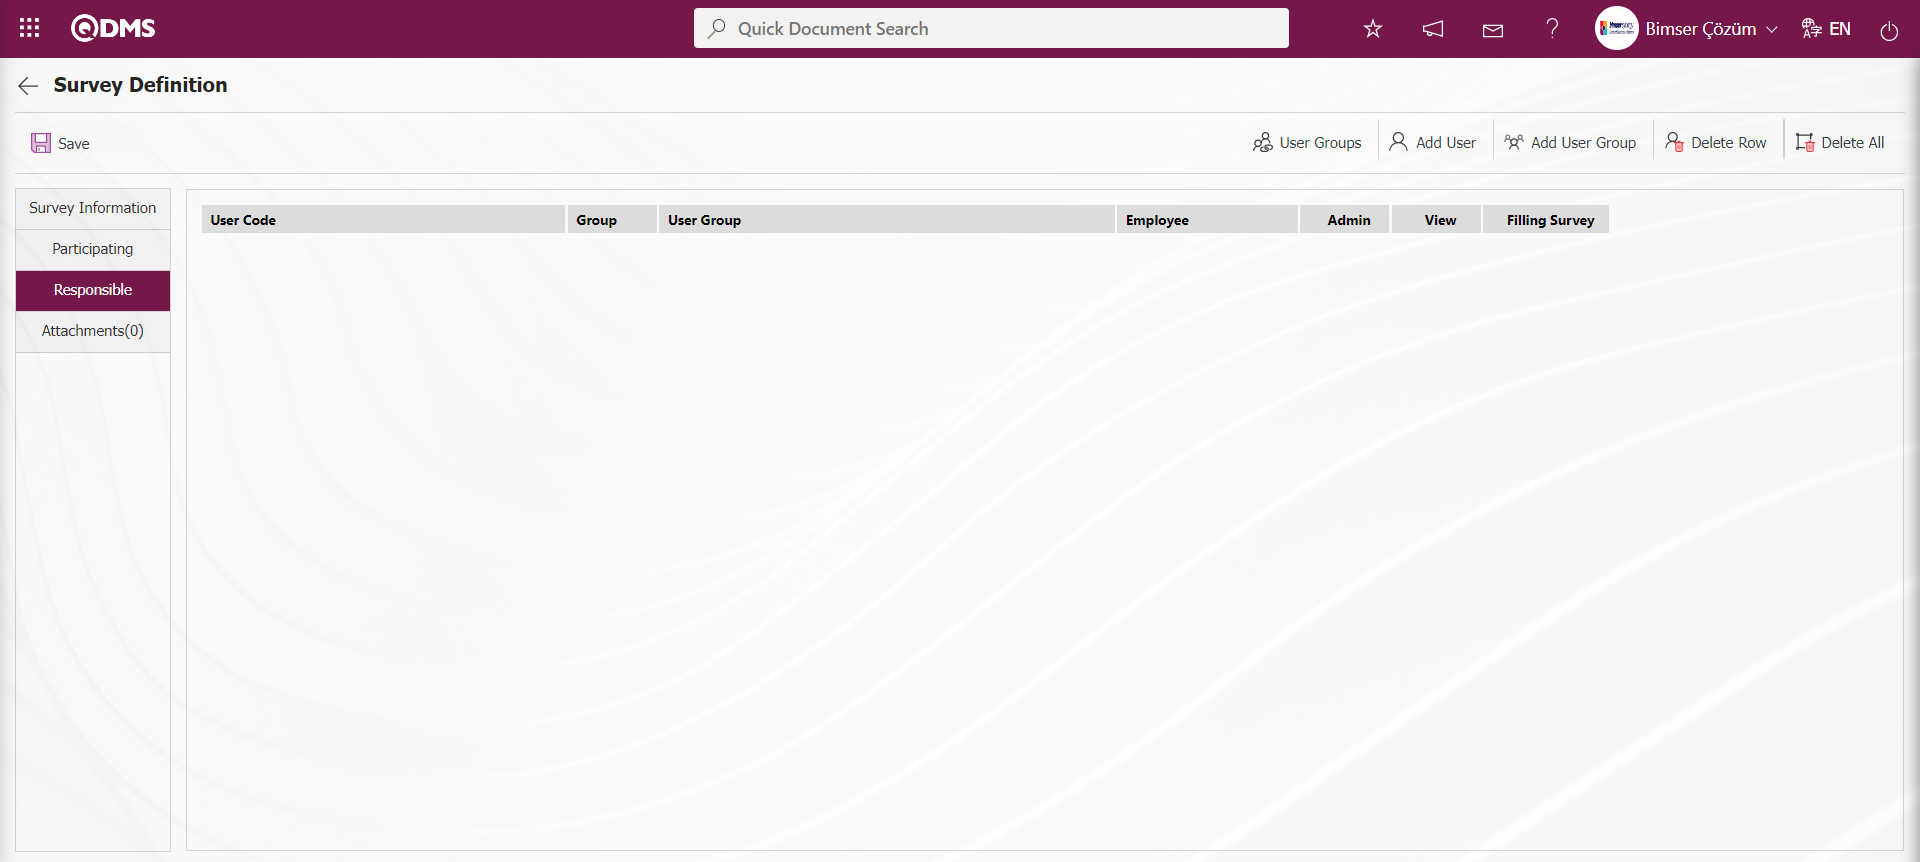
With the help of the buttons on the screen;
 : When user group is added as responsible, this button is used to display the group members.
 : This button is used to add the responsible as a position.
 : This button is used to add the responsible as user group.
 : This button is used to delete the line added as responsible.
 : This button is used to delete all added responsible.
Click on the button in the Responsible tab on the Survey Definition screen.
In the list of personnel defined in the system, the personnel are selected and the  button is clicked.
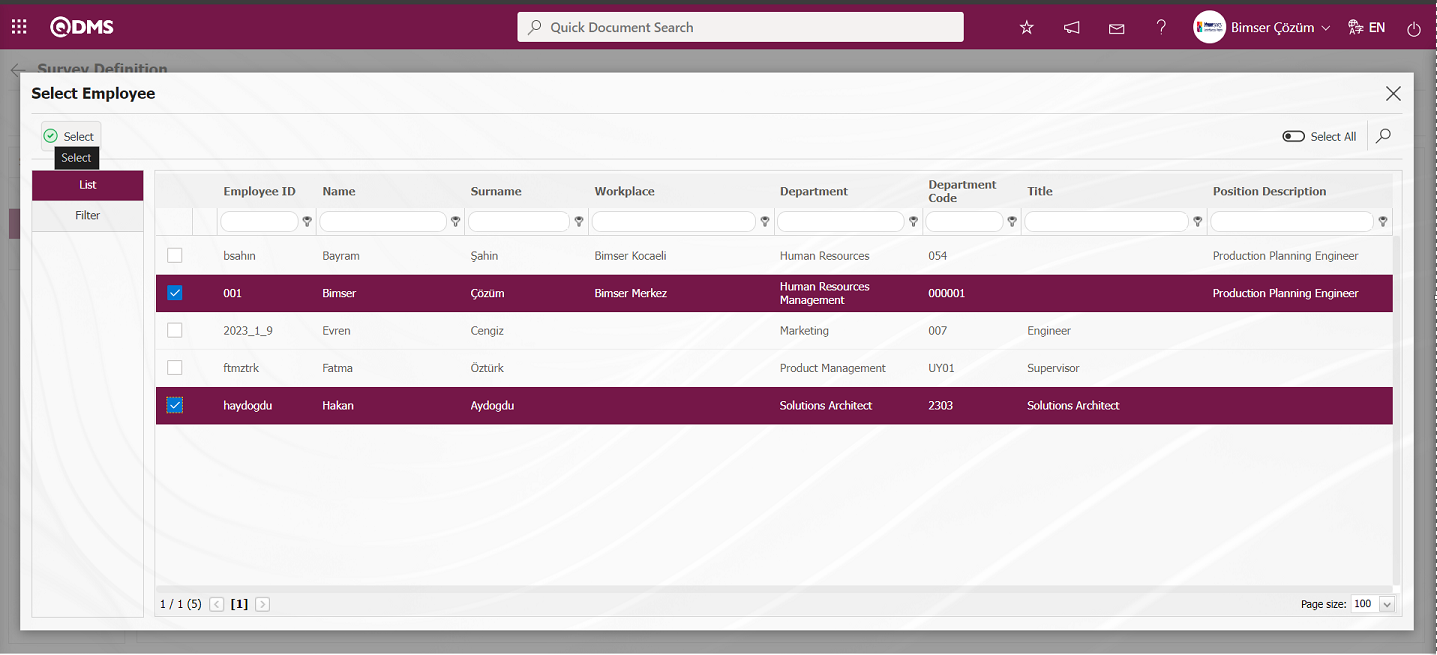
Adding a responsible person to the survey in the personnel list.

Click on the button in the Responsible tab on the Survey Definition screen.
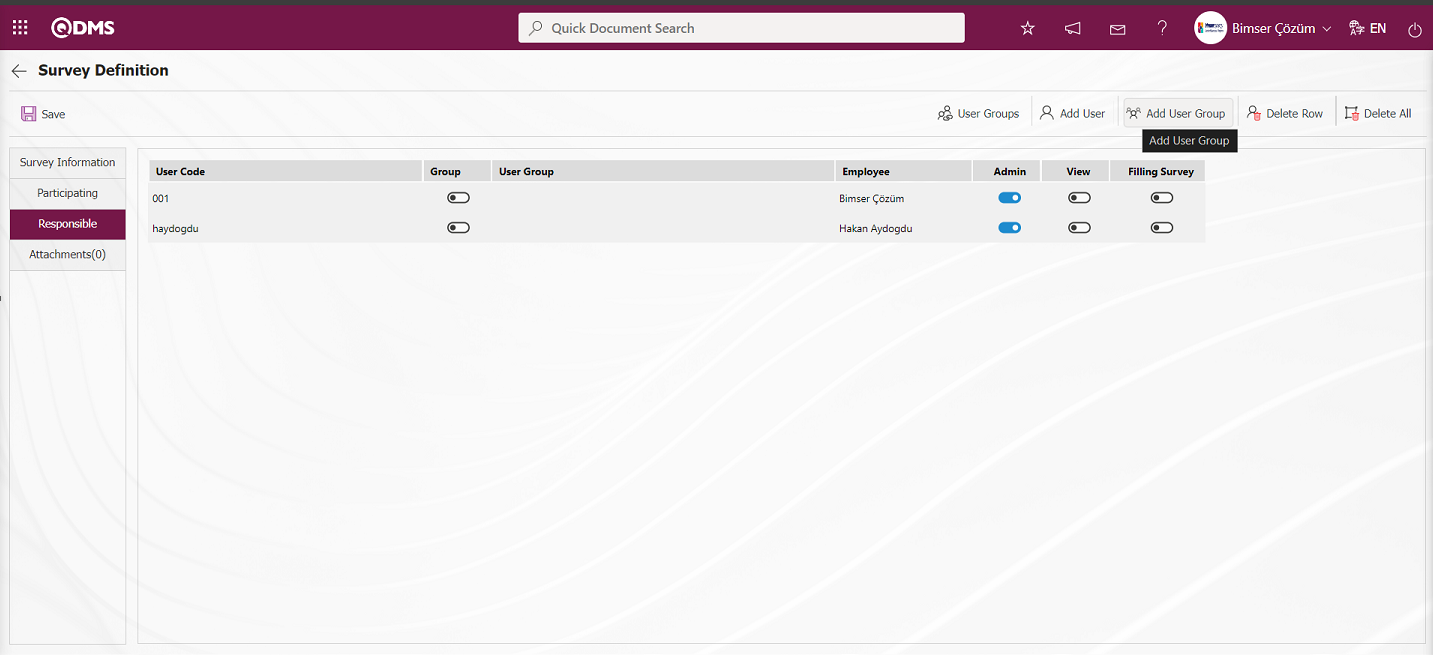
Select user groups from the user group list defined in the system and click the  button.
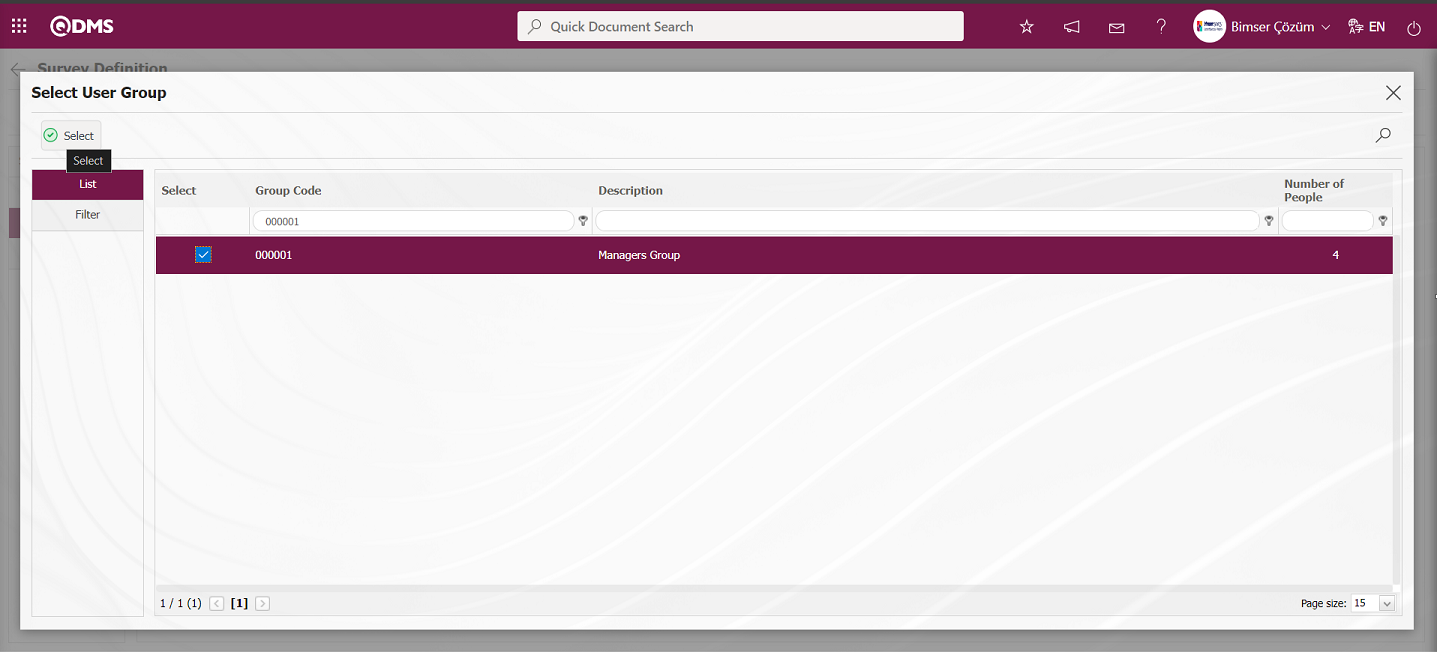
Adding a responsible person to the survey in the user group list.

On the Survey Definition screen, click the  button while the user group added in the Responsible tab is selected.
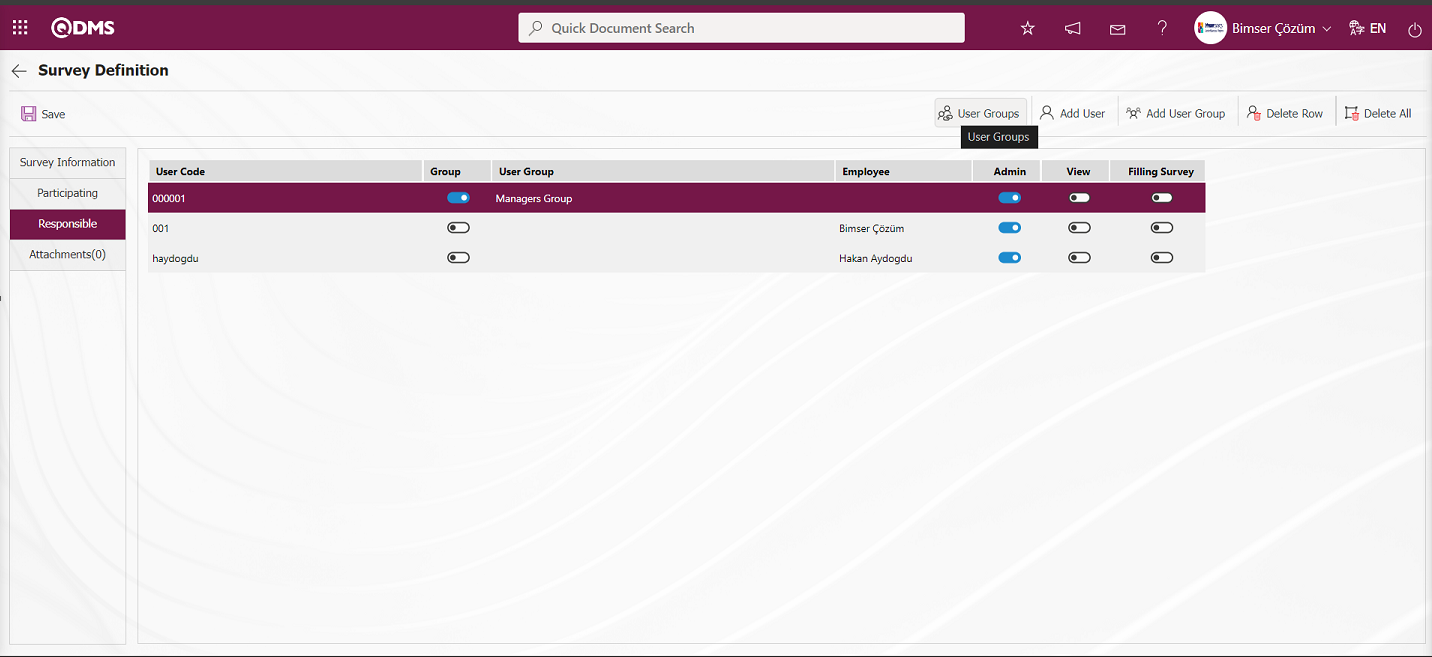
On the screen that opens, the list of personnel in the user group added as responsible is displayed.
After adding a responsible person in the Responsible Persons tab on the Survey Definition screen, the “admin” check box is checked for the user or user group added as responsible for the authorization to make changes to the survey and edit the questions.
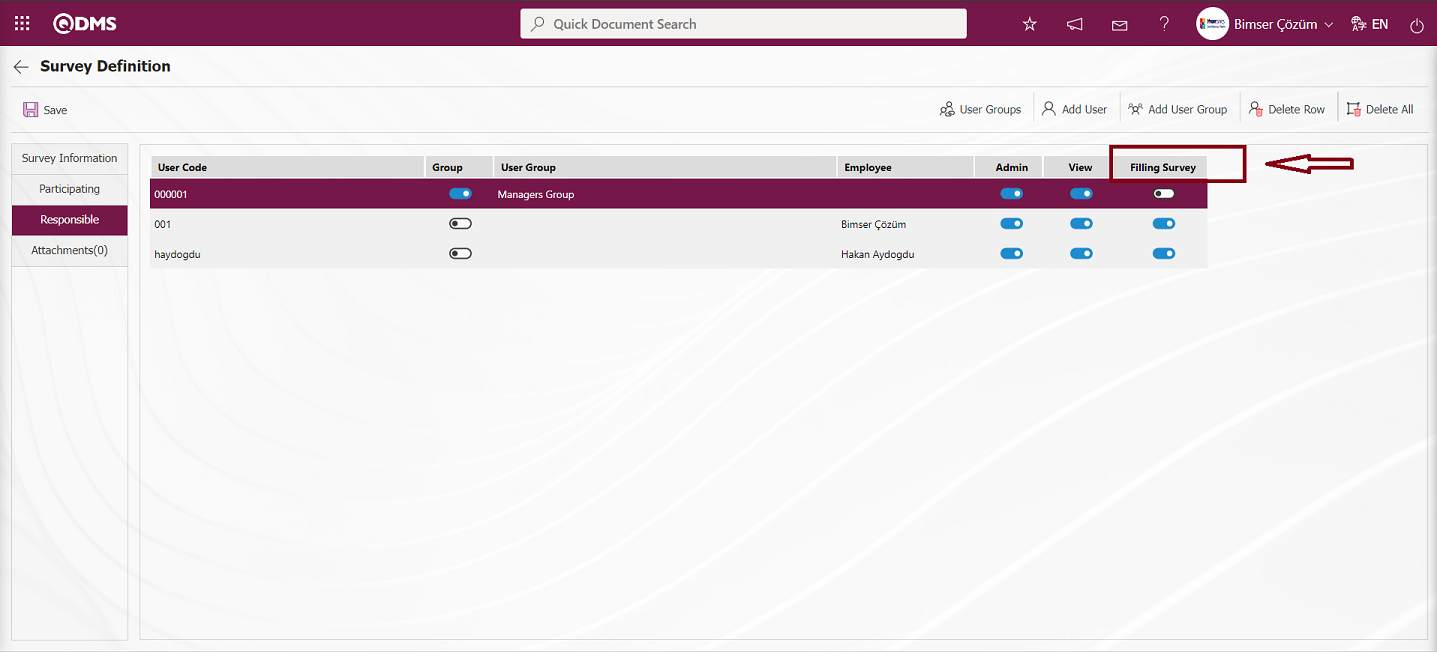
In the Survey Module parameters, the parameter value of parameter 22 “You can answer the survey on behalf of someone else Yeki (Y/ N)” is activated by selecting “Yes”.
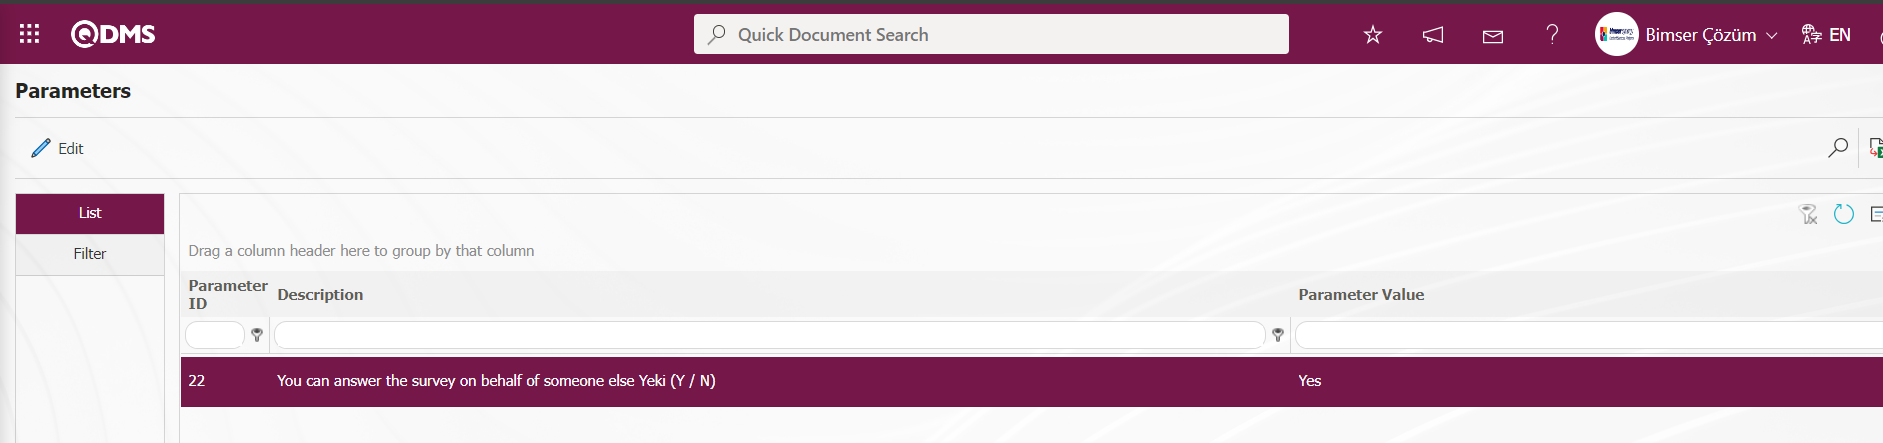
After the parameter is activated, another column called 'Filling Survey' appears in the responsible tab. Users who are authorized here can have the ability to fill out surveys on behalf of other users.
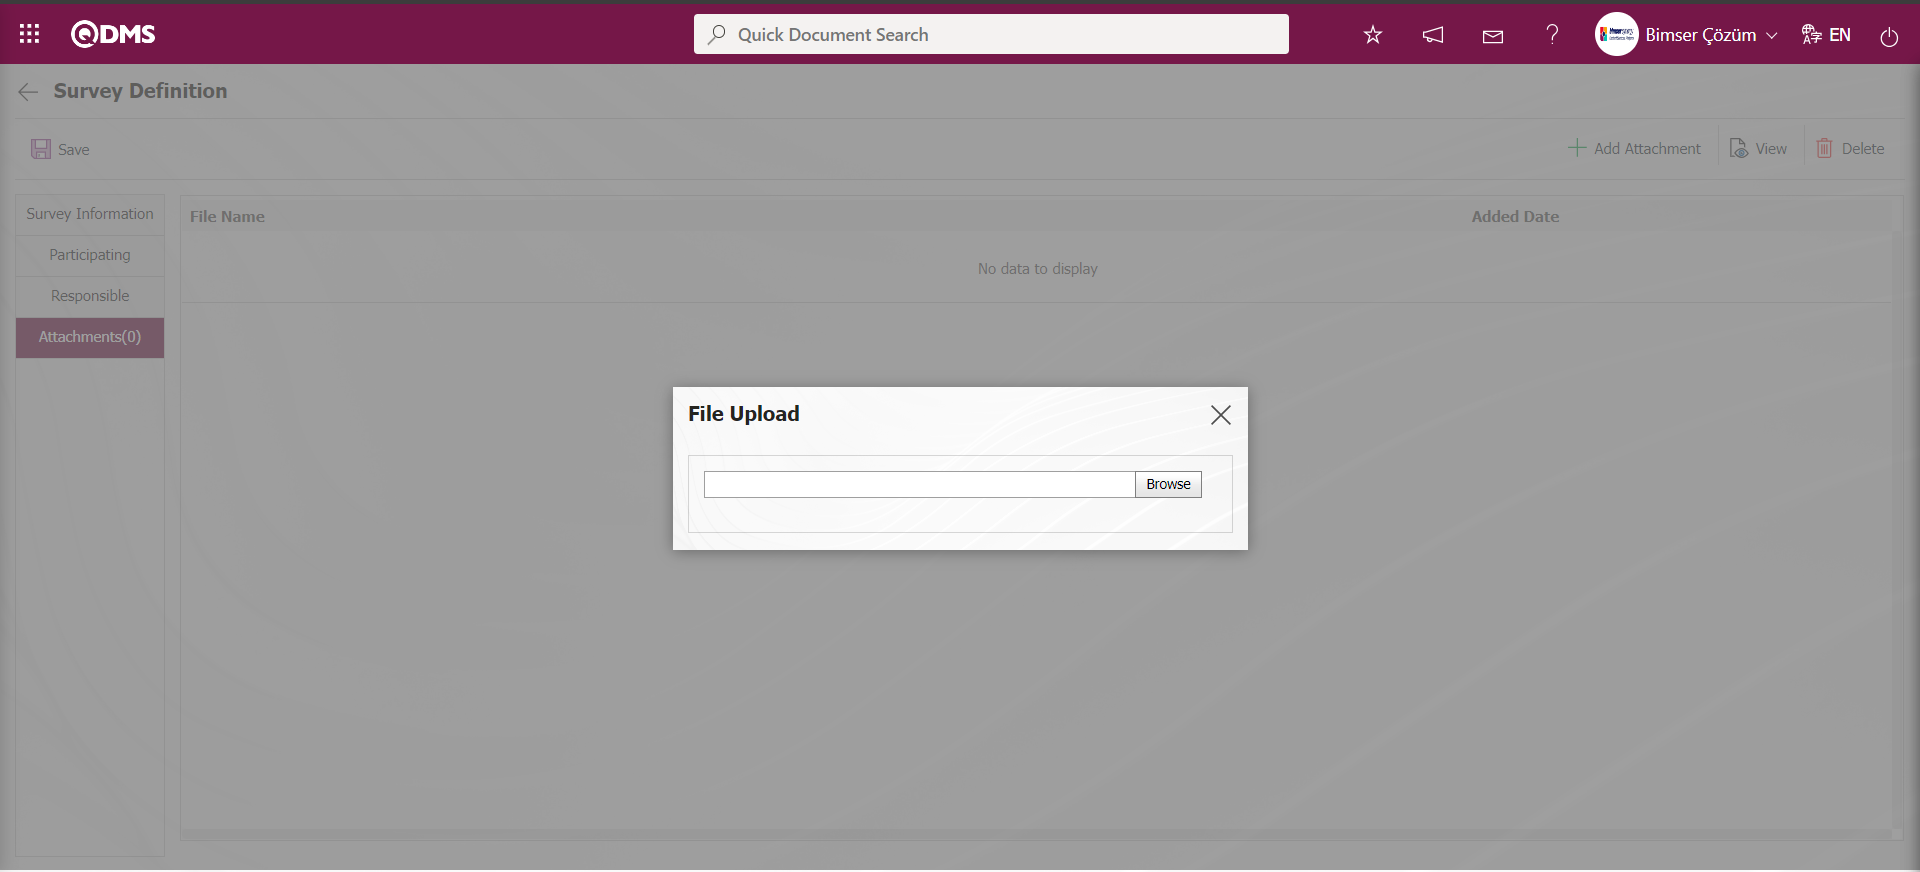
Attachments Tab: This is the tab where additional files are added to the defined survey.

With the help of the buttons on the screen;
 : The files to be added about the survey are added with the help of this button.
 : It is the button used to view the added file.
 : It is the button used to delete the added file.
In the Attachments tab on the Survey Definition screen, the process of adding additional files to the defined survey is done by clicking the button.

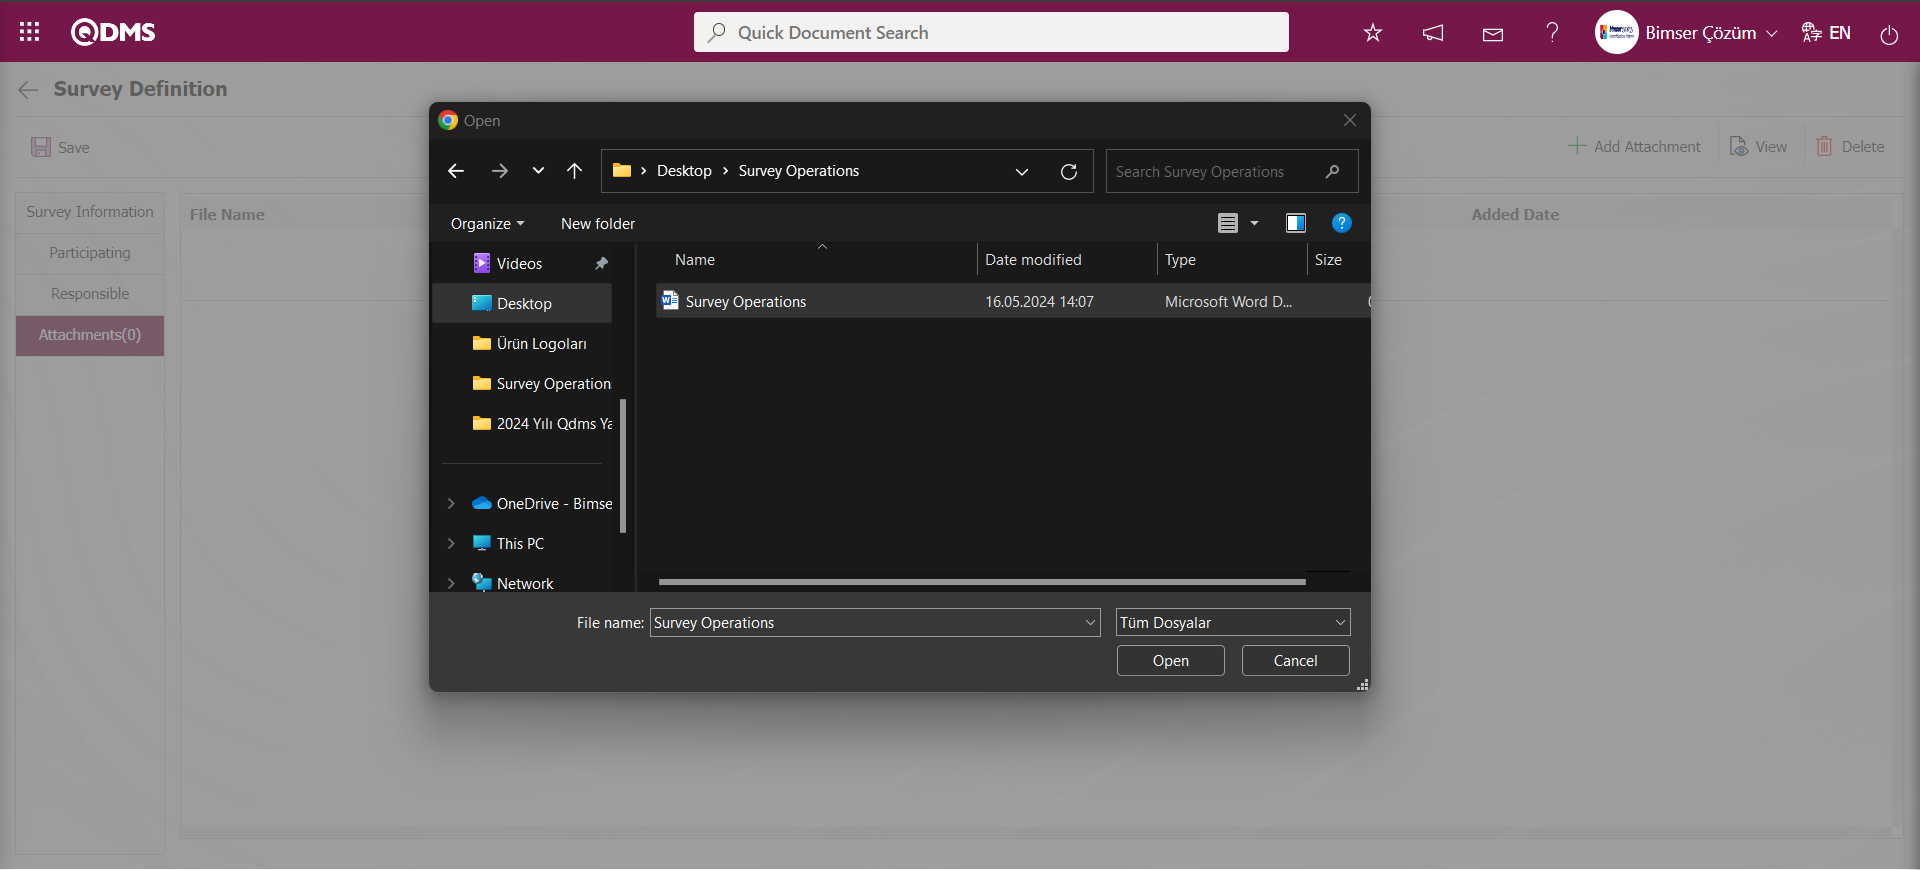
Click the Browse button on the File Upload screen.
Select the file on the screen that opens.
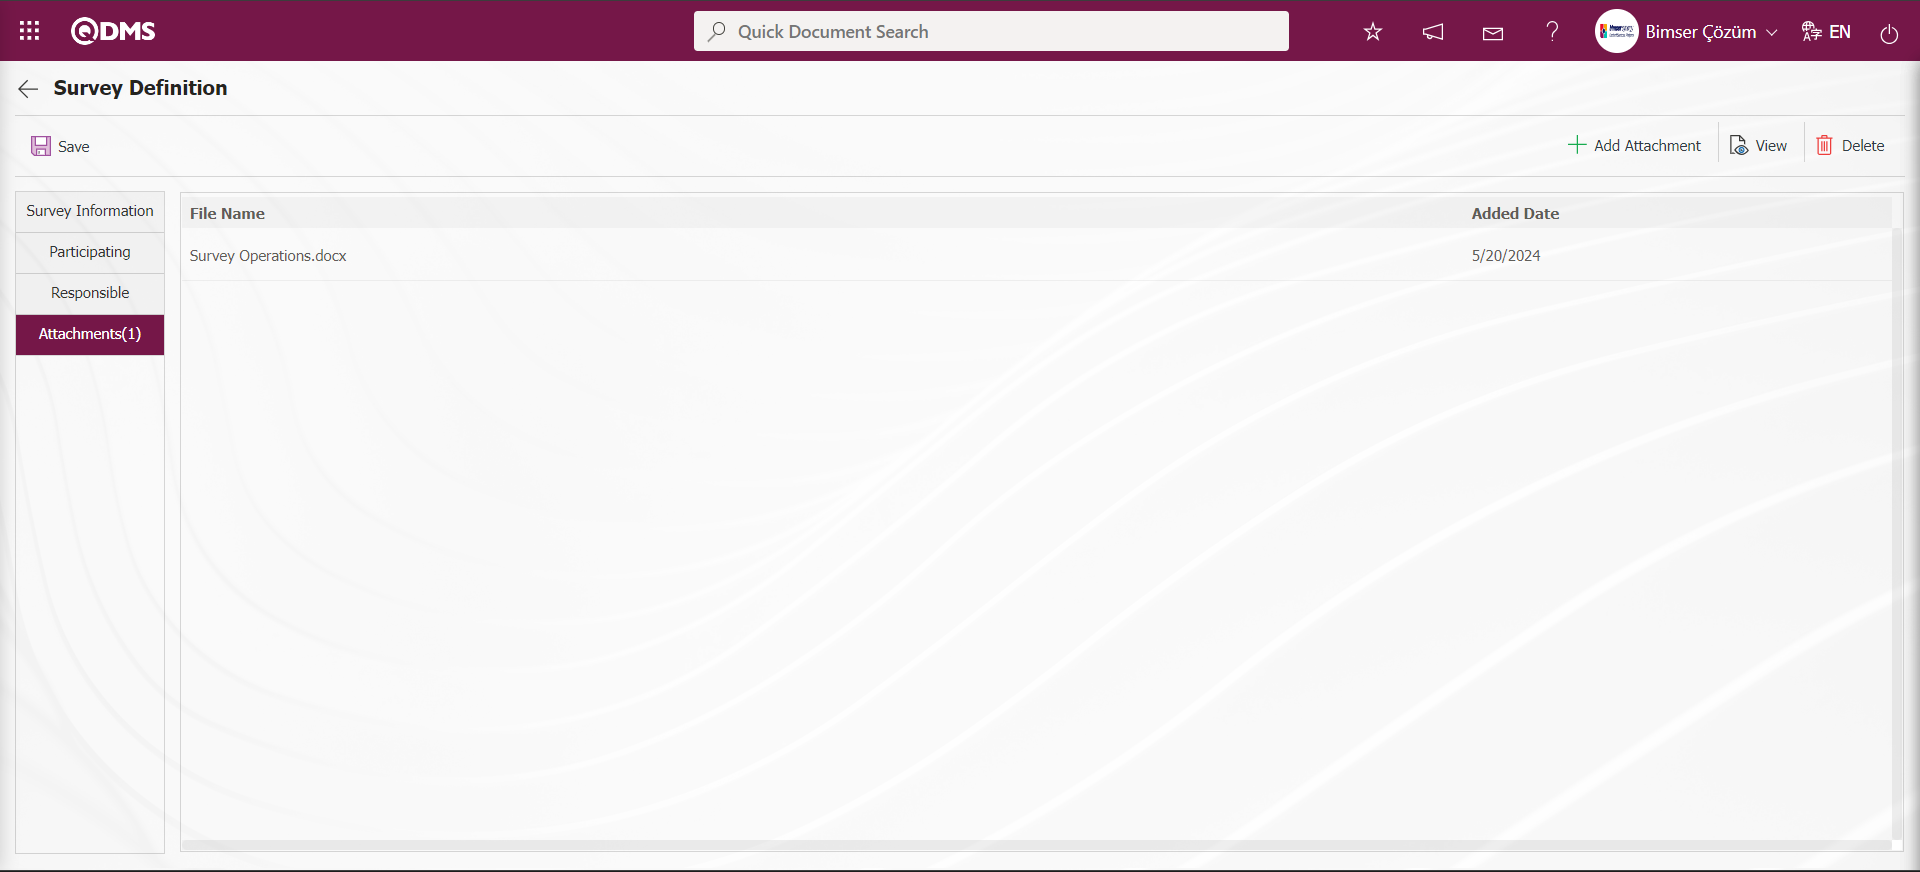
After the selection of the attachment file in the Attachments tab on the Survey Definition screen, the Attachment File is added.
After filling in the information in all tabs, click on the Survey Information tab. After the necessary fields on the Survey Definition screen are done with the relevant information, the survey is created by clicking the  button in the upper left corner of the screen on the Survey Information tab.
Since the created survey is not available for use, its status is “Close”.

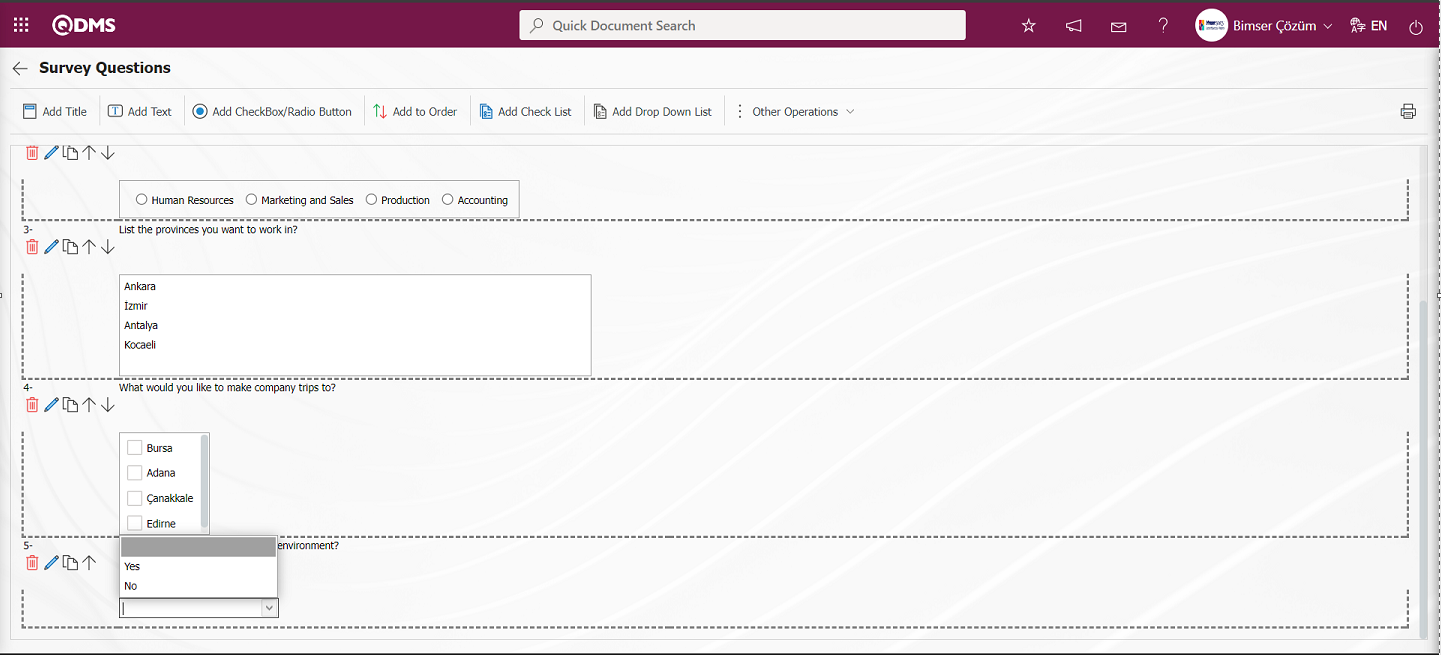
6.2.1.2. Adding Questions to the Survey
Menu Name: Integrated Management System/ Survey/ Prepare Internal Servey form
While on the created survey plan, click on the  button to add questions. Questions are added to the closed survey. The authorization to add questions to the survey; The survey preparer, the survey module administrator and the users with the admin check box checked in the responsibilities we select during the survey creation.
Click the button while the survey defined in the Survey Definition screen is selected.
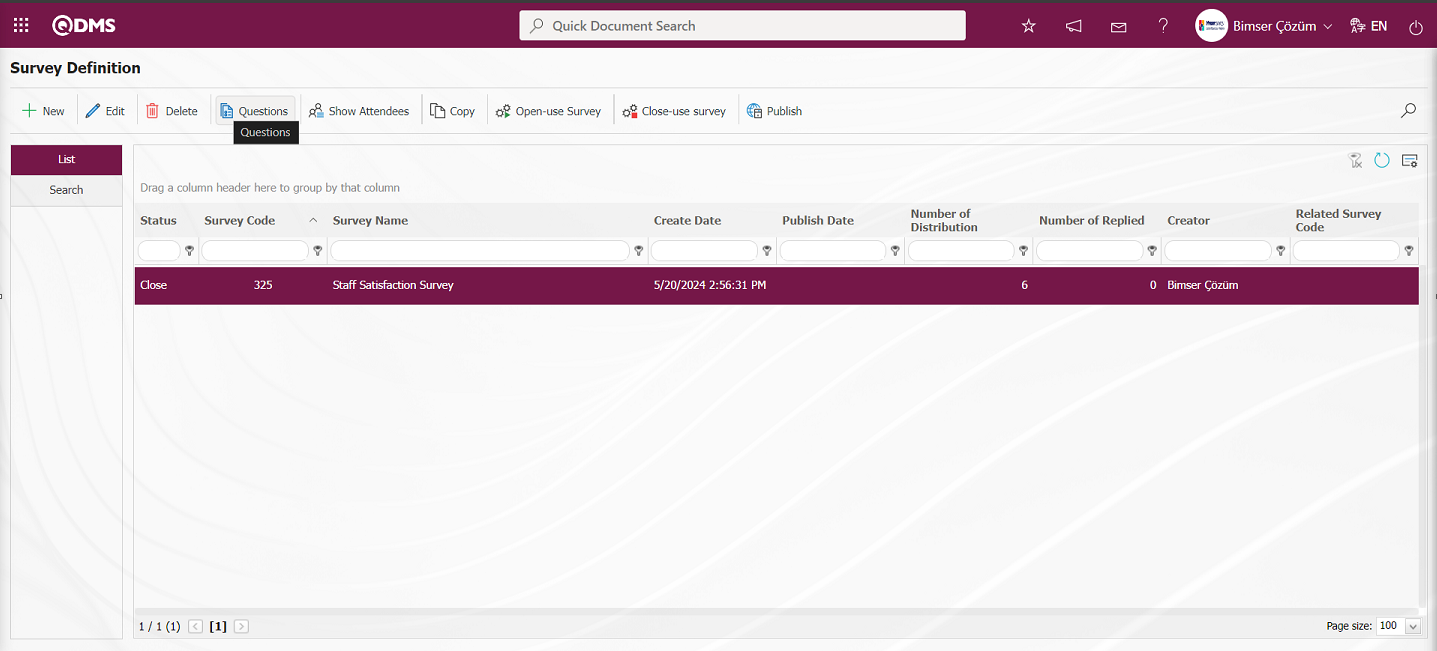
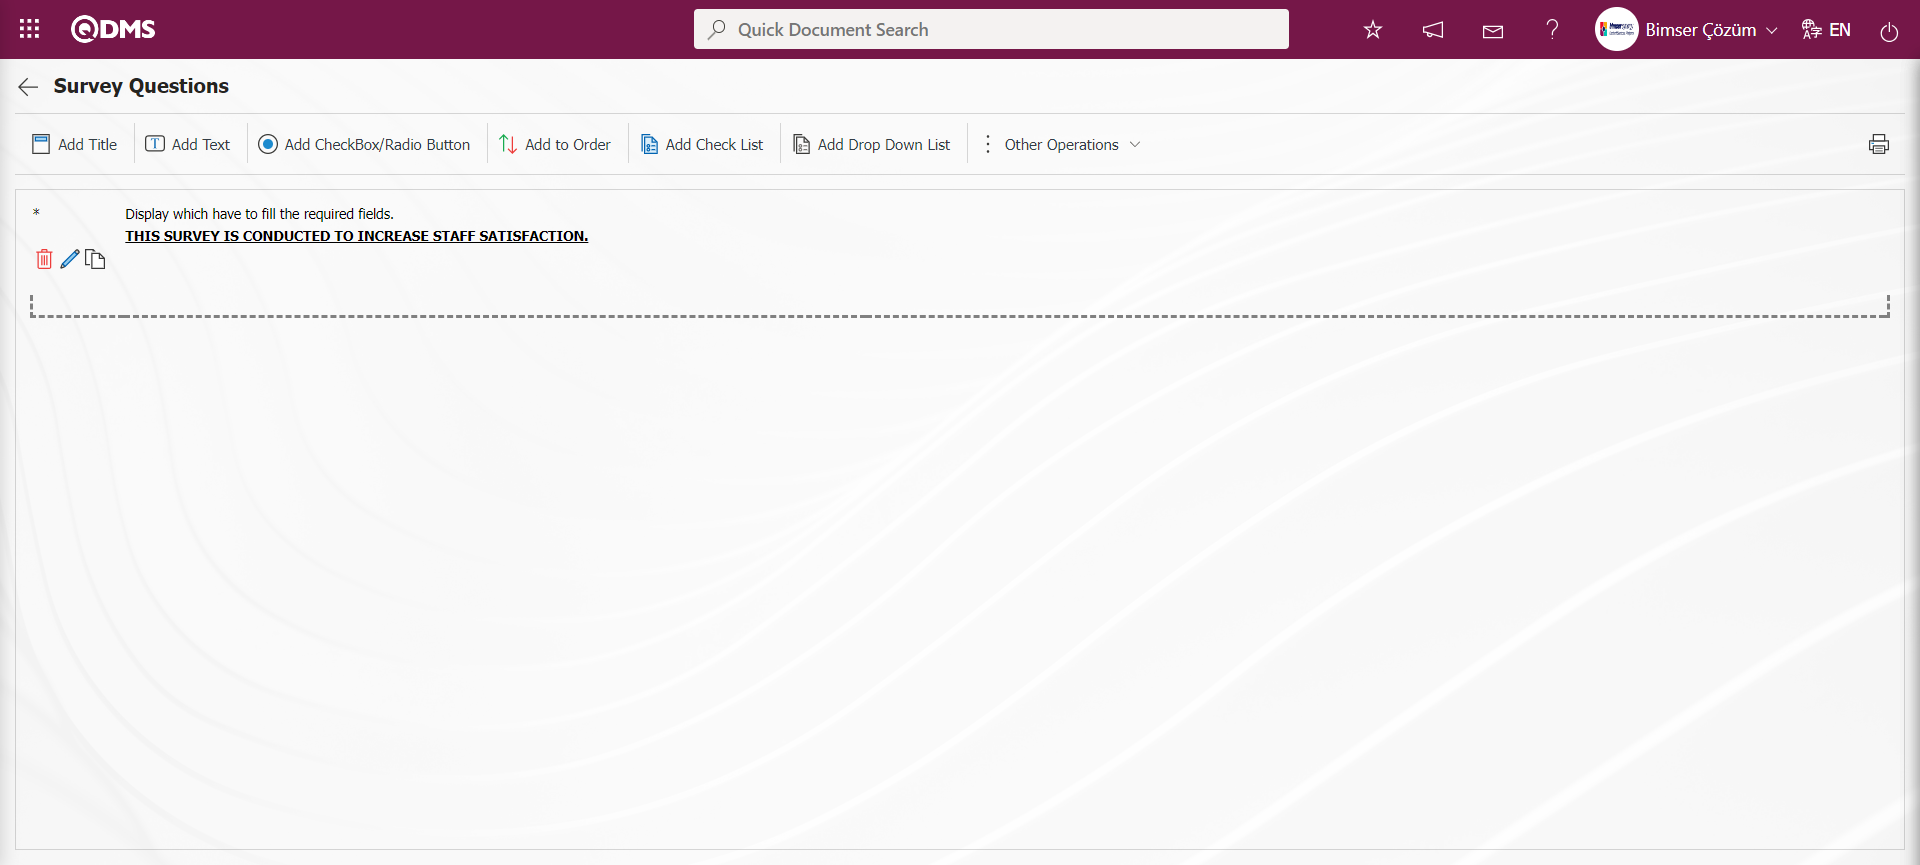
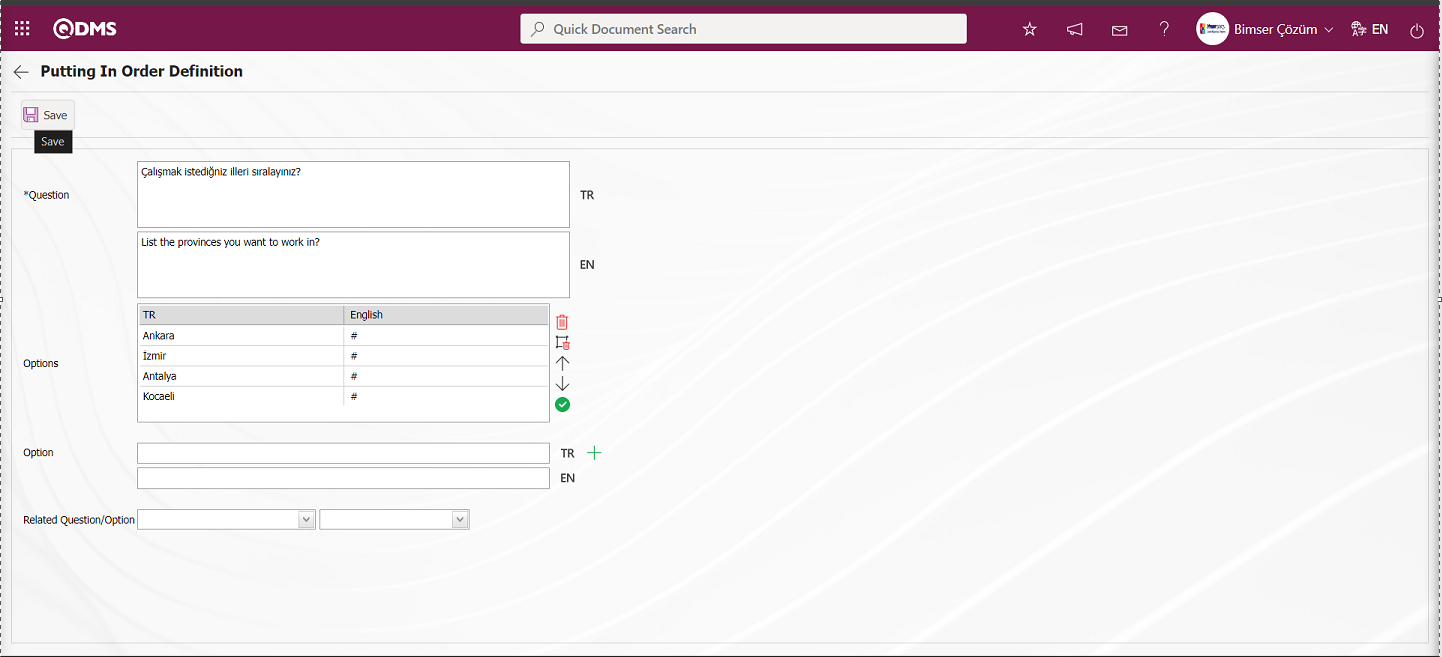
The Survey Questions screen opens
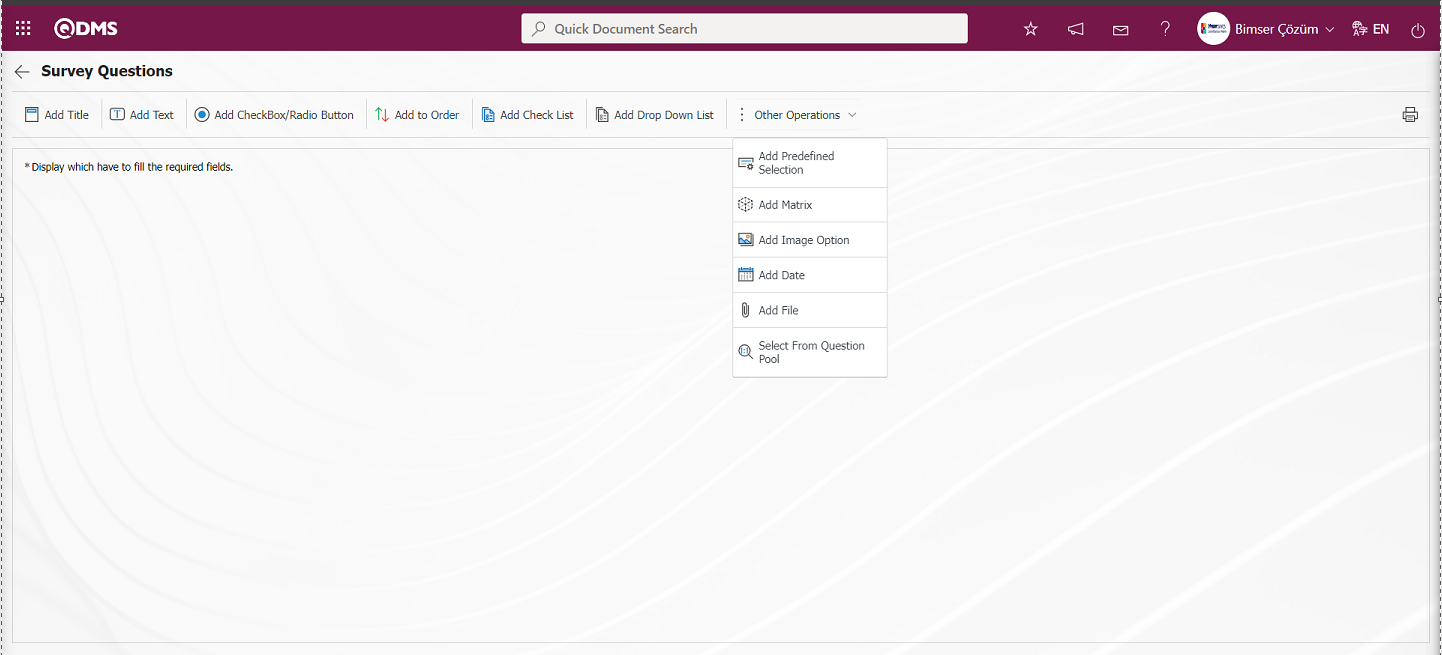
With the help of the buttons on the screen;
: It is the button that allows you to print your questions.
: This button is used if you want to section the questionnaire and add a title. After each title separator, the number of the defined question comes as 1.
: It is the question type used when the people who fill out the questionnaire are asked questions that require free information.
: It is used when the answers given are selected from the specified options.
: It is used when all options of a question are preferred and listed in order of priority. The options are listed in order from most to least or from fewest to most.
: If there are too many options in the question to be created and they need to be selected like a check list, a multiple choice list type question can be added.
: This is the question type to be used in case of selecting a single answer from the drop-down list.
: This question type allows the selection of lists in the fields of personnel, customer, department, company profile and product defined in Qdms.
: It is a question type created in the form of a matrix in which sub-questions are defined under the question text.
: It is a question type in the form of a matrix with pictures where pictures are added in the question text field and picture addition is made in the options.
: On the screen opened by clicking, the user can add a question to select the date.
: Creates an Additional File field for adding additional files to the questionnaire.
 : It is the question type that is selected from the list of question categories defined in the Question Categories screen opened in the Question Pool menu in the Survey module sub-structure.
Adding a Question to the Survey;
Adding a question to the question category is done by using question options types.
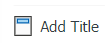 : It is the question type used when it is desired to add a title by sectioning the survey. After each title separator, the number of the defined question comes as 1.
Click the button to add Add Title question type to the questionnaire defined on the Survey Questions screen.
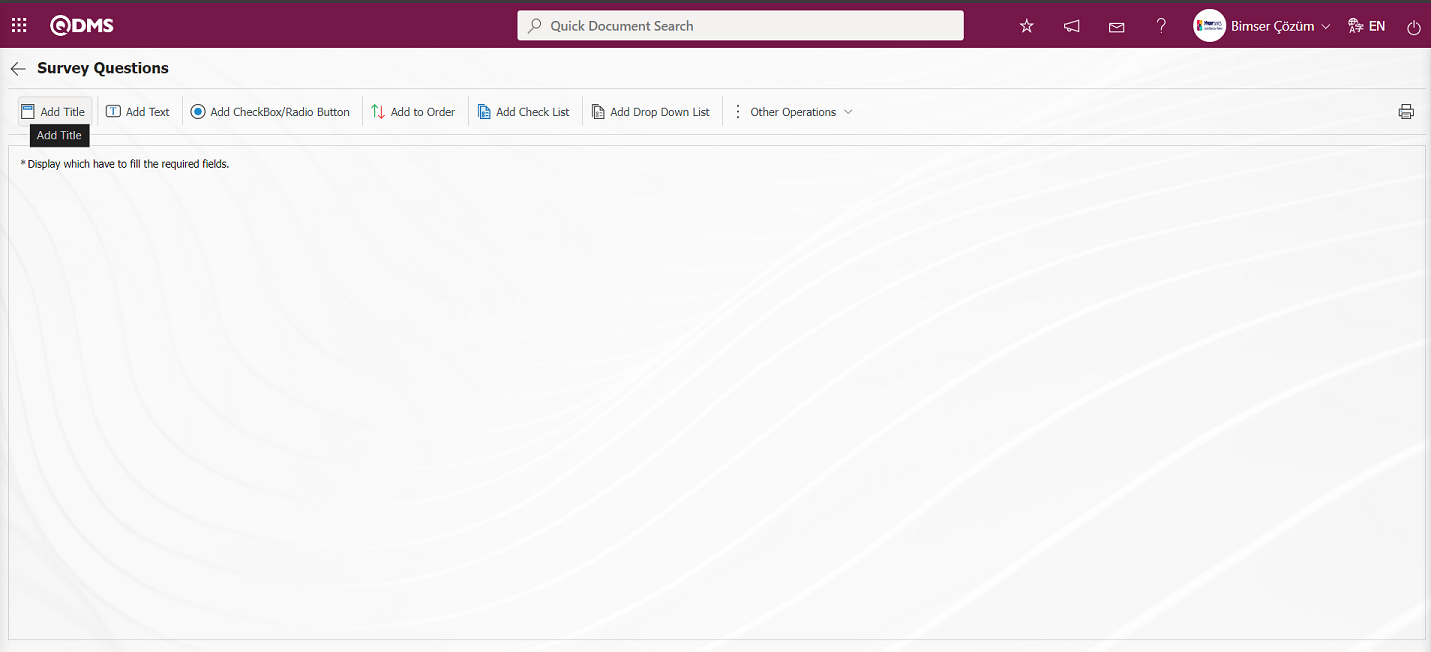
The Title Definition screen opens.
Related fields are defined on the screen that opens:
Title: This is the field where the title text information is written on the Add Title screen.
On the Add Title screen, the title information is written in the Title field. In case of use in other languages, the language equivalent of the title information is entered in the field of related languages. After the relevant title is added to the Add Title field and the relevant information is entered in the required fields, the registration process is realized with the  button in the upper left corner of the screen.
With the help of the buttons on the screen
 : The defined question information is deleted.
 : Editing and updating operation is done on the defined question information.
 : Copy the defined question information
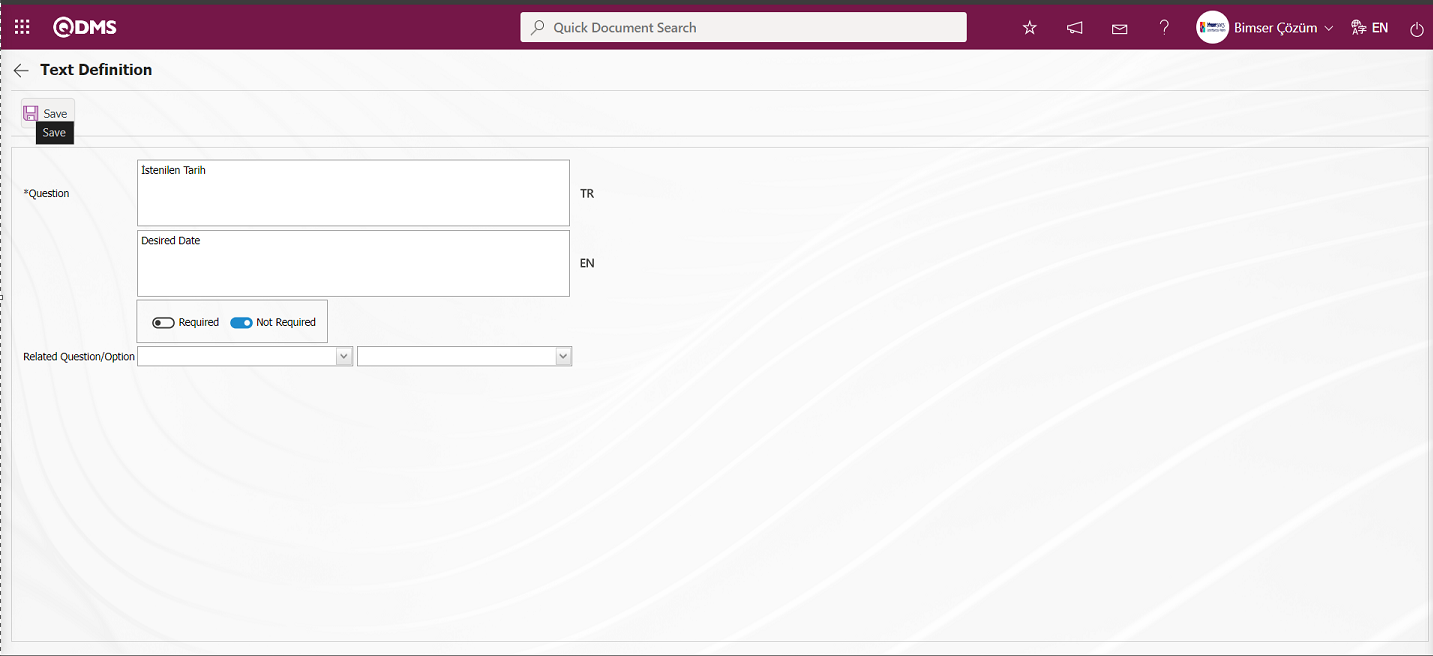
 : This is the type of question used when survey respondents are asked questions that require free entry of information.
Click the button to add Add Text question type to the Survey defined on the Survey Questions screen.
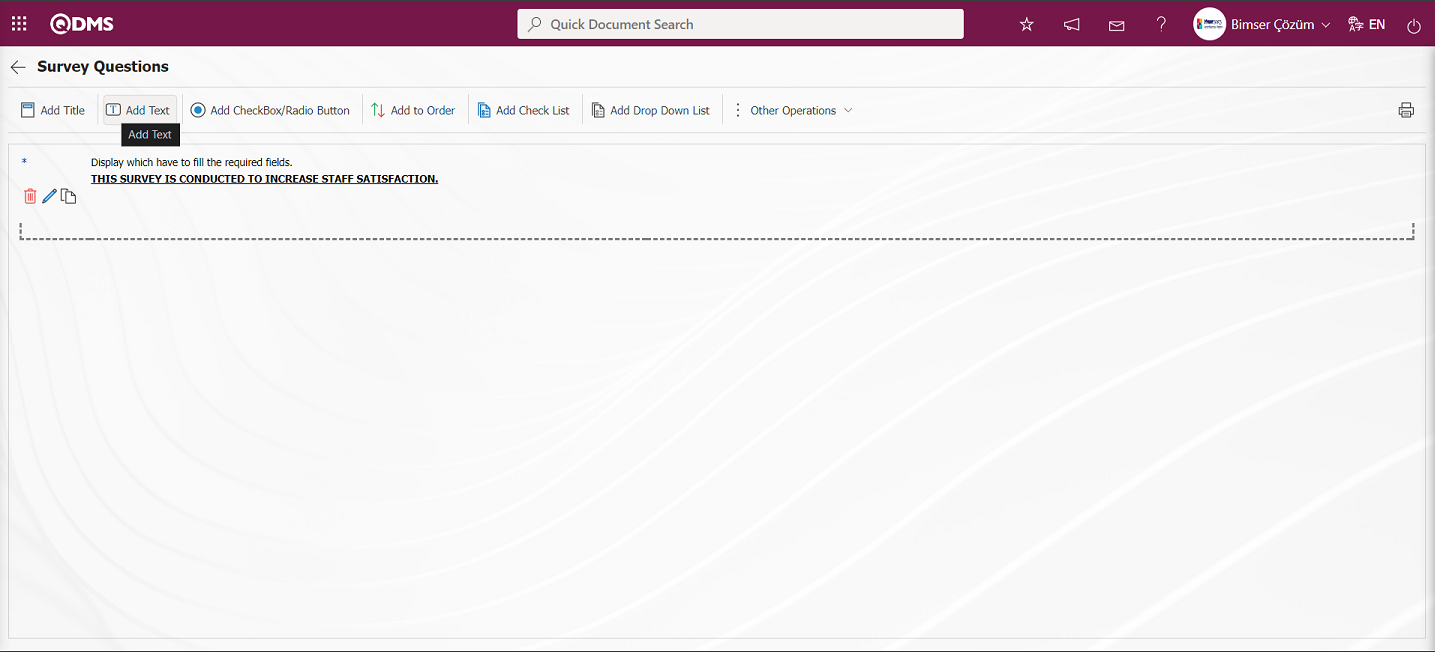
The Text Definition screen opens.
The relevant fields are defined on the screen that opens:
Question: This is the field where the question text to be asked on the Text Definition screen is written in the Turkish field. In case of use in other languages, the question data to be asked is entered in the field with the relevant languages.
Row Number: This is the field where the number of lines is entered on the Text Definition screen. It is used to determine the size of the text. If this field is 0 or 1, the area to be answered is seen as a single line.
It is the field where the obligation to answer the question to be asked is determined. Check boxes related to the relevant field are checked according to whether the question has to be answered or not.
Related Question/Option: This is the field where the question is displayed depending on the option of the defined optional question. By selecting the option of the related question and question, when the option of this question is selected, the related question is displayed.
If there is an answer requirement, saving is not allowed when the question is not answered, a warning message is given. In the Text Definition screen, Turkish and English language equivalents are written in the Question Text field and the registration process is done by clicking the  button in the upper left corner of the screen.
 : It is the question type in which the answers given are selected from the specified options.
Click button to add Add CheckBox/Radio button question type to the questionnaire defined in the Survey Questions screen.
The Add Option screen opens.

Related fields are defined on the screen that opens:
Question Text: This is the field where the question text to be asked on the Add Option screen is written in the Turkish field. In case of use in other languages, the question data to be asked is entered in the field with the relevant languages.
Options: This field contains the list of options on the Add Option screen.
Option/Point: This is the field where the options of the question are written on the Add Option screen. If the survey will be a scored survey, the score is also written for the options entered.
With the help of the buttons on the screen
(Delete Row): On the options screen, the selected option is removed from the option list.
(Delete All): Delete all options on the options screen.
(Up): In the options screen, the selected option is moved upwards in the option list.
(Down): In the options screen, the selected option is scrolled down in the option list.
(Select&Move): It is possible to edit and update the selected option on the options screen by moving it to the Option-Score field.
In the Option-Point field, the option and score information of the question is written and added to the Options list by clicking the (Add CheckBox/Radio button) button.
The obligation to answer the question to be asked is determined from this field.
Selecting 1 or more than 1 of the options is determined according to the check box in this field.
The options can be displayed side by side (Single Line) or stacked (Multi-Line).
If the multiline option is selected, a field called number of columns will appear and the options of the question will be displayed in as many columns as the specified value.
Calculate Method: In the Add Option screen, if the questionnaire is a scored questionnaire, this is the field where the method by which the scores given to the options of this question will be calculated is determined. For example; A question in a survey that 10 people will answer has 4 options and each option has its own points. Assuming that the score of the first option is 5, if 10 users choose the first option, it is determined whether these scores are added up (50) or averaged (5) and included in the average score of the survey.
Weighted Score: In the Add Option screen, if the questionnaire is a scored questionnaire, this is the field where the weight of the question in the questionnaire is determined. If all questions are equally weighted, a value of 1 should be entered. If it is written as 0, the survey score is not calculated.
Related Question/Option: This is the field where the question is displayed depending on the option of the defined optional question. By selecting the option of the related question and question, when the option of this question is selected, the related question is displayed.
After filling in the required fields on the Add Option screen, the registration process is realized by clicking the  button in the upper left corner of the screen.

 : This is the question type used when all the options of a question are preferred and listed in order of priority. The options are listed in the order of “many to few” or “few to many”.
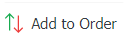
Click the button to add Add to Order question type to the survey defined on the Survey Questions screen.
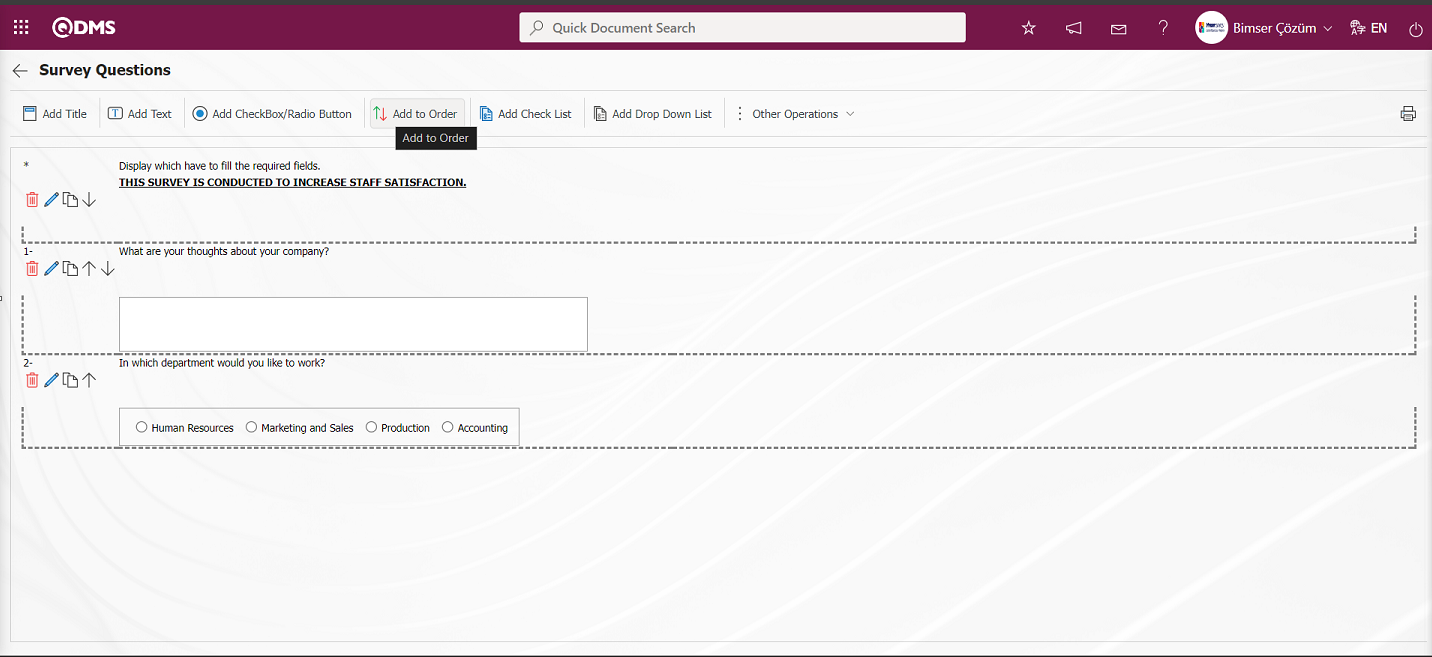
The Putting In Order Definition screen opens.
With the help of the buttons on the screen
(Delete Row): On the options screen, the selected option is removed from the option list.
(Delete All): Delete all options on the options screen.
(Up): In the options screen, the selected option is moved upwards in the option list.
(Down): In the options screen, the selected option is scrolled down in the option list.
(Select&Move): It is possible to edit and update the selected option on the options screen by moving it to the Option-Score field.
Option: This is the field where options are written on the Putting In Order Definition screen. Turkish and English language equivalents of the option information are written in the relevant field and added to the Options list with the  (Add CheckBox/Radio button) button.

After filling in the information related to the required fields on the Putting In Order Definition screen, the registration process is realized by clicking the  button in the upper left corner of the screen.
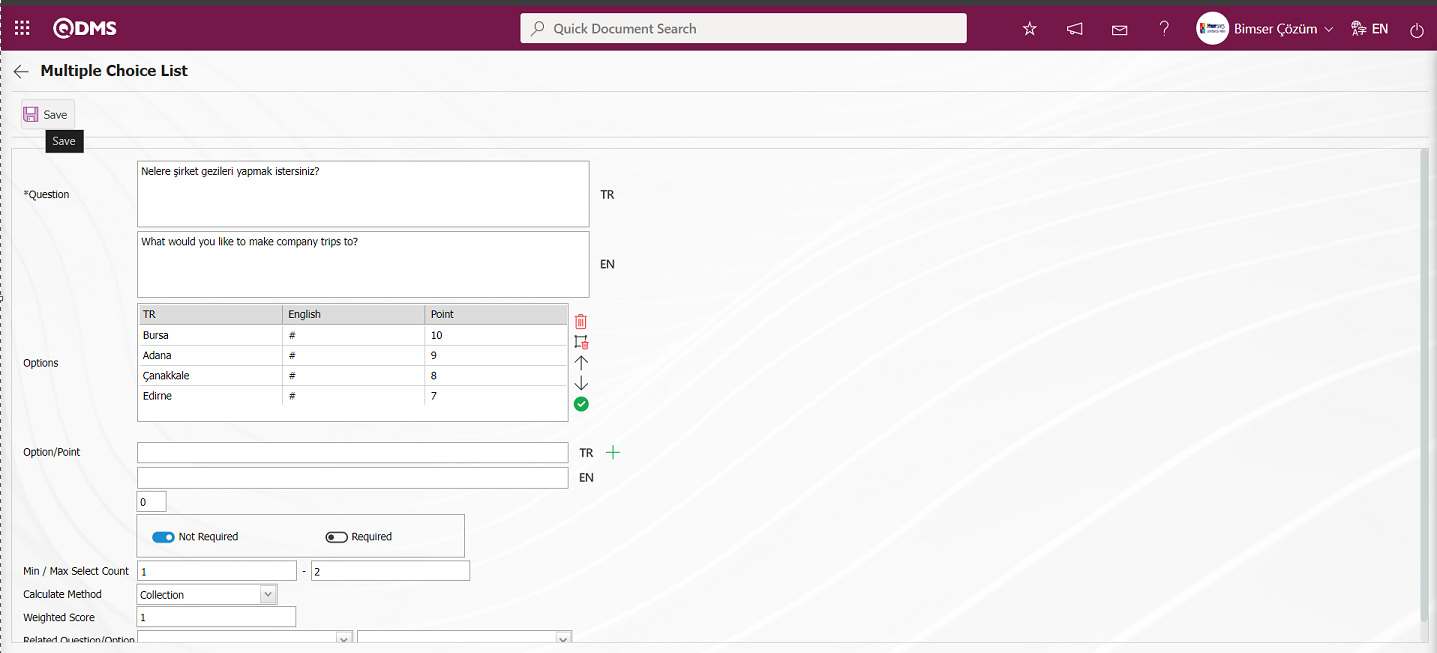
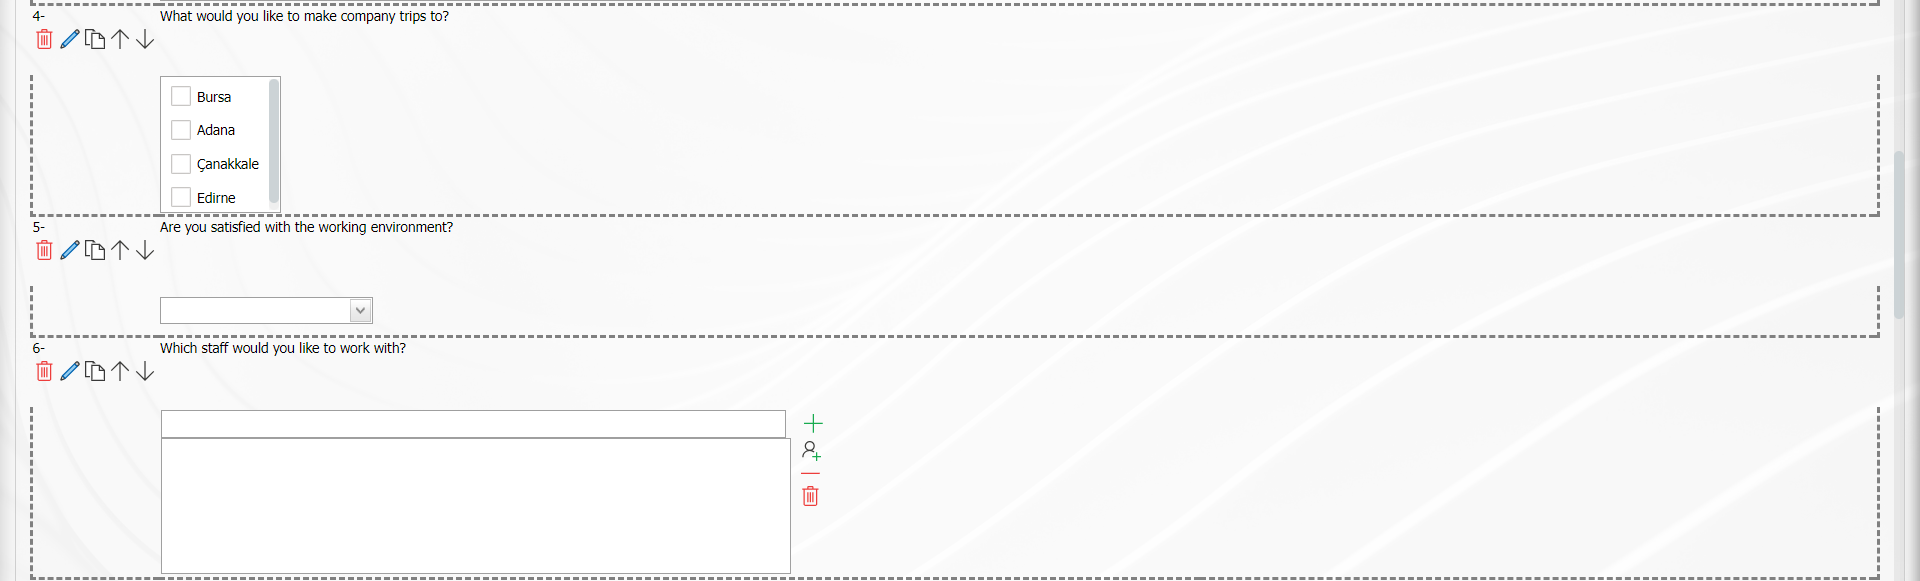
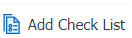 : If there are too many options in the question you want to create, it is the type of question where the process of selecting them like a check list is performed.
Click the button to add an Add Check List question type to the survey defined on the Survey Questions screen.
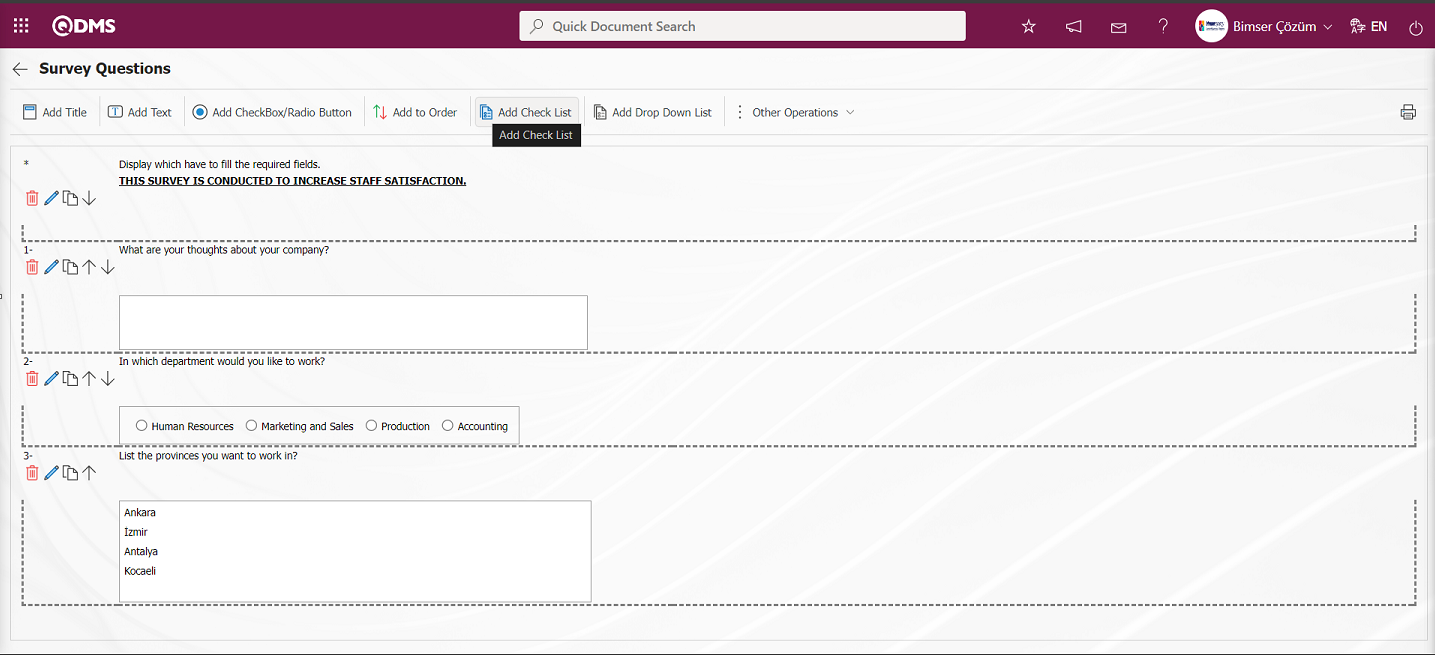
The Multiple Choice List screen opens.
The relevant fields are defined on the screen that opens:
Question: This is the field where the question text to be asked on the Multiple Choice List screen is written in the Turkish field. In case of use in other languages, the question data to be asked is entered in the field with the relevant languages.
Option/Score: This is the field where the options of the question are written on the Multiple Choice List screen. If the survey will be a scored survey, the score is also written for the options entered.

With the help of the buttons on the screen
(Delete Row): On the options screen, the selected option is removed from the option list.
(Delete All): Delete all options on the options screen.
(Up): In the options screen, the selected option is moved upwards in the option list.
(Down): In the options screen, the selected option is scrolled down in the option list.
(Select&Move): It is possible to edit and update the selected option on the options screen by moving it to the Option-Score field.
In the Option/Point field, the option and score information of the question is written and added to the Options list by clicking the  (Add CheckBox/Radio button) button.

The obligation to answer the question to be asked is determined from this field. 
Select the maximum and minimum number of options to be selected on the Multiple Choice List screen. 
Calculate Method: In the Multiple Choice List screen, if the questionnaire is a scored survey, this is the field where the method by which the scores given to the options of this question will be calculated is determined. For example; A question in a survey that 10 people will answer has 4 options and each option has its own points. Assuming that the score of the first option is 5, if 10 users choose the first option, it is determined whether these scores are added up (50) or averaged (5) and included in the average score of the survey.

Weighted Score: On the Multiple Choice List screen, if the survey is a scored survey, this is the field where the weight of the question in the survey is determined. If all questions are equally weighted, a value of 1 should be entered. If it is written as 0, the survey score is not calculated.

Related Question/Option: This is the field where the question is displayed depending on the option of the defined optional question. By selecting the option of the associated question and question, the associated question is displayed when the option of this question is selected.
After entering the relevant information in the required fields on the Multiple Choice List screen, the registration process is done by clicking the  button in the upper left corner of the screen.
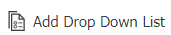 : This is the question type to be used in case the question asked has only one answer selected from the drop-down list.
Click the button to add Add Drop Down List Question Type question type to the questionnaire defined on the Survey Questions screen.
Dropdown List screen opens.
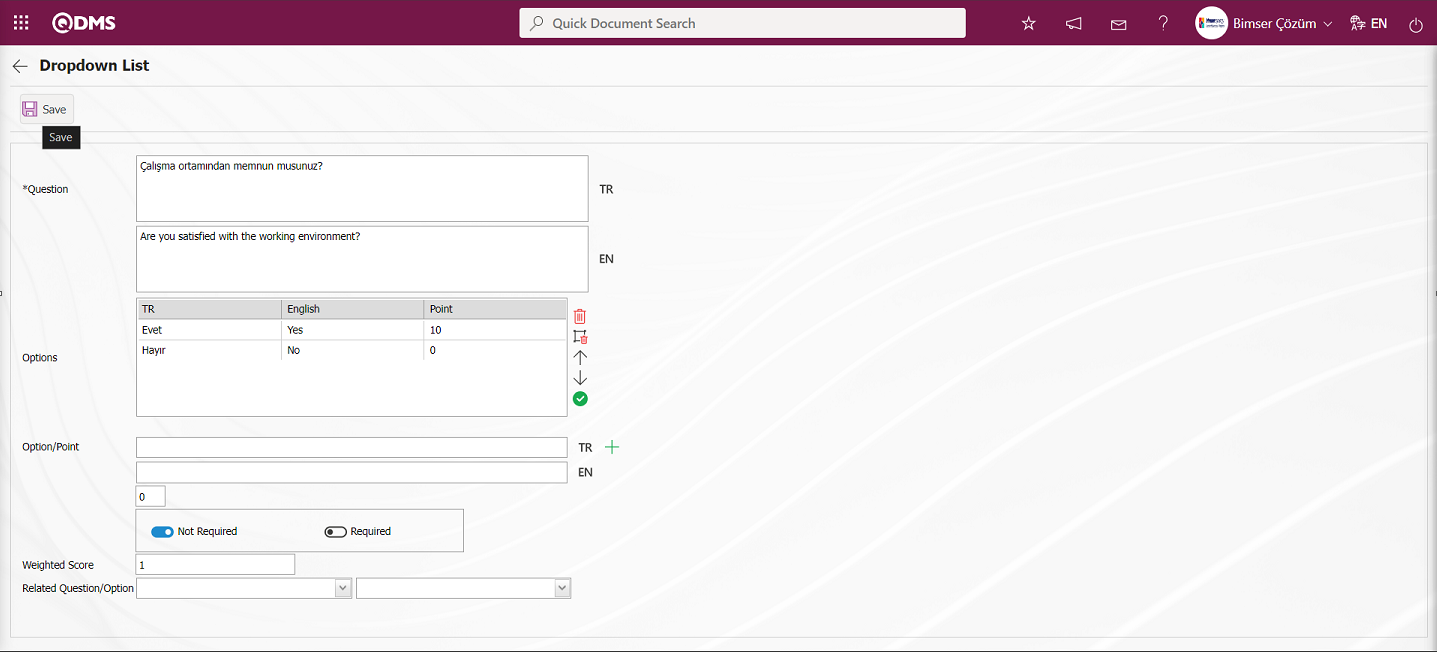
Related fields are defined on the screen that opens:
Question: This is the field where the question text to be asked on the Dropdown List screen is written in the Turkish field. In case of use in other languages, the question data to be asked is entered in the field with the relevant languages.
Options: It is the field where the option list is located on the Dropdown List screen.
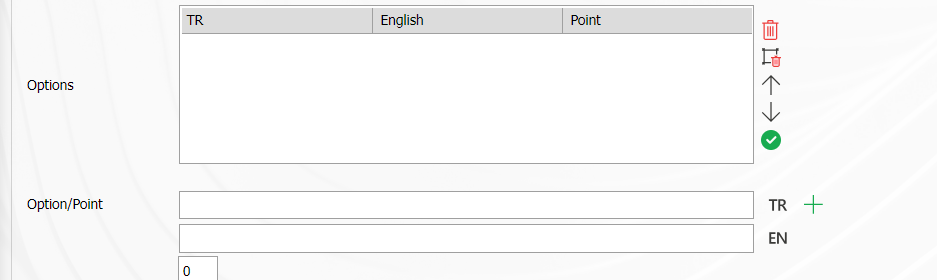
With the help of the buttons on the screen
(Delete Row): On the options screen, the selected option is removed from the option list.
(Delete All): Delete all options on the options screen.
(Up): In the options screen, the selected option is moved upwards in the option list.
(Down): In the options screen, the selected option is scrolled down in the option list.
(Select&Move): It is possible to edit and update the selected option on the options screen by moving it to the Option-Score field.
Option/Point: This is the field where the options of the question are written on the Dropdown List screen. If the survey will be a scored survey, the score is also written for the options entered.
In the Option-Score field, the option and score information of the question is written and added to the Options list by clicking the (Add CheckBox/Radio button) button.

Weight Points In the Dropdown List screen, if the questionnaire is a scored questionnaire, this is the field where the weight of the question in the questionnaire is determined. If all questions are of equal weight, a value of 1 should be written. If it is written as 0, the survey score is not calculated.
After entering the relevant information in the required fields on the Dropdown List screen, the registration process is done by clicking the  button in the upper left corner of the screen.
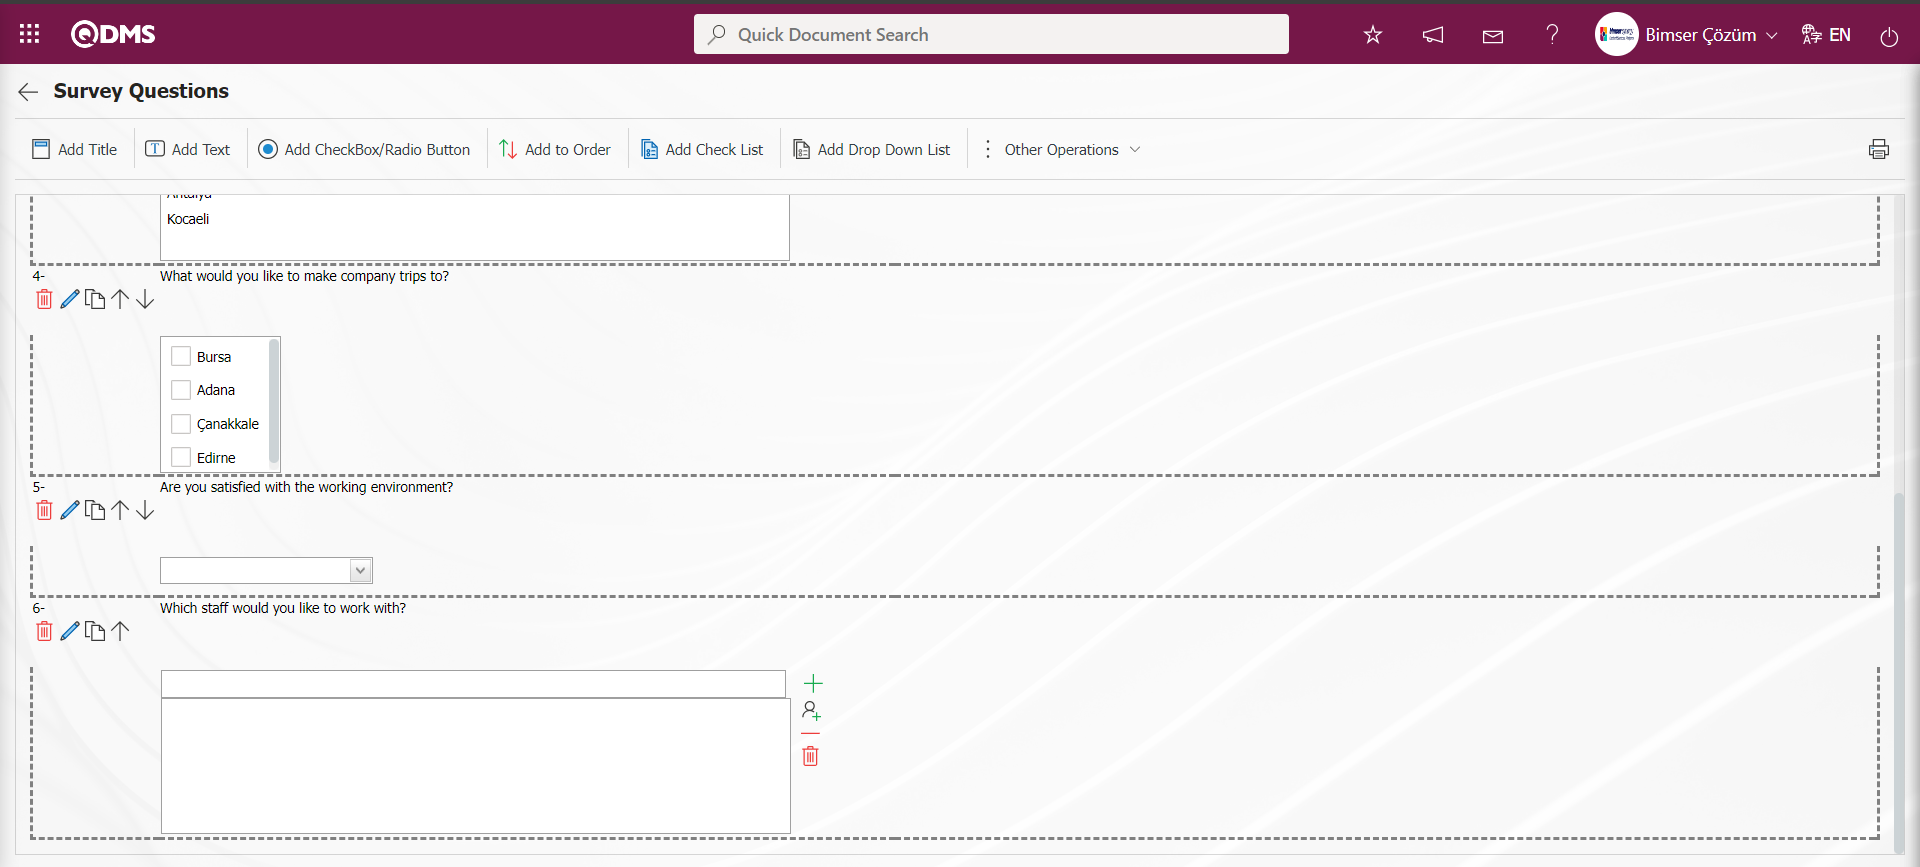
 : This question type allows the selection of lists in the fields of personnel, customer, department, company profile and product defined in QDMS.
Click button to add Add Predefined Selection Question Type question type to the questionnaire defined in the Questionnaire Questions screen.

The Add Predefined Selection screen opens.
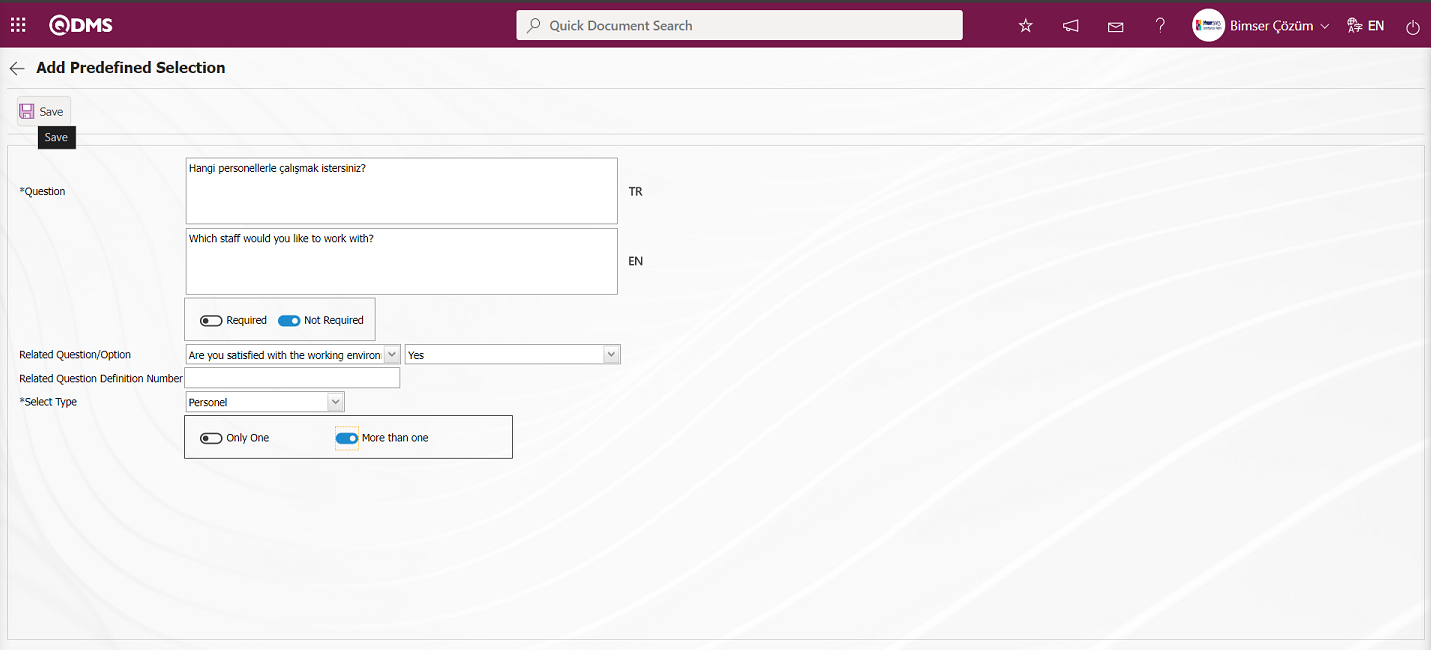
Define the relevant fields on the screen that opens:
Question: This is the field where the question text to be asked in the Add Predefined Selection screen is written in the Turkish field. In case of use in other languages, the question data to be asked is entered in the field with the relevant languages.
Selection Type: It is the field where the selection is made in the personnel, customer, department, company profile and product options defined in QDMS, which are opened by clicking the drop-down list on the Add Predefined Selection screen.
Selecting 1 or more than 1 of the options is determined according to the check box in this field.

Related Question/Option: This is the field where the question is displayed depending on the option of the defined optional question. When the option of this question is selected by selecting the option of the associated question and question, the associated question is displayed. In this field, the related question is defined by selecting the related question and option information.
Related Question Definition No: Related question definition no information is written.
In the Add Predefined Selection screen, after entering the necessary fields and the relevant information, the registration process is done by clicking the  button in the upper left corner of the screen.
 : It is a matrix-shaped question type in which sub-questions are defined under the question text.
Click button to add Add Matrix Question Type question type to the questionnaire defined in the Questionnaire Questions screen.

Matrix screen opens
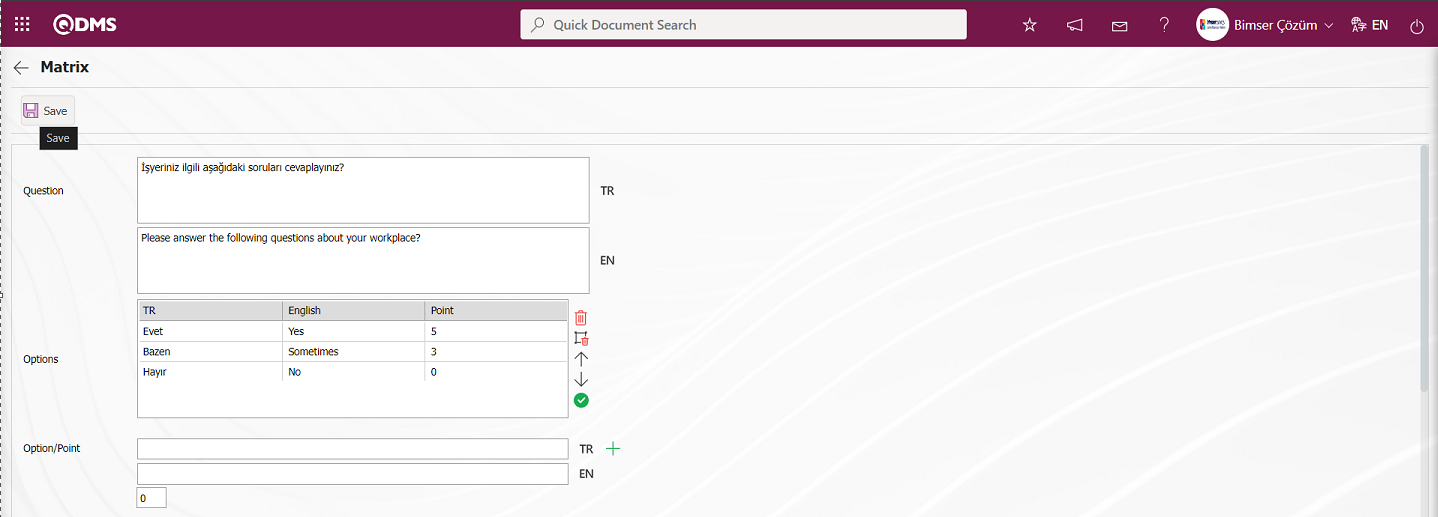

Related fields are defined on the screen that opens:
Question: This is the field where the question text to be asked on the matrix screen is written in the Turkish field. In case of use in other languages, the question data to be asked is entered in the field with the relevant languages.
Option/Score: This is the field where the options of the question are written on the matrix screen. If the survey will be a scored survey, the score is also written for the options entered.

With the help of the buttons on the screen
(Delete Row): On the options screen, the selected option is removed from the option list.
(Delete All): Delete all options on the options screen.
(Up): In the options screen, the selected option is moved upwards in the option list.
(Down): In the options screen, the selected option is scrolled down in the option list.
(Select&Move): It is possible to edit and update the selected option on the options screen by moving it to the Option-Score field.
In the Option-Point field, the option and score information of the question is written and added to the Options list by clicking the (Add CheckBox/Radio button) button.

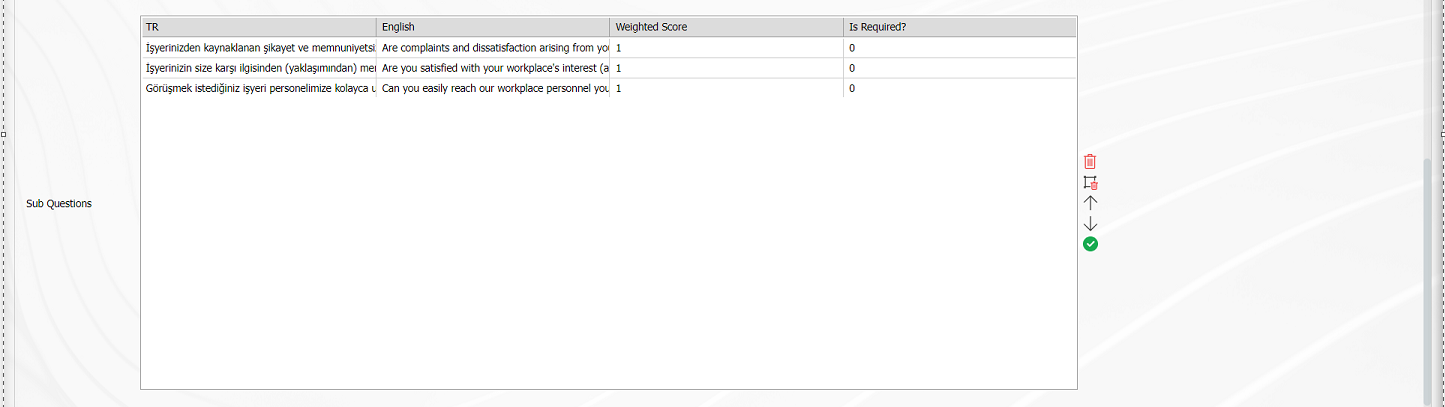
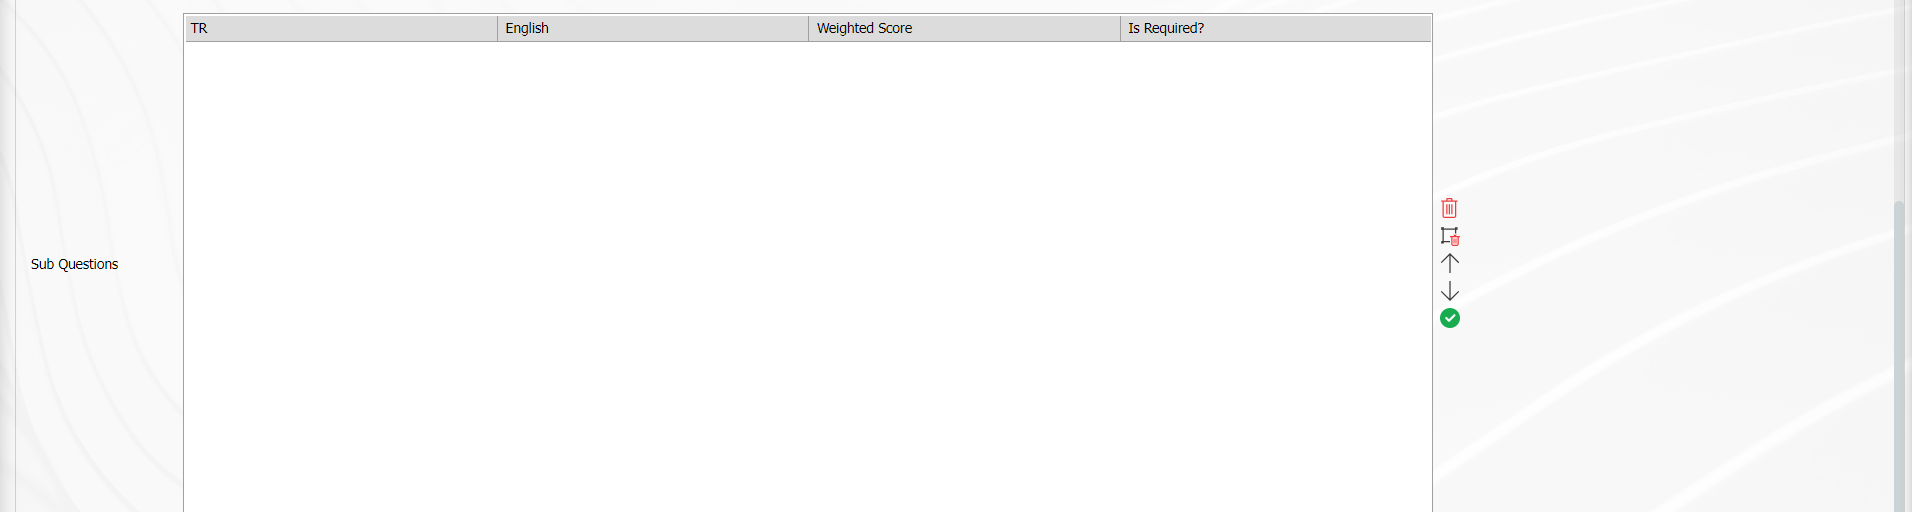
Sub Questions: This field contains the list of sub questions added on the matrix screen.
With the help of the buttons on the screen
(Delete Row): In the Sub Questions screen, the selected sub question is removed from the Sub Questions list.
(Delete All): Delete all sub-questions on the Sub-questions screen
(Up): In the Sub-Questions r screen, the selected sub-question is moved upwards in the sub-question list.
(Down): On the Sub-questions r screen, move the selected sub-question downwards in the sub-question list.
 (Select&Move): By moving the selected sub-question on the Sub-Questions screen to the Option-Score field, editing and updating is enabled.
Sub Question: This is the field where sub-questions are written on the matrix screen.
Sub Question information is written in the Sub Question field and added to the Sub Questions list by clicking the button.

Weight Score: This is the field on the matrix screen where the weight of the question in the questionnaire is determined if the questionnaire is a scored questionnaire. If all questions are of equal weight, a value of 1 should be written. If it is written as 0, the survey score is not calculated.
The answer requirement of the question to be asked is determined from this field.

Selecting 1 or more than 1 of the options is determined according to the check box in this field. 
After entering the relevant information in the required fields on the matrix screen, the registration process is done by clicking the  button in the upper left corner of the screen.

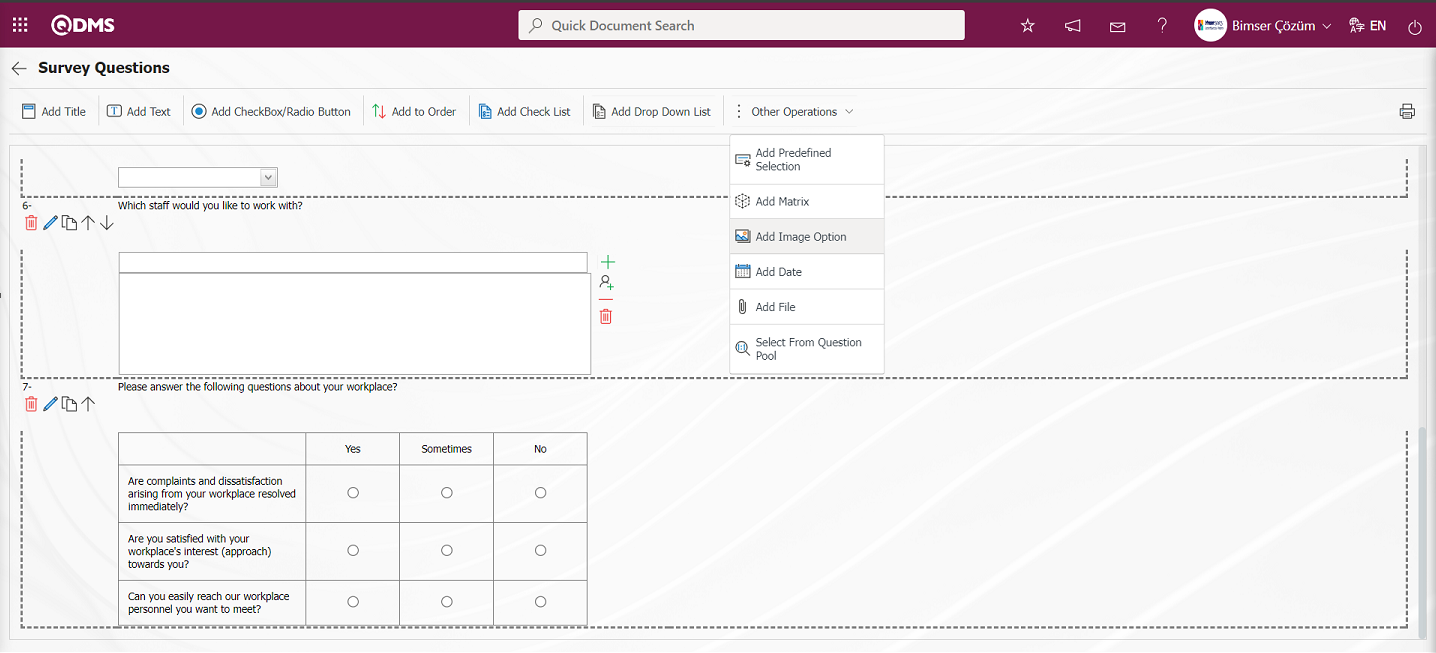
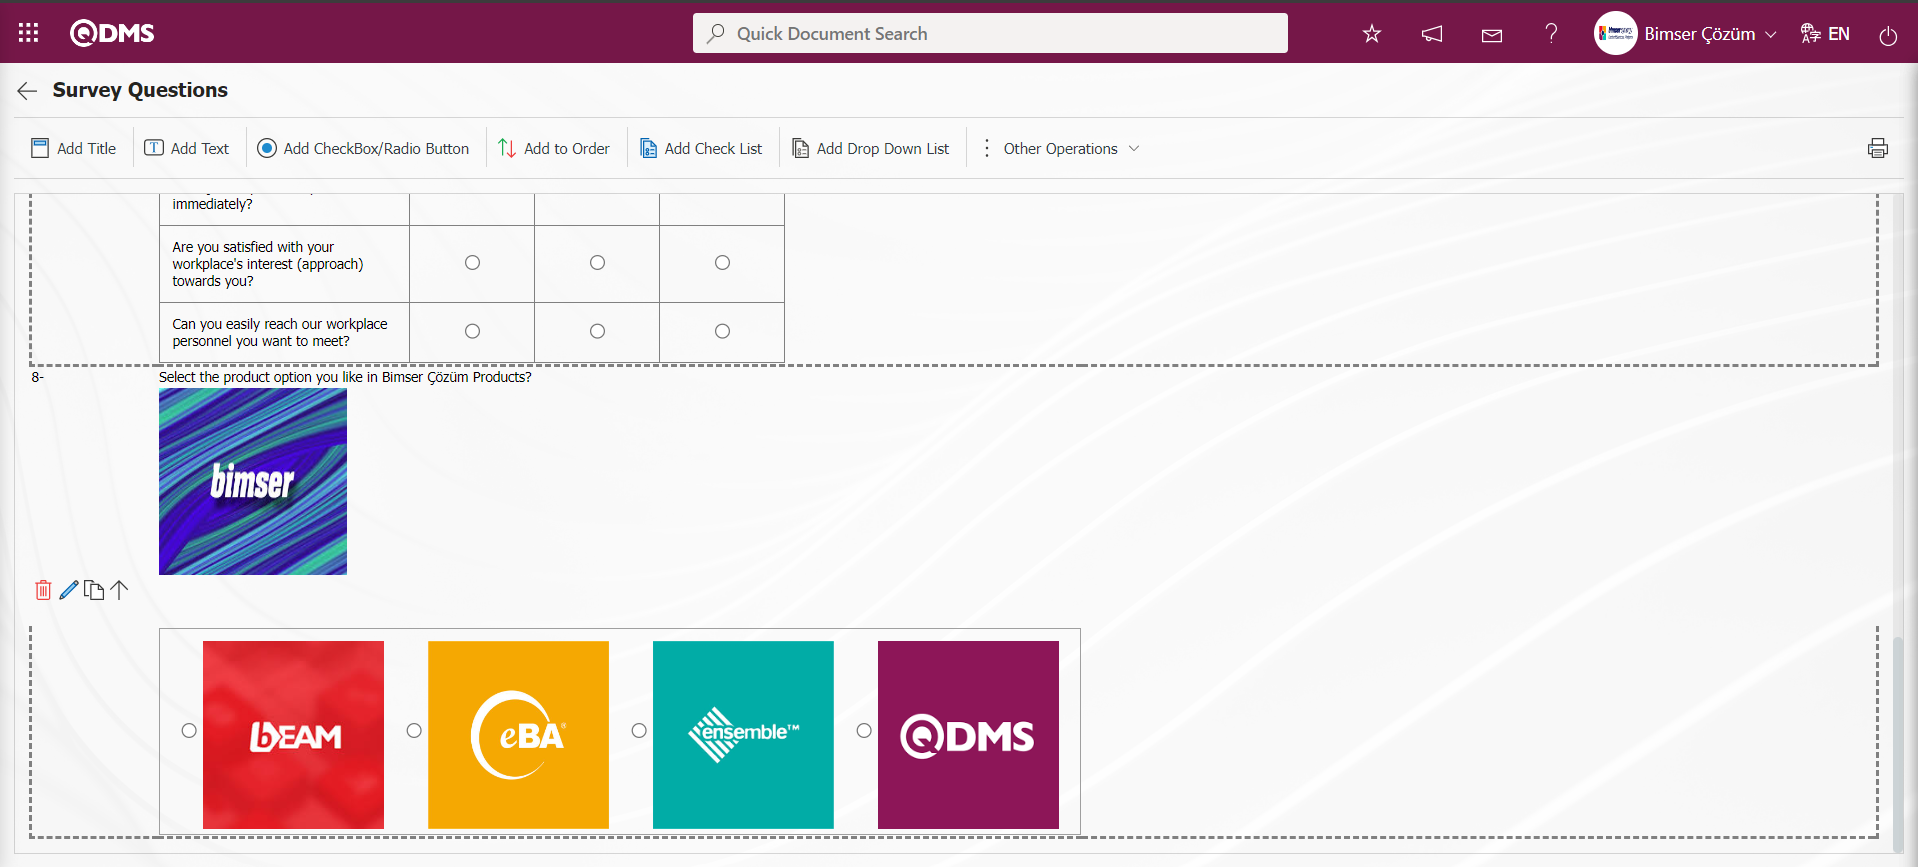
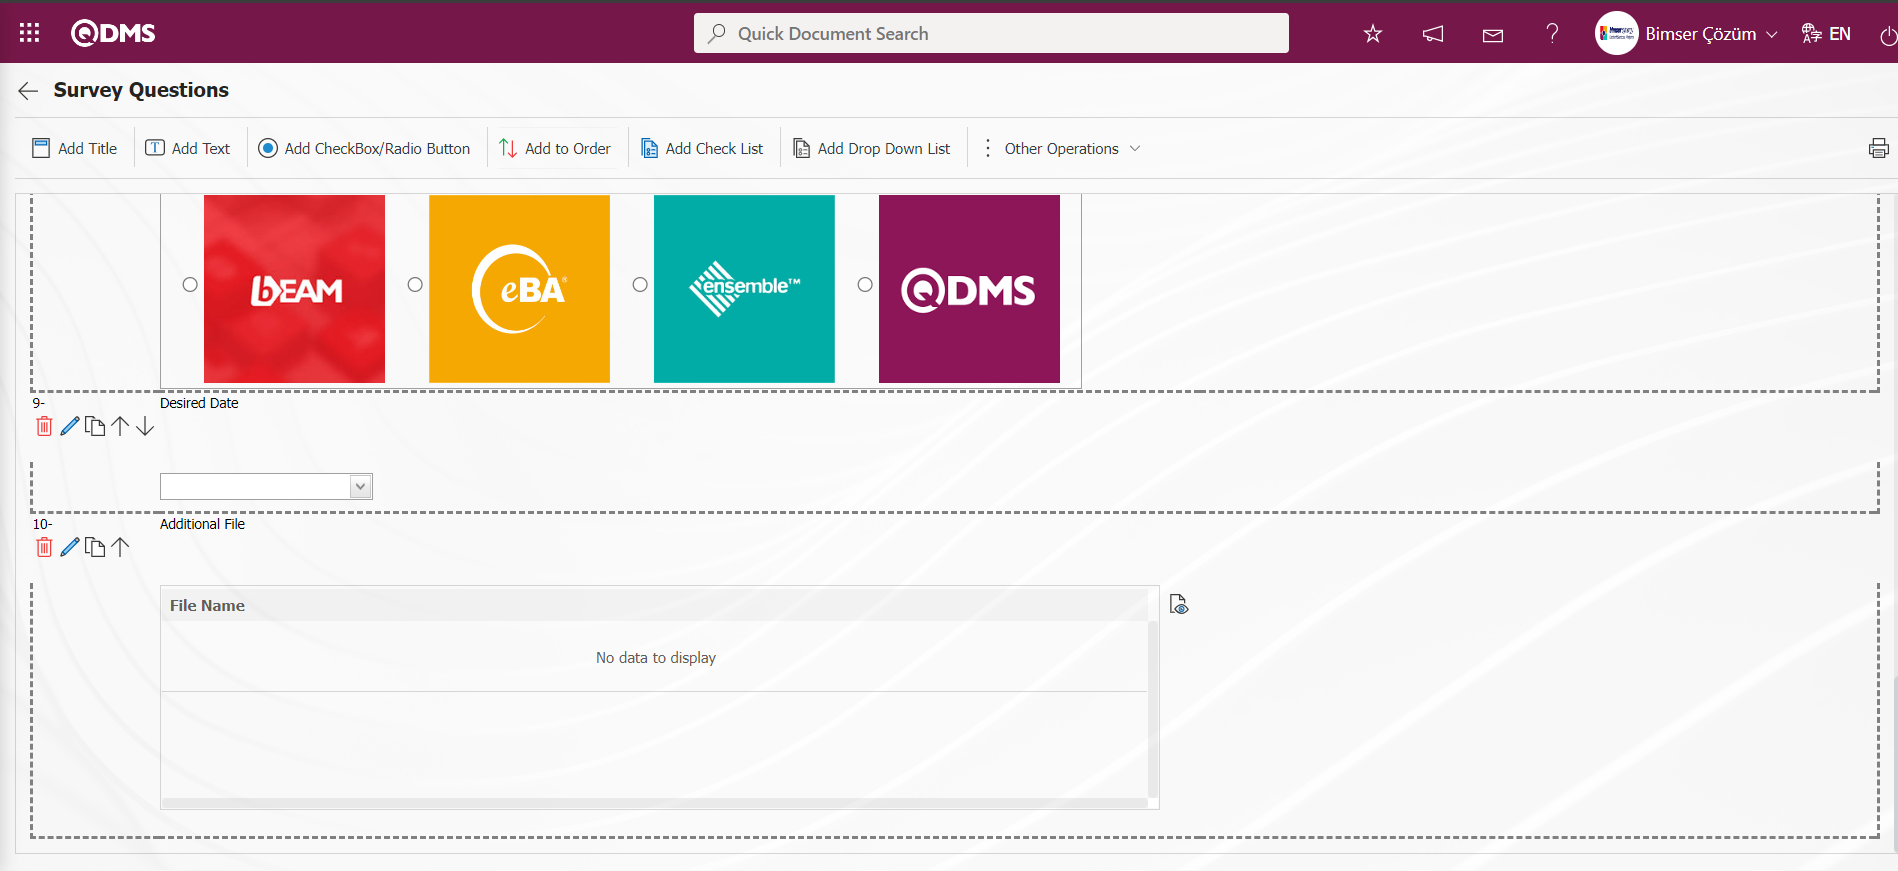
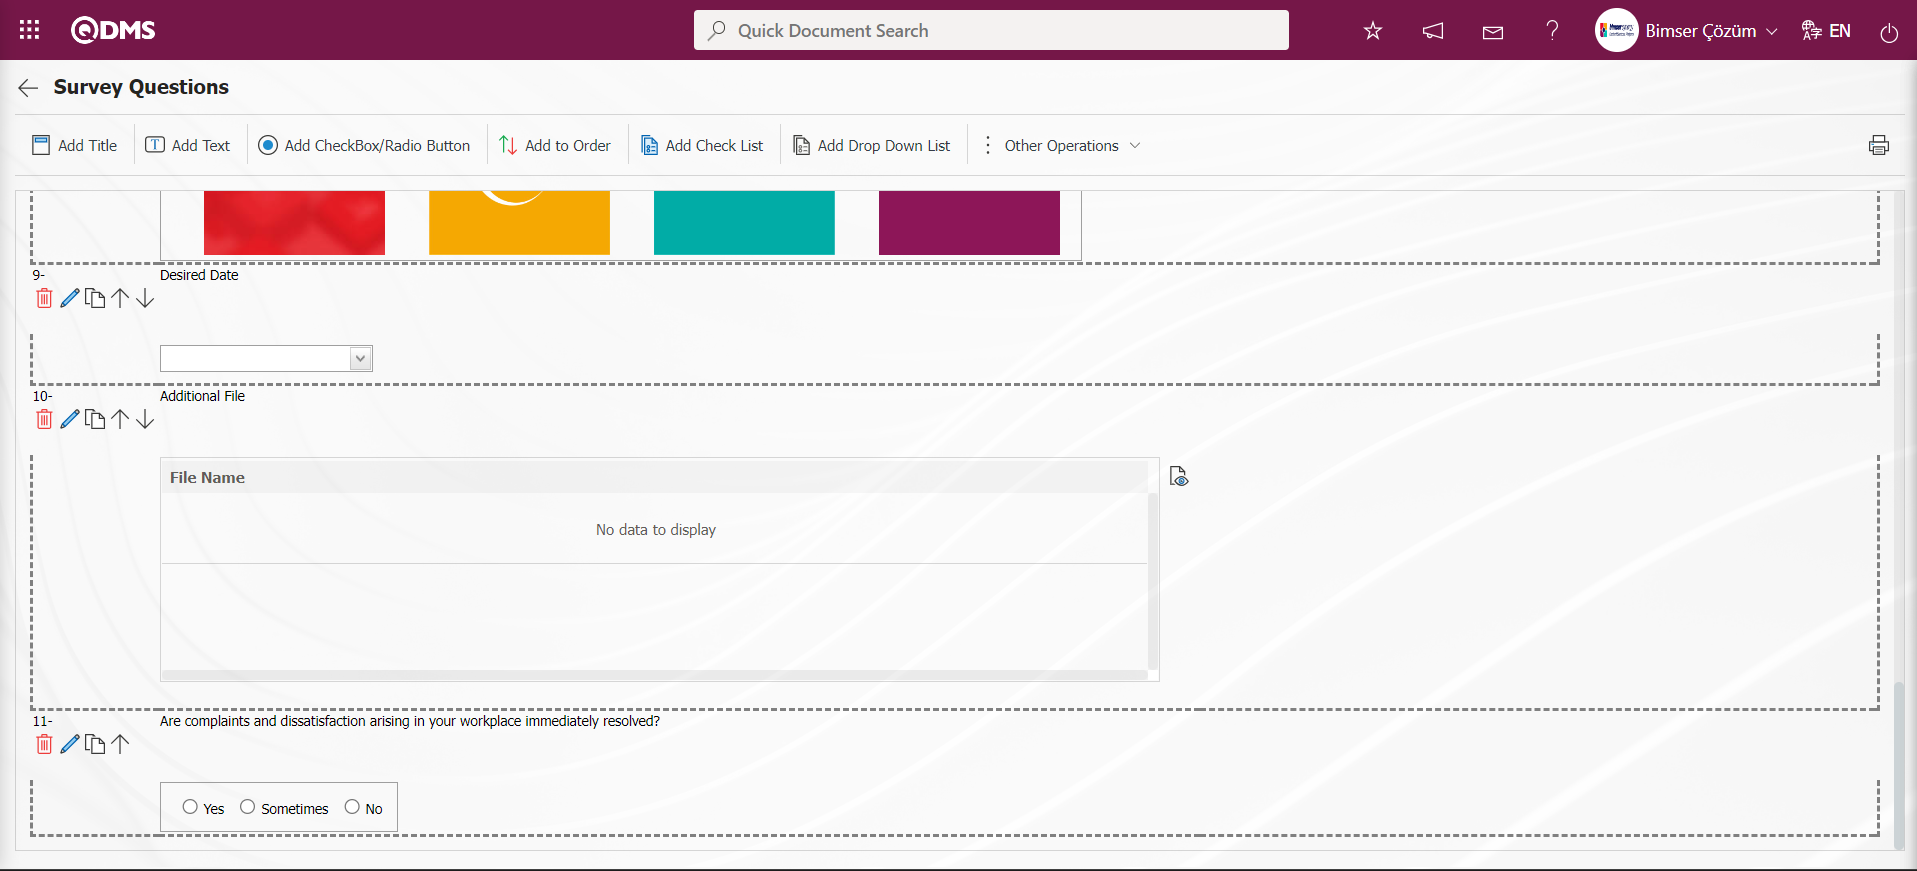
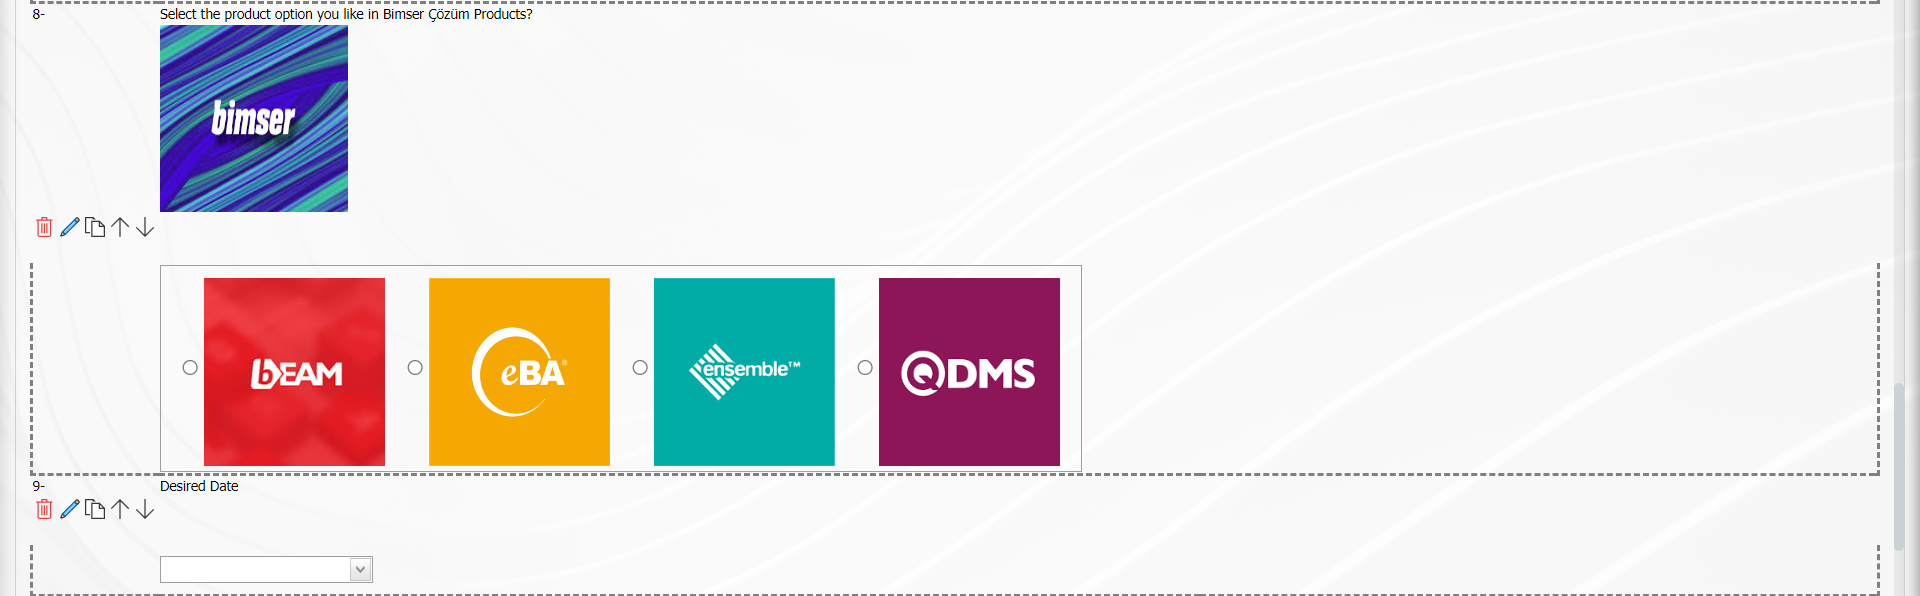
 : It is a type of question in the form of a picture matrix in which a picture is added in the question text field and a picture is added in the options.
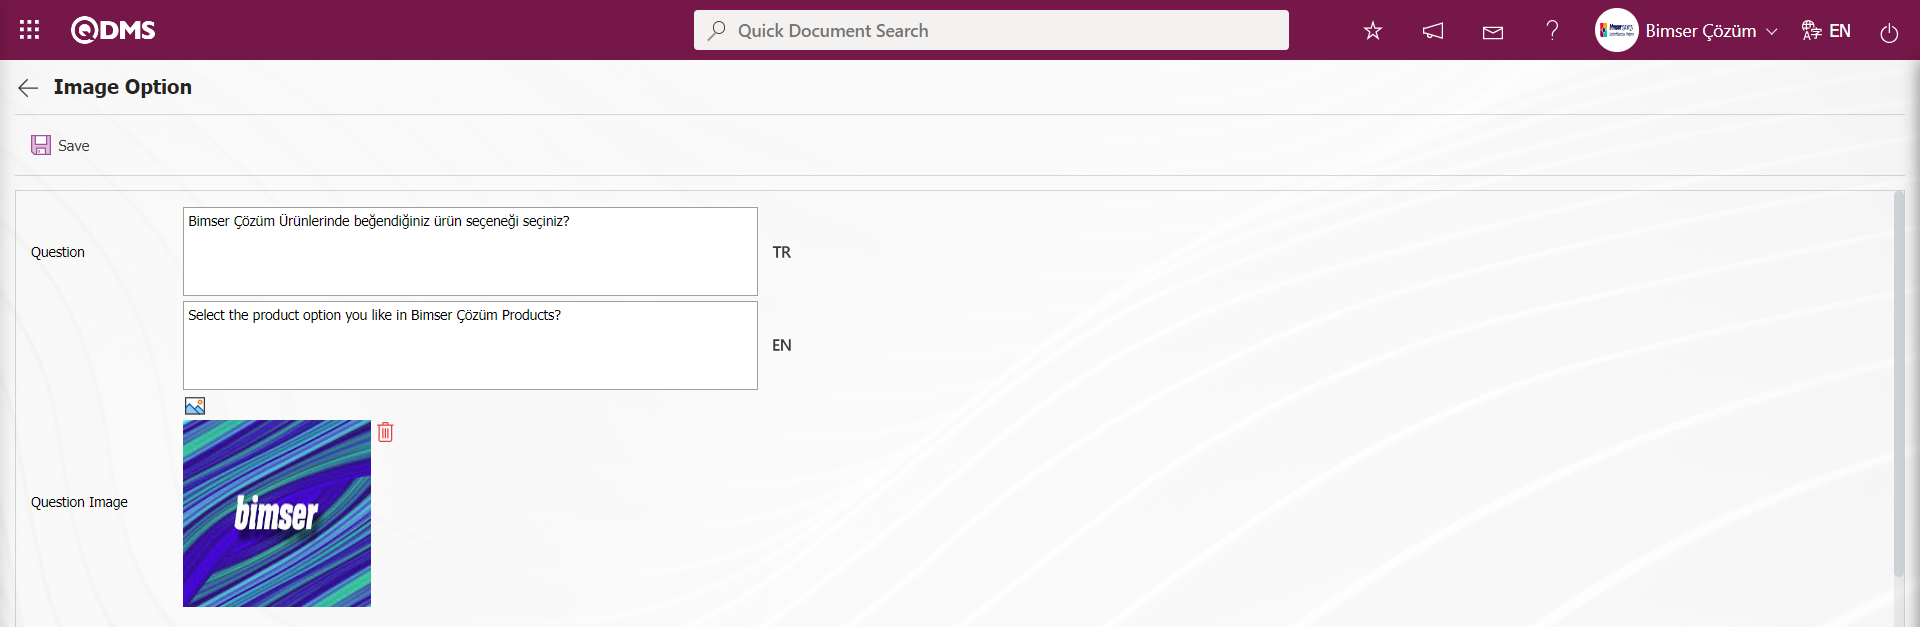
Click the button to add Add Image Option Question Type question type to the questionnaire defined in the Questionnaire Questions screen.
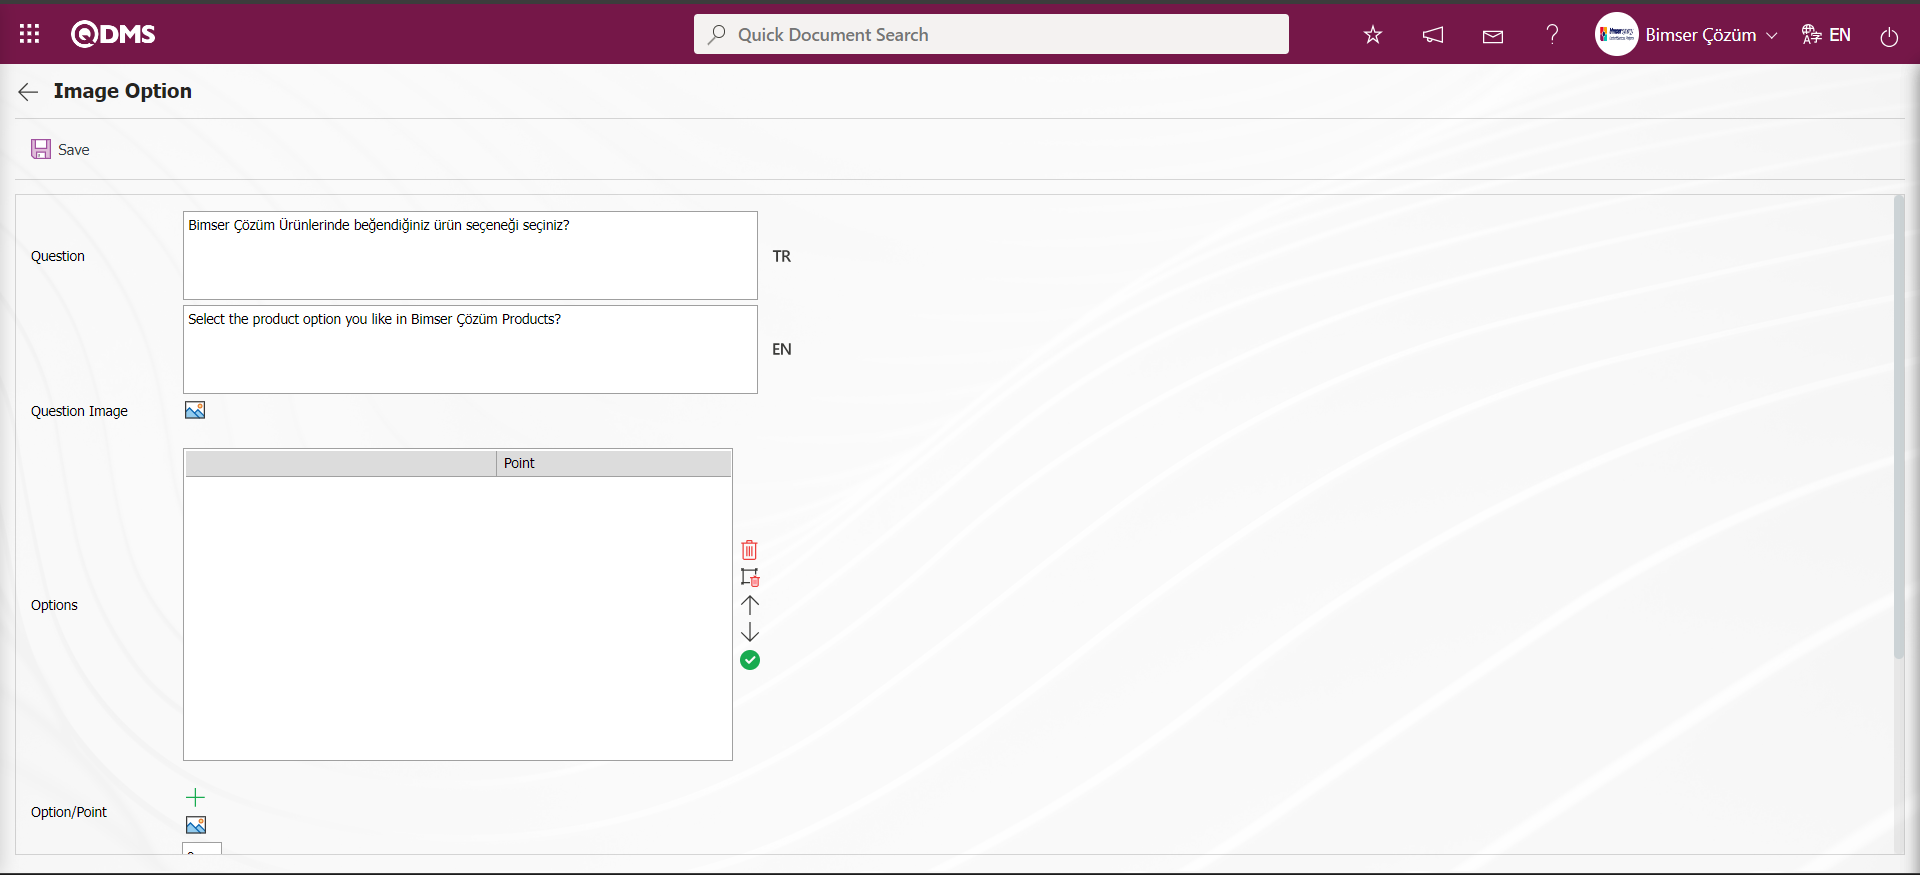
On the Image Option screen, the  button is clicked to add an image to the question text.
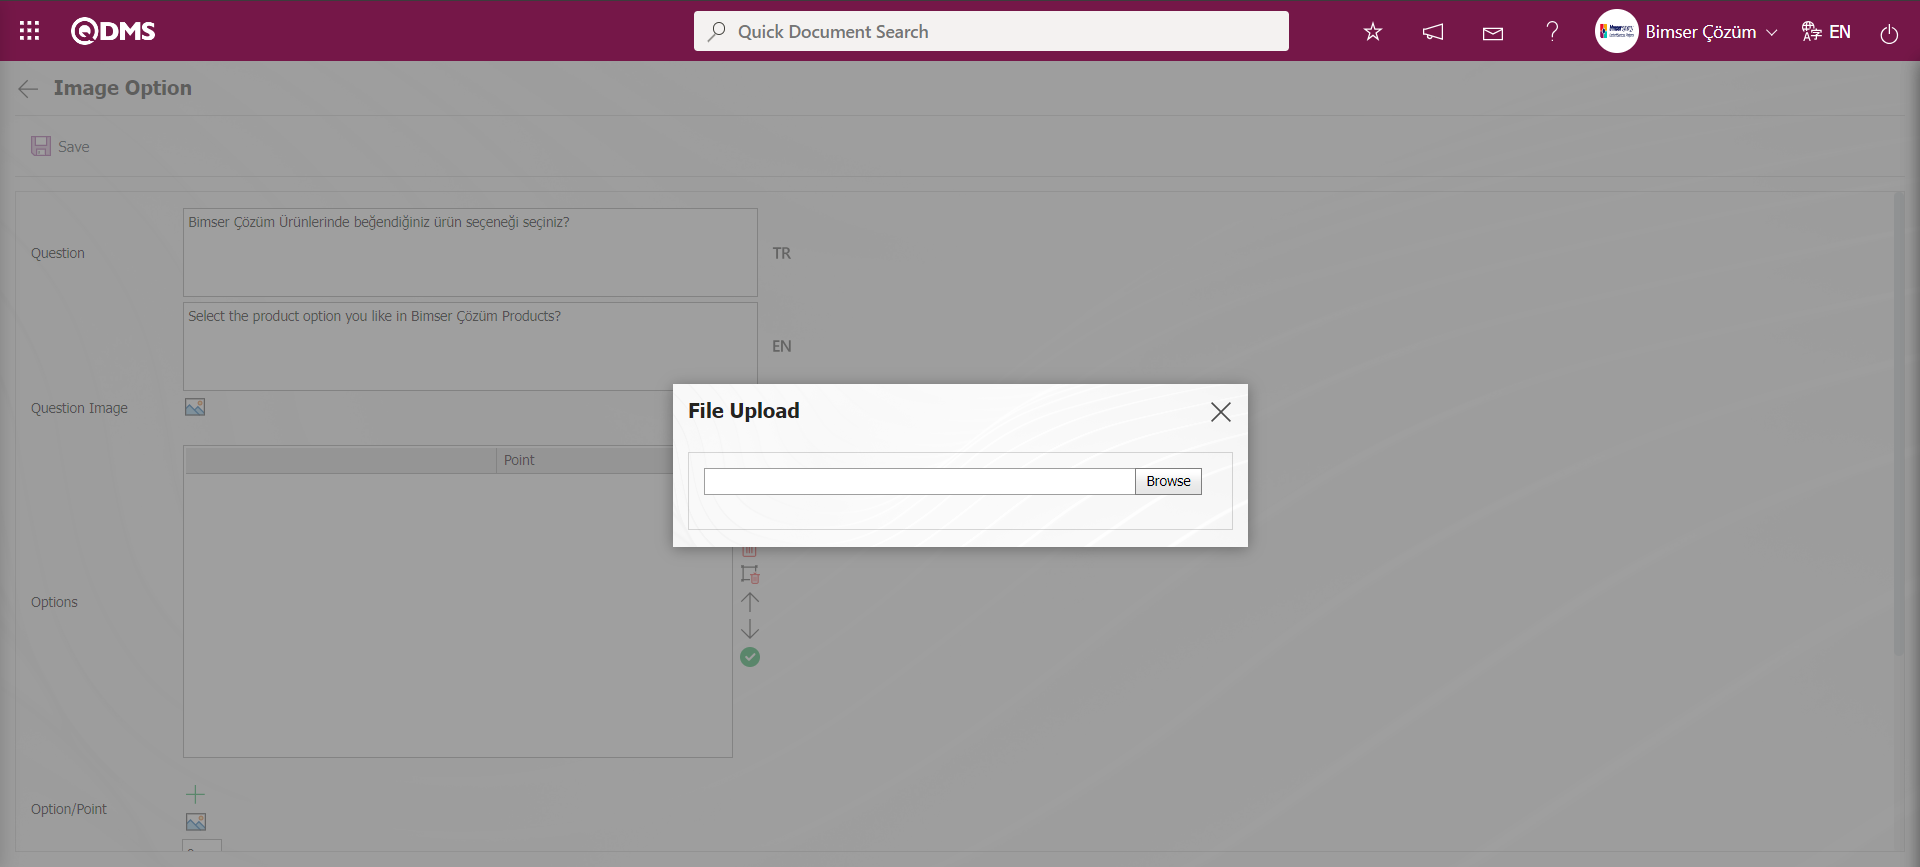
Click the Browse button on the File Upload screen.
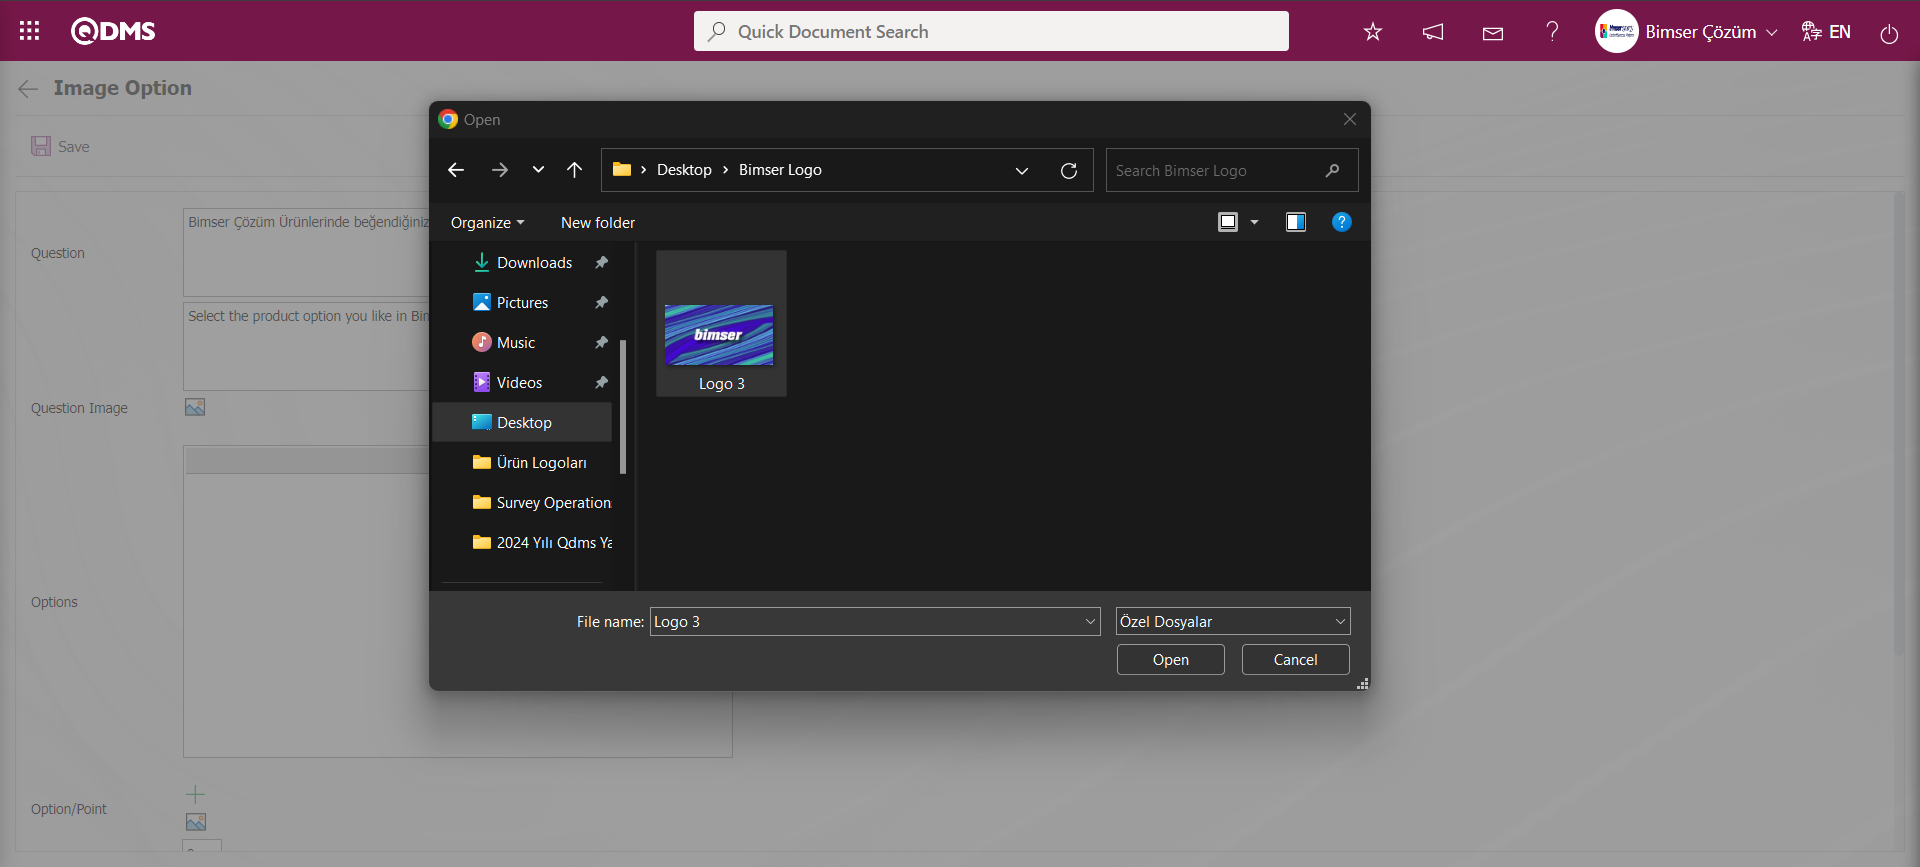
Select the image file on the screen that opens.
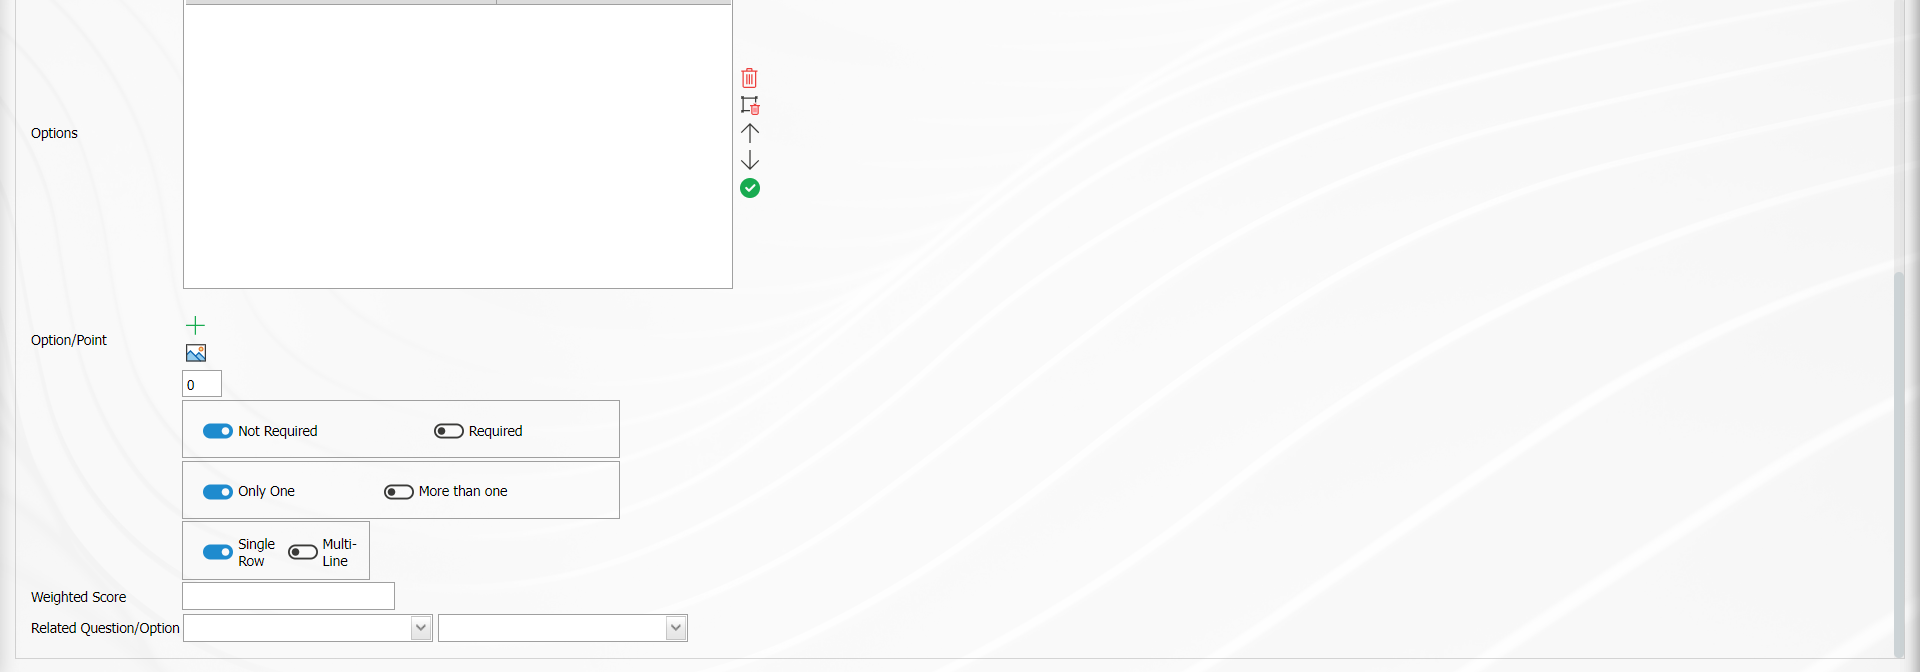
In the Option -Points field  button is clicked to add the pictures in the options.
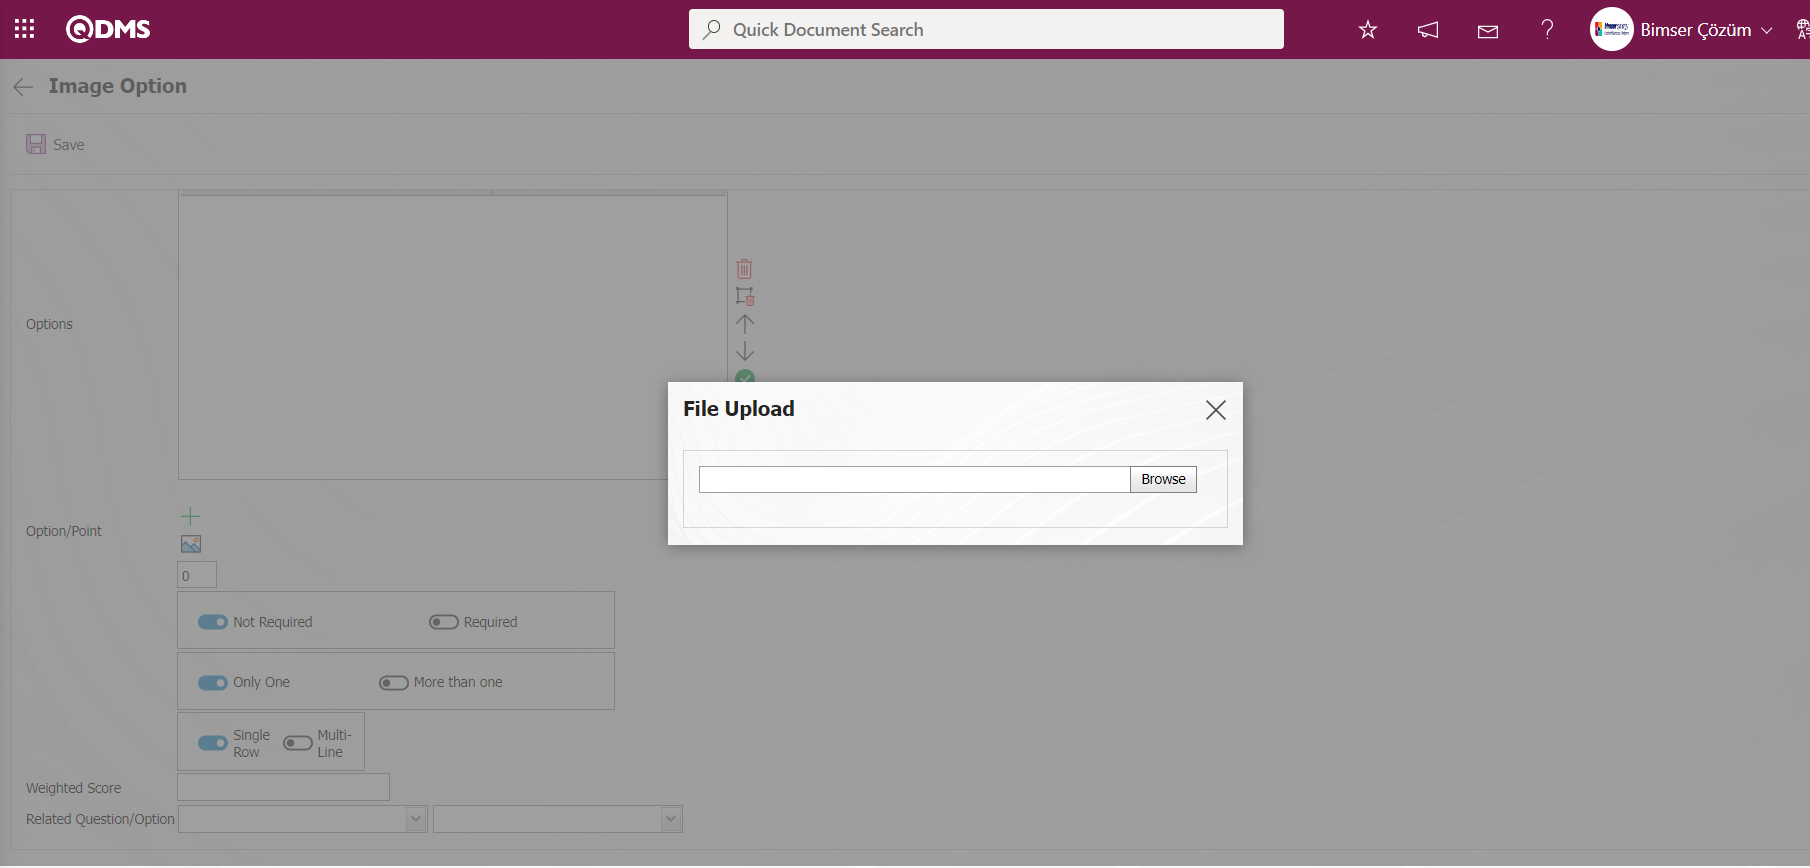
Click the Browse button on the File Upload screen.
The option file with image is selected.

On the Option/Point screen, click the  (Add Image Option) button to add an image option.
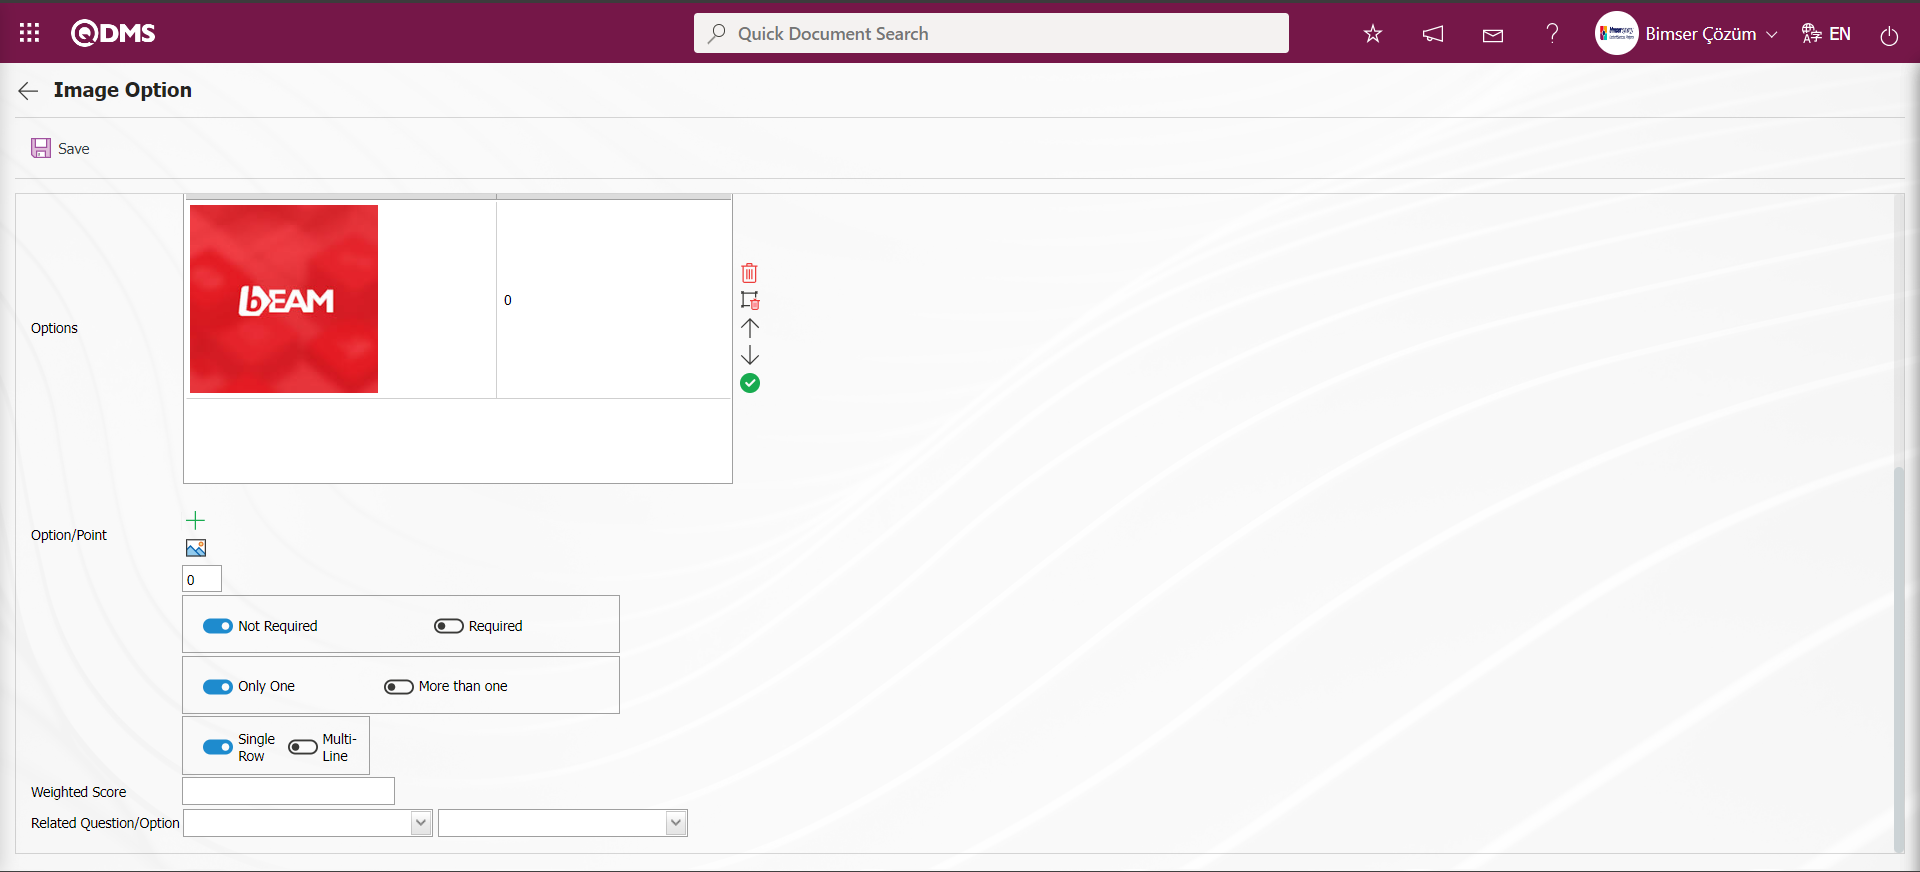
In the same way, all option images are added by clicking the button in the Option/Point field. (Add Image Option) button is clicked to add them.
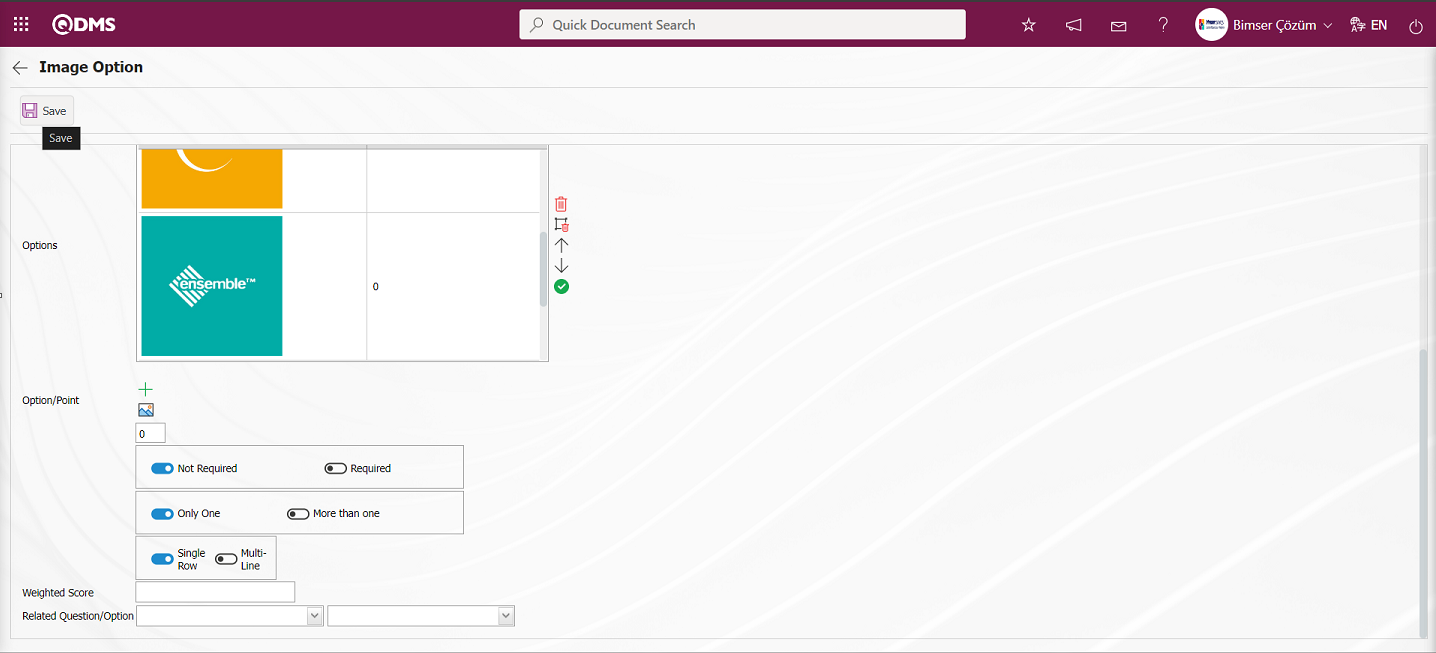
After adding the question picture and image options, the registration process is done by clicking the  button in the upper left corner of the screen.
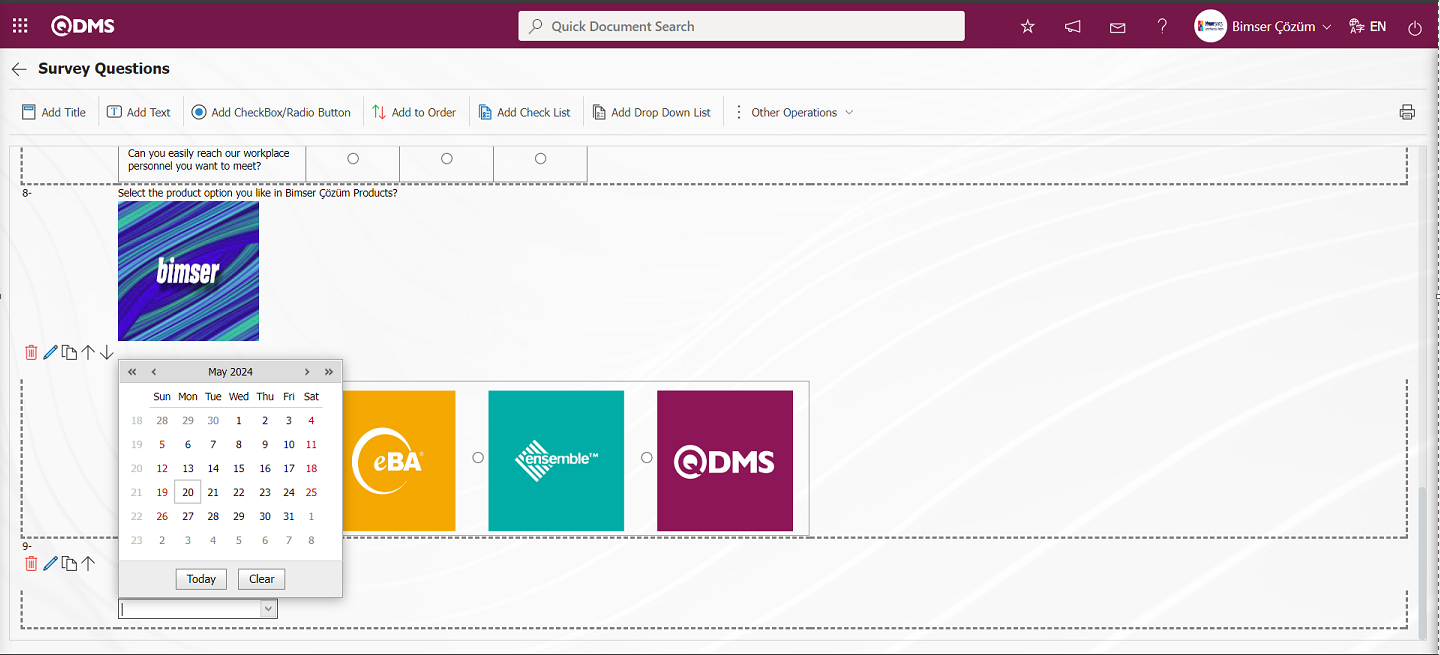
 : On the screen that opens, the user can select the date in the Calendar field.
Click the button to add a date to the questionnaire defined in the Questionnaire Questions screen.

The Text Definition screen opens.
Related fields are defined on the screen that opens:
Question: This is the field where the question text to be asked on the Text Definition screen is written in the Turkish field. In case of use in other languages, the question data to be asked is entered in the field with the relevant languages.
The obligation to answer the question to be asked is determined from this field.
In the Text Definition screen, the required fields are entered and the registration process is done by clicking the  button in the upper left corner of the screen.
 : Creates an Add File field for adding an additional file to the questionnaire.
Click the button to add an Add File to the questionnaire defined in the Survey Questions screen.
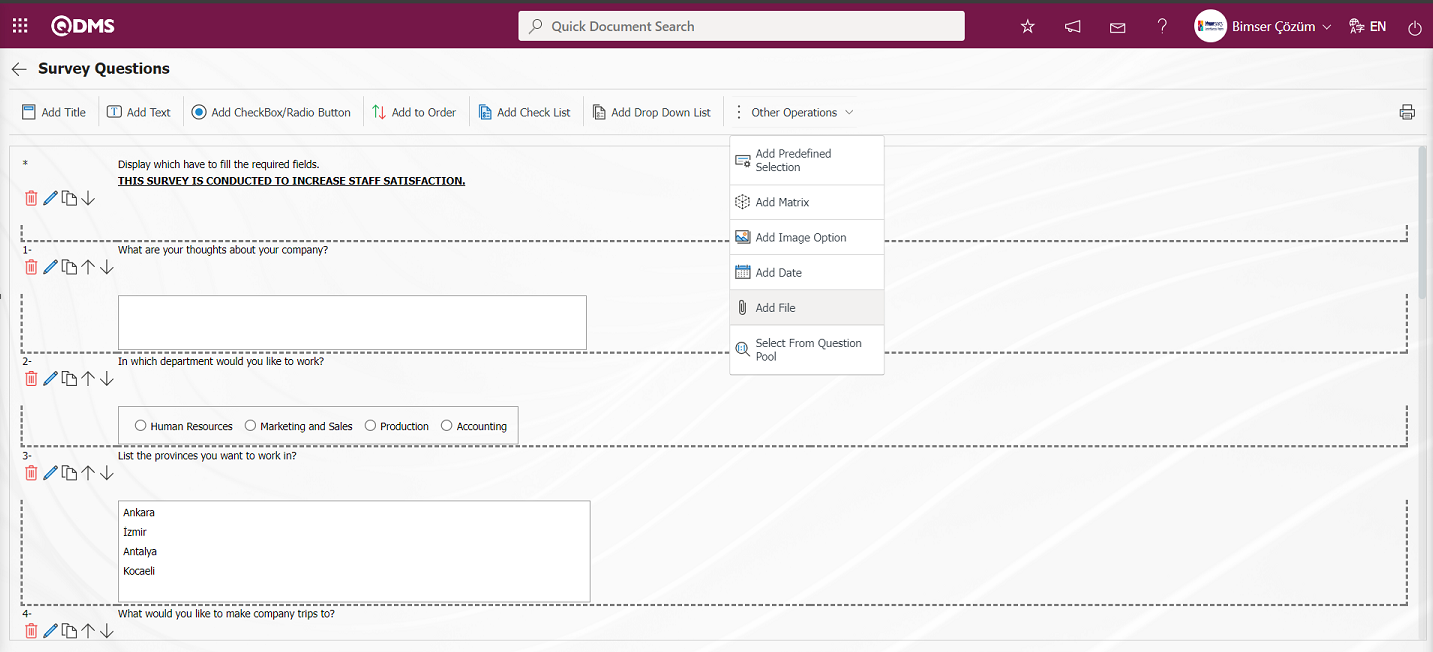
The Add additional file screen opens.
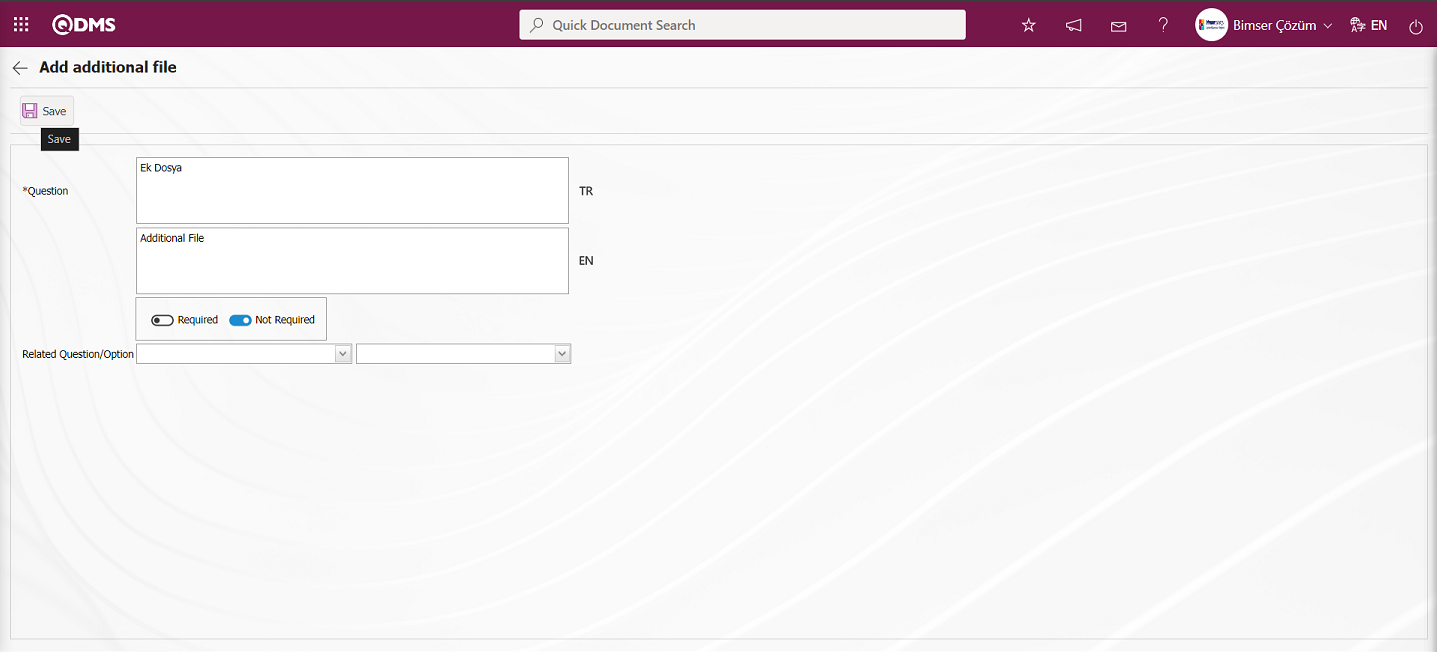
Related fields are defined on the screen that opens:
Question: This is the field where the question text to be asked on the Add additional file screen is written in the Turkish field. In case of use in other languages, the question data to be asked is entered in the field with the relevant languages.
The obligation to answer the question to be asked is determined from this field.
Associated Question/Option: This is the field where the question is displayed depending on the option of the defined optional question. By selecting the option of the associated question and question, when the option of this question is selected, the associated question is displayed.
After entering the necessary information in the Add additional file screen, click the  button at the top left corner of the screen.
 : It is the question type that is selected from the list of question categories defined in the Question Categories screen opened in the Question Pool menu in the Survey module infrastructure.
Click the button to add a question category from the question category list from the Question Pool to the questionnaire defined on the Questionnaire Questions screen.

Select the question category from the Select Question Category list and click the  button.
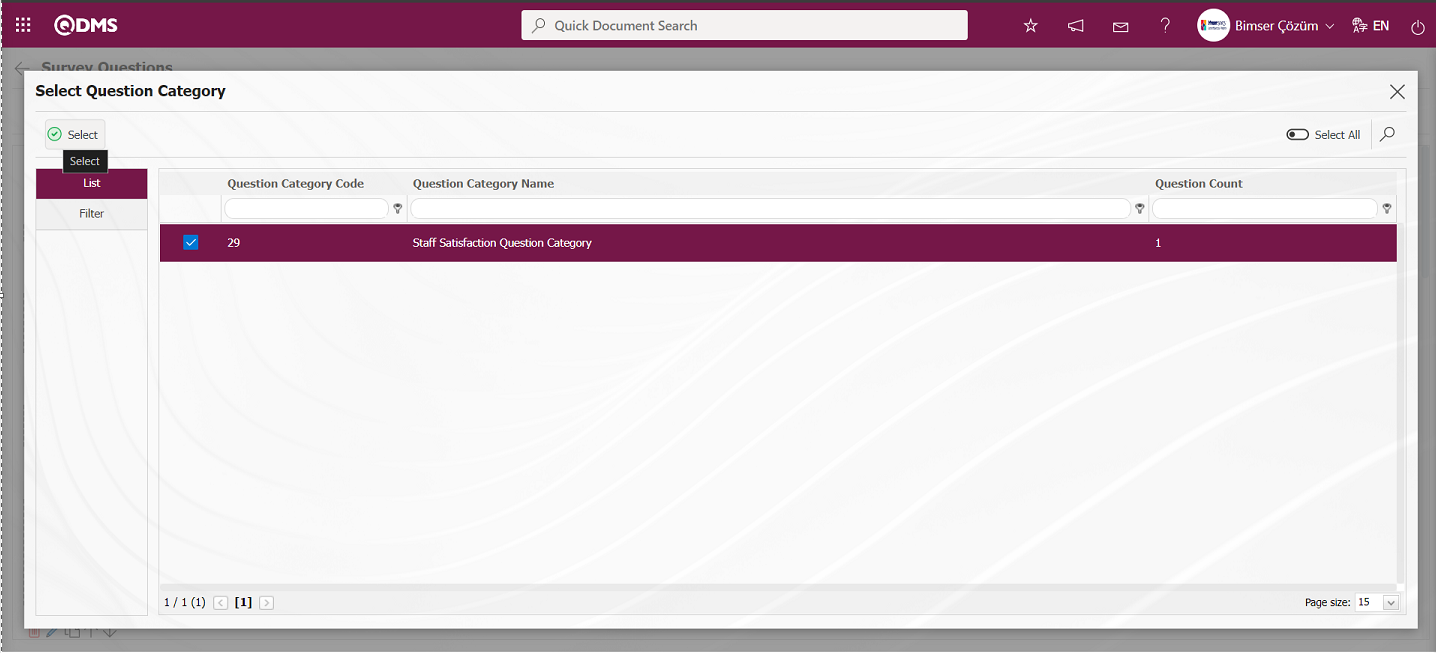
The question category selected in the question pool is added to the survey.
The question types added to the survey defined on the Survey Questions screen are displayed as follows. 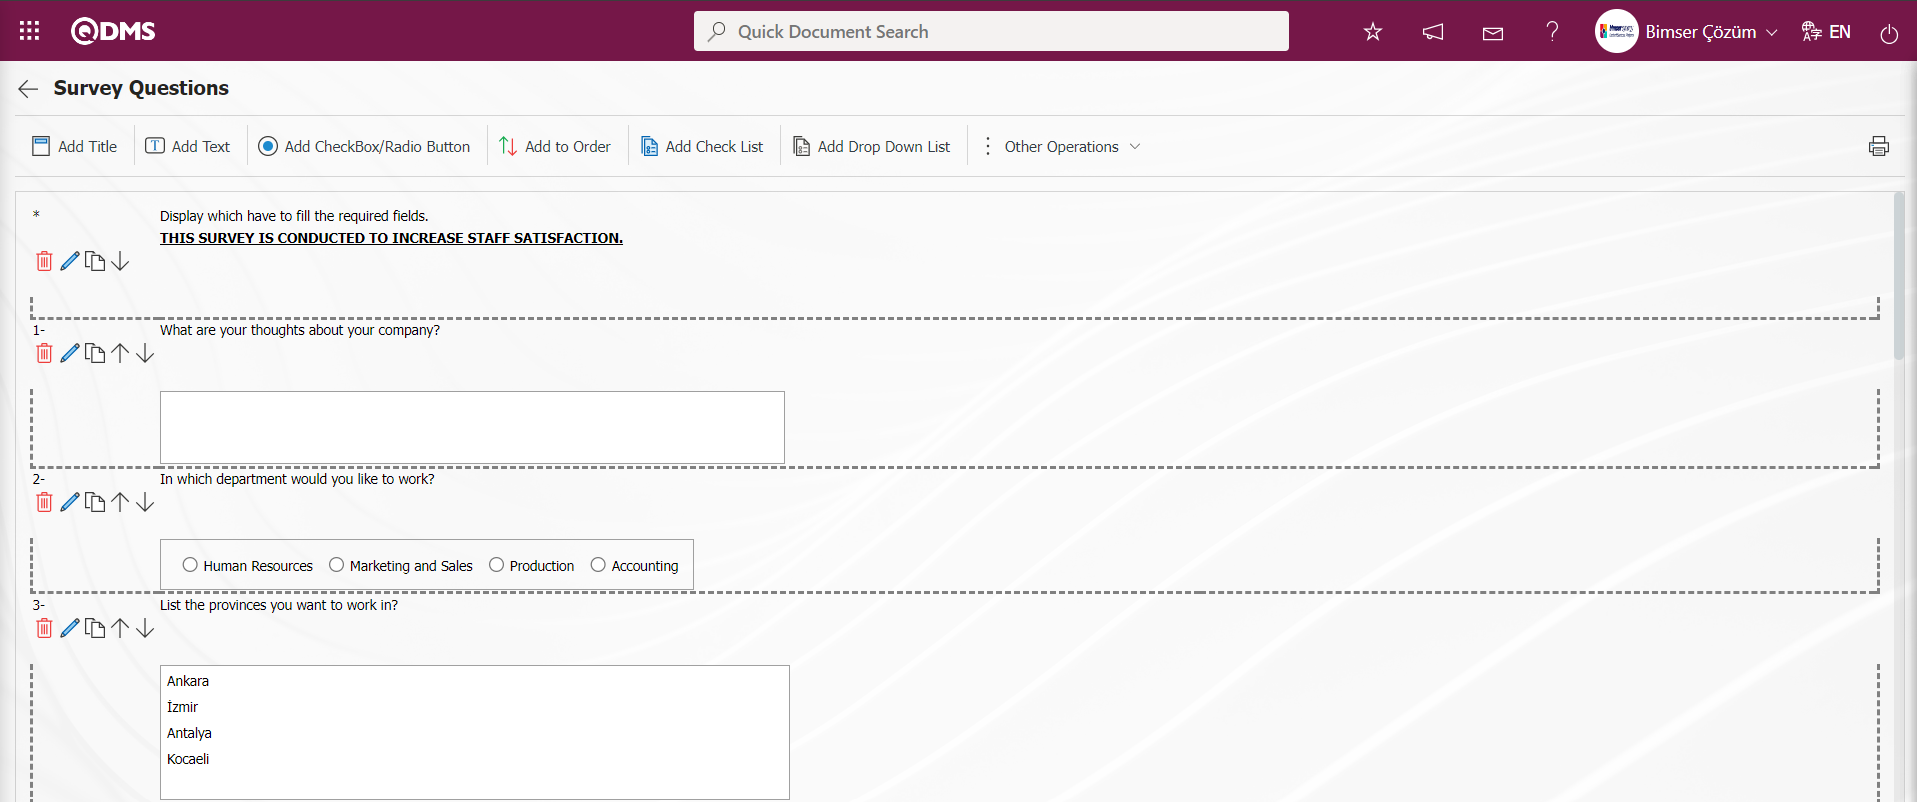

6.2.1.3.Opening, Closing and Publishing the Survey
Menu Name: Integrated Management System/ Survey/ Prepare Internal Servey form
The survey can be opened manually with the button after the survey information, participants and questions have been set. By clicking this button, the survey is now visible to the participants. In the pending jobs of the people selected as participants, a task will appear as “Questionnaires you need to complete”. If you want this to be sent to the participants via e-mail, the  button is used. In the Survey Operations module parameters, the parameter value of the parameter 7 “Validity date are completed surveys automatically closed?” is selected as “no” and the parameter is disabled.

If the parameter is passive, the  button is used to close the survey. When the parameter is activated by selecting the parameter value of the parameter “Yes”, it automatically switches to closed status when the validity period of the survey expires.
While the survey in closed status is selected on the Survey Definition screen, click the 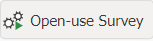 button.
“Questionnaire is opened up to use.” message is given by the system to indicate that the questionnaire is opened for use. After the message given by the system, a questionnaire is sent on Qdms to the users we added as participants to the survey to be filled out and the task “Surveys will be filled out. ‘ is dropped to the users’ pending jobs.
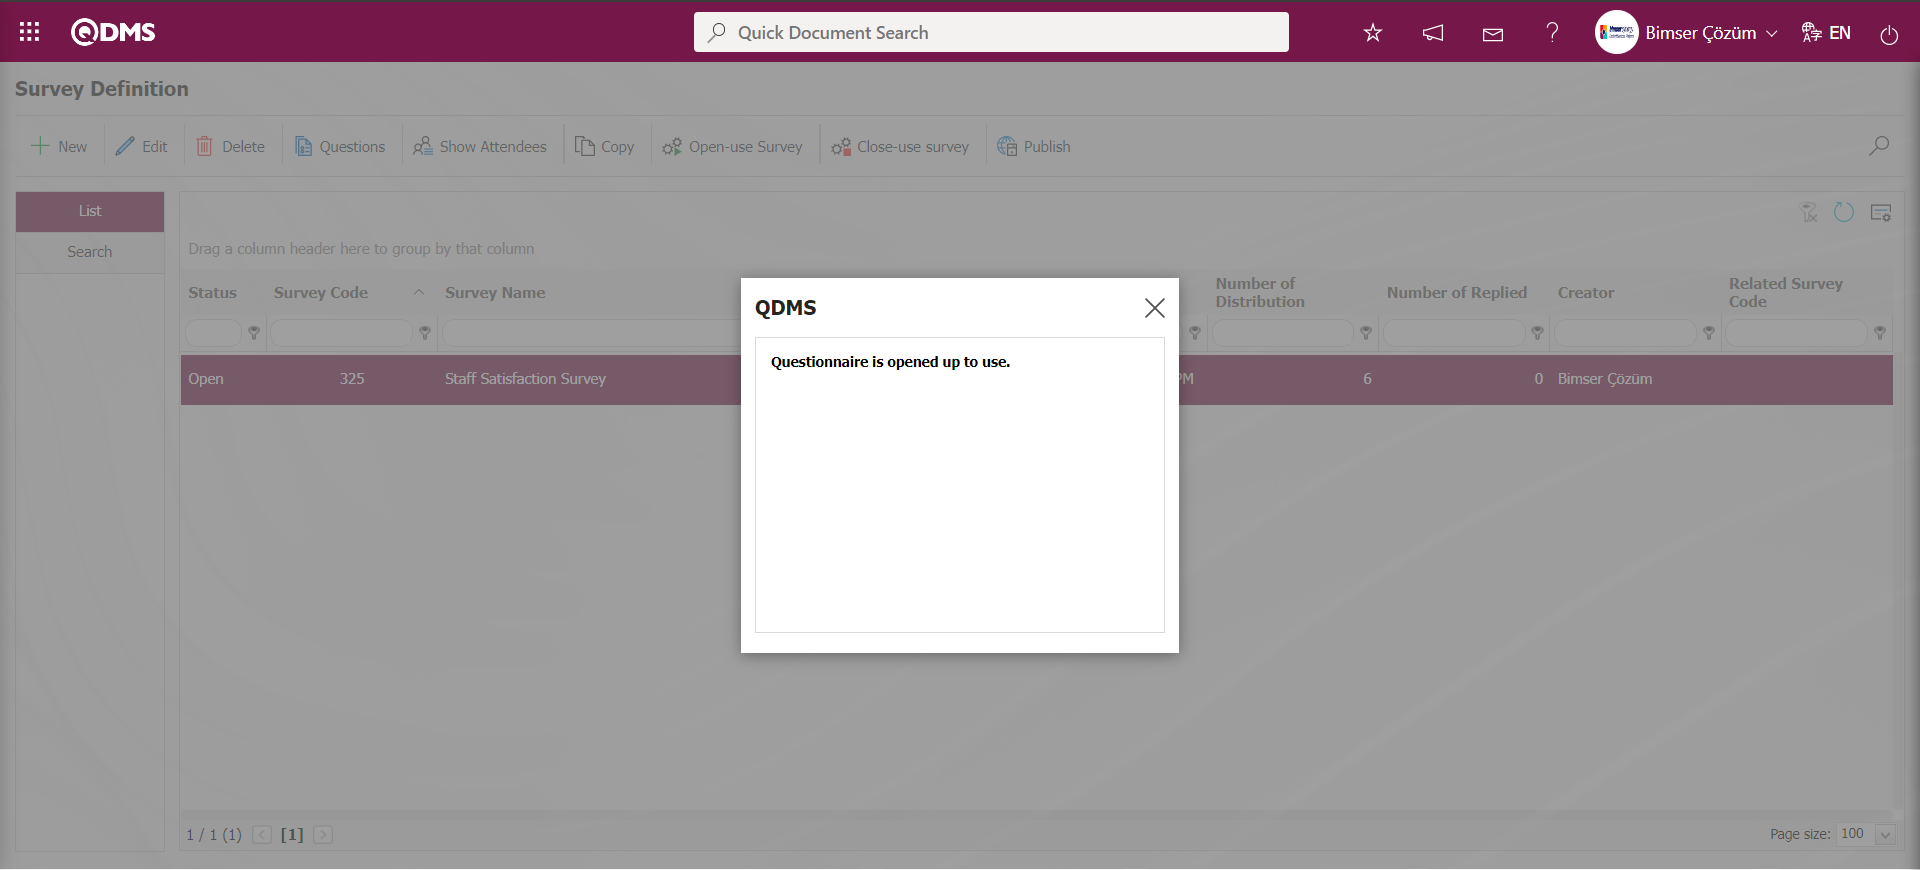
After the survey is made available on the Survey Identification screen, its status becomes “Open”.

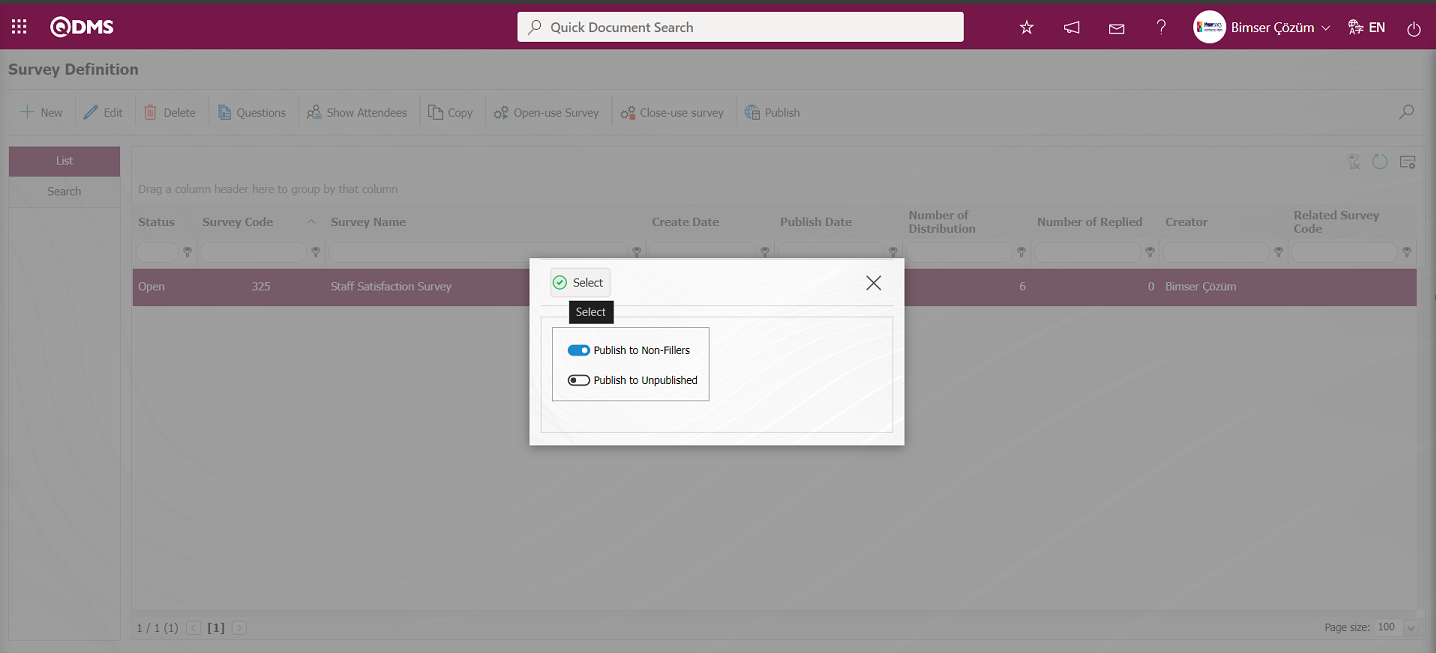
While the survey in open status is selected on the Survey Definition screen, click the  button.
Options on the screen that opens;
Publish to Non-Fillers: This is the option selected for users whose questionnaire is not filled.
Publish to Unpublished: It is the option selected for users whose survey is not published.
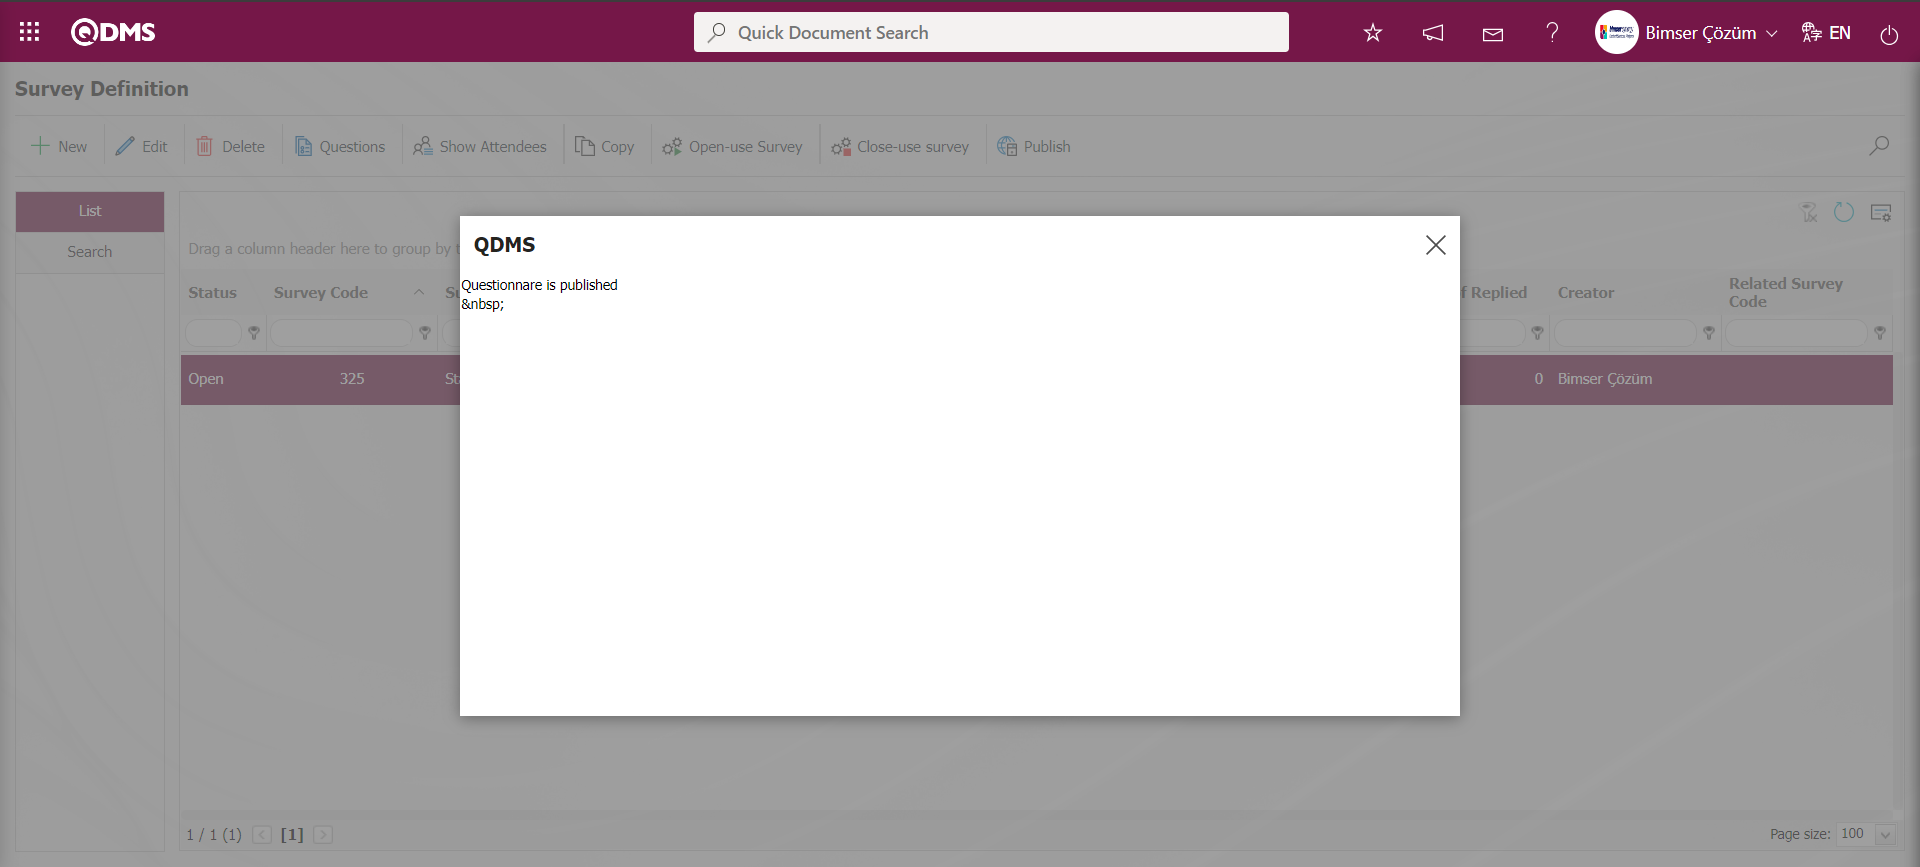
By selecting the Publish to Non-Fillers option on the screen that opens  the process of publishing the survey to those who have not filled out the survey as mail is done.
“Questionnare is published” message is given by the system, indicating that the survey is published.
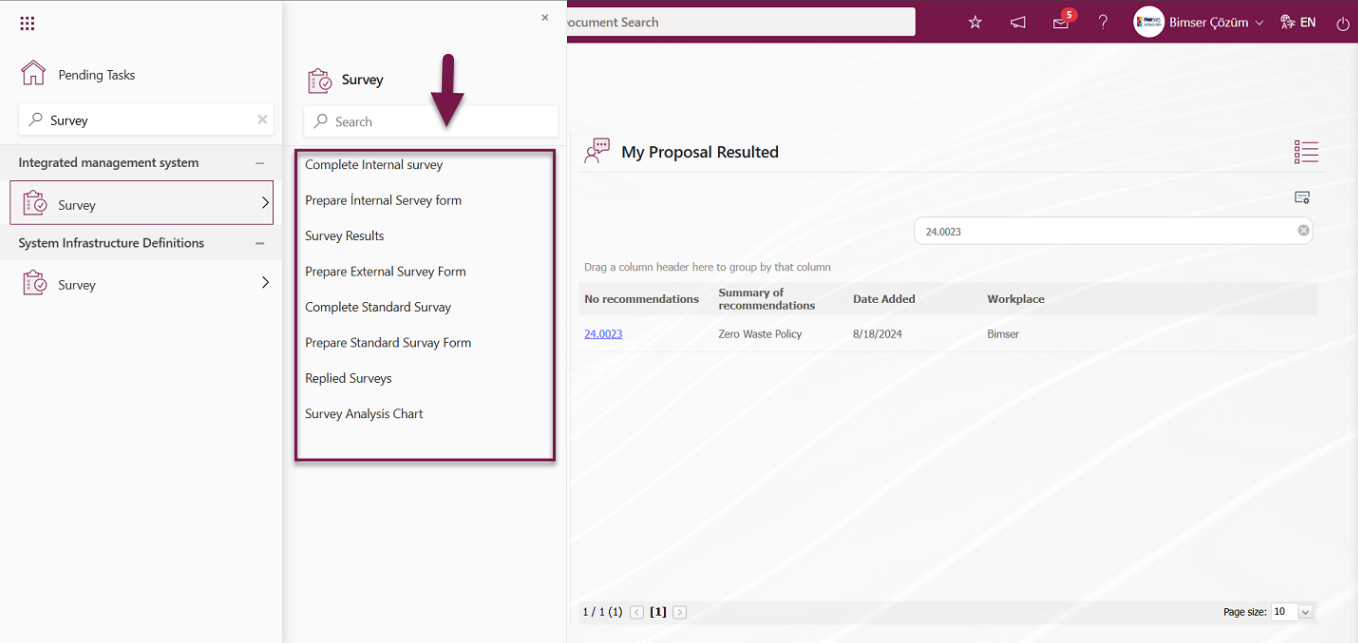
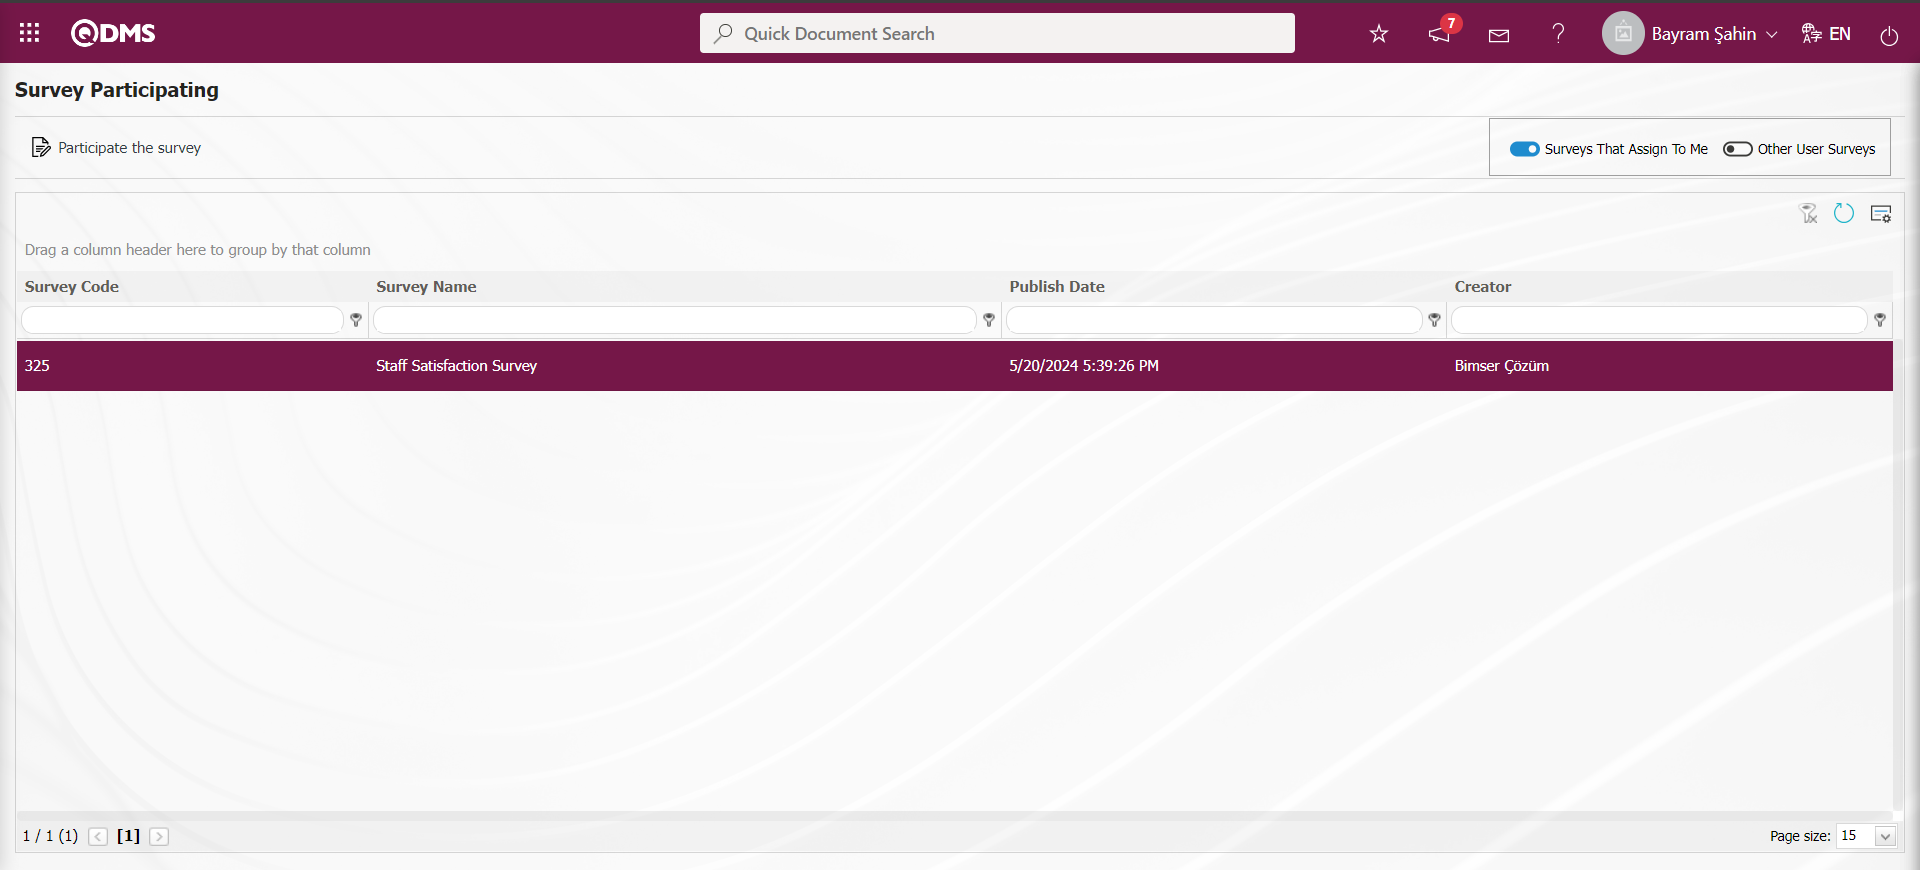
6.2.2. Complete Internal survey
Menu Name: Integrated Management System/Survey Operations/ Complete Internal survey
There are two selection criteria on the Internal Survey filling screen: “Surveys That Assign To Me” and “Other User Surveys”. Users fill out the survey by selecting the relevant option. In addition to completing the survey with the help of the Complete Internal Survey menu, by clicking the code of the survey that falls as a task from the My Pending Jobs menu, the page where the specified surveys can be filled in is accessed and the survey is filled in.
From Complete Internal Survey Menu
After clicking on the Complete Internal survey menu, the survey filling page is accessed and the survey filling process is performed by clicking on the  button while the relevant option criteria and the survey is selected.
With the help of the buttons on the screen;
 : Survey filling screen opens.
While the “Surveys That Assign To Me” criterion and the survey is selected on the Survey Filling screen, the button is clicked.
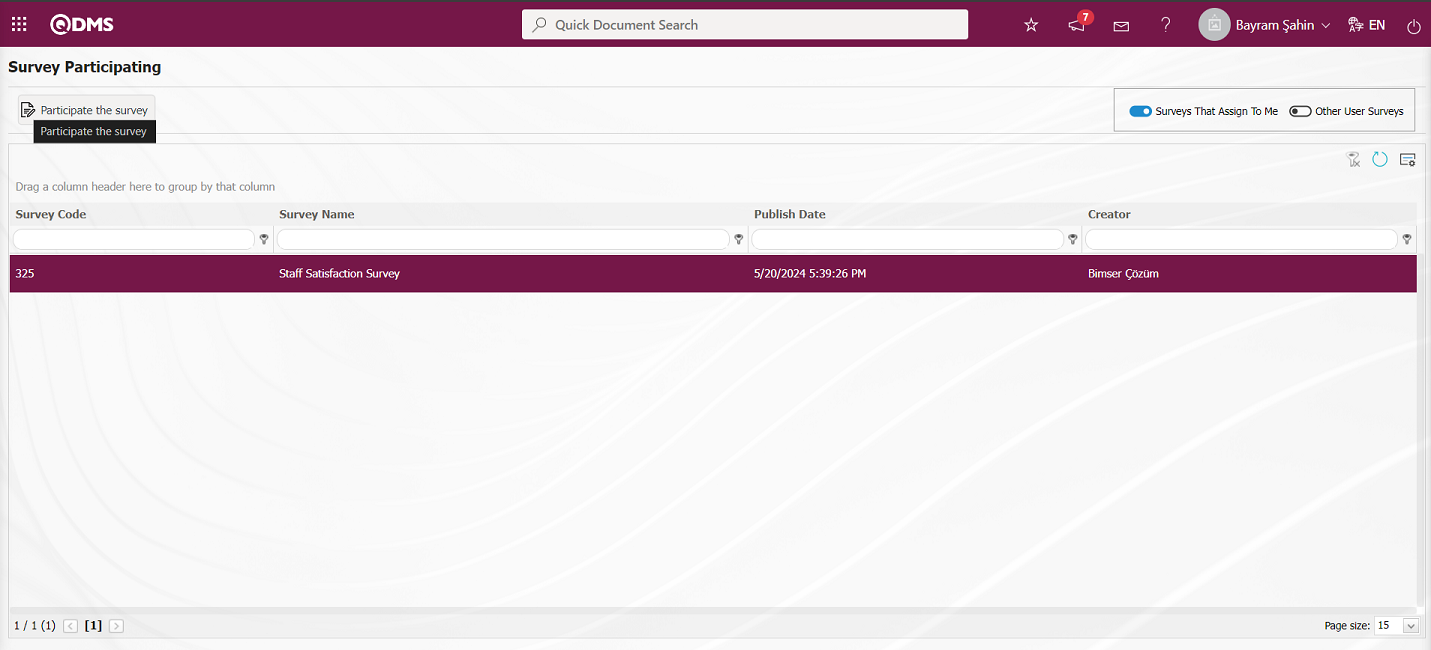
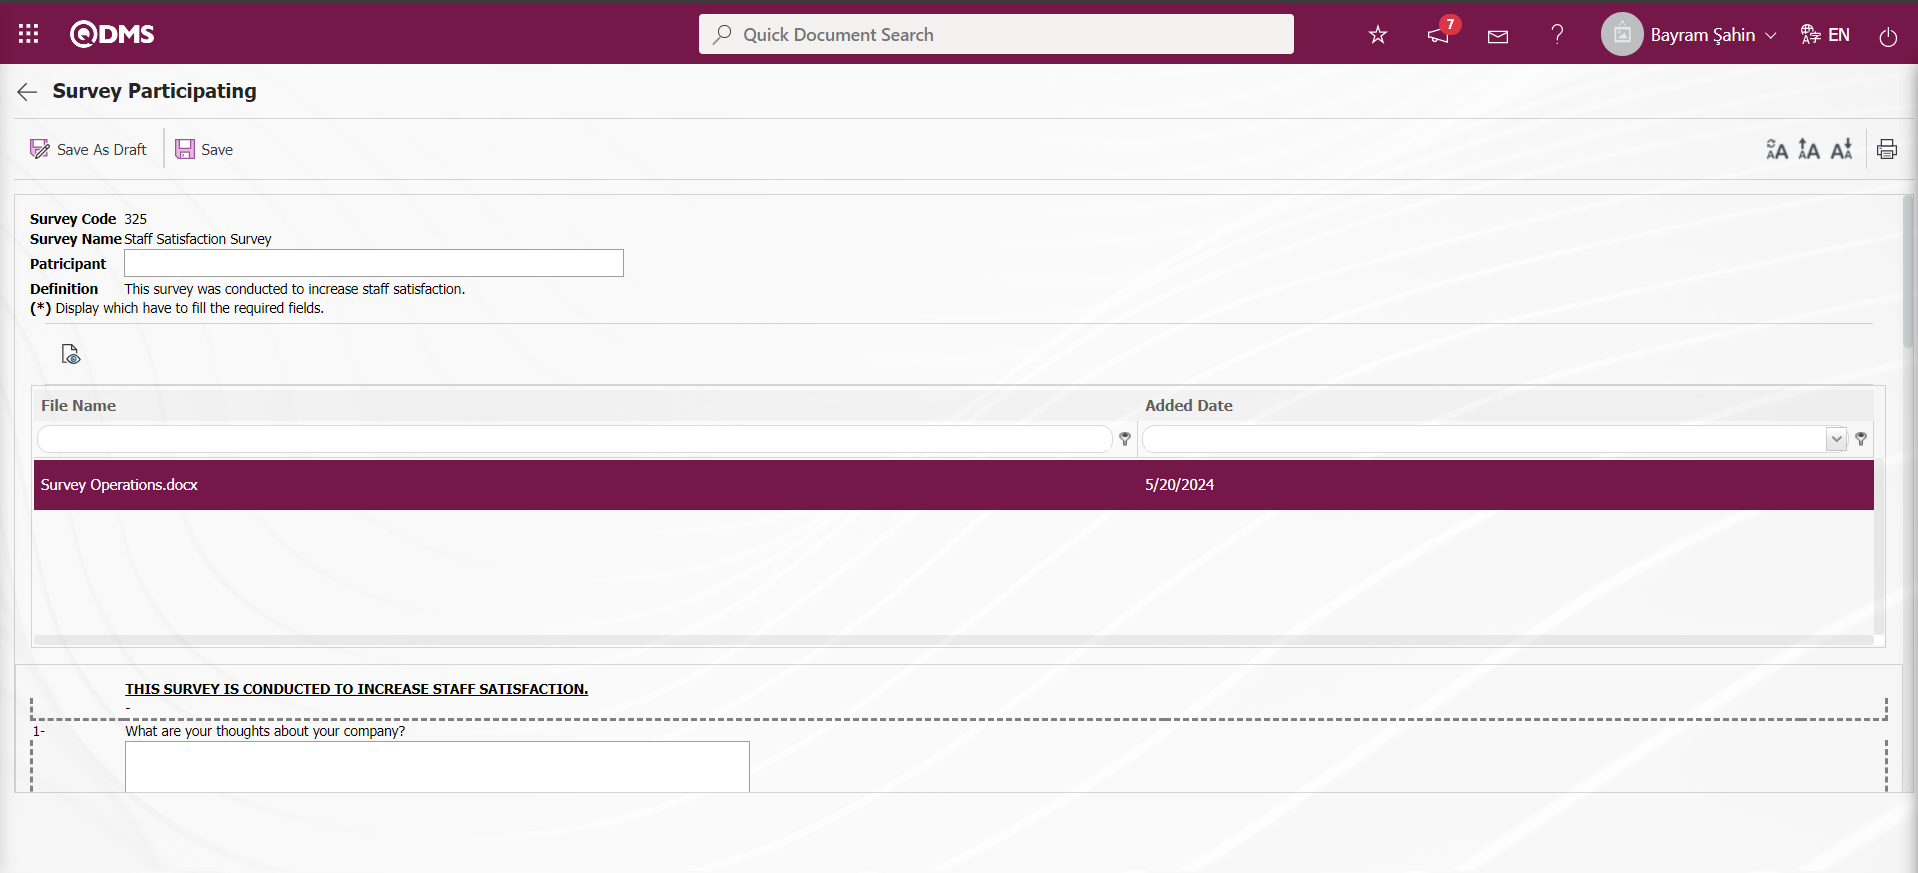
The Survey Participating screen opens.
With the help of the buttons on the screen;
 : Saves the survey as a draft. This button is the button displayed depending on the parameter. The parameter value of the parameter number 10 “Use draft mode in Survey Complete stage” in the survey operations parameters is activated by selecting “Yes”.
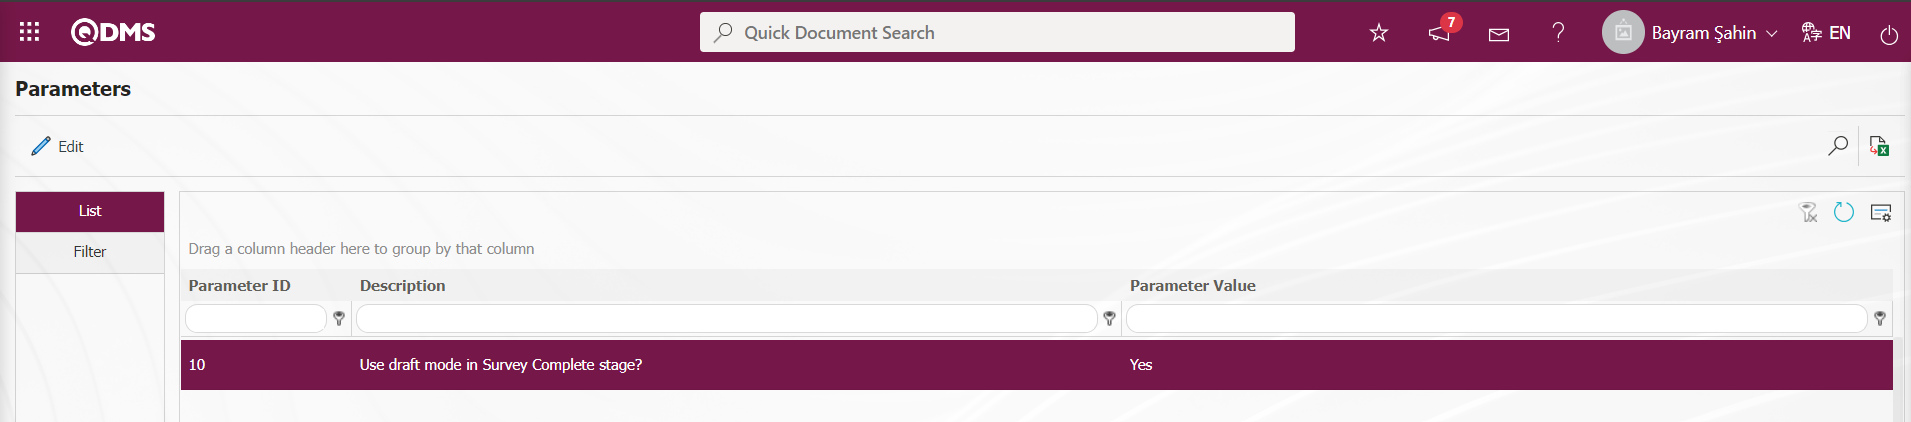
After the parameter is activated, this button is displayed on the questionnaire filling screen and this button is clicked to save the questionnaire as a draft.
 : Registration is done.
 : Viewing the additional files added in the survey is done.
 : Resetting the font size of the survey is done. After the change in the font size of the survey, the process of restoring it to its previous state is done.
 : Enlarging the text size of the survey is done.
 : Reducing the font size of the survey is done.
 : Printing the survey is done.
The survey viewing process is done. The questions of the displayed survey are answered and filled in. 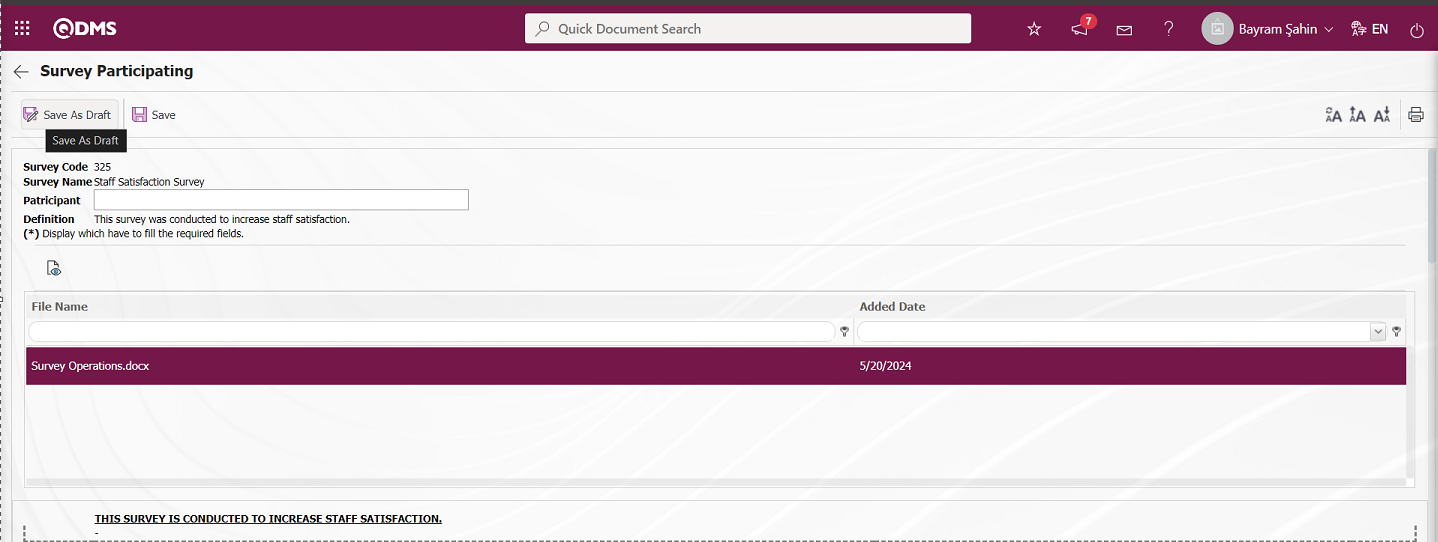
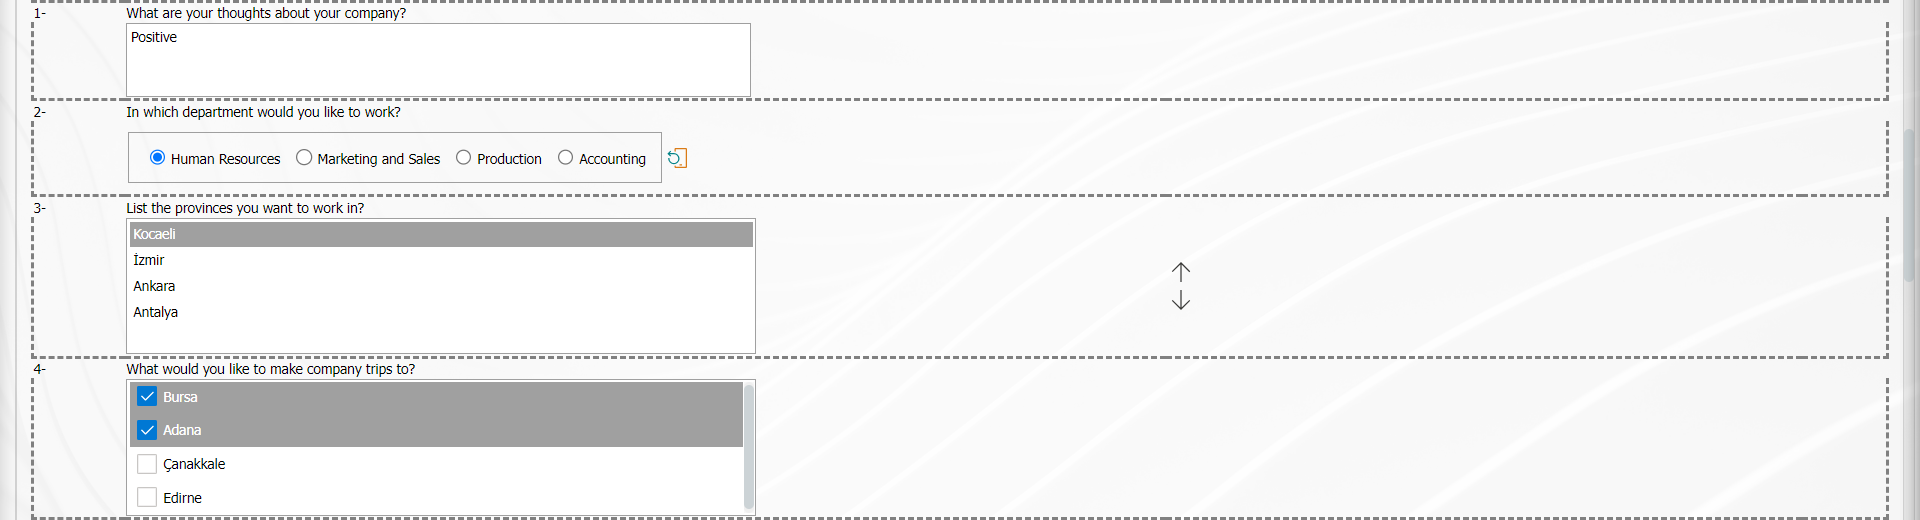

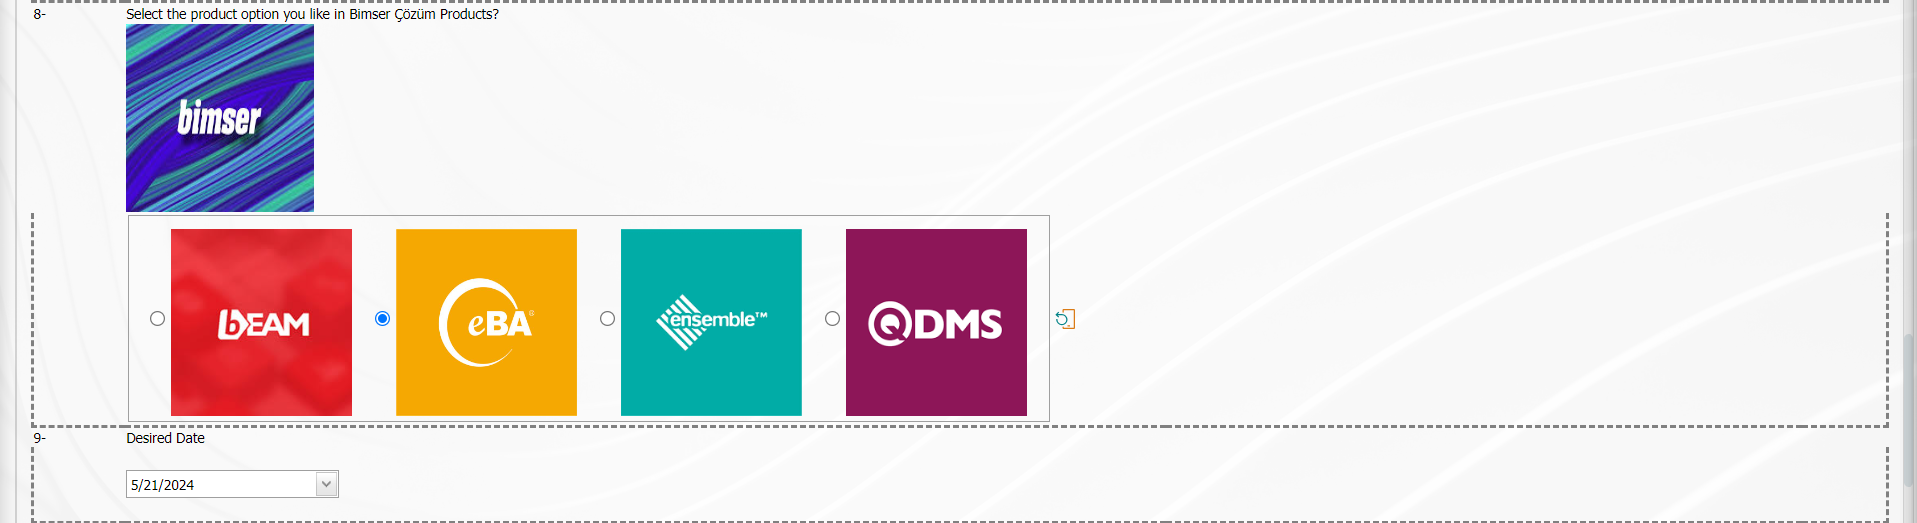
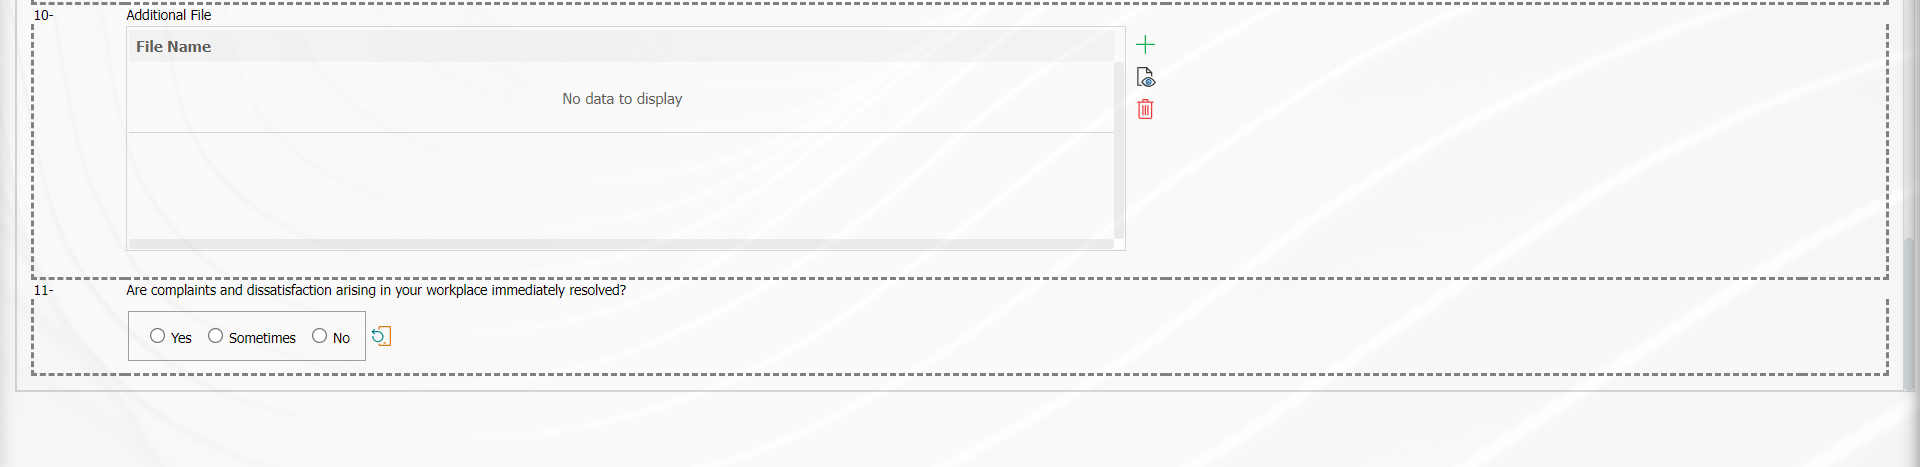
On the Survey Participating screen, the  button is clicked to save the survey as a draft.
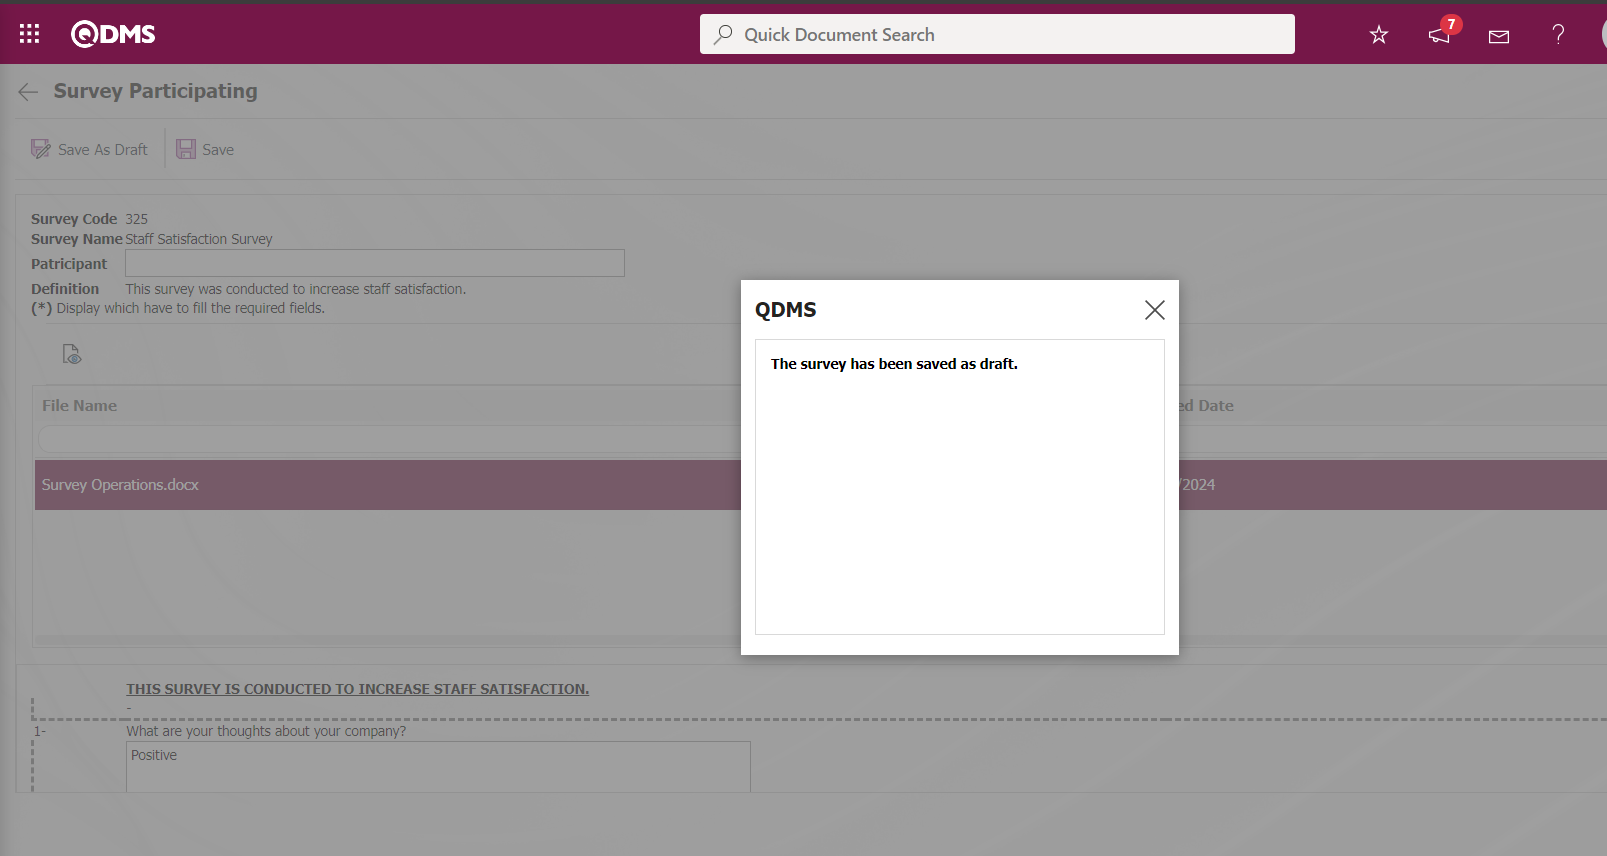
On the Survey Participating screen, select the survey  saved as draft and click on the button.
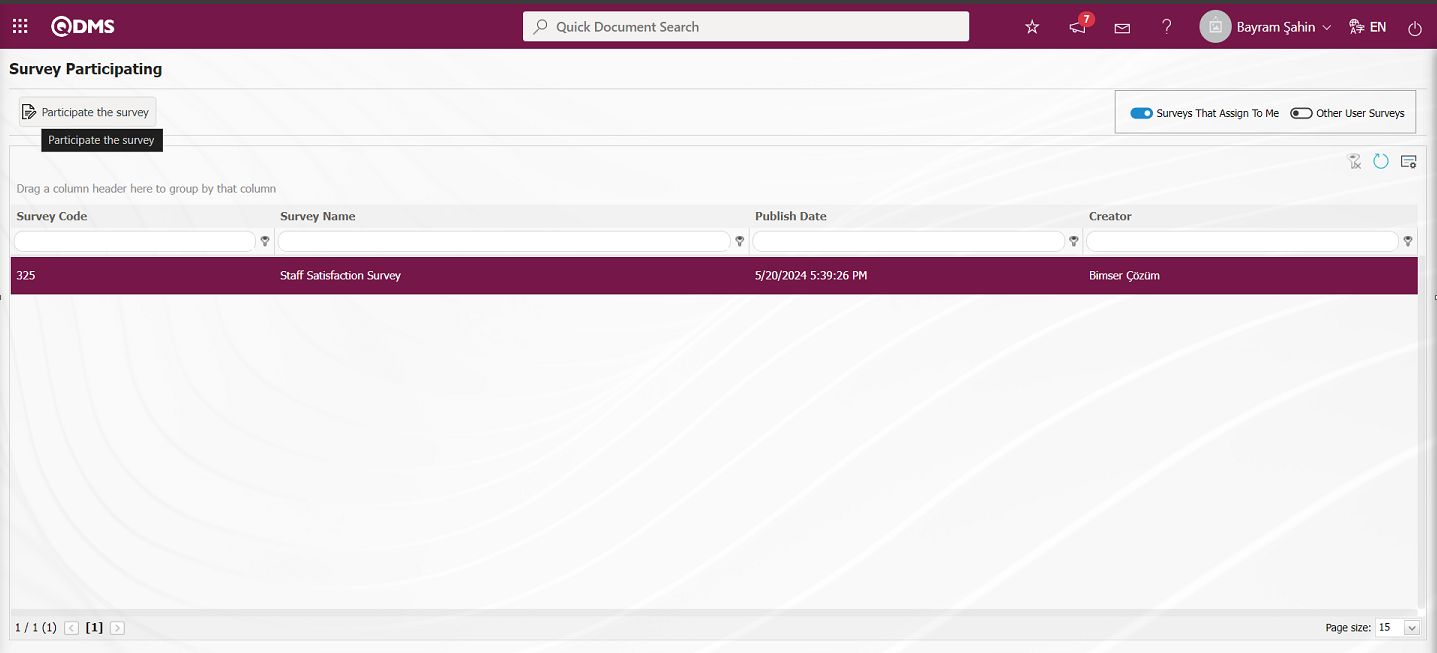
The  button is clicked by making rearrangements and changes on the survey information saved as draft.
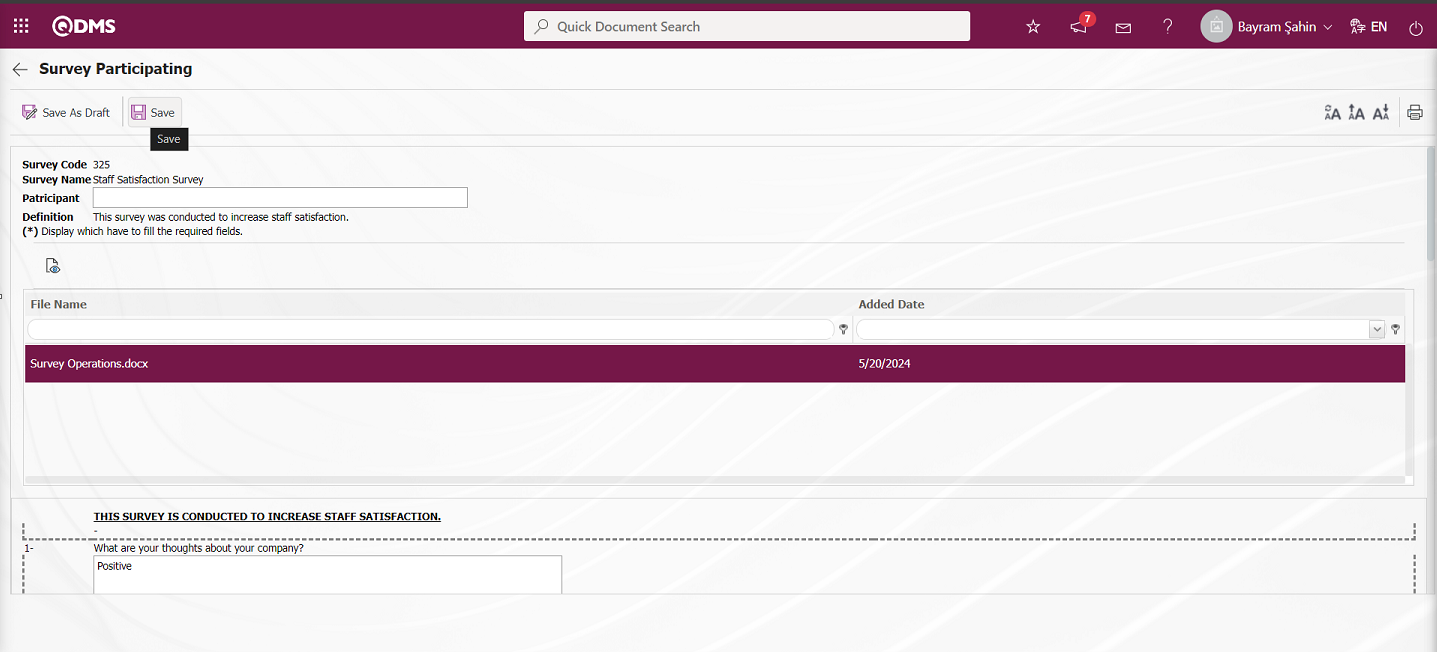
The system will give the message “Your survey saved successfully”, indicating that the survey has been completed
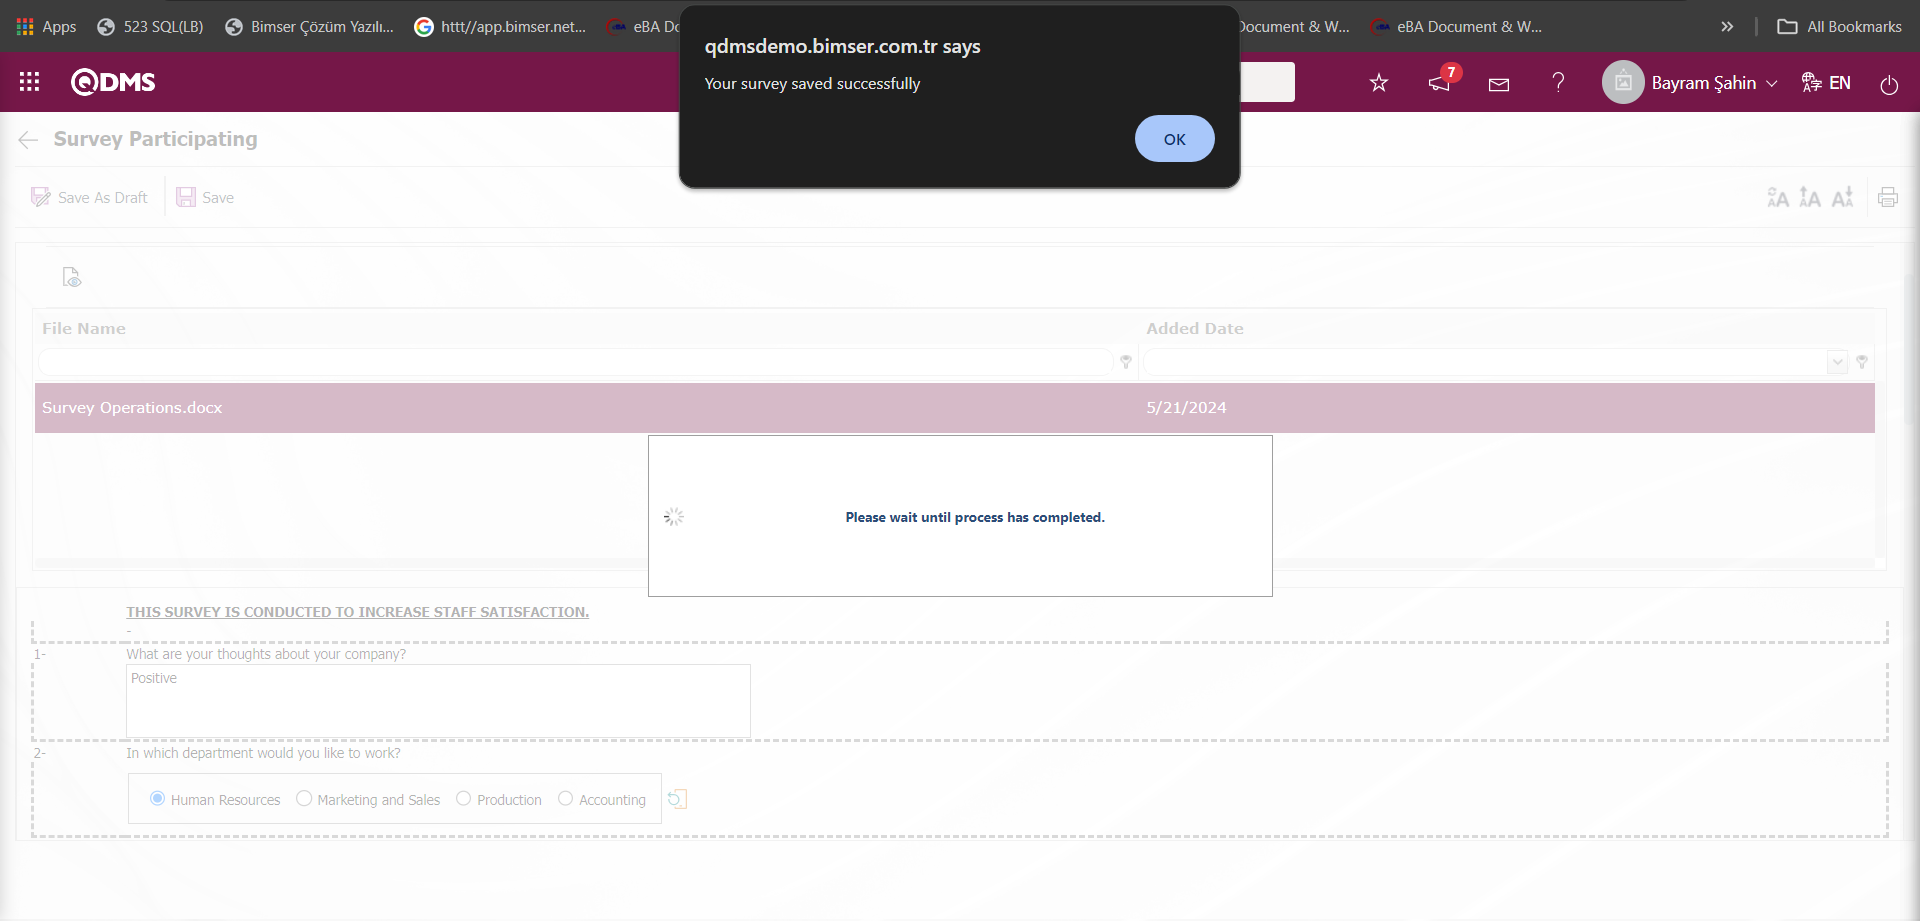
Display of the associated question on the Survey Participating screen;
The option on the Survey Participating screen is the question displayed depending on the option of the question. It is displayed on the questionnaire filling screen when the option of the associated question is selected on the Survey Questions Definition screen.
Example:
When the option of the question numbered 5, which is defined as the associated question on the Survey Participating screen, is “No”, the associated question is not displayed.
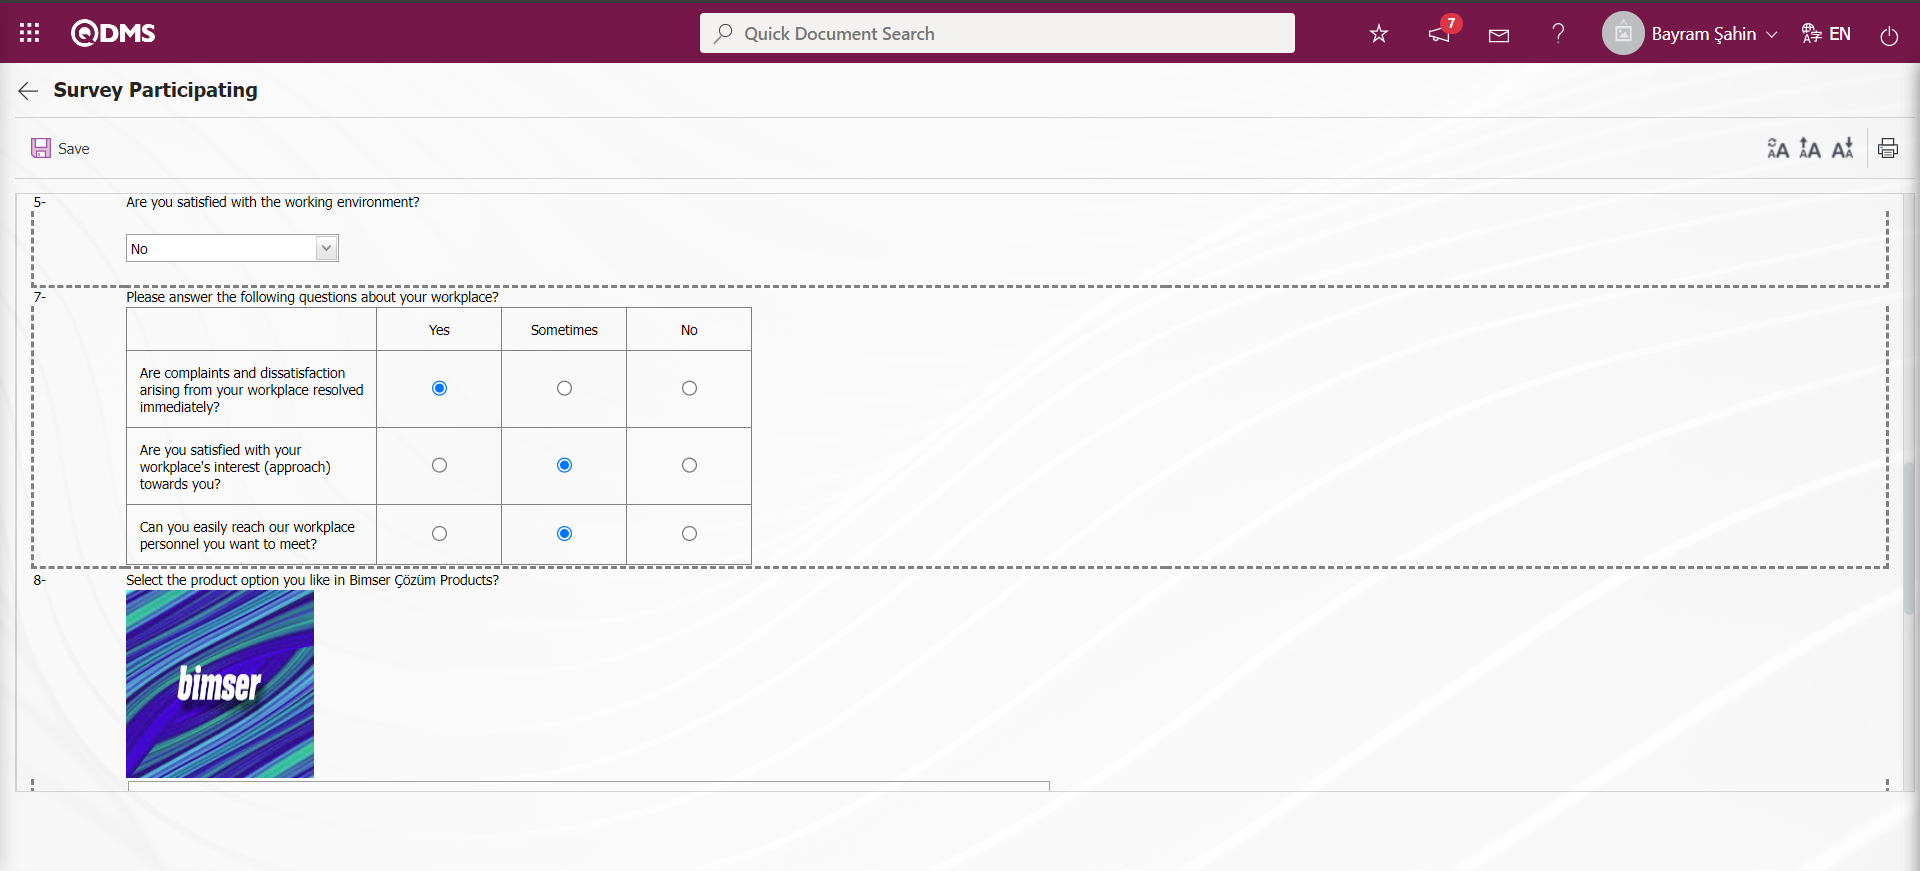
On the Survey Participating screen, the relationship question option is displayed when the relevant option is selected. When the option of question number 5 is “Yes”, the related question is displayed and the answer is made.
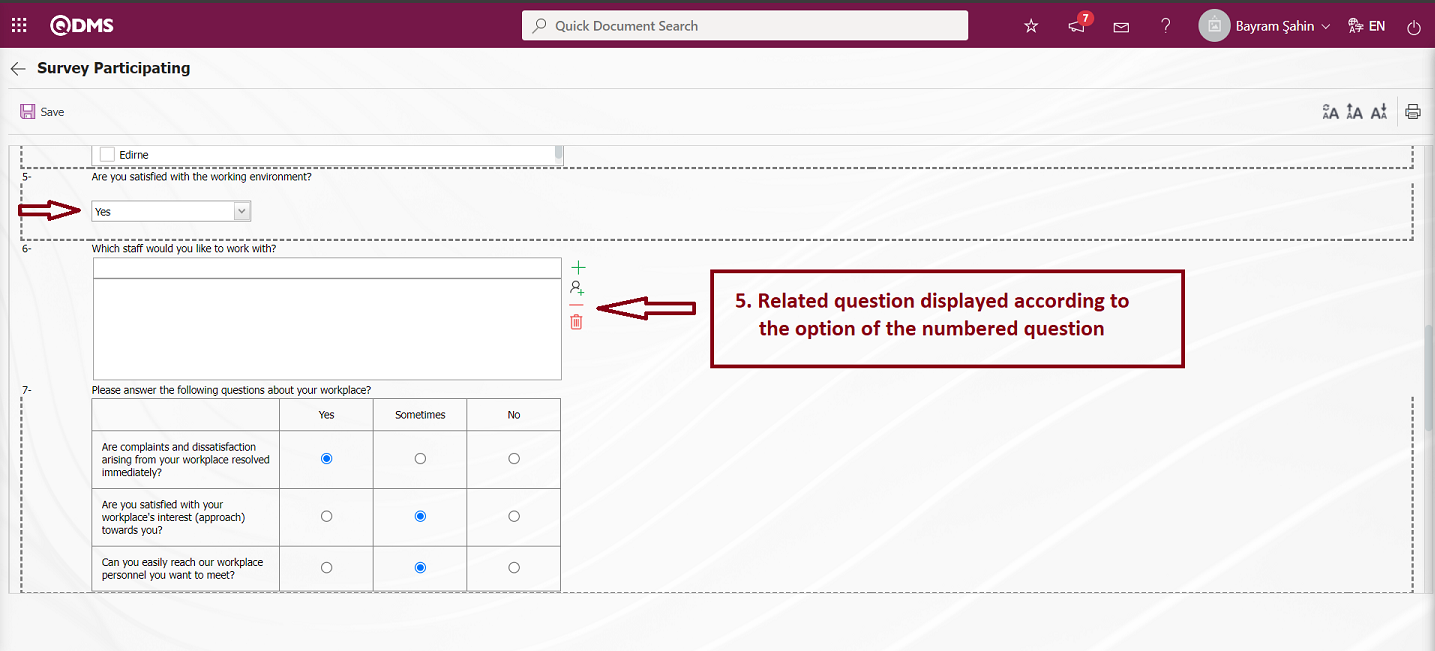
From My Pending Jobs Menu
People who are selected as participants will have a pending job with the task “Surveys will be filled out.”
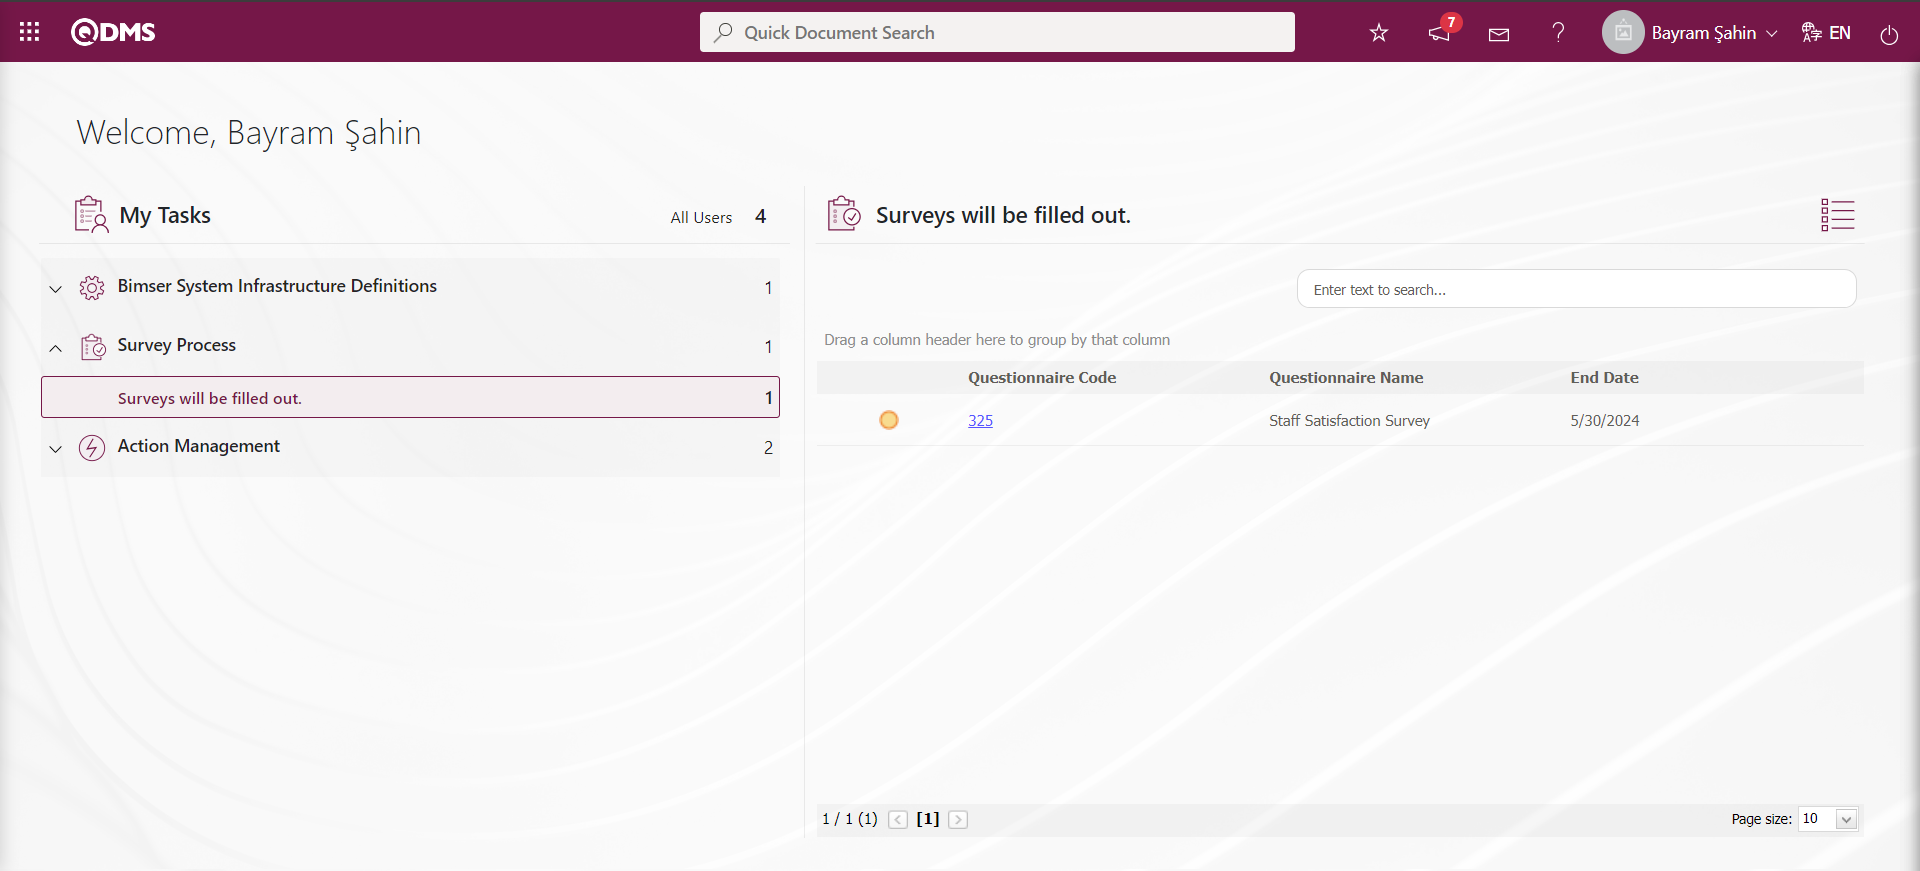
The Survey Filling screen is opened by clicking on the link in the Survey code field in the relevant task.
With the help of the buttons on the screen;
: Saves the survey as a draft. This button is the button displayed depending on the parameter. The parameter value of the parameter number 10 “Use draft mode in Survey Complete stage” in the survey operations parameters is activated by selecting “Yes”.
After the parameter is activated, this button is displayed on the questionnaire filling screen and this button is clicked to save the questionnaire as a draft.
: Registration is done.
: Viewing the additional files added in the survey is done.
: Resetting the font size of the survey is done. After the change in the font size of the survey, the process of restoring it to its previous state is done.
: Enlarging the text size of the survey is done.
: Reducing the font size of the survey is done.
: Printing the survey is done.
The survey viewing process is done. The questions of the displayed survey are answered and filled in. ! ref85
On the Survey Participating screen, the  button is clicked to save the survey as a draft.
On the Survey Participating screen, select the survey  saved as draft and click on the button.
The  button is clicked by making rearrangements and changes on the survey information saved as draft.
The system will give the message “Your survey saved successfully”, indicating that the survey has been completed
Display of the associated question on the Survey Participating screen;
The option on the Survey Participating screen is the question displayed depending on the option of the question. It is displayed on the questionnaire filling screen when the option of the associated question is selected on the Survey Questions Definition screen.
Example:
When the option of the question numbered 5, which is defined as the associated question on the Survey Participating screen, is “No”, the associated question is not displayed.
On the Survey Participating screen, the relationship question option is displayed when the relevant option is selected. When the option of question number 5 is “Yes”, the related question is displayed and the answer is made.
6.2.3. Replied Surveys
Menu Name: Integrated Management System/ Survey/ Replied Surveys
This menu lists the completed questionnaires. Viewing the questions in the questionnaire, printing, making and saving changes while the questionnaire is open for use is done on the questionnaire filling screen. If a previously completed survey is still open or has not expired, it can be edited and resubmitted. When the survey is closed for use, no changes can be made, questions can be viewed and answers can be printed.The Replied Surveys menu has two tabs, List and Search. In the List tab, the completed surveys are listed. In the Search tab, filtering is done according to the fields according to the search criteria.
List tab;
This is the tab where the completed questionnaires are listed.
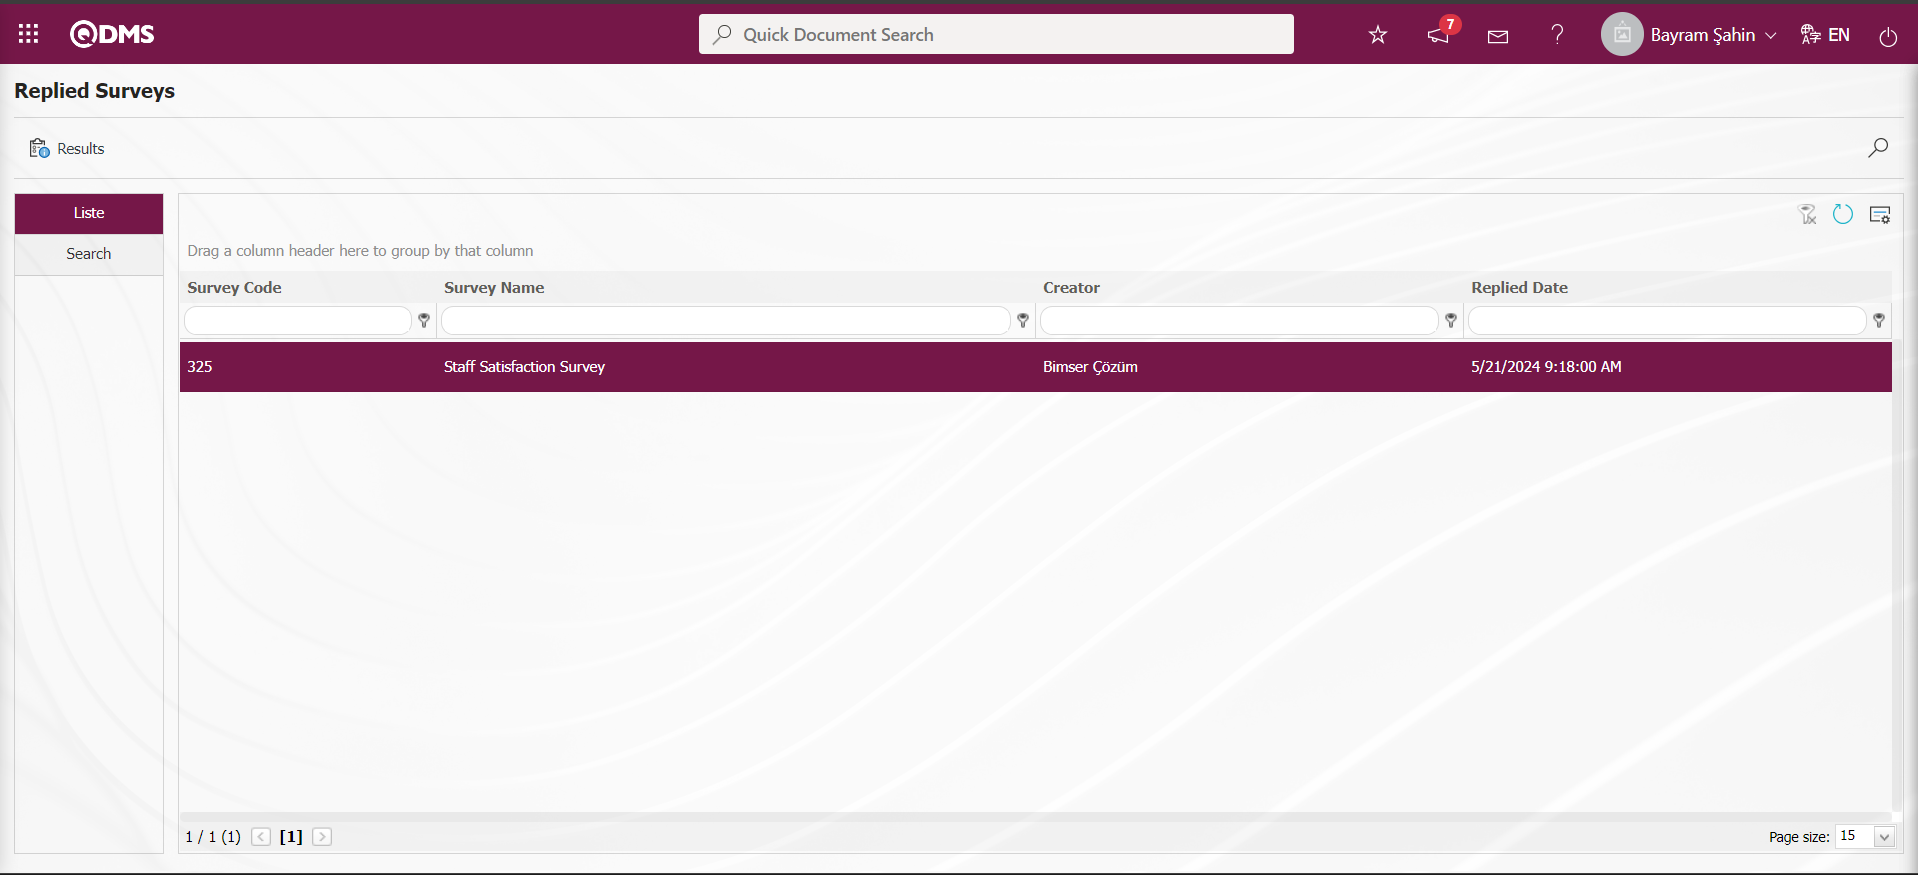
With the help of the buttons on the screen;
 : The results of the completed survey are displayed.
 : Records are filtered and searched.
: The search criteria on the menu screens are used to clean the data remaining in the filter fields in the grid where the search operation is performed.
: The menu screen is restored to its default settings.
: User-based designing is done on the menu screen with the show-hide feature, that is, the hiding feature of the fields corresponding to the columns on the menu screens.
On the Replied Surveys screen, on the List tab, click the button while the survey is selected in the list.
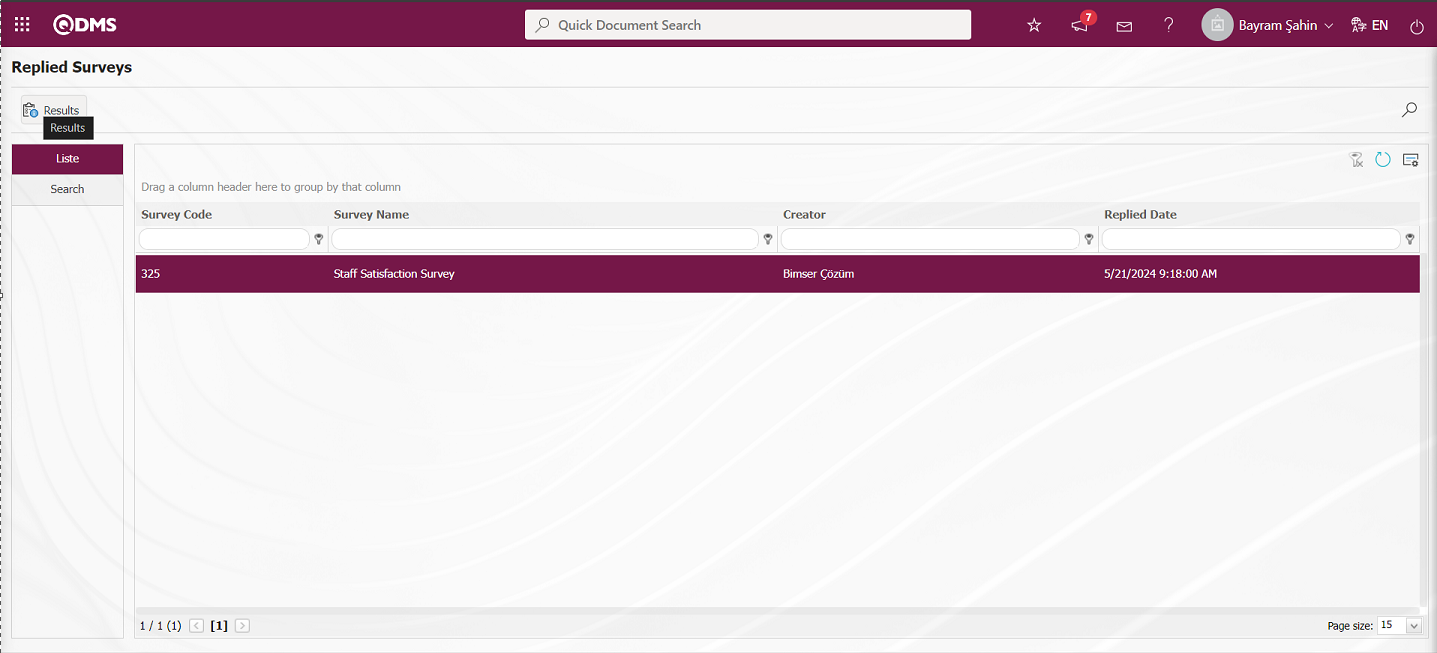
The Survey Participating screen opens.
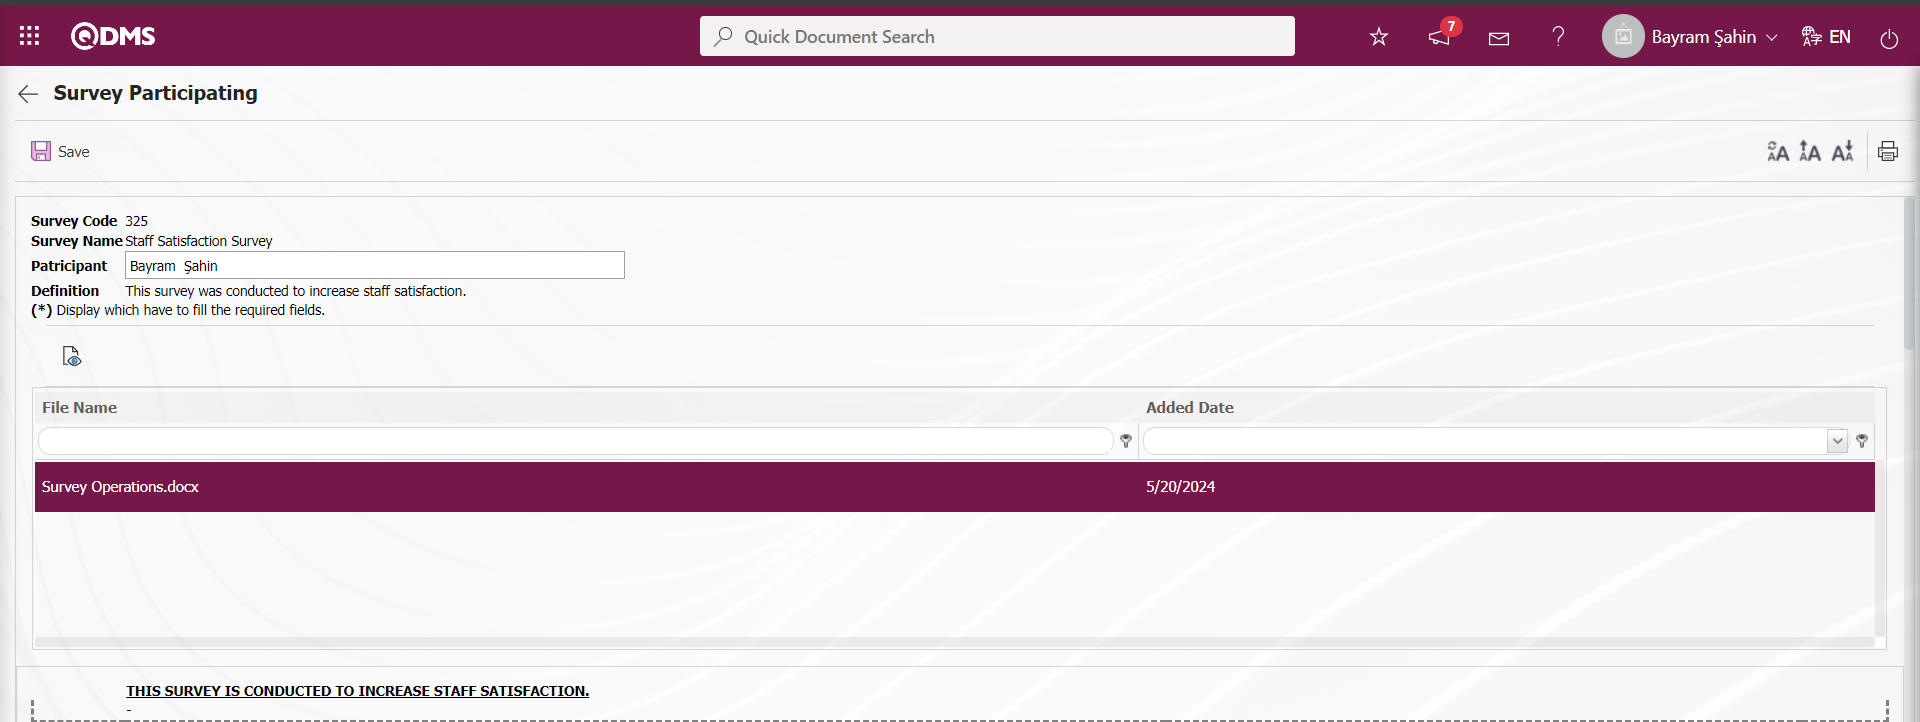


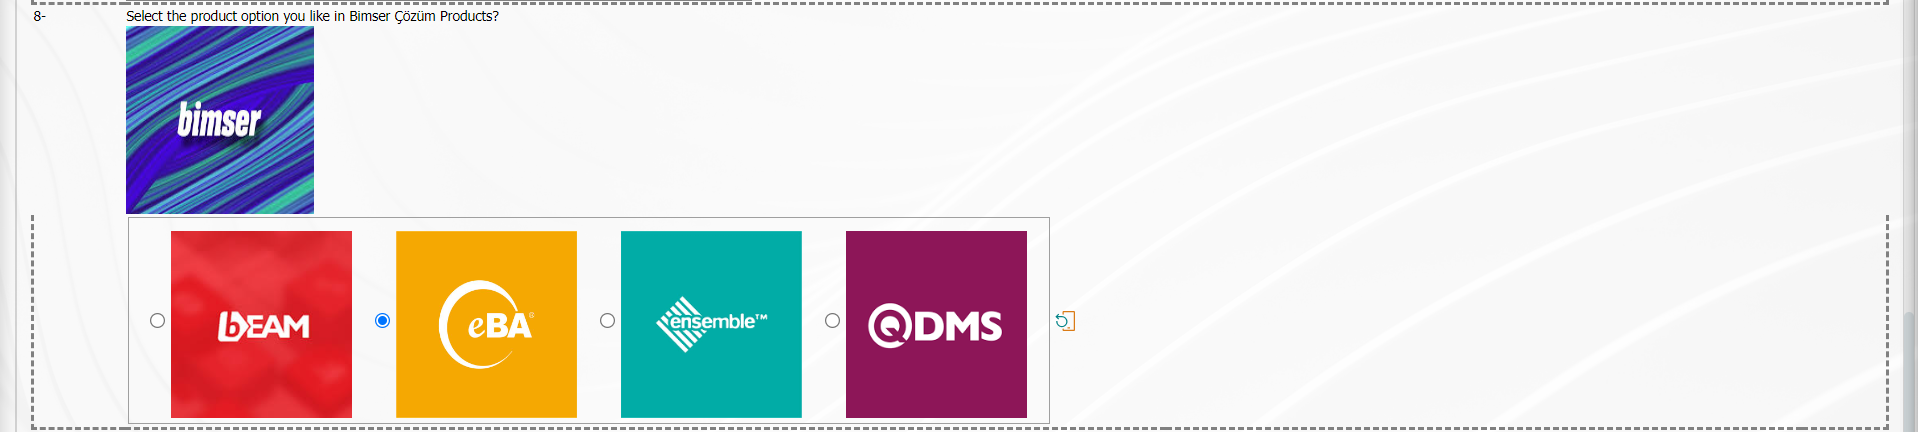
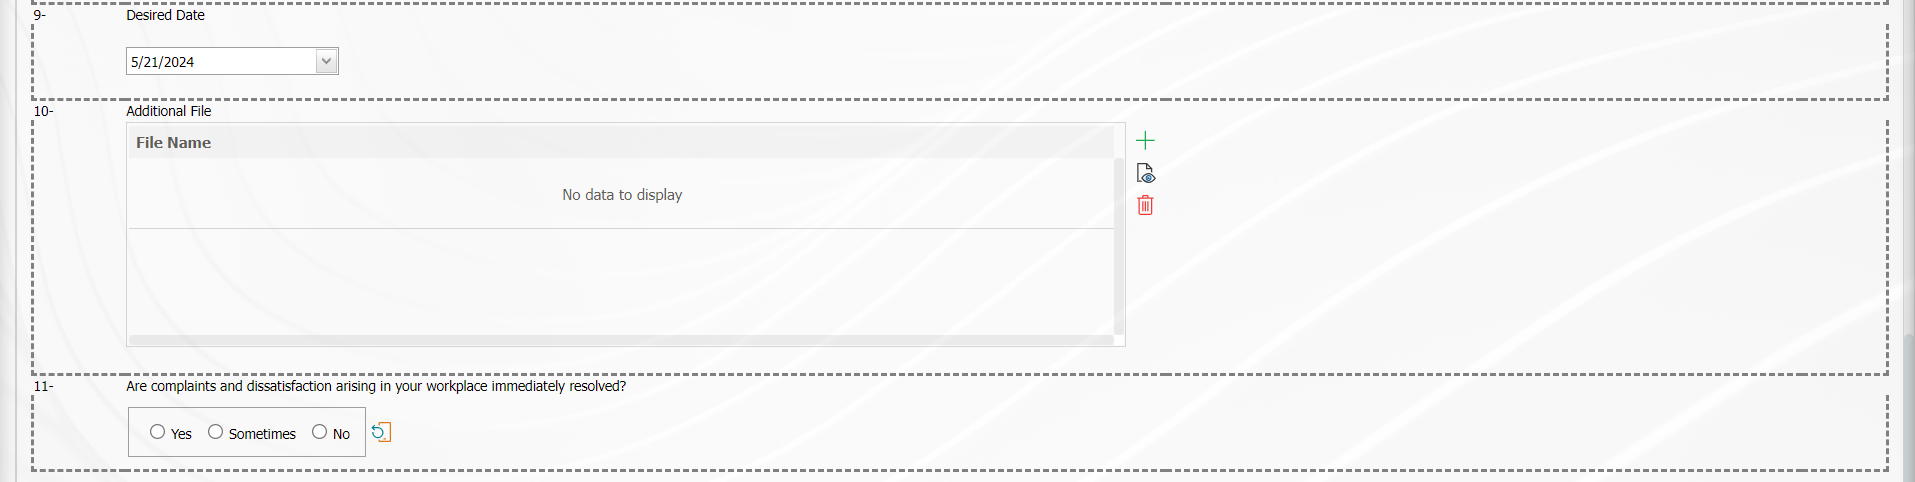
With the help of the buttons on the screen;
 : Registration is done.
 : Viewing the additional files added in the survey is done.
 : Resetting the font size of the survey is done. After the change in the font size of the survey, the process of restoring it to its previous state is done.
 : Enlarging the text size of the survey is done.
 : Reducing the font size of the survey is done.
 : Printing the survey is done.
On the Survey Participating screen, the user can make changes and edits to the answers of the survey questions. After editing the answers to the survey questions, the user clicks the  button in the upper left corner of the screen and performs the registration process
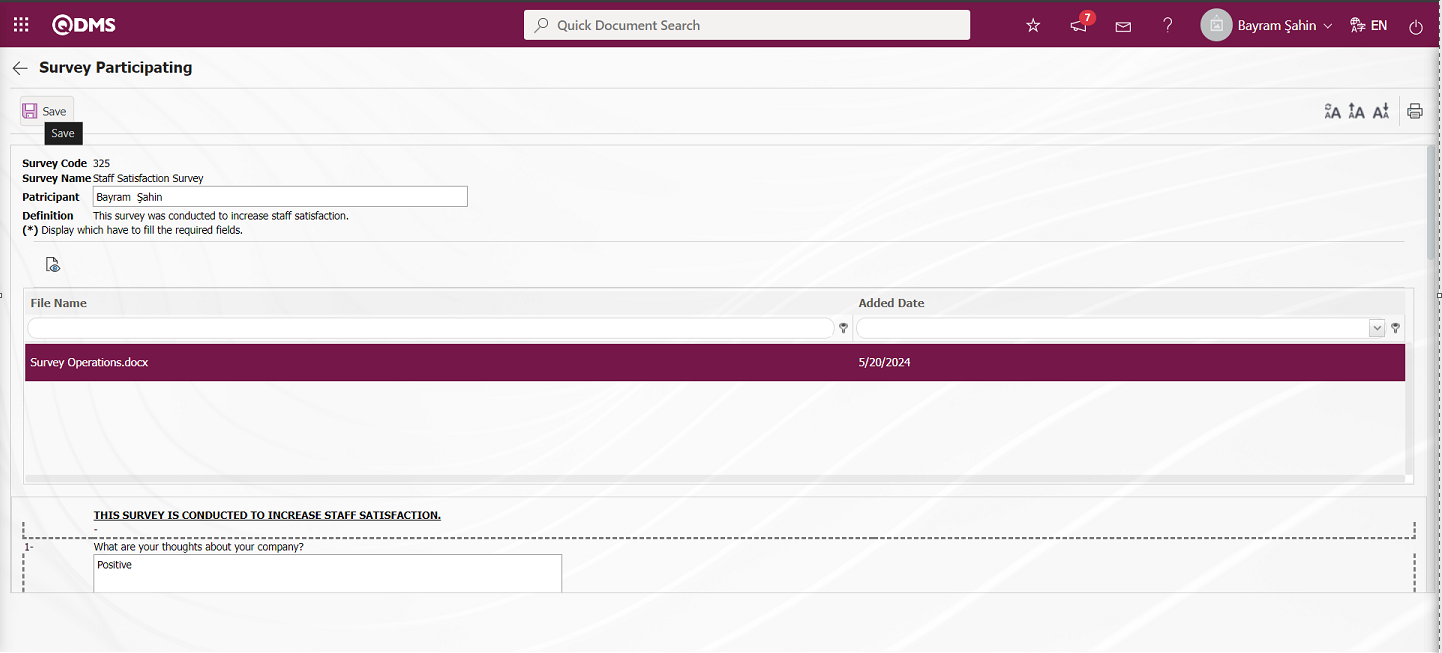
The system displays the message “Your survey saved successfully”, indicating that the survey has been completed.
Search tab;
Filtering is done by entering data or selecting data in the fields with search criteria in the Completed Surveys tab and clicking the (Search) button.
6.2.4. Survey Results
Menu Name: Integrated Management System/ Survey/ Survey Results
After the surveys are completed and closed for use, the survey report and survey results can be accessed from this area.There are two tabs in the Survey Results menu: List and Search tabs. In the List tab, the completed surveys are listed. In the Search tab, filtering is done according to the fields according to the search criteria.
List tab;
It is the tab where the surveys are listed.
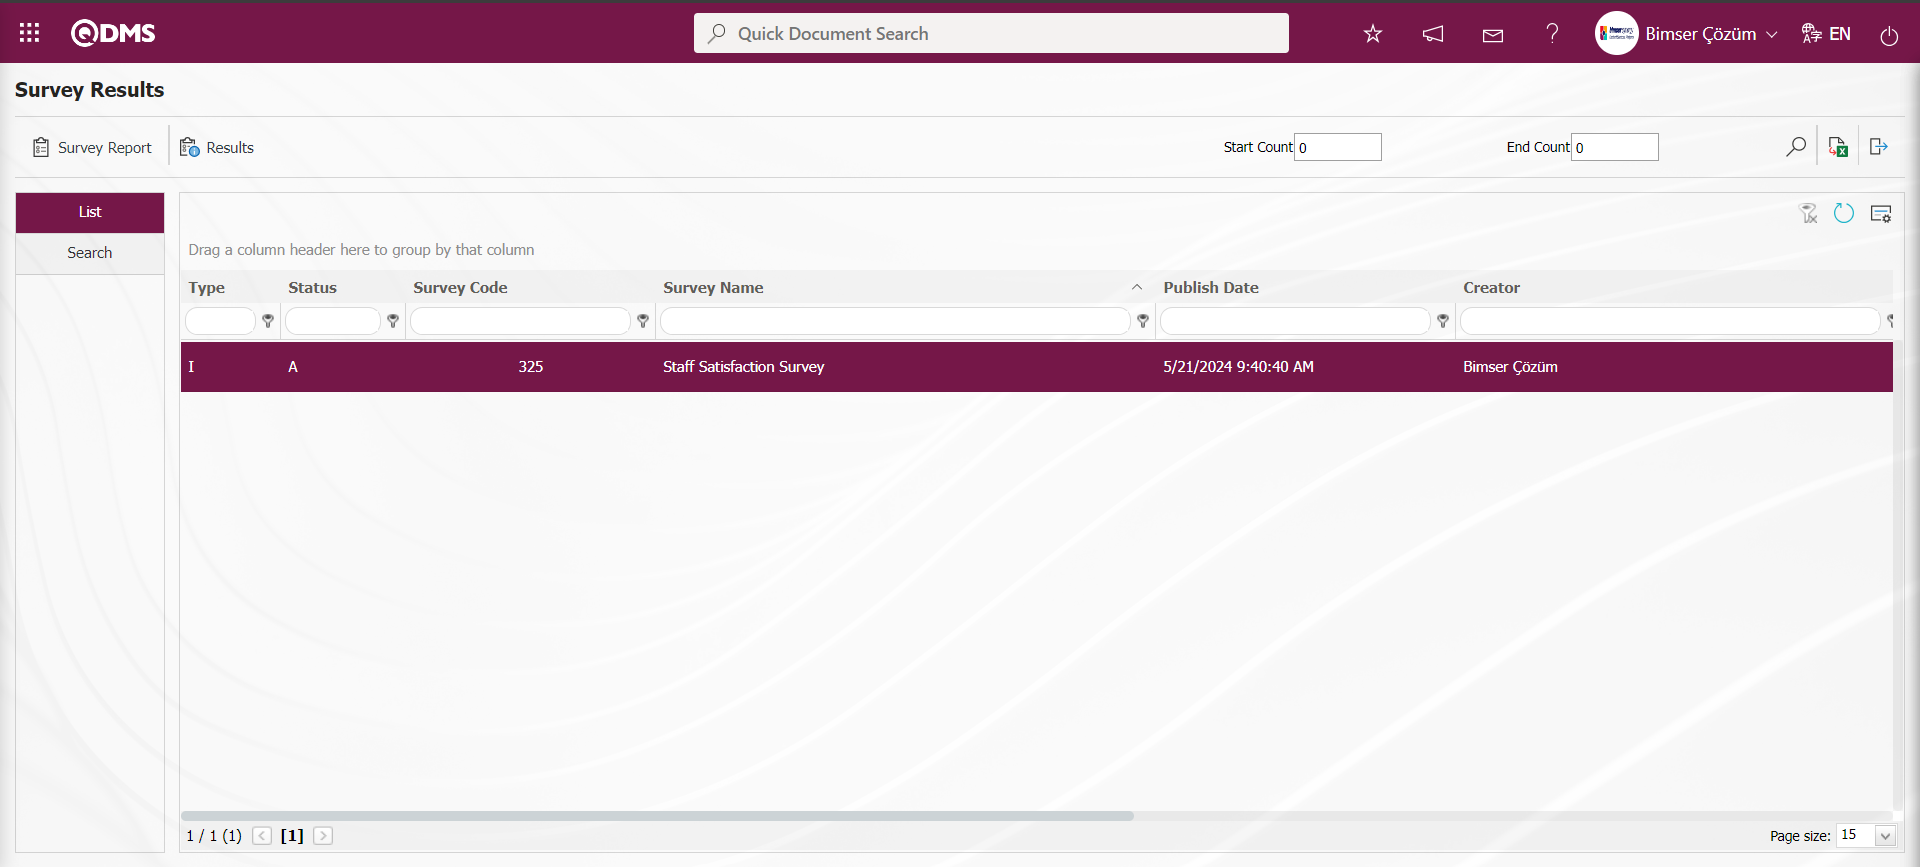
With the help of the buttons on the screen;
 : Displays the survey report.
 : The form of the completed questionnaire is displayed for the respondents.
: Records are filtered and searched.
 : Data is exported to Excel.
: The search criteria on the menu screens are used to clean the data remaining in the filter fields in the grid where the search operation is performed.
: The menu screen is restored to its default settings.
: User-based designing is done on the menu screen with the show-hide feature, that is, the hiding feature of the fields corresponding to the columns on the menu screens.
On the Survey Results screen, click the button while the survey is selected from the list in the list tab.

The Survey Report screen opens. This screen displays who participated in the survey, participation rates, percentage of participation rate, maximum score of the survey, score of the survey, score percentage of the survey, and how many participants answered the questions asked and what percentage of the answers to each question were answered.

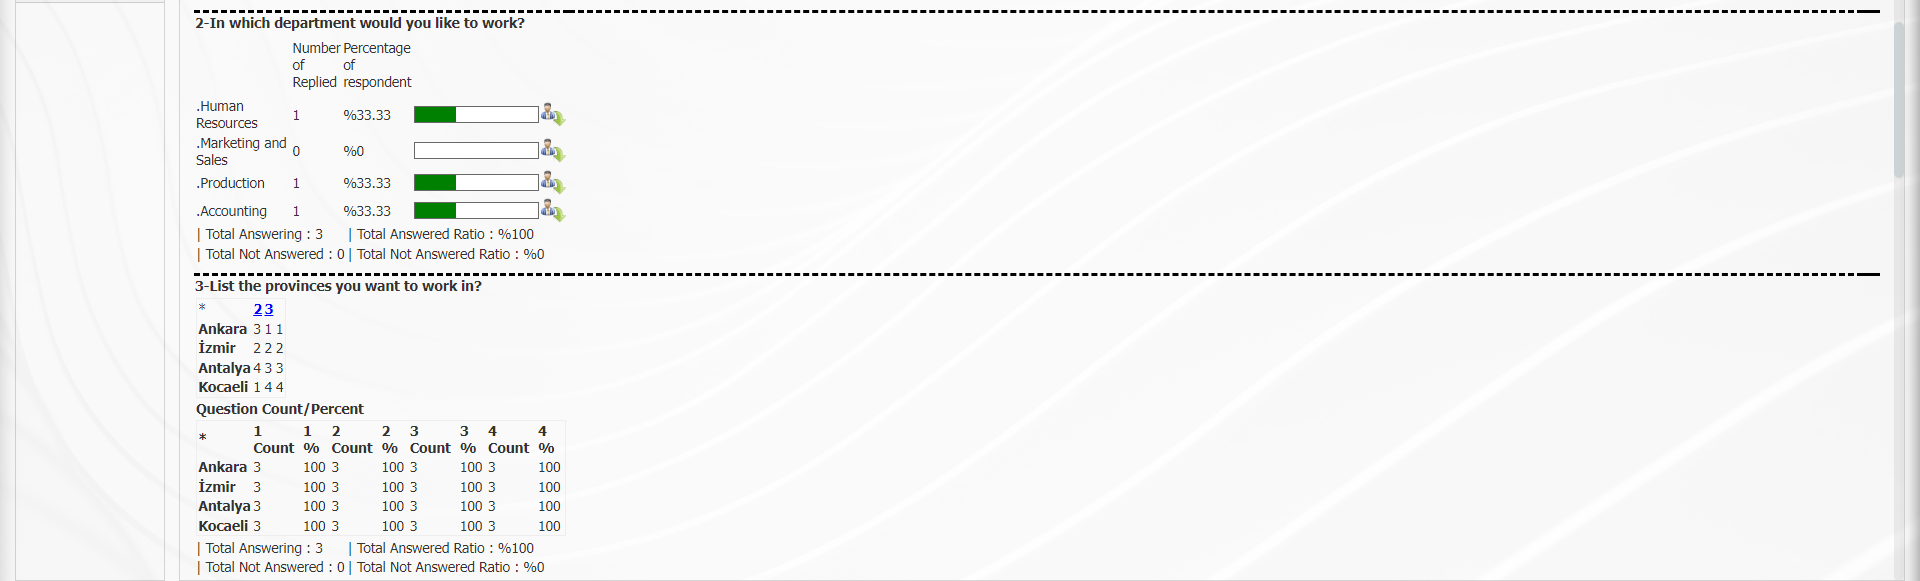
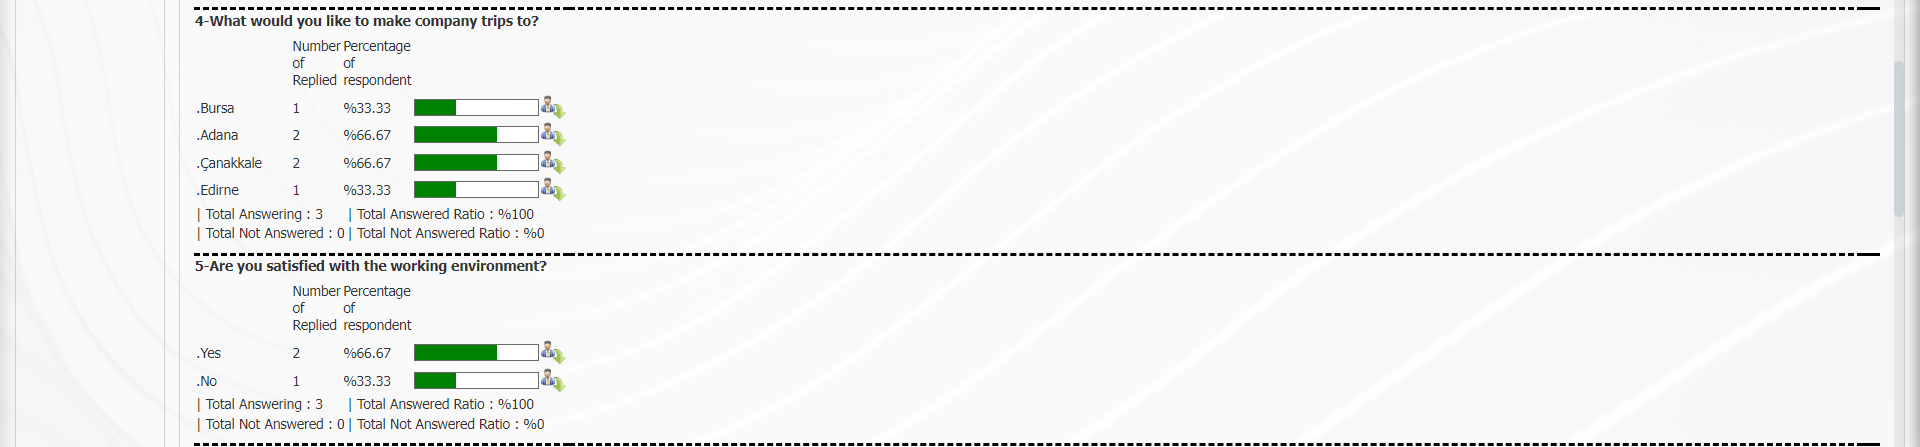
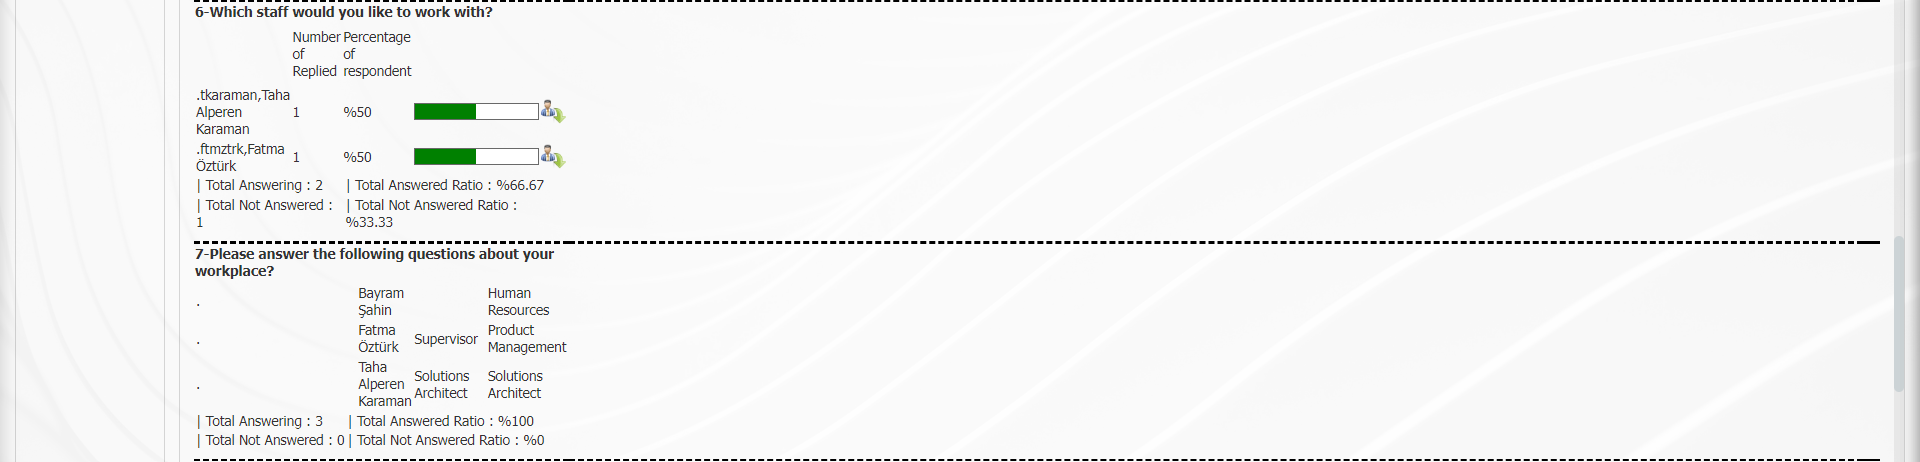
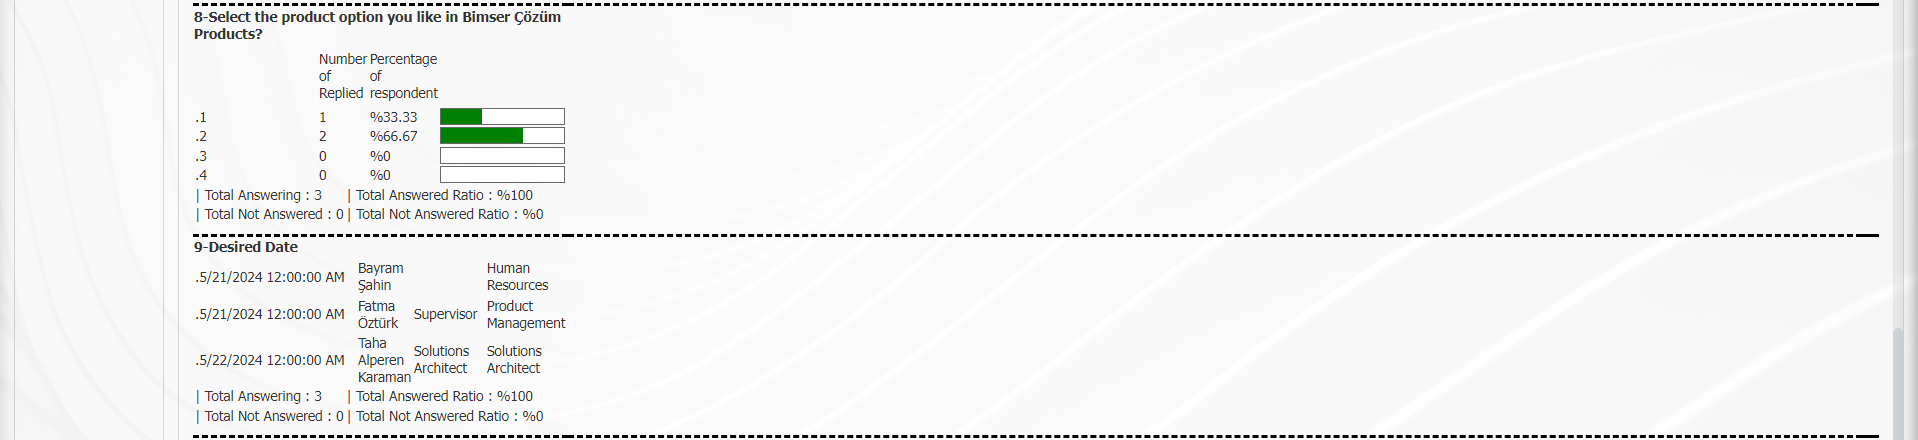

With the help of the buttons on the screen;
: Records are filtered and searched.
: Data is transferred to Excel.
 : Data is transferred as Pdf.
 : The survey report is printed.
Click the  (View Answers) button on the Survey Report screen.
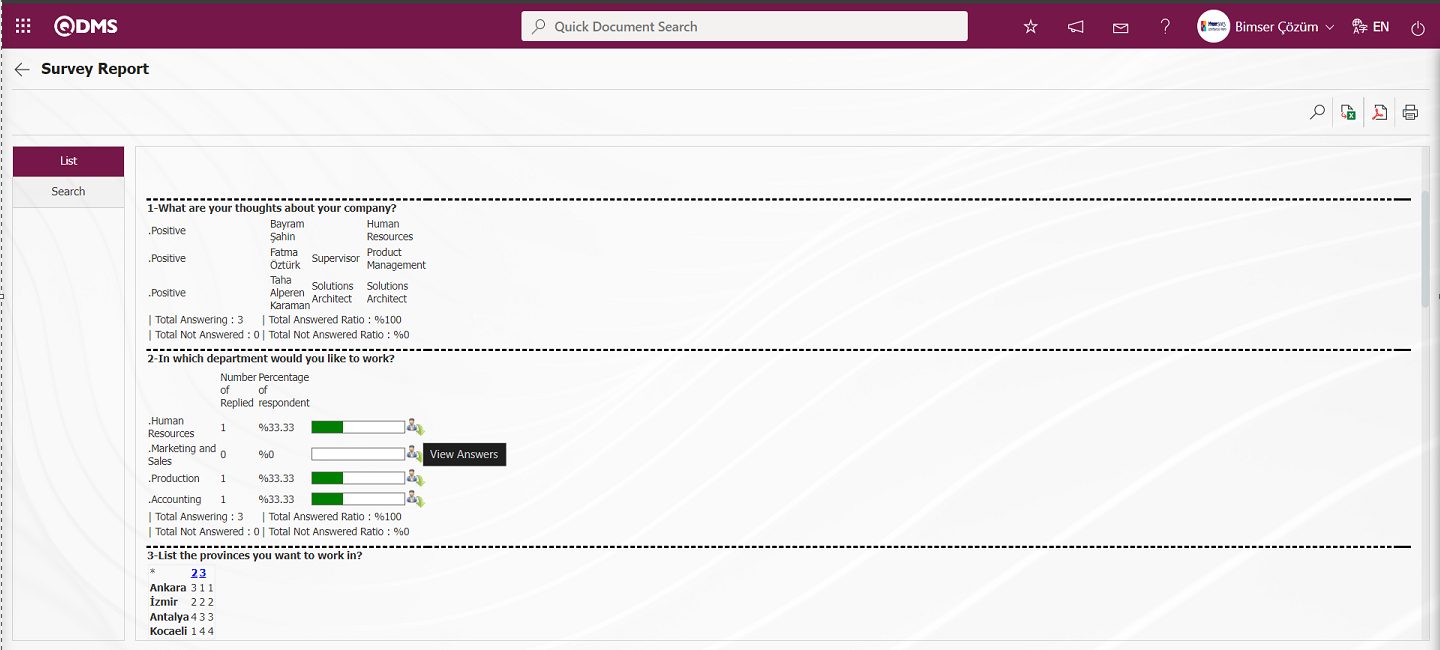
On the Survey Report screen, the (View Answers) button can be used to see who has chosen this option. This button is valid if it is not a hidden survey, otherwise the names cannot be displaye
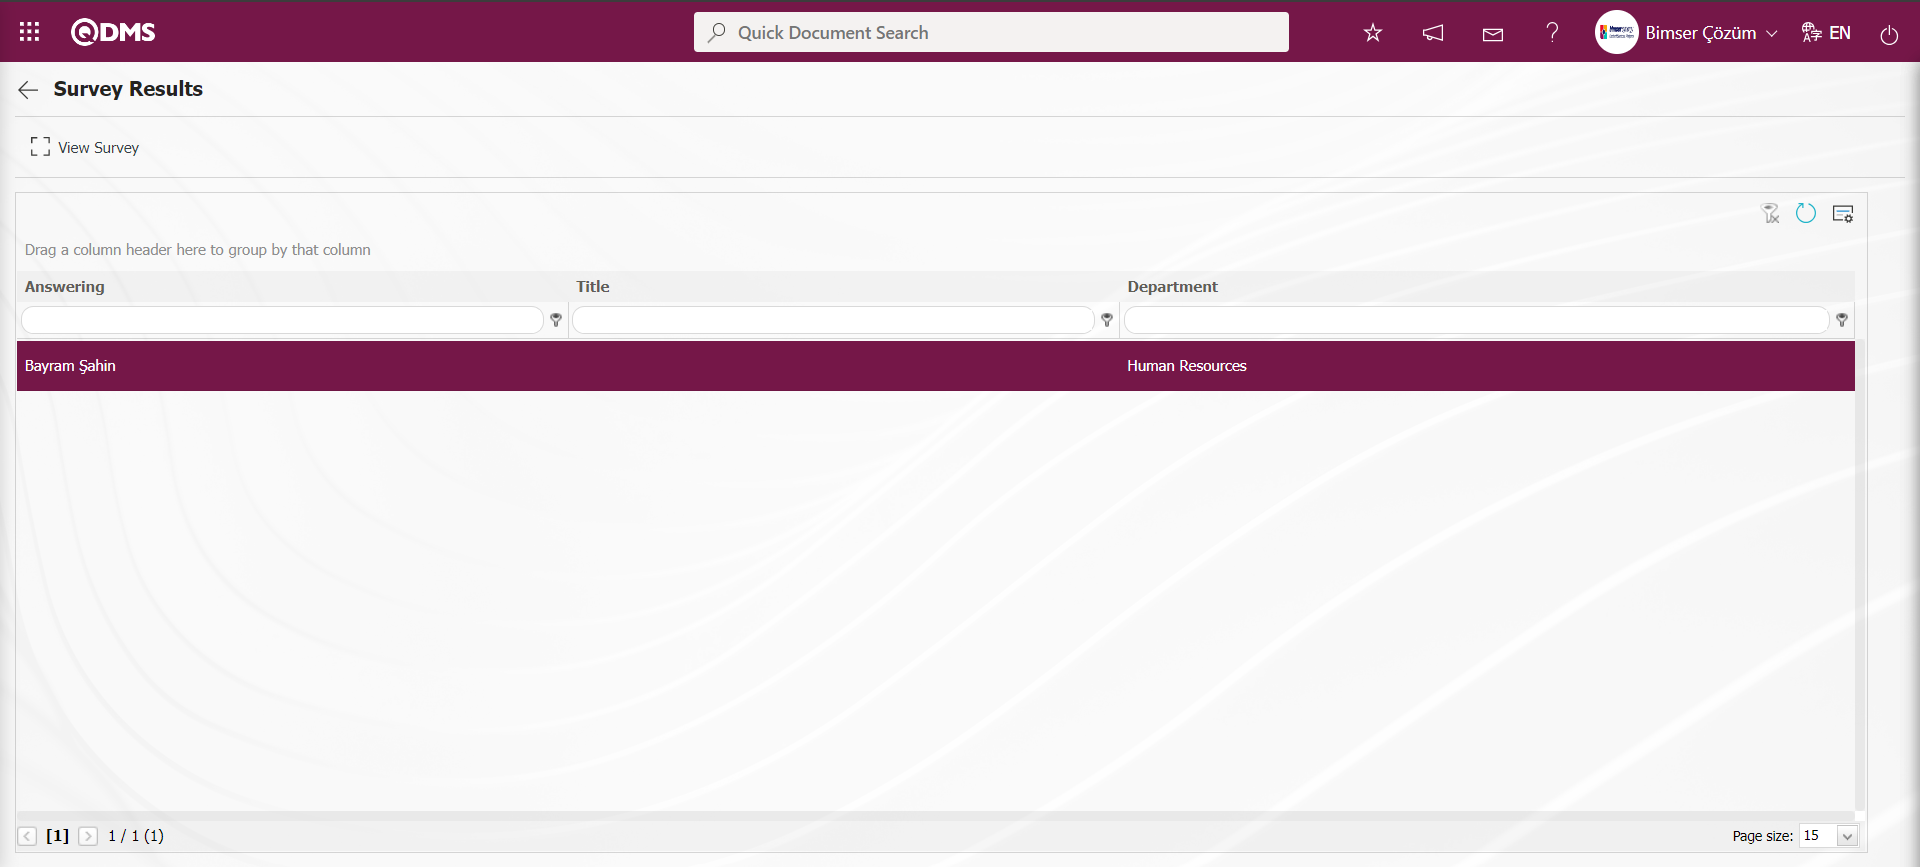
With the help of the buttons on the screen;
 : The Survey Participating screen opens and the completed survey is displayed.
Click the button on the Survey Results screen.
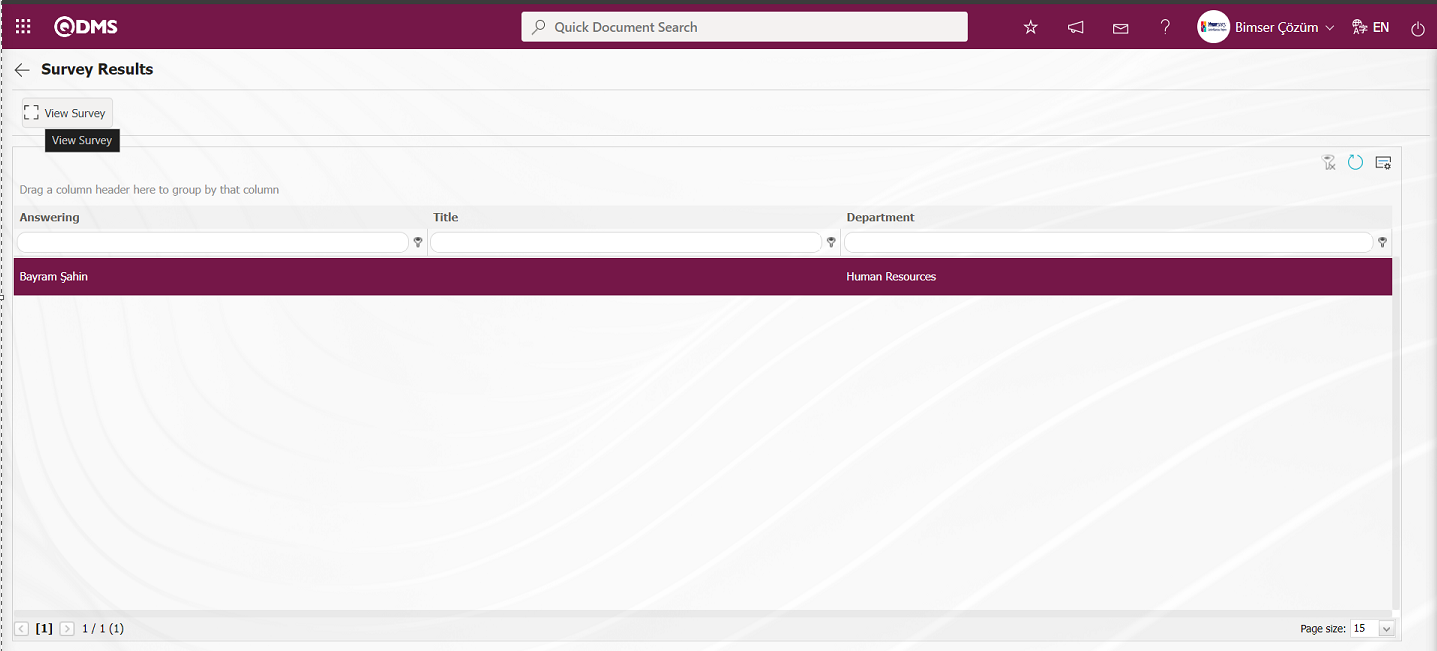
The screen that opens displays the survey completed by the participant.
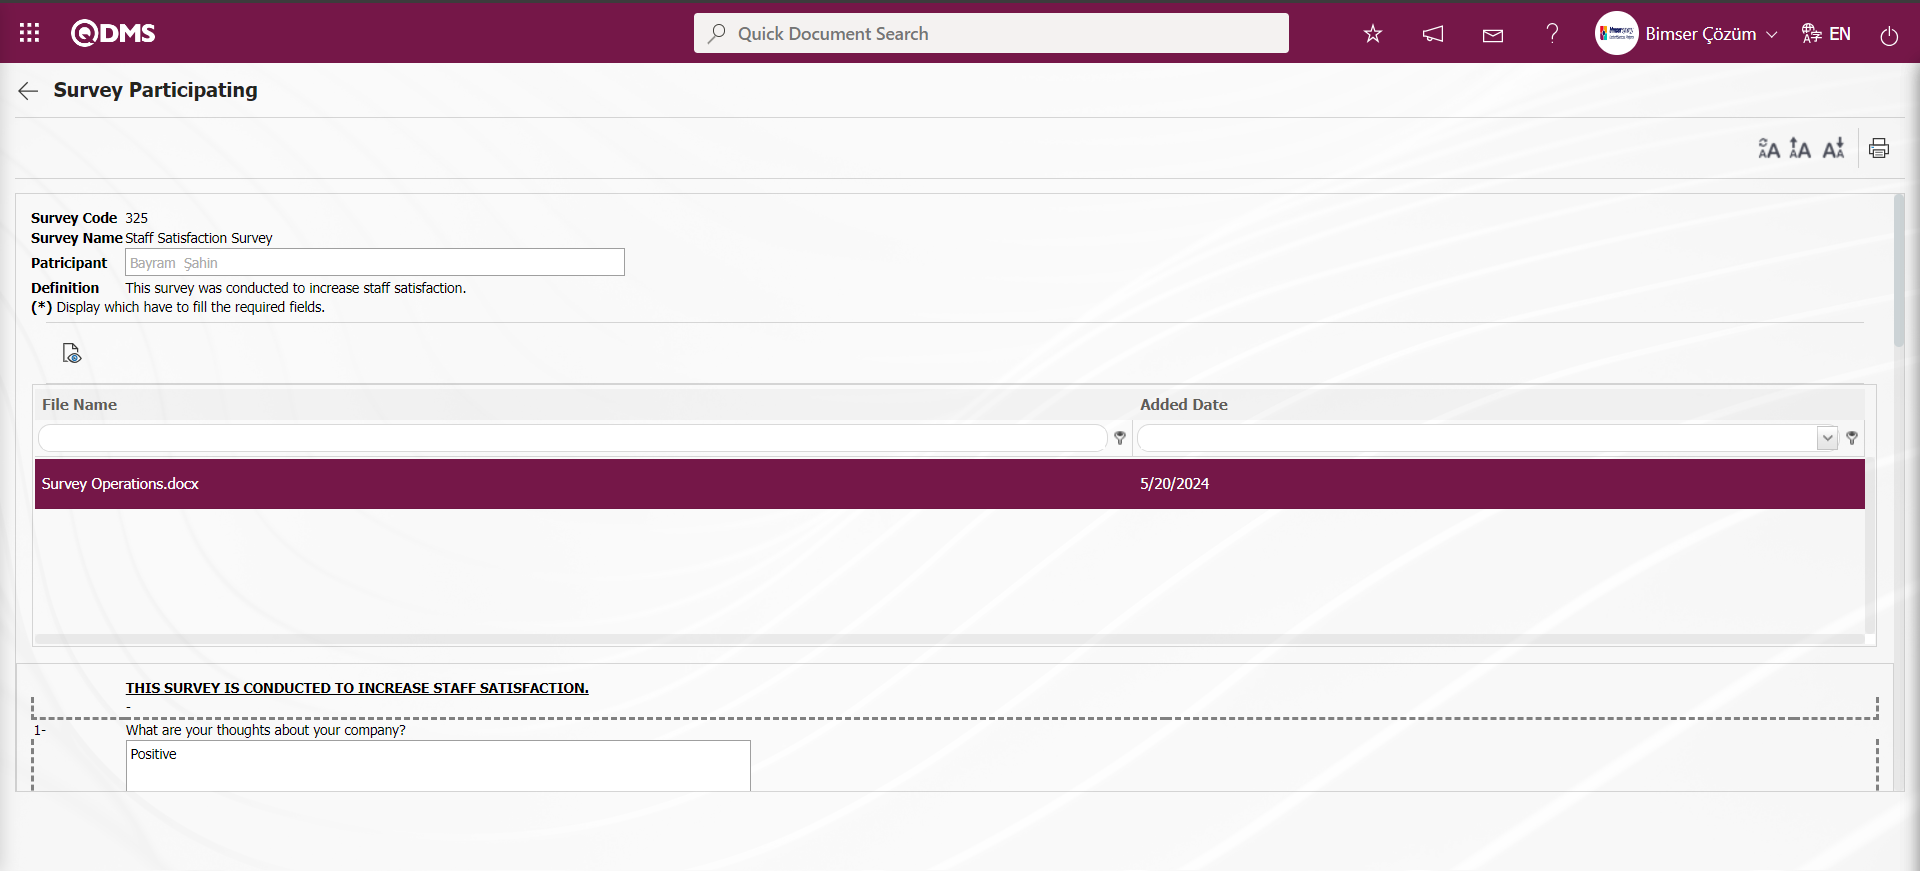
Click the  (Export to Excel) button on the Survey Results screen.
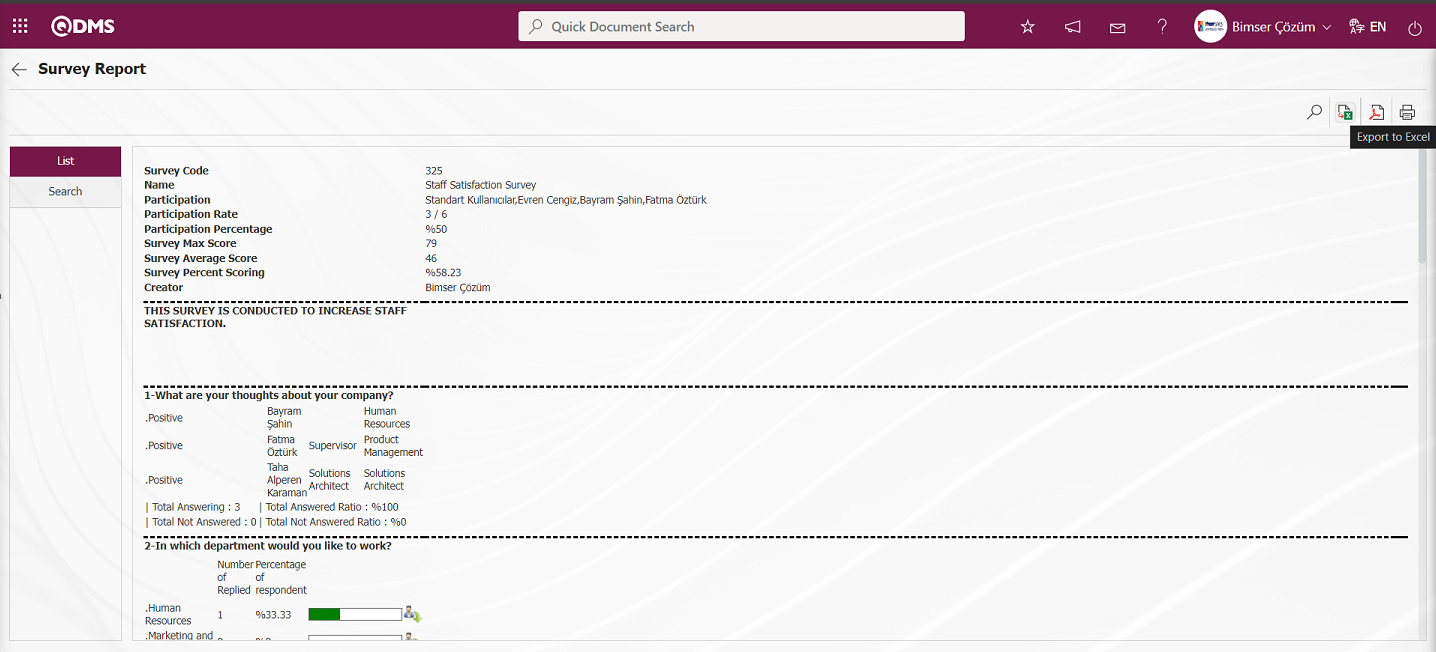
The survey report is received in excel format.
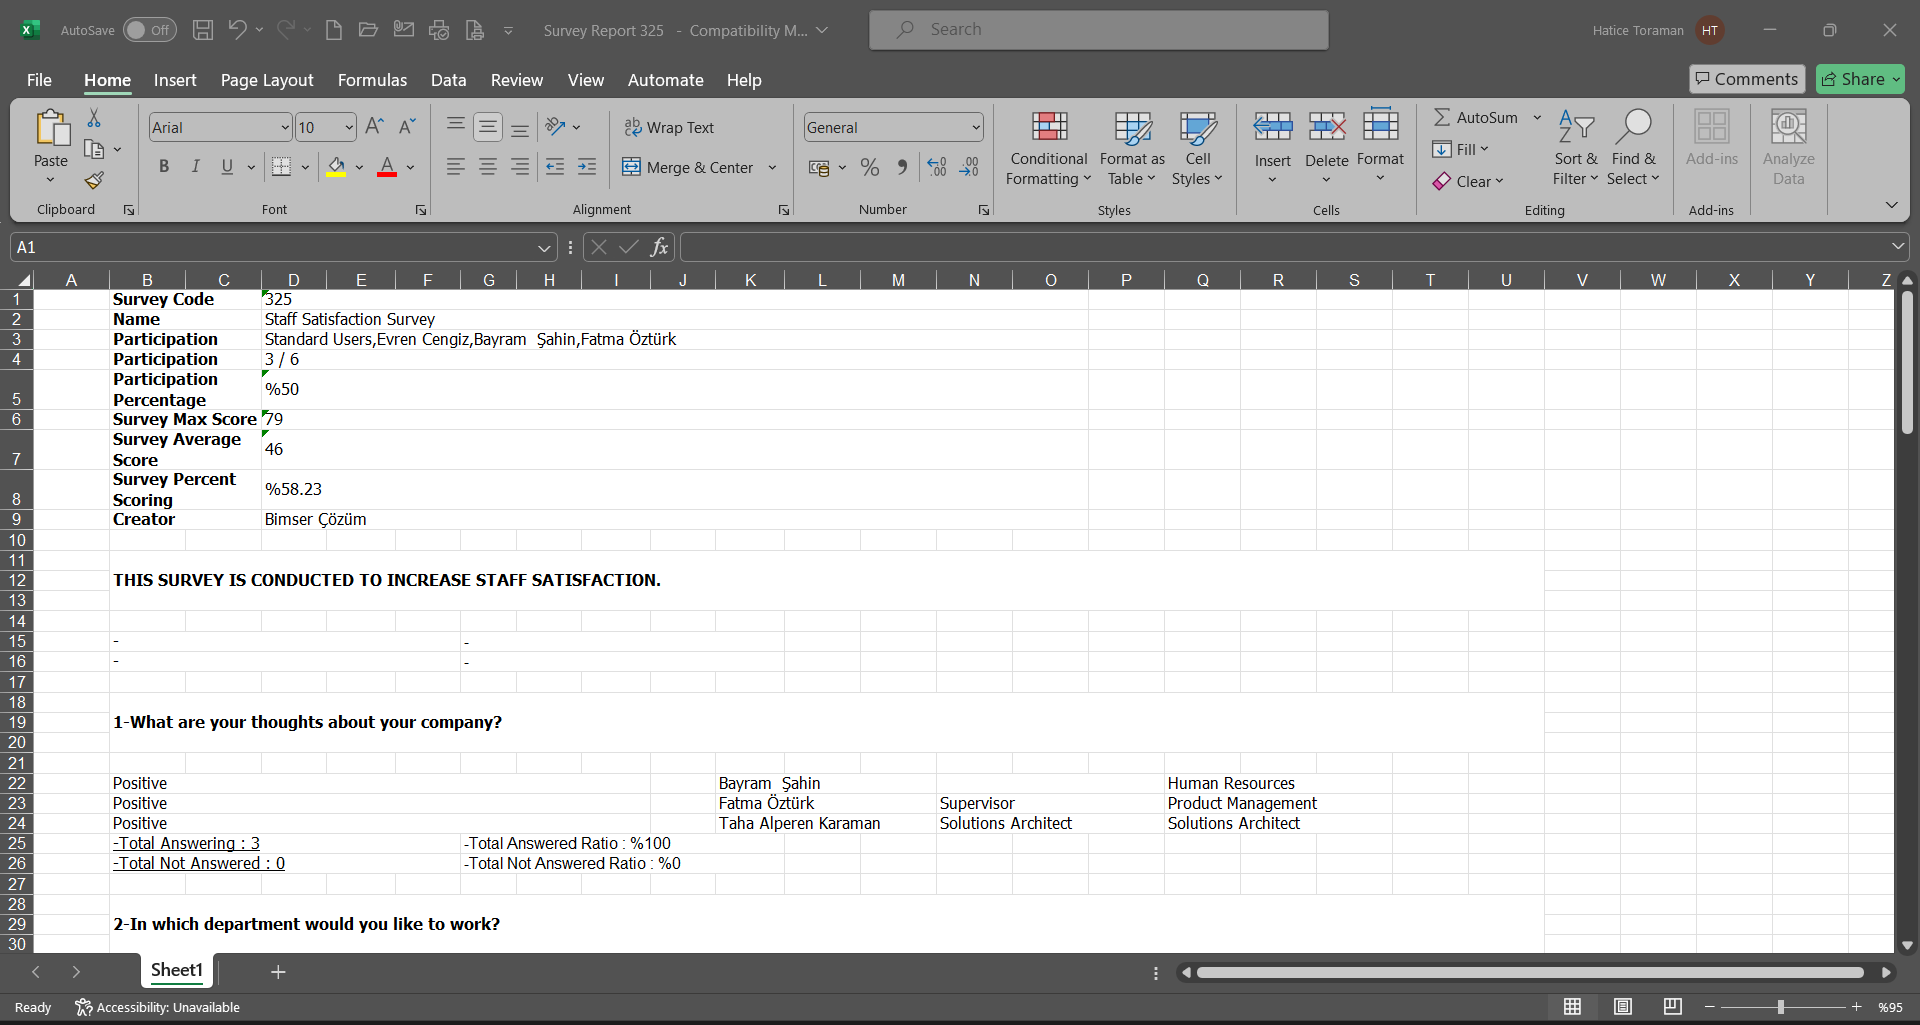
Click the  (Export Pdf) button on the Survey Results screen

The survey report is displayed in pdf format.
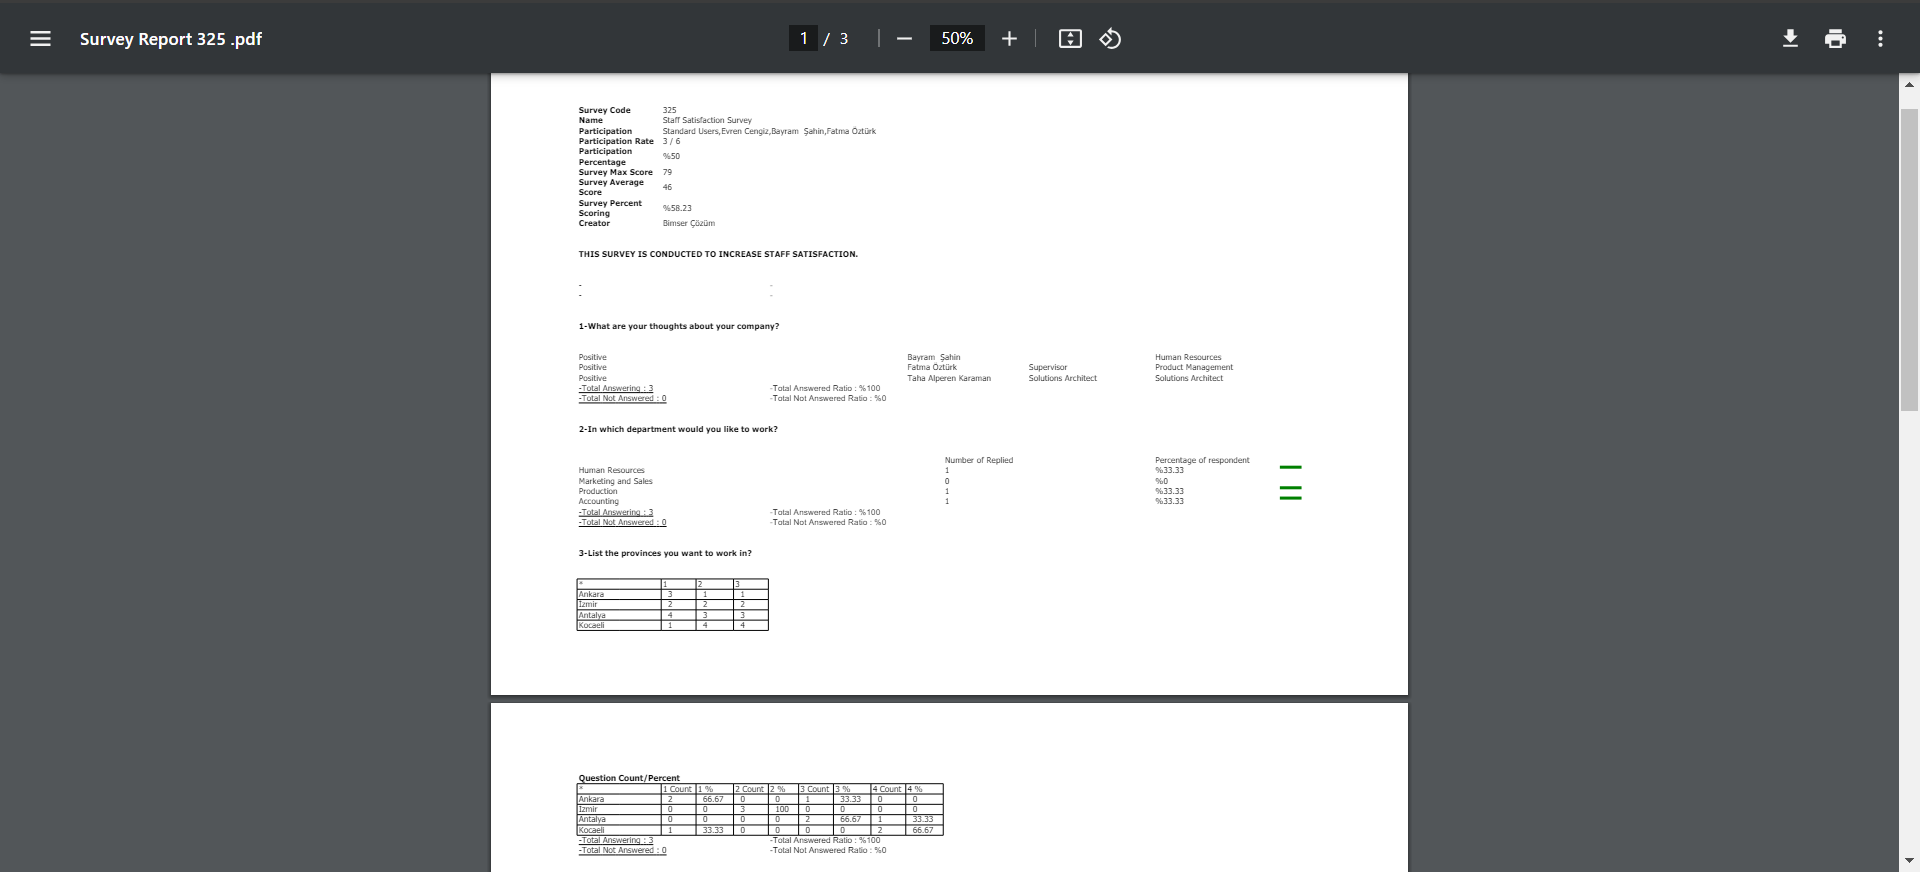
Click the (Print) button on the Survey Report screen.
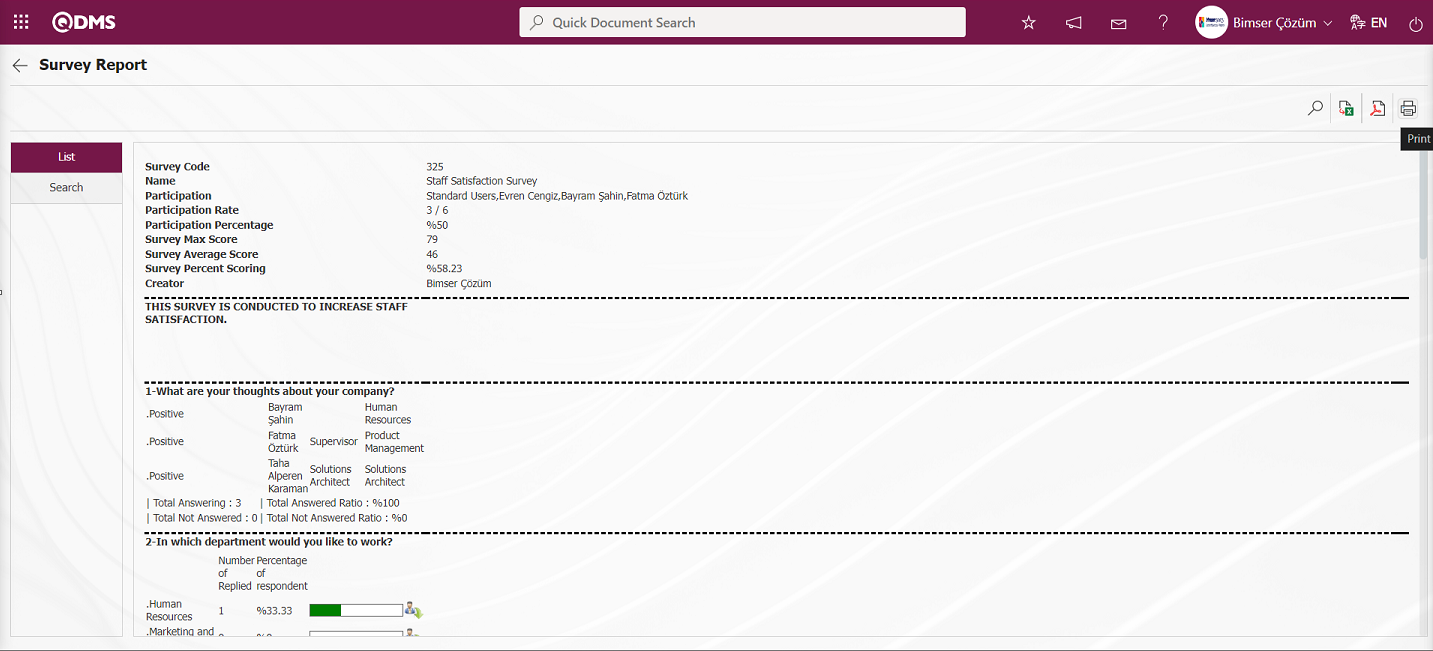
On the screen that opens, print options are set in the relevant fields and the Survey report is printed by clicking the  button.
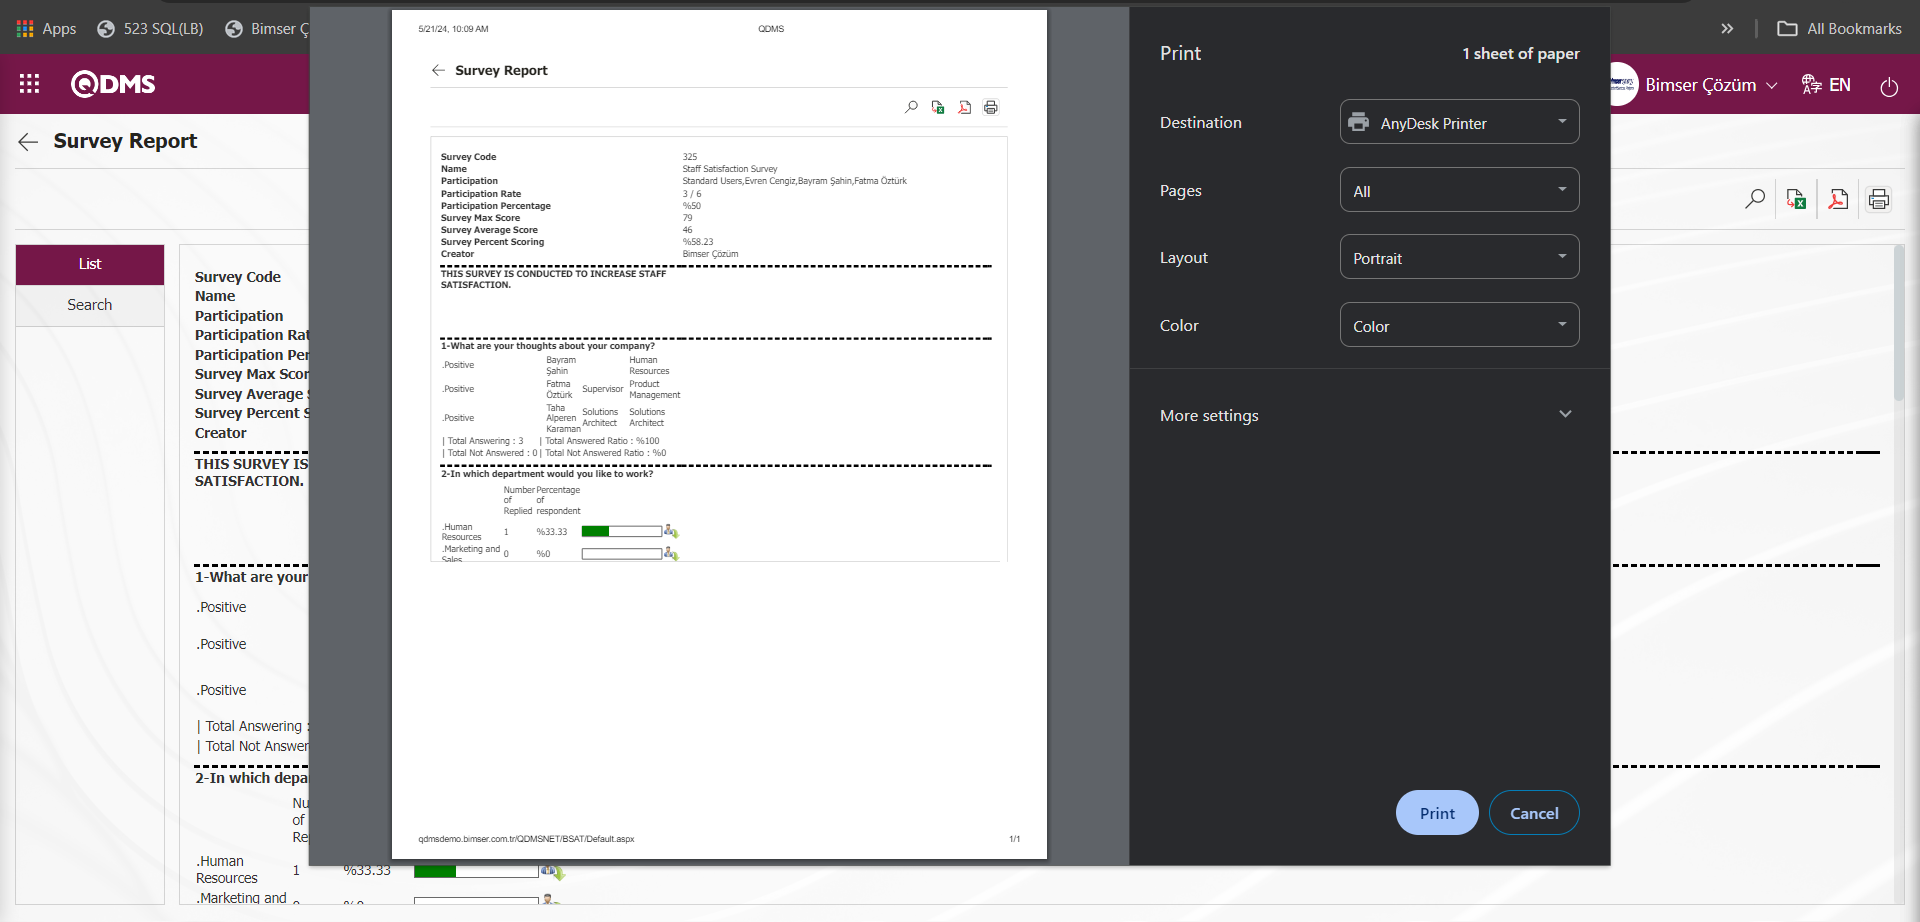
On the Survey Report screen, filtering is done according to the fields consisting of survey questions in the Search tab.
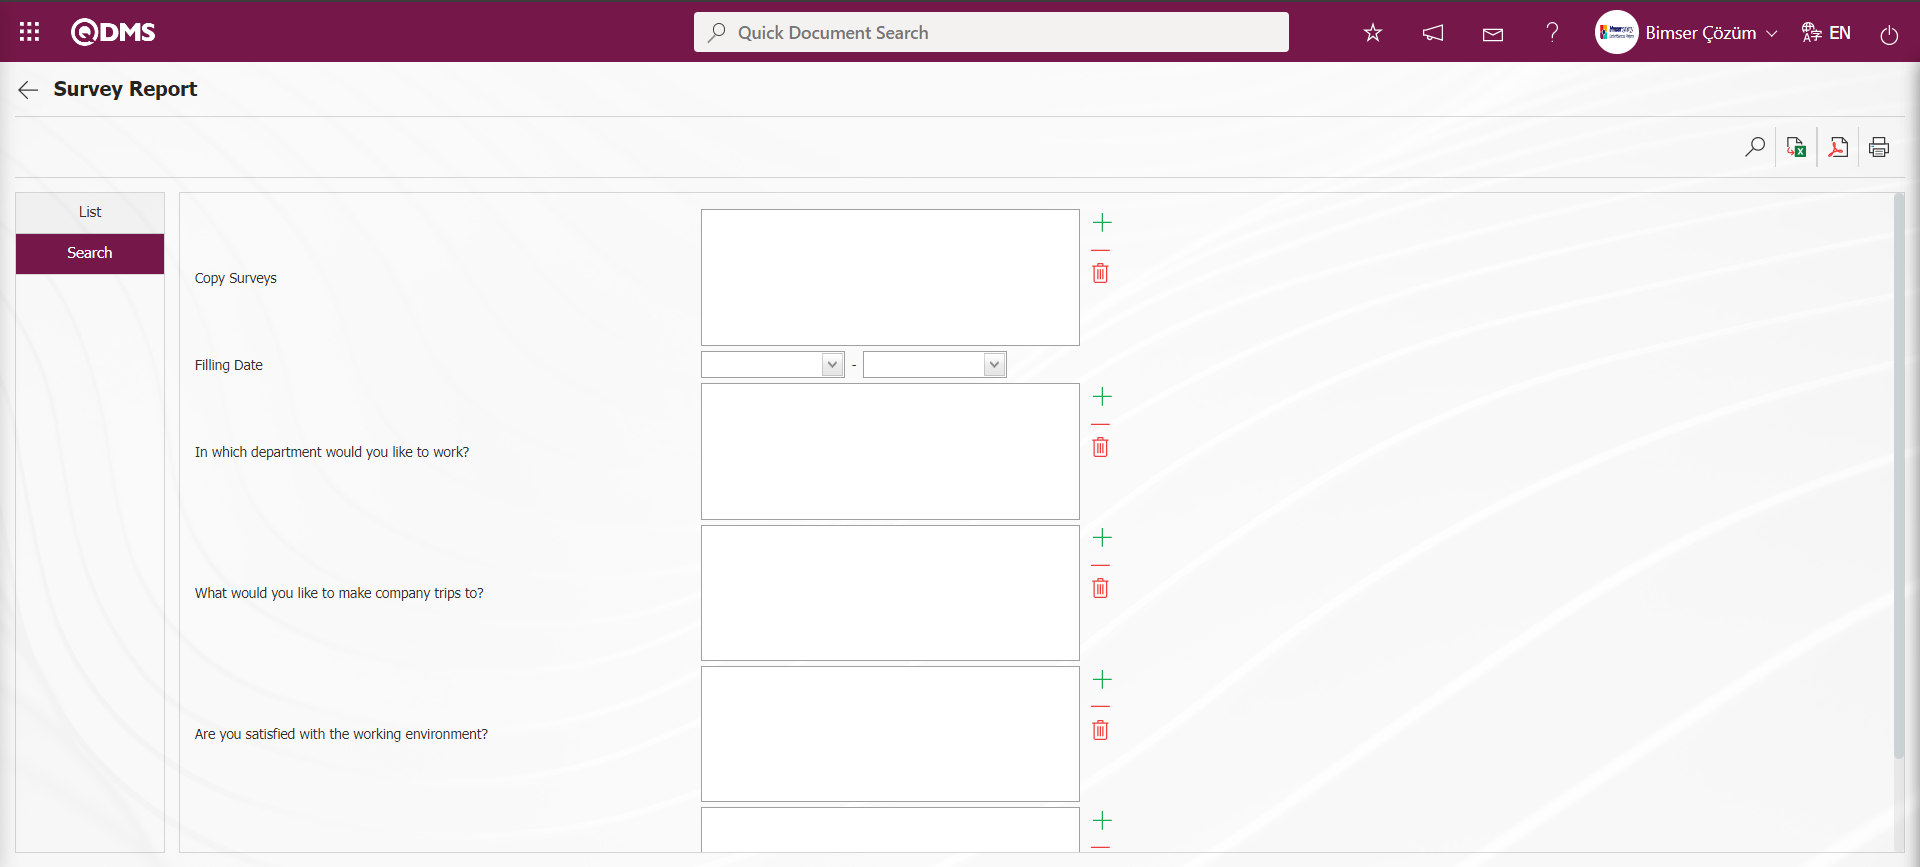
On the Survey Results screen, on the list tab, click the  button while the Survey is selected in the list.
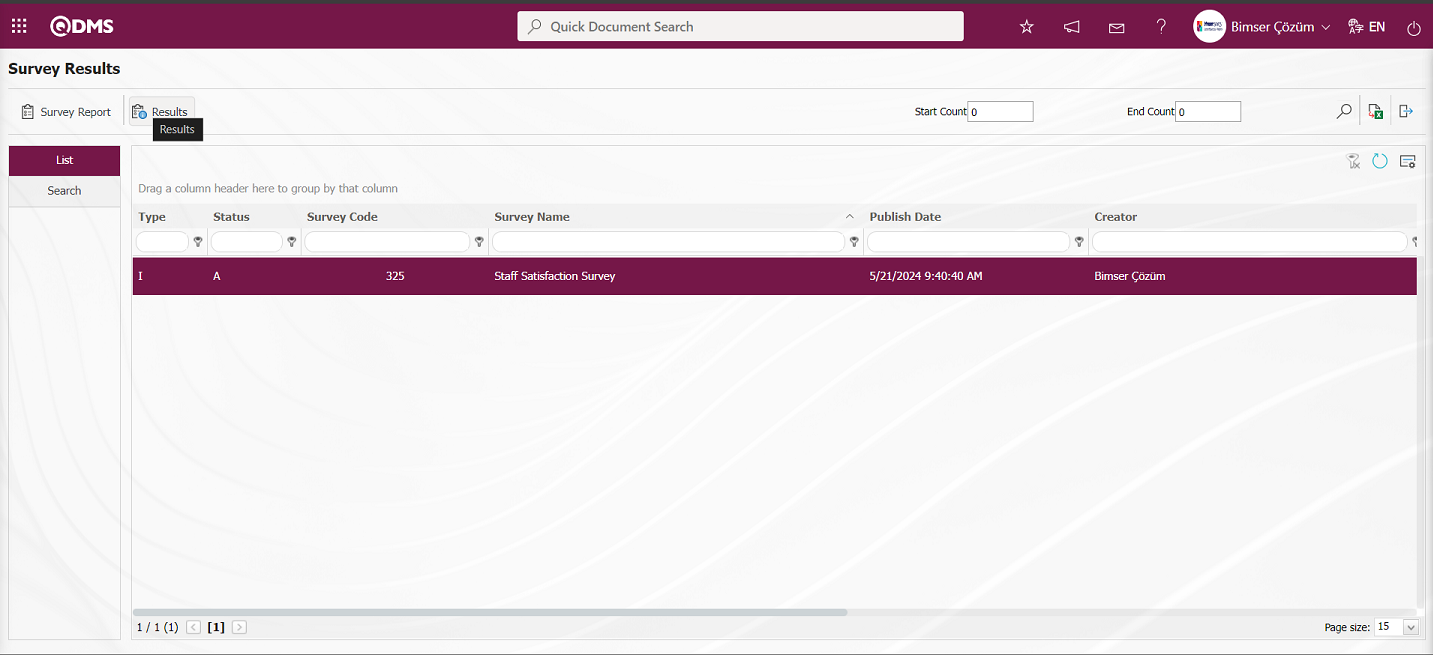
In the Survey Results screen, survey results information such as the date of completion, the number of questions answered, the survey score and score percentage can be accessed.
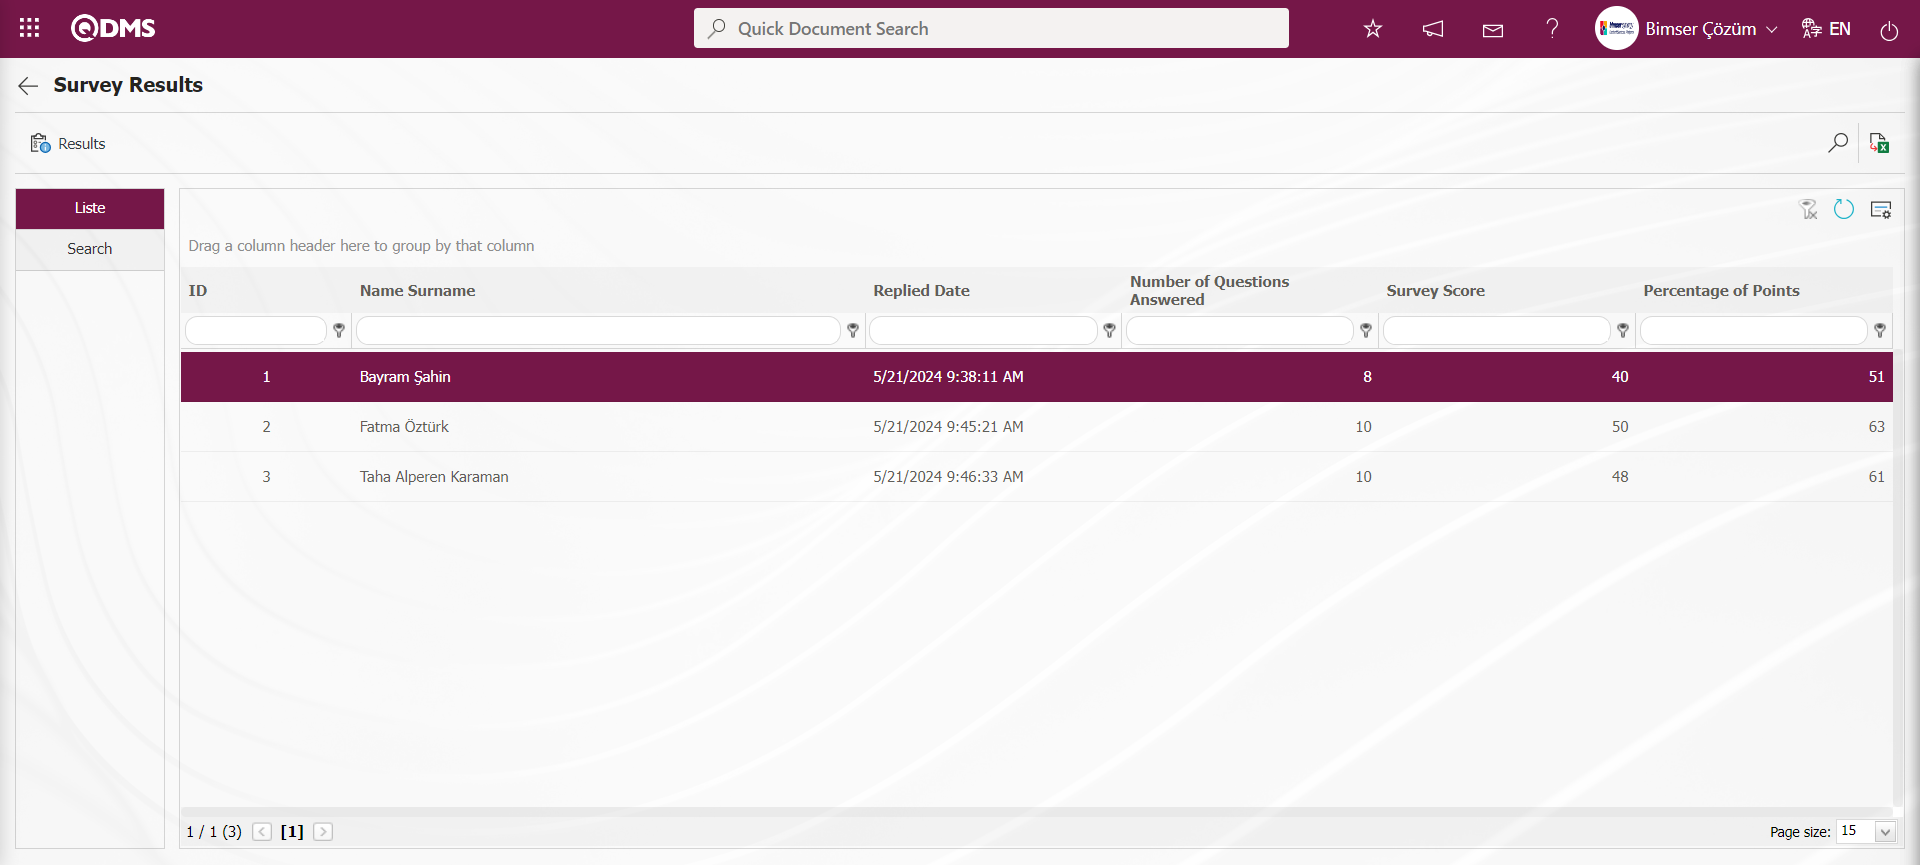
With the help of the buttons on the screen;
 : The form of the survey completed by the respondents is displayed.
On the Survey Results screen, click the button while the participant is selected in the list tab.
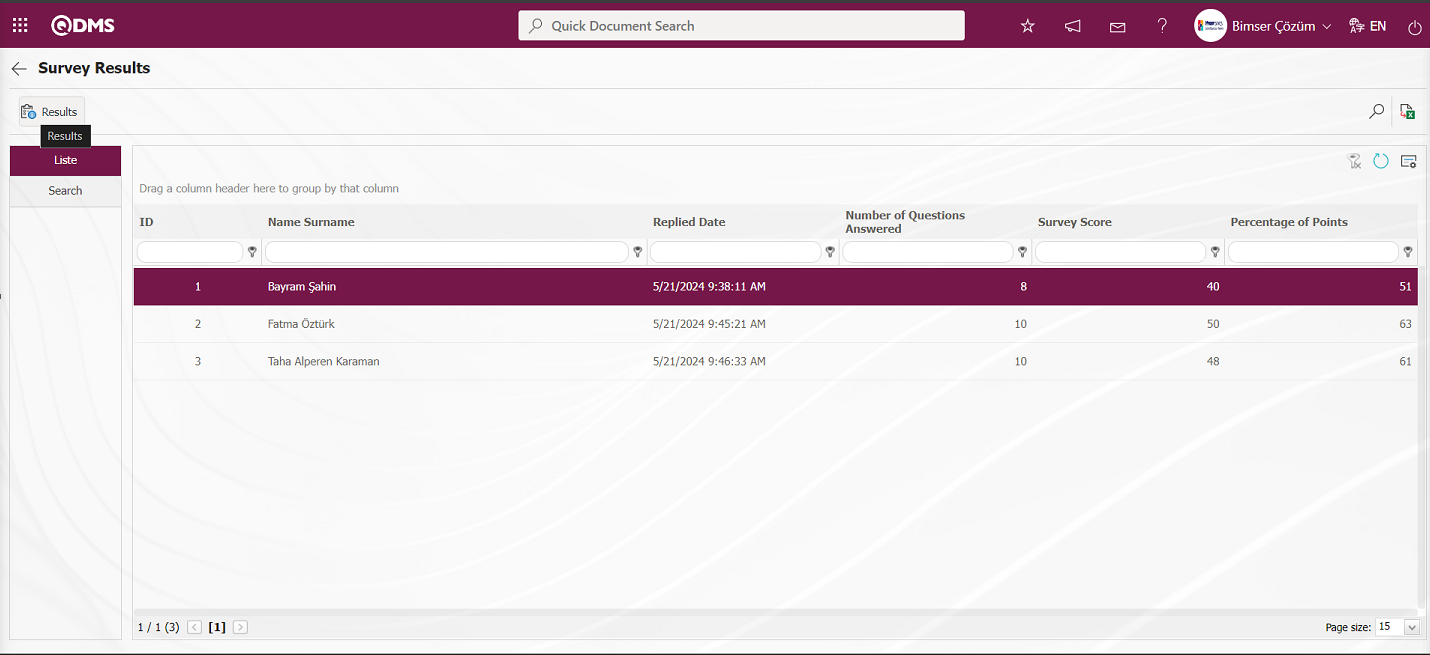
The Survey Participating screen opens and the form of the survey is displayed.

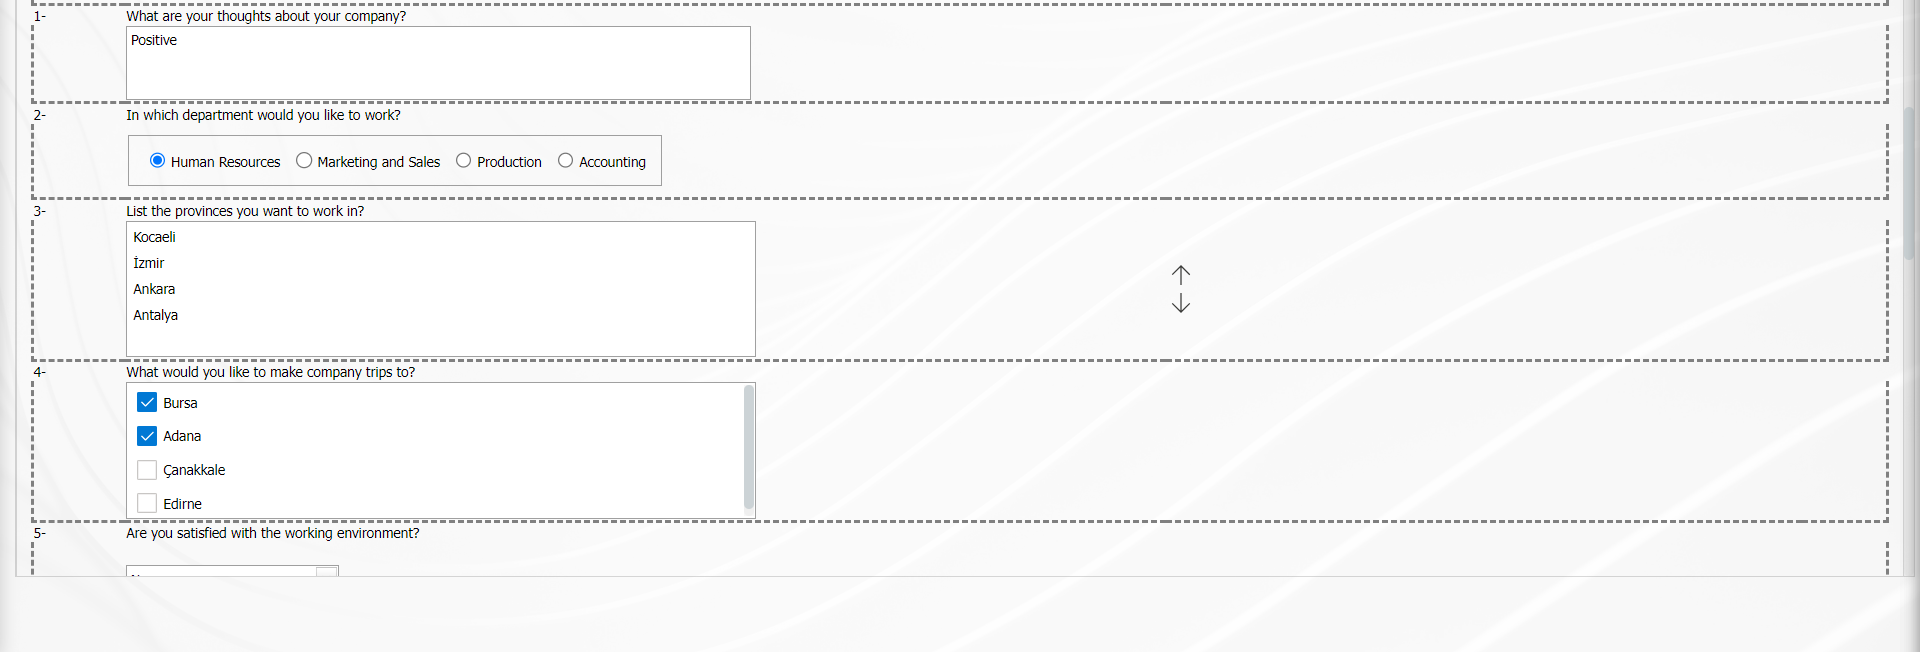
On the Survey Results screen, on the List tab, while the Survey is selected in the list, enter the information in the Start Count and End Count fields and click the  (Export to Excel) button.
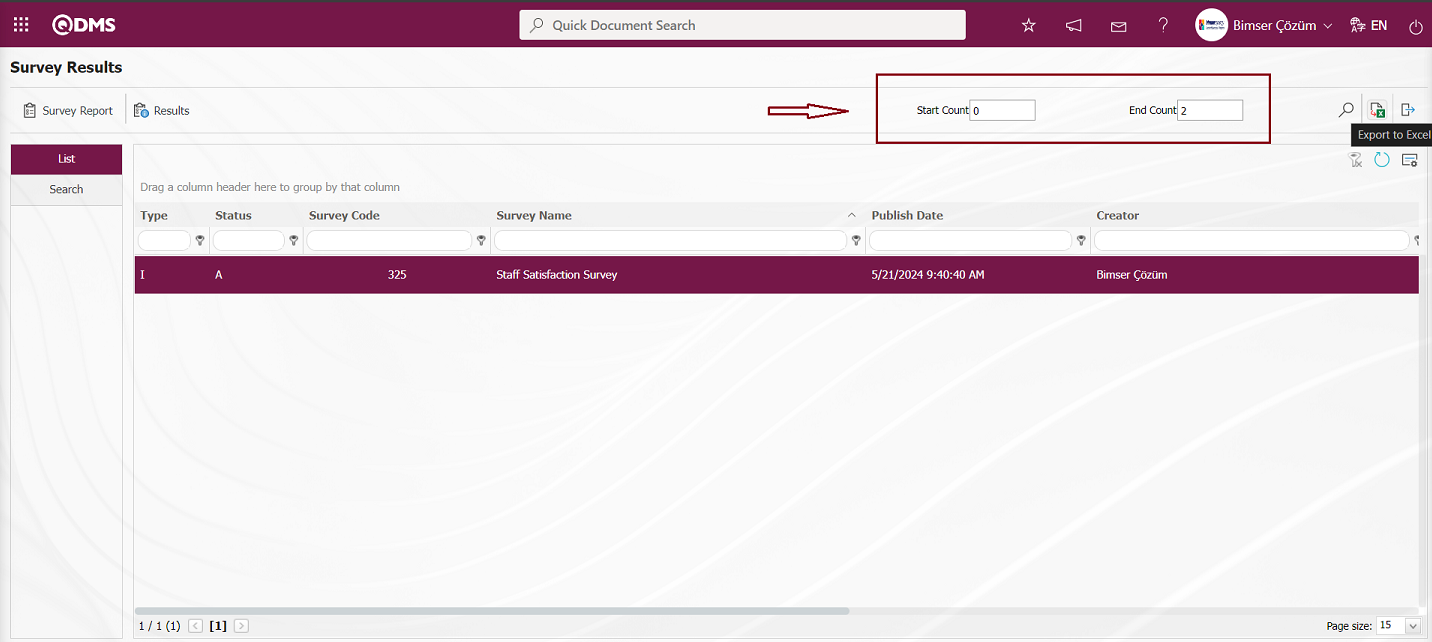
Survey Results are reported in Excel format.
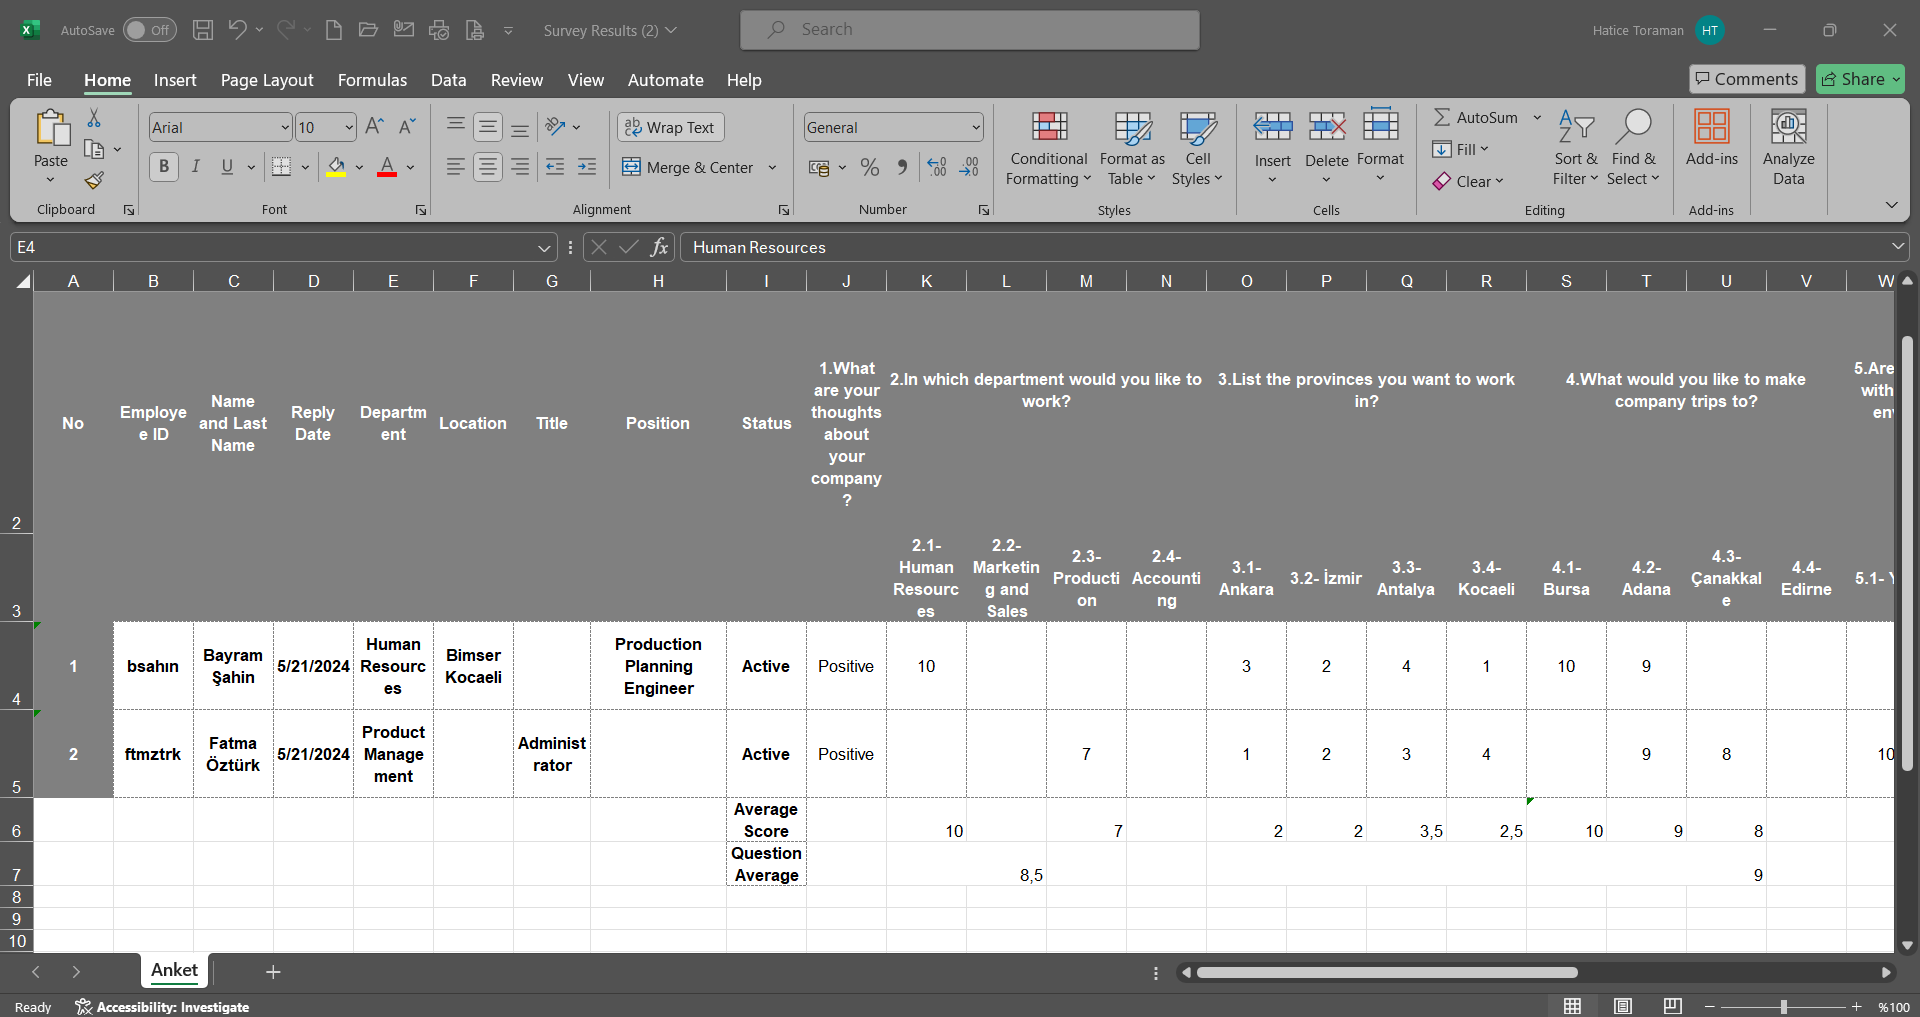
On the Survey Results screen, the (Export to Excel) button is clicked to export the survey results to excel. In the event that the number of users, questions and options in the survey are many, it is the field that allows the transfer from the personnel to be transferred to excel, starting from the answers of the 0th personnel to the answers of the Xth personnel, so that the transfer to excel can be faster. In other words, it ensures that the data is restricted according to the number of personnel and transferred to excel.

6.2.5. Prepare External Survey Form
Menu Name: Integrated Management System/Survey/ Prepare External Survey Form
When there are surveys to be filled out by customers or suppliers, the relevant surveys are prepared from this menu. External surveys are the type of surveys that will be sent to customers and suppliers registered in the QDMS system and users who are not defined in the system. When they save the surveys received in their e-mails after filling them in, they are automatically transferred to the QDMS system as data. System infrastructure definitions/ BSID/ Definitions/ Customer - Supplier definition, customers, suppliers and their e-mail addresses must be defined previously. After the external survey form is prepared, made available and published, the survey is sent by e-mail to the customer or supplier selected to fill out the survey. When the customer or supplier fills and saves the questionnaire received in the mail, the results fall into the QDMS system. The stages of preparing the internal survey form, preparing the external survey form and preparing the standard survey form are functionally the same screens. Survey types are functionally separated. There are two tabs on the External Survey Identification screen: List and Filter tabs.
List tab;
The process steps are performed using the buttons displayed on the Survey Definition screen. Process steps such as defining a survey, editing, deleting and copying the survey information selected in the list are done with the help of the buttons displayed.

With the help of the buttons on the screen;
: This button is used to create a new survey. The screen where the information of the survey is entered, who will participate in the survey, the responsible persons of the relevant survey and the additional files related to the survey, if any, will appear. Only the standard survey does not have a participant tab.
: The edit button can be used if the admin check box is checked in the survey creator, the survey module manager and the responsibles we select during survey creation. Apart from this, editing cannot be done in other cases that are not authorized. It is used to make corrections, additions and deletions in the existing survey.
: It is used to delete erroneous surveys from the system. Deleted questionnaires are not stored, they are completely deleted with the information in them. Surveys in open status cannot be deleted. The authorization to delete the survey is available to the survey creator, the survey module manager and the responsible persons we select during survey creation if the admin check box is checked.
: For surveys whose status is closed, the users who prepared the survey, the survey module manager and the users whose admin check box is checked in the responsibilities we selected during survey creation add questions to the survey with this button.
: It is used to copy a new survey from the selected Survey in the list.
On the Survey Definition screen, click the button while the survey is selected in the list in the list tab.
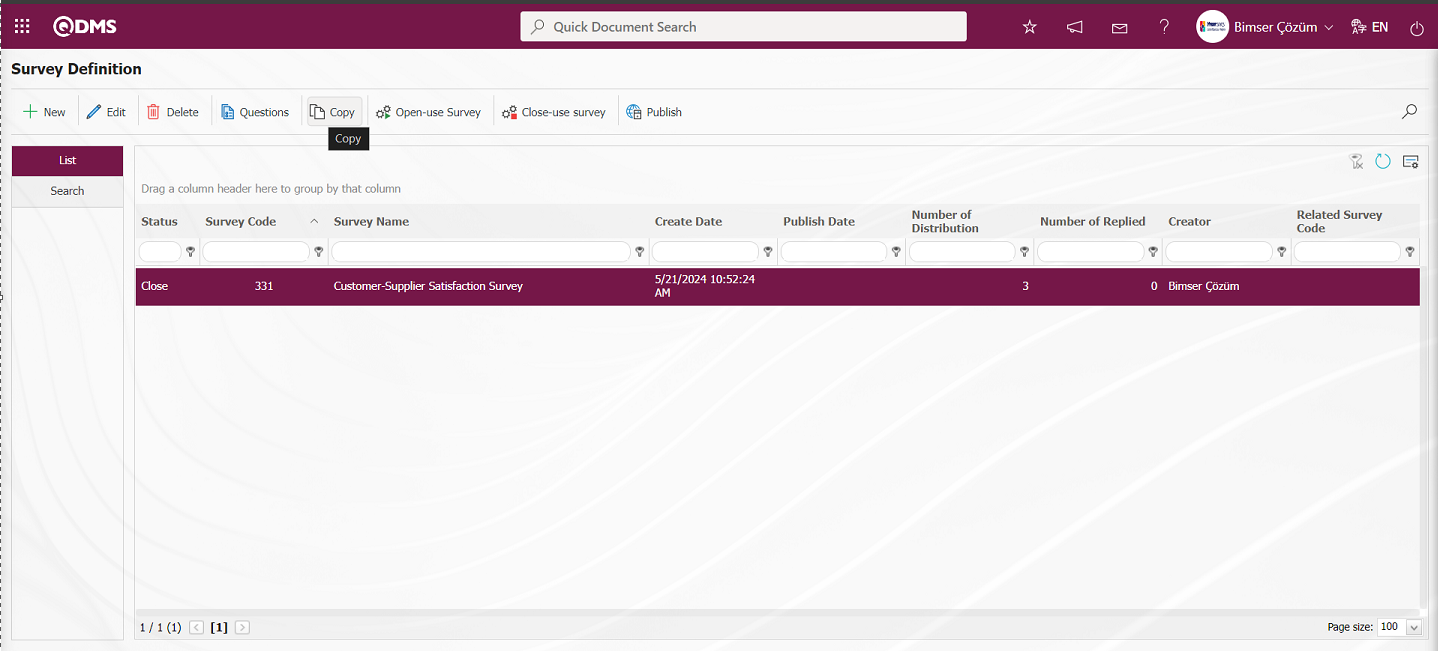
The Survey Definition screen opens.
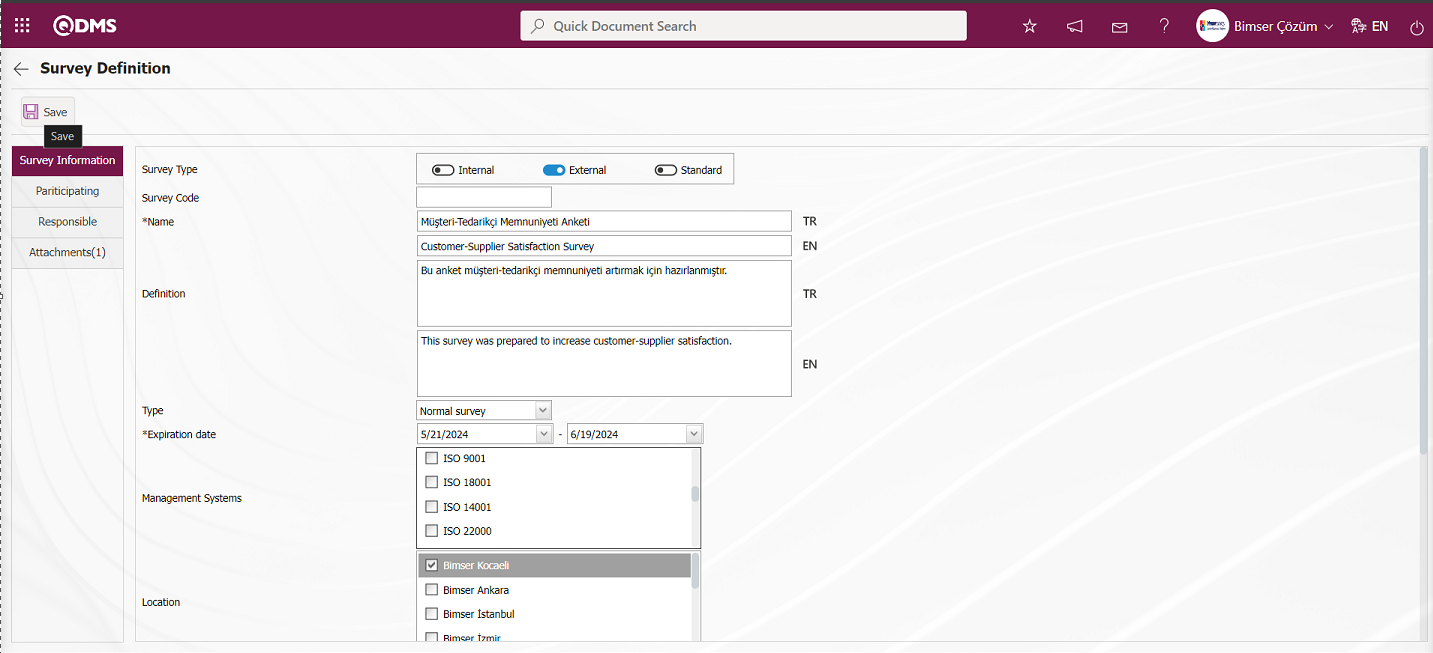
On the Survey Definition screen, in the Survey Type field, copying is done by selecting the survey type other than external survey if desired. By selecting the Survey Type as External, the survey is copied by clicking the  button in the upper left corner of the screen.
The survey copied in the Survey Definition process is displayed.
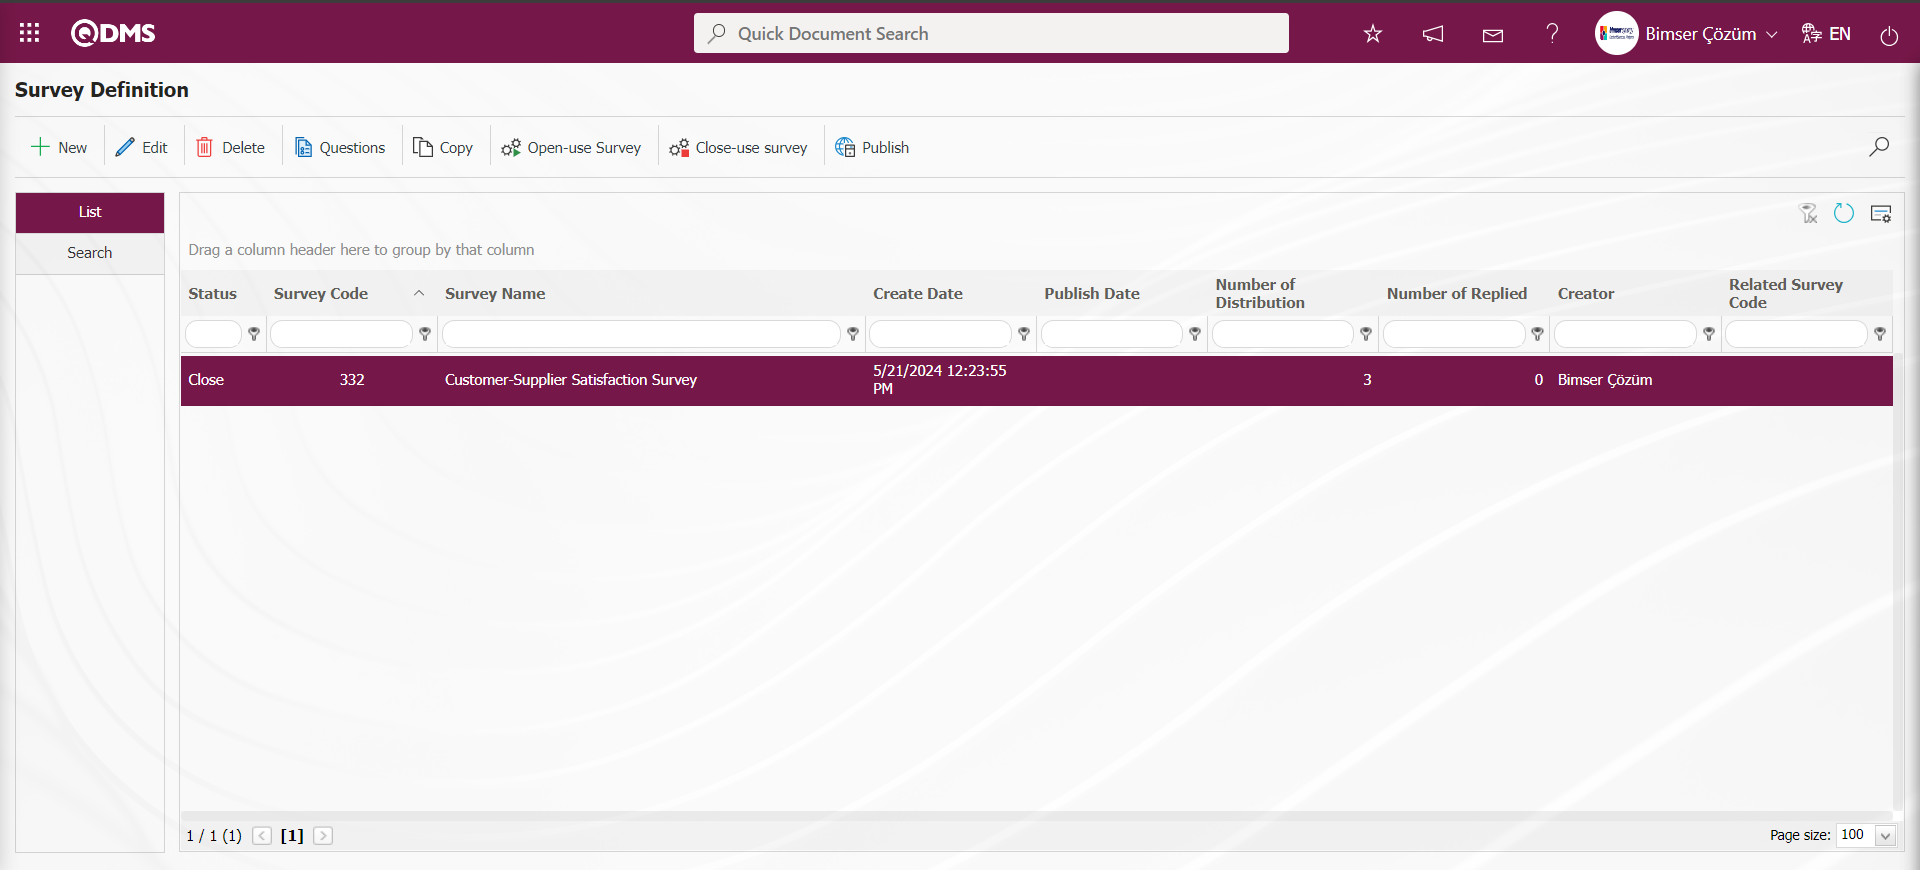
: It is used to make the survey available in the system. The users we add as participants will be sent a survey on QDMS to fill out the survey and the users will be assigned to their pending tasks. After the survey record is created and questions are added, this button must be clicked for users to view and fill out the survey.
: The survey should be closed manually by clicking this button. The parameter value of the parameter number 7 “Validity date are completed surveys automatically closed?” in the survey module parameters is activated by selecting “Yes”.
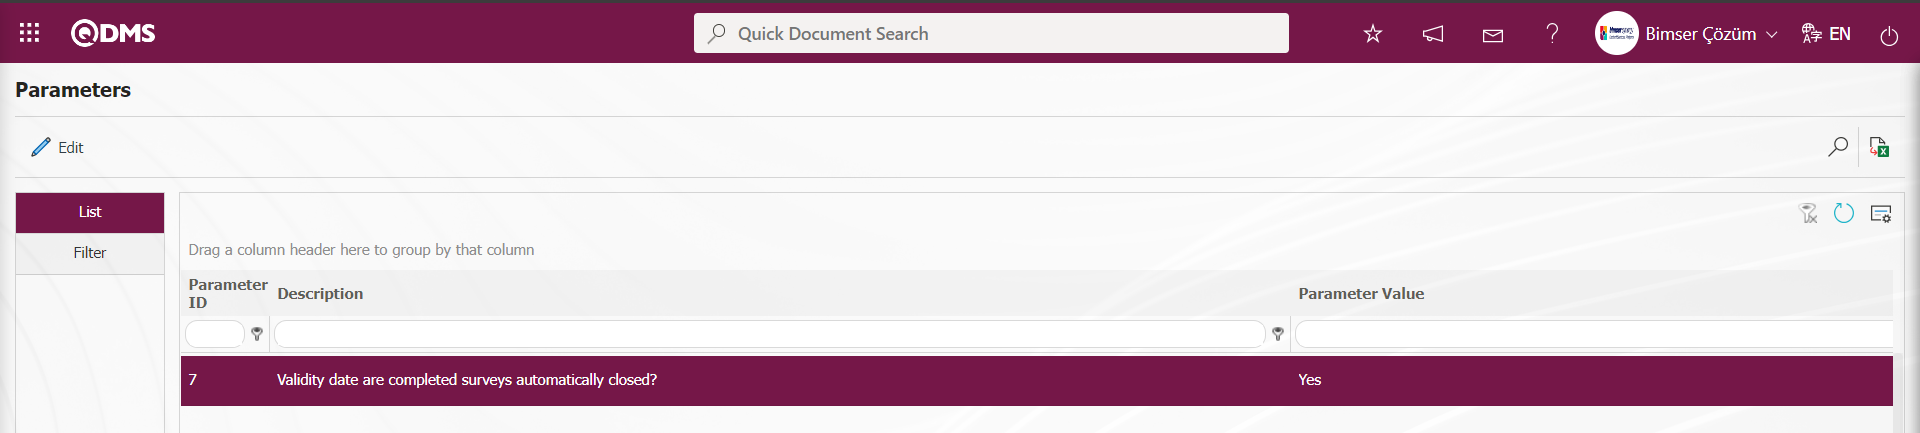
When the parameter is activated, the survey with expired validity date is closed without using this button.
: If you want the survey to be published by e-mail, click on the button.
: In case of a large number of surveys, filtering is done with the search button by typing the data in the available fields in the search tab..
: The search criteria on the menu screens are used to clear the data remaining in the filter fields in the grid where the search operation is performed.
: The menu screen is restored to its default settings.
: User-based designing of the menu screen is done with the show-hide feature, that is, the hiding feature of the fields corresponding to the columns on the menu screens.
Search tab: In the Search tab, data is entered in the fields with search criteria and filtered according to the search criteria.
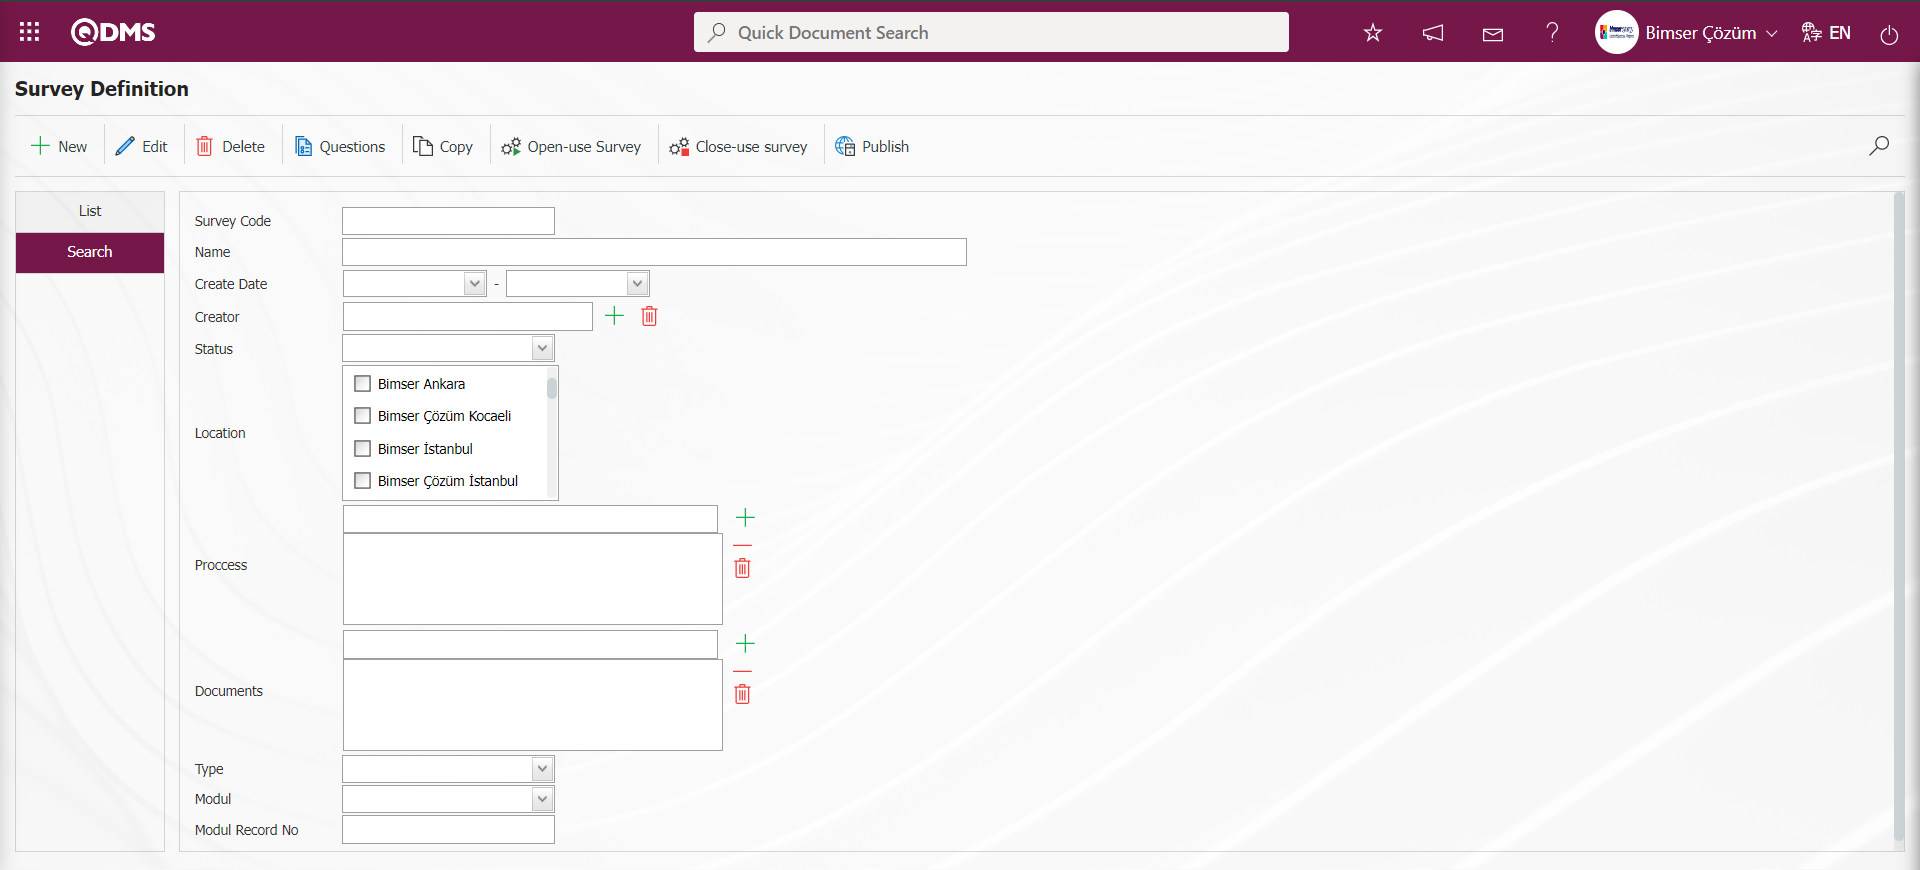
6.2.5.1. Preparing a New Survey
Click on the Integrated Management System/ Survey/ Prepare External Survey Form menu to open the survey definition screen.

Click on the  button at the top left corner of the screen to define a new survey.

The Survey Definition screen opens.
Survey Information Tab: General information about the survey is filled in. For example: Survey code, Survey name, Description and Survey type.
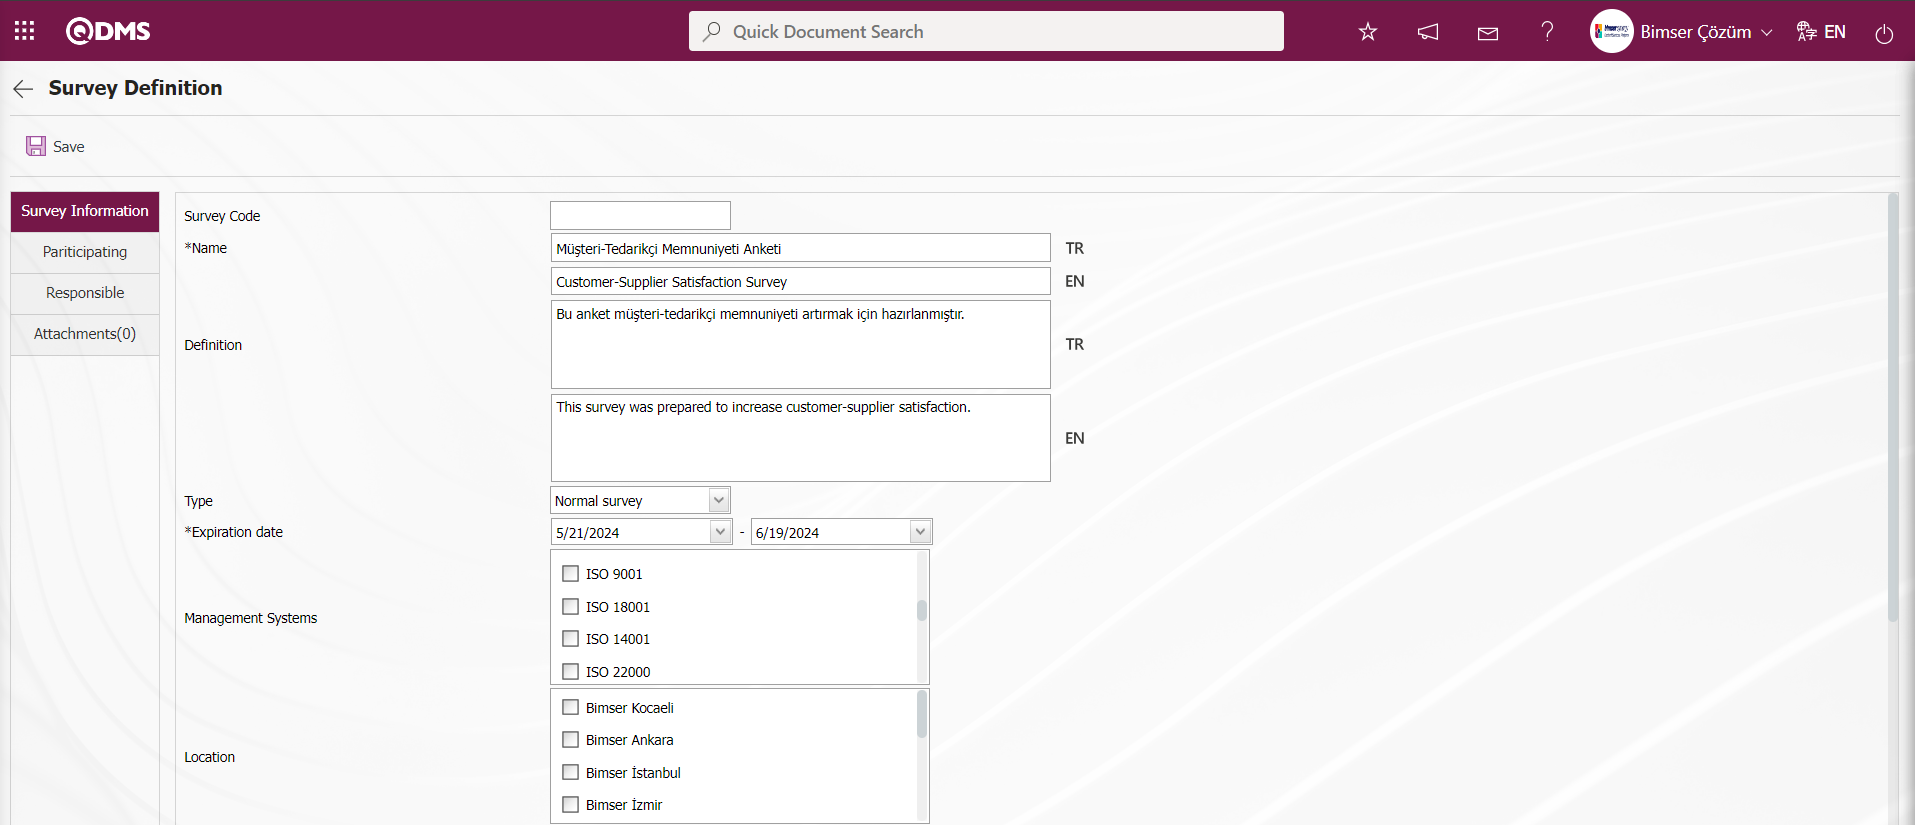
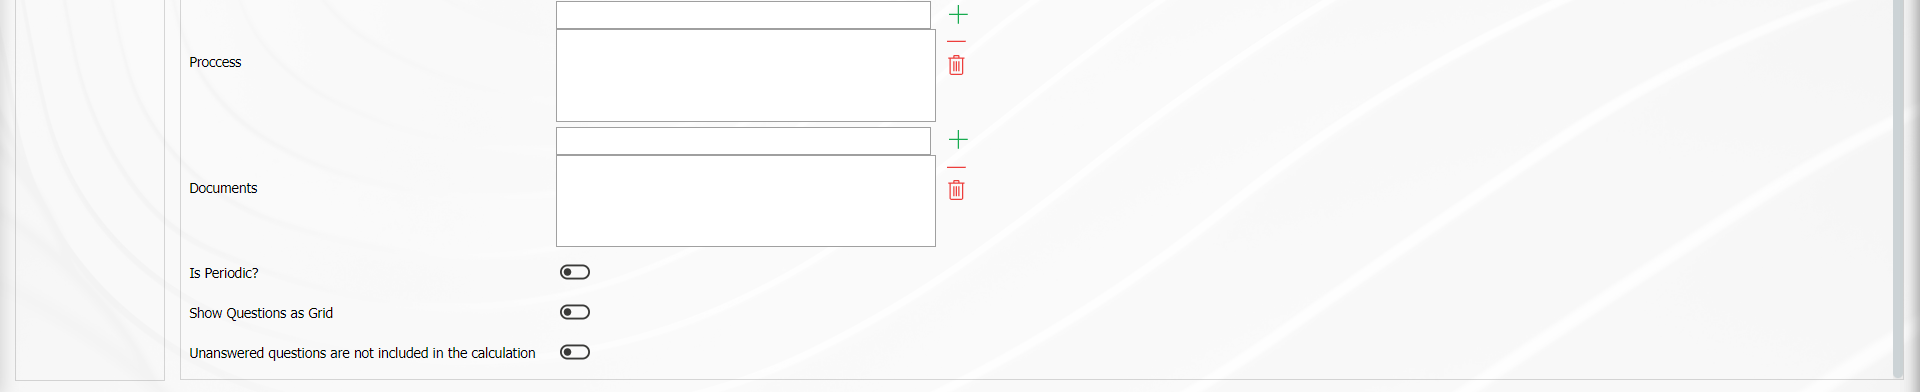
Define the relevant fields on the screen that opens:
Survey Code: It comes automatically by the system.
Name: This is the field where the name of the survey is entered. For example: Staff satisfaction survey, service services survey. In case of use in other languages, the survey names should be written in the field for other languages.
Definition: The descriptions to be entered about the created survey should be written in this field.
Type: There are 2 different survey types. These are normal survey and template survey. The normal survey type is selected for surveys that we prepare without establishing a relationship with the modules. For use in other modules (for example: CAPA activity evaluation survey), the template survey type is selected.
Expiration Date: Determines the dates between which the survey will be in effect. The survey is opened and closed manually for users. However, if the parameter value of the survey parameter number 7 “Validity date are completed surveys automatically closed?” is “Yes”, the survey closes the survey automatically on the specified deadline based on the effective date.
Management System: Select which management system is in the scope of the survey. Multiple selection is possible.
Location: Enter the location where the survey will be used. Multiple selection can be made.
Process: The survey created with this button can be associated with processes.
Secret: There is a “ Secret” check box at the bottom of the survey information page. When this check box is checked, the registration numbers of the people who fill out the relevant survey are hidden by the system.
Periodic Survey: When the parameter number 11 “Use periodic survey?” from the Survey module parameters is activated by selecting the parameter value “Yes”, it allows the created survey to be opened periodically depending on a certain repetition interval.
The parameter value of parameter 12 “Will periodic surveys be posted automatically to participants?” from the survey module parameters is activated by selecting “Yes”.
After the parameter is activated, periodic surveys are automatically published to the survey participants.
Show Questions as Grid: In the defined survey, the relevant check box for “Show Questions as Grid” is checked. After the “Show Questions as Grid” option is selected, only option and multiple choice type questions are defined on the Survey Questions screen. If the question type defined first on the Survey Questions screen, for example, an optional question is defined, the process of continuing to define questions in the optional question type is performed. However, the button to define questions in multiple choice type is removed and no question definition process is performed in this type. According to the question type defined first on the Survey Questions screen, the button to define the question type of that type remains on the screen and the process of defining questions in that question type continues.
Unanswered questions are not included in the calculation: If you do not want the questions not answered in the defined questionnaire to be included in the calculation, check the relevant check box.
Participating Tab: External Participants who are requested to participate in the created survey are selected from this field. We need to add which external participants are requested to answer the relevant survey in this field. Adding customers, adding suppliers, adding external participants and selecting external participantsare done in this tab.
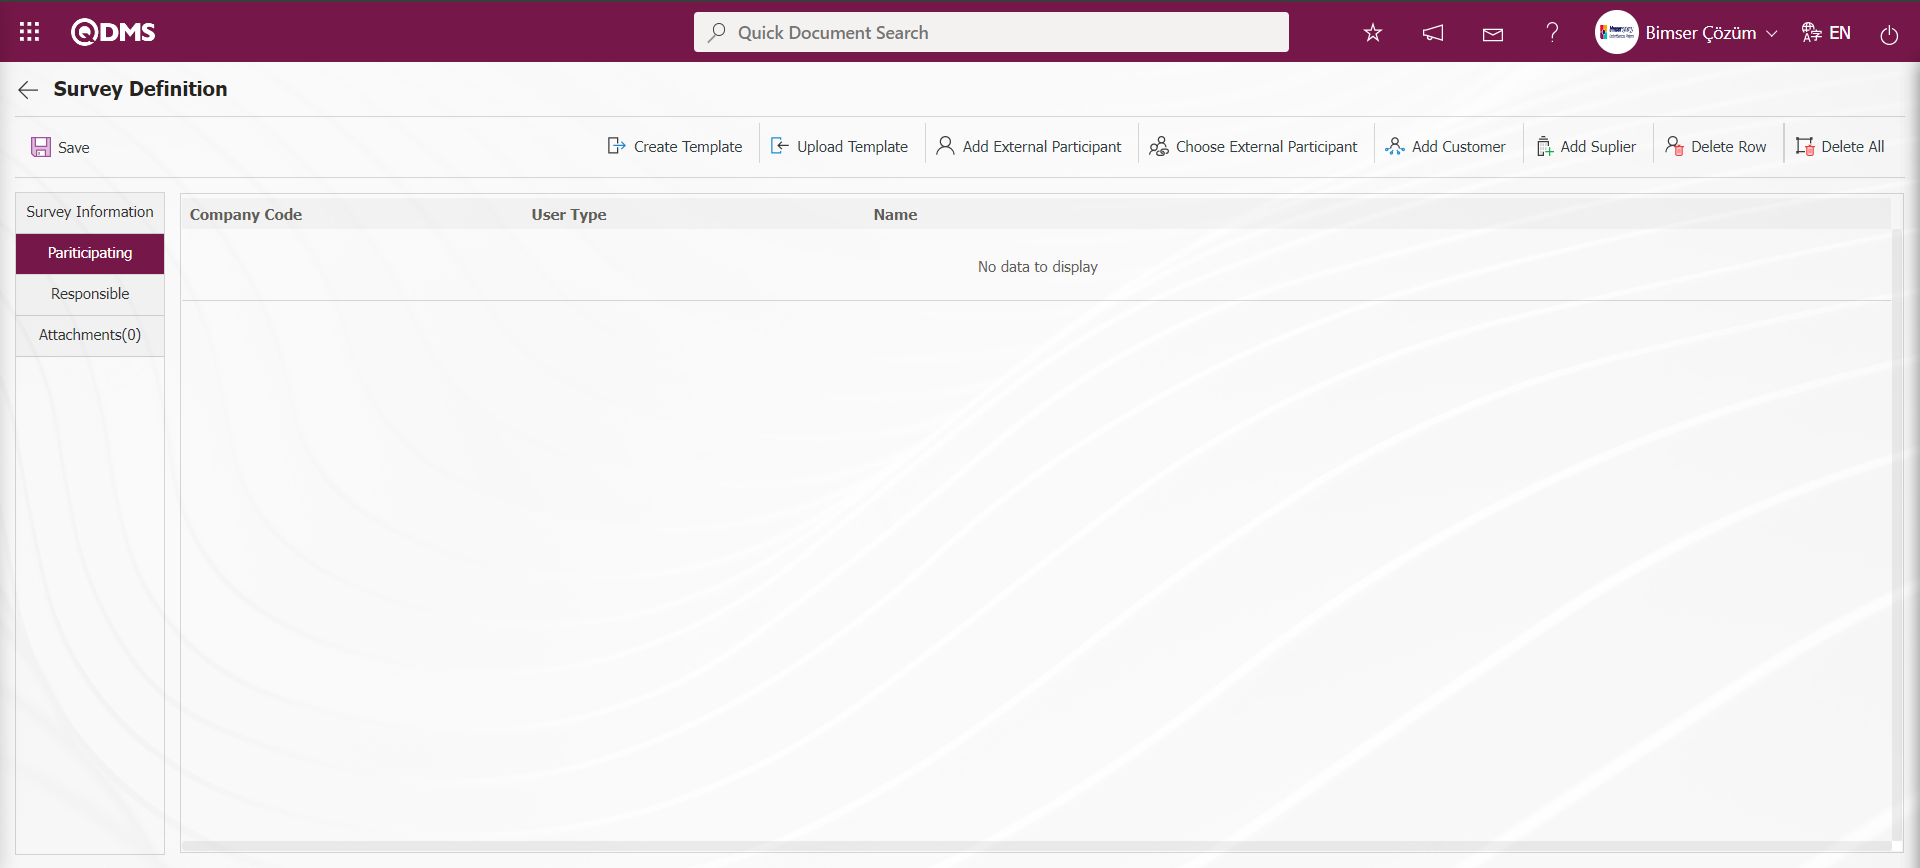
With the help of the buttons on the screen;
 : The External Participant template is downloaded.
 : The completed external participant template is uploaded to the system.
 : External Participant is added.
: External Participants are selected.
 : Used to select a customer.
 : Used to select suppliers.
 : Used to delete the selected row.
 : Deletes added participants in bulk.
Click the button on the Survey Definition screen.

Select the customer from the customer list defined in the system and click the  button.
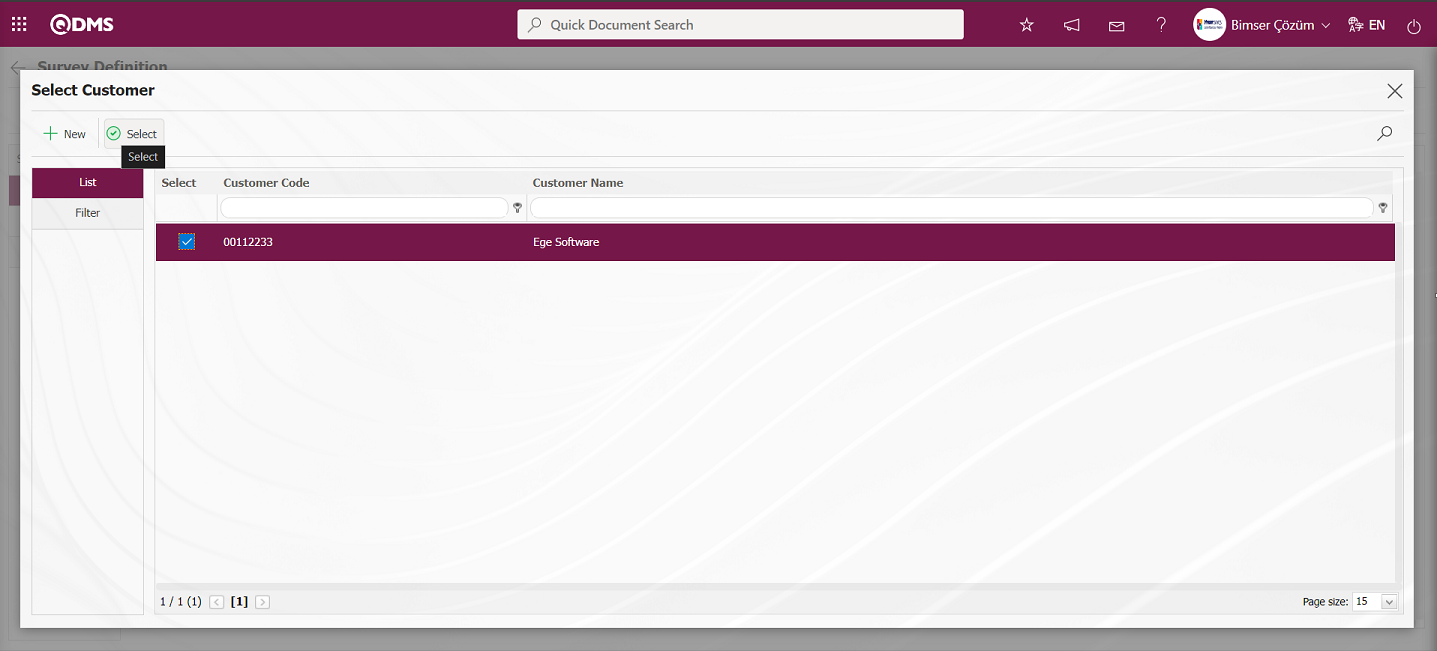
Add participants to the survey in the Customer list.
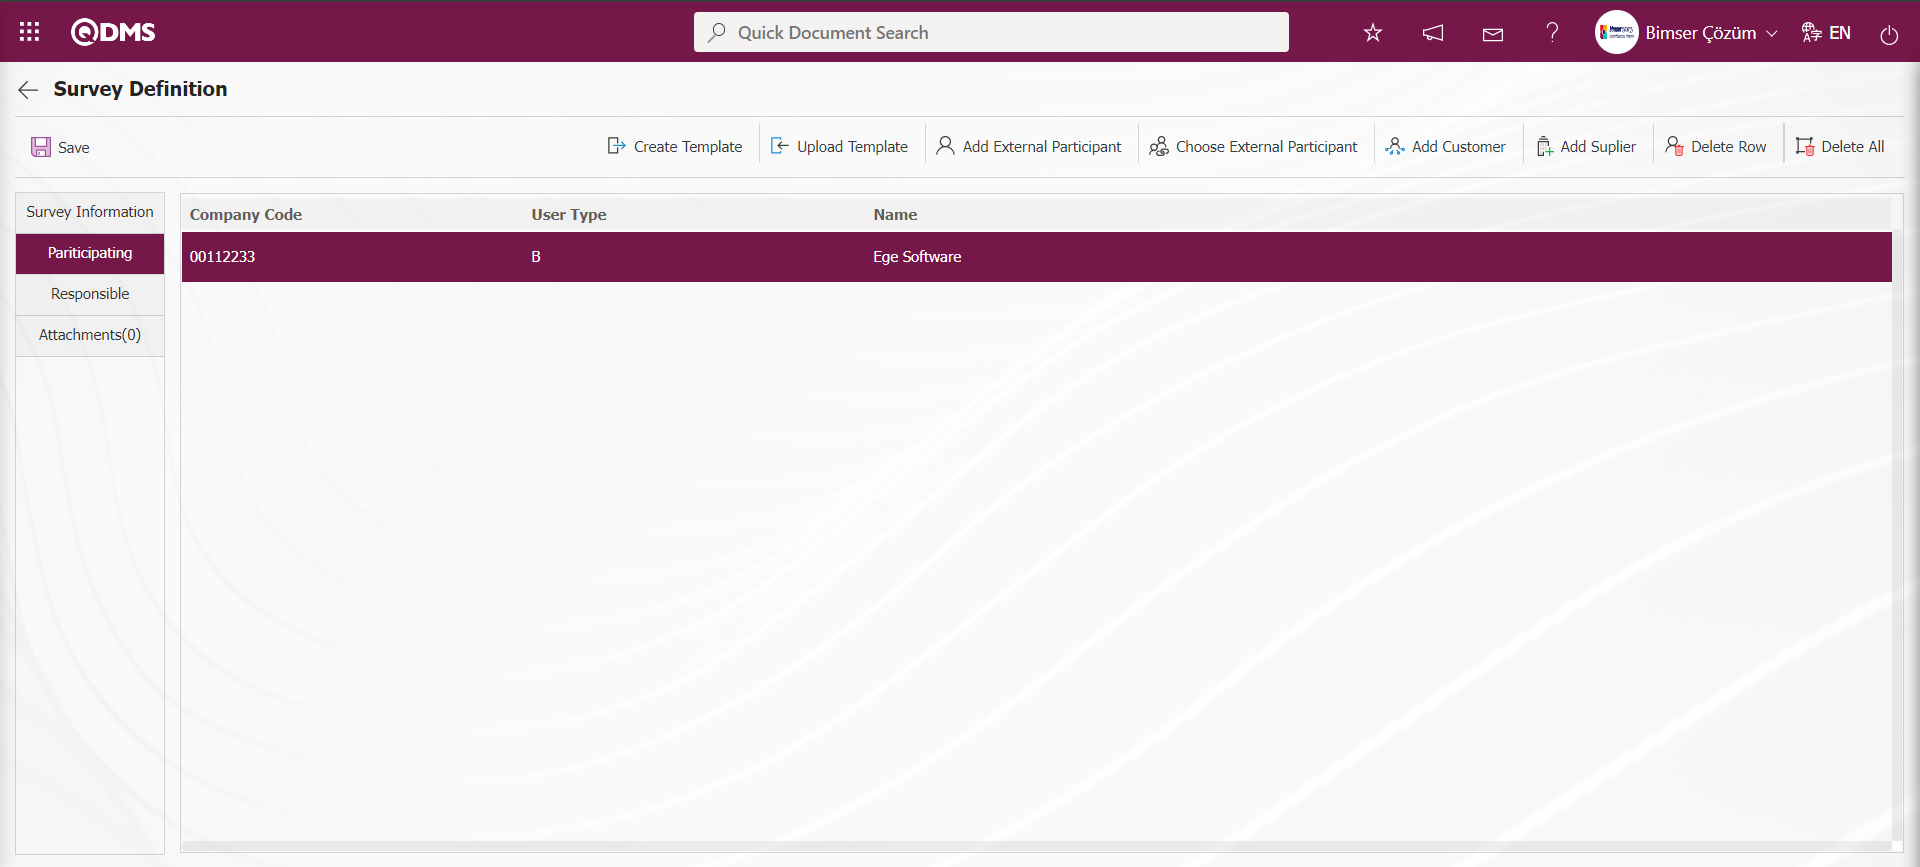
Click the 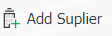 button on the Survey Definition screen.
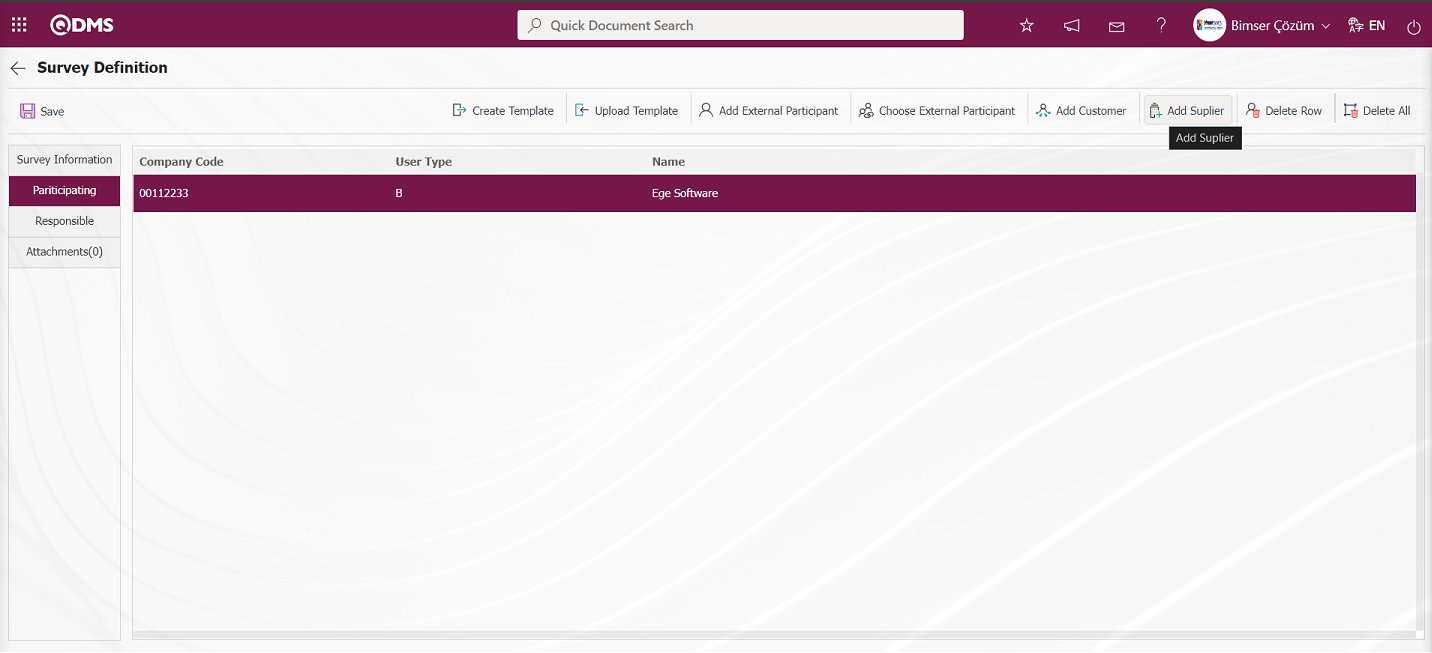
Select the supplier from the supplier list defined in the system and click the  button.
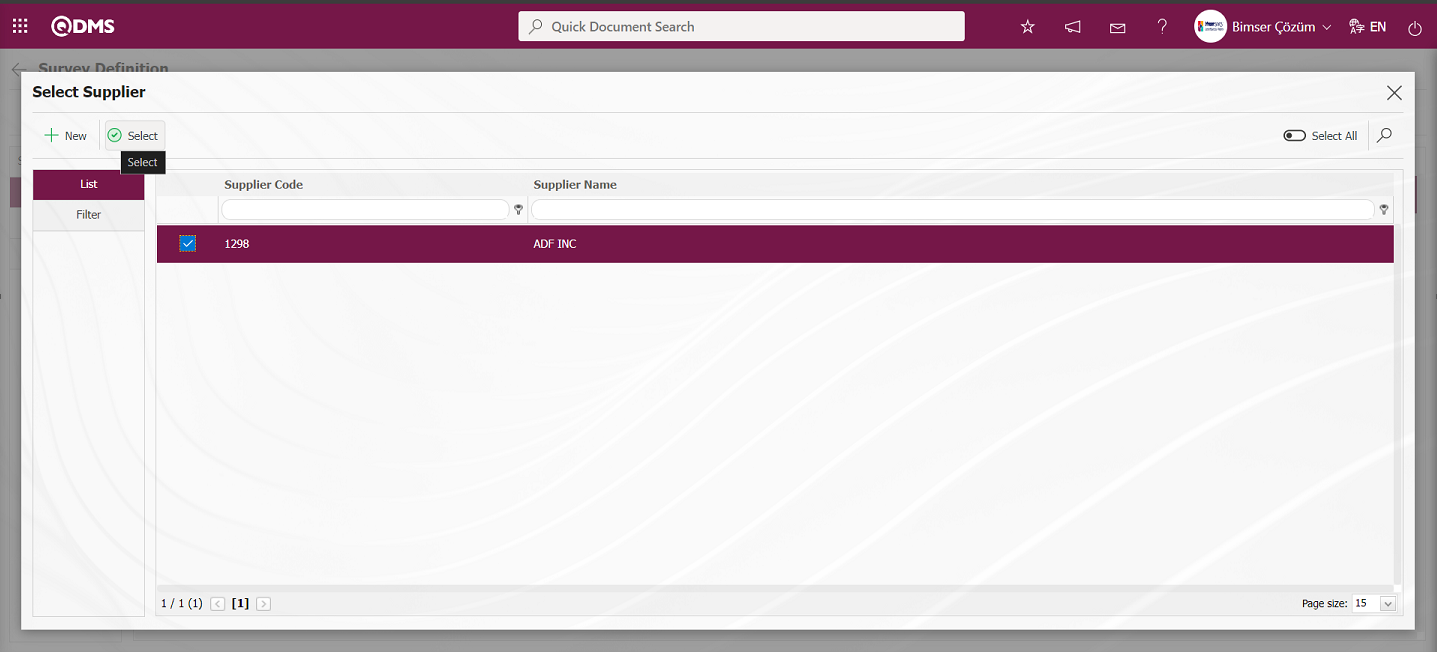
Add participants to the survey in the Supplier list.
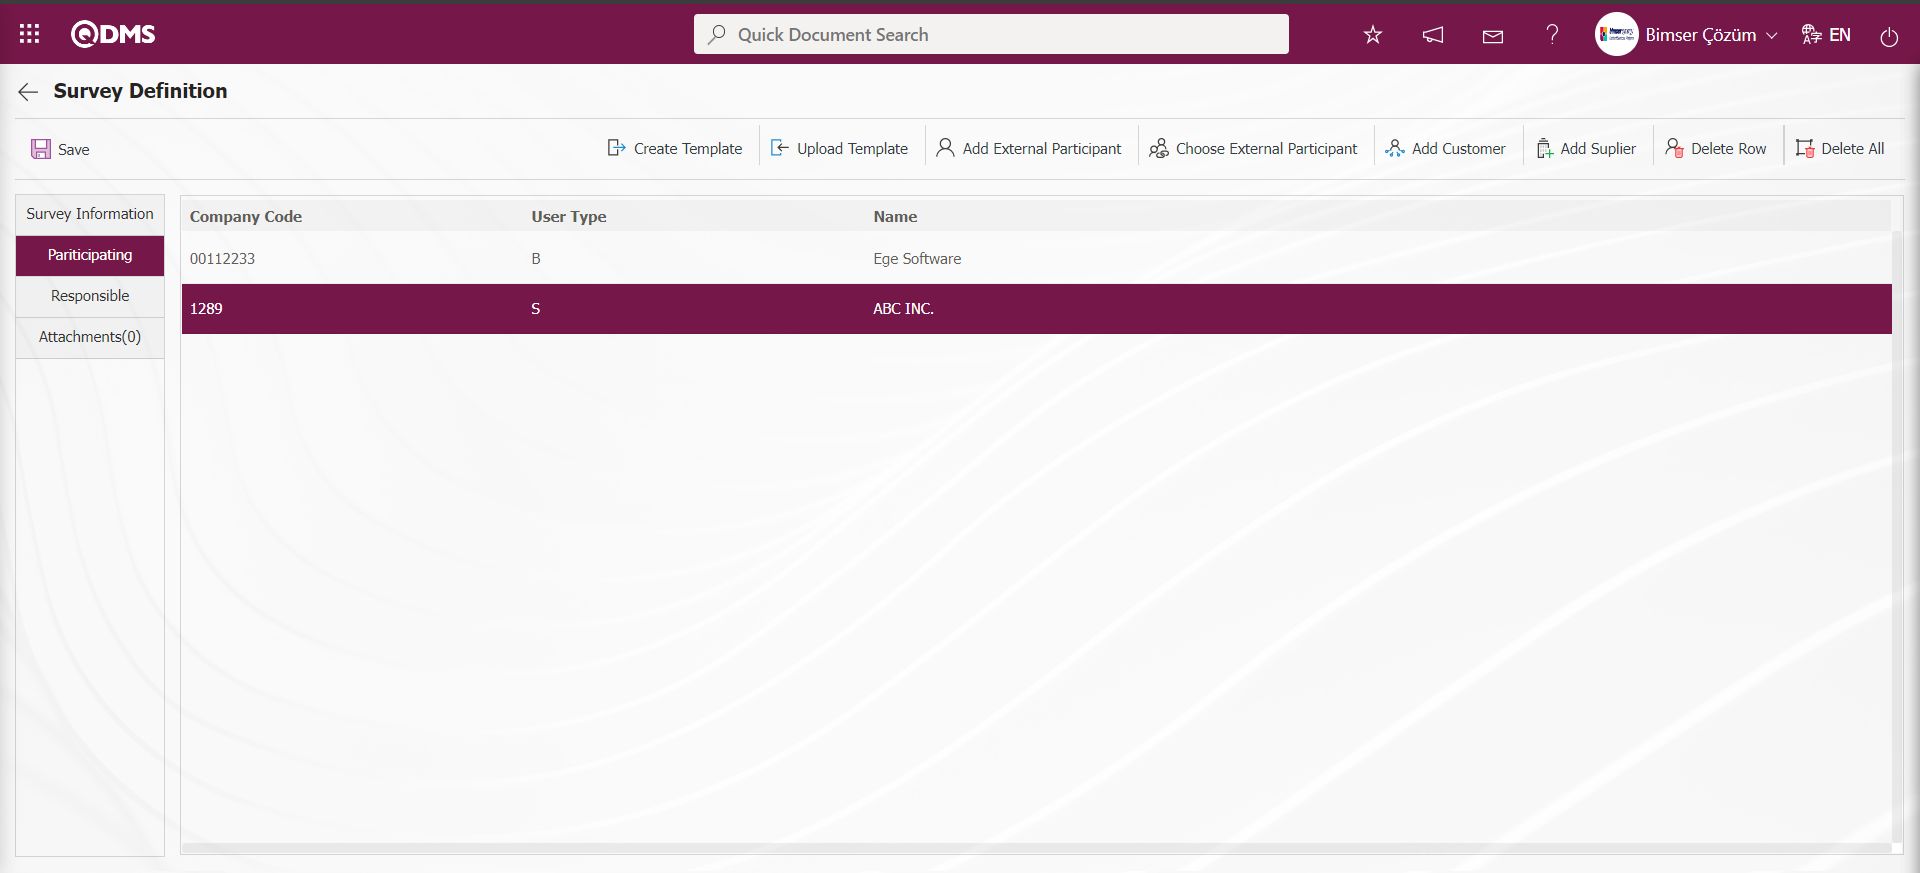
Click the  button on the Survey Definition screen.
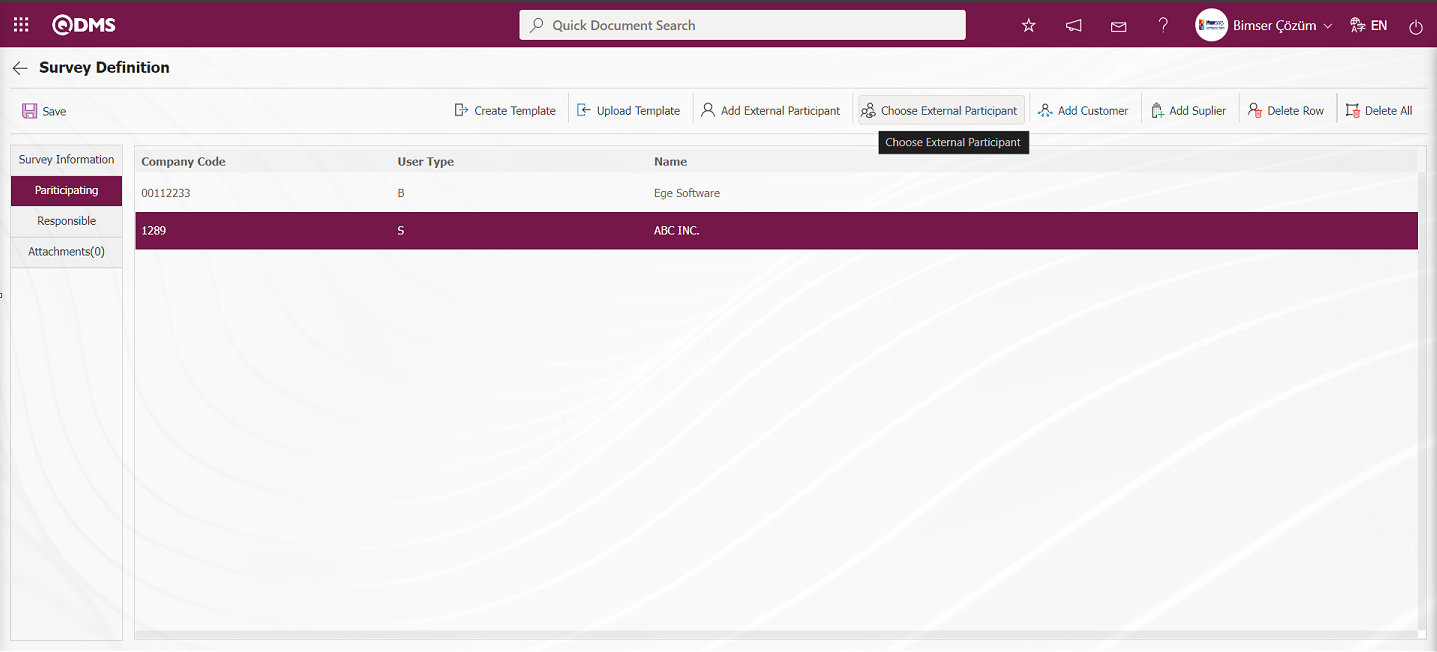
Select the External Participant from the External Participant list defined in the system and click the  button.
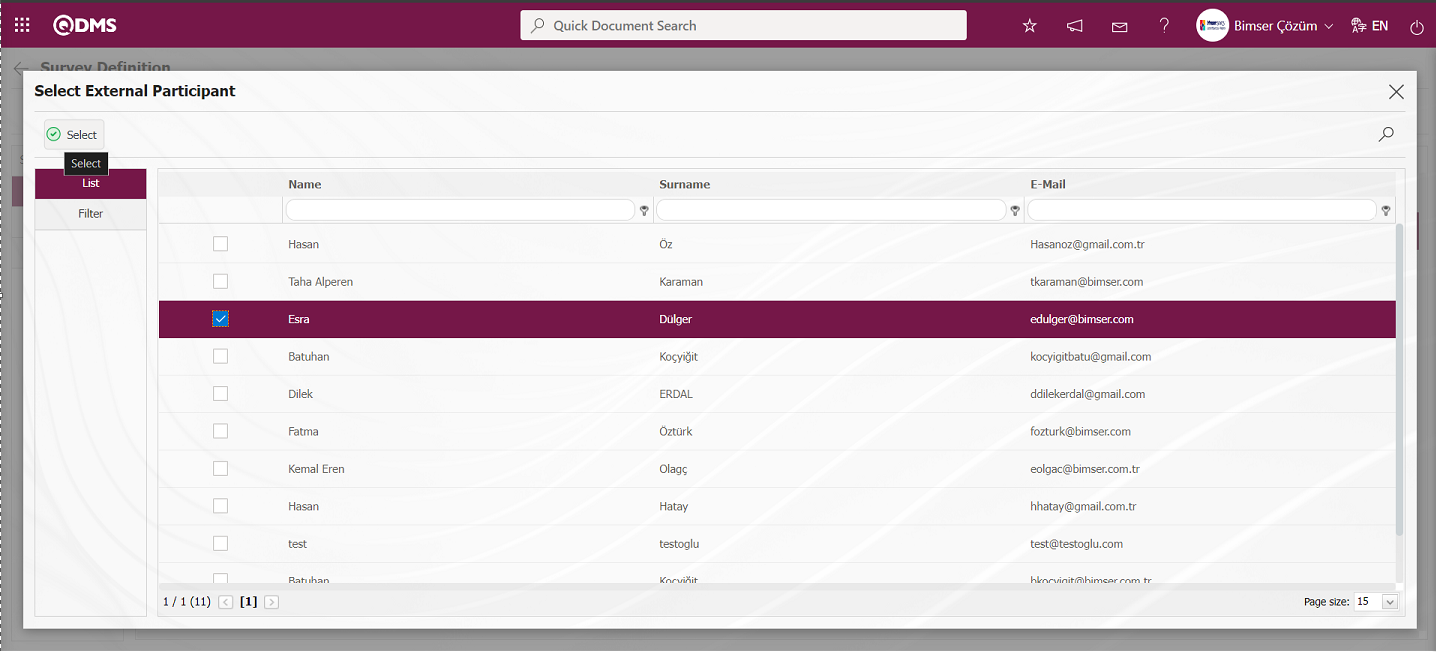 Adding an external participant to the survey is done in the External Participant list.
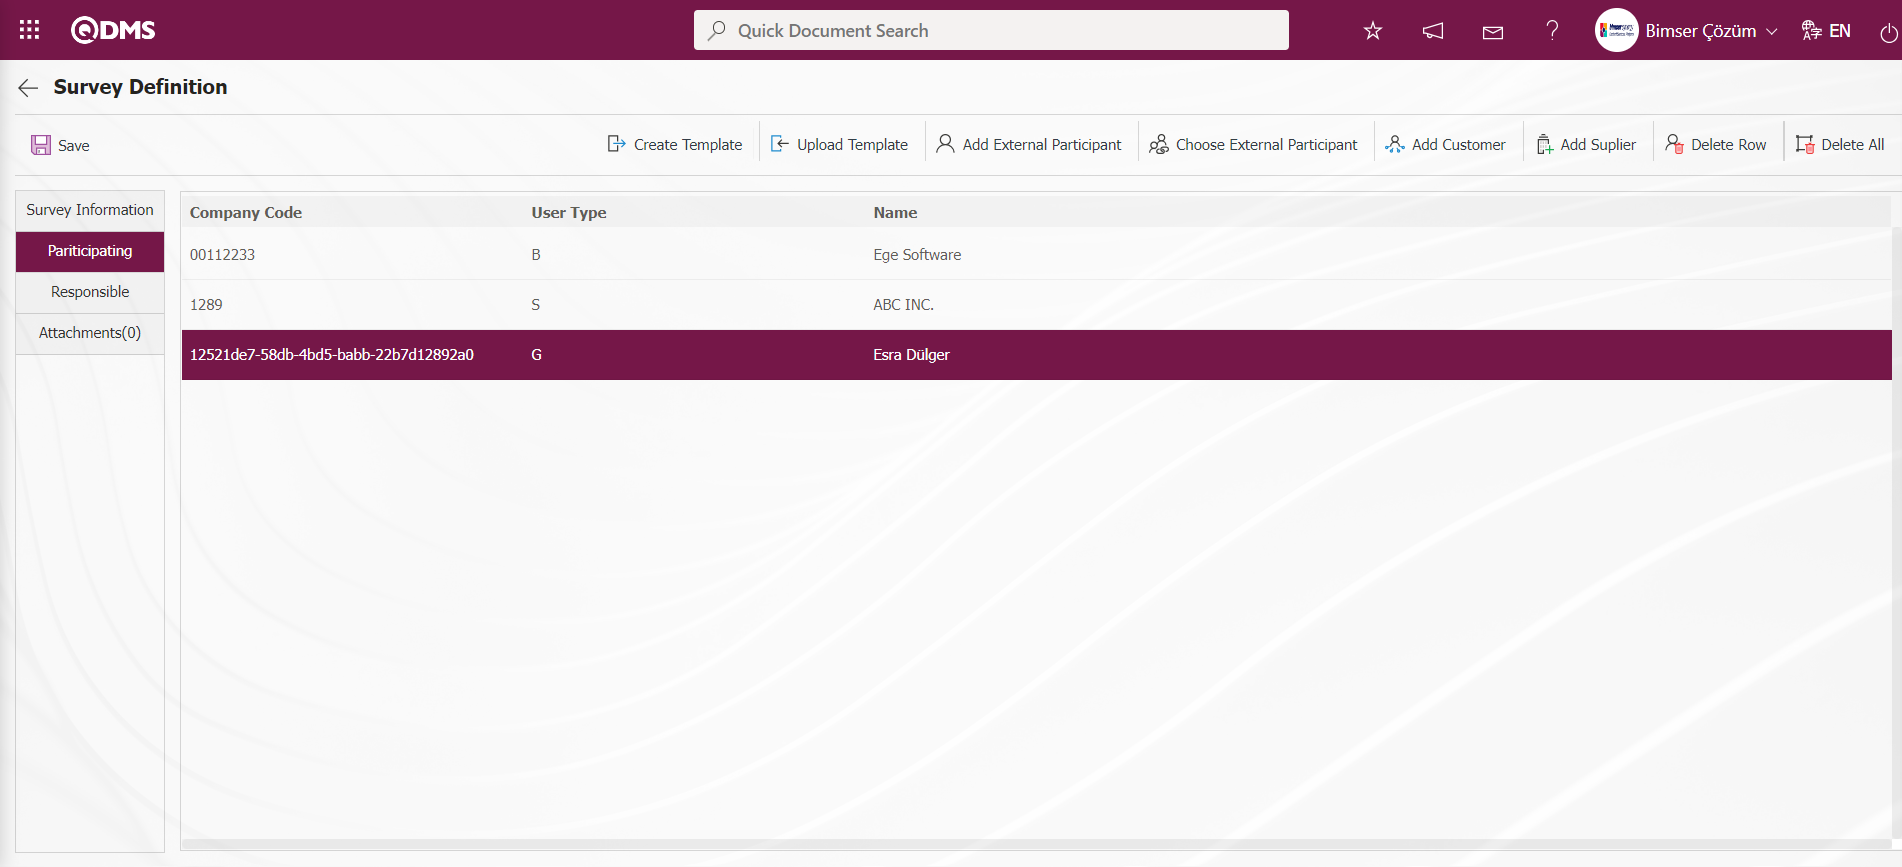
Click the  button on the Survey Definition screen. Click the
  button on the screen that opens.
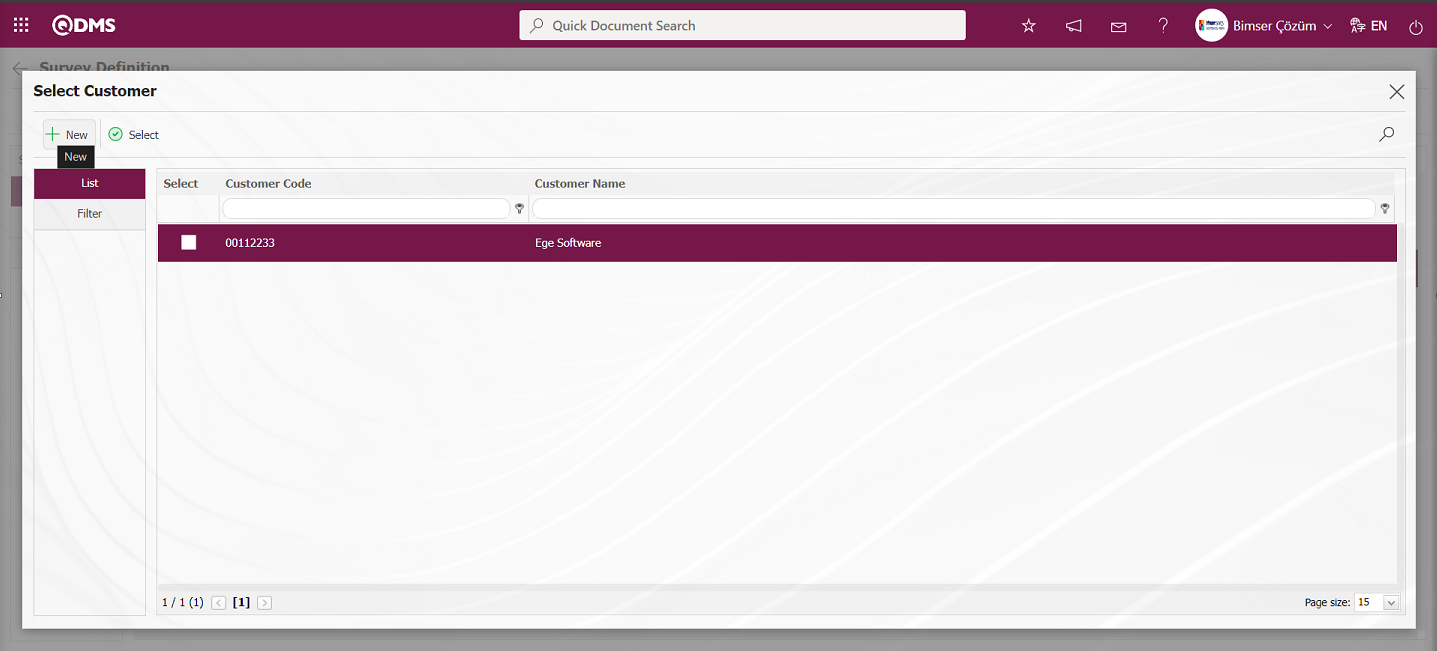
On the Customer - Supplier Definition - New Record screen, the customer is defined and added to the list.

Click the  button on the Survey Definition screen. Click the
  button on the screen that opens.
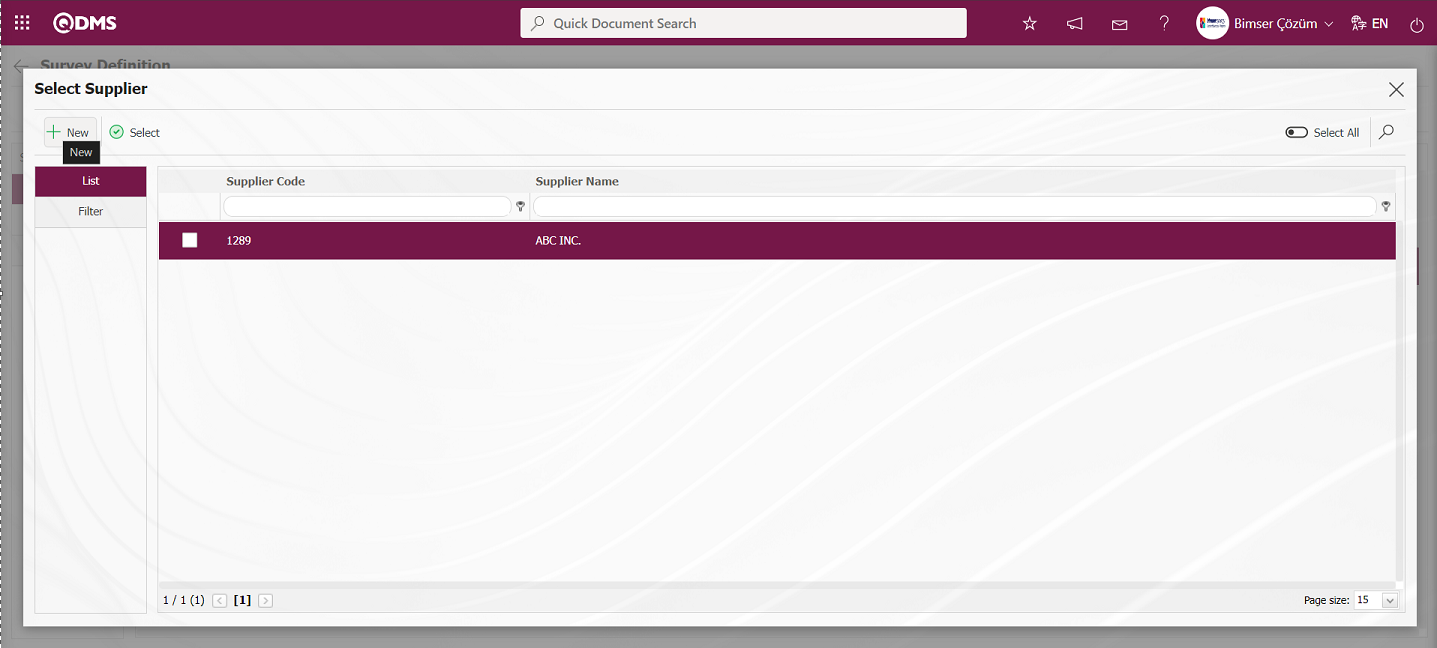
Opened Customer - Supplier Definition - New Record on the Supplier Identification screen, the process of adding to the list is done.
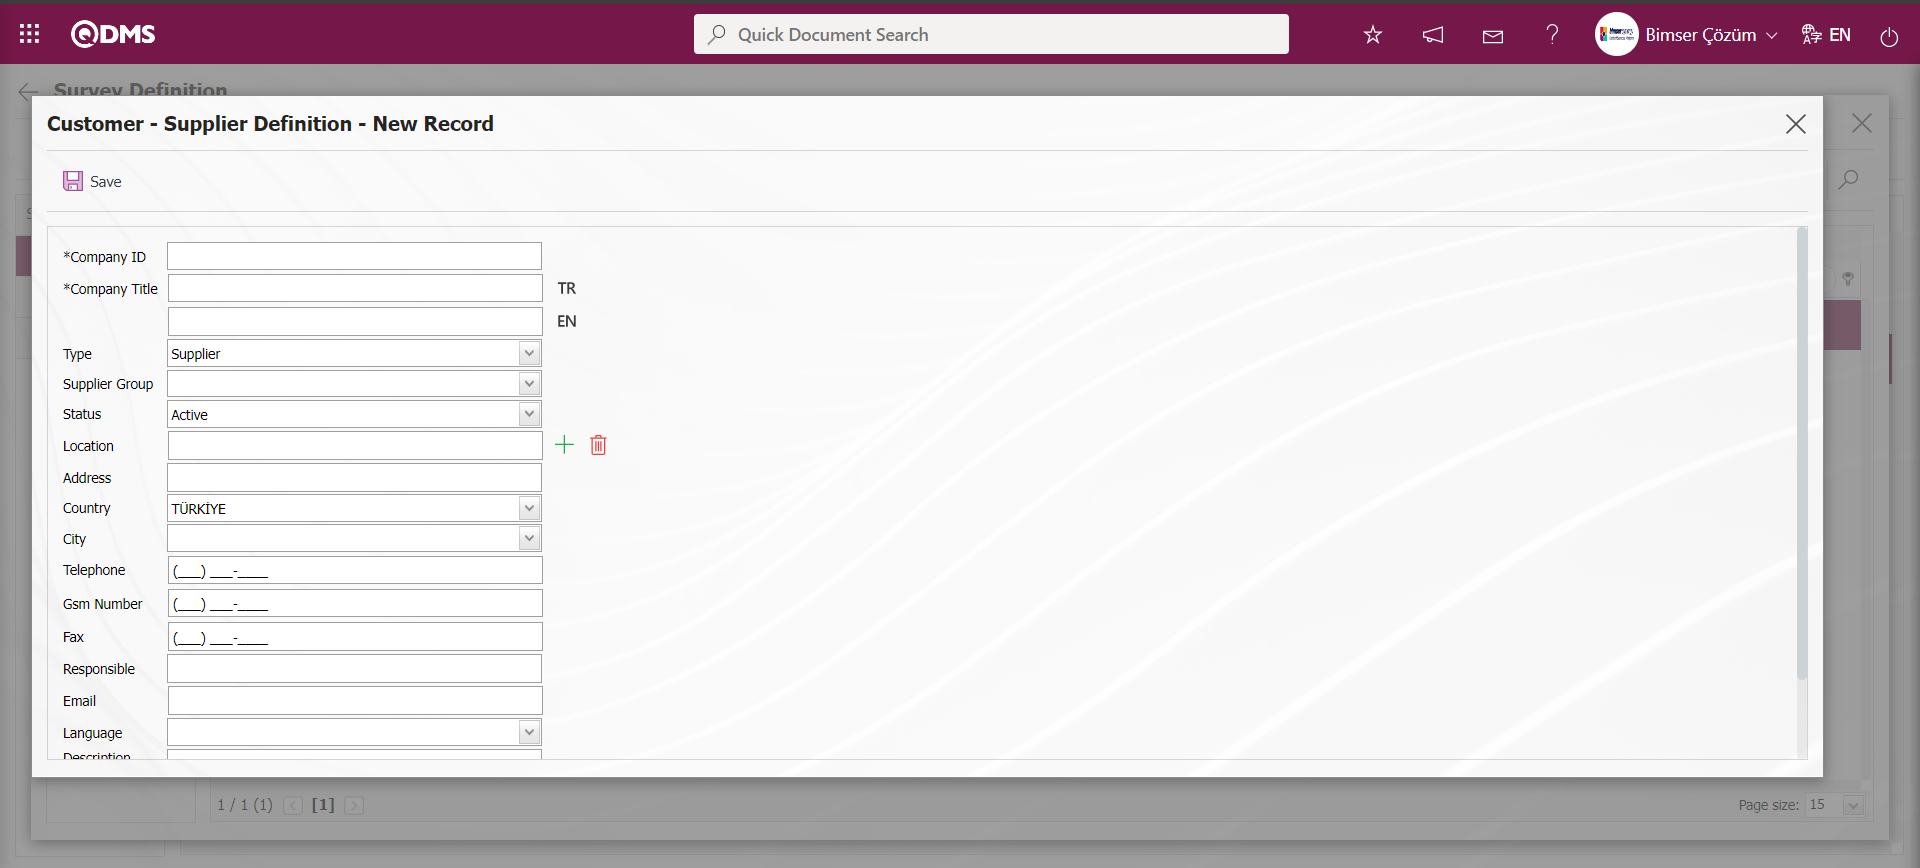
Click the  button on the Survey Definition screen.
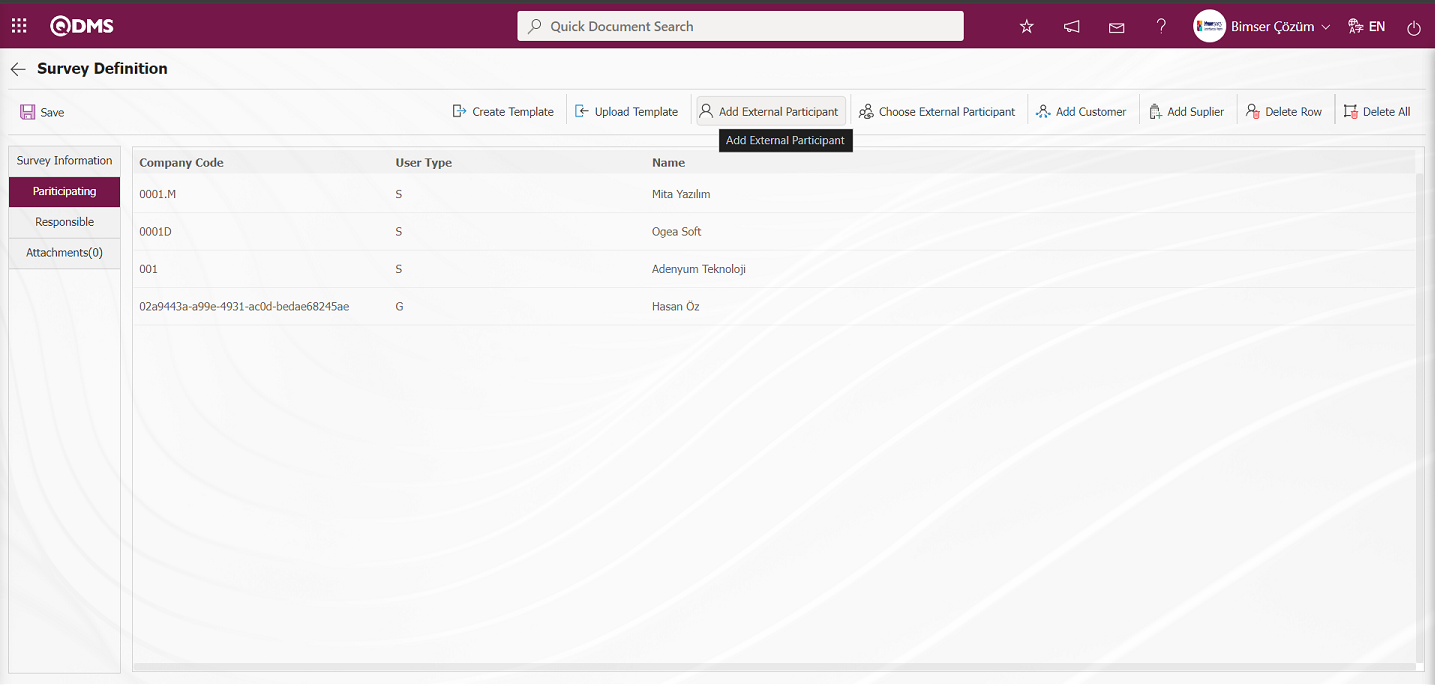
On the Add External Participant screen, the external participant is defined and added to the survey if desired.
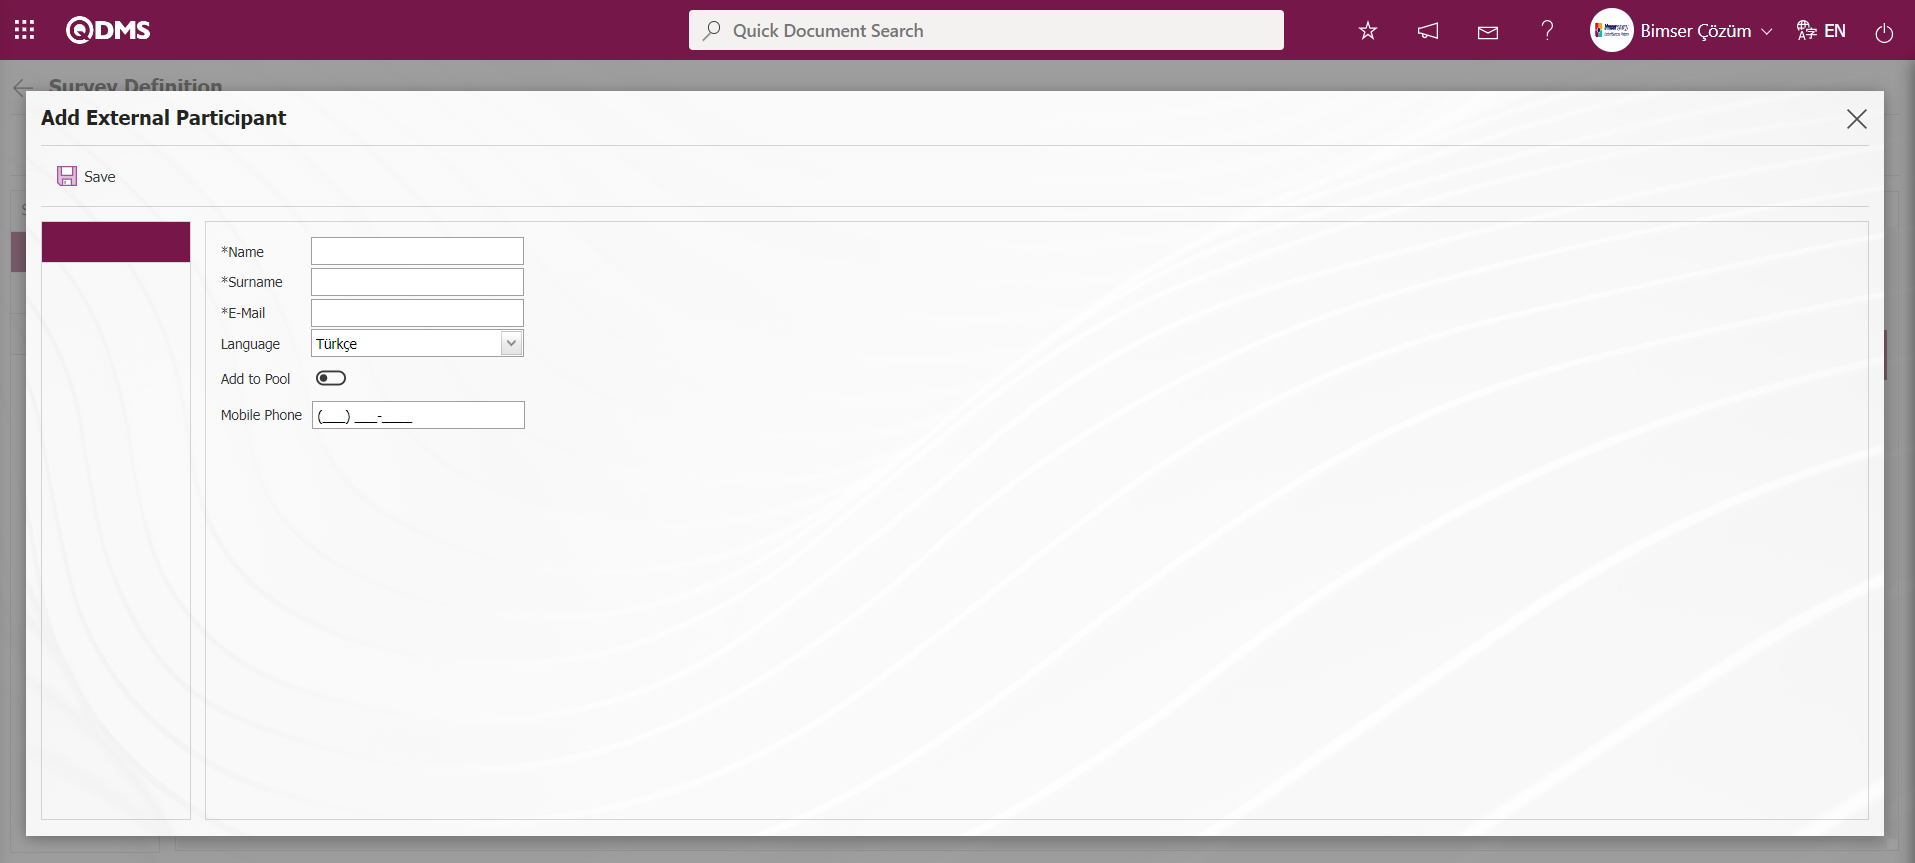
Responsibles tab: The Responsibles tab should be used when it is desired to give the authorizations to view the survey results, make changes on the survey, edit questions to different users other than the survey preparer or the administrator of the survey module. The admin check box should be checked for the user or user group added for the authorization to make changes on the survey and edit questions. The user or user group added for the authorization to view the survey results must be given view authorization.
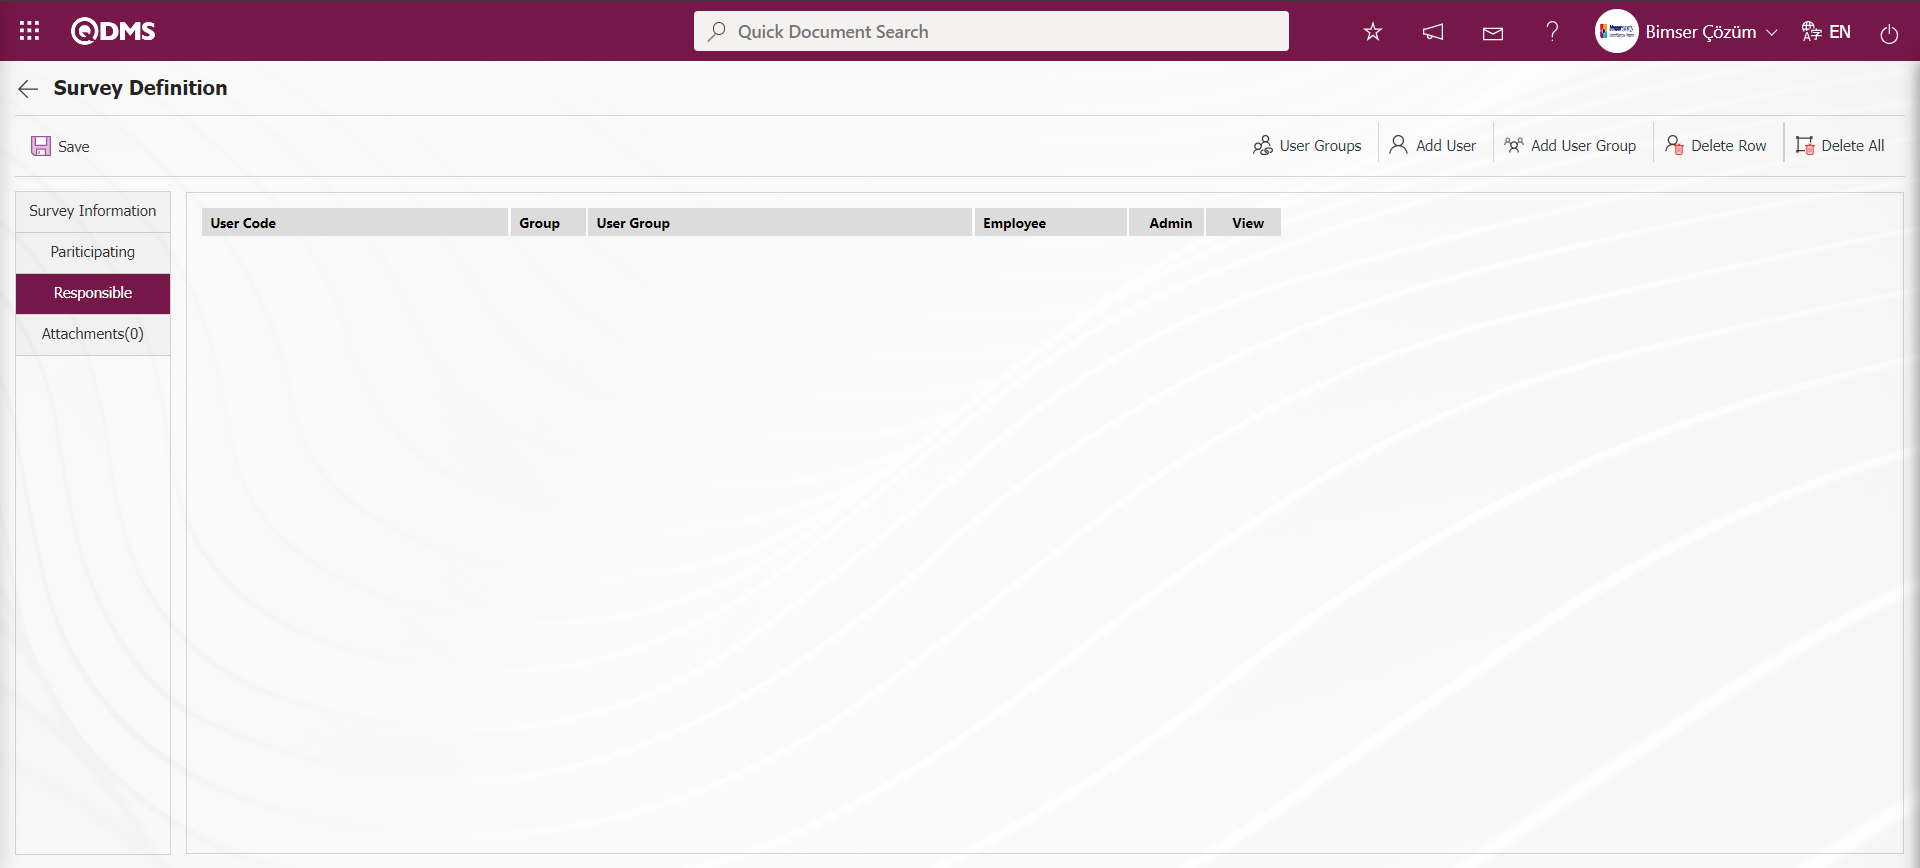
With the help of the buttons on the screen;
 : When a user group is added as responsible, this button is used to view the group members.
 : This button is used to add the responsible as a position.
 : This button is used to add responsible persons as a user group.
 : This button is used to delete the line added as responsible.
 : It is the button where all added responsible persons can be deleted.
Click the  button on the Responsible tab on the Survey Definition screen.

Select the personnel in the list of personnel defined in the system and click the  button.
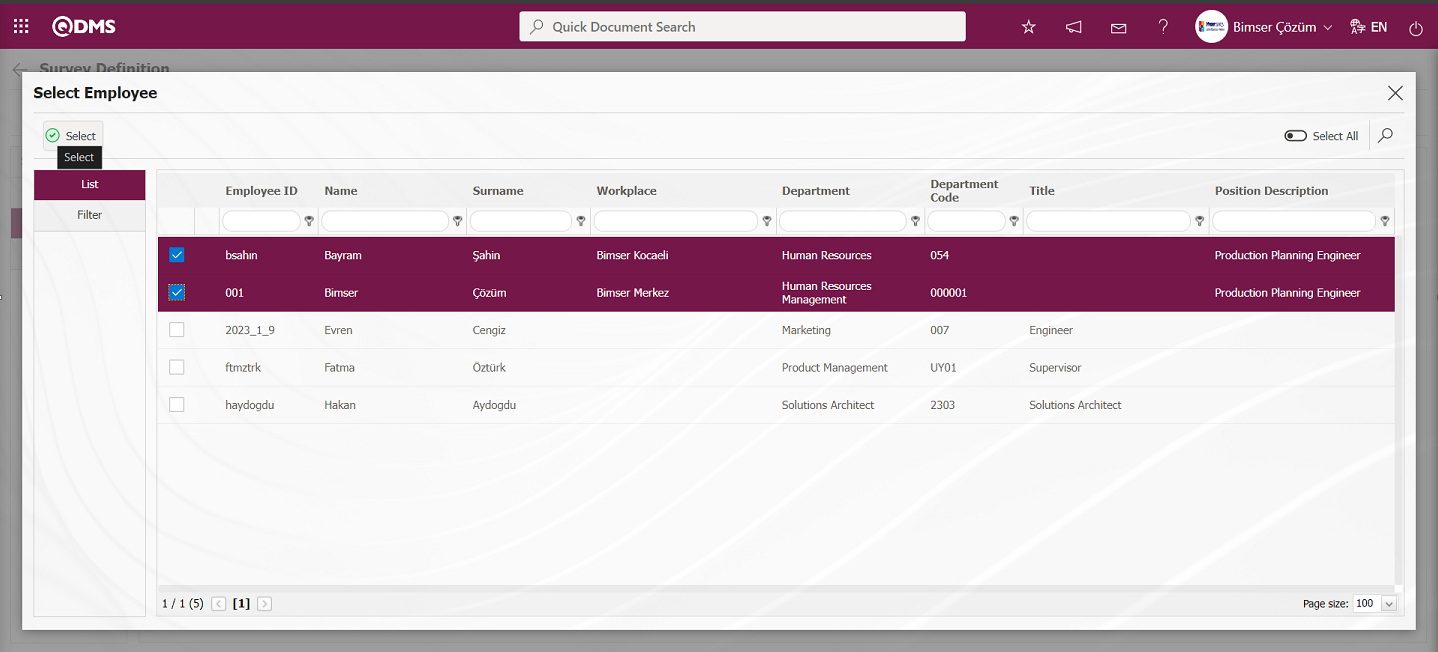
Responsible is added to the survey in the personnel list.

On the Survey Definition screen, click the  button on the responsible tab.
Select user groups from the user group list defined in the system and click the  button.
Adding a responsible person to the survey in the user group list.
On the Survey Definition screen, click the  button while the user group added in the Responsible tab is selected.
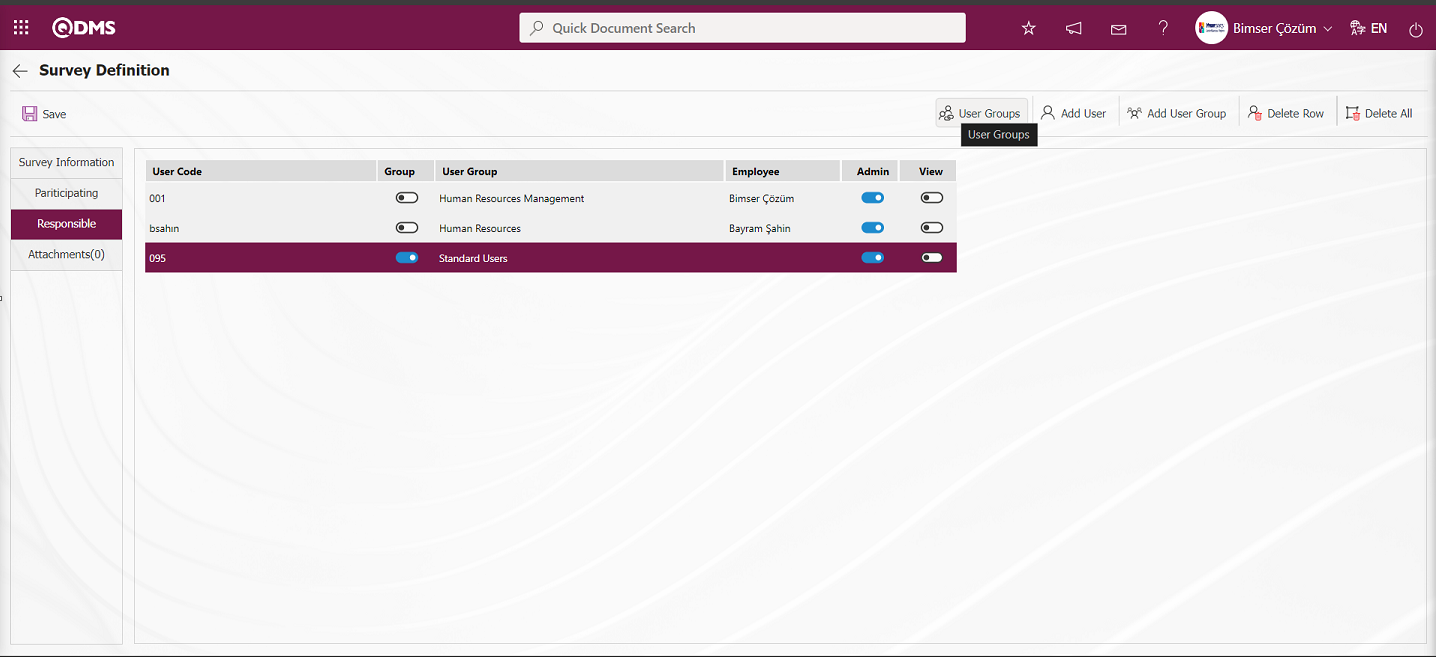
On the screen that opens, the list of personnel in the user group added as responsible is displayed. 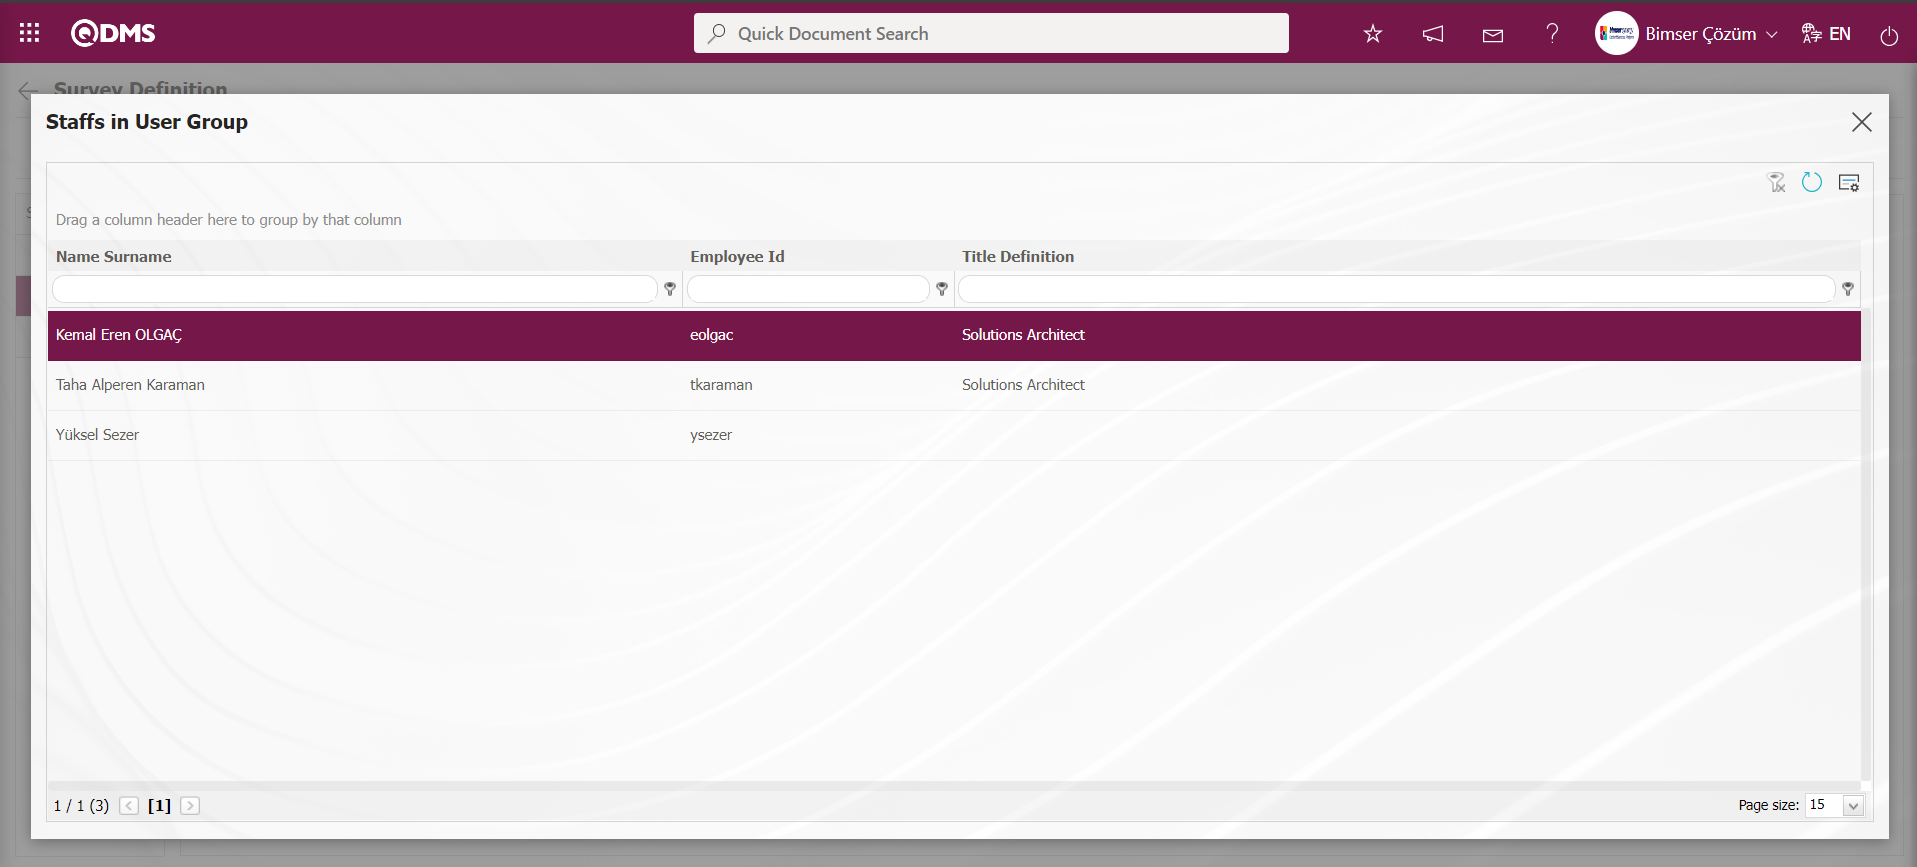
After adding a responsible person in the Responsible tab on the Survey Definition screen, the admin check box is checked for the user or user group added as responsible for the authorization to make changes to the survey and edit the questions.
Attachments Tab: This is the tab where additional files are added to the defined survey.
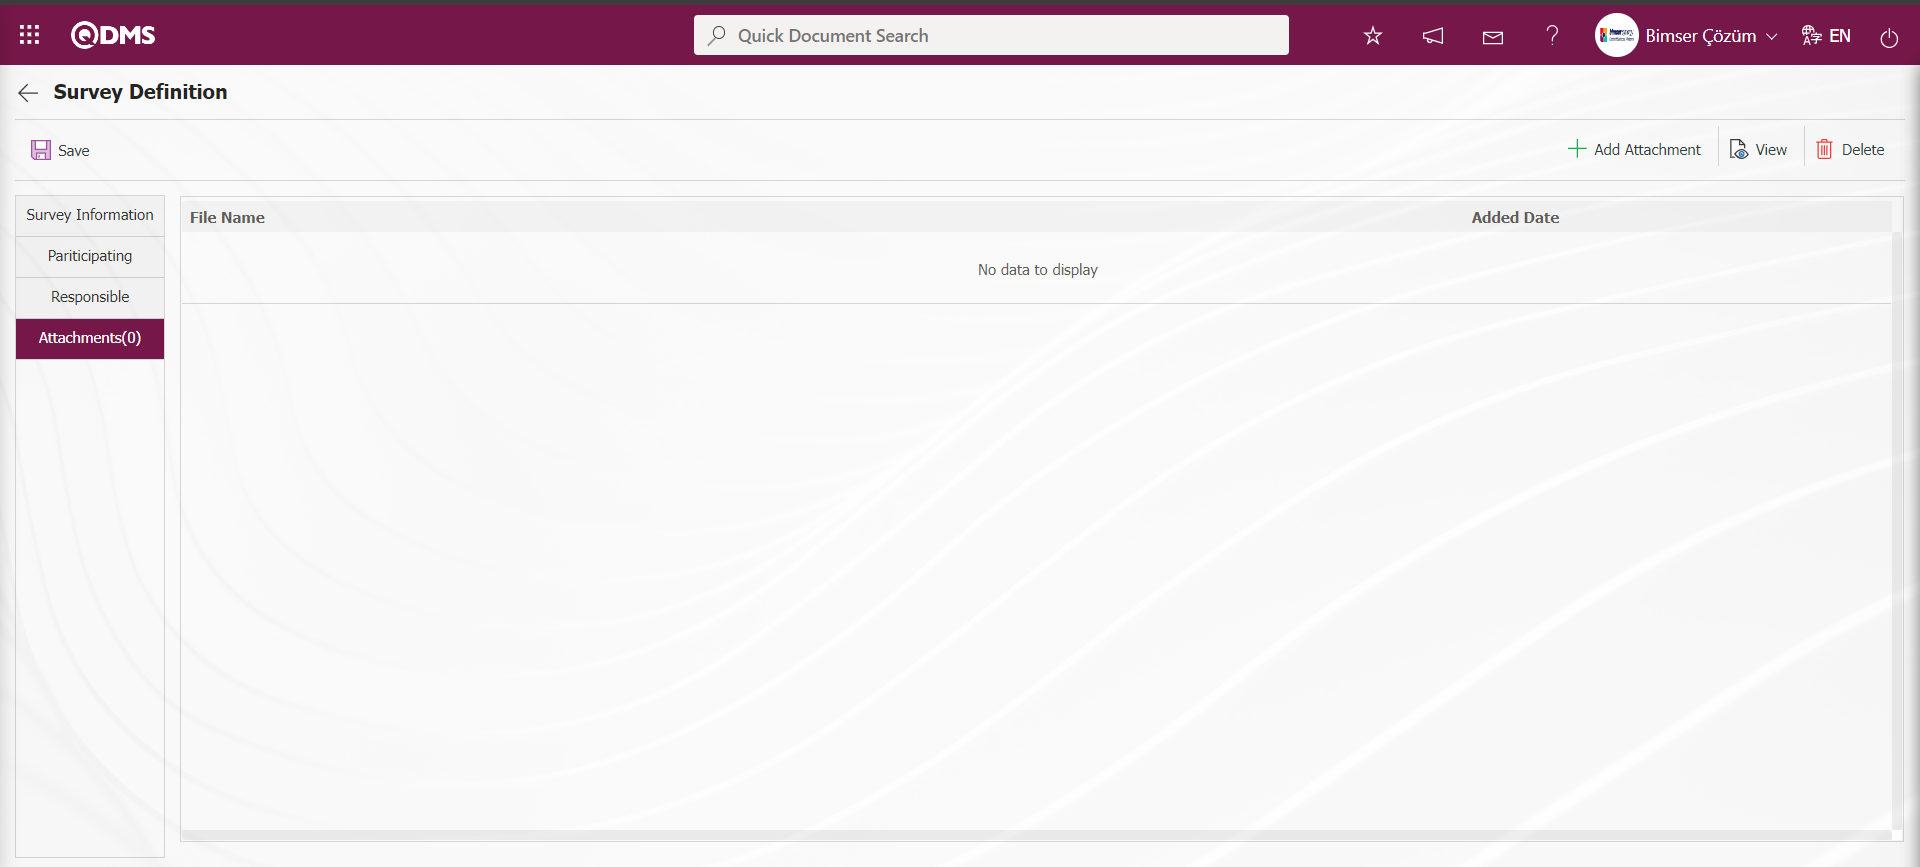
With the help of the buttons on the screen;
 : The files to be added related to the survey can be added with this button.
 : This button is used to display the added file.
 : This button is used to delete the added file.
In the Attachments tab on the Survey Definition screen, the button is clicked to add an additional file to the defined survey.
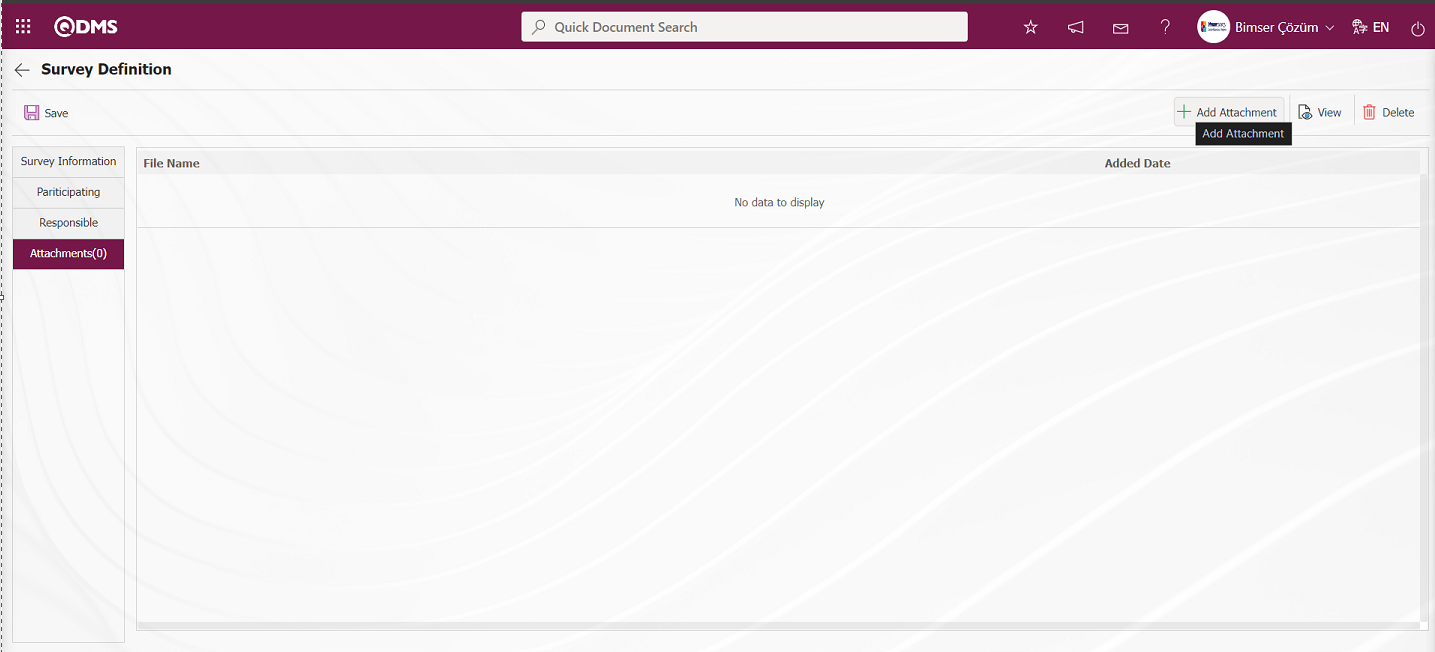
Click the  button on the File Upload screen.

Select the file on the screen that opens.

After the selection of the attachment file in the Attachments tab on the Survey Definition screen, the Attachment File is added.
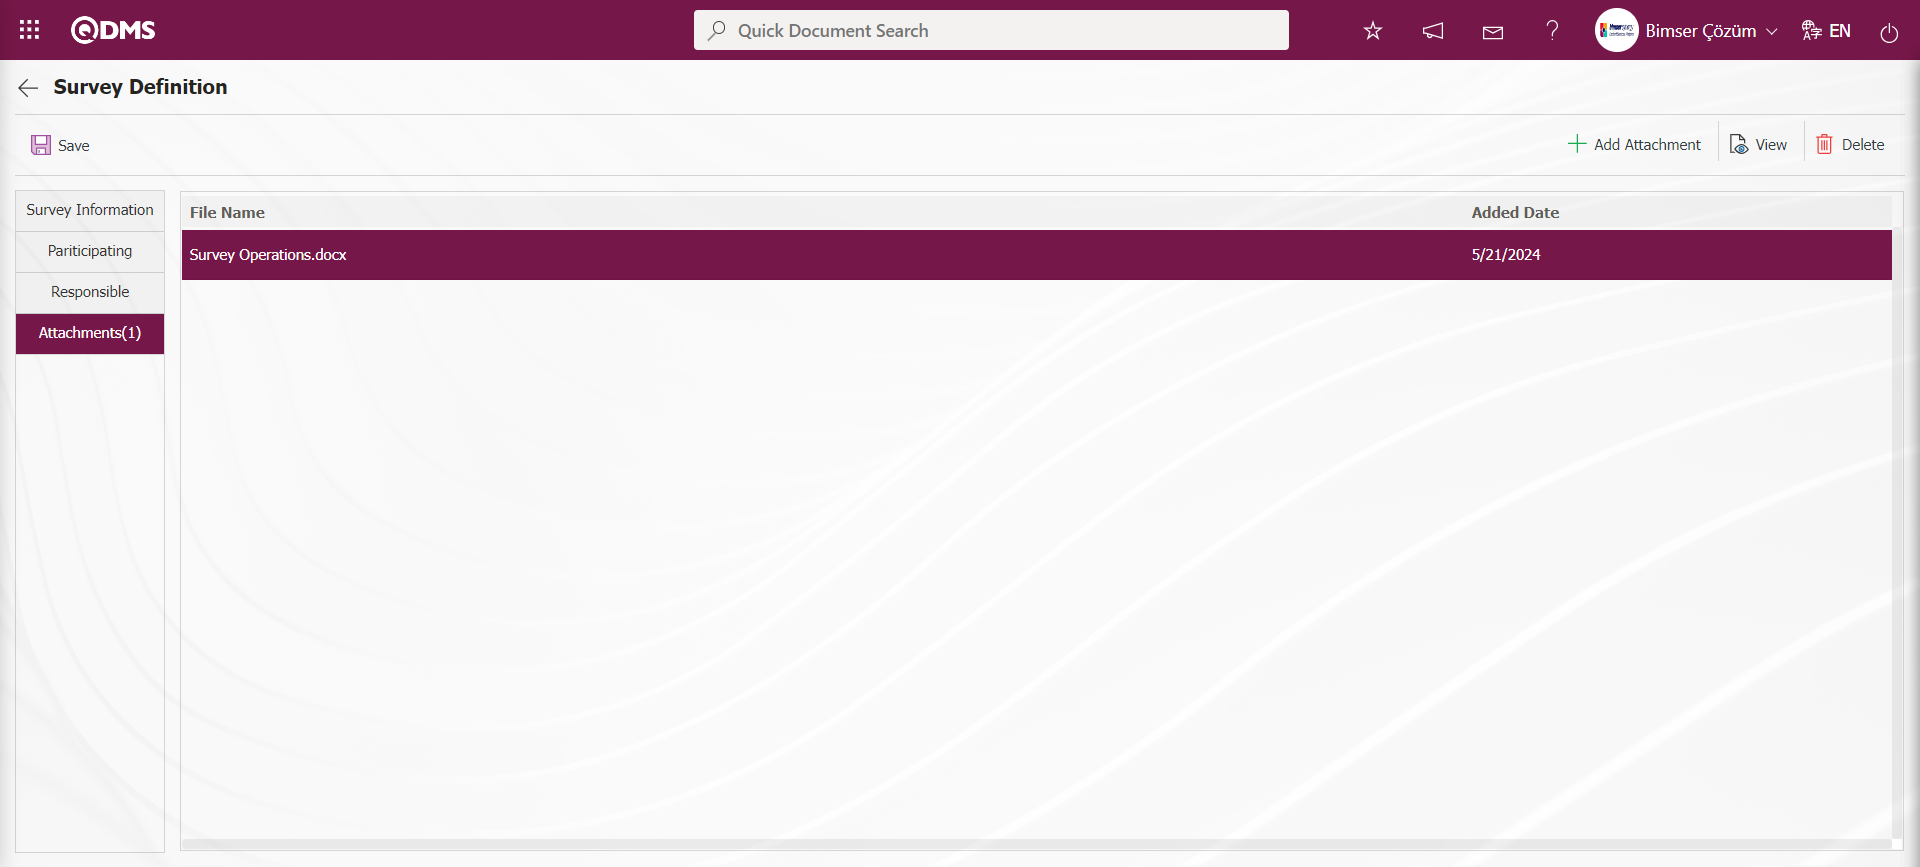
After filling in the information in all tabs, click on the Survey Information tab. After the necessary fields on the Survey Definition screen are completed, the survey is created by clicking the  button in the upper left corner of the screen on the Survey Information tab.
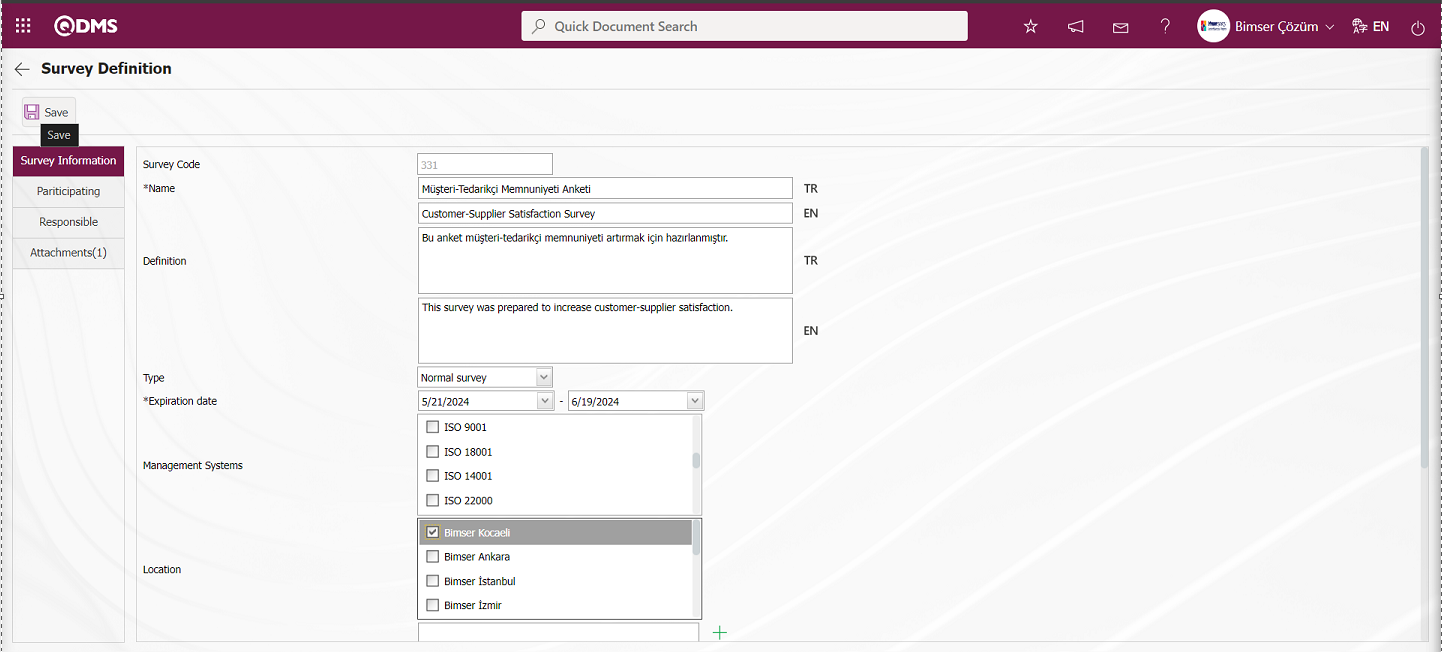
Since the created survey is not available for use, its status is “Close”.

In the Prepare External Survey Form Definition process, the process of adding questions to the survey, opening, closing and publishing the survey is done in the same way as the steps for the internal survey form definition process.
6.2.6. Prepare Standard Survay Form
Menu Name: Integrated Management System/Survey/ Prepare Standard Survay Form
A standard questionnaire form is prepared with the help of this menu to record the questionnaires to be filled in by users who cannot access QDMS. Standard Questionnaires are the type of questionnaires used to fill in the records electronically by the people assigned on behalf of the users who we think we cannot reach electronically. For example; filling out the questionnaires distributed on the street. These people who fill out the questionnaire cannot access QDMS. Internal survey form preparation, external survey form preparation and standard survey form preparation phases are functionally the same screens. The difference from the Internal Survey Form Preparation menu is that no participants are added and the number of survey entries will be specified by writing the maximum number of fillings. There are two tabs on the Prepare Standard Survay Form screen: List and Filter tabs.
List tab: The process steps are performed using the buttons displayed on the Questionnaire Identification screen. Process steps such as defining a questionnaire, editing, deleting, copying the selected questionnaire information in the list and adding participants in the defined questionnaire are done with the help of the buttons displayed.
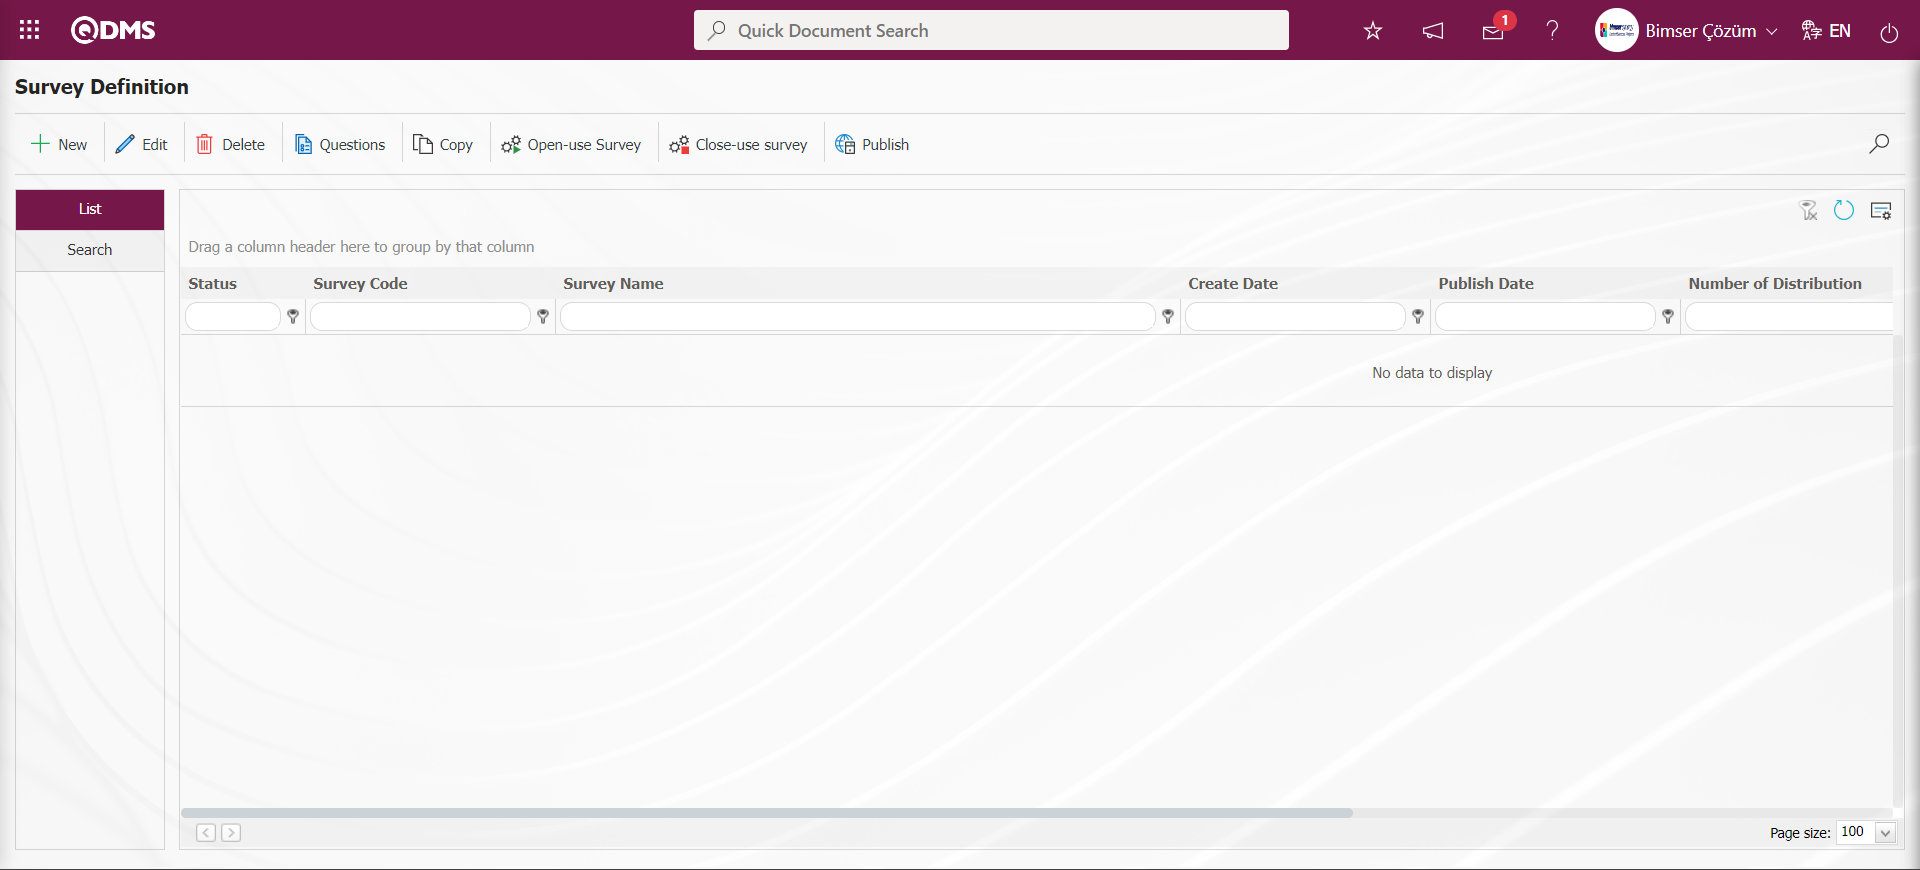
With the help of the buttons on the screen;
: This button is used to create a new survey. The screen where the information of the survey is entered, who will participate in the survey, the responsible persons of the relevant survey and the additional files related to the survey, if any, will appear. Only the standard survey does not have a participant tab.
: The edit button can be used if the admin check box is checked in the survey creator, the survey module manager and the responsibles we select during survey creation. Apart from this, editing cannot be done in other cases that are not authorized. It is used to make corrections, additions and deletions in the existing survey.
: It is used to delete erroneous surveys from the system. Deleted questionnaires are not stored, they are completely deleted with the information in them. Surveys in open status cannot be deleted. The authorization to delete the survey is available to the survey creator, the survey module manager and the responsible persons we select during survey creation if the admin check box is checked.
: For surveys whose status is closed, the users who prepared the survey, the survey module manager and the users whose admin check box is checked in the responsibilities we selected during survey creation add questions to the survey with this button.
: It is used to copy a new survey from the selected Survey in the list.
On the Survey Definition screen, click the button while the survey is selected in the list in the list tab.
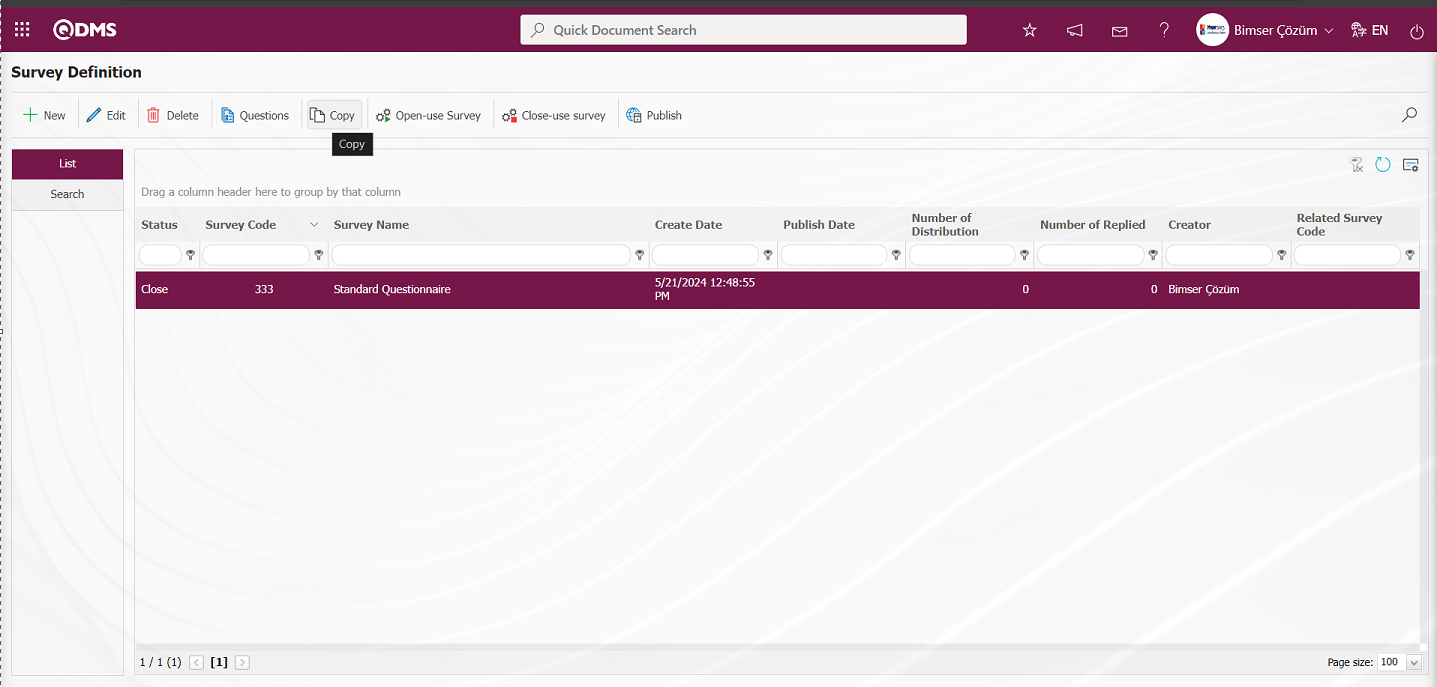
The Survey Definition screen opens.

On the Survey Identification screen, in the Survey Type field, copying is done by selecting a survey type other than the standard survey, if desired. By selecting the Survey Type as Standard, the survey is copied by clicking the  button in the upper left corner of the screen.
The survey copied in the Survey Definition process is displayed.
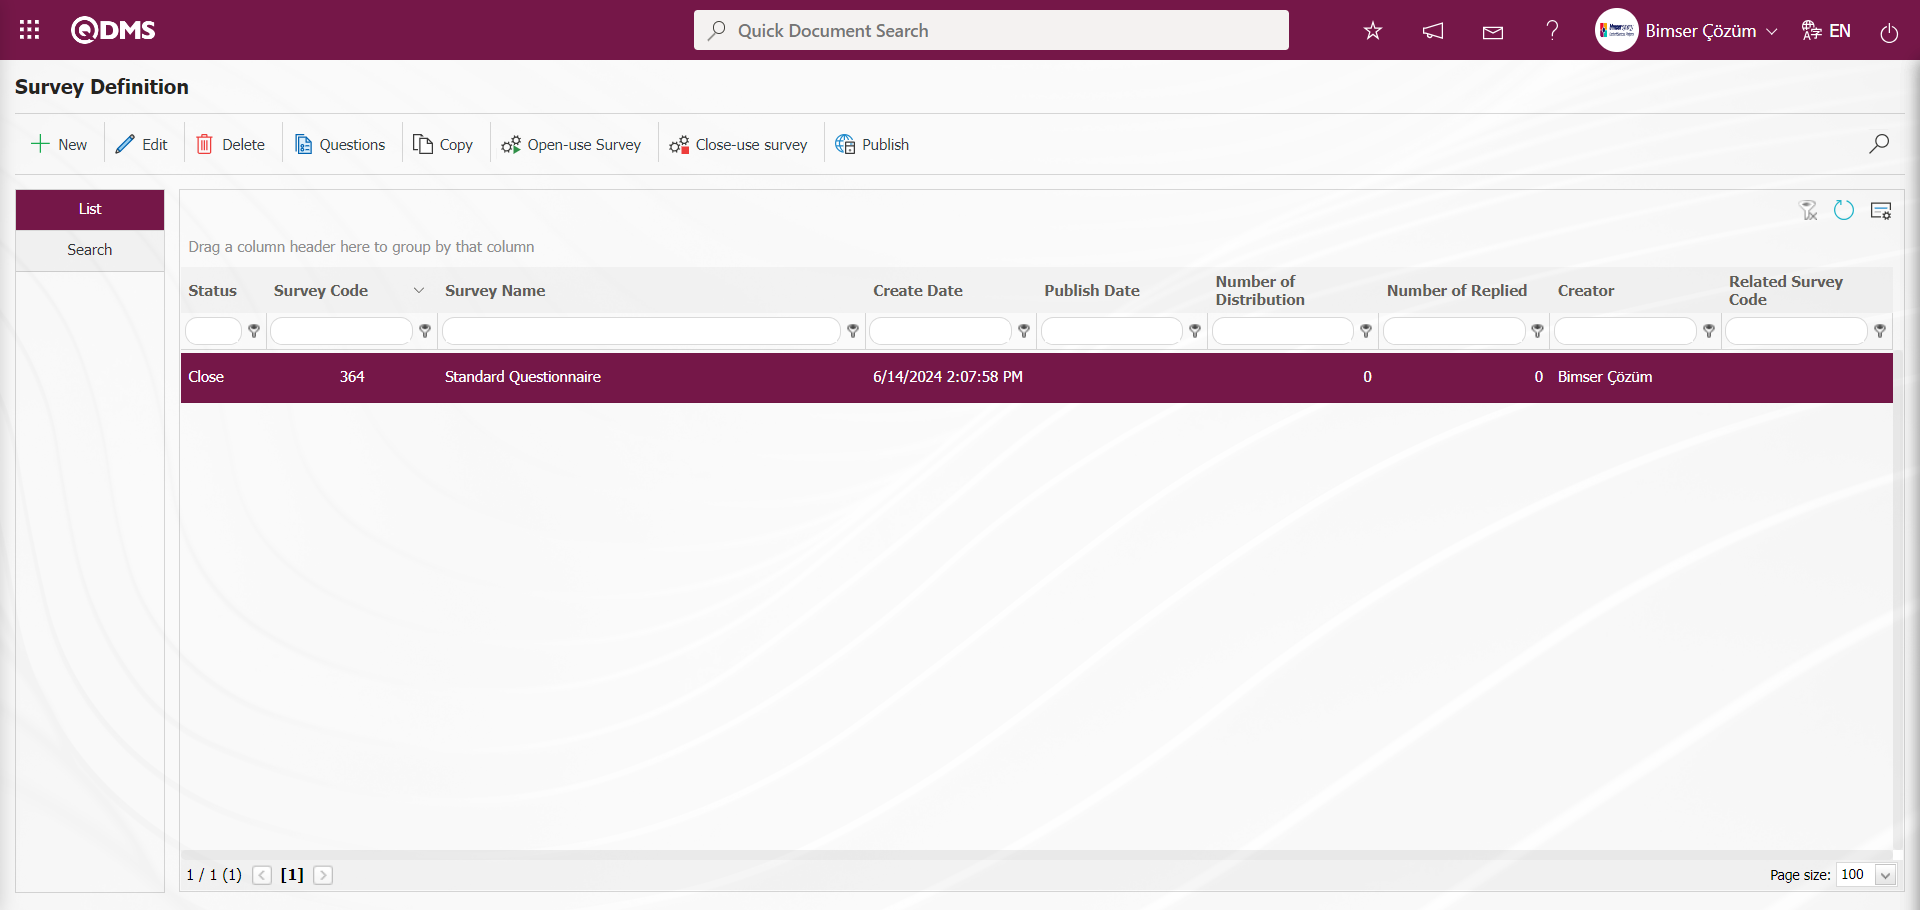
: It is used to make the survey available in the system. The users we add as participants will be sent a survey on QDMS to fill out the survey and the users will be assigned to their pending tasks. After the survey record is created and questions are added, this button must be clicked for users to view and fill out the survey.
: The survey should be closed manually by clicking this button. The parameter value of the parameter number 7 “Validity date are completed surveys automatically closed?” in the survey module parameters is activated by selecting “Yes”.
When the parameter is activated, the survey with expired validity date is closed without using this button.
: If you want the survey to be published by e-mail, click on the button.
: In case of a large number of surveys, filtering is done with the search button by typing the data in the available fields in the search tab..
: The search criteria on the menu screens are used to clear the data remaining in the filter fields in the grid where the search operation is performed.
: The menu screen is restored to its default settings.
: User-based designing of the menu screen is done with the show-hide feature, that is, the hiding feature of the fields corresponding to the columns on the menu screens.
Search tab: In the Search tab, data is entered in the fields with search criteria and filtered according to the search criteria.
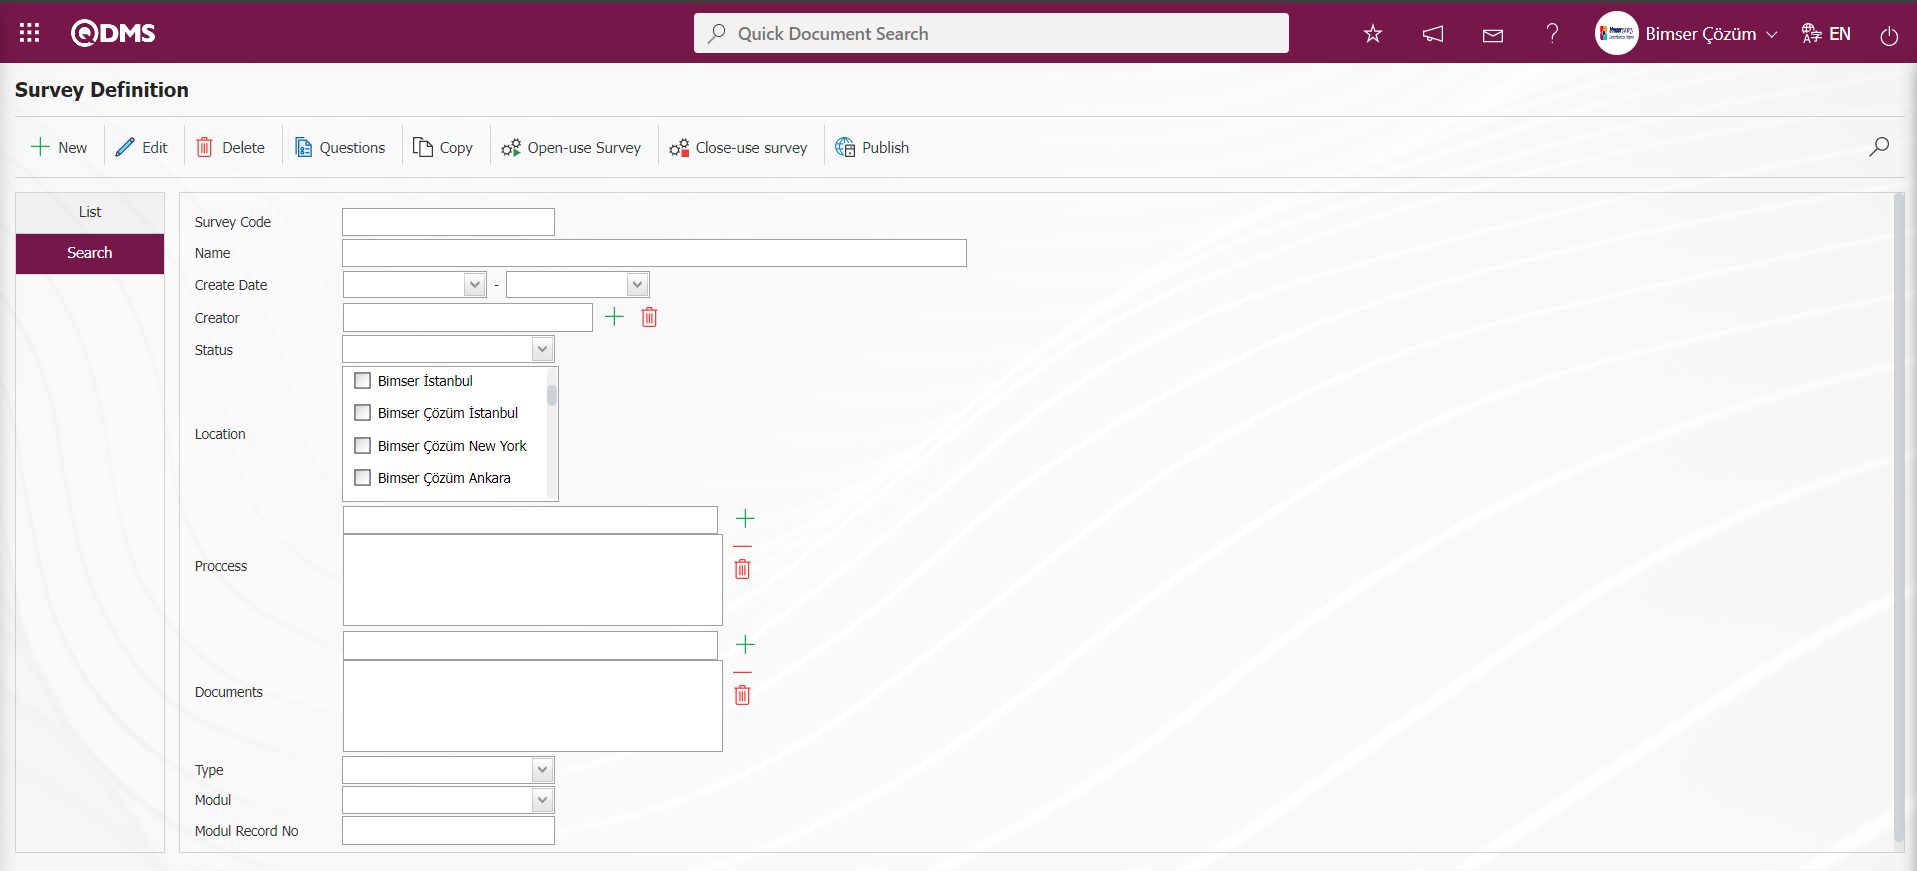
6.2.6.1. Preparing a New Survey
Click on the Integrated Management System/Survey/Prepare Standard Survay Form menu to open the survey definition screen.
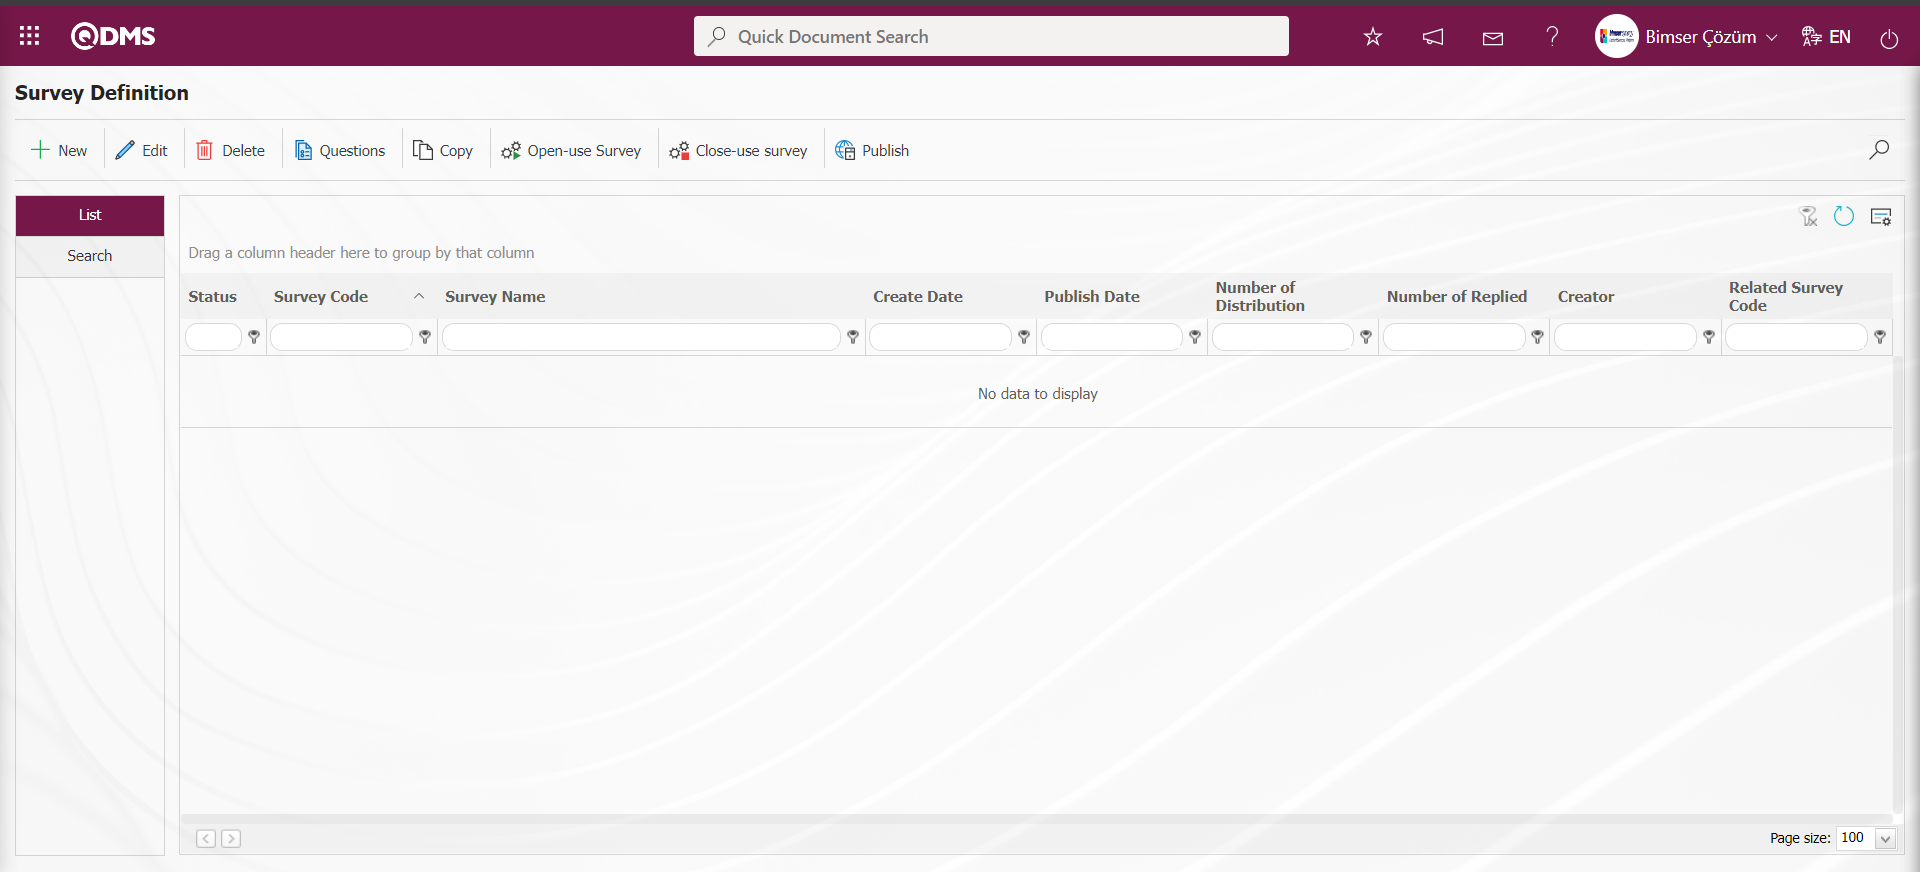
Click on the  button at the top left corner of the screen to define a new survey.

The Survey Definition screen opens.
Survey Information Tab: General information about the survey is filled in. For example: Survey code, Survey name, Description and Survey type.
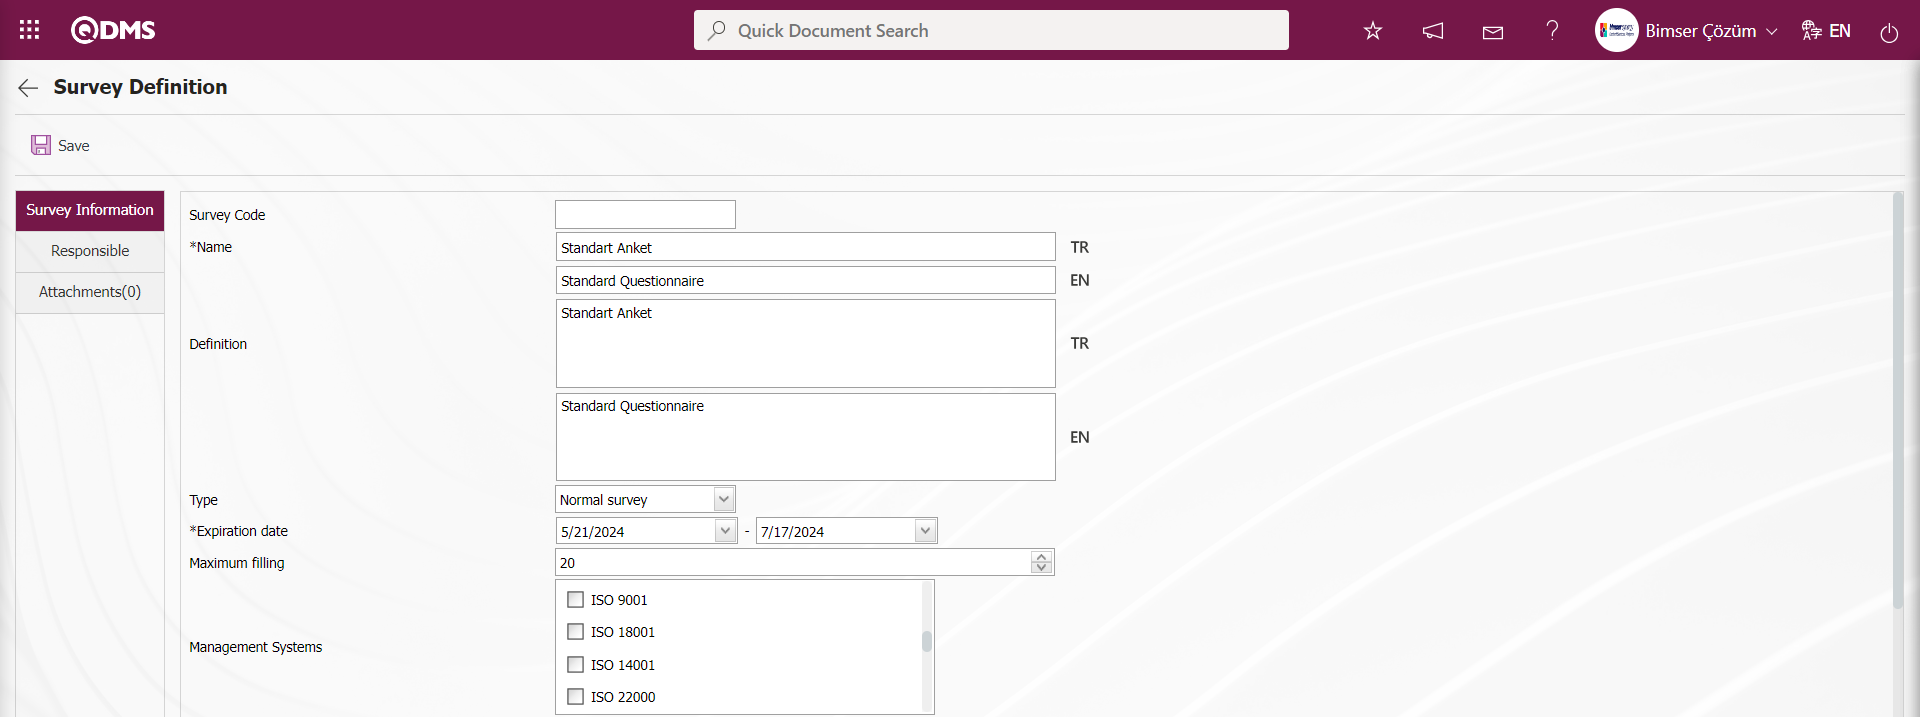
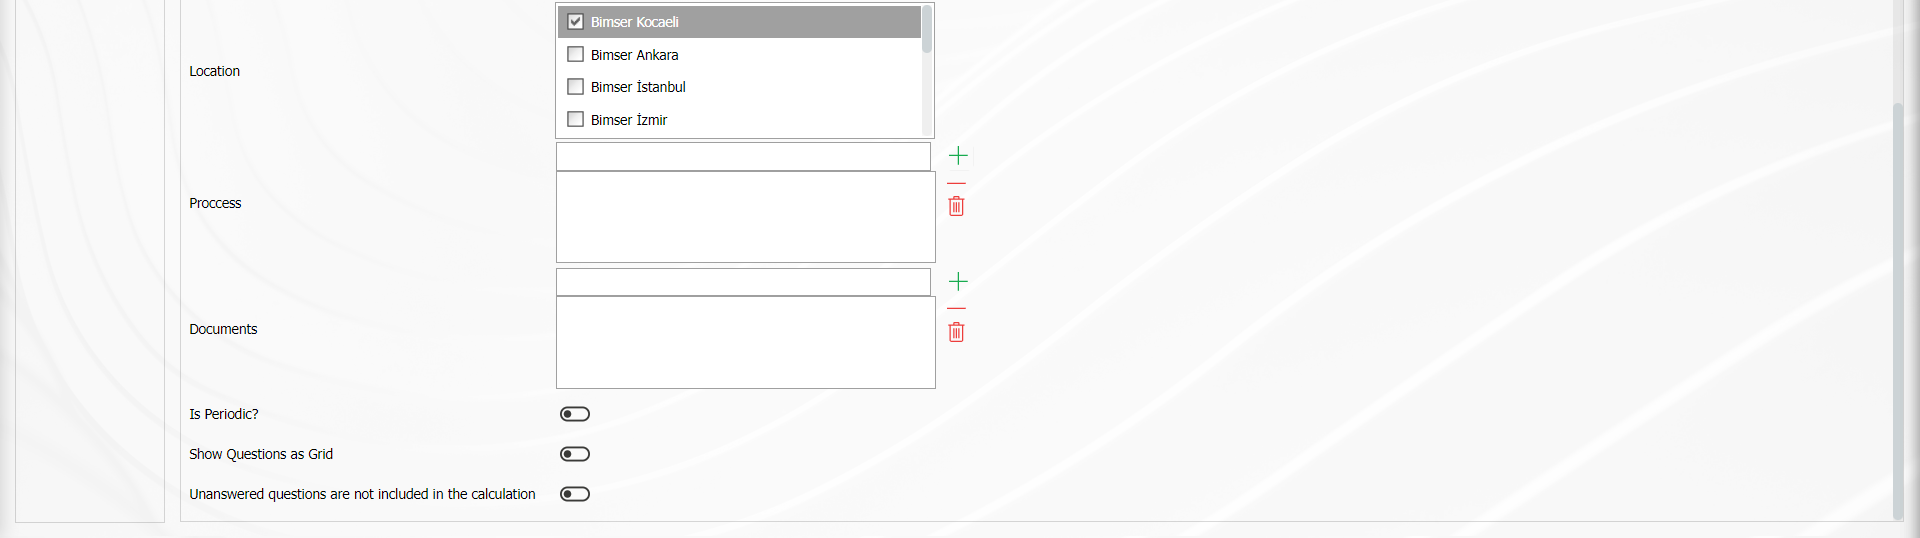
Define the relevant fields on the screen that opens:
Survey Code: It comes automatically by the system.
Name: This is the field where the name of the survey is entered. For example: Staff satisfaction survey, service services survey. In case of use in other languages, the survey names should be written in the field for other languages.
Definition: The descriptions to be entered about the created survey should be written in this field.
Type: There are 2 different survey types. These are normal survey and template survey. The normal survey type is selected for surveys that we prepare without establishing a relationship with the modules. For use in other modules (for example: CAPA activity evaluation survey), the template survey type is selected.
Expiration Date: Determines the dates between which the survey will be in effect. The survey is opened and closed manually for users. However, if the parameter value of the survey parameter number 7 “Validity date are completed surveys automatically closed?” is “Yes”, the survey closes the survey automatically on the specified deadline based on the effective date.
Maximum filling: This is the field where the maximum filling number is written and how many surveys will be entered.
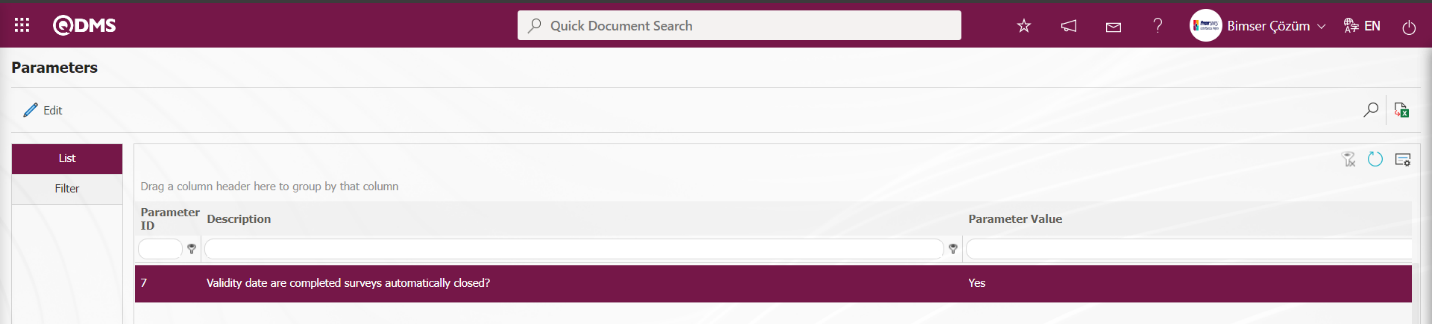
Management System: Select which management system is in the scope of the survey. Multiple selection is possible.
Location: Enter the location where the survey will be used. Multiple selection can be made.
Process: The survey created with this button can be associated with processes.
Secret: There is a “ Secret” check box at the bottom of the survey information page. When this check box is checked, the registration numbers of the people who fill out the relevant survey are hidden by the system.
Periodic Survey: When the parameter number 11 “Use periodic survey?” from the Survey module parameters is activated by selecting the parameter value “Yes”, it allows the created survey to be opened periodically depending on a certain repetition interval.
The parameter value of parameter 12 “Will periodic surveys be posted automatically to participants?” from the survey module parameters is activated by selecting “Yes”.
After the parameter is activated, periodic surveys are automatically published to the survey participants.
Show Questions as Grid: In the defined survey, the relevant check box for “Show Questions as Grid” is checked. After the “Show Questions as Grid” option is selected, only option and multiple choice type questions are defined on the Survey Questions screen. If the question type defined first on the Survey Questions screen, for example, an optional question is defined, the process of continuing to define questions in the optional question type is performed. However, the button to define questions in multiple choice type is removed and no question definition process is performed in this type. According to the question type defined first on the Survey Questions screen, the button to define the question type of that type remains on the screen and the process of defining questions in that question type continues.
Unanswered questions are not included in the calculation: If you do not want the questions not answered in the defined questionnaire to be included in the calculation, check the relevant check box.
Responsible tab: Responsible tab should be used when it is desired to give the authorizations to view survey results, make changes on the survey, edit questions to different users other than the survey creator or module manager.
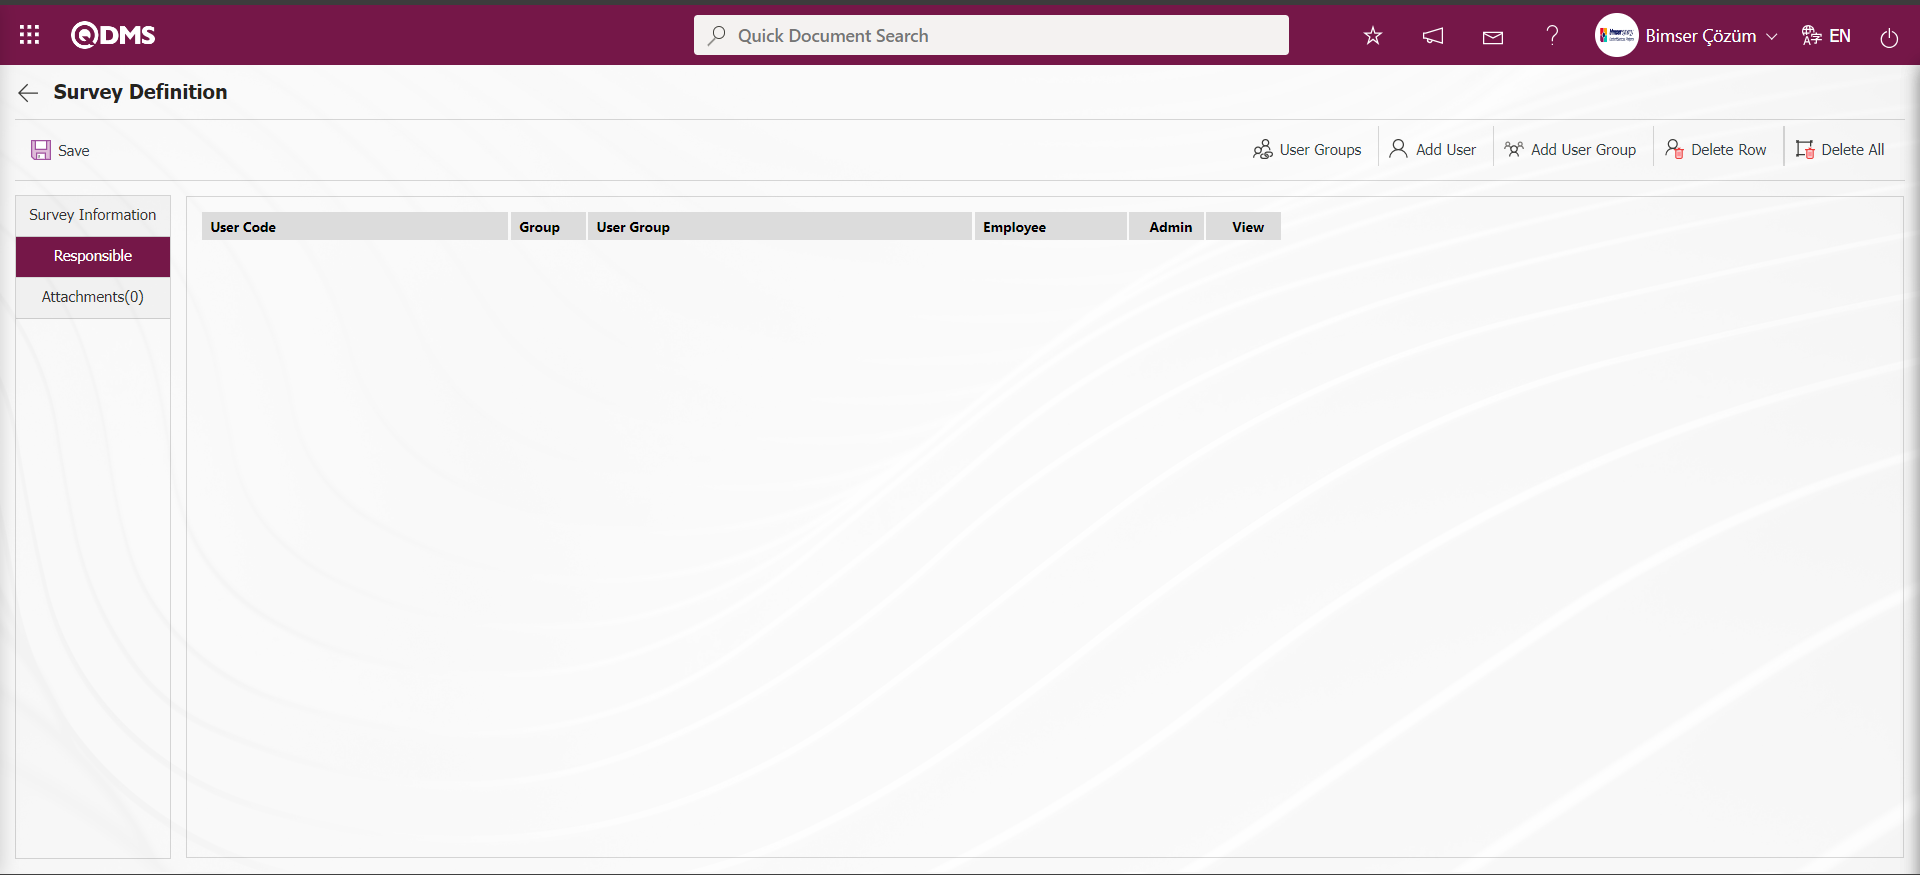
With the help of the buttons on the screen;
 : When a user group is added as responsible, this button is used to view the group members
 : This button is used to add the responsible as a position.
 : This button is used to add responsible persons as a user group.
 : This button is used to delete the line added as responsible.
 : It is the button where all added responsible persons can be deleted.
Click on the  button in the Responsible tab on the Survey Definition screen.

Select the personnel in the list of personnel defined in the system and click the  button.
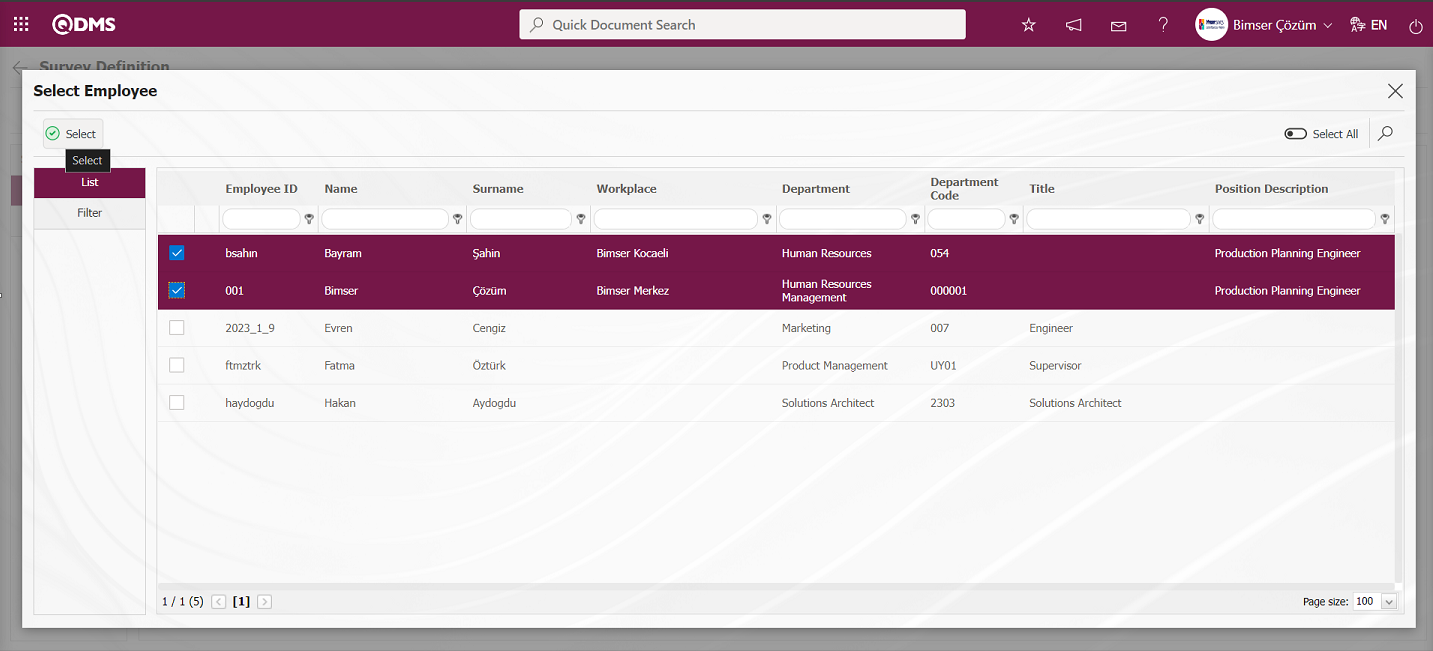
Adding a responsible person to the survey in the personnel list.
Click the  button in the responsible tab on the Survey Definition screen.
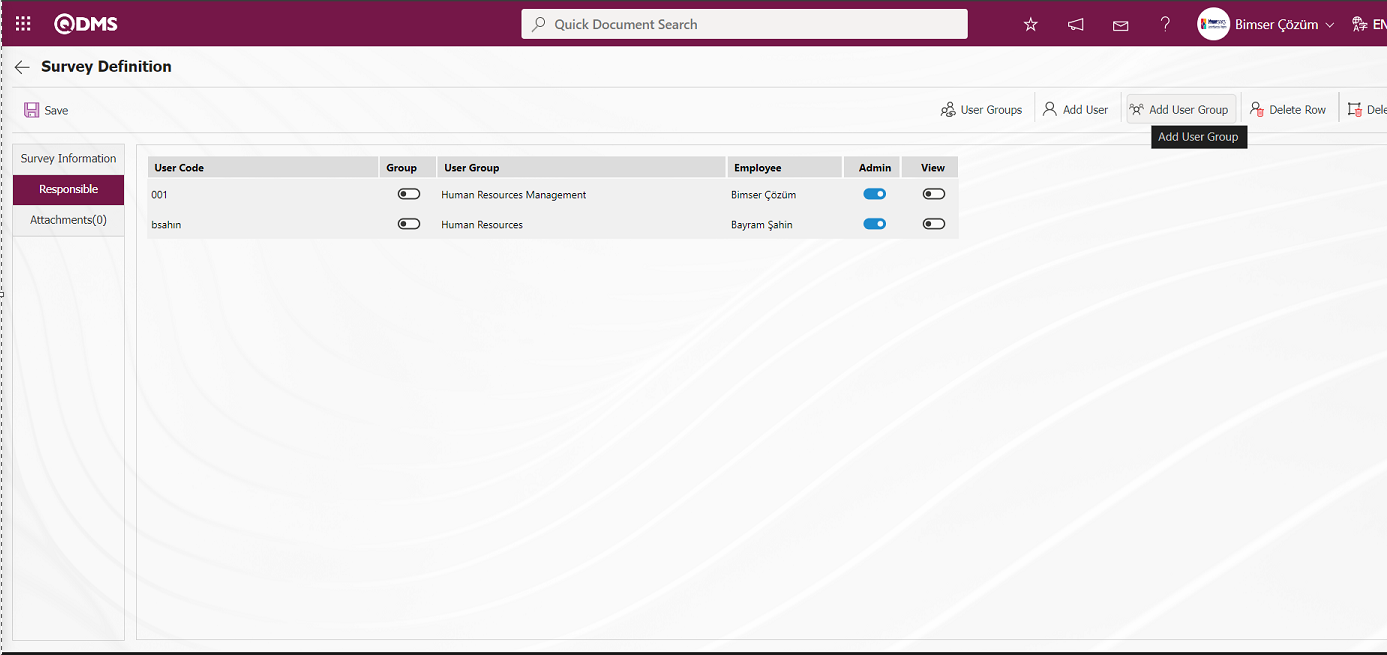
User groups are selected from the user group list defined in the system and the  button is clicked.
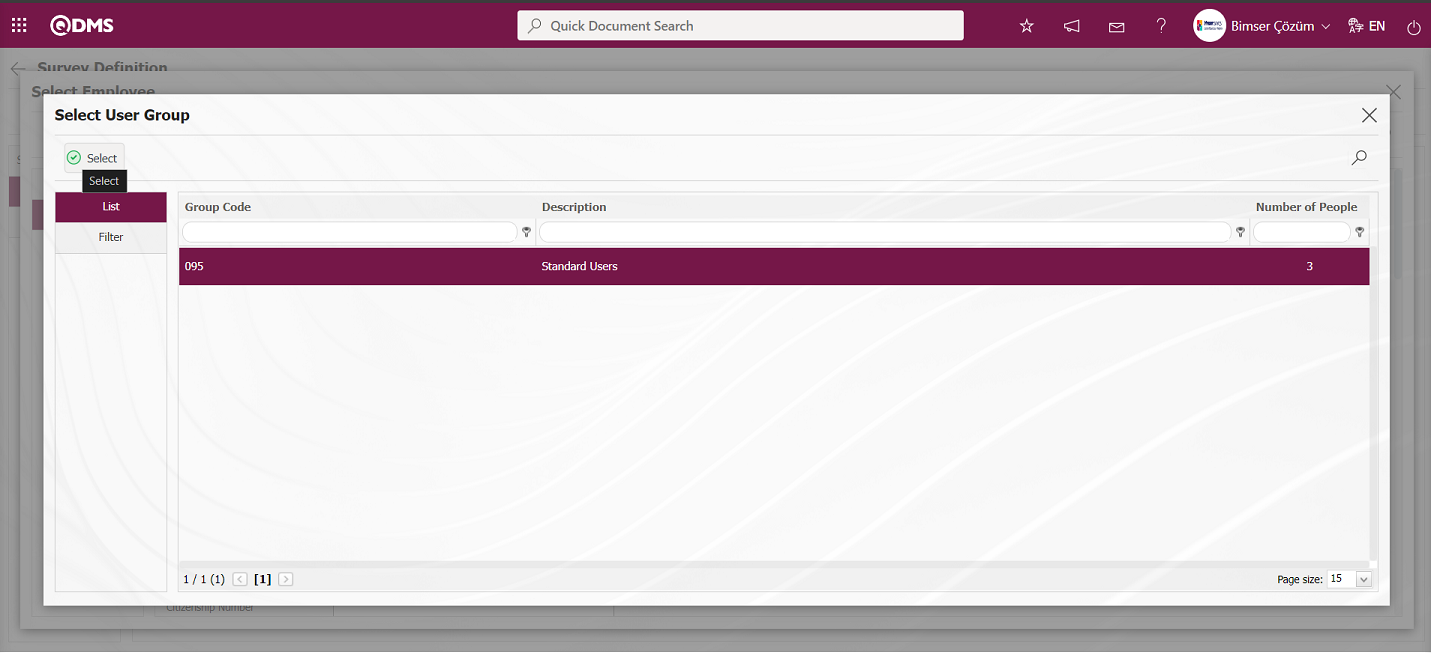
Adding a responsible person to the survey in the user group list.
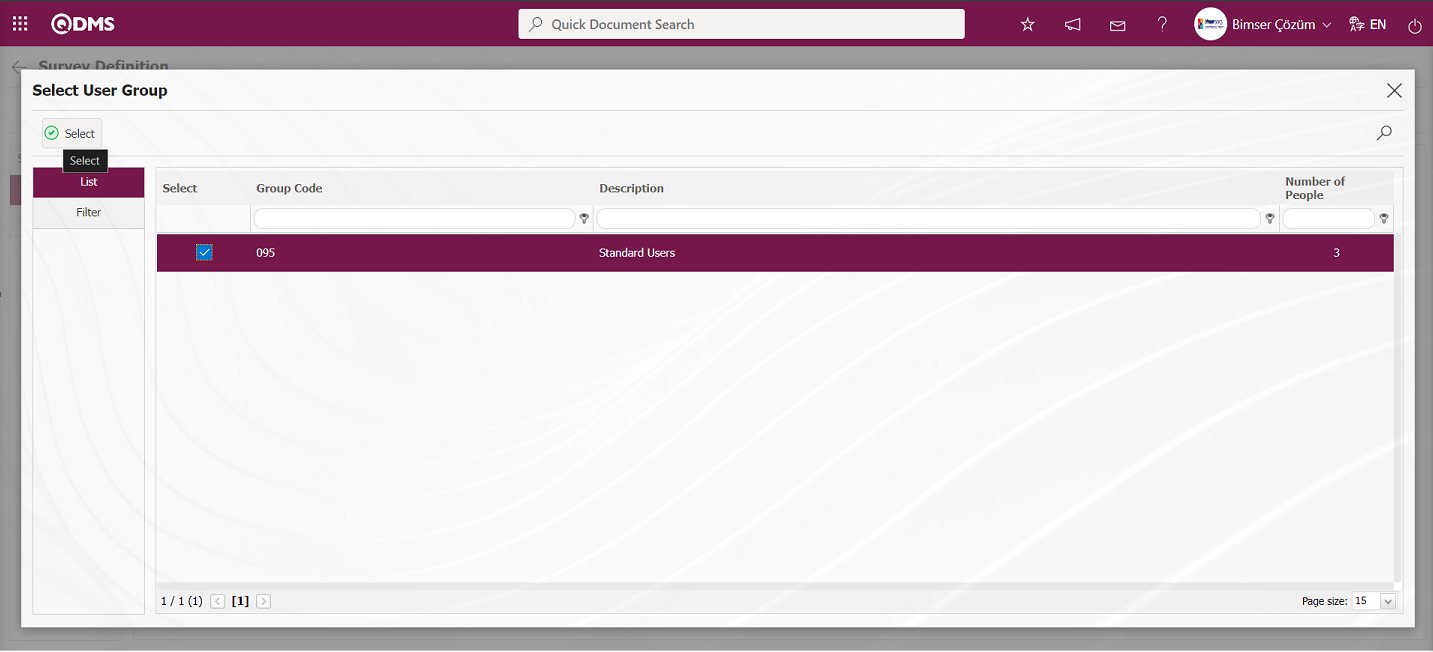
On the Survey Definition screen, click the  button while the user group added in the Responsible tab is selected.
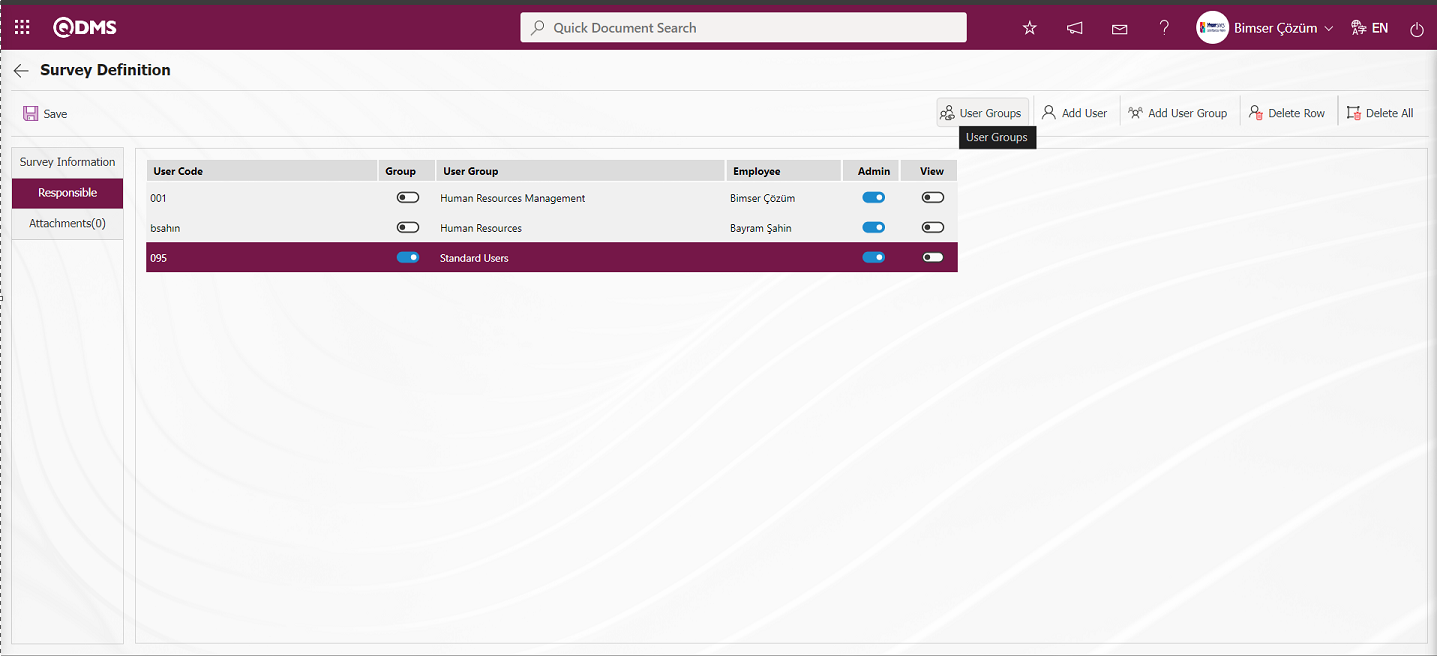
On the screen that opens, the list of personnel in the user group added as responsible is displayed.

After adding a responsible person in the Responsible tab on the Survey Definition screen, the admin check box is checked for the user or user group added as responsible for the authorization to make changes to the survey and edit the questions.
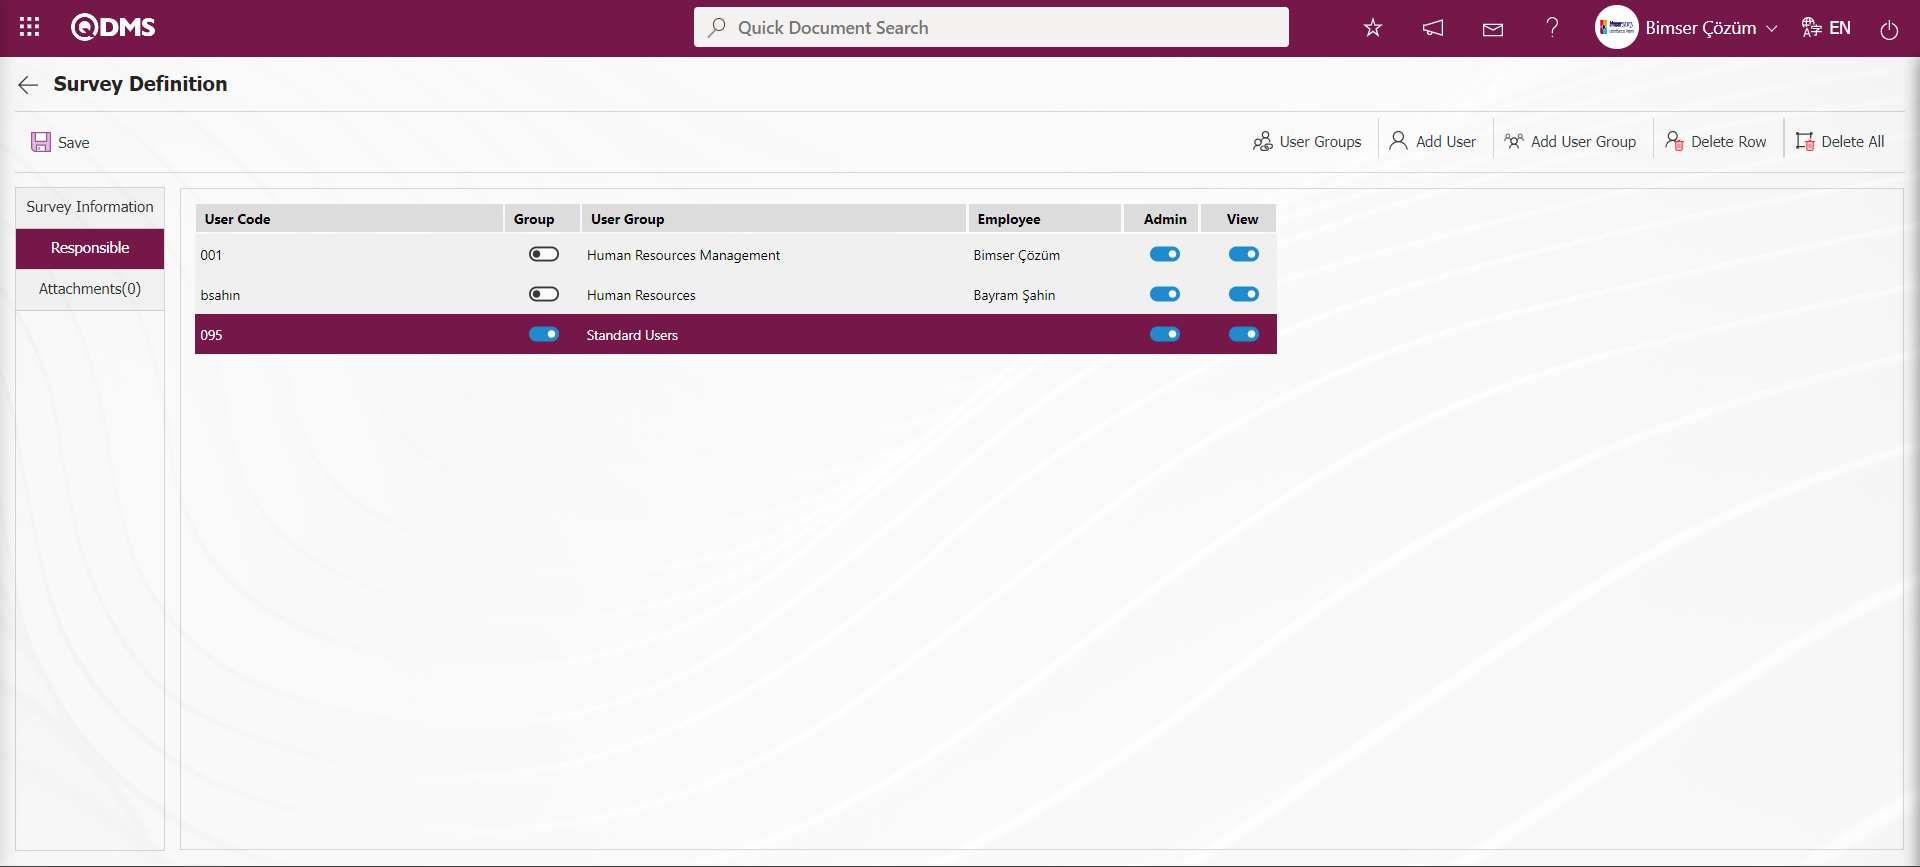
Attachments Tab: This is the tab where additional files are added to the defined survey.

With the help of the buttons on the screen;
 : The files to be added related to the survey can be added with this button.
 : This button is used to display the added file.
 : This button is used to delete the added file.
In the Attachments tab on the Survey Definition screen, the button is clicked to add an additional file to the defined survey.
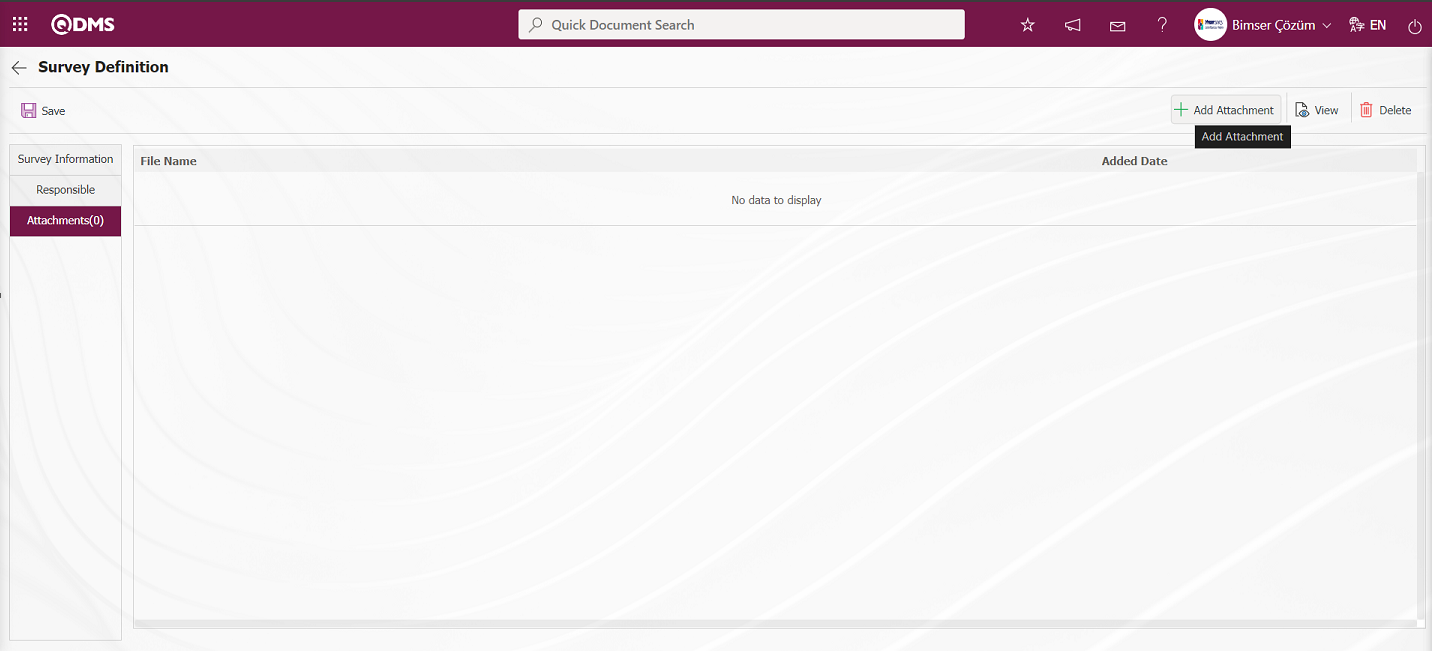
Click the  button on the File Upload screen.
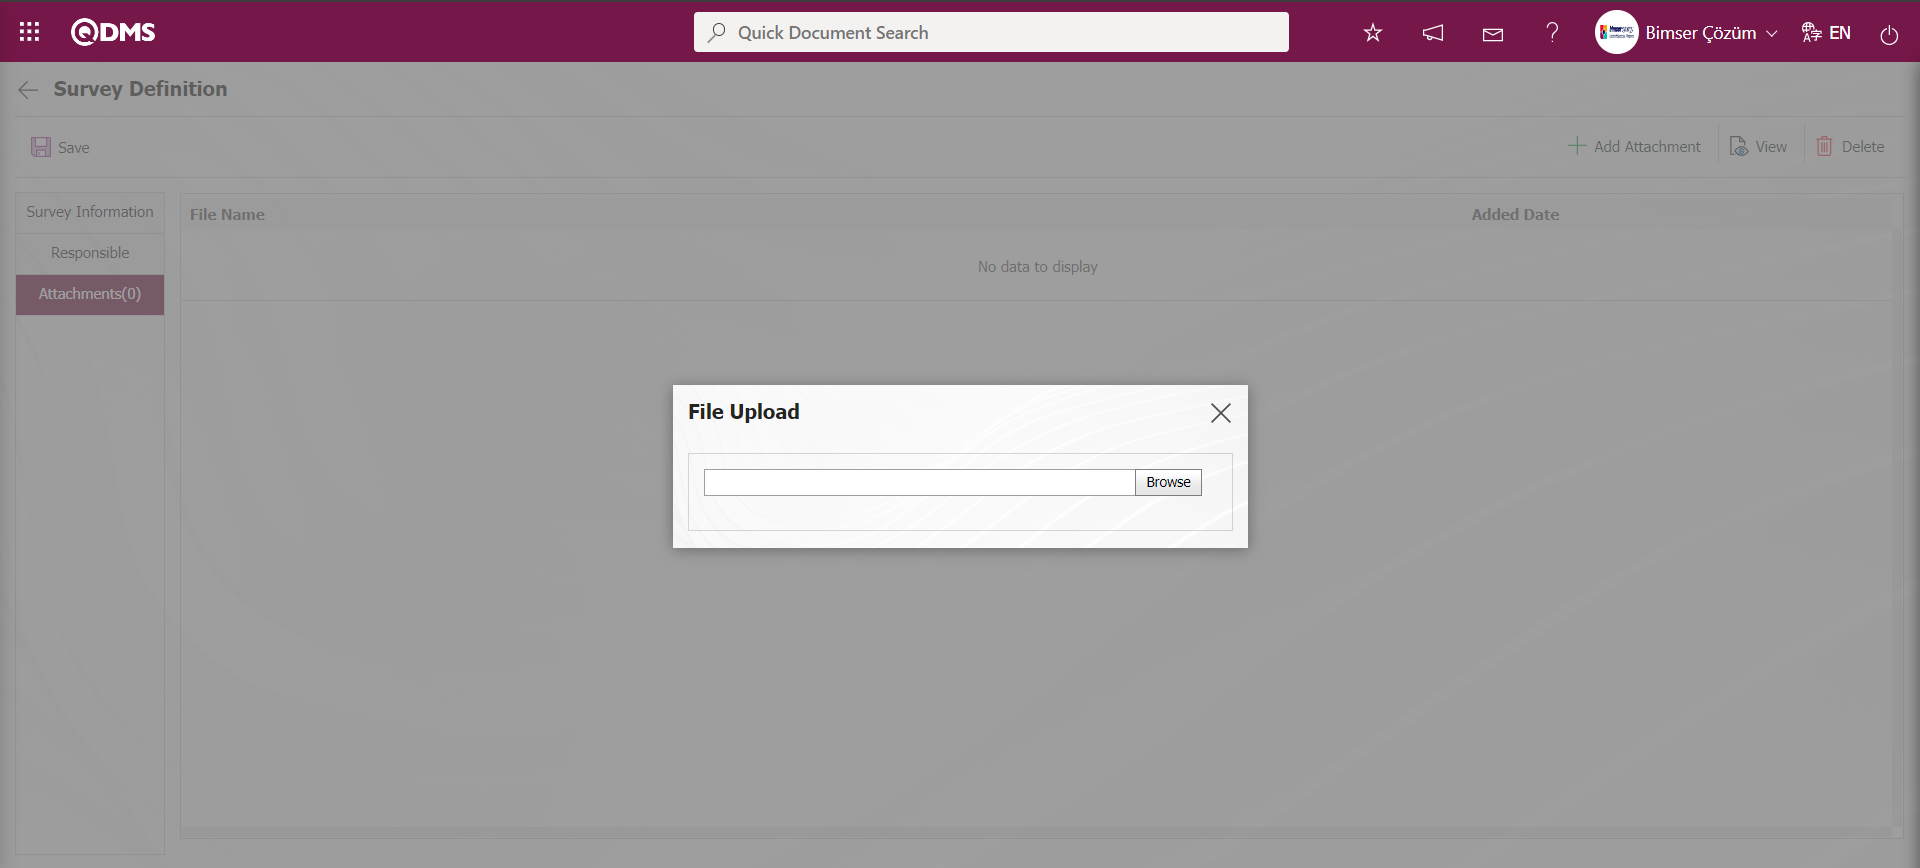
Select the file on the screen that opens.
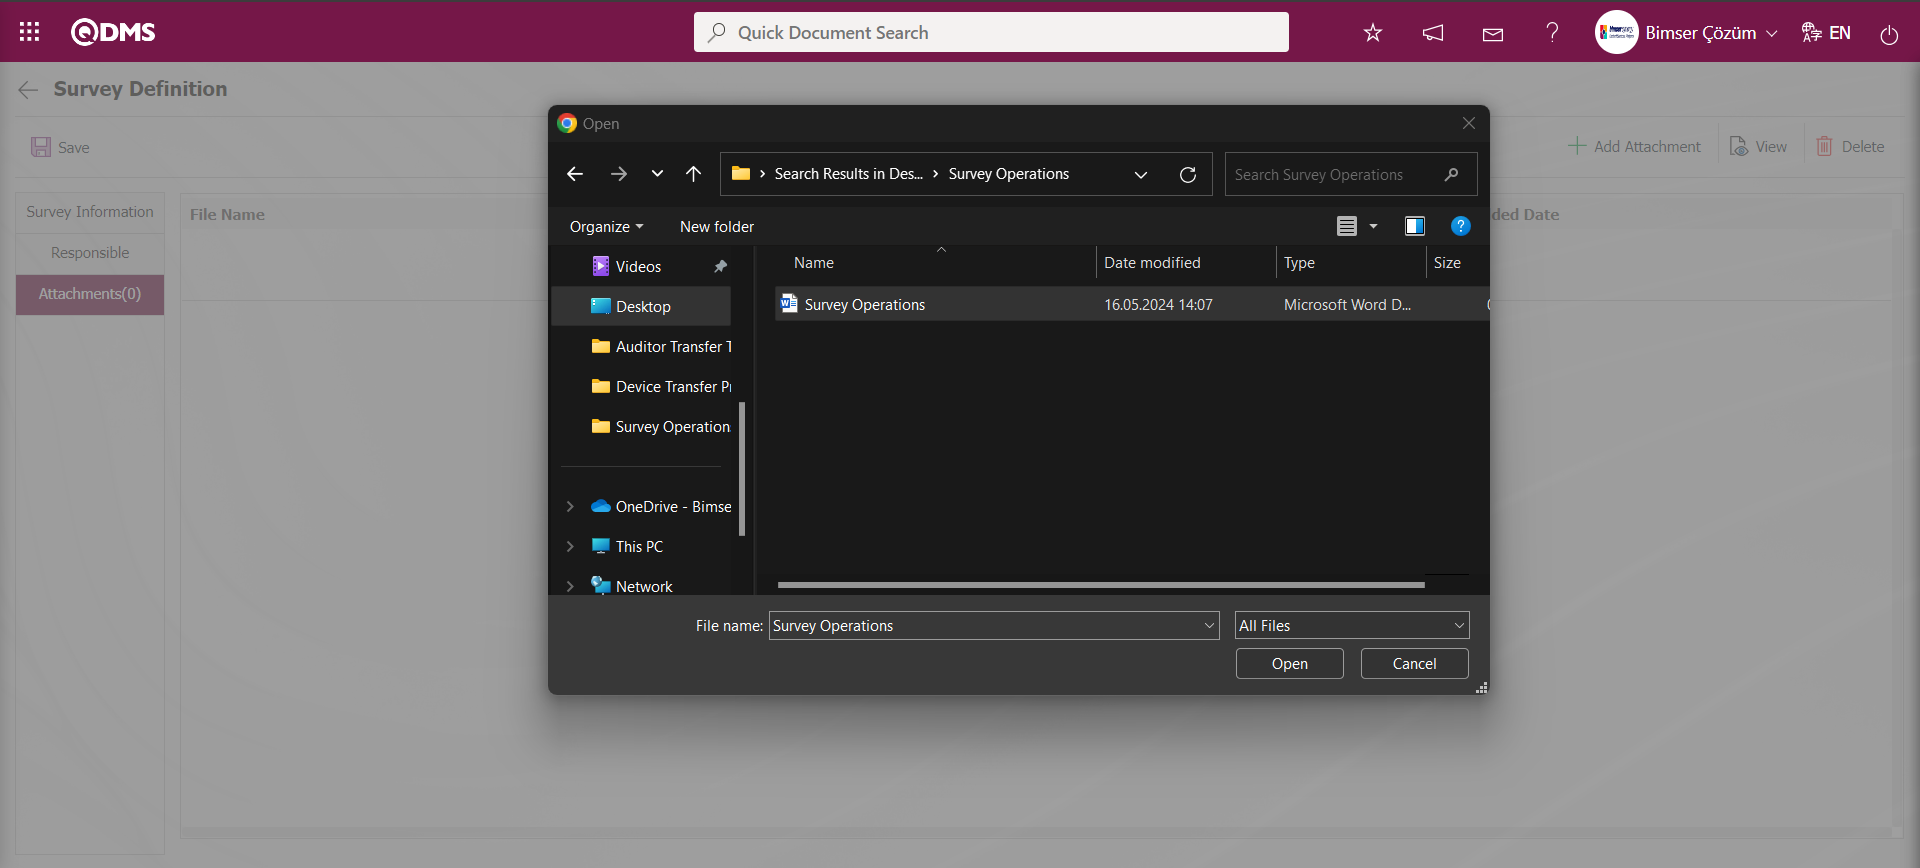
After the selection of the attachment file in the Attachments tab on the Survey Definition screen, the Attachment File is added.
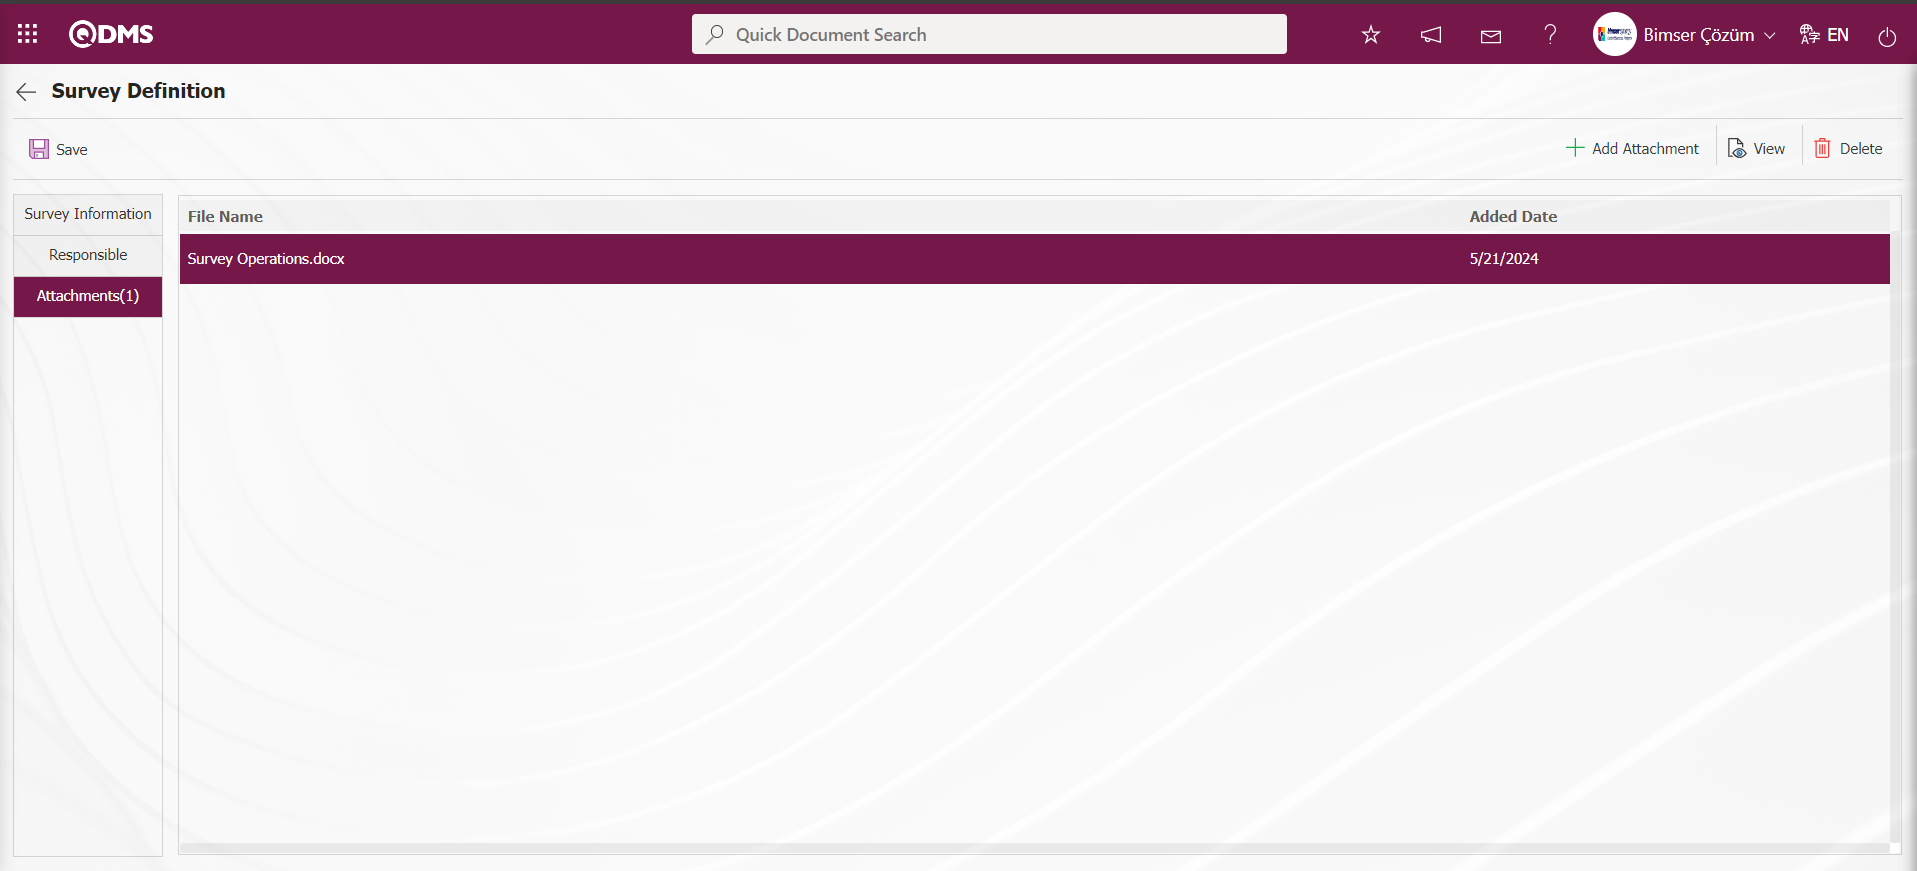
After filling in the information in all tabs, click on the Survey Information tab. After the necessary fields on the Survey Definition screen are done with the relevant information, the survey is created by clicking the  button in the upper left corner of the screen on the Survey Information tab.
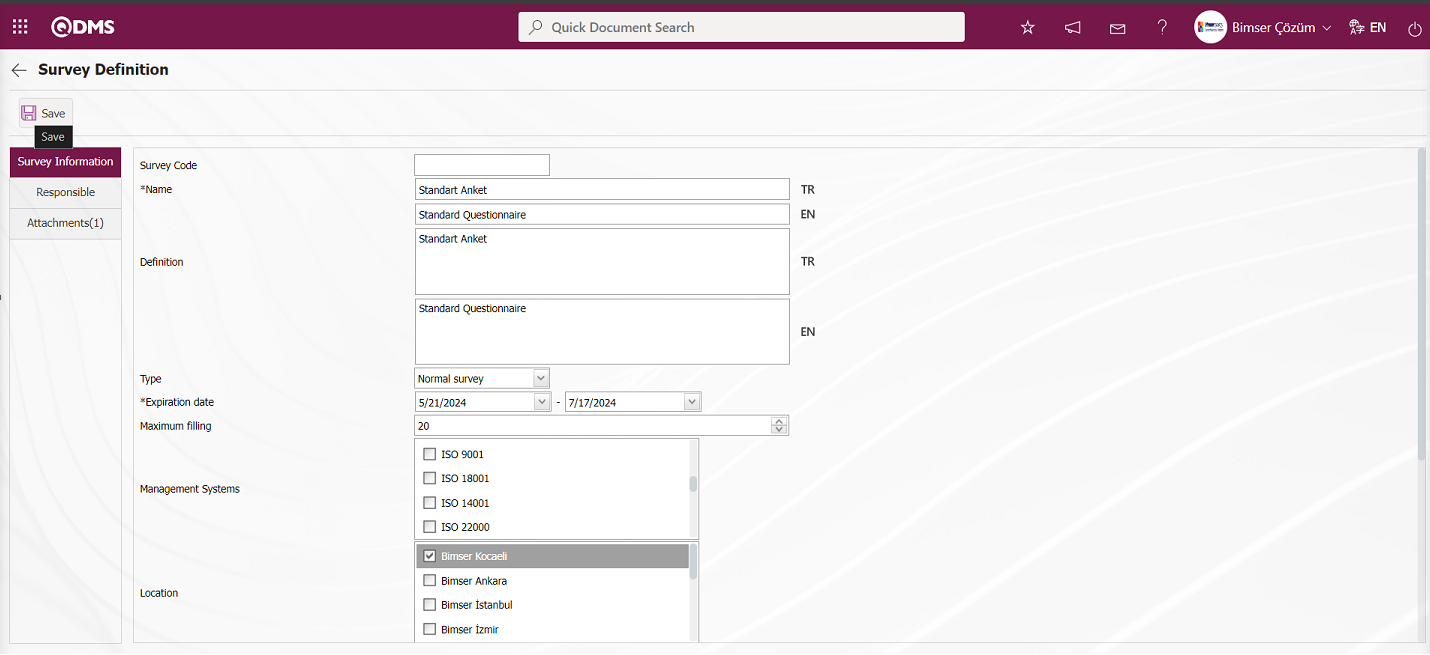
Since the created survey is not available for use, its status is “Close”.
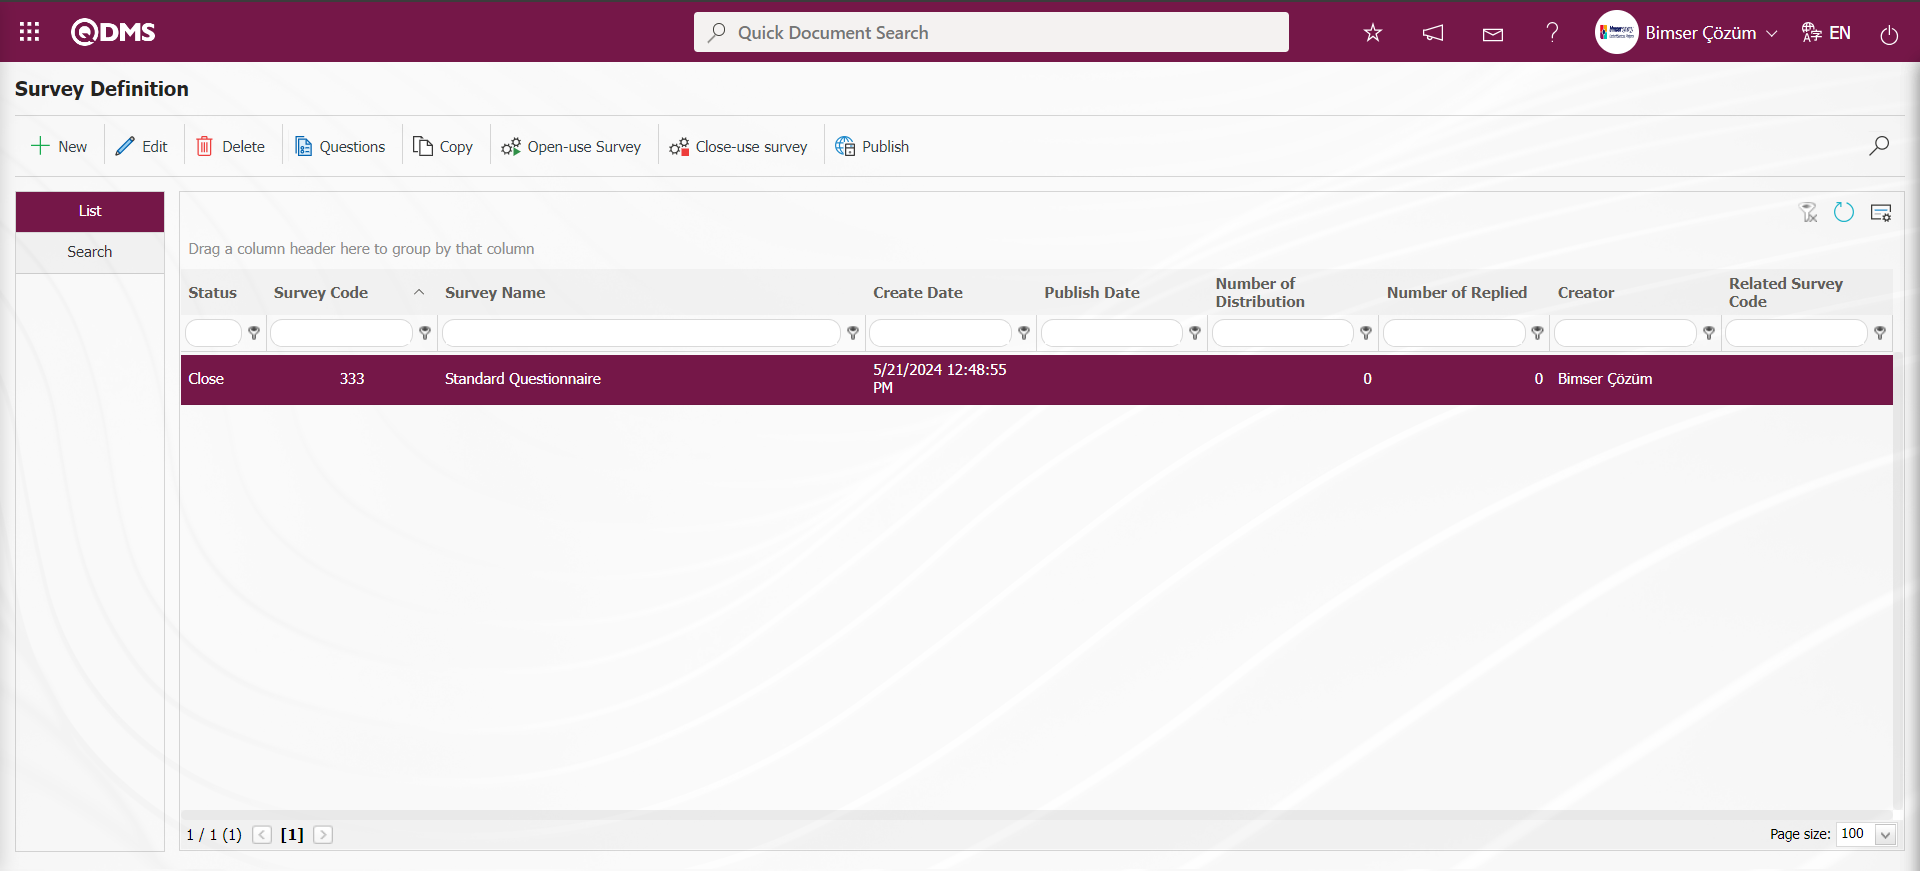
In the Standard Survey Form Definition process, the process of adding questions to the survey, opening, closing and publishing the survey is done in the same way as the steps for the Internal Survey Form Definition process..
6.2.6.2. Complete Standard Survay
Menu Name: Integrated Management System/Survey/Complete Standard Survay
The survey answers are filled in manually by the participants. These survey answers are entered and recorded in the QDMS system by the admin responsible persons selected during the preparation of the standard questionnaire form. When the standard survey filling menu is clicked, the following page opens.
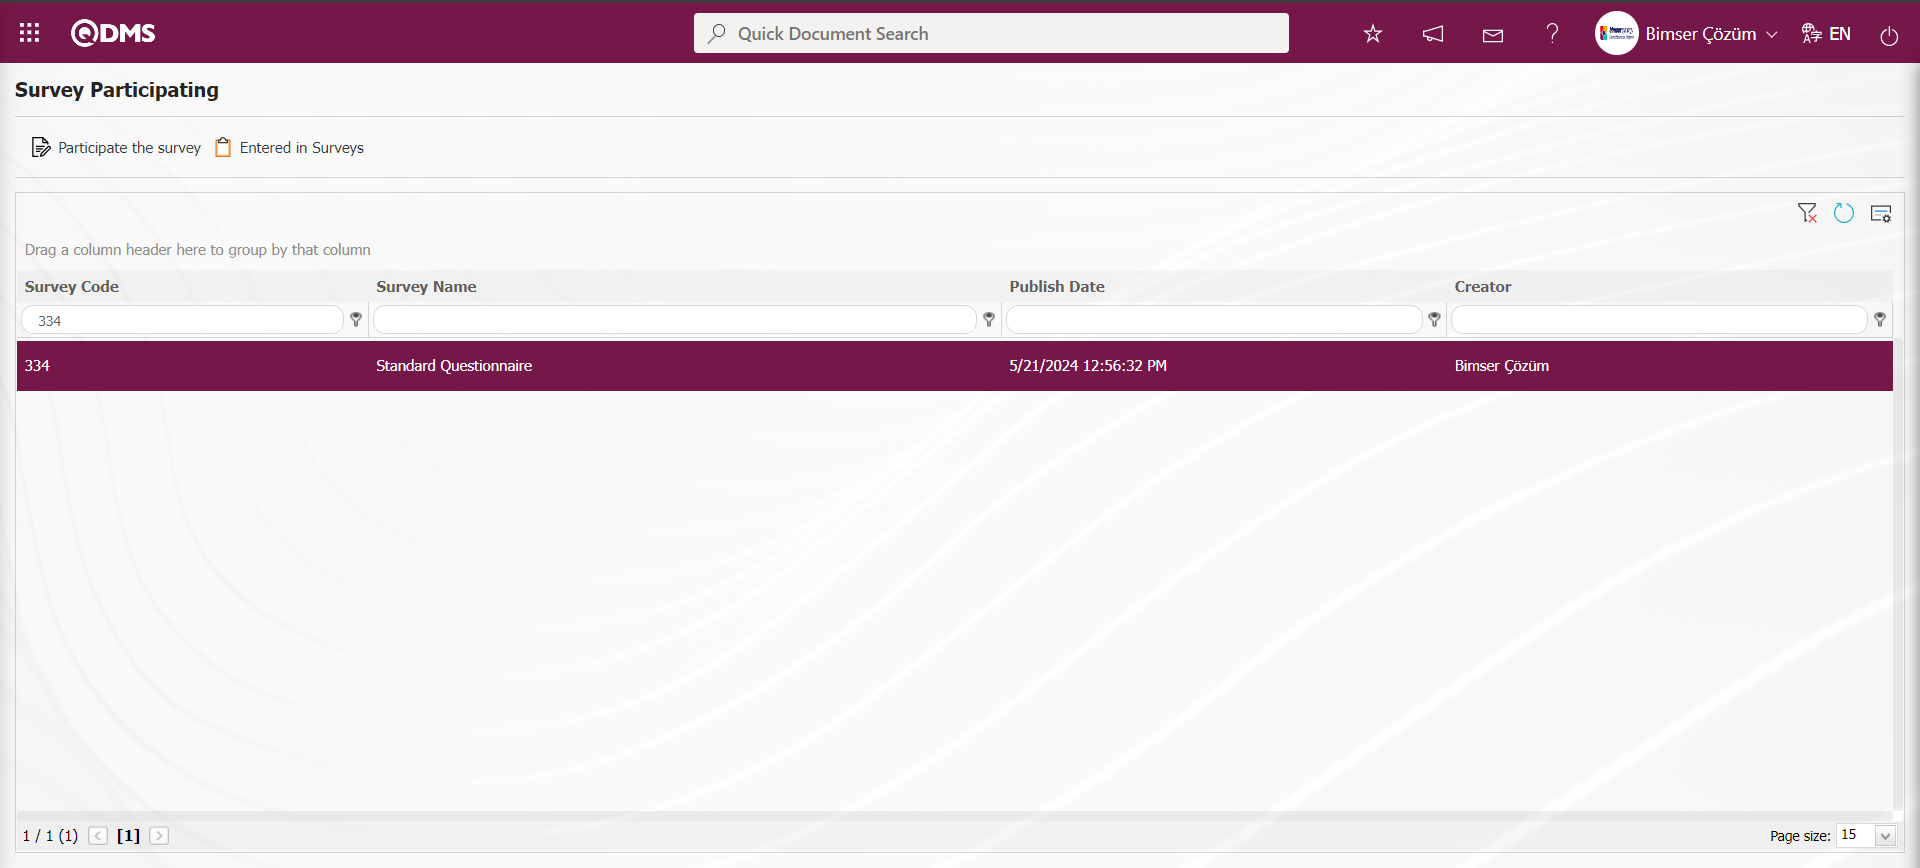
With the help of the buttons on the screen;
 : Opens the survey filling screen.
 : Shows the surveys entered.
Select the survey to be filled in and click on the button to access the page where the name and surname of the person filling in the survey will be entered.
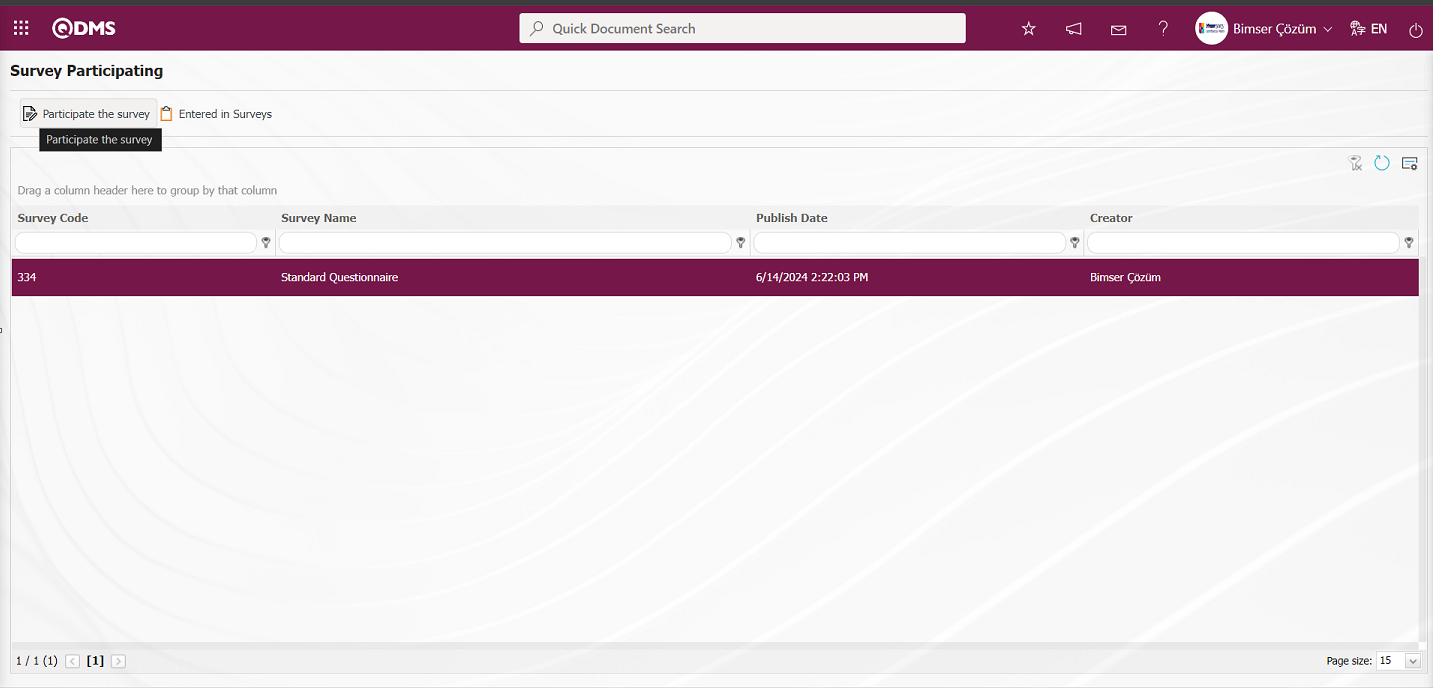
With the help of the buttons on the screen;
: Registration is done.
: Viewing the additional files added in the survey is done.
: Resetting the font size of the survey is done. After the change in the font size of the survey, the process of restoring it to its previous state is done.
: Enlarging the text size of the survey is done.
: Reducing the font size of the survey is done.
: Printing the survey is done.
The survey viewing process is done. The questions of the displayed survey are answered and filled in.
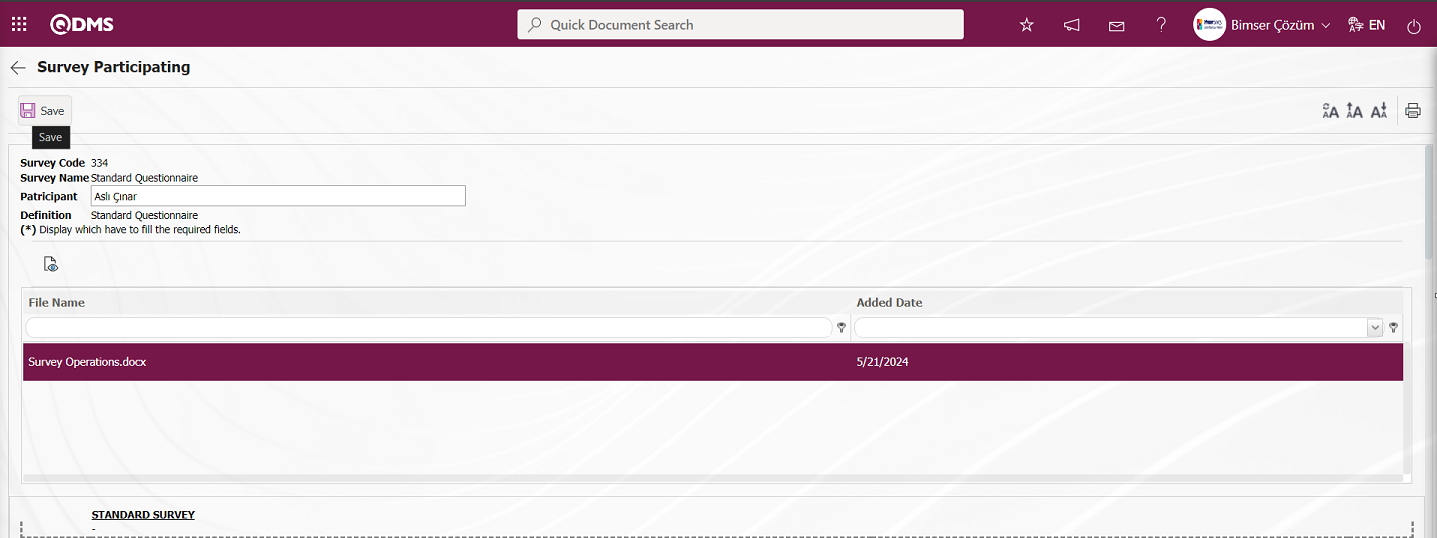

Enter the name and surname of the respondent in the Participant field and click the  button after answering the questions in the questionnaire. This process is done for each person who filled out the survey. “Your survey saved successfully” message is given by the system.
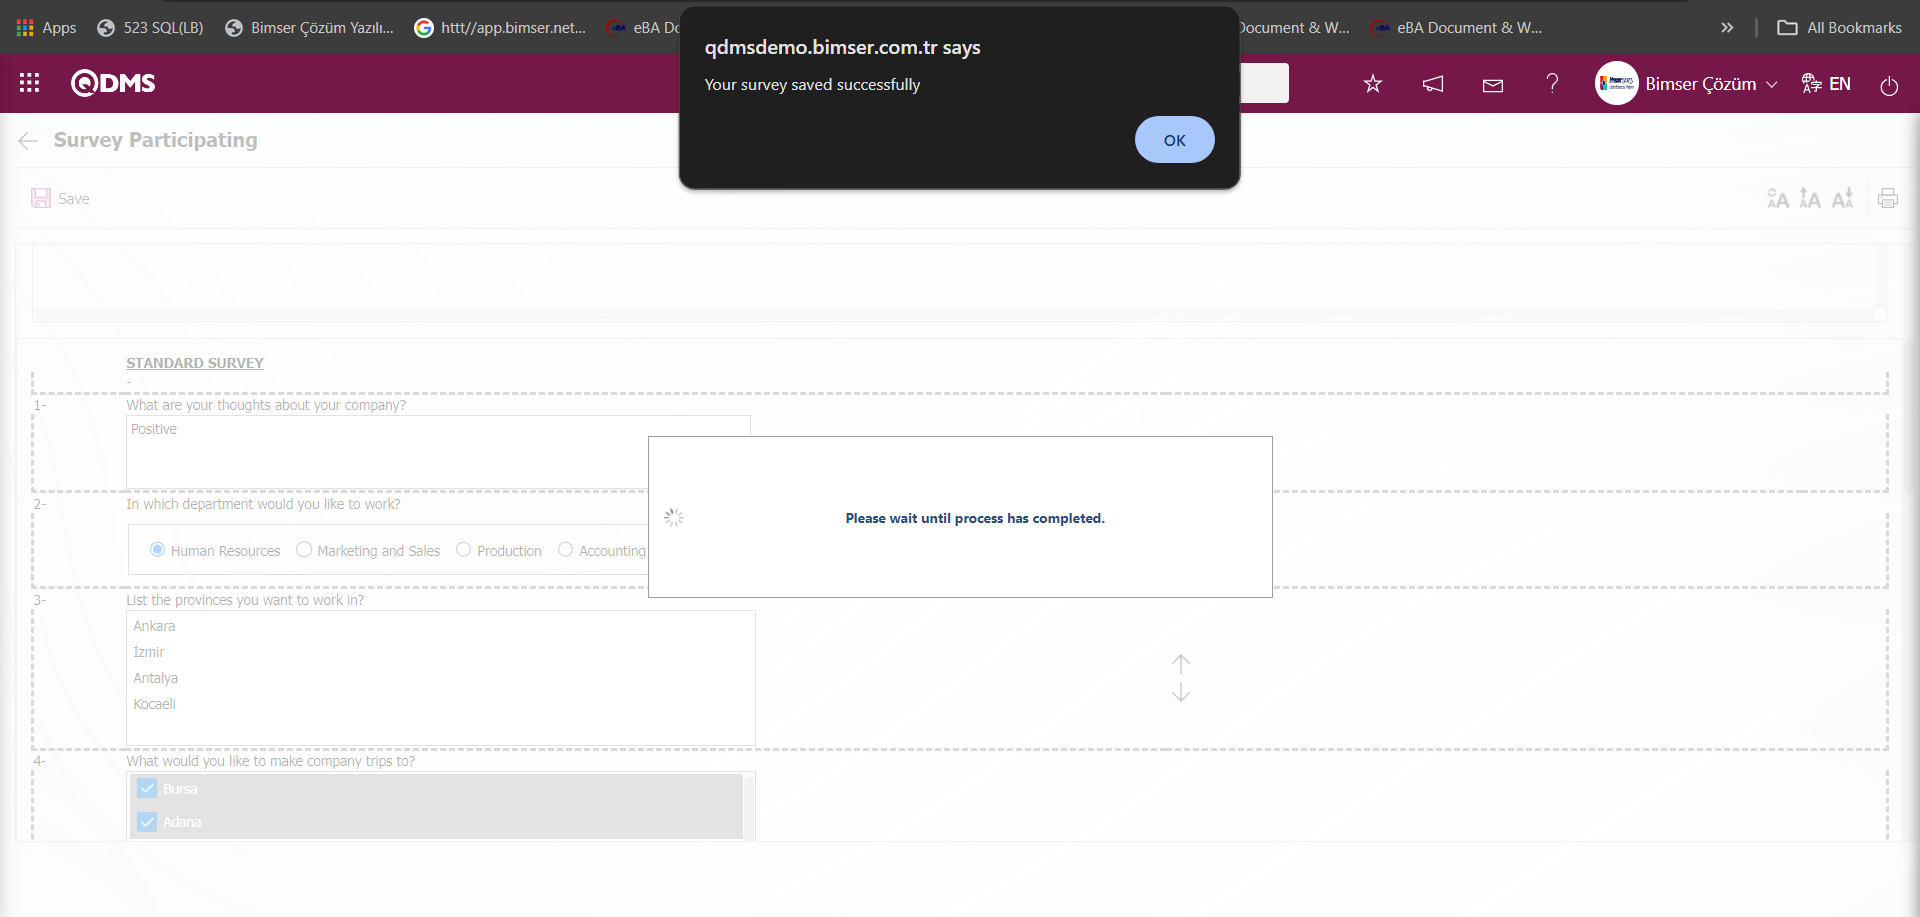
On the Survey Participating screen, click the  button to display the list of those who have completed the survey.
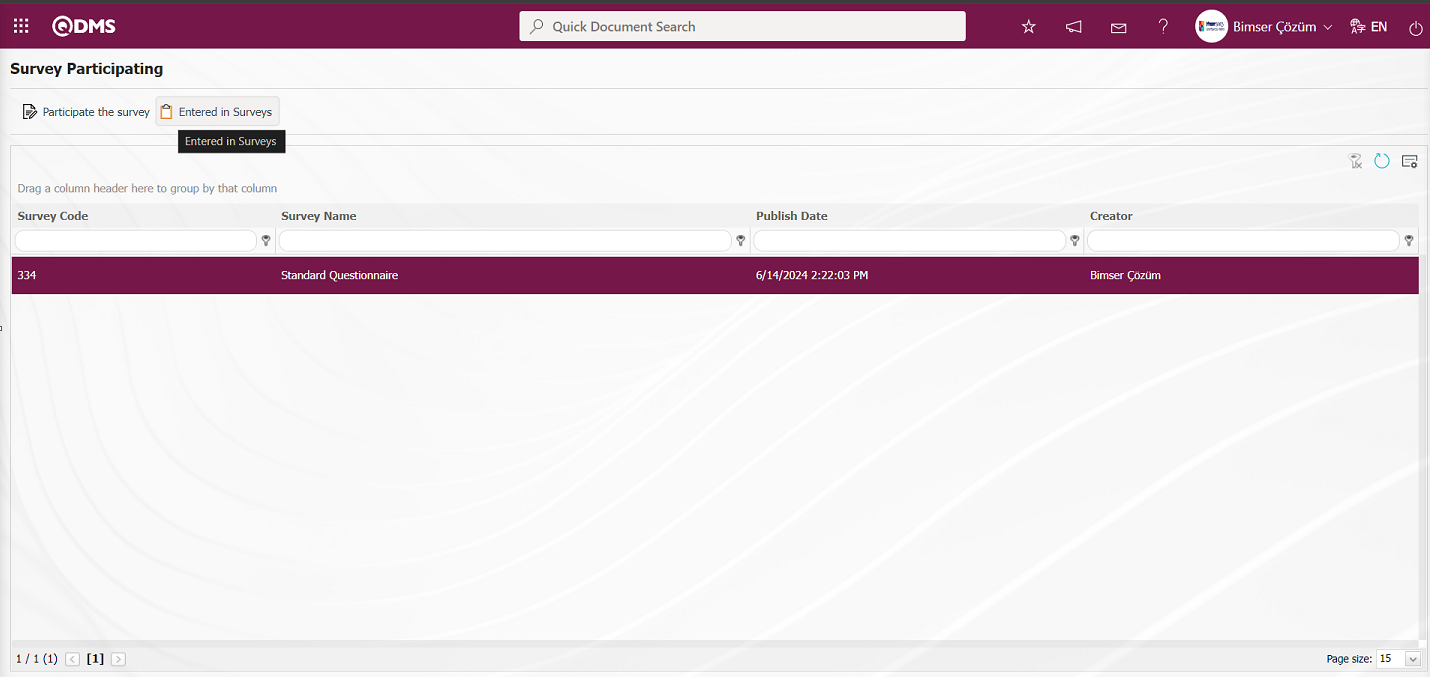
The Participatings in the Survey screen opens and the list of those who have completed the survey is displayed.
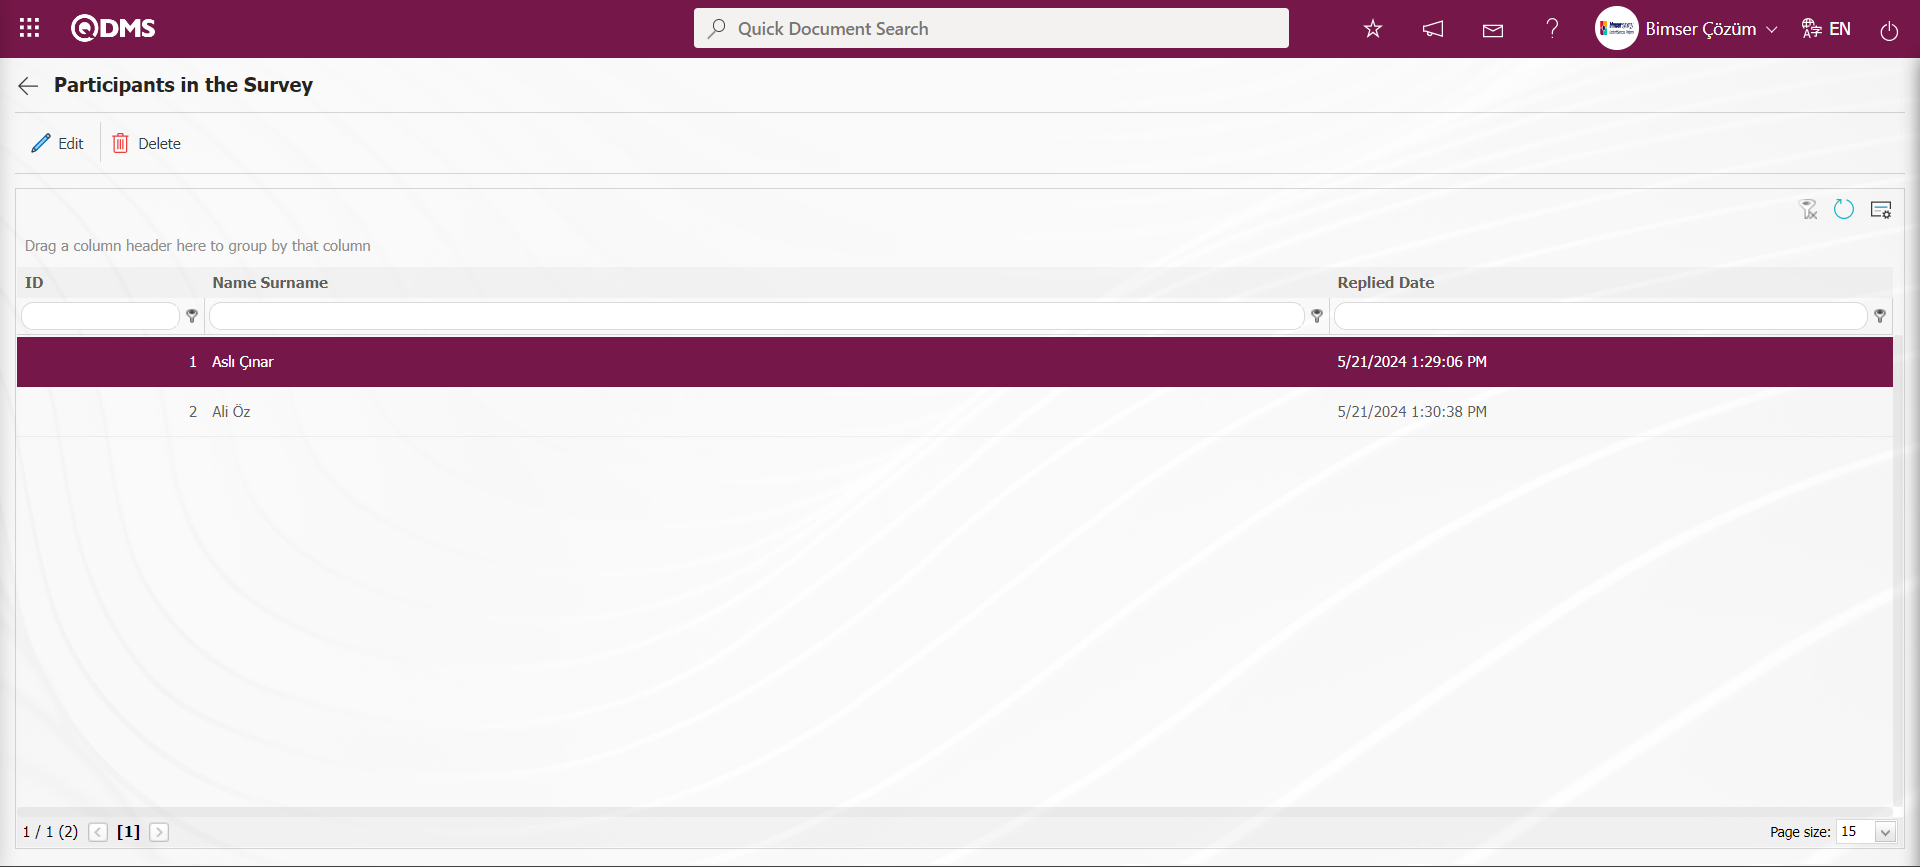
With the help of the buttons on the screen;
 : The survey filling screen of the user selected in the list is opened and editing and updating is done on the survey information.
On the Participatings in the Survey screen, click the button while the user is selected in the list.
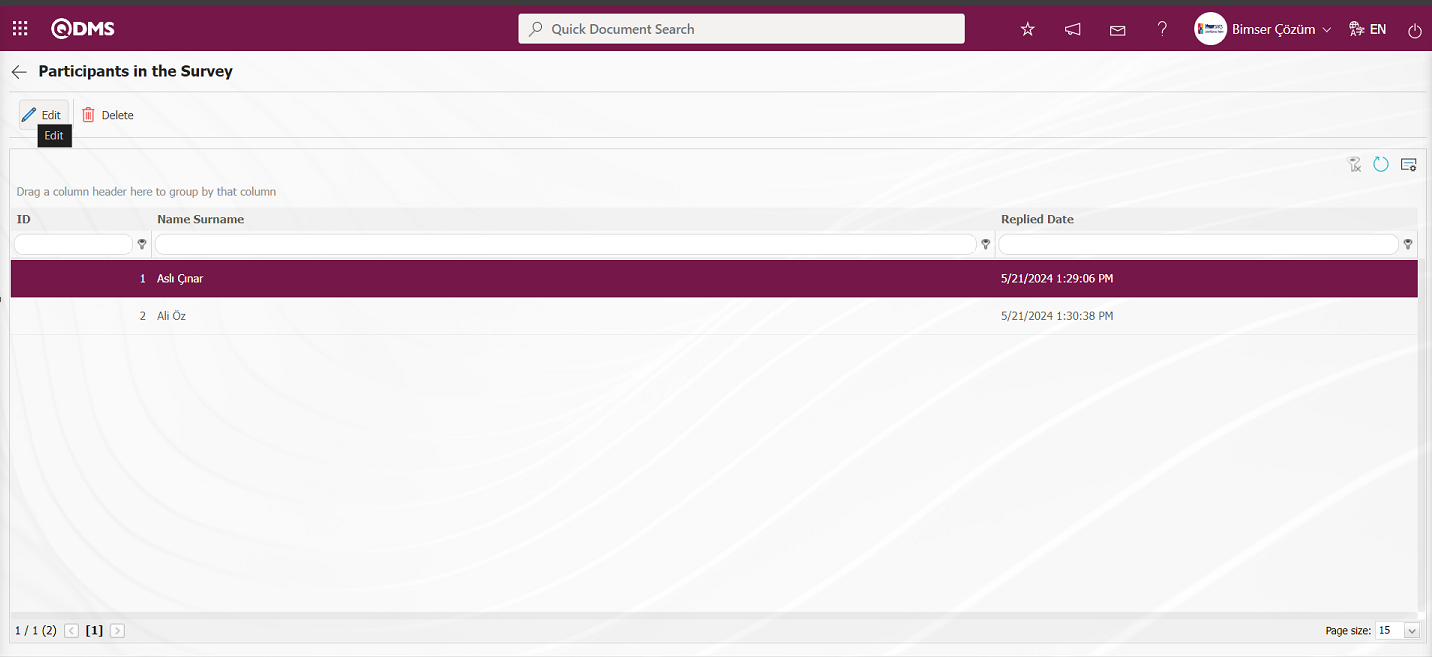
In the Survey Participating screen, changes and edits are made on the answers of the filled survey questions.
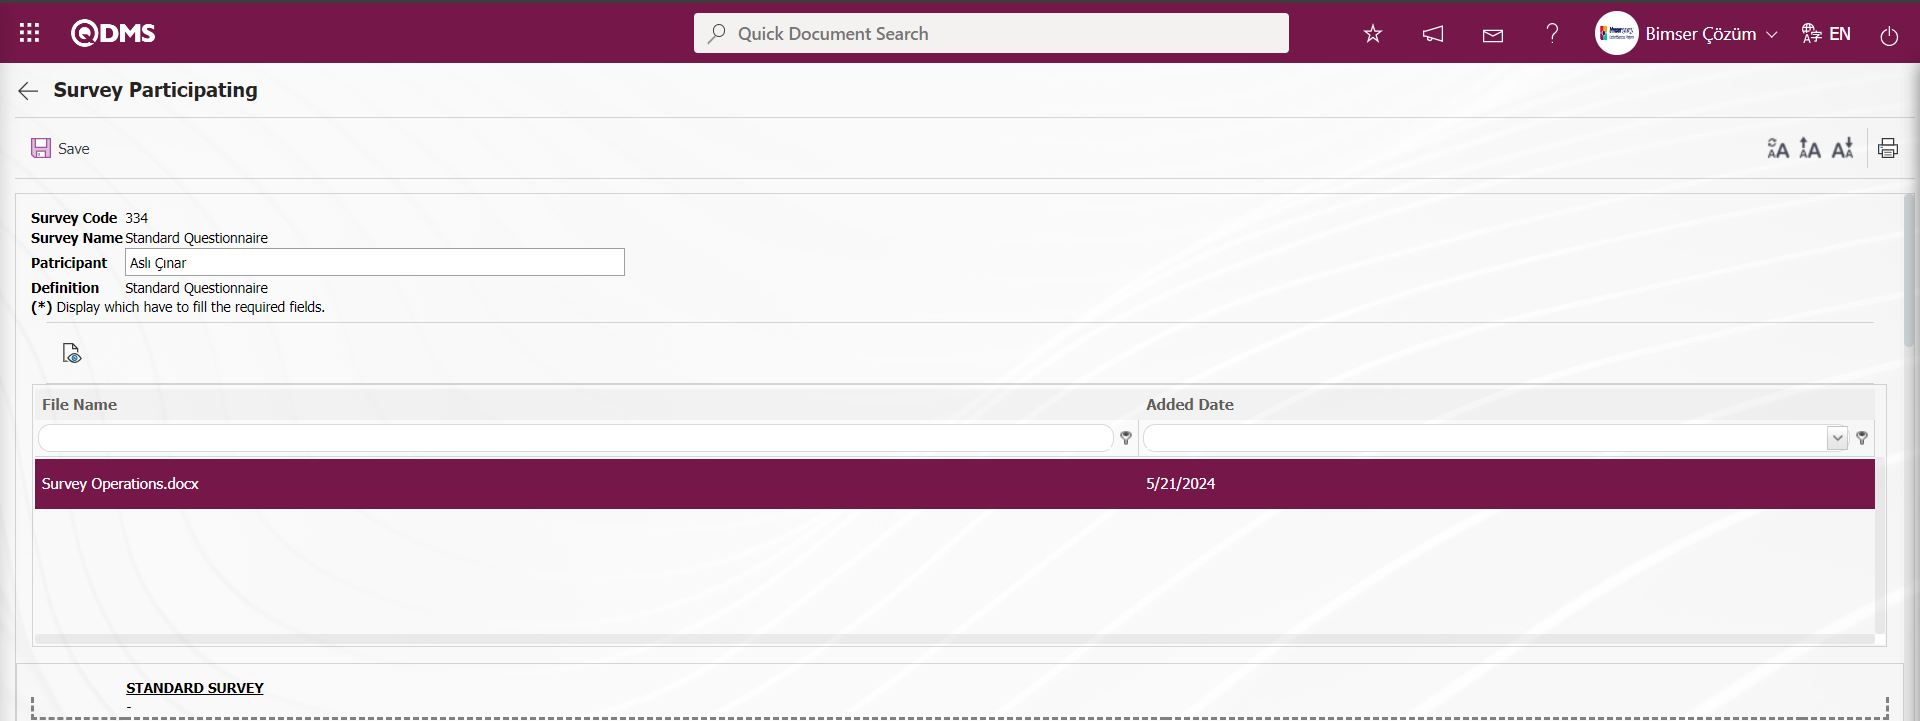
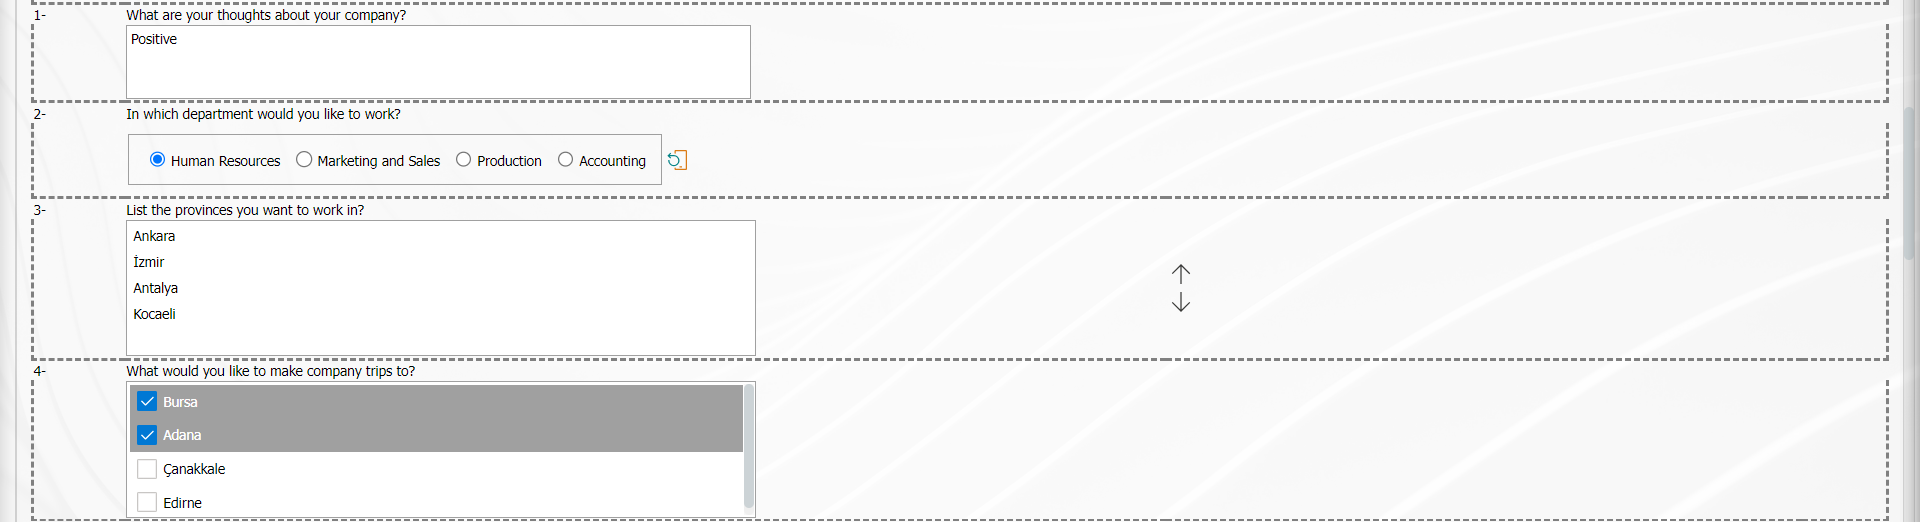
6.2.7. Survey Analysis Chart
Menu Name: Integrated Management System/ Survey/ Survey Analysis Chart
It is the menu used to generate graphical reports of surveys that are related to each other on the basis of participants and scores. In this graph, surveys conducted in previous years can also be compared with each other.
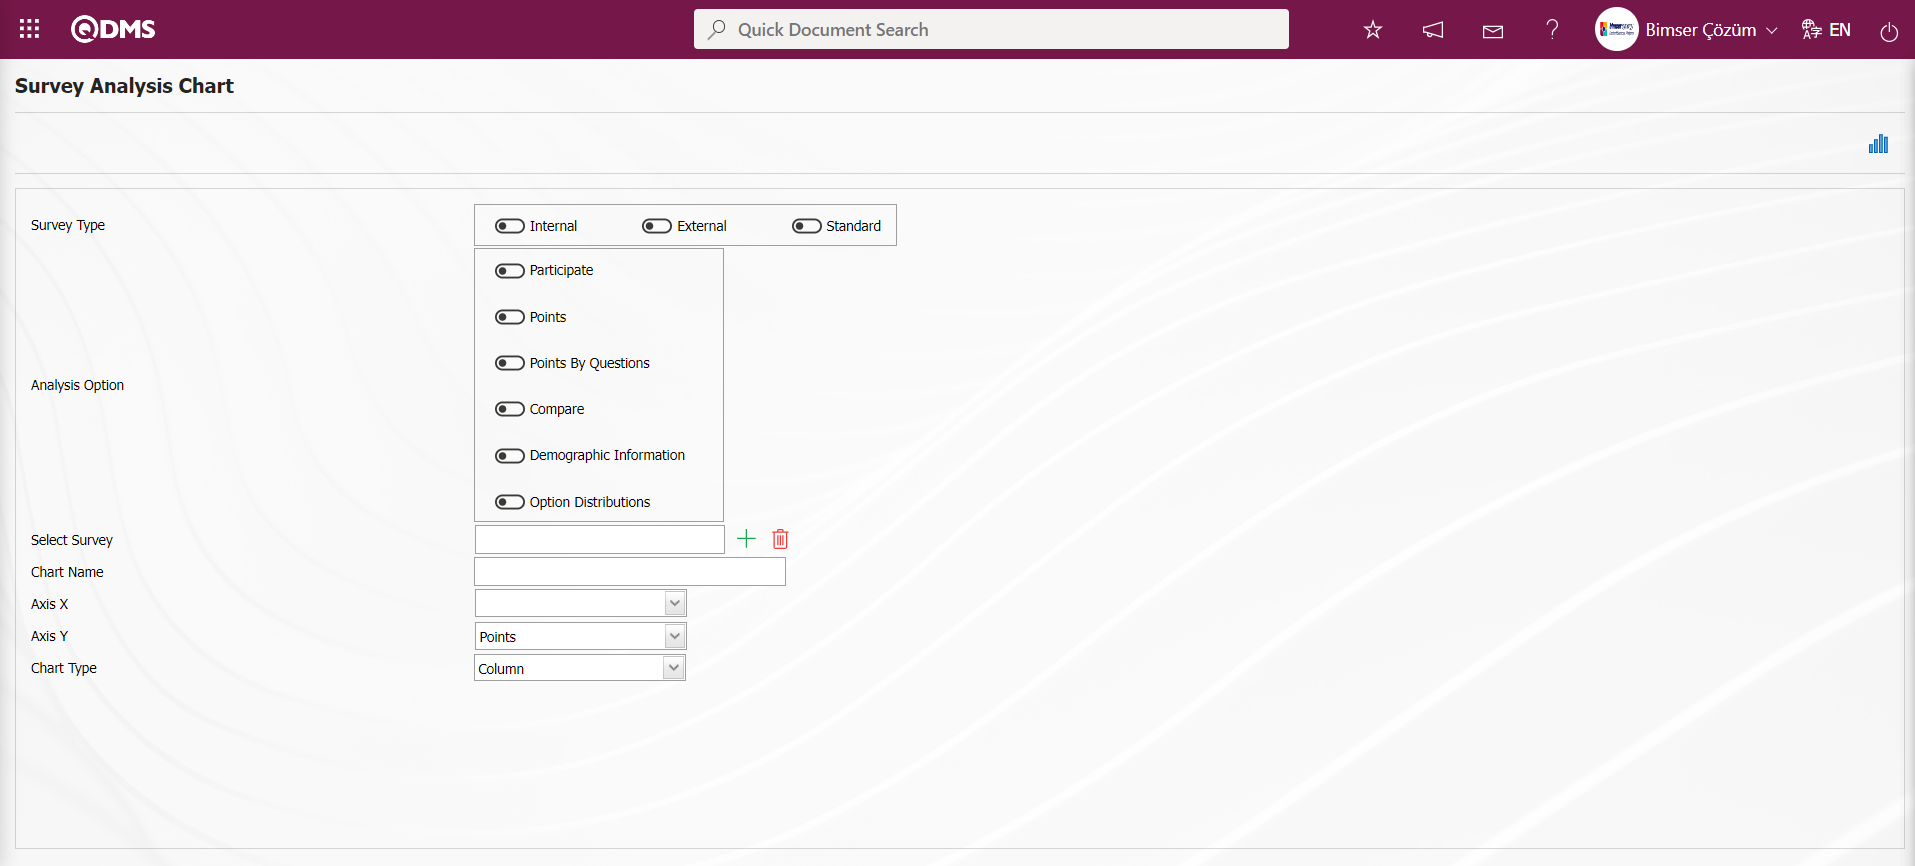
With the help of the buttons on the screen;
 : Creates Survey Analysis report.
Click the (Create Chart Report) button on the Survey Analysis Chart screen.
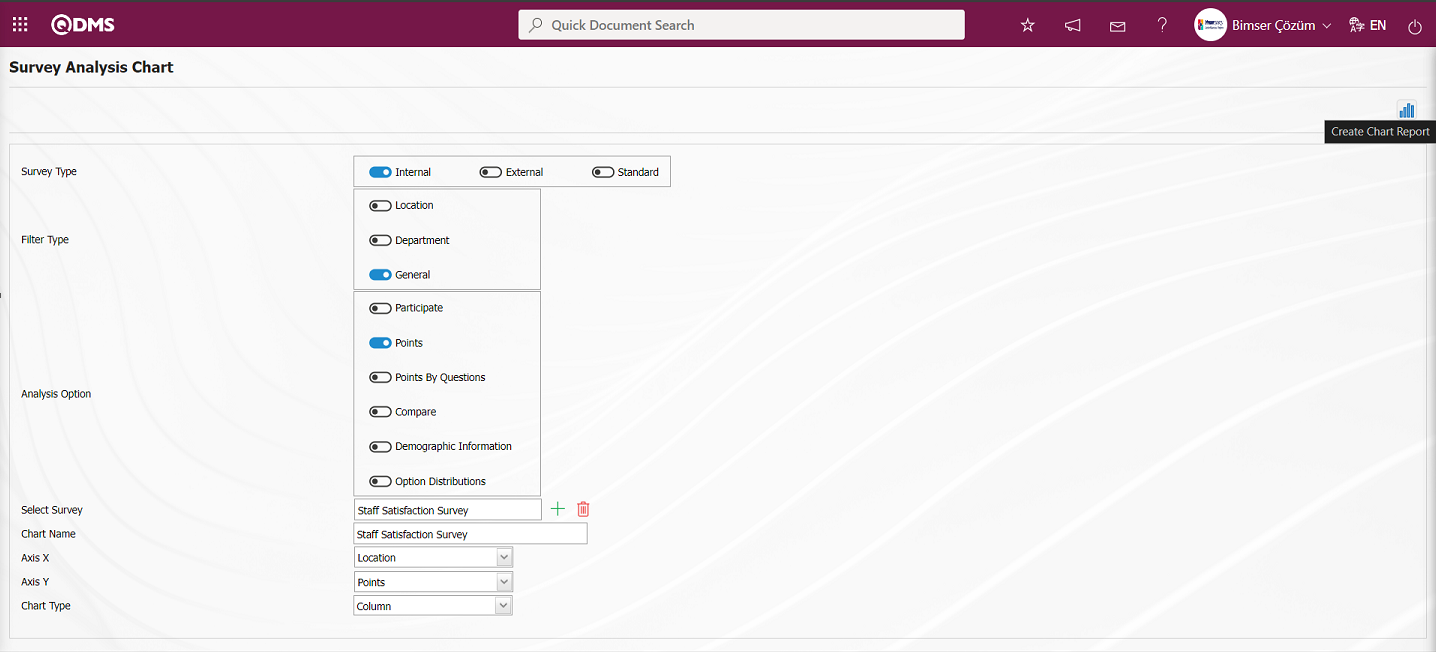
The Create Chart chart in Excel format is displayed.