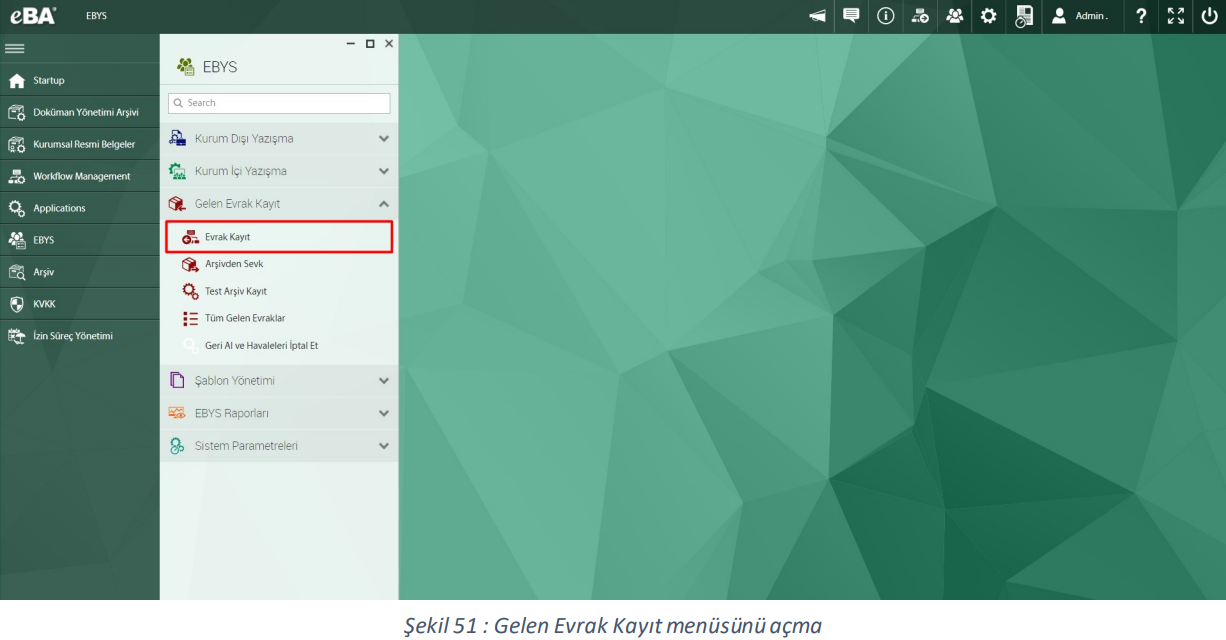
3. Create an Incoming Document Record
On the eBA Login page, under the EBYS menu, under the Incoming Document Record breakdown, click A new process is started by clicking on the Document Registration menu.
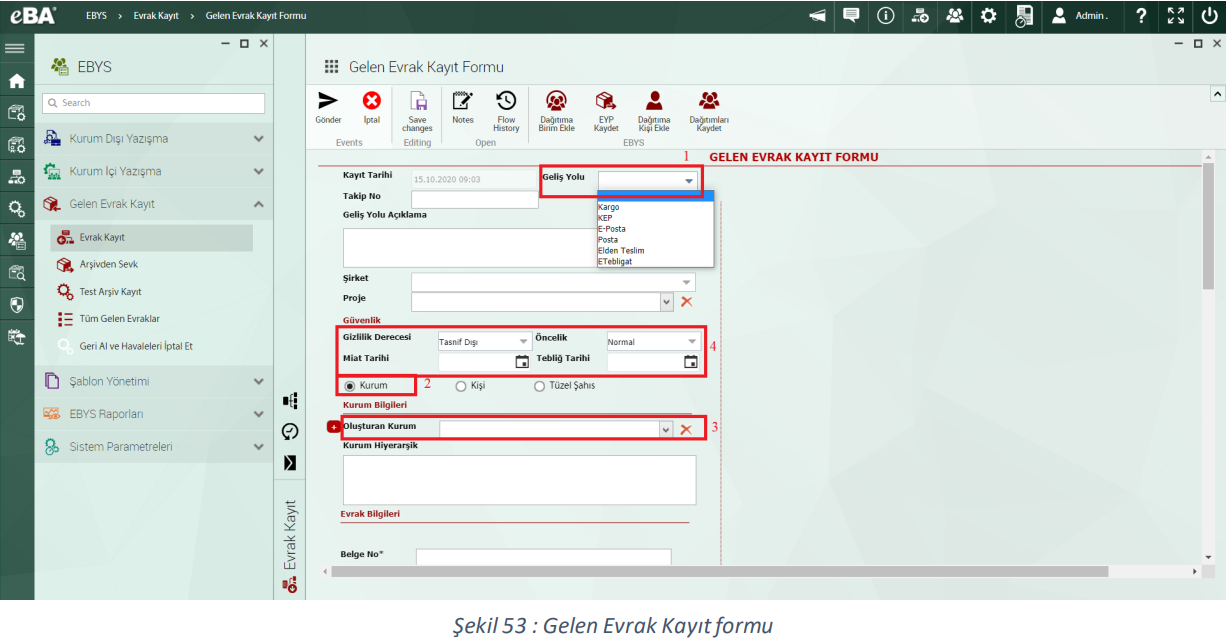
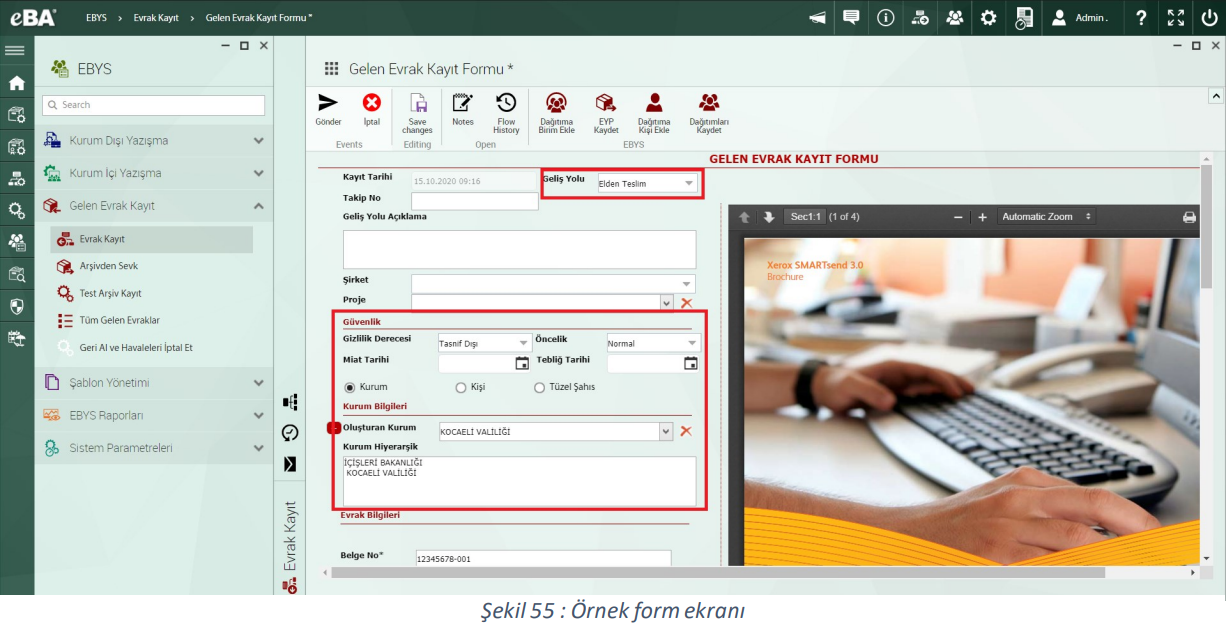
In Figure 53, the Way to Arrival is selected from field 1 and the Institution is selected from field number 2. In field number 3 The Institution Information from which the document came from and the Security information of the document are filled in the field number 4. This information Then, in the Document Information section in the field number 5, the information of the incoming document is entered.
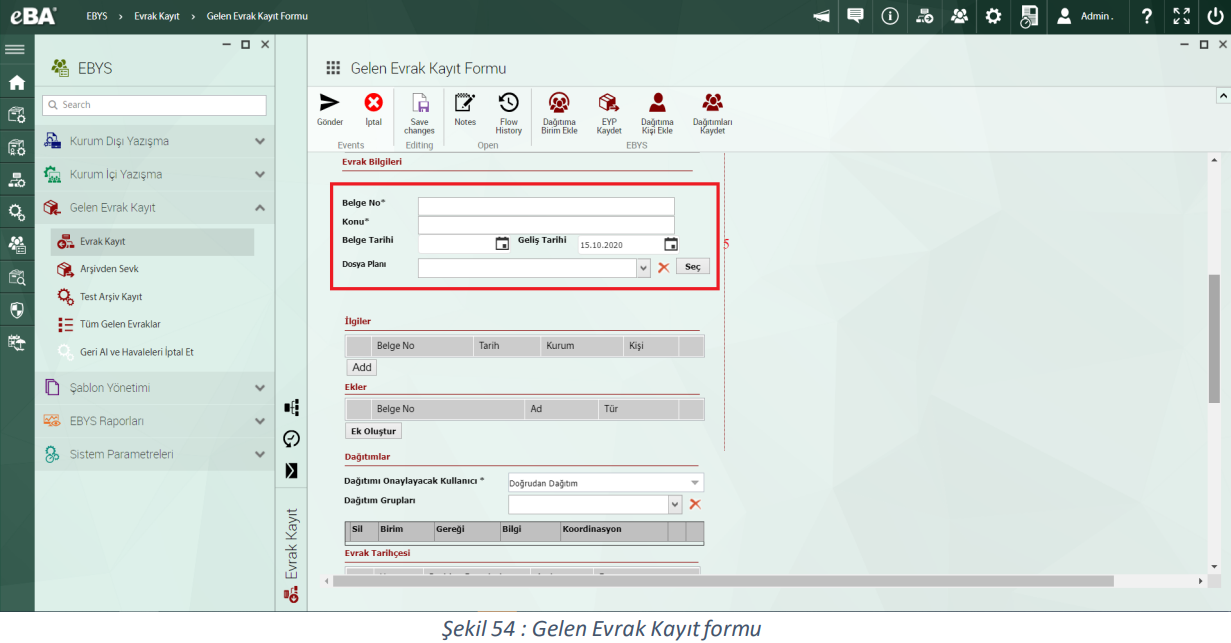
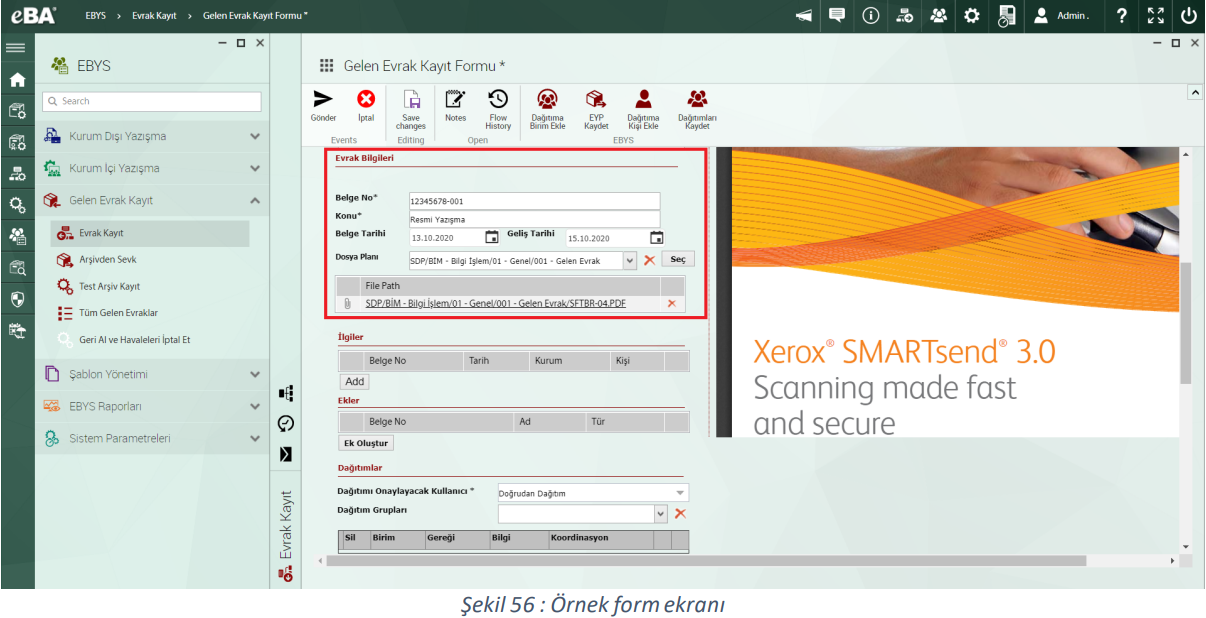
A sample entry of the incoming document is indicated in Figures 55 and 56.
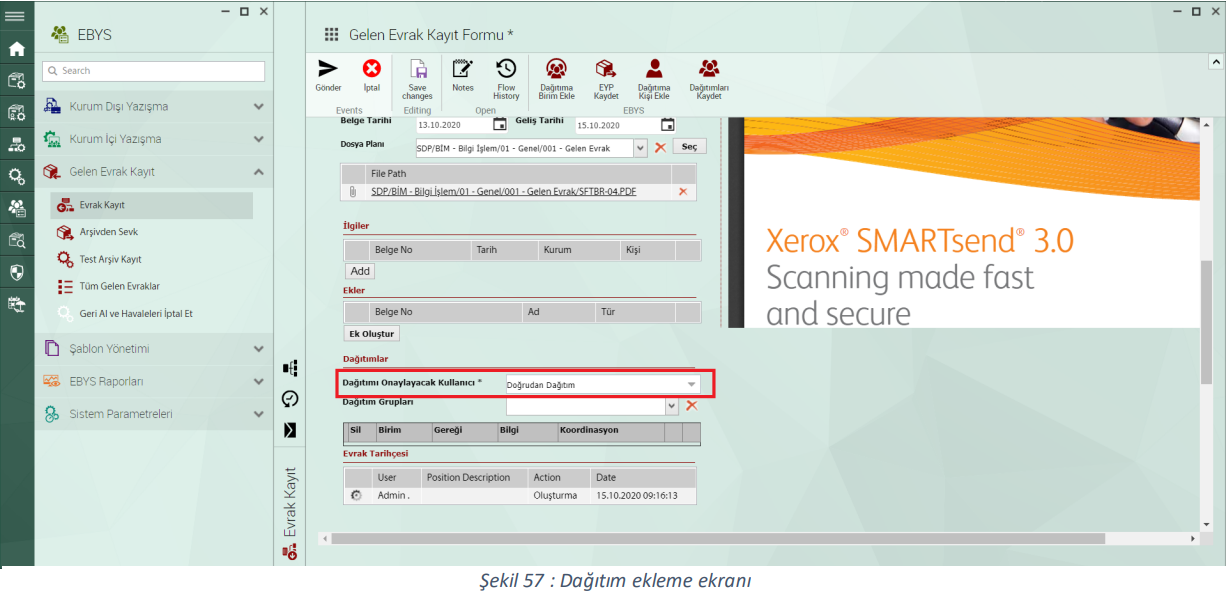
Deploy from the User to Approve Deployment * field in the Deployments section marked as the selection of the user to approve is performed.
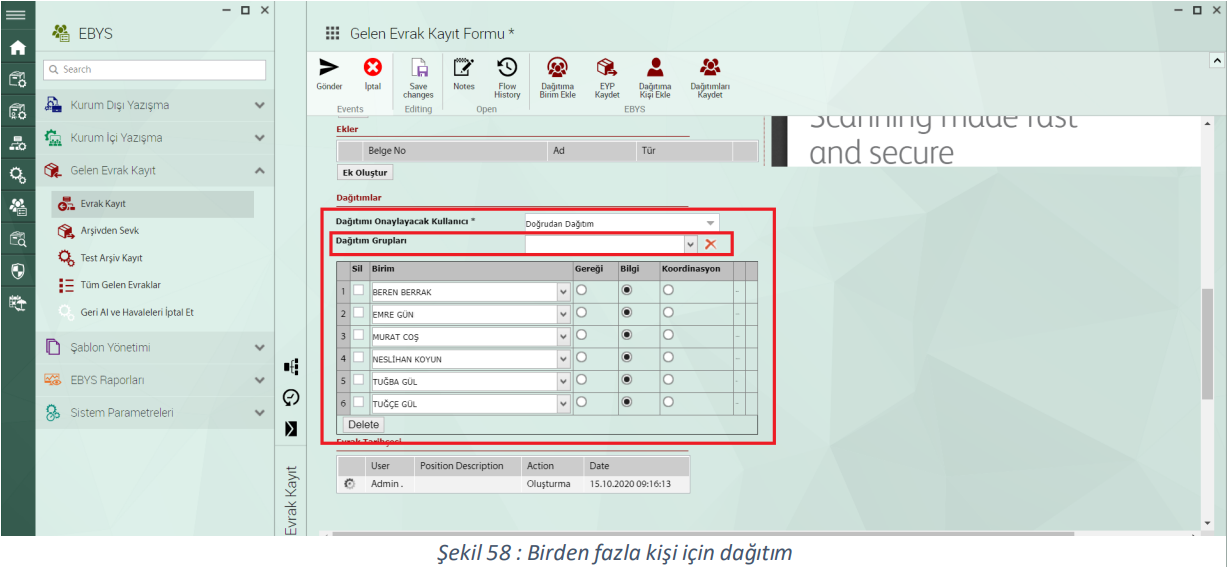
If the deployment is to be made for more than one person, in the User Who Will Approve the Deployment field, click Direct Distribution is selected and the relevant units are added from the Distribution Groups area. After the unit selection is made, In the rows added to the table, the operation (Requirement, Information, Coordination) to be performed by each row should be selected. This as well as the Add Unit to Distribution, Add People to Distribution buttons at the top of the form can be added. Saving the persons/units added to the distribution line with the Save Distributions button to select the previously saved distribution list in subsequent processes. EYP Save button on the Ribbon Bar with Events and Deployments, KEP By manually uploading the files with the EYP extension to the system, the incoming document registration form is automatically is used to be filled in.
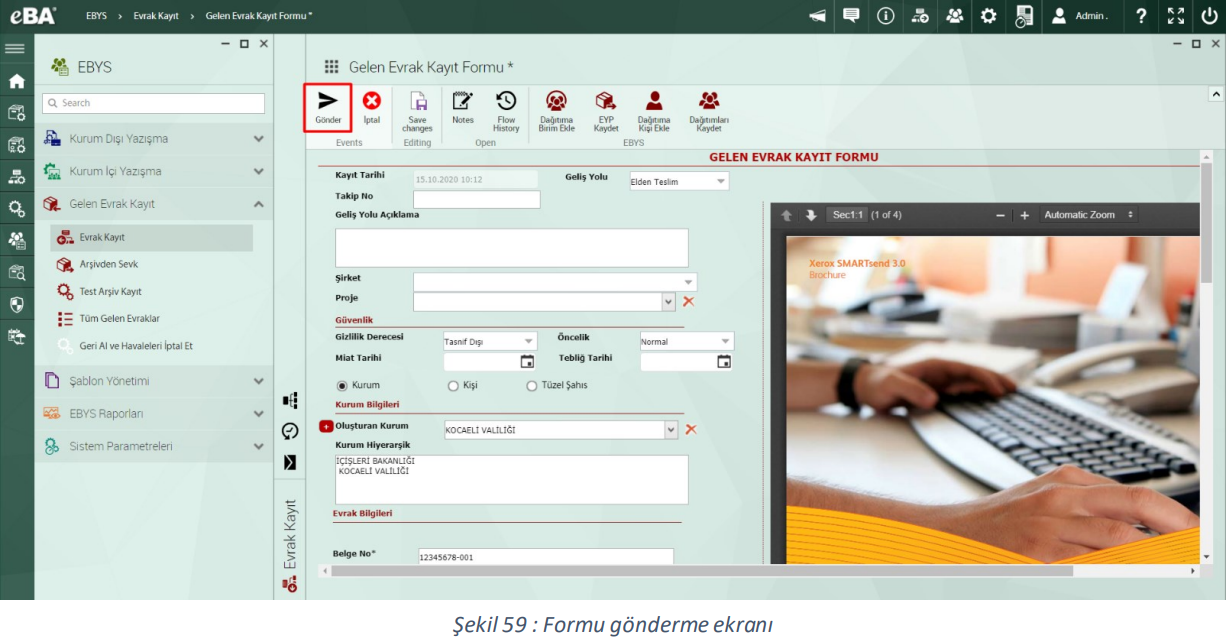
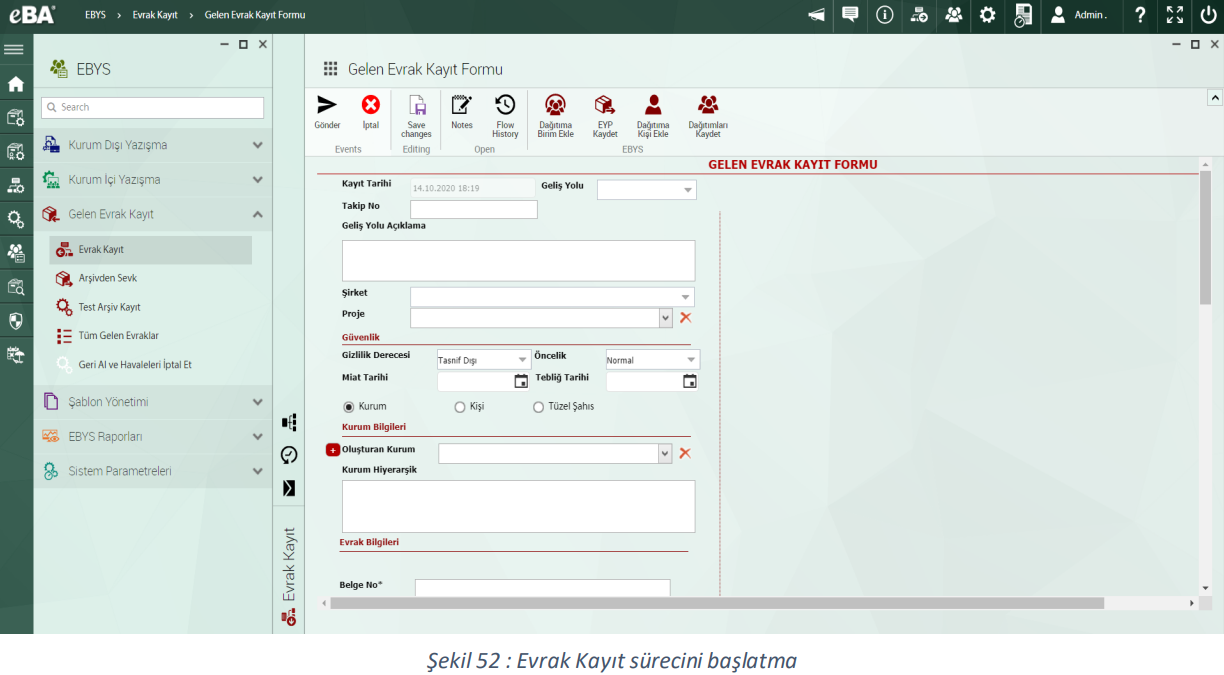
After the Incoming Document Form is filled out, click Submit in the field marked as Send the form button is clicked.
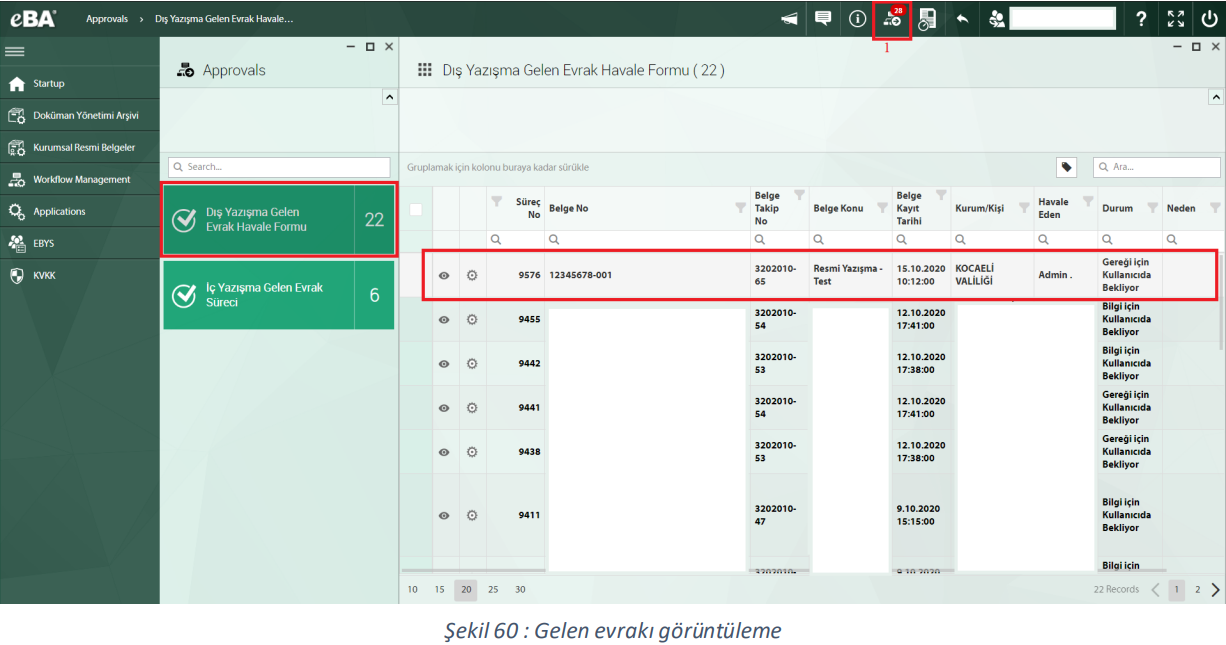
In the figure, click on the Approvals tab (field 1) and select the marked External Correspondence Incoming Document Remittance Form process. In the window that opens, the incoming documents are listed. Marked flow most recently sent incoming documents form. It is displayed by clicking on the corresponding form.
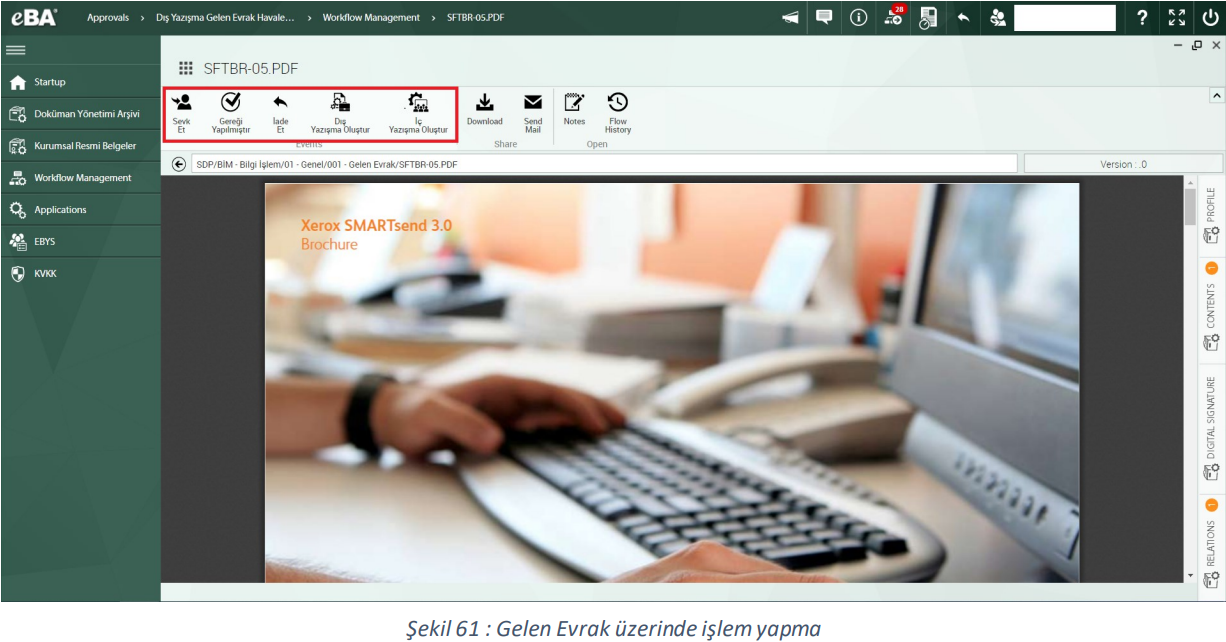
The Ship button is clicked to transfer an incoming document form pending user approval. Other actions that the user can take are "Required, Return, Create External Correspondence, Internal Correspondence Create" can be performed by clicking on the event buttons. • Required Done: It is used to indicate that the user has done the transactions related to the document. • Return: Used for the user to return the document. • Create External Correspondence: Click to create external correspondence over incoming documents. • Create Internal Correspondence: It is used to create an internal correspondence over incoming documents.
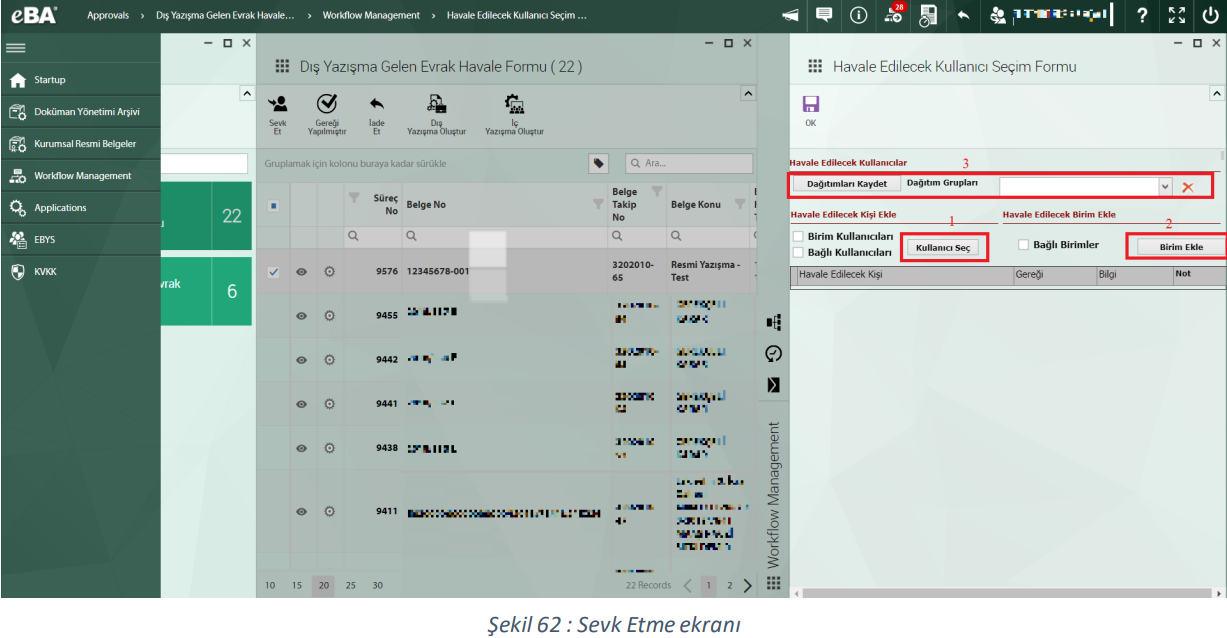
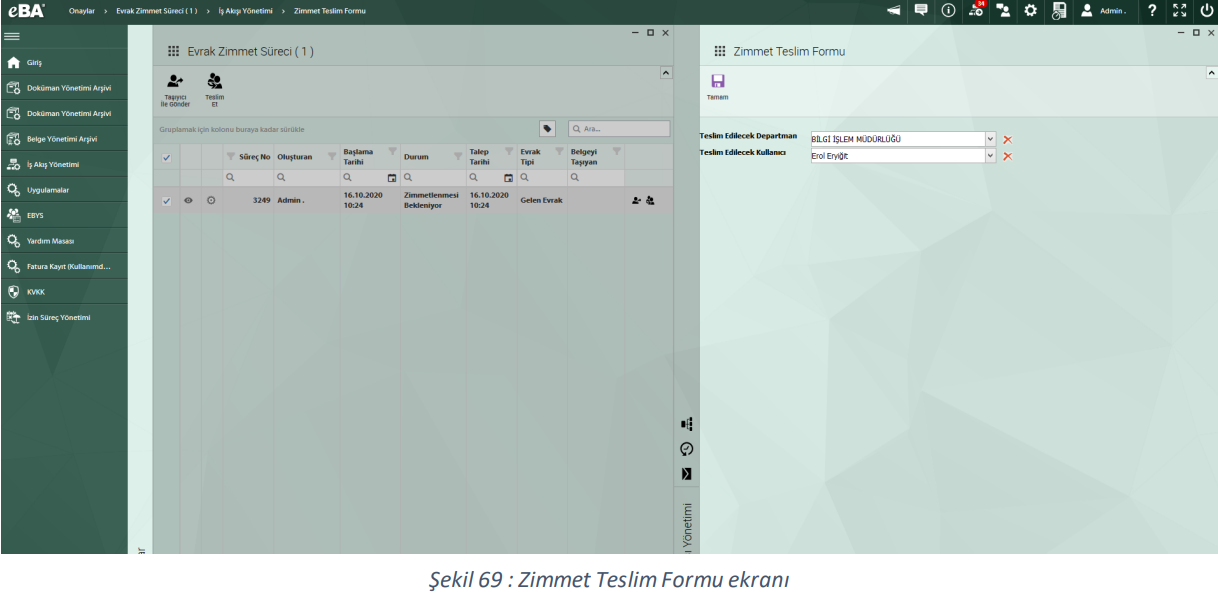
In the User Selection Form to be Remitted window that opens when the document is wanted to be shipped, you can directly distribution can be made by selecting the person or unit. Instead of selecting frequently used deployments over and over again Deployments can be saved with the Save button.
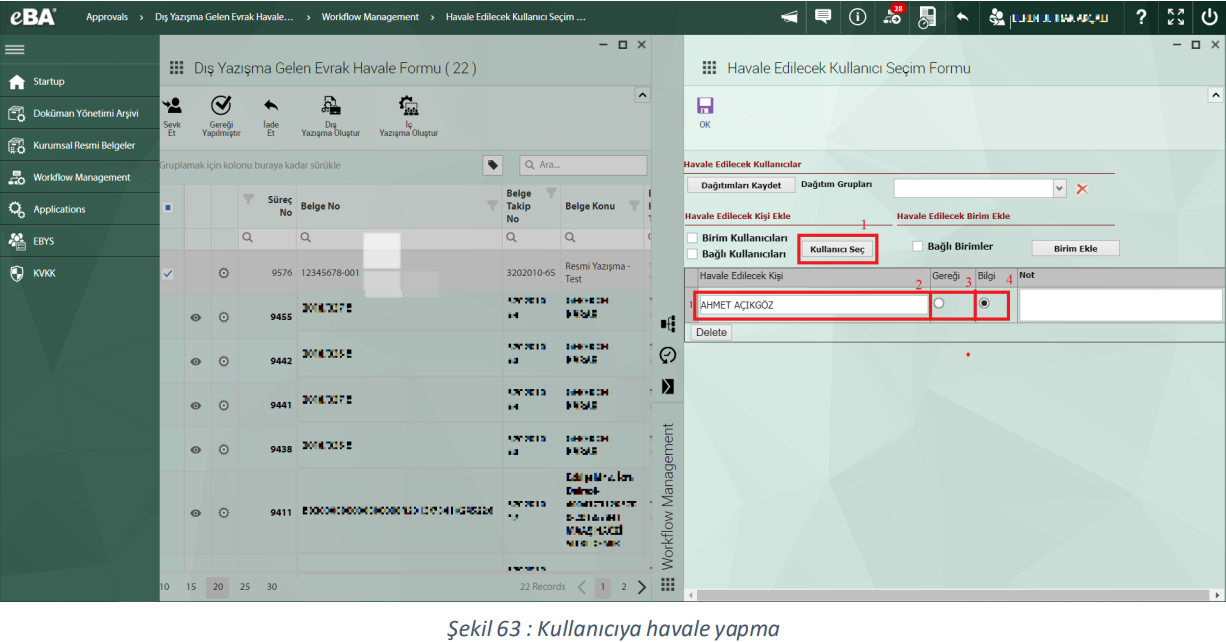
For transfers to be made to the person, by clicking on the Select User button (field number 1), Select the person to be transferred from the user list in the window and click the OK button in the window After pressing, the contact is added to the table on the remittance screen. Is it in the form of Requirement of Remittance or Information by selecting one of the options in the Requirement and Information columns (field 3 and 4) is being adjusted. To complete the transfer, click the OK button on the window.
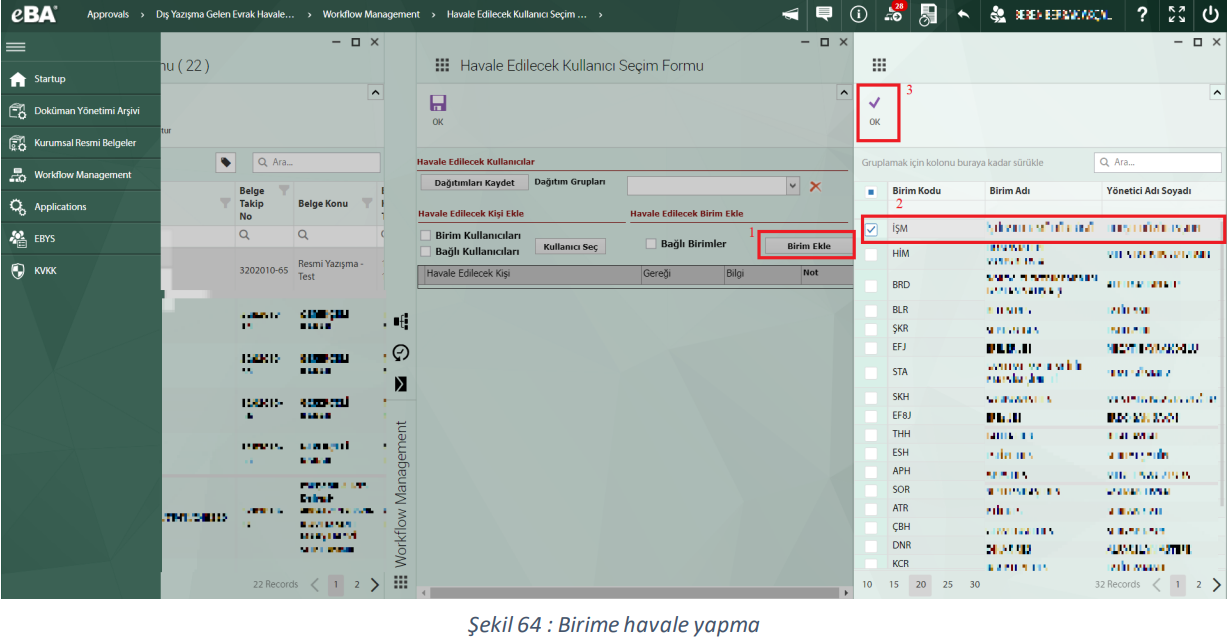
For transfers to be made to the unit, select a unit by clicking the Add Unit button (field number 1) window opens. Selecting the unit to be sent (field 2) and pressing the OK button (3 numbered field) is added to the table on the remittance screen of the selected unit. Is it in the form of Requirement of Remittance or Information by selecting one of the options in the Requirement and Information columns (field 3 and 4) is being adjusted.
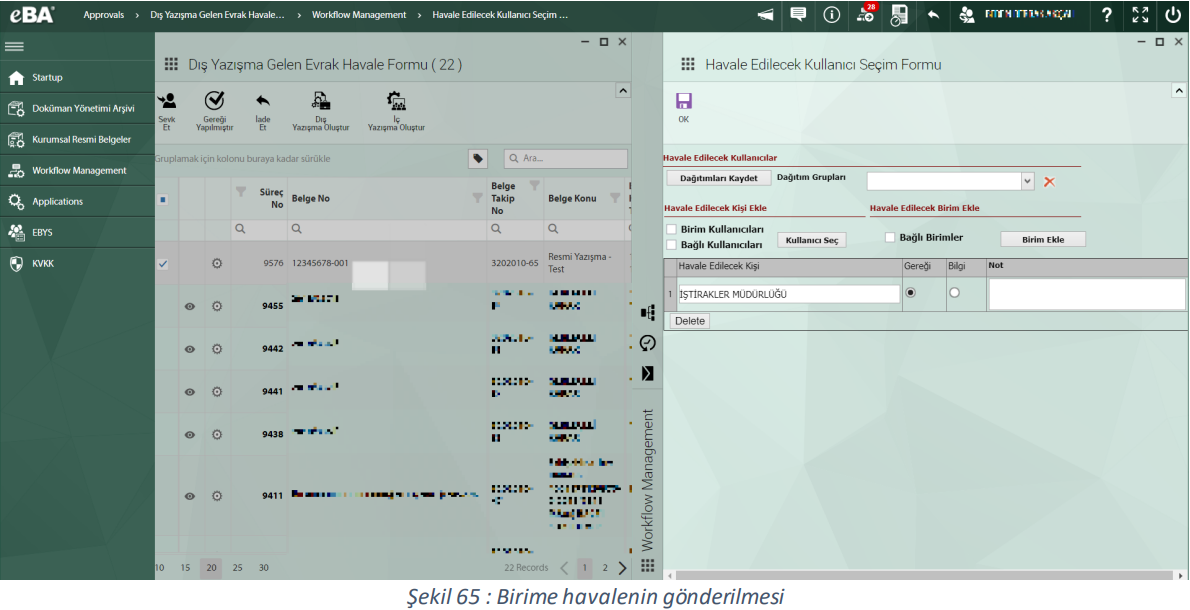
Click the OK button on the window to complete the transfer.
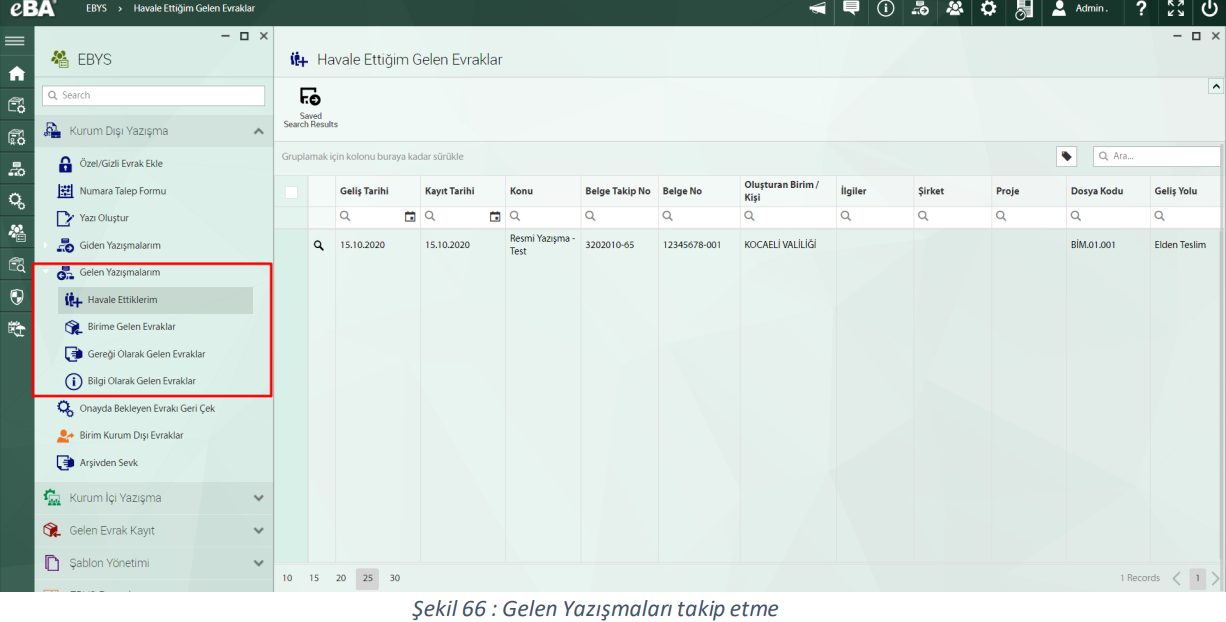
To keep track of incoming correspondence, under the External Correspondence menu, click My Incoming Correspondence menu. Click on the documents menu to be followed in the marked area. On the relevant form The incoming document registration form is displayed and the workflow history can be viewed.
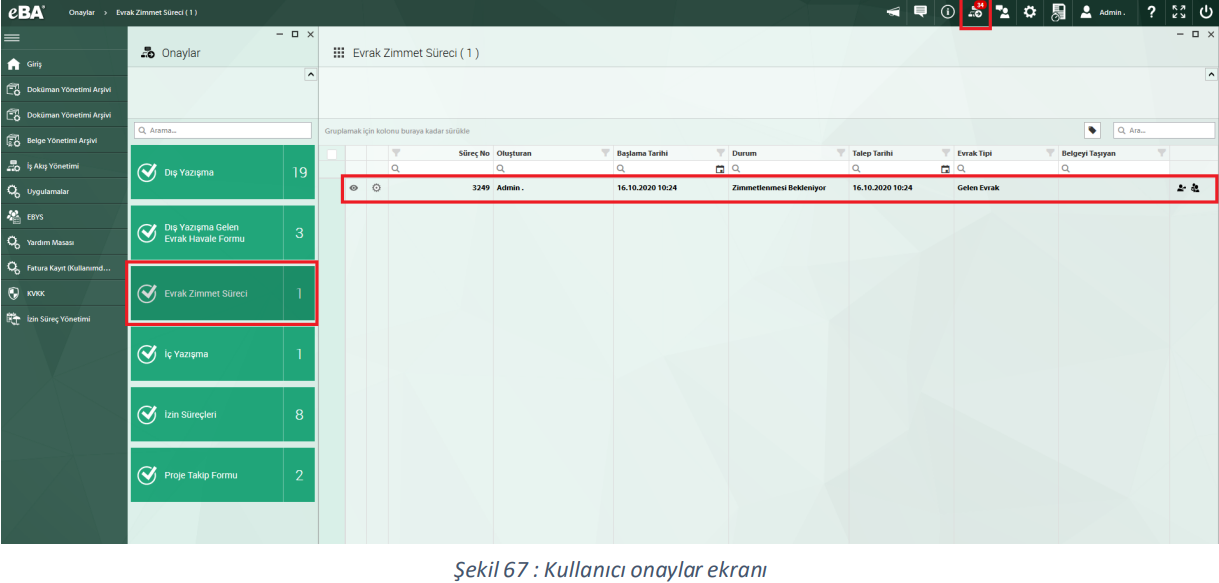
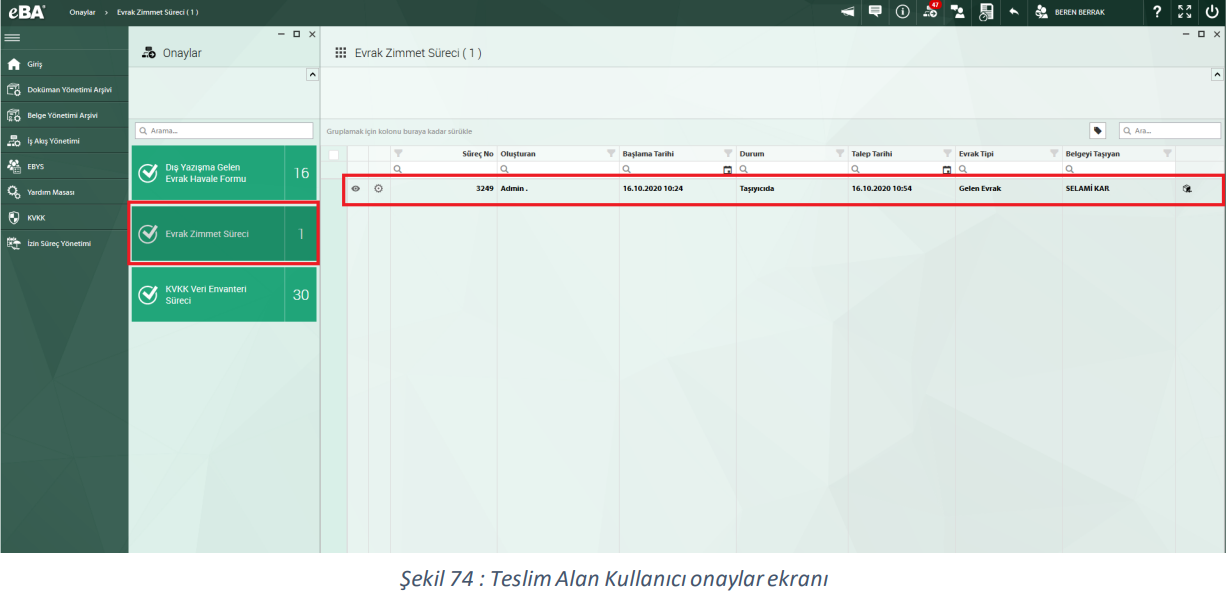
3.1 Document Embezzlement Process
Document Embezzlement Process in the approvals of the person filling out the form with the submission of the incoming document process is started automatically, the initiated process is in the user's Approvals window Document Embezzlement Process Appears. The process is continued by clicking on the relevant flow.
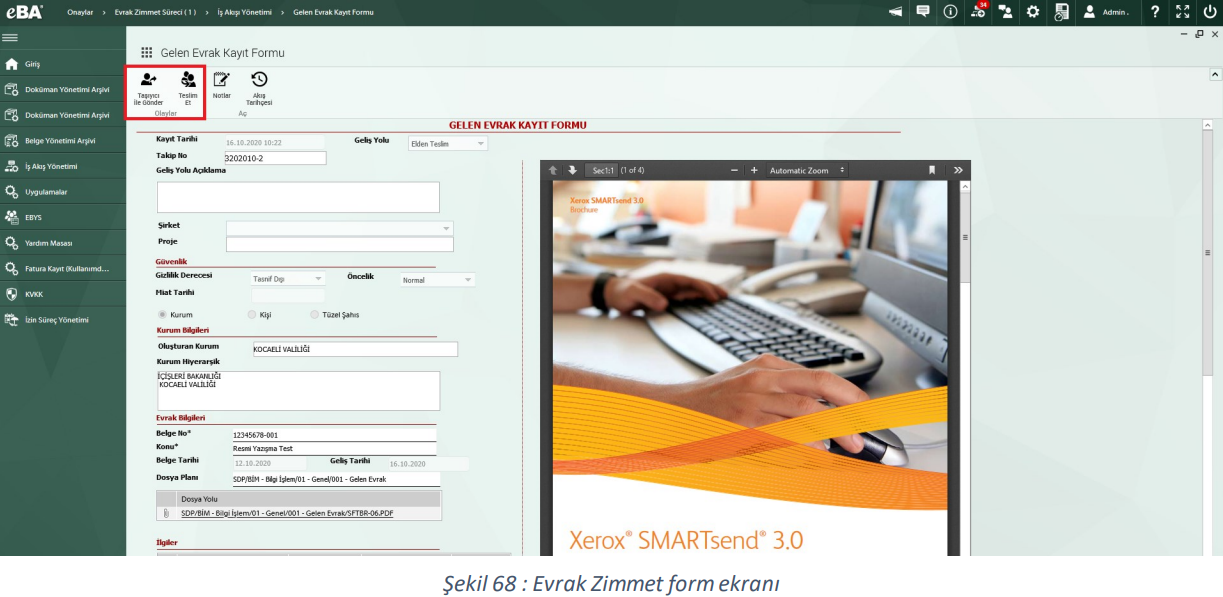
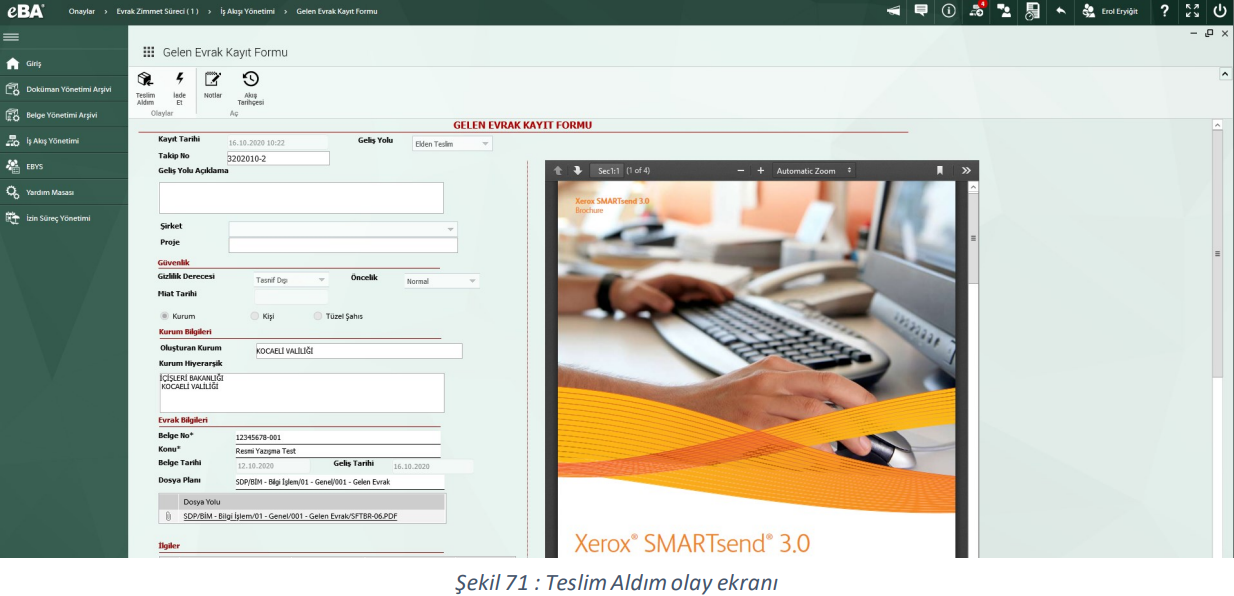
When the flow is displayed, two user events, Ship and Deliver with Carrier exists. If the documents are to be delivered to the personnel in the institution, Submit is the eBA non-user If the documents will be moved with the personnel, the Send with Carrier event is clicked. Embezzlement Submission Form to select the user to whom the document will be delivered when clicking Submit Opens. First, select the Department to Be Delivered, and then select the User to Deliver and click the OK button.
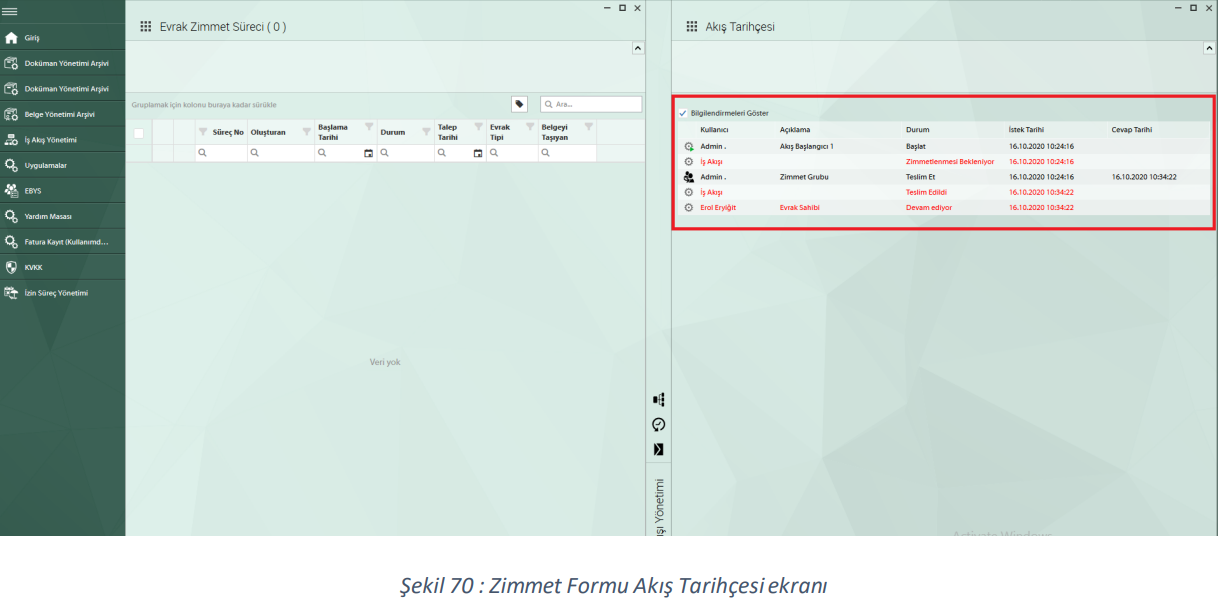
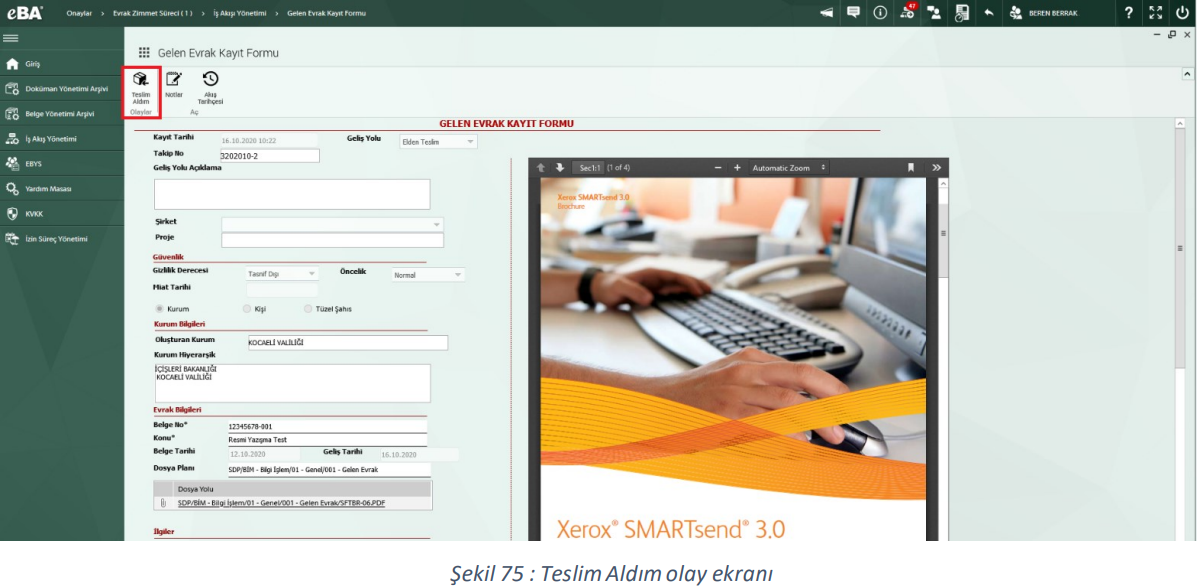
In the flow history, with the Deliver event, it appears that the document is waiting for user approval. User When it views the paperwork, it has three events: Deliver it, Send with Carrier, and Pickup. If the user has received the document, he clicks on the Received event.
When the user clicks on the Received event, the flow is waiting for the process to be approved again. In the process pending approval, the user may hand over the document to other personnel with the Deliver Delivery, with the Carrier Submit eBA users who can transport paperwork through non-staff or with the Remove to File event add the document to the file plan and finish the flow.
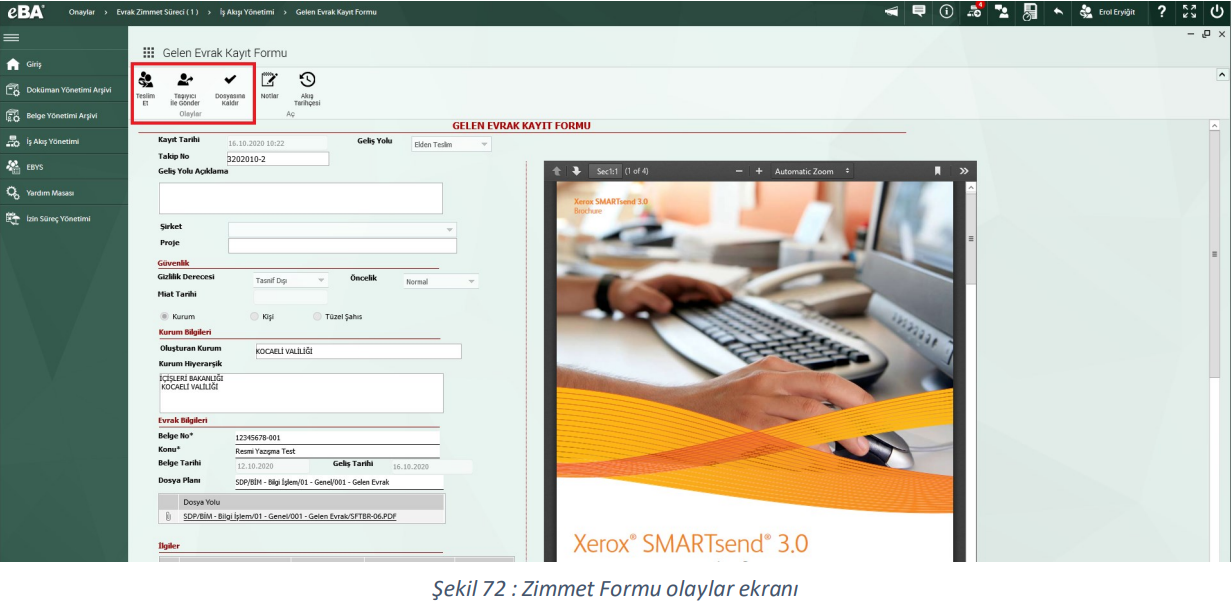
Clicking on the Send with Carrier event opens the Carrier Embezzlement Form.
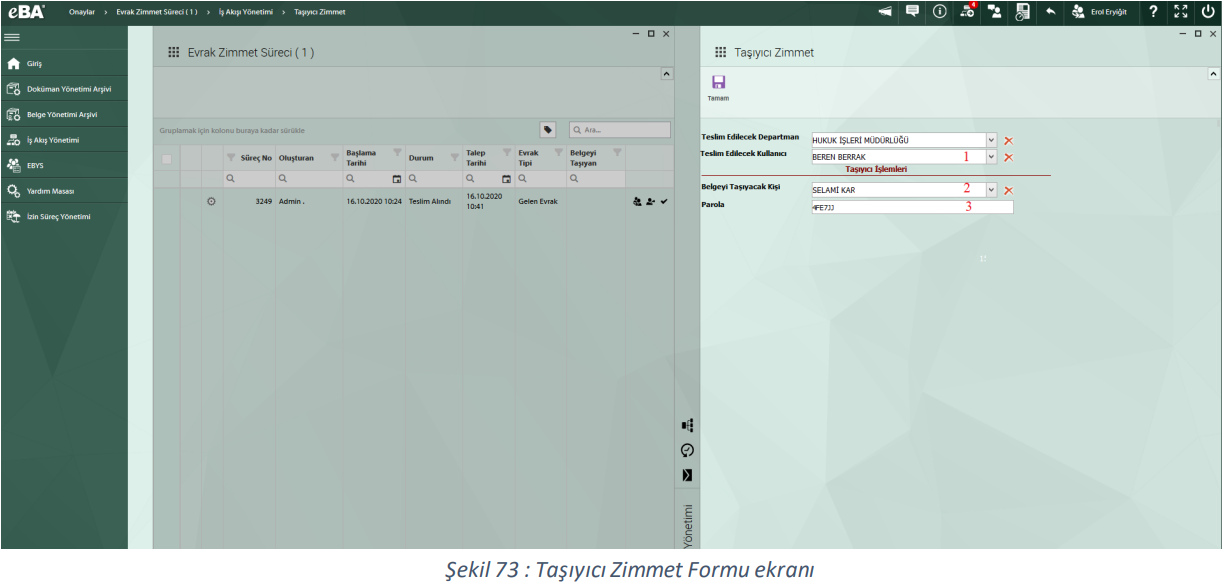
From the field marked with Figure 1, the user within the institution who will deliver the document is selected. From field number 2 After selecting the person who will carry the document, typing the password of the selected user in the field number 3, click the OK button is clicked. Note: You can review the Document Carrier and Password Identification section for carrier and carrier password definitions.
The document appears in the user's confirmation to be delivered after it has been sent.
If the user has checked out the document when viewing the form, they click the Checked Out event. After the Pickup confirmation, the user is sent the flow back to him. Submit User Documents may deliver to other staff with Shipment by Carrier, eBA non-user staff or add the document to the file plan with the Remove to File event.
Click the Remove to File button to add the received document to the file plan.
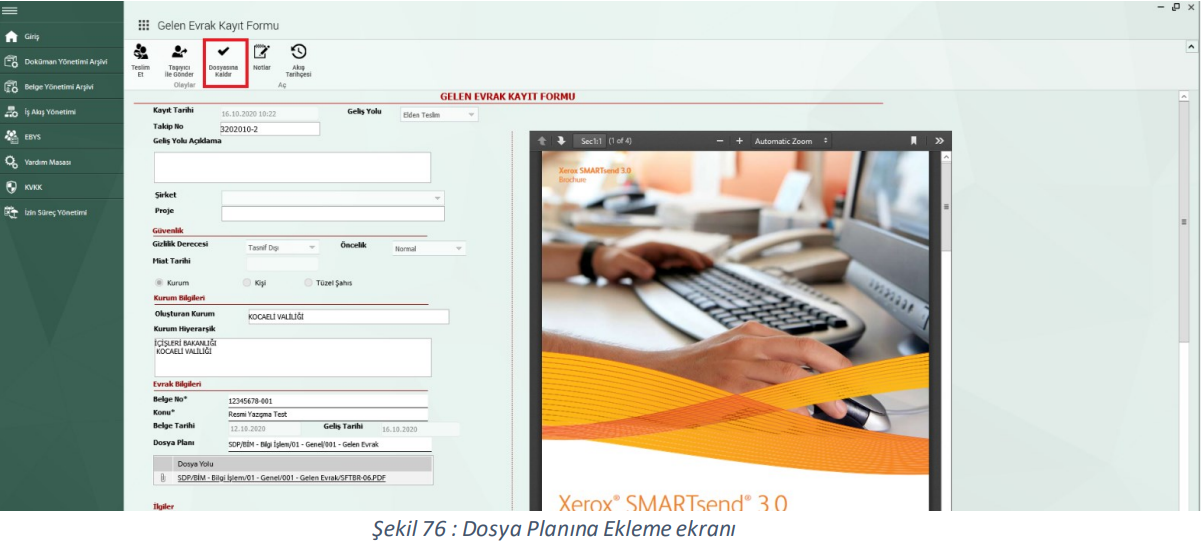
Pressing the Remove to File event will write the file information to which the document is attached The Location form opens.
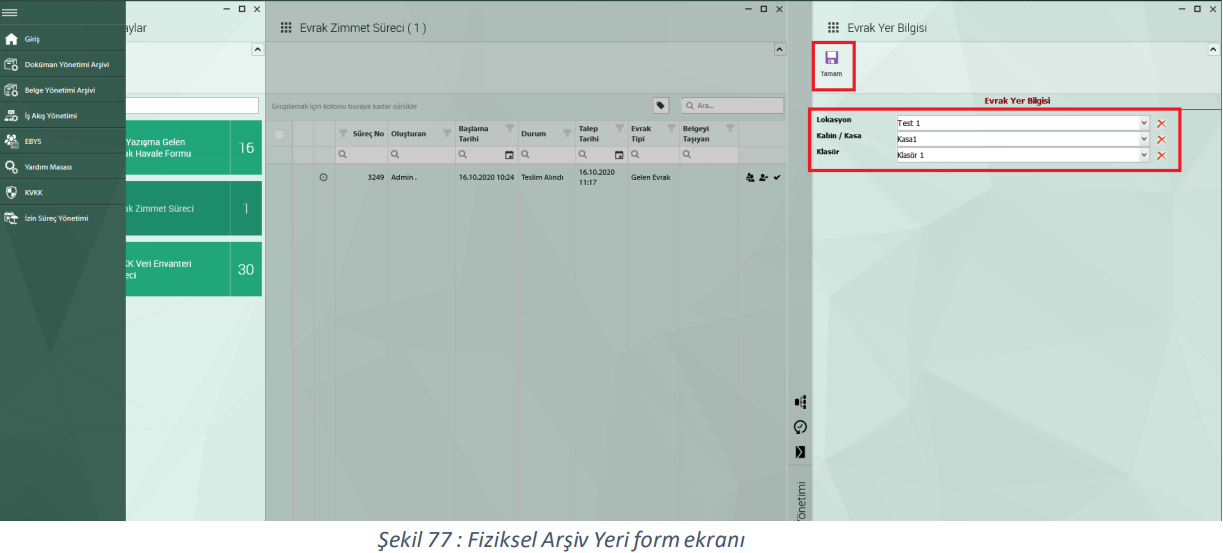
In the Document Location Information form, in the Location field, the location of the document is in the Cabin / Cash register field which cabinet it is in and which folder it has been added to in the Folder field is selected and OK button is clicked.
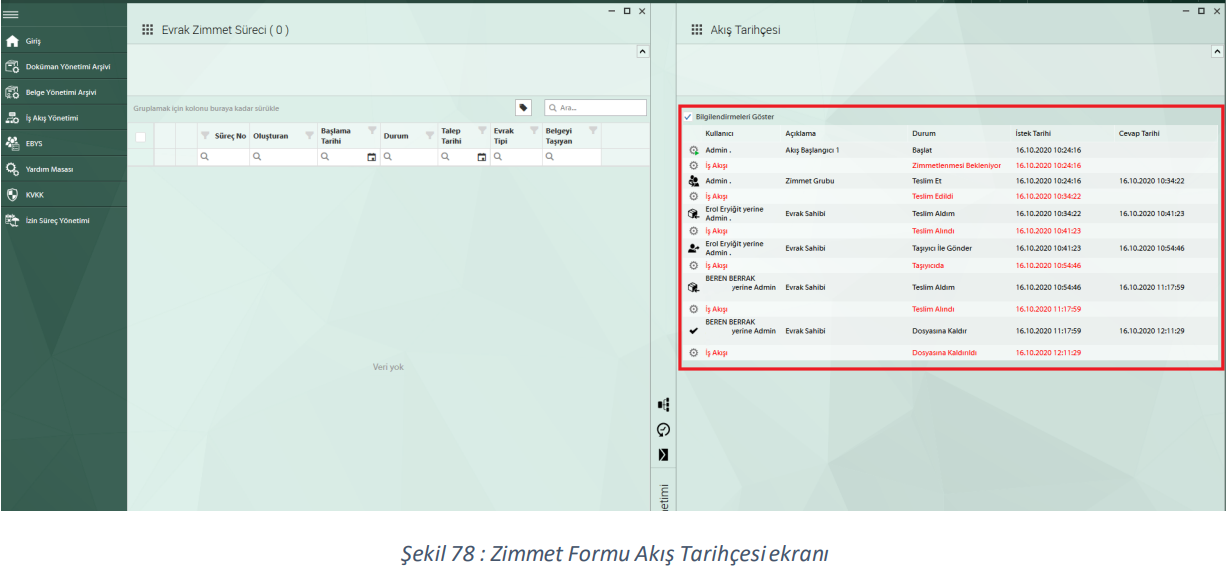
As in the flow history, the embezzlement process is finished with the Removed File status.
3.1.1 Document Bearer and Password Identification
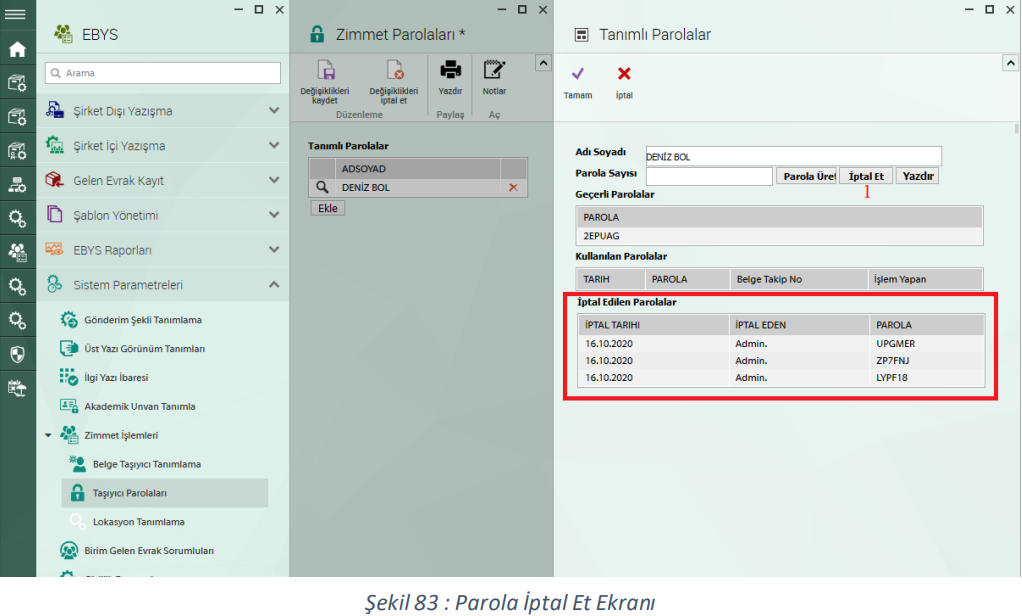
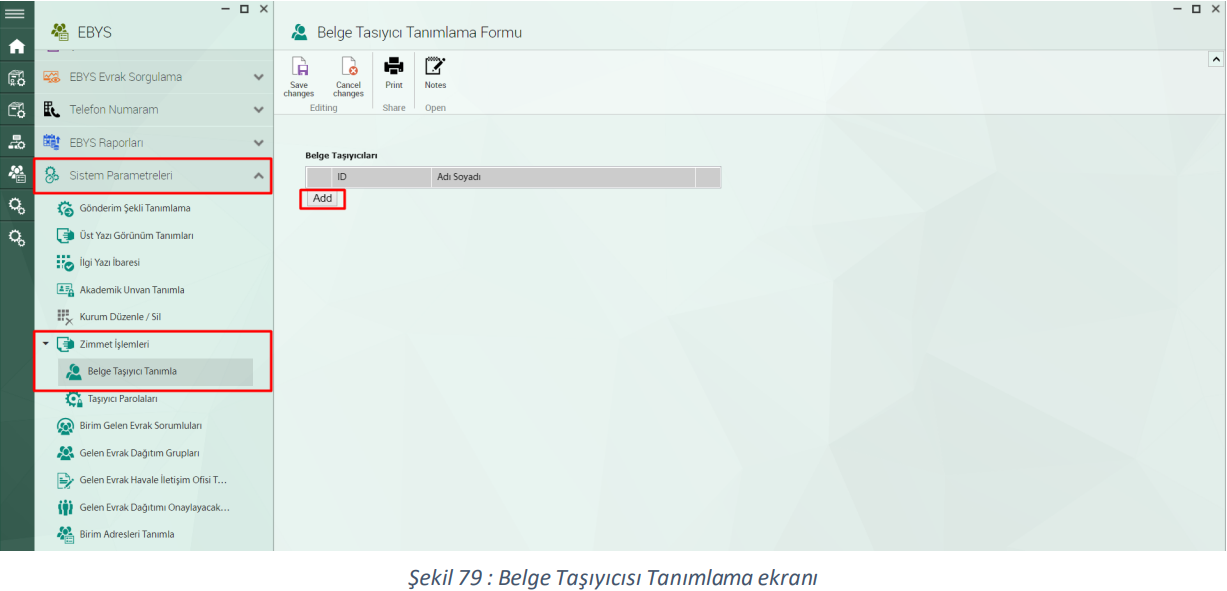
Document under System Parameters to be able to select the document carrier in the Document Embezzlement Process carriers need to be introduced to the system. In Figure 30, System Parameters/Embezzlement/Document The Carrier Identification menu is clicked. In the form that opens, the carriers added in the Document Carriers table Appears. The new document carrier user is selected by clicking the Add button. Record the actions taken Click the Save Changes button.
Define password for added carriers System Parameters / Embezzlement Operations / Carrier This is done under the Passwords menu. For carriers added to the system by clicking the Add button in the form that opens password is defined.

In the figure number 1, the user to define the password is selected. To be produced in the number 2 field After typing the number of passwords requested, click the Generate Password button.
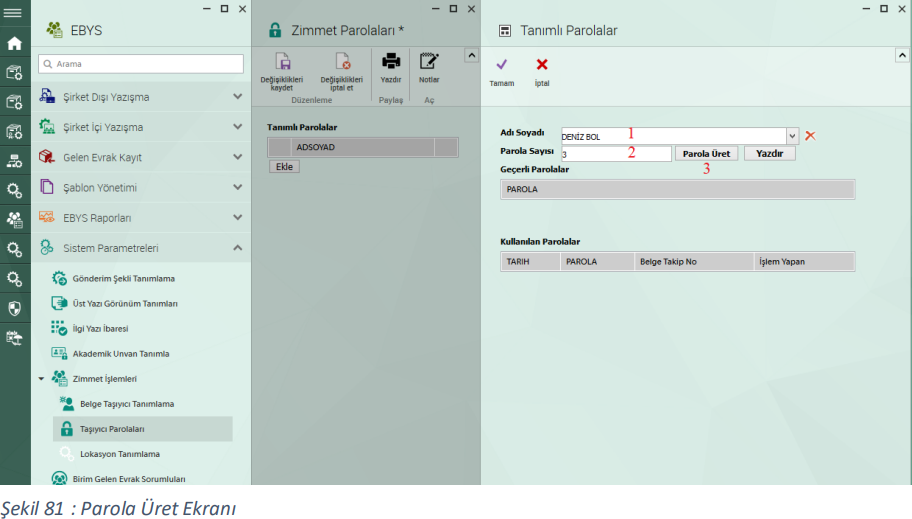
Passwords generated into the Current Passwords table after pressing the Generate Password button is added, click the OK button to save the action done
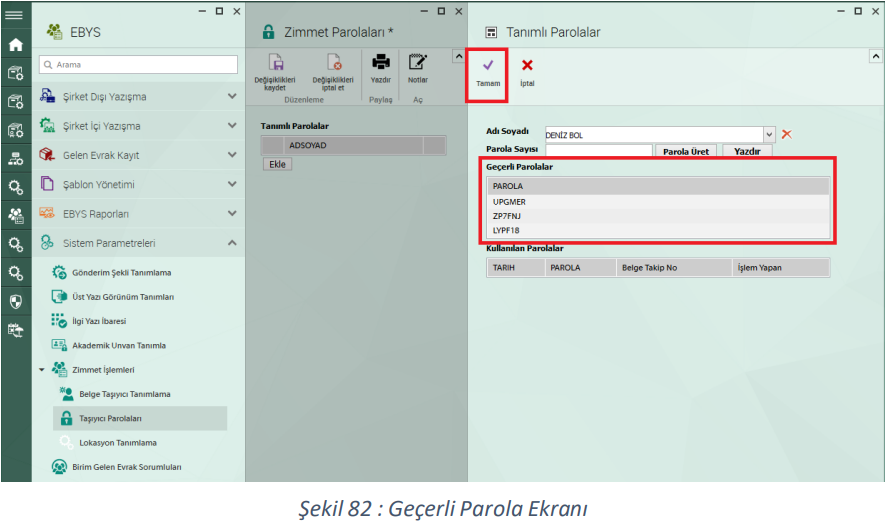
Click the Cancel button to delete current passwords and define a new password. Revoked passwords Revoked Passwords and used passwords are listed in the Passwords Used table. Password used can not be used again